PL7 JUNIOR/PRO Operate modes manual (Operate modes manual eng V4.0) - page 2
Presentation
44

Managing applications
3
Presentation
What’s in this
This chapter shows the different tools used to manage an application.
chapter
What’s in this
This Chapter contains the following Maps:
Chapter?
Topic
Page
PL7 access security management
46
Accessing PL7 software
47
Creating an application
48
Opening an application
49
Protecting an application on a PLC
50
Saving an application
53
Offline/online operation
54
Transferring a program from a PC to the PLC or vice versa
55
Transferring data from file to PLC and vice versa
57
Comparing applications
58
Backing up in the internal Eprom Flash memory
59
Backing up on a TSX MFP BAK 032P memory card
60
Accessing a PL7 through a network
62
Memory Usage
63
Sending a command to the PL7
65
45
Managing applications
PL7 access security management
At a Glance
PL7 access security management, administered by the super user, limits and con-
trols access to the various PL7 functions.
It is applied to the terminal where the PL7 software is installed, not the application.
PL7 software provides 5 user profiles:
l Read Only,
l Operate,
l Adjust,
l Debug,
l Program.
User information
The User information box displays information on the current user.
When the PL7 Access security management option has not been implemented or
is inactive, this information is as follows:
l indication that PL7 access control is inactive,
l the PL7.INI file path.
When PL7 Access security management is active, this information is as follows:
l indication that PL7 access control is active,
l user name,
l user profile,
l the "User".INI file name and path.
l the start options file name and path.
PL7 software
The super user is the only one with the rights to manage PL7 access security.
access
management
From the "PL7 Access Security Management" dialog box the super user can:
l create/ modify a list of users,
l import a list of users,
l export a list of users,
l activate the "PL7 Access Security Management" function,
l modify his/her password.
Note: The name reserved for the super user is Supervisor.
46

Managing applications
Accessing PL7 software
At a Glance
It is possible to run several PL7 operations simultaneously (multi-instance) from the
same station.
PL7 software also offers the possibility of setting the launch parameters for PL7 us-
ing a launch options file. This is used, for example, to automatically launch an appli-
cation in a given work environment using a customized short cut icon.
Access without
Carry out the following operations:
launch option
Step
Action
1
Select the PL7 icon required (Micro, Junior or Pro) from the Modicon Teleme-
canique program group.
2
If PL7 Access Security Management is active, a dialog box is used to iden-
tify the user.
Enter a user name.
3
Enter a password, where applicable.
4
Confirm with OK or press Enter.
Access with
Carry out the following operations:
launch option
Step
Action
1
Select the icon for the launch option command line.
2
If PL7 Access Security Management is active, an information box warns that
the program cannot be launched unless access rights have been granted.
Click on OK.
3
A dialog box is then used to identify the user.
Enter a password.
4
Confirm with OK or press ENTER.
Notes:
The operating mode described above can vary slightly depending on the launch op-
tions.
Depending on the launch options declared in the options file, different dialog boxes
may appear.
When the user is not known (name and/or password incorrect), only the minimum
PL7 profile (read only) is available.
47

Managing applications
Creating an application
Procedure
Carry out the following actions:
Step
Action
1
Select the command File/New.
2
Select the hardware base.
3
Select the processor type:
4
Depending on which processor it is, select the type of memory card. The type
of memory card can always be modified subsequently when configuring the
processor.
5
Depending on the processor version, the Grafcet option must be selected be-
fore being used in the application.
Suggestion for
Define the structure of the program to be used:
setting up an
l single task,
application
l multi task,
l fast task,
l events,
l function view.
Define the structuring of the variables in:
l bits,
l words,
l tables,
l chains,
l symbols.
Define the PL7 configuration and the module parameters.
48
Managing applications
Opening an application
Procedure
This function is applied from a PL7 product that is already open.
Carry out the following actions:
Action
Step
1
Select the command File/ Open.
2
Select the file for the application (*STX).
3
Click on Open.
Note:
The applications are saved by default in the directory defined when it was installed.
This can be looked up and modified using the command Option/Personalize.
The modifications will take effect after the next PL7 session.
49

Managing applications
Protecting an application on a PLC
At a Glance
The application’s Protection function can be accessed in offline mode from the Ap-
plication properties screen.
This function provides:
l Global application protection,
l For protecting the sections, the type of protection can be defined:
l individually by section,
l for all sections of an application or task.
Global
Carry out the following actions:
application
Step
Action
protection
1
From the Station directory select Properties via the contextual menu
2
Select the Protection tab.
3
In the Application zone, check the Global application protection box.
This function is used after transferring the application to the PLC to provide read and
write protection.
Only the Run, Stop and Init functions which can be accessed via the PLC/Com-
mand to the PLC command are authorized in a protected PLC application.
WARNING
Protection cannot be removed once applied. A protected application
cannot be modified. The only option is to load a new application onto
the PLC.
Failure to observe this precaution can result in severe injury or
equipment damage.
50

Managing applications
Global
This is for sections included in either:
protection of all
l the program,
sections
l or a task.
Carry out the following actions:
Step
Action
1
Select the Programs, Tasks or Section directory.
2
Using the contextual menu select Protection of Included Sections.
3
Select the following from the drop-down menu: Write Protect, or Read and
Write Protect.
Individual
Carry out the following actions:
protection of
Step
Action
sections
1
Select the section to be protected.
2
Using the contextual menu selectProperties.
3
From the drop-down menu, select Protection: Write or Read and Write
Activating
section
Step
Action
protection
1
From theStation directory selectProperties using the contextual menu.
2
Select the Protection tab.
3
Check the box protection activated, and enter the password. A padlock by
the section shows that it is protected.
Notes:
The first time the application is used, the password must be confirmed.
The Clear button is used to delete the password.
The password is stored in the PLC when the application is transferred.
Deactivating
Carry out the following actions:
protection
Step
Action
1
From theStation directory selectProperties using the contextual menu.
2
Select the Protection tab.
3
Check the Protection deactivated box, and enter password. An open padlock
by the section shows that protection has been deactivated.
51
Managing applications
Note
It is not possible to modify a section if partial or total protection is activated.
A padlock shows which type of protection has been activated:
l open: protected section - protection deactivated,
l closed: protected section - protection activated.
52

Managing applications
Saving an application
Saving a new
Carry out the following actions:
application
Step
Action
1
Select the command File/Save or File/Save as.
2
If necessary, select the application’s disk and/or save directory using the pull-
down menu "In".
3
Enter the name of the file in the "Name" field (maximum of 215 characters).
Caution: The characters given below cannot be used in naming a :\
/
file:
? "
<
>
|.
4
Confirm using Save.
Note: When saving an application, which exceeds the capacity of one disk, dialog
boxes will appear on the screen asking you to insert the disks one after another.
This will continue until the save of the application is complete.
You are advised to prepare several empty, formatted discs in advance, and to num-
ber them in the order in which you insert them.
Saving an
Select the command File/Save.
existing
application
53
Managing applications
Offline/online operation
Offline mode
Offline mode (no PLC connection) is used to Create/Modify an application on the
terminal. The application being edited is stored on disk in the working directory.
The File/Save command or the icon
must be used to save to disk in the appli-
cations directory.
Online mode
Online mode (connected to the PLC) is used to Create/Modify an application in the
PLC.
The following functions are available:
l create/modify LD, IL, ST or Grafcet programs,
l modify task period,
l modify predefined function block parameters (apart from register size),
l modify number of internal words,
l modify module data and parameters,
l import/export a source file or variables, PLC in Stop mode,
l export an application, PLC in Stop mode,
l debug, adjustment.
The following functions are not available:
l add or remove a module,
l modify the I/O channel association<->application-specific function,
l add predefined function blocks,
l modify register size,
l modify number of bits and internal constants,
l import an application
l open an application.
Notes:
When being modified in online mode, the application is updated on the PLC and on
the disk in the working directory:
l the save to the PLC is automatic.
l The File/Save command or the icon
must be used to save to disk in the ap-
plications directory.
For functional
A functional module can be created, modified, and removed in offline or online
modules
mode, with the PLC in Stop or Run mode.
Commands
Switching to online mode: Select PLC/Connect command.
Switching to offline mode: Select the PLC/Disconnect command.
54

Managing applications
Transferring a program from a PC to the PLC or vice versa
PC -> PLC
Carry out the following actions:
Transfer
Step
Action
1
Select the PLC/Transfer Program command or the icon
2
Select PC->PLC transfer and click OK.
3
If a cartridge allowing symbols and comments to be stored is declared in con-
figuration, the box with the symbols is available: you can choose to make the
symbol transfer or delay it until a later stage of the transfer.
Elements not transferred to the PLC:
l Functional Module descriptive forms,
l comments on DFB types,
l comments on DFB instances (with TSXMRP 2128P, TSXMRP 3256P memory
cartridges),
l animation tables,
l runtime screens,
l symbols and comments on variables (when there is no memory cartridge).
PLC -> PC
Carry out the following actions:
Transfer
Step
Action
1
Select the PLC/Transfer Program command or the icon
2
Select PLC->PC transfer and click on OK.
Notes on PLC -> First scenario:
PC transfer
If no applications are open on the terminal (PC), the program is transferred. If there
is a symbol and comments database on the PLC, it is transferred, otherwise the of-
fline database is initialized (empty).
Second scenario:
If the PC has an application open when a request for PLC -> PC transfer is made,
and modifications have been made since the last save, the software suggests sav-
ing them before continuing.
The software then suggests:
55
Managing applications
l either saving the data (symbols), the respective application documentation file,
the animation tables and the runtime screens on the terminal (PC) - to do this use
the Keep button.
l or it suggests initializing the data (symbols), the respective application documen-
tation file, the animation tables and the runtime screens on the terminal (PC) - to
do this use the Initialize button (default values are the same as at application in-
stallation).
If there is a symbol and comments database is on the PLC, it is transferred from the
PLC to the PC.
WARNING
For DFB instance comments:
DFB instance comments are not retained in the variables editor even if
the user selects the "Keep" option
To combat this problem you must:
l either use a PCMCIA memory card for storing symbols and com-
ments,
l or Export the symbols and comments from the old application, un-
load the new one and Import the symbols and comments into this
new application.
Failure to observe this precaution can result in severe injury or
equipment damage.
Transfer results
Results of the transfer are shown in the status bar (at the bottom of the window).
The ESC key can be used at any time to interrupt a transfer.
56

Managing applications
Transferring data from file to PLC and vice versa
File -> PLC data
Carry out the following actions:
transfer
Step
Action
1
Select the PLC/Transfer Data command.
2
Select transfer direction, File -> PLC.
3
Enter the name of the file to be transferred then click on OK.
The range of values contained in the file can be displayed by clicking on
the icon
The ">" command displays a dialog box which is used to choose a data file from the
existing ones on the disk.
PLC -> File data
Carry out the following actions:
transfer
Step
Action
1
Select the PLC/Transfer Data command.
2
Select transfer direction, PLC -> File.
3
Set the transfer parameters:
l the range of %MW values to be transferred,
l the name of the file in which the data will be stored.
4
Click on OK.
The ">" command displays a dialog box which is used to choose the destination file.
WARNING
A transfer in progress can only be interrupted if there is a fault of some
kind (PLC fault, break in the PLC/PC link, etc.).
Failure to observe this precaution can result in severe injury or
equipment damage.
57

Managing applications
Comparing applications
Presentation
Comparing applications is used to identify any differences between:
l the application in the PL7 and the one in the terminal,
l the application in the PL7’s RAM and the one in the EPROM FLASH memory.
l the PC and PL7 symbol base.
Procedure
Carry out the following actions:
Step
Action
1
Select the command AP/Comparet.
2
Select the type of comparison:
l PC program<->PL7 program,
l RAM <->BACKUP field,,
l PC symbol<-> PL7 symbol.
3
Click on OK.
Result
The result is shown in a dialogue box with:
l the date and the time of the last modification of the application run,
l the version number,
l the application name,
l the comments.
With the symbol base the dialogue box shows:
l the date and time of the last modification,
l the signature,
l the number of symbols,
l the space occupied,
l the total compressed size
58

Managing applications
Backing up in the internal Eprom Flash memory
Presentation
TSX 37-10 PL7s and TSX 37-20 PL7s can save the application (program and con-
stants) in the internal PL7 EPROM FLASH memory if this is in the RAM and is not
more than 15 associated symbol addresses.
This is used:
l to reload the PL7 RAM manually (transferring BACK UP -> RAM field) using the
contents of the EPROM FLASH,
l to reload the RAM automatically using the contents of the EPROM FLASH, when
the application in RAM is invalid.
This function must be carried out in offline mode.
Transferring
Carry out the following steps:
Ram -> Back up
Step
Action
field
1
Select the command AP/Backup.
2
Select the RAM->BACK UP field transfer and click on OK
WARNING
If the %SW97 system word is initialized at 0, only the application pro-
gram contained in the internal RAM is transferred to the Eprom Flash
(equivalent to a program back up).
Any saving of %MWi is deleted.
Failure to observe this precaution can result in severe injury or
equipment damage.
Transferring
Carry out the following steps:
Back up -> Ram
Step
Action
field
1
Select the command AP/Backup.
2
Select the BACK UP->RAM field transfer and click on OK.
The results of the transfer are shown on the status bar.
59

Managing applications
Backing up on a TSX MFP BAK 032P memory card
At a Glance
TSX Micro and Premium PLCs provide the option of backing up the application (pro-
gram and constants) on a TSX MFP BAK 032P memory card.
This Backup function is not available if the application is already running on a RAM
or EPROM memory card. The internal RAM memory can thus be reloaded using the
contents of the Backup card.
This function must be performed in Offline mode.
Ram -> Backup
Carry out the following actions:
memory card
Step
Action
transfer
1
Save the application held in the PLC’s internal RAM on the programming ter-
minal, if necessary.
2
Insert the TSX MFP BAK 032P memory card into the PLC (the write protection
lock must be set to OFF).
3
Transfer the application from the terminal to the PLC’s internal RAM memory.
4
Declare the memory card in the configuration editor.
5
Select the PLC/Backup command.
6
Select the RAM->BACKUP zone transfer and click on OK.
Notes:
For a RAM->Backup transfer on TSX 3720 PLCs with an external memory card, pri-
ority is given to transferring the application to the memory card.
When the memory card is inserted into the PLC the contents of the internal RAM
memory are re-initialized.
Backup memory
Carry out the following actions:
card -> Ram
Step
Action
transfer
1
Insert the TSX MFP BAK 032P memory card into the PLC (the write protection
lock must be set to ON).
2
Inserting the memory card automatically transfers its contents into internal
RAM (and into EPROM FLASH: for the TSX 37-20).
60
Managing applications
Notes on the
At the end of transfer, with the Backup card in the processor, the PLC is forced to
PLC’s operating
STOP even if the RUN AUTO option has been configured. The PLC can be set to
modes
RUN from the terminal, but after a power restoration the PLC starts systematically
in forced STOP mode.
After removing the Backup memory card, the PLC performs a cold restart in RUN or
STOP mode depending on the AUTO RUN configuration.
If internal word initialization on cold restart is not configured, the transfer from the
Backup memory card into RAM retains the internal word values.
61

Managing applications
Accessing a PL7 through a network
Procedure
Carry out the following actions:
Step
Action
1
Select the command AP/Enter PL7 address.
2
Select the type of drivers (e.g. UNTLW01).
3
Enter the network address
Network address The network address syntax is as follows:
syntax
l (network no. station no) module track no. PL7 address
l (network no. station no.)SYS
{network no. station no.} = network address and destination station on FIPWAY
(this part is omitted if the PL7 to be accessed is not on the FIPWAY network).
PL7 module.track address = UNI-TELWAY address (module = 0 or 254, track no.
= 0 terminal point or 1 for the communication card, PL7 address = 0 to 98).
SYS = access to the system gate (or UNI-TE server) of the destination PL7.
Note
Using the number 254 as a position when communicating between slaves allows it
to stay on the same UNITELWAY bus by optimizing exchange routing.
Example
{0.2}0.1.3 = PL7 having 3 for an address on the Unitelway link of the module 0 com-
munication card, track 1 of station 2 on network 0.
SYS = default address of the PL7 physically linked to the terminal.
62
Managing applications
Memory Usage
At a Glance
The memory usage function can be accessed via the PLC/Memory usage com-
mand or from theApplication properties screen.
It provides information on:
l PLC memory used (data, program, configuration and system),
l memory mapping for an application (internal memory and memory card).
"User data" zone
This zone groups together the objects linked to software configuration data:
l Bits and I/O bits:
l
%Mi bits,
l
%Si bits,
l Input/output bits,
l Bits associated with Grafcet, %Xi, %Xi,j,…
TSX37xx: zone set at 2560 bits and I/O bits outside the internal memory.
TSX57xx: zone in the internal memory that can be configured.
l Words:
l
%MWi words,
l
%SWi system words,
l Words linked to configured function blocks (%Ci:V, etc),
l Words associated with Grafcet, %Xi, T, %Xi,j,T,…
l I/O data:
l Data used for managing I/O modules and I/O words (%IW, %QW, %MW).
l DFB:
l data for DFB type instances,
l PL7 internal management.
"User program"
This zone gives user program consumption details.
zone
l Constants:
l constants %Kwi + display base (binary, etc.).
l Executable code:
l code linked to the user program,
l application EF code,
l DFB type code + initialization value.
l Comments and graphic information:
l user program decompilation information,
l information linked to EFs,
l information linked to DFBs.
63
Managing applications
"Other" zone
This zone summarizes consumption linked to the application configuration and ap-
plication structure.
The total of the values declared is equal to the total amount of memory available in
the various memory spaces.
Mapping by memory type is displayed by positioning the mouse over the bars of the
chart.
l Configuration.
l hardware configuration (I/O, FIP),
l software configuration (Timers, Registers, etc.),
l System:
l Stack of tasks, catalogs, etc.
"Optimize"
The Optimize command is used to reorganize the memory structure where possi-
command
ble.
It is also used to remove EFs which are not used in the application from the memory.
64

Managing applications
Sending a command to the PL7
Presentation
The Command to a PL7 function is used to run (Run), stop (Stop) or initialize (Init)
a PL7 application from the terminal in offline mode.
Procedure
Carry out the following actions:
Step
Action
1
Enter the communication driver type between the terminal and the PL7.
2
Enter the PL7’s network address.
3
Select the command Identify in order to establish communication with the tar-
get PL7. The following parameters are supplied:
l the type of processor,
l the current status of the PL7 (Run, Stop or Init),
l the name and version of the PL7 application,
l the date of the last modification,
l any comments.
4
Select the type of command (Run, Stop or Init).
5
Select the Send command.
65
Managing applications
66

Configuration and Programming
II
Introduction
Subject of this
This section describes how to configure the hardware devices TSX Micro/TSX Pre-
part
mium and how to program an application.
What’s in this
This Part contains the following Chapters:
part?
Chapter
Chaptername
Page
4
TSX Micro and TSX Premium: Configuring
69
5
Program access
101
6
Programming in LD rung language
115
7
Programming instruction list in LIST language
151
8
Programming in Structured Text ST language
173
9
Programming in Grafcet language
195
10
Editing variables
227
11
Function modules
245
12
DFB function blocks
259
67
Configuration and Programming
68

TSX Micro and TSX Premium:
Configuring
4
At a Glance
Subject of this
This chapter describes:
chapter
l How to configure the software application.
l How to configure the hardware application.
What’s in this
This Chapter contains the following Sections:
Chapter?
Section
Topic
Page
4.1
TSX-Micro
71
4.2
TSX Premium
84
69

TSX Micro/TSX Premium: Configuring the application
4.1
TSX-Micro
At a glance
Object of this
This section describes:
section
l How to configure the software application with a TSX-Micro.
l How to configure the hardware application with a TSX-Micro.
What’s in this
This Section contains the following Maps:
Section?
Topic
Page
Accessing the application configuration
72
Choosing/Changing the processor
73
Configuring the processor
75
Configuring the module positions
78
Configuring inputs/ outputs for each module
80
Software configuration of the application
81
Configuring Grafcet objects
82
71

TSX Micro/TSX Premium: Configuring the application
Accessing the application configuration
Principles
The configuration software displays the processor selected when the application
was created.
The aim of this function is to:
l replace the processor (if the one selected at the time of creation is not suitable),
l configure the processor,
l declare/parametrize the various input/output modules and integrated modules,
l enter the software configuration,
l enter the Grafcet configuration.
In online mode this function is used to:
l diagnose module faults,
l debug modules.
Procedure
Carry out the following actions:
Step
Action
1
From the Application Browser, double left click on the "Configuration" di-
rectory or position the cursor over it using the arrow keys and press right arrow.
2
Select:
l Hardware configuration to access the module racks,
l Software configuration to define the application software parameters,
l Grafcet object configuration to define the grafcet parameters specific to
the application.
3
The configuration entered is confirmed by the Edit/Confirm command, the
Confirm command from the contextual menu, or the icon
Note:
The Edit/Cancel modifications (CTRL+Z) command or the
icon cancels all
modifications made since the last confirmation.
72

TSX Micro/TSX Premium: Configuring the application
Choosing/Changing the processor
Choosing the
Choosing the processor is the first stage in setting up an application. This choice is
processor
reversible.
Carry out the following actions:
Step
Action
1
Select the commandFile/ New from the PL7 home screen.
2
Select the PLC type >TSX MICRO.
3
Select the processor type -> TSX37xx Vyy.
4
If necessary, select a memory extension card (PCMCIA - if the processor sup-
ports it).
5
Specify whether or not your application contains Grafcet.
6
Click on OK.
Changing the
The configuration editor provides assistance when attempting to change the proces-
processor
sor. A message is sent out if the change is not authorized.
WARNING
When changing to a version V3.x processor
Using aV3.x processor in an application that has previously been con-
figured with a lower processor version leads to an irreversible change
in the application structure.
This conversion involves:
l the creation of program structure in sections,
l the automatic creation of the Grafcet section when the initial program
module is written in Grafcet language,
l an increase in the size of the application by approximately 100 bytes.
Failure to observe this precaution can result in severe injury or
equipment damage.
Carry out the following actions:
Step
Action
1
Select the Edit/Change processor command.
2
Select the required processor.
3
Select a memory card if necessary.
4
Confirm and then click on OK or press ENTER.
73
TSX Micro/TSX Premium: Configuring the application
Note:
It is possible to change the processor using the drop-down menu in the configuration
editor.
74

TSX Micro/TSX Premium: Configuring the application
Configuring the processor
Procedure
Carry out the following operations:
Step
Action
1
From the application configurator select position 0.
2
Select Open module using the contextual menu or double click on the proces-
sor.
3
According to the application, enable the RUN/STOP input (See RUN/STOP
input, p. 76).
4
According to the application, enable the Alarm (See Alarm output, p. 76) out-
put.
5
According to the application, enable the Save program and first %MWi (See
Saving/Restoring %MWi internal words, p. 76) input.
6
According to the application, enable Automatic start in RUN (See Automatic
start in RUN, p. 76).
7
According to the application, enable the initialization of %MWi internal words
on Cold restart.
8
Select the type of memory card for processors which have this option.
9
Select the type of MAST task execution:
l Cyclical
l Periodic: 1 to 255 ms (20 ms, default value). If the value is 0 execution will
be cyclical.
10
Enter the MAST task watchdog (See WatchDog, p. 77) value: 10 to 500 ms
maximum (250ms, default value).
11
According to the application, enter the FAST task period value: 1 to 255 ms
maximum (5ms, default value).
12
According to the application, enter the FAST task watchdog value: 10 to 500
ms maximum (100 ms, default value).
13
Confirm using the Edit/ Confirm (CTRL + W) command or using the icon
75
TSX Micro/TSX Premium: Configuring the application
RUN/STOP input
The %I1.8 input parameters can be set to switch the PLC between RUN/STOP as
follows:
l %I1.8 to 1 -> the PLC switches to RUN (program running),
l %I1.8 to 0 -> the PLC switches to STOP (program stops running).
This is taken into account on rising edge.
A STOP command by the %I1.8 input takes priority over a RUN command from a
terminal or a network command.
A fault on the RUN/STOP input causes the machine to STOP.
Alarm output
An alarm function can be assigned to the %Q2.0 output.
After setting the PLC in RUN mode, if no blocking faults are detected (PLC in STOP
mode or output in fallback mode, %S9=1), the safety output is set to 1.
This output can be used in safety circuits external to the PLC. For example:
l to pace the supply of output pre-actuators,
l to pace the PLC supply.
As soon as a blocking fault appears, the safety output is set to 0.
Saving/
This function is only available on version V2.0 PL7s or later:
Restoring %MWi
l Saving
internal words
To save internal words in Flash EPROM the application must be in STOP.
Saving %MWi internal words is always linked to an application program save.
It is triggered according to the selection made during configuration:
l by setting the discrete %I1.9 input to 1,
l by setting the bit 0 of %SW96 to 1.
l Restoring
The saved %MWi’s are transferred from internal flash EPROM memory to RAM
memory on a cold restart.
To restore the %MWi internal words to internal RAM you need to deactivate the
Reset %MWi on cold restart box in the processor configuration screen .
Automatic start
If this option is checked, the PLC will automatically switch to RUN on a cold start.
in RUN
If there is no memory card, the PLC will start up using the contents of the processor’s
internal RAM.
If a memory card is inserted, its contents determine the start up.
76
TSX Micro/TSX Premium: Configuring the application
WatchDog
The duration of the master task operation when in cyclic or periodic mode, is con-
trolled by the PLC (watchdog) and must not exceed the value set out in the T max
configuration (250ms default, 500ms maximum, rollover 10ms).
If this value is exceeded, an error is declared in the application, which stops the PLC
immediately:
l TSX Micro: setting the %Q2.0 alarm output to 0 if it has been configured.
Execution monitoring:
l %S11: indicates that the watchdog has been exceeded. It is set to 1 by the sys-
tem when the cycle time exceeds the watchdog value.
l %SW11: contains the watchdog value (in ms).
l %S19 (periodic operation): indicates that the period has been exceeded. The
system sets it to 1 when the cycle time exceeds the task period.
l %SW0 (periodic operation): this word contains the period value (in ms). It is ini-
tialized on cold restart by the value set during configuration. It can be modified by
the user.
77
TSX Micro/TSX Premium: Configuring the application
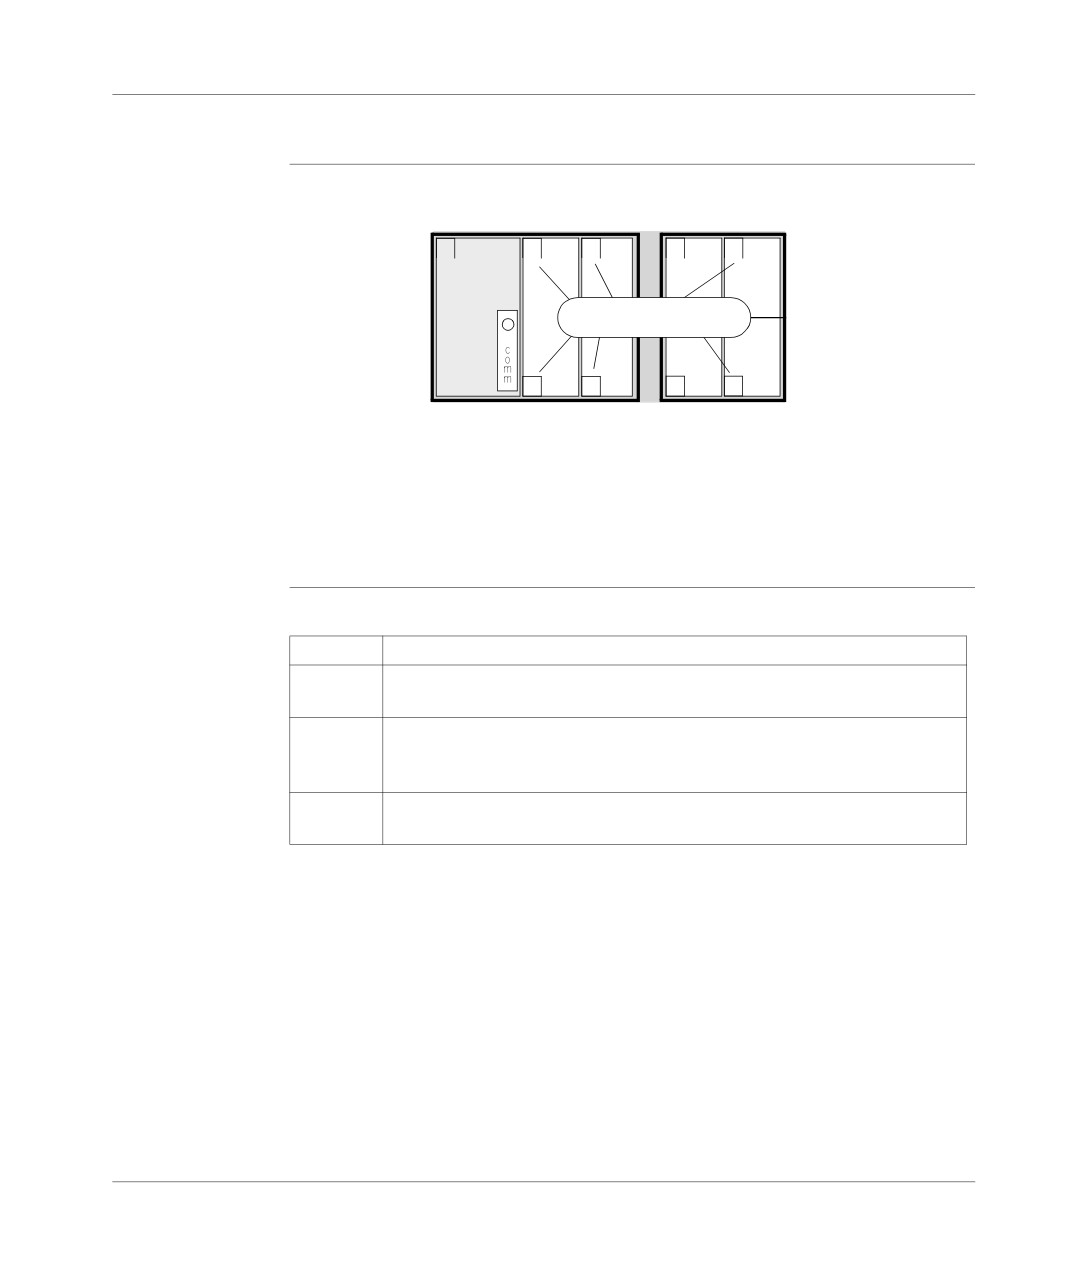
Configuring the module positions
Introduction
Editor:
0
1
3
5
7
TSX
3710
Positions of standard format
and semi format modules
2
4
6
8
Main rack
Extension rack
A standard format module takes up two positions.
A half format module takes up one position.
The 0 position is allocated to the processor and to integrated modules (such as the
TSX 37-22).
Procedure
Carry out the following operations:
Step
Action
1
Select the position of the module to be configured (using the mouse or arrow
keys).
2
Select the Edit/Add module command or double click on the position select-
ed. A dialogue box is displayed showing a list by family of the modules that can
be configured for the selected position (standard format module or half format).
3
Select the family (using the mouse or arrow keys), the module (the TAB key is
used to move between the different zones) and choose OK to confirm.
Notes:
If the module takes up 2 positions (as with all standard format modules), the soft-
ware automatically updates the position configuration.
If no input/output modules are declared in the configuration, or if there are any for-
mat modules, the PL7 software gives access to the %Ix.0 to %Ix.15 bits and to the
%Qx.0 to %Qx.15 outputs for each position (even if the half format module con-
cerned has less inputs/outputs).
78
TSX Micro/TSX Premium: Configuring the application
If there are any standard format modules, the PL7 software gives access to the
%Ix.0 to %Ix.31 input bits for odd positions and to the %Qx+1.0 to %Qx+1.31 output
bits for even positions (even if the standard format module concerned has less in-
puts/outputs).
79

TSX Micro/TSX Premium: Configuring the application
Configuring inputs/ outputs for each module
Procedure
Carry out the following actions:
Step
Action
1
Select the module to be configured (using mouse or arrow keys).
2
Select the command Services/Open the module or double click on the mod-
ule selected.
For integrated modules a window shows:
l the module reference and position,
l the configuration context (See Configuration context, p. 80) in progress.
3
Enter the parameters and confirm with the command Edit/ Confirm (CTRL +
W).
To find out about the various parameters, refer to the job headings concerned.
Depending on whether the command View/Module Zone is selected or not,
the display is different.
4
Close the window by pressing (CTRL+F4) and parametrize the next module.
Configuration
The Configuration selection is used to set the module’s parameters.
context
Adjust can be selected for counting, movement and weighing modules and is used
to:
l set initial parameter values offline,
l modify parameters on-line.
The Debugging selection (only accessible in on-line mode) is used, depending on
the module to:
l display the status of the inputs,
l display the module diagnostics and the channels,
l perform output writing.
80

TSX Micro/TSX Premium: Configuring the application
Software configuration of the application
Procedure
Carry out the following operations:
Step
Action
1
Double left click on the Configuration directory or select it using the arrow
keys, then press right arrow.
2
Select the Software configuration directory.
Software configuration is used to set the following for the application:
l the number of different types of function blocks,
l the number of register words,
l the number of %M internal bits,
l the number of %M internal words,
l the number of %KW constants.
3
For each of the fields to be modified, select the field and then enter the required
value (entry is controlled to prevent values greater than the maximum autho-
rized number (See Maximum number of authorized objects, p. 81)) from being
entered.
4
Confirm the configuration with the Edit/Confirm (Ctrl + W) command
Maximum
For each of the objects this number is:
number of
Objects
Maximum value
authorized
objects
%TMi timers
64
%Ti Series 7 timers
64
%MNi monostables
8
%Ci counters
32
%Ri registers
4
%DRi drums
8
Number of words per register
255
%Mi internal bits
depends on the size of memory available
%MWi internal words
depends on the size of memory available
%KWi constants
depends on the size of memory available
81

TSX Micro/TSX Premium: Configuring the application
Configuring Grafcet objects
Introduction
Before configuring Grafcet objects the following action must be taken:
l when setting up the application you must specify that it will contain a Grafcet sec-
tion, otherwise you will not be able to access the Grafcet configuration editor,
l the processor version (See Processor version, p. 83) used must support Grafcet
language.
Grafcet object configuration is used to set the following for the application:
l the number of steps,
l the number of active steps,
l the number of valid transitions.
Procedure
Carry out the following actions:
Step
Action
1
Double left click on the Configuration directory or select it using the arrow
keys, then press right arrow.
2
Select the Configure Grafcet Objects directory.
3
For each of the fields to be modified, select the field and then enter the required
value (entry is controlled to prevent values greater than the maximum autho-
rized number (See Maximum number of authorized objects, p. 82)) from being
entered).
4
Confirm the configuration with the command Edit/ Confirm (Ctrl + W).
Maximum
For each of the objects this number is:
number of
Objects
Maximum values
authorized
Number of steps
TSX3705/08/10: 1 to 96.
objects
TSX3721/22: 1 to 128.
Number of active steps
TSX3705/08/10: 1 to 96.
TSX3721/22: 1 to 128.
Number of valid transitions
TSX3705/08/10: 1 to 192.
TSX3721/22: 1 to 256.
82
TSX Micro/TSX Premium: Configuring the application
Processor
Compatibility table
version
V1.1 processor
This generation of processors does not support Grafcet.
V1.5, V2.0, V3.x, and V4.0 processors
If you are using Grafcet it must be declared when the application is set up.
It is not possible to change this option subsequently.
83

TSX Micro/TSX Premium: Configuring the application
4.2
TSX Premium
At a glance
Object of this
This section describes:
section
l How to configure the software application with a TSX-Micro.
l How to configure the hardware application with a TSX-Premium.
What’s in this
This Section contains the following Maps:
Section?
Topic
Page
Accessing the application configuration
85
Configuring the racks
86
Configuring the supply modules
88
Choosing/Changing the processor
89
Configuration of the processor
91
Configuring the module positions
94
Configuring inputs/outputs for each module
96
Software configuration of the application
98
Configuring Grafcet objects
99
84