Perkins 402D, 403D, 404D Industrial Engine. Manual - part 15
 

  Index      Engines     Perkins 402D, 403D, 404D Industrial Engine - service manual


Search            


Content   ..  13  14  15  16   ..


Perkins 402D, 403D, 404D Industrial Engine. Manual - part 15


SEBU8311-01

59

Maintenance Section

Alternator - Inspect

i02322311

Alternator - Inspect


Perkins recommends a scheduled inspection of

the alternator. Inspect the alternator for loose

connections and correct battery charging. Check the

ammeter (if equipped) during engine operation in

order to ensure correct battery performance and/or

correct performance of the electrical system. Make

repairs, as required.

Check the alternator and the battery charger for

correct operation. If the batteries are correctly

charged, the ammeter reading should be very near

zero. All batteries should be kept charged. The

batteries should be kept warm because temperature

affects the cranking power. If the battery is too cold,

the battery will not crank the engine. When the

engine is not run for long periods of time or if the

engine is run for short periods, the batteries may not

fully charge. A battery with a low charge will freeze

more easily than a battery with a full charge.

i02665597

Alternator and Fan Belts -

Inspect/Adjust


Inspection

To maximize the engine performance, inspect the

belts for wear and for cracking. Replace belts that are

worn or damaged.

For applications that require multiple drive belts,

replace the belts in matched sets. Replacing only

one belt of a matched set will cause the new belt to

carry more load because the older belt is stretched.

The additional load on the new belt could cause the

new belt to break.

If the belts are too loose, vibration causes

unnecessary wear on the belts and pulleys. Loose

belts may slip enough to cause overheating.

To accurately check the belt tension, a suitable gauge

should be used.

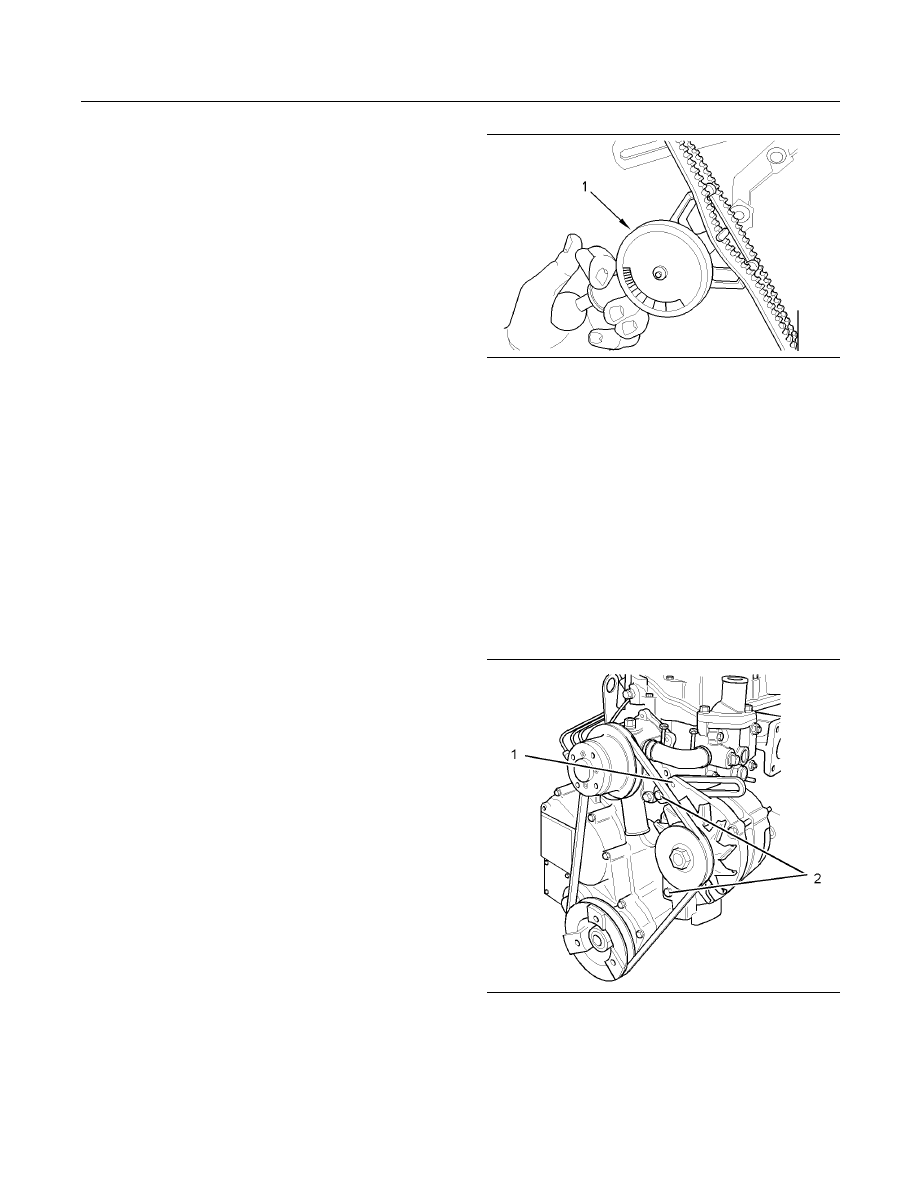
g01003936

Illustration 31
Typical example
(1) Burroughs Gauge

Install the gauge (1) at the center of the belt between

the alternator and the crankshaft pulley and check

the belt tension. The correct tension for a new belt is

400 N (90 lb) to 489 N (110 lb). The correct tension

for a used belt that has been in operation for 30

minutes or more at the rated speed is 267 N (60 lb)

to 356 N (80 lb).

If twin belts are installed, check and adjust the

tension on both belts.

Adjustment

g01091158

Illustration 32

Typical example
(1) Adjusting bolt
(2) Mounting bolts

1. Loosen mounting bolts (2) and adjusting bolt (1).

60

SEBU8311-01

Maintenance Section

Alternator and Fan Belts - Replace

2. Move the alternator in order to increase or

decrease the belt tension.

3. Tighten adjusting bolt (1). Tighten mounting bolts

(2). Refer to the Specifications Manual for the

correct torque settings.

i02166560

Alternator and Fan Belts -

Replace


g01091158

Illustration 33
Typical example

(1) Adjusting bolt
(2) Mounting bolts

For applications that require multiple drive belts,

replace the belts in matched sets. Replacing only

one belt of a matched set will cause the new belt to

carry more load because the older belt is stretched.

The additional load on the new belt could cause the

new belt to break.

Note: When new belts are installed, check the belt

tension again after 20 hours of engine operation.

Refer to the Disassembly and Assembly Manual for

the installation procedure and the removal procedure

for the belt.

i02322315

Battery - Replace


Batteries give off combustible gases which can

explode. A spark can cause the combustible gas-

es to ignite. This can result in severe personal in-

jury or death.

Ensure proper ventilation for batteries that are in

an enclosure. Follow the proper procedures in or-

der to help prevent electrical arcs and/or sparks

near batteries. Do not smoke when batteries are

serviced.

The battery cables or the batteries should not be

removed with the battery cover in place. The bat-

tery cover should be removed before any servic-

ing is attempted.

Removing the battery cables or the batteries with

the cover in place may cause a battery explosion

resulting in personal injury.

1. Switch the engine to the OFF position. Remove

all electrical loads.

2. Turn off any battery chargers. Disconnect any

battery chargers.

3. The NEGATIVE “-” cable connects the NEGATIVE

“-” battery terminal to the NEGATIVE “-” terminal

on the starting motor. Disconnect the cable from

the NEGATIVE “-” battery terminal.

4. The POSITIVE “+” cable connects the POSITIVE

“+” battery terminal to the POSITIVE “+” terminal

on the starting motor. Disconnect the cable from

the POSITIVE “+” battery terminal.

Note: Always recycle a battery. Never discard a

battery. Dispose of used batteries to an appropriate

recycling facility.

5. Remove the used battery.

6. Install the new battery.

Note: Before the cables are connected, ensure that

the engine start switch is OFF.

7. Connect the cable from the starting motor to the

POSITIVE “+” battery terminal.

SEBU8311-01

61

Maintenance Section

Battery Electrolyte Level - Check

8. Connect the NEGATIVE “-” cable to the NEGATIVE

“-” battery terminal.

i02747977

Battery Electrolyte Level -

Check


When the engine is not run for long periods of time or

when the engine is run for short periods, the batteries

may not fully recharge. Ensure a full charge in order

to help prevent the battery from freezing. If batteries

are correctly charged, the ammeter reading should

be very near zero, when the engine is in operation.

All lead-acid batteries contain sulfuric acid which

can burn the skin and clothing. Always wear a face

shield and protective clothing when working on or

near batteries.

1. Remove the filler caps. Maintain the electrolyte

level to the “FULL” mark on the battery.

If the addition of water is necessary, use distilled

water. If distilled water is not available use clean

water that is low in minerals. Do not use artificially

softened water.

2. Check the condition of the electrolyte with a

suitable battery tester.

3. Install the caps.

4. Keep the batteries clean.

Clean the battery case with one of the following

cleaning solutions:

Use a solution of 0.1 kg (0.2 lb) baking soda

and 1 L (1 qt) of clean water.

Use a solution of ammonium hydroxide.

Thoroughly rinse the battery case with clean water.

i02323088

Battery or Battery Cable -

Disconnect


The battery cables or the batteries should not be

removed with the battery cover in place. The bat-

tery cover should be removed before any servic-

ing is attempted.

Removing the battery cables or the batteries with

the cover in place may cause a battery explosion

resulting in personal injury.

1. Turn the start switch to the OFF position. Turn the

ignition switch (if equipped) to the OFF position

and remove the key and all electrical loads.

2. Disconnect the negative battery terminal. Ensure

that the cable cannot contact the terminal. When

four 12 volt batteries are involved, two negative

connection must be disconnected.

3. Remove the positive connection.

4. Clean all disconnected connection and battery

terminals.

5. Use a fine grade of sandpaper to clean the

terminals and the cable clamps. Clean the items

until the surfaces are bright or shiny. DO NOT

remove material excessively. Excessive removal

of material can cause the clamps to not fit

correctly. Coat the clamps and the terminals with

a suitable silicone lubricant or petroleum jelly.

6. Tape the cable connections in order to help

prevent accidental starting.

7. Proceed with necessary system repairs.

8. In order to connect the battery, connect the

positive connection before the negative connector.

62

SEBU8311-01

Maintenance Section

Cooling System Coolant (Commercial Heavy-Duty) - Change

i02595666

Cooling System Coolant

(Commercial Heavy-Duty) -

Change


NOTICE

Care must be taken to ensure that fluids are contained

during performance of inspection, maintenance, test-

ing, adjusting and repair of the product. Be prepared to

collect the fluid with suitable containers before open-

ing any compartment or disassembling any compo-

nent containing fluids.

Dispose of all fluids according to Local regulations and

mandates.

NOTICE

Keep all parts clean from contaminants.

Contaminants may cause rapid wear and shortened

component life.

Clean the cooling system and flush the cooling

system before the recommended maintenance

interval if the following conditions exist:

The engine overheats frequently.

Foaming is observed.

The oil has entered the cooling system and the

coolant is contaminated.

The fuel has entered the cooling system and the

coolant is contaminated.

Note: When the cooling system is cleaned, only

clean water is needed.

Note: Inspect the water pump and the water

temperature regulator after the cooling system has

been drained. This is a good opportunity to replace

the water pump, the water temperature regulator and

the hoses, if necessary.

Drain

Pressurized System: Hot coolant can cause seri-

ous burns. To open the cooling system filler cap,

stop the engine and wait until the cooling system

components are cool. Loosen the cooling system

pressure cap slowly in order to relieve the pres-

sure.

1. Stop the engine and allow the engine to cool.

Loosen the cooling system filler cap slowly in

order to relieve any pressure. Remove the cooling

system filler cap.

g01301065

Illustration 34

Typical example

2. Open the drain cock or remove the drain plug (1)

on the engine. Open the drain cock or remove the

drain plug on the radiator.

Allow the coolant to drain.

NOTICE

Dispose of used engine coolant or recycle. Various

methods have been proposed to reclaim used coolant

for reuse in engine cooling systems. The full distillation

procedure is the only method acceptable by Perkins to

reclaim the coolant.

For information regarding the disposal and the

recycling of used coolant, consult your Perkins dealer

or your Perkins distributor.

Flush

1. Flush the cooling system with clean water in order

to remove any debris.

2. Close the drain cock or install the drain plug in the

engine. Close the drain cock or install the drain

plug on the radiator.

NOTICE

Do not fill the cooling system faster than 5 L

(1.3 US gal) per minute to avoid air locks.

Cooling system air locks may result in engine damage.


Content   ..  13  14  15  16   ..