Kawasaki Diesel MULE 4010 TRANS 4x4 (KAF950G9). Manual - part 111
 

  Index      Engines     Kawasaki Diesel MULE 4010 TRANS 4x4 (KAF950G9) - service manual


Search            


Content   ..  109  110  111  112   ..


Kawasaki Diesel MULE 4010 TRANS 4x4 (KAF950G9). Manual - part 111


16-26 FRAME

Guard

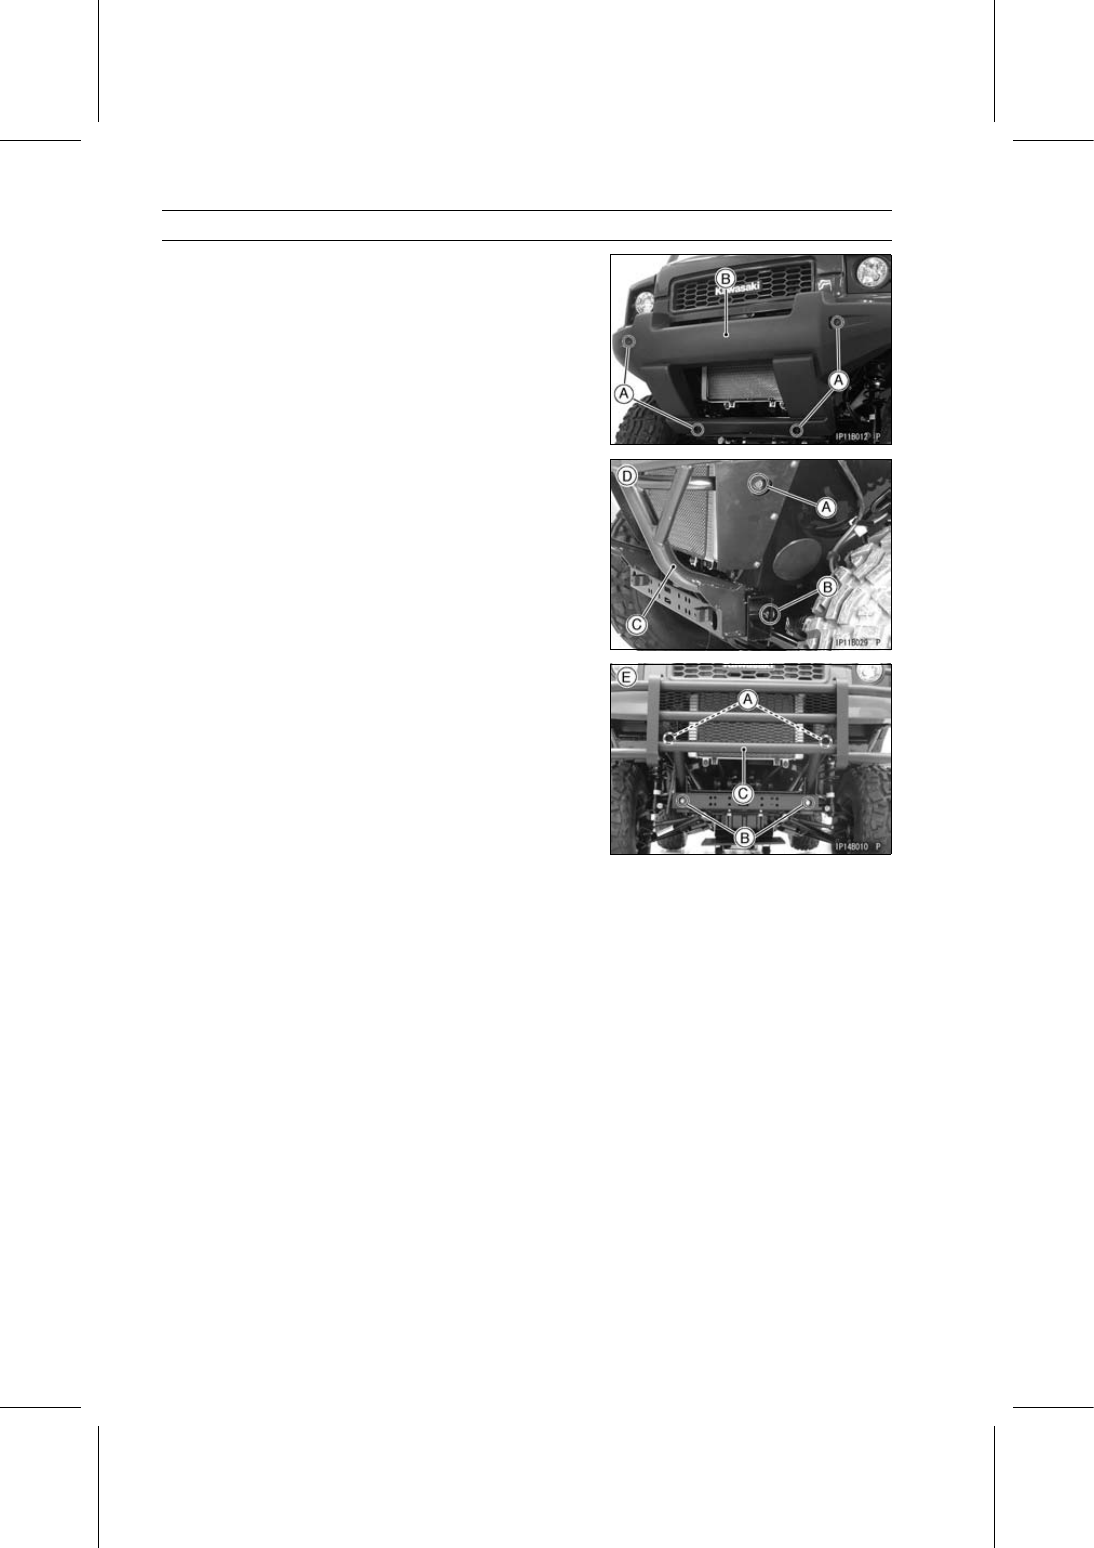
Front Guard Removal

Remove:

Screws [A] and Collars (KAF950G9

∼ GC/HA)

Front Guard Cover [B] (KAF950G9

∼ GC/HA)

Remove (Left and Right):

Front Guard Bolts [A] (Upper)
Front Guard Bolts [B] and Nuts (Lower)

Remove the front guard [C].

[D] KAF950G9

∼ GC/HA

[E] KAF950GD

Front Guard Installation

Installation is the reverse of removal, note the following.

Replace the nuts (lower) with new ones.

FRAME 16-27

Fenders

Front Fender Removal

Remove:

Screws [A] and Collars
Rivets [B]

Clear the hook portion [C] from the slot and remove the
front fender [D].

Front Fender Installation

Check that the clip-nuts [A] are in place as shown in the
figure.

Insert the hook portion [A] into the slot [B] of the front
fender.

Install the front fender, note the following parts [A] [B] [C]
size.

Screws [A] [L = 16 mm (0.63 in.)] and Collars [L = 4 mm
(0.16 in.)]
Screw [B] [L = 22 mm (0.87 in.)] and Collar [L = 6 mm
(0.24 in.)]
Tapping Screw [C] [L = 20 mm (0.79 in.)] and Collar [L =
9.5 mm (0.37 in.)]
Quick Rivets [D]

Rear Fender Assembly Removal

Remove:

Screws [A] and Collars
Rear Fender [B]

16-28 FRAME

Fenders

Remove:

Tapping Screws [A]
Bolt [B], Collar and Nut
Rear Fender Stay [C]

Remove:

Bolts [A], Collars and Nuts
Rear Fender Inner Cover [B]

FRAME 16-29

Covers

Front Cover Removal

Tilt up the front cargo hood.

Remove:

Front Fenders (see Front Fender Removal)
Front Guard (see Front Guard Removal)
Screws [A] and Collars (Left and Right)
Bolts [B] and Washers (Left and Right)

Disconnect the head light connecters [A] (Left and Right).

Remove the front cover [B] with head lights assembly.

Front Cover Installation

Installation is the reverse of removal, note the following.

Check that the clip-nuts [A] (left and right) are in place as
shown in the figure.

Attach the rubber damper [A] of the bracket to the dent
[B] of the front cover.

Front Fender Inner Cover Removal

Remove:

Front Fender (see Front Fender Removal)
Tapping Screw [A] and Collar
Quick Rivets [B]
Front Fender Inner Cover [C] (Middle)


Content   ..  109  110  111  112   ..