Kawasaki Diesel MULE 4010 TRANS 4x4 (KAF950G9). Manual - part 76
 

  Index      Engines     Kawasaki Diesel MULE 4010 TRANS 4x4 (KAF950G9) - service manual


Search            


Content   ..  74  75  76  77   ..


Kawasaki Diesel MULE 4010 TRANS 4x4 (KAF950G9). Manual - part 76


12-26 FINAL DRIVE

Bevel Gear Case

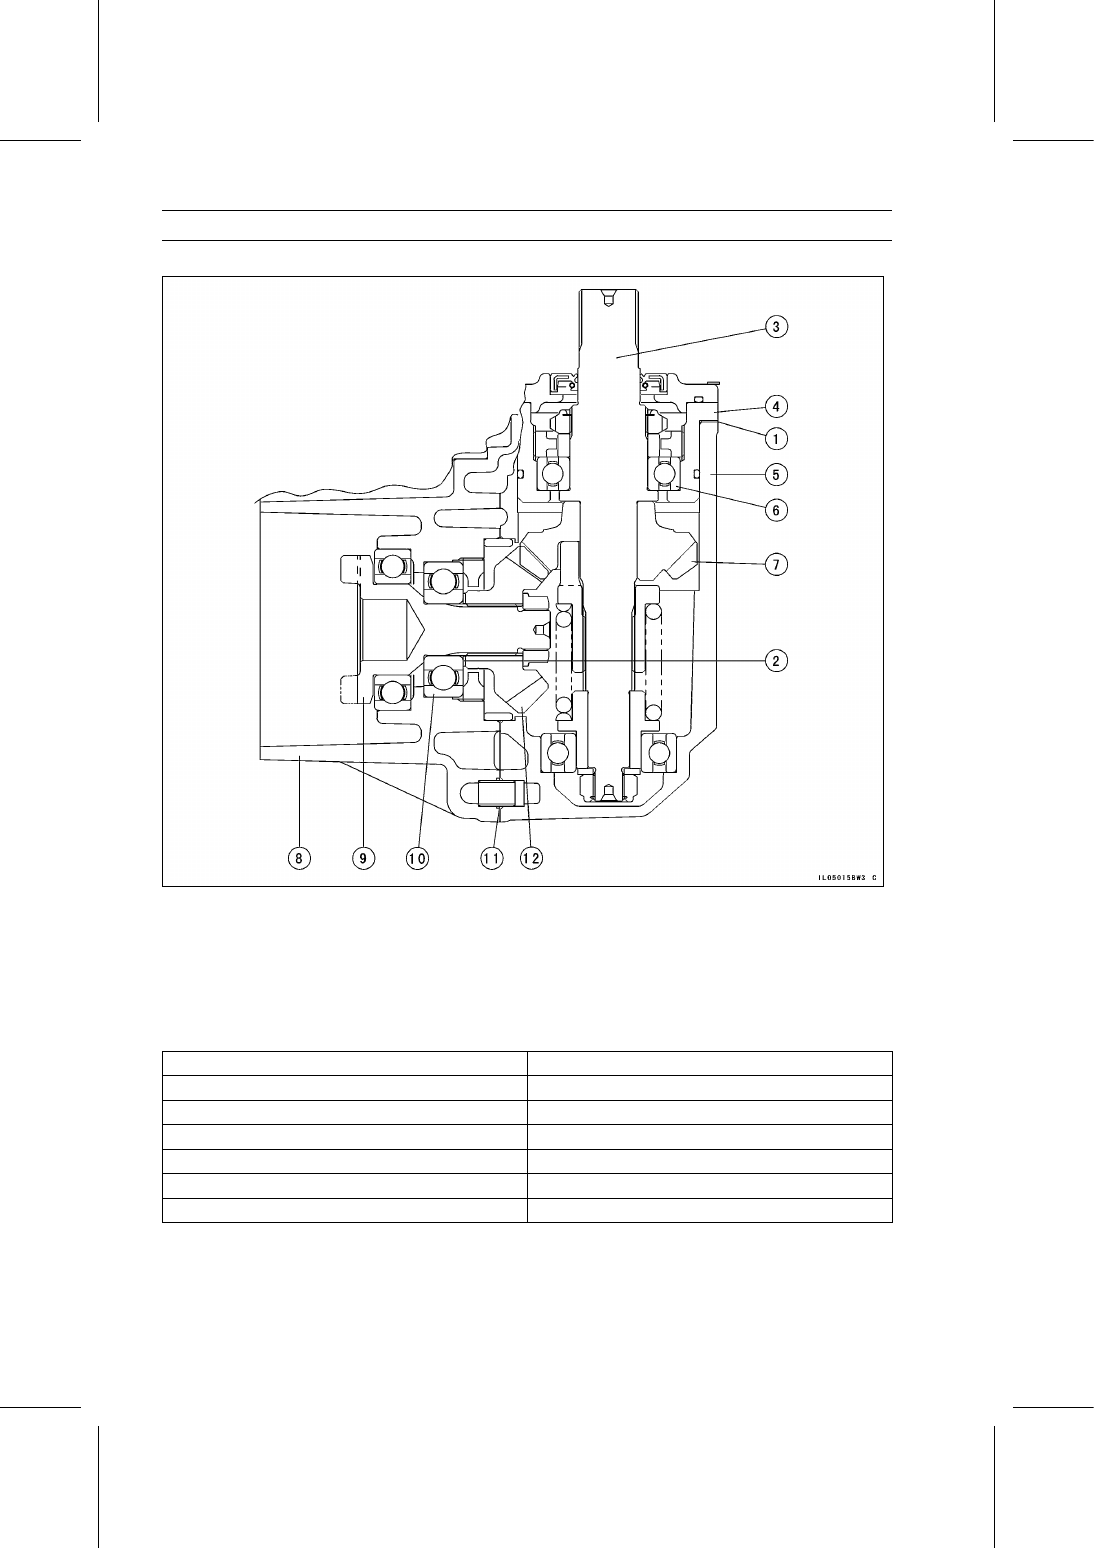
Bevel Gear Case (Backlash-Related Parts)

1. Driven Gear Shim(s)
2. Drive Gear Shim(s)
3. Driven Gear Shaft
4. Bearing Housing
5. Bevel Gear Case
6. Ball Bearing

7. Driven Bevel Gear
8. Hi/Low Gear Case
9. Drive Gear Shaft

10. Ball Bearing

11. Gasket

12. Drive Bevel Gear

1. Driven Gear Shims

Thickness

Part Number

0.1 mm (0.004 in.)

92025-1859

0.15 mm (0.006 in.)

92025-1860

0.5 mm (0.020 in.)

92025-1861

0.8 mm (0.031 in.)

92025-1862

1.0 mm (0.039 in.) (primary)

92025-1858

1.2 mm (0.047 in.)

92025-1863

FINAL DRIVE 12-27

Bevel Gear Case

2. Drive Gear Shims

Thickness

Part Number

0.15 mm (0.006 in.)

92025-1573

0.2 mm (0.008 in.)

92025-1574

0.7 mm (0.028 in.)

92025-1534

0.8 mm (0.031 in.)

92180-0288

0.9 mm (0.035 in.)

92180-0289

1.0 mm (0.039 in.) (primary)

92180-0290

1.1 mm (0.043 in.)

92025-1575

1.2 mm (0.047 in.)

92180-0291

1.3 mm (0.051 in.)

92025-1533

Tooth Contact Adjustment

Clean any dirt and oil off the bevel gear teeth.

Apply checking compound to 4 or 5 teeth on the driven
bevel gear.

NOTE

Apply checking compound to the teeth in a thin, even
coat with a fairly stiff paint brush. If painted too thickly,
the exact tooth pattern may not appear.

The checking compound must be smooth and firm with
the consistency of tooth paste.

Special compounds are available from automotive sup-
ply stores for the purpose of checking differential gear
tooth patterns and contact. Use this for checking the
bevel gears.

Turn the driven bevel gear for 3 or 4 turns in the drive and
reverse (coast) directions, while creating a drag on the
drive bevel gear.

Check the drive pattern and coast pattern of the bevel
gear teeth. The tooth contact patterns of both drive and
coast sides should be centrally located between the top
and bottom of the tooth, and a little closer to the toe of the
tooth.
If the tooth contact pattern is incorrect, replace the shim(s)
at the drive bevel gear and shim(s) at the driven bevel
gear, following the examples shown. Then erase the tooth
contact patterns, and check them again. Also check the
backlash every time the shims are replaced. Repeat the
shim change procedure as necessary.

NOTE

If the backlash is out of the standard range after chang-
ing shims, correct the backlash before checking the
tooth contact pattern.

Drive Bevel Gear [A]
Driven Bevel Gear [B]
Bottom [C]
Top [D]
Heel [E]
Toe [F]

12-28 FINAL DRIVE

Bevel Gear Case

Incorrect Tooth Contact Patterns
Example 1: Increase the thickness of the drive bevel gear
shim(s) by 0.05 mm (0.002 in.), and/or increase the thick-
ness of the driven bevel gear shim(s) by 0.05 mm (0.002
in.) to correct the pattern shown below. Repeat in 0.05 mm
(0.002 in.) steps if necessary.

Drive Bevel Gear [A]
Driven Bevel Gear [B]
Bottom [C]
Top [D]
Heel [E]
Toe [F]

Example 2: Decrease the thickness of the drive bevel gear
shim(s) by 0.05 mm (0.002 in.), and/or decrease the thick-
ness of the driven bevel gear shim(s) by 0.05 mm (0.002
in.) to correct the pattern shown below. Repeat in 0.05 mm
(0.002 in.) steps if necessary.

Drive Bevel Gear [A]
Driven Bevel Gear [B]
Bottom [C]
Top [D]
Heel [E]
Toe [F]

FINAL DRIVE 12-29

Bevel Gear Case

Bevel Gear Inspection

Visually check the bevel gears [A] for scoring, chipping,
or other damage.
Replace the bevel gears as a set if either gear is dam-
aged.

Ball Bearing Inspection

Since the ball bearings are made to extremely close toler-
ances, the wear must be judged by feel rather than mea-
surement. Clean each bearing in a high flash-point sol-
vent, dry it (do not spin the bearing while it is dry), and oil
it with engine oil.

Spin [A] the bearing by hand to check its condition.
If the bearing [B] is noisy, does not spin smoothly, or has
any rough spots, replace it.

Oil Seal Inspection

Inspect the oil seals.
Replace it if the lips are misshapen, discolored (indicat-
ing that the rubber has deteriorated), hardened, or been
otherwise damaged.

Damper Inspection

Visually inspect the driven bevel gear [A], cam follower
[B], spring [C] and shaft [D].
Replace any part that appears damaged.


Content   ..  74  75  76  77   ..