DIESEL PARTICULATE FILTER HANDLING. Manual - part 8
 

  Index      Engines     DIESEL PARTICULATE FILTER HANDLING - service manual 2013 year


Search            


Content   ..  6  7  8  9   ..


DIESEL PARTICULATE FILTER HANDLING. Manual - part 8


ENGINE

DIESEL PARTICULATE FILTER HANDLING MANUAL, WSM

1-S21

(Continued)

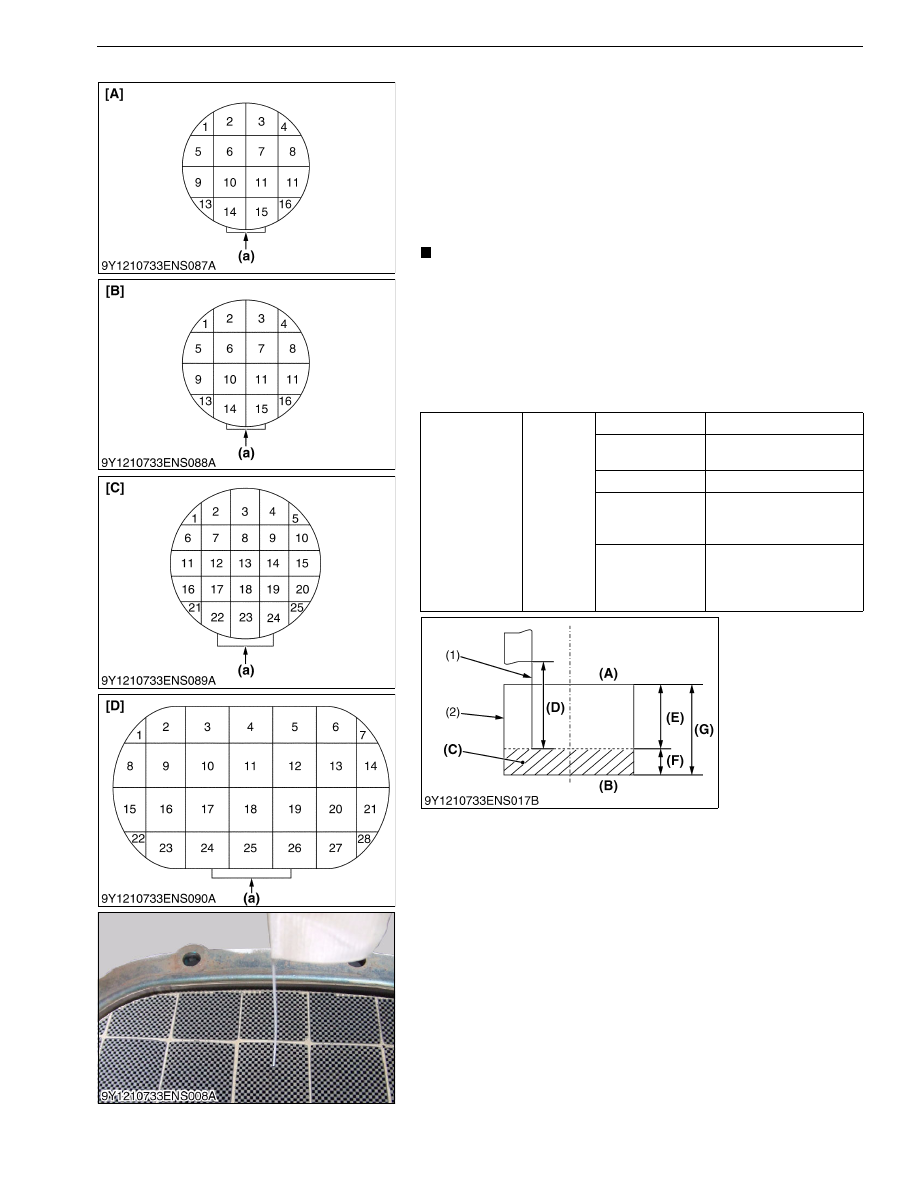
2. If the actual cell depth (E) is less than the allowable limit, the

DPF filter complete cannot be reused.
If the DPF filter complete is judged as non-reusable, report the
result of the judgment to the customer that requested the filter
cleaning via the service dealer, and replace the DPF filter
complete with a new one.

(Reference)

Actual Cell Depth (E) = Cell Depth (G) 

 Accumulated Ash

Depth (F)

NOTE

• Select a metal pin gauge having a wire size slightly thinner

than the cell width (0.60 to 0.80 mm dia., 0.024 to 0.031 in.
dia.).

• When the pin gauge is inserted into the cell hole, insert it

by lightly tapping on the gage end with a finger tip. 

• If the pin gauge is forcibly pushed in, the pin pierces

through the accumulated ash and it cannot be measured
accurately. So be careful not to push the pin forcibly.

Actual Cell 
Depth (Average 
of all 
measurement 
blocks)

Allowable 
limit

D1803-CR-E4

85 mm (3.3 in.)

D1803-CR-TE4
V2403-CR-E4

102 mm (4.02 in.)

V2403-CR-TE4

119 mm (4.68 in.)

V2607-CR-E4
V2607-CR-TE4
V3307-CR-TE4

119 mm (4.68 in.)

V3800-CR-TE4
V3800-CR-TIE4
V3800-CR-TE4C
V3800-CR-TIE4C

106 mm (4.17 in.)

(1) Pin Gauge (0.60 to 0.80 mm dia., 

0.024 to 0.031 in. dia.)

(2) DPF Filter Complete

(a) Serial No.

(A) Exhaust Inlet Side
(B) Exhaust Outlet Side
(C) Accumulated Ash
(D) 150 mm (5.91 in.)
(E) Actual Cell Depth
(F) Accumulated Ash Depth
(G) Cell Depth
[A] D1803-CR-E4, D1803-CR-TE4, 

V2403-CR-E4, V2403-CR-TE4

[B] V2607-CR-E4
[C] V2607-CR-TE4, V3307-CR-TE4
[D] V3800-CR-TE4, V3800-CR-TIE4, 

V3800-CR-TE4C, 
V3800-CR-TIE4C

ENGINE

DIESEL PARTICULATE FILTER HANDLING MANUAL, WSM

1-S22

[10] ASSEMBLY OF DPF MUFFLER FULL ASSEMBLY

(1) D1803-CR-E4, D1803-CR-TE4, V2403-CR-E4, V2403-CR-TE4

IMPORTANT

• Visually check if there is no damage (ceramic crack or damage) with the cleaned and returned DPF filter

complete. 

DOC Catalyst Complete, DPF Filter Complete and DPF Outlet
Body
1. Replace the gaskets (2), (5) with new ones.
2. Clean the mounting surface of each flange.
3. Assemble the DOC catalyst complete (7), DPF filter complete

(4), and DPF outlet body (1) with DPF mounting clamp band (3),
(6).
NOTE

• Assemble the DPF filter complete (4) in the correct

direction.

Exhaust Temperature Sensor (In the event of need for
replacement)

When the exhaust temperature sensor is removed or has to be

replaced because it is damaged, follow the procedure given below.
1. Clean the screw parts and apply anti seize agent (NEVER

SEEZ made by Bostik, Grade: Pure nickel special grade).

2. Install the exhaust temperature sensor T0 (3), T1 (2), and T2 (1)

from the exhaust inlet side (catalyst complete side) sequentially.

3. Install each exhaust temperature sensor with the specified

torque.
NOTE

• Anti seize agent is already applied to the screw parts of

new exhaust temperature sensor.
So, it is not necessary to apply it when replacing new ones.

Tightening torque

DPF mounting clamp band

16 to 20 N·m
1.7 to 2.0 kgf·m
12 to 14 lbf·ft

(1) DPF Outlet Body
(2) Gasket
(3) DPF mounting clamp band
(4) DPF Filter Complete

(5) Gasket
(6) DPF mounting clamp band
(7) DOC Catalyst Complete

Tightening torque

Exhaust temperature sensor T0
Exhaust temperature sensor T1
Exhaust temperature sensor T2

25.0 to 35.0 N·m
2.55 to 3.56 kgf·m
18.5 to 25.8 lbf·ft

(1) Exhaust Temperature Sensor T2 

(White Connector: 1J801-18520)

(2) Exhaust Temperature Sensor T1 

(Gray Connector: 1J500-18510)

(3) Exhaust Temperature Sensor T0 

(Black Connector: 1J500-18500)

(A) Exhaust Outlet Side
(B) Exhaust Inlet Side

ENGINE

DIESEL PARTICULATE FILTER HANDLING MANUAL, WSM

1-S23

Differential Pressure Pipe (In the event of need for
replacement)

When the differential pressure pipe is removed or has to be

replaced because it is damaged, follow the procedure given below.
1. Clean the screw parts and apply anti seize agent (NEVER

SEEZ made by Bostik, Grade: Pure nickel special grade).

2. Use caution not to make a mistake in assembling the differential

pressure pipes (1) and (2).

3. Install the differential pressure pipe (1) and (2) with the specified

torque.

Tightening torque

Differential pressure pipe

16.0 to 23.0 N·m
1.64 to 2.34 kgf·m
11.8 to 16.9 lbf·ft

(1) Differential Pressure Pipe
(2) Differential Pressure Pipe

(A) Exhaust Outlet Side
(B) Exhaust Inlet Side

ENGINE

DIESEL PARTICULATE FILTER HANDLING MANUAL, WSM

1-S24

(2) V2607-CR-E4

IMPORTANT

• Visually check if there is no damage (ceramic crack or damage) with the cleaned and returned DPF filter

complete. 

DOC Catalyst Complete, DPF Filter Complete and DPF Outlet
Body
1. Replace the gaskets (3), (6) with new ones.
2. Clean the mounting surface of each flange.
3. Assemble the DOC catalyst complete (7), DPF filter complete

(4), and DPF outlet body (1) with DPF filter complete mounting
bracket (2), (5).
NOTE

• Assemble the DPF filter complete (4) in the rightcorrect

direction.

Exhaust Temperature Sensor (In the event of need for
replacement)

When the exhaust temperature sensor is removed or has to be

replaced because it is damaged, follow the procedure given below.
1. Clean the screw parts and apply anti seize agent (NEVER

SEEZ made by Bostik, Grade: Pure nickel special grade).

2. Install the exhaust temperature sensor T0 (3), T1 (2), and T2 (1)

from the exhaust inlet side (catalyst complete side) sequentially.

3. Install each exhaust temperature sensor with the specified

torque.
NOTE

• Anti seize agent is already applied to the screw parts of

new exhaust temperature sensor.
So, it is not necessary to apply it when replacing new ones.

Tightening torque

DPF filter complete 
mounting bracket

16 to 20 N·m
1.7 to 2.0 kgf·m
12 to 14 lbf·ft

(1) DPF Outlet Body
(2) DPF Filter Complete Mounting 

Bracket

(3) Gasket
(4) DPF Filter Complete

(5) DPF Filter Complete Mounting 

Bracket

(6) Gasket
(7) DOC Catalyst Complete

Tightening torque

Exhaust temperature sensor T0
Exhaust temperature sensor T1
Exhaust temperature sensor T2

25.0 to 35.0 N·m
2.55 to 3.56 kgf·m
18.5 to 25.8 lbf·ft

(1) Exhaust Temperature Sensor T2 

(White Connector: 1J770-18520)

(2) Exhaust Temperature Sensor T1 

(Gray Connector: 1J770-18510)

(3) Exhaust Temperature Sensor T0 

(Black Connector: 1J500-18500)

(A) Exhaust Outlet Side
(B) Exhaust Inlet Side


Content   ..  6  7  8  9   ..