BBM DIESEL 1500cc MODEL ZERO-TURN MOWER. Manual - part 6
 

  Index      Engines     BBM DIESEL 1500cc MODEL ZERO-TURN MOWER - service manual


Search            


Content   ..  4  5  6  7   ..


BBM DIESEL 1500cc MODEL ZERO-TURN MOWER. Manual - part 6


1) After the engine has been run at the normal

operating temperature, stop the engine.

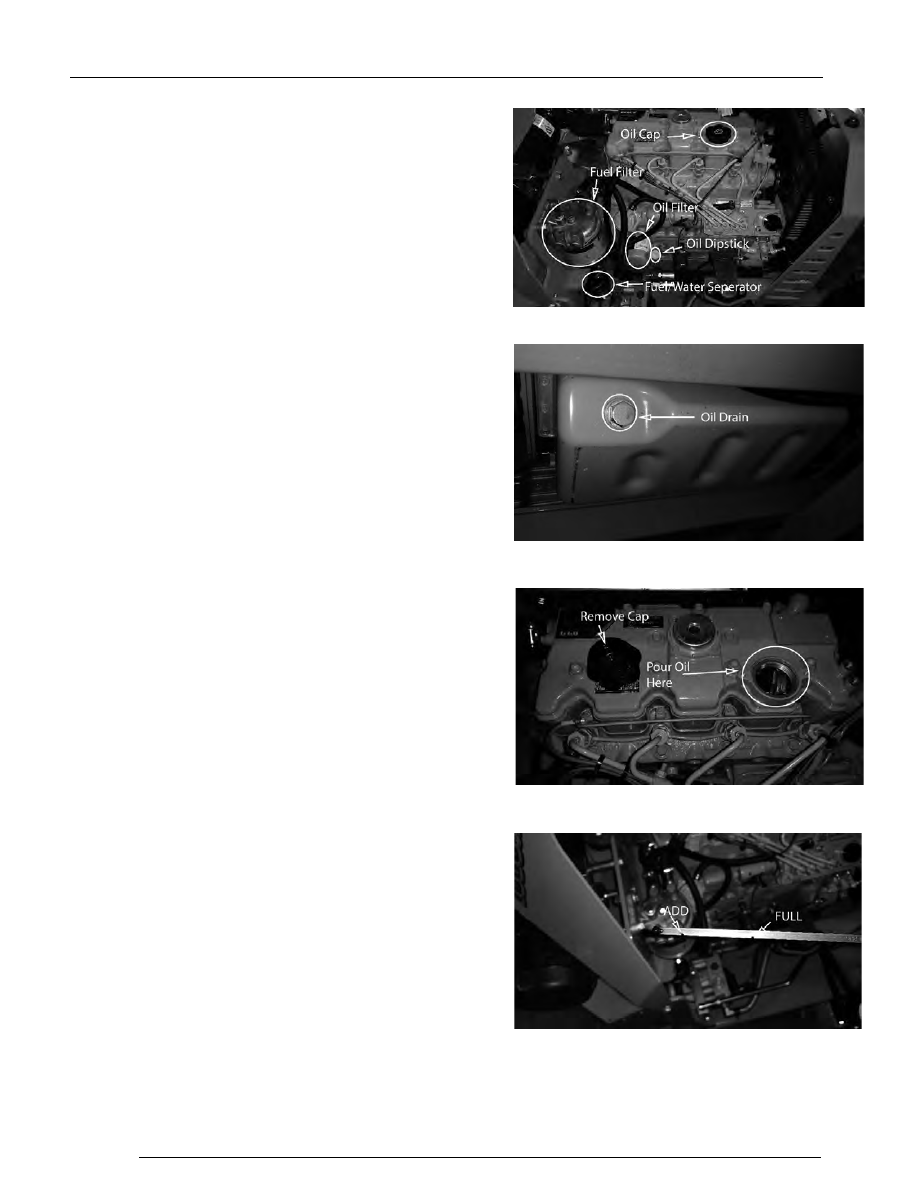
2) Remove the oil drain plug located underneath

the engine. Allow the oil to drain into a drain

pan. After the oil has drained, the oil drain plug

should be cleaned and installed.

3) Remove the oil filter with a chain wrench.
4) Check the oil filter for any metal debris that may

indicate engine wear.

5) Clean the sealing surface of the cylinder block.
6) Apply clean engine oil to the new oil filter seals.
7) Install the oil filter. Tighten the oil filter until the

oil

 filter seal contacts the cylinder block. Do not

overtighten the oil filter.

8) Remove the oil filler cap. Fill the crankcase with

approximately 5.91 quarts of oil. When refilling

be

 careful not to overfill the crankcase.

9) Start the engine and run the engine at “LOW

IDLE” for two minutes. Perform this procedure in

order to ensure that the lubrication system has

oil

 and that the oil filters are filled. Inspect the oil

filter for leaks.

3.1 Changing your engine oil and oil filter: 

10) Stop the engine and allow the oil to drain

back to the sump for a minimum of ten

minutes.

11) Remove the oil level gauge in order to

check the oil level. Maintain the oil level

between the “ADD” and “FULL” marks

on

 the oil level gauge.

PAGE 


 22

PAGE


23

When servicing the fuel system on the Diesel, it is 
necessary to purge the air from the system by loosening 
the 9/16˝ bolt on top of the fuel filter and pumping the fuel 
bulb (located underneath the radiator) until air bubbles 
are no longer visible.


3.2 Changing your fuel filter: 

1) Your 1500cc Diesel has two fuel system filters. 

The first is a filter/water separator.

2) Open the drain on the bottom of the filter/water 

separator. Catch the draining fluid in a suitable 
container. Dispose of the drained fluid correctly.

3) Close drain.
4) The second fuel filter is a canister located above 

the fuel/water separator.

5) Close the fuel supply valve.
6) Clean the outside of the fuel filter assembly.
7) Remove the setscrew.
8) Remove the canister. Ensure that any fluid is 

drained into a suitable container.

9) Assemble the following items: seals (8), seal (7), 

canister (3), and bowl (10). Place washer (5) and 
seal on setscrew (2).

10) Fasten the assembly to the fuel filter base with 

setscrew (2).

11) The fuel system will need to be primed after the 

new filter is installed. Refer to the Priming section. 
Make this! What priming do ours have? 

PAGE 


24

Remove and inspect air cleaner weekly. 
(More often in dusty conditions). Do not 
blow filter out with air pressure, this will 
cause the filter to be filled with tiny holes 
that will allow dirt to enter. Instead, tap 
filter on side to remove any debris. 
Replace at least once a year, more 
often in dusty conditions. 

3.3 Changing the air cleaner: 

1) The air filter is located on the back

of the mower. Unlatch the four
latches that hold the cap onto the
filter housing.

2) Remove the outer air element and

inspect it. If it is dirty it might be
necessary to use low air pressure to
clean it out (30psi or less). Higher
air pressure can damage the pleats.

3) Clean or replace both the inner and

outer air elements.

4) Reattach the cap onto the filter

housing.

Keep radiator screen clean and free of debris 
on liquid cooled models. Check screen hourly 
during dry conditions. Slide radiator screen up 
to remove. 

PAGE


25

SECTION 

4

: ELECTRICAL SYSTEM

The fuses on the 1500cc Diesel are located behind the 
left swing away tank. The top 40 amp fuse is the main 
fuse and the two 15 amp fuses are for the linear 
actuator and for the clutch.  

Always check the condition of the wiring harness 
ground cable. Ensure that the ground is connected, 
clean, and tight. On most models, the ground wire is 
connected to the negative side of the battery. 

Check the condition and connection of the relays. Two 
relays are located behind the left swing away tank and 
the other 5 are located behind the 
right swing away tank. Ensure that they are 
clean and connected. Make sure that wire terminal 
ends have not been pushed out of the relay block. 

On most models, the red wire coming out of the 
engine is the charging wire from the alternator. Check 
for 13.6—14.2 volts DC at this wire with engine at full 
throttle.

The linear actuator is the mechanism that raises and 
lowers the deck. If it ever starts to make noise when 
raising and lowering the deck you might find it 
necessary to tighten the nuts and bolts on the front 
and rear of the actuator. Be careful not to overtighten 
these as you can damage the actuator. Also if your 
actuator ever stops working make sure to check the 
main fuse or the linear actuator fuse


Content   ..  4  5  6  7   ..