Military reference books and manuals (2009-2023, Volume 1) - page 30
FM 31-27
Field Manual
Headquarters
No. 31-27
Department of the Army
Washington, DC, 15 February 2000
Pack Animals in Support of
Army Special Operations Forces
Contents
Page
PREFACE
iv
Chapter 1
OVERVIEW
1-1
Purpose
1-1
Mission
1-1
Capabilities
1-2
Chapter 2
ANIMAL MANAGEMENT
2-1
Selection
2-1
Health and Welfare
2-5
Feed and Water
2-9
Feeding in Garrison
2-17
Feeding in the Field
2-19
Care of Forage
2-21
Chapter 3
ANIMAL CARE AND TRAINING
3-1
Grooming
3-1
Farrier Science
3-4
Field Training
3-9
DISTRIBUTION RESTRICTION: Distribution restricted to United States (U.S.) Government agencies to protect
technical or operational information. This determination was made on 15 February 2000. Requests for this
document will be referred to Commander, U.S. Army John F. Kennedy Special Warfare Center and School,
ATTN: AOJK-DT-SF, Fort Bragg, NC 28310.
DESTRUCTION NOTICE: Destroy to preclude reproduction or further dissemination.
i
FM 31-27
Page
Chapter 4
ANIMAL HEALTH MANAGEMENT
4-1
Animal Behavior
4-1
Physical Examination
4-3
First Aid Supplies
4-6
First Aid Treatment
4-7
Parasitic Infestation
4-12
Diseases
4-13
Immunization Schedule
4-16
Medical Supply List
4-16
Pharmacological Listing
4-17
Euthanasia
4-17
Chapter 5
PACKING EQUIPMENT
5-1
Packsaddles
5-1
Halter and Packing Equipment
5-3
Care of Equipment
5-5
Fitting and Adjusting the Saddle
5-6
Unsaddling the Animal
5-10
Saddling with a Fitted Saddle
5-11
Chapter 6
HORSEMANSHIP
6-1
Equipment
6-1
Riding Techniques
6-6
Leading a Pack String
6-9
Combat Considerations
6-10
Chapter 7
TECHNIQUES AND PROCEDURES
7-1
Tying and Using Knots
7-1
Wrapping Cargo with a Manta
7-1
Building Loads
7-4
Saddling
7-5
Slings and Hitches
7-7
The Pack String
7-11
Campsites
7-14
Transporting Sick and Wounded Personnel
7-17
Chapter 8
ORGANIZATION AND MOVEMENT
8-1
Organization
8-1
ii
FM 31-27
Page
Duties and Responsibilities
8-1
Movement Procedures
8-2
Bivouac
8-4
Chapter 9
TACTICAL CONSIDERATIONS
9-1
Security
9-1
Cover and Concealment
9-2
Actions on Contact
9-3
Urban Environments
9-3
Chapter 10
LLAMAS AND OTHER ANIMALS
10-1
Llamas
10-1
Dogs
10-5
Camels
10-6
Elephants
10-7
GLOSSARY
Glossary-1
BIBLIOGRAPHY
Bibliography-1
INDEX
Index-1
iii
Preface
This manual provides guidance for training Army special operations forces
(ARSOF) personnel in the techniques of animal pack transport and for organizing
and operating pack animal units. It captures some of the expertise and
techniques that have been lost in the United States (U.S.) Army over the last 50
years. The chapters on care, feeding, and veterinary medicine compose a
considerable portion of the manual; however, this material is not intended as a
substitute for veterinary expertise nor will it make a veterinarian out of the
reader. ARSOF personnel must have a rudimentary knowledge of anatomy and
physiology, common injuries, diseases (particularly of the feet), feeding, and
watering to properly care for the animals and to avoid abusing them from
overloading or overworking.
Though many types of beasts of burden may be used for pack transportation, this
manual focuses on horses, mules, and a few other animals. One cannot learn how
to pack an animal by reading; there is no substitute for having a horse or mule
while you practice loading a packsaddle. However, the manual is useful for
anyone going into an environment where these skills are applicable.
Field Manual (FM) 31-27 is a guide for ARSOF personnel to use when employed
in training or combat situations using pack animals. It is not a substitute for
training with pack animals in the field.
The proponent of this publication is the United States Army John F. Kennedy
Special Warfare Center and School (USAJFKSWCS). Submit comments and
recommended changes to Commander, USAJFKSWCS, ATTN: AOJK-DT-SF,
Fort Bragg, NC 28310.
Unless this publication states otherwise, masculine nouns and pronouns do not
refer exclusively to men.
iv
Chapter 1
Overview
The last pack transport unit in the U.S. Army was deactivated after the
Korean War. Before then, pack animals were employed in every war
fought by the U.S. Army. The Army used approximately 350,000 horses
and mules during World War I. Unconventional forces in Italy and in
Burma used mules during World War II. Mules were also used during the
Korean War.
Since the deactivation of the pack transport units, the Army has relied on
air and ground mobility for transporting equipment. Today and
throughout the spectrum of conflict, ARSOF may find themselves
involved in operations in rural or remote environments. In many of these
environments, the indigenous population uses pack animal
transportation. Therefore, it may not be possible or practical to use air or
ground mobility to move supplies and equipment to the desired locations.
PURPOSE
1-1. This manual is a guide to train select animals and ARSOF personnel
used during the conduct of transport operations using pack animals. The pack
horse and mule are described exclusively in this manual as they are common
worldwide. Mission, enemy, terrain, troops, time available, and civilians
(METT-TC) will dictate practicality. This reference assists in understanding
the basic principles and techniques that apply in using any animal to pack
provisions.
1-2. The success of pack operations, under extreme weather and terrain
conditions, depends on the selection and training of personnel and animals.
Time, resources, training, and personnel should indicate that the proper and
efficient use of available equipment, the sensible care of animals in the field,
and the employment of acceptable movement techniques are essential to the
success of the mission.
MISSION
1-3. Animal pack transport systems extend or replace other transport means
in the support of special operations (SO) missions (tactical or strategic).
Animal transport systems can greatly increase mission success when hostile
elements and conditions require the movement of combat troops and
equipment by foot. The animal’s capabilities allow the unit to move with less
personnel fatigue.
1-1
FM 31-27
CAPABILITIES
1-4. Pack animals can transport limited quantities of cargo and weapons
over any terrain and under virtually any condition passable by an individual
on foot. The pack detachment can traverse steep grades and heavily wooded
areas without trail preparation and can maintain acceptable speeds over
terrain that is not mountainous, carrying 20 percent of their body maximum
(150 to 300 pounds [lb]). This amount should be decreased for loads that are
prone to excessive rocking as the animal walks (for example, top-heavy loads
and bulky loads). This capability continues indefinitely as long as the animals
receive proper care and feed. In mountainous terrain, with no reduction in
payload, the mule or horse can travel from 15 to 20 miles per day.
1-2
Chapter 2
Animal Management
The survivability of a pack animal detachment and its ability to
successfully complete a mission depends on the animals and their
management. Historically, animals of all types and sizes have been
successfully used for pack transportation throughout the world. Animals
indigenous to the area of operations are usually more effective than
imported animals. Although native animals may be smaller and not
ideally proportioned, they are acclimated to the environment, generally
immune to local afflictions, and accustomed to the native forage.
However, any animal locally procured needs to be thoroughly inspected
for disease and physical soundness. Animal management entails
selection, feed, and feeding along with stable management. Poor selection
and improper feed and feeding of the pack animals could prove disastrous
for the detachment.
SELECTION
2-1. Mobility and effectiveness of the pack animal detachment depend
largely on the selection and training of the pack animals. The pack animal,
regardless of its color, breed, or size, should have a friendly disposition, a
gentle nature, and no fear of man. He should be willing to travel under a load
and be sure-footed. Large, draft-type horses usually are not agile and do not
make good pack animals. The ideal pack animal should be 56 inches to 64
inches in height or
14 to
16 hands. (Since one hand equals about
10
centimeters [cm], the metric equivalent is 140 cm to 160 cm). It must be
tough, compact, sturdy, and well-formed. Figure 2-1, page 2-2, shows specific
parts of an ideal pack animal (horse). For additional information and a more
detailed illustration of the pack animal see Care and Feeding of the Horse by
Lon D. Lewis, ISBN 0-68-304967-4.
ANIMAL CONFORMATION
2-2. The single most important conformation factor is good body condition.
Thin animals are poor candidates for many reasons. They should be avoided
if they do not gain weight once on adequate nutrition. Thin animals do not
tolerate the rigors of long pack trips since they have little time to eat or
graze. They easily develop saddle or pack sores on their backs because of the
prominence of bones. The lack of body condition may only be due to poor
nutrition. However, it may be due to more serious problems such as bad teeth
or chronic infection. A pack animal should be calm and not easily spooked,
easy to work around and not stubborn, and should be able to socialize well
with other pack animals so that it is not too timid or too aggressive.
2-1

FM 31-27
Figure 2-1. Animal Conformation
2-3. The head should be proportioned to the neck that supports it. A big
head on a long, weak neck does not give the animal a desirable pendulum for
balance. A well-formed head is usually a sign of good breeding. The animal’s
eyes should be clear and free from any cloudiness in the cornea or fluid
within the eye. There should be no drainage of tears over the lower eyelids.
The white sclera around the eyes should be white with no hint of infection or
yellow discoloration (jaundice). The pink conjunctiva (clear membrane that
goes over the white of the eye) under the eyelids should be pink, not red, and
should have no hint of infection. The animal must also have good vision to
pick its way through rough or rocky terrain.
2-2
FM 31-27
2-4. The teeth should match to form a good occlusion. There should not be
sharp points or hooks. Although these can be removed by a person skilled in
floating teeth, they may soon return due to improper occlusion. Good teeth,
lips, and tongue are important to the animal’s survivability by allowing it to
eat and drink properly. It needs good lips to find and pick up grain and water
since it cannot see the end of its nose. The junction of the head and neck
should be strong without a meaty appearance.
2-5. The neck should be proportioned to the animal’s body and not too long.
The animal needs strength in the neck to use its head as a pendulum and
keep its balance in adverse terrain.
2-6. On a pack animal, the withers should be prominent, but not so high the
packsaddle will rub or ride on it. Flat, rounded, or mutton (flat and thick)
withers should be avoided because the packsaddle will not ride well on the
animal. Attention is given to the height of the withers in relation to the
height of the croup. An animal with withers lower than the croup has greater
difficulty carrying a load because the load will constantly ride forward
causing greater strain on the shoulders and forelegs. In contrast, an animal
with extremely high withers and a low croup has difficulty with the load
sliding back into the hip, leaving the possibility of the breast collar impeding
movement and breathing.
2-7. The shoulders of a pack animal should be long, deep, and sloping to
provide a larger surface for bearing the weight of a pack load when the
animal is ascending hilly terrain. The chest should be muscular and deep but
not too broad.
2-8. The legs should be straight, well-muscled, and free of any bulging joint
capsules. Avoid animals that have any of the following characteristics on any
legs or hoofs:
• Club feet (foot pastern axis of 60 degrees or more).
• Long, sloping pasterns (foot and pastern axis less than 45 degrees in
front or less than 50 degrees in back).
• Short, upright pastern (foot and pastern axis more than 55 degrees in
front or more than 60 degrees in back).
• Thin hoof walls.
• Thin sole.
• Buttress foot (swelling on the dorsal surface of the hoof wall at the
coronary band).
• Bull-nosed foot (dubbed toe); unilateral contracted foot.
• Toed-in (pigeon-toed) or toed-out. (Normal animals will toe-in or toe-out
if not trimmed correctly. Avoid animals that continue to toe-in or toe-
out after trimming to ensure the bottom of the hoof [inside heel to
outside heel] is perpendicular to tile median plane of the body.)
• Any hoof that is sensitive to moderate pressure applied by a hoof tester
to the toes, sole, frog, or across the heels.
2-3
FM 31-27
2-9. There are also specific defects that pertain only to the front and back
legs of the animal. Avoid animals with the following defects:
• Front legs:
Open-knees
(enlargement of distal physis of the radius and
corresponding enlargement in the knee).
Calf-knees (backward deviation of knees).
Buck-knees (forward deviation of knees).
Offset knees or bench knees (knee sets too far medially over lower
leg rather than setting centered over lower leg).
• Rear legs:
Cow hooks (knock-knees).
Sickle leg (excessive angle of the hock).
2-10. The feet are a critical factor in the animal’s ability to perform, stay
physically sound, and endure the hardships of packing. Ideally, the horse
should stand with its feet at a 45- to 50-degree angle to the ground. The size
of the foot should be in proportion to the size of the animal. Small feet are
often brittle and do not have the base to support a heavy load or absorb
concussion. Large feet could cause the animal to be clumsy and awkward.
Mules have a tendency to have smaller feet, but this fact does not present a
problem. The sole should be slightly concave and the frog prominent, elastic,
and tough. Again, when viewed from the front, an animal that is toed-out
should be avoided.
2-11. The girth should be deep from the withers to the floor of the body, and
the body should be wide and flat. This size indicates ample space for vital
organs, such as the heart and lungs. The barrel should be large. A large
barrel shows a good spread of the ribs that, in turn, give a good load-bearing
surface on top.
2-12. The back should be short, strong, and well-muscled. A short back is
better equipped to carry a load without sagging. Horses with one less
vertebrae than others would be good selections. The backbone should be
prominent. A pack animal with a rounded back and ill-defined backbone is
difficult to pack so that the load rides properly. Chances are good the load
will slip or roll and the detachment will waste valuable time repacking the
load during movement.
2-13. The loin should be of moderate length, well-muscled, and broad. A long
loin will cause weakness at that point. The croup should be low and of
moderate width and slope. The hindquarters should be strong and well-
developed to provide power to the animal.
CONFORMATION DEFECTS
2-14. In the selection of a pack animal, the above criteria are ideal, but many
serviceable pack animals have defects in their conformation and still perform
well. However, it is better in the long run to avoid animals with many defects.
Try to ensure that the larger animals carry the heaviest loads, and the gentle,
experienced animals carry the fragile, easily breakable items. The smaller
2-4
FM 31-27
animals or animals with certain conformation defects should be tasked with
carrying the light and not-so-fragile loads.
HEALTH AND WELFARE
2-15. The health and welfare of the pack animal is a major concern of pack
animal handlers in garrison and in the field. Each individual provides for the
welfare of pack animals. Whole pack trains can be lost and missions
compromised due to poor animal care. Implementing animal care will be
distinctly different for field and garrison conditions even though the
requirements and desired endpoints are the same.
FIELD MANAGEMENT
2-16. Rarely will a packer have the luxury of shelter or even corrals to hold
animals in when packing. If fencing or corrals are not available, some means
of limiting movement is necessary. The packer can limit movement by tying
long “stake-out” lines to trees or by using auger devices secured into the
ground. These methods permit animals to graze in defined areas and provides
wind breaks during cold winds. However, there are some disadvantages. The
animals must be moved every few hours as they graze the available forage.
Sometimes they become entangled in the stakeout lines or entangle the line
in brush or rocks. Some animals panic at loud noises (for example, thunder)
and snap the line or pull the auger out.
2-17. The packers can hobble the animals by tying their front legs together
with just enough space between their legs to take small steps but not run.
They can secure the hobbles around the pastern or above the knees. Pastern
hobbles (American hobbles) are easier to apply and maintain but can cause
some animals to become entangled in brush or rock. Hobbles above the knees
(Australian hobbles) are more difficult to apply and maintain but prevent
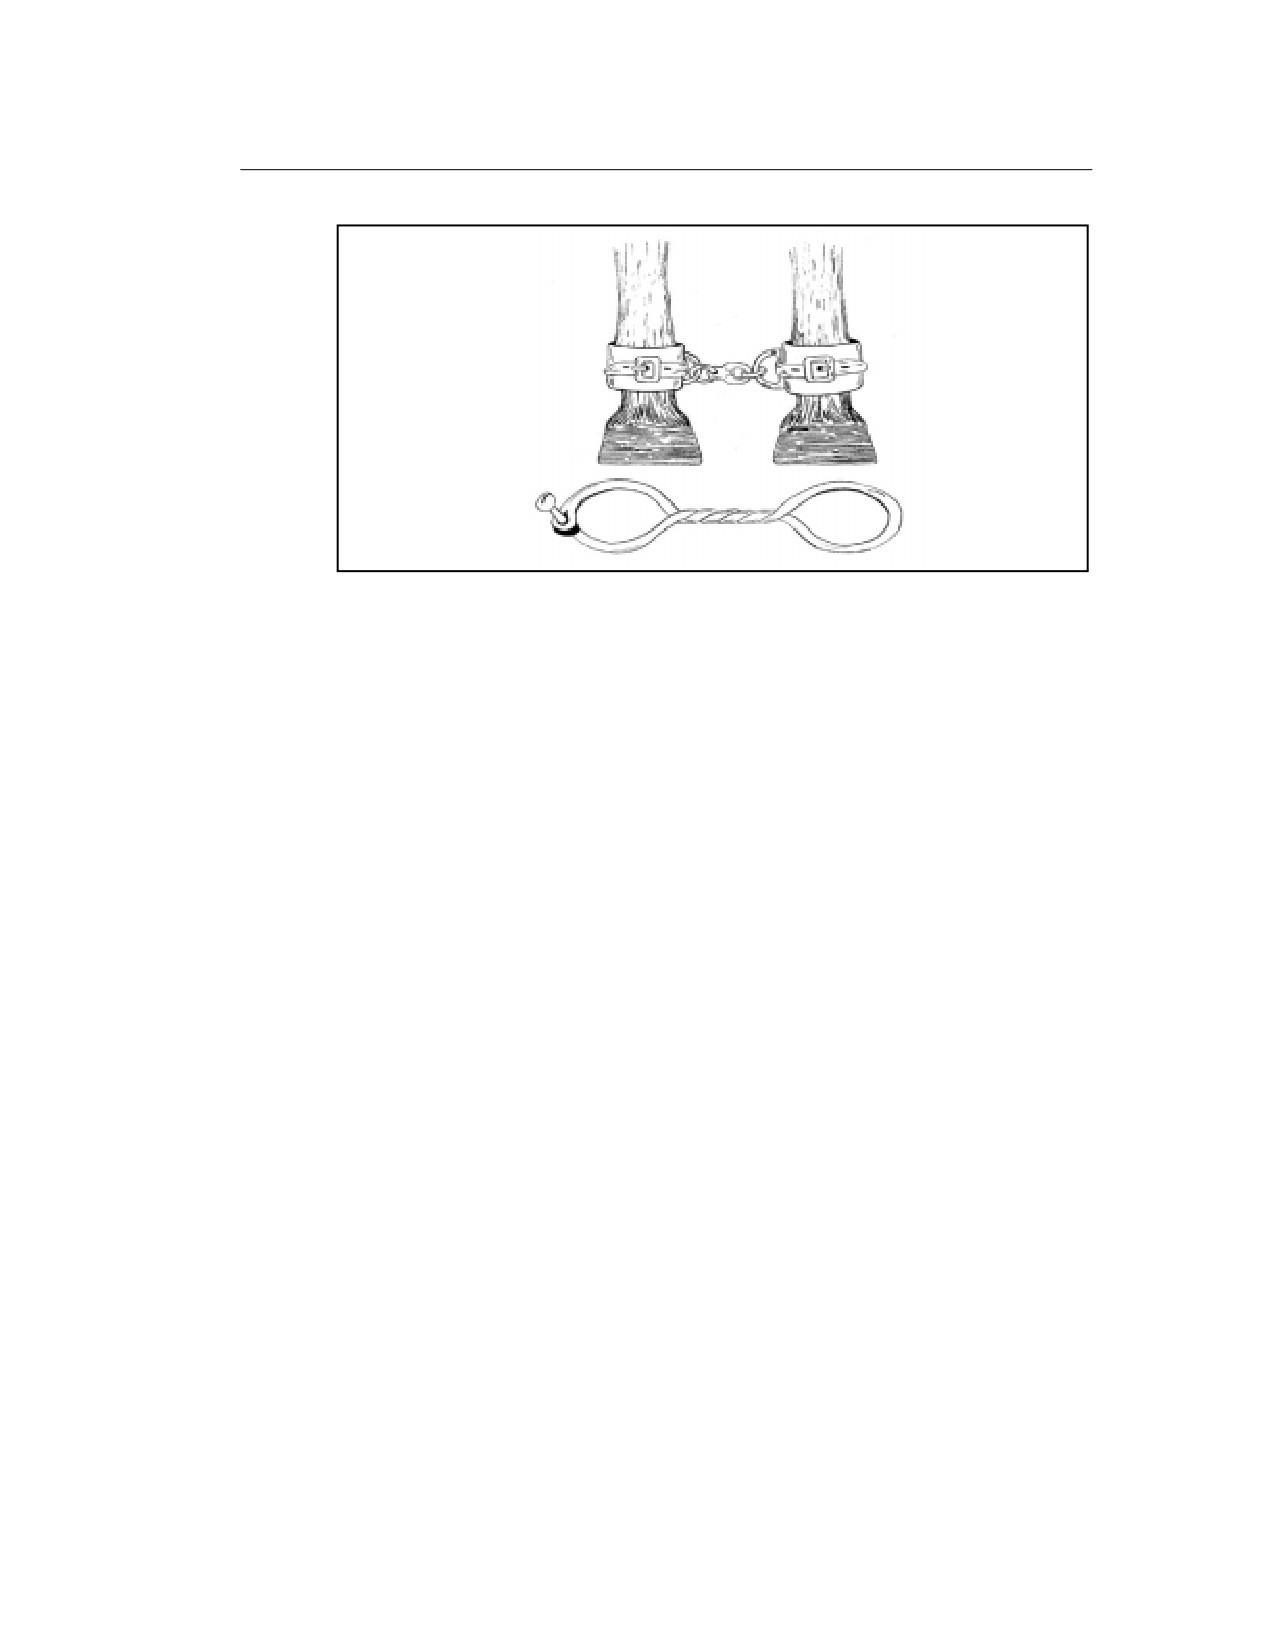
entanglement with brush and rocks. Packers must slowly acclimate animals
to hobbles in garrison before using the hobbles for an extended time on pack
trips. Figure 2-2, page 2-6, shows two types of hobbles that the handler can
use for various purposes.
2-18. The animals must have as much access to good forage as possible. This
need means that packers should include probable grazing areas in their
movement schedules. Even with optimal grazing, pack animal detachments
take additional supplemental feed (in the form of grain) because the animals
do not have enough time to graze and rest after carrying packs for much of
the day. Also, the grazing is often less than optimal and the animals have to
range over considerable distances to obtain adequate nutrition.
NOTE: Pack animal detachments can also consider using portable electric
fencing. However, a few animals are not deterred under normal conditions,
and most animals are not deterred if spooked by thunder and lightning.
2-5
FM 31-27
Figure 2-2. Two Types of Hobbles—Buckled Straps Joined by a Chain and
Swivel and the Light Rawhide Hobble
SHELTERED HOUSING FACILITY (STABLE BUILDING)
2-19. In an unconventional warfare
(UW) scenario, the pack animal
detachment will probably not have the luxury of a permanent or semi-
permanent stable facility. However, most of the field routines may be applied
in stables.
2-20. The detachment commander has command responsibility for stable
management and the training of his soldiers. However, subordinate leaders
are directly responsible for stable management and the stable routine.
2-21. Stable management includes the supervision and maintenance of the
stables and the other facilities. The subordinate leaders will ensure the
grounds and buildings in the stable area are kept as clean and sanitary as
available time and labor will allow and that the grounds are reasonably level
and well drained. They will also ensure the animals are well-groomed,
properly shod, and free of injuries and diseases. Since a large number of
animals may be involved in a pack animal detachment, subordinate leaders
should keep records at the stables on all the assigned animals.
2-22. The design and construction of a stable facility may be limited to the
materials at hand. Regardless of the materials used, the stable should
provide adequate shelter, good ventilation, and few maintenance
requirements. The stable building should provide ready access to the corrals
and storage for feed and packing equipment.
STALLS
2-23. Stalls vary in size depending on the average size of the animals, amount
of time the animals are expected to spend in the stall, and available space. A
12-foot by 12-foot stall allows freedom for a large horse or mule to maintain
fair physical condition during long periods of idleness while confined to
stables. Stalls of this size are normally used for recuperation, foaling of
mares, and protection in extreme climates. A 10-foot by 10-foot stall is
normally satisfactory when animals are in stables only for feeding and rest.
To reduce waste in feeding hay and grain, the stalls should be equipped with
2-6
FM 31-27
hayracks and feedboxes. Stall walls must be free of sharp or rough projections
and unfinished woodwork. A major concern when dealing with animal care is
the construction and maintenance of stall floors. The floor should be level and
have good drainage. It should also be resilient to help maintain a healthy
condition of the animals’ feet and legs. The floor should also be nonabsorptive
for cleanliness and sanitation. Earthen floors composed of clay are
satisfactory but require continual work to clean, level, and smooth. Rough-
finished concrete provides the best type of floor because it is sanitary, is easy
to clean, and requires little maintenance. However, a concrete floor having
little resilience must be covered with a bedding of straw or hay for cushion.
Wooden floors, even if impregnated, are not desirable since they are slippery
and unsanitary. Because of their porosity, they cannot be adequately
disinfected during a Salmonellal outbreak. Regardless of the floor chosen, a
good bed contributes to the comfort and efficiency of the animals. A clean,
comfortable bed will induce the animal to lie down and get better rest. It
provides a soft surface that will prevent bruising or abrasion of elbows, hocks,
and other body parts. It also provides insulation for the body and a
comfortable surface for the animal to stand.
2-24. Horses and mules are herd animals and do not thrive in stalls. This
confinement can lead to behavioral problems that would not be experienced
when the animals are kept in a field environment.
STORAGE
2-25. Storage facilities provide protection and security for feed and tack. They
should also be convenient to the stables and corral. Feed storage should
provide protection from rodents, water, and any loose animals that may
overeat. When possible, stack feed on pallets (best), boards, or plastic sheets
(second best) so that it is not in direct contact with the ground. Stack feed at
least 6 inches from walls to discourage rodents. Rodents prefer narrow spaces
to avoid predators, and the extra distance decreases the frequency of rodent
visits. When covering feed outside, ensure there are no pinpoint holes in the
cover because they are just enough to cause spoilage if it rains. In addition,
arrange to minimize time and personnel necessary for feeding. A tack room
should be planned for each stable and partitioned from the stall area. It
should have facilities for inspection, cleaning, preserving, repair, and storage
of all pack and riding saddles, bridles, halters, panniers, and accessories for
the detachment.
CORRALS
2-26. The pack animal detachment should provide corrals for the animals’
free movement and exercise when they are not in use or in the stalls. Ensure
the corrals are close and easily accessible to the stables, are well drained, and
provide good footing. Fill and level, as much as possible, any depressions and
heavily traveled areas where water can collect. Set fences at a sufficient
height and strength to ensure the safekeeping of the animals. Ensure the
fence is free of sharp or rough projections, exposed nails, and edges prone to
splintering with pressure or rubbing. Provide water troughs or tanks to give
animals free access to water and make sure the containers are large enough
to allow the watering of several animals without congestion. Individual feed
2-7
FM 31-27
boxes or buckets are much better than shared bunks for minimizing fighting
and control of contagious diseases. If feed bunks are used, provide at least 3
feet of bunk space per animal and no more than four animals per bunk to
decrease fighting over feed and to prevent one dominant animal from eating
more feed than another.
2-27. Establish hitching posts or a picket line to groom or pack the animals.
Ensure the footing at the picket line will sustain heavy use. Establish the line
on high ground so water (even if dry season), urine, and feces do not
accumulate around the picket line. Also useful is a foundation of stone cover
with coarse (but smooth) gravel or sand. Avoid fine gravel or coarse gravel
with rough edges as these can lodge in the frog or sulcus. If there is no
natural shelter from the sun and adverse weather, provide one for the
animals’ protection.
SOCIAL DOMINANCE
2-28. Horses (and mules) develop a social hierarchy or “pecking order.” All
animals in the herd respect this hierarchy. Fighting and injury prevails until
the hierarchy is established. Once the hierarchy is established, fighting
decreases. The hierarchy can change as new animals are introduced or as
dominant animals age or become debilitated.
2-29. Let the animals establish the hierarchy but manage it so as to minimize
the injuries as the hierarchy forms. Introducing new animals to the herd with
a wooden fence (or other similar barrier) separating them will help in
managing the herd. This method decreases the chances of kick and bite
injuries as subordinate animals try to escape.
2-30. The hierarchy can be very helpful if understood and used. The dominant
animals fight to be at the front of the pack line and fight to eat first. Identify
the dominant and subordinate animals and place them in the pack line
according to the hierarchy. Likewise, feed in order to reinforce the existing
hierarchy.
SANITATION
2-31. Sanitizing at the stables and in the field is a continuous process for
maintaining the health of animals and personnel. Stables and corrals must be
kept clean to reduce the breeding of flies, which is one of the most serious
sanitation problems that lead to disease and infection. The most effective
countermeasure to reduce flies is to reduce moisture and harborage. Good
drainage and the removal of wet or soiled bedding helps control moisture.
Eliminating areas favorable to fly breeding and hatching—that is, moist, dark
areas with organic material—controls fly harborage. Also brush out all feed
boxes daily and scrub them monthly. Individual watering buckets or troughs
are preferred. If this is not possible, drain and clean the water trough weekly.
Allow only animals belonging to the detachment to drink from these troughs.
Most importantly, ensure birds cannot defecate in them and rodents cannot
swim in them. Any animals suffering from a communicable disease should be
watered from a bucket that is thoroughly cleaned and disinfected after each
use.
2-8
FM 31-27
FEED AND WATER
2-32. The health, condition, and effectiveness of a pack animal directly relate
to the type and amount of food being consumed. The pack animal handler
determines the amount and types of food by the amount and type of work to
be performed. The working animal needs a diet containing more concentrates
than present in the diet of the idle animal to supply the fuel for energy and
the proteins and minerals for the replacement of tissue and maintenance of
condition. Personnel in the pack animal detachment need to have a basic
knowledge of feed grains and roughage, their characteristics, and their
geographical availability. This information is also critical for operational
planning.
FEED REQUIREMENTS
2-33. The body requires food for growth, repair of body tissue, and energy for
movement. The body also needs food to maintain temperature and energy for
such vital functions as circulation, respiration, and digestion. Protein from
feeds such as linseed meal, oats, and bran provide for body growth and repair
of tissue. Minerals from feeds such as grass, hay, bran, bone meal, and milk
are needed for healthy bones. Carbohydrates and fats from feed such as corn,
wheat, rye, and oats produce heat and energy or are stored as fat and sugar
as an energy food reserve. Bulk feeds such as hay, grass, bran, and oats are
necessary for digestion. There is no single food that contains all the required
nutrients; therefore, foods are combined to obtain the desired nutritional
value. Oats are the best grain feed for stabled animals. For animals on
pasture, natural grasses come closest to providing all required nutrients. The
nutritional value of feed is measured in terms of the amount and proportions
of digestible nutrients it supplies.
2-34. A ration is the feed allowed one animal for 24 hours, usually fed in two
portions, morning and evening. The components of a ration depend upon the
class and condition of the animals, the work being done, the variety of
available foods, the kind of shelter provided, the climate, and the season.
Feed must be selected and combined, proportionately, to form a balanced
ration that consists of proteins, carbohydrates, fats, minerals, and vitamins.
Pack animals cannot thrive on concentrated foods alone. They need both
forage and concentrates but the ratios need to be controlled as explained
below. Quantities of feed in one ration vary depending on the amount of idle
time the animals have, the work being performed, and the availability of the
feed. Insufficient feed—particularly bulky feed—causes loss of conditioning,
general weakness, and predisposes an animal to disease. Too much feed can
be wasteful and cause the animal to be overweight. An animal that is too
heavy will tire prematurely and suffer heat stress.
GUIDELINES FOR FEEDING
2-35. All pack animal handlers should adhere to specific principles for optimal
feeding. The following paragraphs explain each of these principles.
2-36. Feed to Maintain a Body Condition Score (BCS) of 5. Table 2-1, page
2-10, clarifies the differences seen with different BCSs. It is important for
2-9
FM 31-27
animals to maintain a BCS of 5 for several reasons. If animals are too thin,
they will—
• Be prone to saddle sores because the bones (especially the withers) will
protrude.
• Have less energy and be sluggish.
• Have less body reserve to sustain them if rations are inadvertently
unavailable.
• Be more susceptible to infections and contagious diseases.
2-37. Handlers must also be aware of the opposite effect. If animals become
too heavy, they will—
• Be wasting feed that may be needed later.
• Be predisposed to heat stress.
• Be predisposed to premature exhaustion.
• Cause their packs to not fit well.
Table 2-1. Horse’s Appearance Associated With Dietary Energy Intake
Body Score
Descriptions a,b,c
2—Very Thin
Animal emaciated; slight fat covers base of spinous processes; transverse
processes of lumbar vertebrae feel rounded; spinous processes, ribs, tailhead,
tuber coxae, and tuber ischii prominent; withers, shoulders, and neck structure
faintly discernible.
3—Thin
Fat buildup about halfway on spinous process; transverse process cannot be
felt; slight fat cover over ribs; spinous processes and ribs easily discernible,
tailhead prominent, but individual vertebra cannot be identified visually; tuber
coxae appear rounded but easily discernible; tuber ischii not distinguishable;
withers, shoulders, and neck not obviously thin.
4—Moderately
Slight ridge along back; faint outline of ribs discernible; tailhead prominence
Thin
depends on conformation, but fat can be felt around it; tuber coxae not
discernible; withers, shoulders, and neck not obviously thin.
5—Moderate
Back is flat (no crease or ridge); ribs not visually distinguishable but easily felt.
Fat around tailhead slightly spongy; withers appear rounded over spinous
process; shoulders and neck blend smoothly into body.
6—Moderately
May have slight crease down back; fat over ribs spongy, fat around tailhead soft;
Fleshy
fat beginning to be deposited along the side of withers, behind shoulder, and
along the side of the neck.
7—Fleshy
May have crease down back; individual ribs can be felt, but there is a noticeable
filling between ribs with fat; fat around tailhead soft; fat deposited along withers,
behind shoulders, and along the neck.
8—Fat
Crease down back; difficult to feel ribs; fat around tailhead very soft; area along
withers filled with fat; area behind shoulders filled with fat; noticeable thickening
of neck; fat deposited along inner thighs.
a A body condition score of 5 indicates the proper amount of dietary energy intake, 3 or less
indicates inadequate energy intake, and 7 or greater indicates excess energy intake.
b “Nutrient Requirements of Horses.” 5th ed., National Academy Press, Washington, DC, 1989.
c “Care and Feeding of the Horse.” Lon D. Lewis. 2d ed., Williams and Wilkins, 1996.
2-10

FM 31-27
2-38. Feed According to the Animal’s Feeding Weight (not necessarily current
weight). Dietary intake is best determined by adjusting the ration first to the
animal’s feeding weight. Although accurate scales may not be readily
available, the animal’s weight can be reasonably estimated by measuring
around the animal at the girth line. A tape measure is placed around the
thorax just behind the withers and follows underneath the animal in the
same manner as a cinch strap would. Measurements are taken following
respiratory expiration. (Hold the tape snug through several respiration cycles
and note the smallest number.)
2-39. This measurement is then converted to an estimated weight shown in
Table 2-2. If the animal is not at BCS 5 at the time of measurement, add or
subtract 200 pounds per BCS difference. For example, if the BCS was 3, add
400 pounds to the girth measured estimated weight to arrive at a new feeding
weight. This extra feed is needed to increase the animal’s body. If the BCS is
4, then add
200 pounds. Additional rations may need to be added for
compensatory weight gain.
Table 2-2. Estimating a Horse’s Weight From Girth Measurements a
Measure behind the withers and elbows. The measuring tape should course underneath the thorax
in the same location as the cinch strap would be placed.
Girth Length
Weight
Girth Length
Weight
(inches)
(lb)
(cm)
(kg/lb)
55
500
140
230/506
60
650
150
285/627
62
720
64
790
160
345/759
66
860
68
930
170
410/902
70
1,000
72
1,070
180
475/1,045
74
1,140
76
1,210
190
545/1,199
78
1,290
80
1,370
200
615/1,353
a “Care and Feeding of the Horse.” Lon D. Lewis. 2d ed., Williams and Wilkins, 1996.
2-40. Increase Feed for Work Over Maintenance Level. Animals should be fed
two rations: one for idle (not working) and one for working. The inactive
ration is calculated to maintain body condition but not to allow for increased
weight. Working animals need more nutrients: primarily energy but also
protein and other nutrients. The idle ration can be predominantly forage. A
small amount of grain is beneficial to ensure protein, amino acids, and trace
mineral requirements are met. The idle ration should be of low enough
energy content to preclude “typing-up” once they resume strenuous work. It is
2-11

FM 31-27
best to feed fat, grain with high fat content, or soluble carbohydrates if they
are accessible.
2-41. Working rations need to have increased amounts of high energy feed.
The animals need this increase for the following reasons:
• Working animals have less time to forage and rest if working long
hours. Even on optimal pastures, pack animals need 4 to 5 hours of
grazing to meet their nutritional requirement.
• Working animals have an increased demand for energy.
• Grain and oil are easier to transport than forages.
• Small amounts of grain or oiled grain can easily be fed in nosebags
(feedbags) during short halts.
2-42. Dietary components directly affect performance and onset of fatigue.
High fat diets often enhance aerobic and anaerobic performance and delay
fatigue. Fats or oil are preferred over either soluble carbohydrates or
proteins. Likewise, soluble carbohydrates are preferred over protein.
However, it is more difficult to balance the ration. Using regular grain is
simpler, but not as beneficial. Table 2-3 shows amounts of forage and grain to
feed for idle and working pack animals.
Table 2-3. Idle (Not Working) and Working Rations a
Feeding Weight
Forage
Grain
(lb)
(lb)
(lb)
800
14
7
1,000
15
10
1,200
16
13
Additional grain (or oil) increment for working is as follows:
One pound of high quality grain per hour worked up to a maximum of 40 percent grain in the
total ration. Over 40 percent will cause some animals to founder (lameness) or colic. Therefore,
if more energy is needed, add oil to the grain and forage (for example, vegetable oil, corn oil, soy
oil, or animal fat) in the diet. One pint of oil per 5 pounds of grain results in 20 percent added fat
in the grain.
Example: An 800-pound pack animal working for 8 hours would need an additional 80 ounces
(8 hours x 10 ounces) or 5 pounds.
a These are general guidelines that are suitable for most conditions. More precise rations can be
formulated using the references cited at the end of this field manual.
2-43. Feed Animals as Individuals. Some animals will require more feed for
the same work even though they may appear to be of similar size, age, and
temperament. The following are guidelines to feeding. These should only be
considered as a starting point. Rations will have to be adjusted for the
animal, weather, terrain, and altitude. In some cases as described below, the
ration may need to be increased 50 percent or even more.
2-44. Adjust as Needed to Maintain Ideal Body Weight. Once the animal
achieves a BCS of 5, the ration should be adjusted to maintain that BCS.
Animals should be taped around the girth line regularly to track changes in
2-12
FM 31-27
body weight. Most people are too subjective and variable in their visual
appraisals of weight and often will not detect weight change until the animal
gains or loses 100 pounds. The ration will also have to be adjusted for work,
weather, and altitude.
2-45. Adjust Rations to Cold Weather, Hot Humid Weather, and Very High
Altitude. Horses and mules with a long, thick hair coat can tolerate cold
weather well if they remain dry and out of the wind. The energy requirement
only increases about 1 percent for each degree Fahrenheit (F) below 18
degrees F. However, if they become wet and are subject to wind, the energy
requirement can increase 20 percent.
2-46. Hot humid weather can decrease the animal’s appetite. Therefore, it
may be necessary to increase the palatability by adding molasses to the grain
mix. It may also be necessary to feed a high-grain and low-forage diet. Very
high altitude can also decrease the animal’s appetite. Likewise, it may be
necessary to increase palatability of the ration.
2-47. Change Forages Slowly. Change forages gradually over
5 days. If
introduced to a new pasture, limit grazing to 1 hour the first day and increase
by 1 hour for the following 4 days. Feed hay before turning out to graze to
preclude overeating on new lush pastures.
TYPES OF RATIONS
2-48. There are three basic types of rations that can be used: the garrison
ration, the field ration, and the emergency ration. All three can be altered in
quantities and substance depending on conditioning and training taking
place, type and health of the animals, season, and combat situation. Table
2-4, page
2-14, shows a recommended allowance for garrison and field
rations.
Garrison Rations
2-49. It is used at permanent or semipermanent operational bases where the
pack animals are fairly idle. It contains a standard feed allowance of
approximately 10 pounds of grain (8 for mules), 14 pounds of hay, and 5
pounds of bedding. Again, this ration can be increased slightly depending on
the animal’s condition or the training taking place.
Field Rations
2-50. The detachment uses this ration while it is deployed so the pack
animals can maintain condition and strength during heavy work. The field
ration contains an allowance of about 12 pounds of grain (10 for mules), 14
pounds of hay, and no bedding. Such quantities and combinations of feed
could cause a logistic problem in a combat situation and may be altered. If the
situation permits, consider pre-positioning or caching the feed. Another way
to prevent having to carry all the feed is to consider aerial delivery.
Emergency Rations
2-51. The detachment uses this temporary ration for a short time when the
combat situation or environment prohibits the use of a field ration. An
emergency ration is a modification of a field ration for reasons such as logistic
2-13
FM 31-27
problems or the lack of forage in the operational area. Remember that this
ration can vary greatly depending on the situation. Small horses are classed
as those usually found in overseas areas. Light horses are those weighing less
than 1,150 pounds. Heavy horses are those weighing more than 1,150 pounds.
Table 2-4. Recommended Ration Allowances
Garrison Rations
Grain
Hay
Bedding (straw/sawdust)
(lb)
(lb)
(lb)
Horses
Small
7
14
5
Light
10
14
5
Heavy
12.5
15
5
Mules
8
14
5
Field Rations
Grain
Hay
Bedding (straw/sawdust)
(lb)
(lb)
(lb)
Horses
Small
9
14
None
Light
12
14
None
Heavy
14
16
None
Mules
10
14
None
NOTES: 1. Bran may be substituted in amounts not to exceed 3 pounds for a like amount of
grain. One-half pound of linseed meal may be substituted for 1 pound of grain.
2. The substitution of barley, rice, copra meal or any other local product can be made for the
grain ration.
3. The substitution of native grasses, bamboo shoots, or banana stalks can be made for the hay
ration.
4. Fifteen pounds of corn fodder or grain sorghum is considered the equivalent of 10 pounds of hay.
FEED COMPONENTS
2-52. Types of grains and hay or combinations of available grains and hay will
depend on the geographic location of the detachment. It is important,
however, to come as close as possible to meeting all the nutritional
requirements of the pack animals. Some of the grains, hay, and other items
that may constitute a ration are described below.
2-53. Oats are the safest and most commonly used of all grains for the pack
animal. Usually all other grains are combined with oats or regarded as
substitutes. Oats may be safely fed in quantities up to 10 pounds per day but
no more than 6 pounds when the animals are idle. Oats may be fed whole or
crushed; however, crushing ensures more thorough chewing and digestion.
Oats can be steamed or boiled for ill animals but new oats should not be fed
until a month after thrashing.
2-54. Corn is best combined with oats and hay for feeding during the colder
months since it has a tendency to produce heat and fat. Corn is best fed on
the cob, but the animals can be fed shelled corn if it is mixed with oats or
2-14
FM 31-27
bran. When feeding ear corn, 6 to 12 ears are recommended depending on the
amount of work being performed and the individual animal. If substituting
corn for oats, make the change gradually. Take care because corn is
considered a “hot” feed. That means it contains greater than 16 percent
protein. If the change is made too quickly or the animal is fed too much, it
could lead to colic or founder. Substitute about 2 pounds of corn for an equal
quantity of oats weekly.
2-55. Barley is used extensively in Asia, Southeast Asia, and parts of Europe.
It is considered a good grain and may be safely substituted for oats and fed in
the same quantities. The change from oats to barley should be made
gradually over an extended period, substituting 2 pounds of barley for an
equal amount of oats weekly. Barley is very hard and should be crushed or
soaked in water for 2 to 3 hours before feeding, but it may be fed whole.
Barley is a “hot” feed and the same care taken with corn must be taken with
barley.
2-56. Rye is not regarded as a very good feed for horses and mules. If other
feeds are scarce, it may be mixed with other feed such as oats or bran when
necessary. Rye is very hard and should be rolled or crushed before feeding.
2-57. Wheat alone is not a safe feed for horses. It should be rolled and
combined with a bulky grain or mixed with chaff or hay before feeding. One
or two pounds should be given at first and the amount gradually increased to
a maximum of 6 pounds per day.
2-58. Bran is the seed husk of grains such as wheat, rye, and oats, separated
from the flour by sifting. It is an excellent food for the pack animal. Bran,
having a mild laxative effect, is most useful as a supplement to a ration
consisting largely of grains. It helps in building bone and muscle, has no
tendency to fatten, and adds to the general tone and condition of animals. To
supply the desired laxative and tonic effect, add necessary bulk, and
stimulate more thorough chewing, feed about 2 pounds of dry bran mixed
with oats or other grain every day.
2-59. Rice—that is, rough rice, when rolled, crushed, or coarsely ground—may
be fed in quantities up to one-half the grain ration. In an emergency it may be
fed in quantities up to 8 pounds daily.
2-60. Grain sorghum has a general food value of slightly less than that of
corn. Feed the pack animal the same amount of grain sorghum as you would
feed corn and under the same circumstances. Grain sorghum is less fattening
than corn and has a higher protein content.
2-61. Salt is essential to the health and well-being of all animals. The pack
animal’s need for salt is greatly influenced by the amount and type of work he
is performing since a considerable amount is excreted in his sweat. A supply
of salt, adequate to replace that lost through sweating, is an important factor
in preventing heat exhaustion during hot weather. Salt (8 to 10 ounces per
day) should be available free choice in a salt block. Do not add more than 4
ounces to the daily grain ration. If animals sweat excessively, they will need
up to 12 ounces per day. Prolonged sweating depletes the body’s store of
potassium, which causes muscle weakness and early onset of fatigue.
Potassium can be replaced with “lite salt” that is one-half sodium chloride
2-15
FM 31-27
and one-half potassium chloride. Add 3 ounces “lite salt” per day in grain and
add molasses to increase palatability and bind the salt to the grain.
Otherwise, the salt will settle out of the grain as the animal eats. If salt
blocks are used, they should contain trace minerals. Trace minerals are
vitally important. Availability in forages and grains varies by region. Animals
must receive supplements of trace minerals unless the rations are analyzed
and guaranteed to be adequate. Trace minerals can be conveniently
supplemented by providing trace-mineralized salt, either as a loose form or in
block. The trace mineral mix should include zinc, manganese, iron, copper,
cobalt, and iodine as a minimum. If the region is deficient or marginally
variable in selenium, then it should also be added. Areas in which forages
contain excessive selenium (over 5 parts per million of the total ration),
including selenium in trace minerals, will cause both selenium poisoning and
impaired use of other trace minerals. Selenium poisoning causes abnormal
hair and hoof growth. The availability of a salt block eliminates the
requirement to add salt to the feed except when “lite salt” needs to be used to
counter potassium depletion.
2-62. Hay is the basic element of the ration that provides the bulk necessary
for the proper performance of the digestive system. The pack animal should
not be deprived of hay or something with similar bulk, such as straw, for any
considerable length of time. Animals will suffer more on a ration of grain
than on one of hay alone. Should the supply of hay normally required for the
daily rations be diminished, the animals should be grazed or fed such
roughage as can be gathered or produced locally. Oat straw is one of the best
substitutes for hay if the oat heads are still on it. Otherwise, it is not a good
substitute. Any straw, not spoiled, may be used, but barley and rye straw are
not recommended. Do NOT feed wet hay to the animals because it can cause
compaction in the intestines and may lead to colic. Do NOT feed moldy hay to
horses and mules; cows can eat it without suffering ill effects, but horses and
mules cannot. If bulky feed is unavailable, give the animals green or dried
weeds or leaves as substitute roughage. All hays, except for the legumes,
have nearly equal feeding values. Some of the more common hays are alfalfa,
timothy, prairie, and grain.
2-63. Alfalfa is a protein-rich roughage of high nutritive value that more
closely approximates that of grains than the common roughage. Alfalfa is an
excellent source of calcium and vitamins. Being high in protein, alfalfa
combines well with corn to create a laxative effect. When changing to a ration
containing alfalfa, do it gradually; give about 2 or 3 pounds daily. It should
compose not more than one-half of the hay allowance.
2-64. Timothy is usually considered the standard hay, although it is not
particularly rich in digestible nutrients. Timothy mixed with clover gives a
higher nutritive value and a better supply and balance of minerals and
vitamins. However, the clover content should not exceed 50 percent. This
mixture is common in areas where timothy is available, as timothy and clover
are frequently seeded together.
2-65. Prairie hay, or wild hay, is produced from the natural grass growing on
prairie land. Upland prairie hay, its feeding value being slightly higher than
timothy, makes an excellent hay when properly cured. Midland prairie hay,
2-16
FM 31-27
which is produced from coarser wild grasses growing on low land, is of lower
feeding value and is not considered desirable.
2-66. Grain hay is made from oats, wheat, and barley, cut before maturity,
and cured in the same manner as other hay. It has a nutrient value about
equal to that of timothy but is richer in protein. Care must be taken when
feeding grain hay because it may have high amounts of oats still in it.
GRAZING
2-67. Grazing alone can maintain idle animals satisfactorily. It provides good
feed and, moreover, provides exercise for the animals. As with any change in
feed components, grazing periods should increase gradually over 5 days to
condition the animal’s digestive system. For pack animals in the field, grazing
is an important source of roughage and should be used at every opportunity
to reduce the consumption of hay, which may be difficult to obtain or be of
questionable quality. Use of grazing also allows the detachment to carry less.
Grazing on wet or frosted alfalfa or clover should be avoided to prevent gas
colic. Except in an emergency, Johnson grass and grain sorghum should not
be grazed.
PELLET FEED
2-68. This type of feed has several advantages over conventional hay or grain
rations. Storage requirements are decreased, it is easily deliverable by air,
and nutritious by-products can be included. Total feed intake is usually
increased when pellets are fed. One disadvantage is that the cost is higher
than conventional feeding. Another disadvantage is the tendency of the
animals to begin wood chewing or tail biting, but this problem is avoided if
the animals are fed roughage in conjunction with the pellets. The contents of
a pelleted feed should be selected according to the type of roughage being fed.
Alfalfa, for example, provides more protein and calcium than grasses such as
timothy and orchard. Consequently, the protein and calcium content of the
pellet should be lower.
WATER
2-69. Drinking water as a feed component is of utmost importance. The
nutrients of the feed must be in a solution before they can be absorbed.
During work, sweating and other physiological functions greatly deplete the
water content of the body’s tissues. To compensate for this loss, the body
draws from the digestive tract. A deficiency of water in the digestive tract not
only affects digestion but may affect the general health of the animal by
causing such problems as colic and debility. An animal can survive for a
considerable time without food but succumbs in a few days if deprived of
water.
FEEDING IN GARRISON
2-70. The times of feeding and watering while in the operational base or rear
area should be fixed and regular. Feeding and watering, both as to time and
amount, are based on the training, conditioning, and work being performed.
2-17
FM 31-27
WATERING THE ANIMALS
2-71. It is important to offer the animals water and give them plenty of time
to drink before feeding time. Normally, a pack animal requires about 8
gallons of water per day. However, the temperature and amount of work
being performed will determine water requirements. The animals should be
watered three times per day under normal conditions and four times per day
when operating in an extremely warm climate. Under ideal conditions, water
should be available to the animals at all times when they are not being used.
Feed should not be distributed while the animals are being watered because
they will not water properly when they have feed available. If the animal
drinks immediately after feeding, the food in the stomach only partially
mixes with the gastric juices, causing digestion to be incomplete. The flow of
water through the stomach then washes a considerable portion of the
stomach contents into the bowels. A loss of nourishment and indigestion or
colic may result. Water may be given approximately one hour after feeding.
QUANTITY AND FREQUENCY OF FEEDING
2-72. The stomach of the horse and mule is small and is unable to function
properly while holding large quantities of food. Once the stomach is two-
thirds full, the feed will pass through the stomach at the rate it is taken into
the mouth. Therefore, the stomach functions properly when it is two-thirds
full. If the animal is fed too much at one time, the stomach may become
excessively distended and feed will be wasted by not being properly digested.
A feed of three to four pounds of grain represents the approximate amount an
average animal should be fed at a single meal. This feeding may be followed
by a long and slow consumption of hay. Under these conditions the gradual
passage of food into the intestines then takes place under favorable
conditions. If the total amount of grain is increased, it is better to increase the
number of feeds rather than to increase the size of the ration at each meal.
WORKING AFTER FEEDING
2-73. Working an animal hard after a full feed interferes with its ability to
work and with its ability to digest the feed properly. The animal’s ability to
work is hampered by difficulty in breathing, which is caused by the swelling
of the stomach and bowels against the diaphragm and lungs. Digestion is also
accompanied by an increased flow of blood and secretions and increased
muscular activity in the bowels. Hard work diverts blood to other parts of the
body, tires the intestinal muscles, and reduces secretions needed to aid
digestion. As a result, the animal suffers a loss of nourishment from the feed,
may develop serious disorders of the digestive tract, and may die. The
animals may be worked safely one hour after feeding.
FEEDING AFTER WORKING
2-74. The digestive organs of a tired animal are just as fatigued as the rest of
the body. Therefore, a tired animal should not be fed a full ration. Most of the
blood supply is still in the muscles, the muscles of the digestive tract are
tired, and the glands used to secrete digestive fluids are not ready to function
properly. The animal must be cooled and rested before feeding. Give the
animal small amounts of water at frequent intervals and permit him to eat
2-18
FM 31-27
long hay. After about 30 minutes of rest, give him a small portion of grain
followed by the balance, a little at a time, after an hour or more. Failure to
take these precautions frequently results in colic, laminitis (lameness caused
by swelling of the feet), or both. The method of feeding just mentioned is time
consuming. If it is not possible to use that method, feed the animals once
after waiting 1 to 2 hours after work.
FEEDING PROCEDURES
2-75. Feeding a small amount of hay before feeding grain stimulates an
increased flow of saliva and gastric juices, takes the edge off the appetite, and
quiets the nervous animal. In the morning, it is not necessary to feed hay first
because the animal has probably been eating hay all night. An ideal way to
feed hay is to keep it before the animal continuously by replenishing the
supply frequently with small quantities. Feeding chaff with the grain adds
bulk and forces the animal to eat more slowly, ensuring more thorough
mastication.
FEEDING IN THE FIELD
2-76. Feeding pack animals away from garrison in a field or combat
environment presents problems that are not present in garrison. The greatest
problem is setting a regular schedule of feeding times. The hours that
animals work in the field or under combat conditions are seldom the same
every day. Therefore, to adhere to the principles outlined above, the animals
must be fed smaller rations at more frequent intervals. It is very important to
ensure every animal is fed a full ration every day to maintain the strength
required to work in the field.
2-77. Due to logistic constraints, there may not be enough hay available to
ensure the animal receives the required roughage. In this case, the animal
must be allowed to graze at every opportunity to obtain sufficient roughage.
Grazing should be allowed while at a bivouac location and at halts while on
the march. A halt of an hour or more to feed grain should be planned if the
duration of the movement will exceed 5 hours. Important points to consider
when feeding in the field are covered below.
WATERING ON THE MARCH
2-78. Watering on the march should be done whenever possible, especially on
hot days. When watering a string of animals on the move, such as at a stream
crossing, allow the entire string to get in the water before letting any of the
animals drink. Otherwise, the lead animals will drink and then try to move
down the trail before the rest of the animals in the string have had a chance
to drink. Watch to ensure all animals have had the opportunity to drink
before moving the string. Angle the string upstream so the animals ahead do
not foul the water. Give the animals ample opportunity to drink their fill and
not be led away the first time they raise their heads. After watering, keep the
animals at a walk for 10 to 15 minutes before increasing the gait or coming to
a long halt. This action will prevent digestive disturbances.
2-19
FM 31-27
FEEDING HALTS
2-79. Try to plan the place for a feeding halt 2 or 3 miles past a watering
point. Give the animals a little hay after arriving at the feeding point and
tying them to the high line. This procedure will help relax the animals and
start the secretion of the gastric fluids.
FEEDING AT BIVOUAC
2-80. When it is necessary to feed and water at a bivouac location, wait at
least 45 minutes after arrival to water the animals. Remove the bits if a full
watering will be allowed. When watering at the bivouac location, an
individual should lead the animals to the water on foot. A person should lead
no more than two animals at a time. When they drink, he should stand
between the animals so they do not crowd each other. As stated before, the
animals should receive ample time to drink and should not be led away from
the water the first time they raise their heads. The animals should go to the
water and leave the water together. Watch that the animals do not start
pawing the water or lie down in it after being watered, as they often do.
These actions will stir sediment on the bottom and make the water unfit to
drink by other animals.
FEEDING OFF THE GROUND
2-81. Whenever possible keep animals from feeding off the ground. As they
eat off the ground they pick up dirt and sand. The sand or dirt will
accumulate in the colon. With time the animals will develop colic due to
obstruction or they will develop diarrhea due to irritation. Feeding off the
ground also causes premature wear of their teeth. For animals that are
predisposed to forming sharp points and hooks, this will accelerate their
development and subsequently degrade the animal’s ability to eat.
WATER SHORTAGES
2-82. When water is scarce, its consumption will have to be regulated. If the
bits are removed, animals can drink from a very shallow container. A small
quantity will let an animal keep moving if you give the water by the swallow
instead of allowing him to take one long draft.
FEEDING HAY
2-83. When the animals are on a high line, break the hay from the bales and
distribute it along the high line. Feed the hay in small quantities and
replenish it frequently. This procedure is especially important in damp
climates or while it is raining. If the rain is expected to be continuous over a
long period of time, it is best not to feed hay at all. Feeding damp hay will
cause serious colic in the animal, and moldy hay should never be given. As
mentioned before, cattle can eat moldy hay without problems, but horses and
mules cannot. Wait until the rain is finished. Break the bales of hay apart
and distribute only as needed. Personnel should ensure the animals do not
work the hay beneath them where they cannot get to it.
2-20
FM 31-27
FEEDING GRAIN
2-84. When feeding grain in the field, feed the animals from a feedbag and
ensure the feedbags fit properly. If they are too loose, the animals will toss
their heads trying to get to the feed and grain will be spilled and wasted.
Watch the animals while they are feeding from a feedbag, and never allow
them access to water until they have finished eating and the feedbags are
removed. While attempting to drink, they could get the feedbag filled with
water and drown. To conserve feed, spread any feed left in the feedbags on a
cloth to dry. The feed can then be used for the next feed. Grain should not be
spread on the ground for the animals to eat. When the animals eat it, they
also ingest dirt, which can lead to colic. Any grain spilled on the ground in
front of the animals should be swept.
CARE OF FORAGE
2-85. The care of forage is extremely important to the health of the herd.
Feeding damp or moldy hay can cause colic and could disable a large portion
of the herd at once. Inspect the forage at the time of delivery to ensure the
quality of it. In garrison, shelters are available to keep the forage dry. In the
field, make every attempt to keep it dry. When the feed is packed on animals
for transportation, cover it with a manta. This precaution will protect the feed
from the elements and keep the animals from getting into it during the
movement. During temporary storage, raise the forage off the ground by
timbers (or whatever else is available) and cover it to keep it from getting wet
and keep loose or stray animals from getting into it.
2-21
Chapter 3
Animal Care and Training
The proper care and training of pack animals is essential to the health of
the animals and their performance in the field. Without proper care, the
animal’s health and the unit’s ability to complete its mission will suffer.
Without proper training, the unit cannot rely upon the animal to behave
in a manner that ensures mission accomplishment.
GROOMING
3-1. Grooming is essential to the general health, condition, and appearance
of animals. It also provides an excellent time to inspect them for injuries.
When grooming before movement, check the animals for injuries. Also, check
the condition of past injuries, if any, at this time. When grooming after
movement, check the animals for injuries sustained on the trail and for any
evidence the saddle or harness may have chafed the animal. These
precautions permit treatment of any problems before they get to the point of
incapacitating the animal. The value of grooming depends on how thorough
the handler does it. The animal handler obtains efficient grooming when he
takes pride in the appearance of his animals.
WHEN TO GROOM
3-2. The animal handler should groom every animal thoroughly at least once
each day. Always groom an animal before leaving the stable area for work or
exercise. Before saddling the animal, be sure the areas where the saddle pad,
cinch, breast collar/strap, quarter straps, and britching ride are free of dirt
and foreign objects. Failure to clean these areas will result in sores and could
cause the animal to be unusable. On return from work or exercise, remove,
clean, and put away any equipment. Cool a heated, wet, or sweating animal
before grooming it. Give it a brisk rubbing with a cloth to partially dry the
coat, then blanket the animal (if a blanket is not available, leave the saddle
pad on) and walk it until it is cool. Check for injuries that may have occurred
during movement.
EQUIPMENT
3-3. Each individual responsible for the care of animals should have a
grooming kit. The basic kit consists of a currycomb, horse or body brush, hoof
pick, and a grooming cloth (Figure 3-1, page 3-2).
Currycomb
3-4. The handler can use this circular metal device with sawtooth-like edges
to remove caked mud, to loosen matted or dried skin and dirt in the hair, and
to clean the body brush while grooming. He should never use it on the legs
below the knees or hocks and never use it about the head.
3-1

FM 31-27
Figure 3-1. Grooming Kit
Horse or Body Brush
3-5. This brush is the main tool used in grooming. When used properly, the
bristles of the brush penetrate through the hair of the coat and remove dirt
and flaked skin from the hide as well as from the hair. Various brushes are
available. Generally, it is better to use a stiffer bristle to better penetrate the
hair on the coat.
Hoof Pick
3-6. Hooves should be cleaned daily and trimmed or reshod every 4 to 6
weeks. This small metal pick allows the handler to clean rocks and packed
dirt from the hooves. Always use the hoof pick in a downward motion toward
the toe.
Grooming Cloth
3-7. The handler uses the grooming cloth to clean the body orifices and to
give a final polish to the coat. He can make a grooming cloth, about 2 feet
square, from old toweling or any other type of soft cloth.
GROOMING SEQUENCE
3-8. A prescribed sequence of grooming will enable the animal handler to
groom effectively and thoroughly. The following paragraphs explain the
recommended sequence.
3-2
FM 31-27
3-9. Check the animal for any signs of lameness as you walk it to the
grooming area. If any exist, thoroughly clean the hoof of the affected leg with
the hoof pick and look for rocks or other debris causing the problem. Clean
each hoof every day in working animals. One school of thought is that the
soft dirt and debris packed in the hoof gives the animal extra cushion to walk
on in rough terrain. Whether cleaned daily or not, the handler should check
the animal’s feet for thrush, torn frog, loose or missing shoes, and cracks.
Report defects at once to the medic or veterinarian.
3-10. Take the currycomb in the right hand and the brush in the left. Go over
the left side of the animal with the currycomb beginning at the neck.
Continue down to the breast, withers, shoulders, foreleg and knee; then
smoothly transition to the back, side, belly, croup, and hind leg to the hock.
Strike the currycomb frequently against the heel or side of the brush to free
the accumulated dirt and dried skin. Ensure the currycomb follows the
natural lay of the hair.
3-11. Brush the entire left side of the animal in the same order as above
except brush the legs down to the hoofs. After a few strokes, clean the brush
with the currycomb. In using the brush, stand well away from the animal,
keeping your arm stiff, and throw the weight of your body behind the brush.
A twist of the wrist at the end of each stroke will flick the dirt away from the
hair. Ensure the brush follows the natural lay of the hair. This use of the
brush is not necessarily a separate activity from currying; you can do both at
the same time with a brush stroke following each currycomb stroke. Pass to
the right side of the animal, change hands with the brush and currycomb,
and groom the right side in the same order as above.
3-12. Brush head, mane, and tail. In cleaning the mane and tail, begin
brushing at the ends of the hair and gradually to the roots, separating the
locks with your fingers to remove dried skin and dirt. Wipe eyes, nostrils, and
lips and rub the head, ears, and muzzle with the grooming cloth. Clean the
dock (fleshy part of the tail) and give a final polish to the coat.
NOTE: As a precaution against the spread of skin diseases, wash grooming
equipment and drying cloths with soap and water once a week.
ANIMAL INSPECTION
3-13. Inspect the animals, as indicated above, while grooming them. Good
grooming offers the opportunity for close examination of the animal and the
discovery of injuries or defects that otherwise might pass unnoticed.
Correcting or treating these defects or injuries greatly reduces the number of
noneffective animals in a unit. Along with wounds or other injuries present,
there are others that are not immediately visible to the naked eye. For
example, the animal handler can detect some joint and ligament injuries by
inflammation or swelling. These injuries are often very slight and subtle, and
the handler can best detect them by knowing precisely what is normal. The
only method to establish your experience base is to run your hands along the
pack animal’s body daily with particular attention to the legs. If the animal
flinches as you get to the area just to the rear of where the saddle rides, it is a
sign that its kidneys are sore. This pain might result from poor saddle
placement or improper riding position.
3-3
FM 31-27
WARNING
Under no circumstances will an untrained soldier
attempt to shoe an animal. Improper shoeing or quicking
of an animal will result in long-term damage to animal
and soldier alike.
GROOMING SICK ANIMALS
3-14. Do not groom animals that are sick, weak, or depressed. They should be
hand-rubbed at least once a day. Wipe their eyes and nostrils out with a
damp sponge or soft cloth and clean their feet. Leave this cloth near the
animal. Do not place near other animals’ equipment or feed and do NOT use
it on any other animal. Groom animals with minor ailments in the usual
manner. Do not clean or disturb animals with tetanus in any manner at all.
FARRIER SCIENCE
3-15. While not farriers, individuals must be able to replace, at least, a loose
or missing shoe when they are not available. The usefulness of a pack animal
depends on the health and condition of its feet. The use of a “hoof boot”
should be the first course of action when an animal loses a shoe. This item is
part of the Pack Animal First Aid Kit. The feet of a normal animal, due to
their structure, require very little care or protection while on free pasture or
even under light working conditions. At moderate work levels on good footing,
an animal may require no more than cleaning and periodic rasping to trim
and level its feet. The hind feet need only moderate care since they receive
less shock. The front feet carry 60 to 65 percent of the load. As the workload
increases or the terrain becomes more difficult, the animal’s feet require
additional care and protection. Shoeing protects the feet from excessive wear
and enhances balance, support, and traction.
BASIC SHOEING
3-16. Hoof growth, shoe wear, and the work required of the animal governs
the frequency of shoeing. On the average, shoes may remain on the animal
without change or adjustment for 1 to 2 months, though 3 to 4 months wear is
occasionally possible. A farrier does the routine refitting. However, all
handlers should have a basic understanding of the shoeing process, and
several in each unit should be able to replace or refit a lost or outgrown shoe.
FARRIER TOOLS
3-17. A farrier’s kit should contain pincers, a pritchel, clinch cutter, hoof
knife, hoof nipper, hoof rasp, blacksmith and driving hammers, clincher,
fencing pliers, and assorted shoes and nails (Figure 3-2, page 3-5).
RAISING AND HOLDING THE FOOT
3-18. It is important to know the proper way to raise and hold an animal’s
foot before doing any farrier work so that you can control the animal and
3-4
FM 31-27
have both hands free to work. Working with the front and hind legs is slightly
different. The following paragraphs explain each procedure.
Pincers
Used to remove the shoe from the hoof, cut off excess length of clinches, or
remove improperly driven nails.
Pritchel
Used to enlarge the nail holes on shoes or to assist in extracting reusable
nails from shoes.
Clinch Cutter
Used to cut or straighten the nail clinch before removing the shoe. The
handler uses the blade end for that purpose. He can use the other end as a
pritchel.
Hoof Knife
Used for cutting excess horn from the sole of the hoof and for trimming the
frog, if necessary. It is available in right- and left-handed models.
Hoof Nipper
Used to remove the excess growth of wall from the hoof when preparing to
replace or refit a shoe.
Hoof Rasp
Used to remove excess hoof wall and to level the bottom surface of the
hoof. The rough rasp is a hoof rasp that has become dulled. The handler
can use it to remove the burr under the clinches and to smooth the clinch
after the shoe has been replaced. He can also use the rough rasp to file
away the clinches when removing a shoe.
Blacksmith
Used to shape the shoes to the animal’s feet.
Hammer
Driving Hammer
Used for driving the nails that secure the shoe to the hoof and for forming
the clinches.
Clincher
Useful in finishing the clinches, especially when working on young or lame
horses that object to having their feet struck with the hammer.
Fencing Pliers
Have several uses in the kit. They can be used as a hammer or for cutting
nails and many other functions in caring for animals’ feet. Can also be used
to repair saddles and harnesses.
Figure 3-2. Farrier Tools
Front Foot
3-19. To raise a front foot, face the rear and place the hand nearest the
animal on its withers and talk to it. Run your hand down the animal’s
shoulder and leg to the tendon in the back of the leg just above the hoof.
Grasp the tendon between your thumb and forefinger and squeeze slightly.
3-20. Allow time for the animal to lift his foot, then slip your hand around and
lower on the leg until you are cradling the hoof in the palm of your hand.
Move closer to the animal and pass his foot behind your knee nearest the
animal and into your other hand, which has been passed between your legs to
receive it. To free both your hands for work, press your legs together with the
sides of the hoof just above the knees.
3-21. Do not raise the animal’s foot too high or too far away from his body.
Stand with a pigeon-toed stance, bend your legs, and keep your back straight.
This posture will free you to work with both hands. While you are working on
the animal’s leg, you should be very aware of things around you so that you
3-5
FM 31-27
can predict the intentions of the animal. Unless suddenly frightened, an
animal is quite predictable about wanting his feet on the ground. When an
animal is getting a little tired and wants the front leg down, he will test your
grasp of his leg with a few jerks. If he is going to hop on his other foot to get
away, he will invariably move forward slightly with both hind feet in
preparation for this move.
3-22. The farrier should not let an animal take his leg away every time he
wants it. Be considerate of the animal, but do not let the animal be the boss.
The animal will soon get the idea that he can set his foot down as he sees fit,
which can be dangerous.
Hind Foot
3-23. To raise a hind foot, face the rear, place your closer hand on the
animal’s withers and stroke it across the back to the hip, then down the hip
and leg to the fetlock. Grasp the fetlock with your fingers. Draw the leg
toward you. The animal will shift his weight and pick up his foot.
3-24. With one fluid motion, slide into position by moving toward the raised
leg and put the leg in your lap. Your leg (the one nearest the animal) presses
against the inside surface of the fetlock joint, your outer leg holds the other
side of the fetlock. Lock the hind leg into position by placing your arm over
the hock. Adjust the hind leg and yourself so that the back of the leg is firmly
in your armpit. The animal will not be able to pull free. If the animal
struggles and tries to kick, release your hold as the animal attempts to kick
backwards. By letting go, you have time to move to the side before the animal
can pull back and kick you. If you release as the animal is pulling the leg
towards his head, you will not have enough time to move.
3-25. An animal will indicate when he wants his hind leg down. He will “cock”
his leg by drawing it forward and upward toward his stomach, as if to
“cowkick.” If he does not cock his leg, he cannot kick with any force.
SHOE REMOVAL
3-26. To replace a shoe that has not come off the animal, you must follow a
specific sequence to correctly remove the old or damaged shoe.
3-27. Look at the hoof approximately 1/2 to 5/8 of an inch from the shoe. You
should see where the nails holding the shoe have come out of the hoof and are
bent over or clinched. Using the clinch cutter and driving hammer, cut or
straighten the clinches of the nails holding the shoe in place. Place the blade
end of the clinch cutter under the nail point and tap the other end with the
driving hammer. You can also use the rough rasp to accomplish the same
thing by filing down the clinches. Ensure the clinches are completely gone by
straightening or filing. Failure to do so will hinder removal of the shoe or
crack the outer hoof wall. This outcome will require a custom shoe with
displaced nail holes. Driving a nail in the same location will likely “quick” the
animal and make it lame.
3-28. Pull the shoe by wedging the cutting edges of the pincers between the
shoe and hoof at the heel and then exert a quick thrust toward the toe.
Repeat the procedure, alternating from one side of the shoe to the other,
3-6
FM 31-27
progressing toward the toe until the shoe is removed. Once you remove the
shoe, check to see if all the nails came out with the shoe. If they did not, check
the hoof to see if any nails remain. Remove any remaining nails with the
pincers.
HOOF PREPARATION
3-29. Using the hoof pick (found in the grooming kit), thoroughly clean dirt
and debris from the hoof. Then pare away the dead horn over the white line
with the hoof knife. Do not touch the frog unless you cannot insert a hoof pick
between the bars of the frog. In such a case, narrow the frog slightly, but try
not to involve the surface touching the ground. Be careful not to remove too
much of the frog. The frog must be touching the ground and bearing weight.
Lack of pressure on the frog will lead to contraction of the heels. Level the
foot with the rasp. Use long, smooth strokes from heel to toe. Be careful not to
use too much rasp pressure when passing over the heel. You can always take
off a little more heel later, but you cannot replace what has been removed. Do
not expose live horn except over the white line and the outer border of the
sole; the animal needs a covering of dead horn to protect the sensitive sole
against bruising. Be sure to leave the bars intact as cutting away these
structures can cause contraction of the heels and quarters. Sight across the
hoof to see that the surface is flat.
SOFT SHOES OR HARD SHOES
3-30. Regular metal horseshoes throw off a lot of sparks as the animals walk
over rocky ground. These can easily be seen from a distance at night and may
compromise location and activity. Additionally, these sparks can start fires if
the tender is very dry. “Nonsparking” horseshoes made of softer metal or
special hard plastic shoes avoid these problems, but do wear out faster.
SHOE REPLACEMENT
3-31. Fit the shoe to the hoof by holding it so that you can see the white line
through the nail holes. See that the shoe lays flat on the hoof surface without
rocking. Eliminate any wobble between the shoe and hoof by rasping the high
spot on the hoof. You may have to bend or shape the shoe as needed since it
may have become deformed if it was worn loose for a time. Do not worry
about the excess hoof wall in front of the toe of the shoe. You will rasp the
excess away later in the shoeing process.
3-32. Before driving nails, position the shoe over the hoof and make
absolutely sure all nail holes are outside the white line. The white line
measures approximately 1 mm wide and forms the juncture between the
fleshy sensitive lamella (attached to the bone inside the hoof) and the hard
insensitive lamella (attached to the hoof wall). Driving a nail into the white
line can make the pack animal lame.
3-33. Secure the shoe to the hoof with nails and the driving hammer. You
should slightly bend the horseshoe nails near the point so that they will turn
out of the hoof when pounded into it. The other side of the nail is flat. Always
place the flat side of the nail so that it faces the outer edge of the hoof. You
can be sure the nail is facing the right way by looking at its head; there is
3-7
FM 31-27
checkering on one side of the nail head. The checkering should always face
the inside of the hoof. Grasp the nail between your thumb and forefinger and
make sure the flat side of the nail faces the outer surface of the hoof. Place
the point of the first nail through the third nail hole on one side of the shoe,
pointing parallel to the horn fibers of the hoof. Tap the nail lightly several
times to start it into the hoof wall.
3-34. To force the point of the nail through the outer surface of the wall at the
desired spot, continue to apply light blows until the nail is driven
approximately two-thirds of the required distance. You should then apply one
sharp heavy blow on the head of the nail to force the point through the wall.
The bevel on the point of the nail is effective only when driven rapidly
through the horn. If the animal twitches or jerks away at any time during the
nailing, pull the nail and check for moisture or blood on it. The nail should
exit approximately 3/4 of an inch above the ground surface of the foot to
sufficiently hold the shoe. If there are old nail holes in the wall, the new nails
should emerge at least 3/8 of an inch from the old holes. This length puts the
new nails in hoof fibers strong enough to properly hold the nail. After the
point emerges and you drive the nail head solidly into the crease of the shoe,
immediately remove the point of the nail. Do this quickly to avoid serious
injury to you should the animal decide to pull his leg away suddenly. To
remove the point of the nail, point the claws of the hammer toward the toe of
the hoof. Place the claws onto the nail point as deep as possible and close to
the hoof wall, bend the nail straight out from the wall, and rotate the
hammer. This procedure will “wring” off the point and excess length of the
nail. Repeat the process with the same hole on the opposite side of the shoe.
3-35. After you drive in two nails, check the shoe to ensure it still fits
properly. You can adjust the fit by tapping lightly with the hammer to move
it into place. Then put the remaining nails in the shoe. You may find it easier
to “start” the first nail on each side of the shoe before driving either of them
all of the way. “Set” the nails by striking the heads sharply with the driving
hammer. Make sure you hold a solid metal object (such as the flat side of the
pincers) firmly against the end of the nail that protrudes through the hoof
when you strike. Some farriers think that the order in which you set the
clinches is very important. The recommended sequence is to set the two nails
nearest the toe on the opposite side, then the quarter and heel nail on the
first side, followed by the remaining heel nail. Cut off the nail points with the
pincers. Leave enough length for a proper clinch. The clinch should be
approximately 1/8 of an inch long. A clinch that is too long can cause the wall
to break should the shoe become caught on something and pulled off. The
wall fibers of the hoof will break when the nail emerges. Remove the
resulting burr under the seated clinch with the file side of the rough rasp. Be
careful to file away only the burr. Do not file a deep groove around the hoof;
make it just large enough to contain the clinch. Use the clincher to bend the
clinches down into the groove.
3-36. Once again, take the pincers and the hammer to finish forming the
clinch. Hold the pincer jaws against the head of the nail and strike the end of
the nail to seat it even with the wall surface. You should bend the nail
abruptly at the hoof wall. Ensure the hammer travels parallel and as close to
the hoof wall as possible. You can use the clincher for this step if one is
3-8
FM 31-27
available. The clinches are now finished. Using the file side of the rough rasp,
smooth the nails leaving no sharp edges on the wall of the hoof. Rasp and
shape the hoof to the shape of the shoe. Most of this rasping will take place in
the area of the toe and anterior quarter. Be careful not to rasp too much and
rasp away the clinches.
FARRIER’S OBJECTIVE
3-37. The shoeing process will become clearer when it has been demonstrated.
Remember, the intent of this section is only to enable you to replace a loose or
missing shoe. If possible, you should fit each animal with an extra front and
hind shoe. These shoes, their nails, extra nails, and farrier tools should be
part of the standard equipment packed whenever you take the animals out.
The best way to prevent losing shoes is to catch them early. Check them
frequently by tapping them with a hoof pick. Shoes that are loosening will
often sound different. The frequency to check them depends on the terrain.
Loose shoes may not be lost from a pastured animal for several days.
However, loose shoes in rocky terrain can be lost in a few hours. If a shoe
becomes loose on the trail, remove it if possible, to avoid its loss or injury to
the animal. It would be ideal to replace lost or loosened shoes immediately, in
garrison or on the trail. However, there will be times in the field when it is
impossible to replace a shoe before 2 or more days have elapsed. This delay is
typical and may have little or no adverse results. If this situation occurs,
reduce the load of the pack animal or have a rider spend more time walking
than riding his mount if it is a riding animal. Finally, there are the urethane
“spare tires.” Animal handlers can use them as temporary replacements to
shoes, to add traction, or to soak an injured hoof. They are commonly known
as “easy boots.”
FIELD TRAINING
3-38. A pack animal detachment will not always be able to work with animals
that are trained and conditioned to pack. Even if the animals are trained to
pack, they may need retraining or conditioning. In such cases, you need to
know some of the basics of training and conditioning animals. This section
should give you enough information to evaluate the level of their training and
to train and condition them as necessary for pack operations.
TRAINERS
3-39. The attitude of personnel training pack animals is extremely important.
A person assigned to train animals must have a better than average
knowledge of animals. He must also have patience, tact, firmness, and a
liking and aptitude for animal management. Experienced and knowledgeable
trainers seldom need much in the way of restraint. They work confidently,
orderly, and efficiently around the animals. As a result, the animals are
cooperative, more productive, and sustain few injuries. Inexperienced
trainers tend to use more restraint then necessary; are less confident and
orderly; and consequently less efficient. Likewise, the animals buck more, are
less productive, and sustain more injuries. A person who is afraid of animals
or who will become frustrated easily with them will not do well. Above all, the
trainer must not take out his frustrations on the animal by beating, kicking,
3-9
FM 31-27
or using excessive restraint on the animal. A good animal trainer combines
an intelligent respect for animals with a lack of fear. An ideal pack animal
trainer will be—
• Systematic.
• Patient.
• Tactful and resourceful.
• Moderate.
• Observant.
• Exacting.
• Logical.
• Tenacious.
• Consistent.
REQUIREMENTS
3-40. Previous experience and current abilities will determine the training
needs of animals. Along with their physical conditioning, trainers must
evaluate the animals on their level of proficiency in leading; packing; riding;
picketing; standing; gaiting; swimming; balance; and conditioning to the
sights, sounds, and smells of battle. Untrained animals never used for pack
purposes will require a complete training and conditioning program.
EXERCISE AND CONDITIONING
3-41. An animal requires good conditioning to perform the work demanded of
it without injury to its body and muscular organs. You can acquire and
maintain good conditioning through a progressive program of proper exercise
and feeding. Objectives of the program are endurance, stamina, a good state
of flesh, and resistance to disease. You can attain these objectives only by
proper feeding and long periods of conditioning work at the slower gaits,
mostly the walk. You must condition both pack and riding animals to carry
the weights required in field operations.
3-42. Exercise must be regular, graduated, and always within the capabilities
of the animal. Working tired or unfit animals can cause accidents. If an
animal is idle for a considerable time, you must repeat its process of
conditioning. The minimum period of exercise necessary to maintain an
animal in working condition is 2 hours daily. Animals need not be maintained
in peak condition for field duty at all times. However, they should remain in
such condition that a relatively short period of carefully scheduled work will
put them in fit condition for anticipated duty. The kind and amount of
exercise given to animals depend on the type of work they are to perform,
their current condition, and the number of individuals available to exercise
them. Although the most satisfactory exercise is gained by assigning one or
two animals to an individual, pack units
(with limited manpower) will
normally have to adopt other methods. Begin any period of exercise with 10
to 15 minutes of walking to ensure good circulation, particularly in the feet.
Instead of hard surface roads, try to select dirt roads for exercise because
they are easier on the animals’ feet and legs. Also, work the animals on trails
or cross-country to maintain their fit condition. If you are exercising two
3-10
FM 31-27
animals, try to always ride one out and the other in and lead each alternately
on his right and left. This habit will get the animals used to both being led
and ridden. End each exercise period with a 10-minute walk to return the
animals to the stables dry and breathing normally. The walk is the prime
conditioning gait. Walking develops muscle, trotting improves balance, and
galloping develops wind. If you use either of the faster gaits in excess, the
animal will lose rather than gain condition. Determine the length of trot
periods by the condition of the animals, but in no case exceed 7 minutes. Vary
the routes for exercise from day to day so that the animals will not recognize
the route and try to hurry back to the stables. Also use different routes to
relieve monotony. Try to set up the training and conditioning program
according to the amount of time available and the level of proficiency of the
animals and handlers.
PROGRAM DEVELOPMENT
3-43. At the beginning of training, animals may be in poor physical condition
and unaccustomed to hard work. To properly condition animals, yet avoid
injury, ensure operations are long in duration but mild in character.
According to the training principles mentioned above, each animal should
receive advanced training that includes gentling, leading, riding, standing,
packing, gaiting, swimming, and seasoning to battle conditions. Use actual
field movements, progressive in length, throughout the training period to
build up endurance. Conduct a part of such field movements and other phases
of training at night to prepare the animals for night operations. Pay close
attention to the animals during night training to determine if any are night
blind. If so, supplement the diet with Vitamin A. Personnel who train animals
should know how to use restraining devices for controlling animals. Such
devices include the twitch, cross tie, and blinds. Exercise great care, however,
when using such devices. It is best to use the mildest and least dangerous
method of restraint necessary to achieve the desired results. Remember,
kindness, perseverance, and tact oftentimes will accomplish the desired
purpose without using restraint.
Restraining Animals
3-44. Many ingenious devices have been developed over the years for
restraining animals. Some have proven useful and humane and have helped
to quiet and train animals. Others, while they temporarily quiet and subdue
the animal, make his attitude worse than it was originally. Once you use
these methods on an animal, he will get to the point where he is neither
gentle nor likely to carry a load. He will start showing many bad habits, such
as bucking off the pack load. Remember, use restraints only when needed and
use the least amount of restraint needed.
3-45. Blinding. This method is the easiest way to restrain an animal. Make
sure to tie the animal securely to a tree or post. Then take a piece of cloth (a
gunnysack or jacket) or anything else that can be placed over the eyes and tie
it around the back of the animal’s head. When blinded, an animal will seldom
try to move because he will not be able to see. Once the animal responds to
the restraint, vary the amount and use the least amount of restraint
necessary. Reward good behavior. By responding with less restraint to the
3-11

FM 31-27
animal when he behaves correctly, you will gain his trust and respect. He in
turn will be more productive and easier to manage.
NOTE: Under no circumstances should you move an animal, no matter how
slightly, while it is blinded.
3-46. Twitches. Animal handlers use twitches because they are the handiest
and most common method of restraint. As it shuts off circulation in the lip,
never use it continuously for an extended time and never with greater force
than is necessary. Make a twitch by running a small piece of rope or chain
through a hole in the end of a rounded piece of wood 2 to 5 feet long, such as a
pick handle, and tie it in a short loop (Figure 3-3). Pass the loop of the twitch
over the upper lip, which you seize by your hand and draw forward, taking
care to turn the edges of the lip in to prevent injury to the mucous
membranes. Tighten so the twisting points up over the outside of the upper
lip. If the twitch is twisted down towards the end of the upper lip, it will
easily slide off as the animal shakes its head or pulls away. Then tighten the
loop by twisting the stick until you obtain sufficient pressure. Light changes
in pressure with increases against resistance and decreases as the reward for
obedience will help keep the animal’s mind off the reason for the restraint
and reduce the need for severity. These changes also help in training him to
be more controllable. You should seldom use the twitch as a restraint while
saddling or packing animals. Use the twitch mostly when restraining for
medical treatment or shoeing.
CAUTION
Any long handle twitch can be very dangerous. If the
animal is successful in pulling free, the twitch becomes a
high velocity, high energy object that can fly 50 meters or
more. Fractious horses and mules can eventually pull
these twitches free from even the strongest and most
determined handler. Other twitches are safer. One is the
pincher style that can be clipped to the handler.
Figure 3-3. Twitch
3-12

FM 31-27
3-47. Handlers also use another type of twitch made from a 16-inch piece of
cord, such as parachute cord, and a horseshoe. Tie the cord with a square
knot to form a continuous loop. Then twist it and fold to form two smaller
double loops. Place the double loops over the upper lip in the same manner as
a long-handle twitch. Insert one quarter of the horseshoe into the loop so that
the cord will tighten against the side (quarter) of the horseshoe. Turn the
horseshoe to tighten the loops in the same manner as tightening a tourniquet
with a stick. Tighten so the twisting points up over the outside of the upper
lip. If the twitch is twisted down towards the end of the upper lip, it will
easily slide off as the animal shakes its head. Insert the opposite quarter of
the horseshoe into the ring on the halter. If this twitch is applied properly, it
will not come off as the horse or mule pulls back and shakes his head. If he
tries, let him. After a few failing attempts, he will cease fighting and you can
proceed.
3-48. Cross Tie. Trainers often use the cross tie as a mild form of restraint. It
consists of securing the animal’s head in a normal raised position by two tie
ropes extending from the ring in the halter to opposite sides of the stall or
between two trees (Figure 3-4). When properly adjusted, you may use the
cross tie to your advantage while grooming, saddling, or doing any work
around the animal. It also prevents an animal from chewing a wound and
from lying down when you need him standing.
Figure 3-4. Cross Tie
3-13
FM 31-27
3-49. Distractions. Often a distraction rather than a restraint will enable the
handler to accomplish what task needs to be completed. Three forms of
distraction are as follows:
• Rubbing the lower eyelid.
• Tapping over the nasal sinuses.
• Hand twitches to the point of the shoulder.
3-50. Merely rubbing the lower eyelid with your index finger will distract the
animal while completing short procedures. Place the palm of the hand on the
side of the face. Keep the palm of the hand next to the face so that the hand
will move as the head moves. Failure to maintain contact with the palm
against the face will often result in inadvertently touching the eye as the
animal moves its head. Rub the lower eyelid with light to moderate pressure,
but ensure the index finger does not slip into the eye. Lightly tapping over
the nasal sinuses will also distract the animal enough to complete short
procedures. Tap the fingers over the nasal sinuses with light to moderate
pressure.
3-51. Other Restraints. Trainers use additional types of restraints when
treating an animal whose condition is such that complete immobilization of
the part to be treated is required. They use these methods only under normal
conditions. Giving tranquilizers makes the more severe restraints
unnecessary and reduces the danger to the animal from abuse at the hands of
the ignorant or inexperienced. Other restraints include the—
• Side stick.
• Muzzle.
• Knee strap.
• Casting rope.
• Side line.
• Running “W” (Both front legs are restricted by rope and can be pulled
out from under the horse. Should only be done on soft ground to
prevent injuring the horse’s knees).
Calming an Animal
3-52. Fear is one of the animal’s strongest instincts. If fear is allowed to
remain a dominant instinct, the animal cannot be trained satisfactorily to do
the work demanded of him. The goal of the trainer throughout the training
period should be to gain and maintain the confidence of the animal. Horses
and mules have a remarkable memory and tend to remember the unpleasant
experiences longer than the pleasant ones. Retraining thus becomes more
difficult than initial training, especially with a young, impressionable animal.
Rewards for accomplishment are extremely valuable in the gentling process.
Patting the neck, rubbing the head, and hand-feeding are good aids in
gaining the confidence of the animal. The unwarranted use of whips,
switches, or other devices to inflict pain or restraint should not be allowed in
training. A willing, confident animal will work to the extent of his physical
ability while the scared, reluctant animal will expend less productive energy
than his trainer.
3-14
FM 31-27
Catching an Animal
3-53. The most convenient method of catching loose stock is by just walking
up to the animal either in a corral or in the field. However, first, you must
have gained his trust. Only through love and kindness to the animal will you
gain his trust and respect for your presence at his neck. Once you start to
catch a loose animal, do not give up just because he walks off or spooks. Do
not leave him to go to another animal. If you are not firm, you will soon have
an animal that is impossible to catch without either roping or cornering him
in a corral. You will have taught him to avoid you by letting him go at the
first sign of resistance. Maintain eye-to-eye contact while you are trying to
catch a loose animal. The animal often communicates his intentions through
his eyes. Also, watch the animal’s ears. If they point backwards or cock to one
side, you do not have the animal’s complete attention and you must have it to
catch him. He must respect you above all animals in the immediate area. The
head of an animal being caught is not always the first thing a person should
touch. Often the middle of the neck or the back area is the best area. Rubbing
the animal about the withers and back will enable you to step in close to him
and then hook your arm over his neck. Some animals will try to pull away
from you at this point. If he pulls away from you more than once, slip the
halter rope over his neck when you start to scratch or fondle him. You will
then have a loop to hold him. When he starts to move away, stop him firmly.
Immediately reward the animal for his obedience with a few reassuring pats
and caresses. Do not knock him around for responding to the halter rope
around his neck. If you do, the next time you want to catch this animal, you
may not be able to get near him. Last, but not least, a little grain in a bucket
or feed bag will usually let you catch most animals that are used to being
grained. If they get used to being grained immediately after being caught,
their anticipation of the grain will make them very easy to catch. Having an
apple or carrot to give them after catching them is another way to ensure
their cooperation, but be sure to always give it to them. Never tease them
with a treat just to coax them into getting close enough to catch, then not give
it to them. As mentioned before, horses and mules, especially mules, have
good memories and will not forget such an insult.
Breaking to Picket
3-54. Picket breaking is an important thing to teach animals to ensure
against halter pulling. If you picket-break an animal before attempting to
saddle or pack him, the impression of secure fastening will never leave him.
He will feel that any strain put on the halter or halter shank is useless.
Trainers have used the following method for picket breaking successfully for
many years. It saves time and labor, since the animal does most of the work,
and seldom has to be repeated. Catch the animal and put a strong halter with
a large halter ring around his neck. Get a good, strong, soft rope, 1 inch or
more in diameter. Run one end through the halter ring and tie a fairly snug
bowline around the animal’s neck. Tie the other end securely to the middle of
a smoothly trimmed log approximately
12 inches in diameter and
approximately 20 feet long. Place the log in the middle of a smooth, open
piece of ground where the animal will not be able to become entangled with
anything except the above-mentioned equipment. If no logs are available, use
something like a large truck or tractor tire. The animal may pull, tug, and
3-15
FM 31-27
jerk on the log and try everything he can think of to get away from the log but
without success and without harm to himself. Soon the animal will learn that
it cannot go anywhere and that a halter and rope mean escape is impossible.
Training to Stand
3-55. You should teach an animal to stand still when the lead rope is hanging.
Trainers call this kind of restraint a “ground hitch.” Breaking to a ground
hitch will prevent an animal from straying or running away if he comes loose
from the pack string. One way to train an animal to stand with the lead rope
hanging down is to run the lead rope through a ring attached to a spike in the
ground. Place a set of hobbles on the animal and run the lead rope through
the ring and then tie it to the hobbles. When the animal tries to move, he will
not be able. He soon learns he should stand still when the lead rope is
hanging. During this period, be sure to observe the animal from a distance to
ensure no harm comes to the animal.
Leading
3-56. You must teach all animals to lead. First teach them to lead next to a
dismounted packer. Then teach them to lead alongside well-broken animals.
Leading should be at the walk, as daily exercise, until the new animals lead
quietly and have improved sufficiently in condition to allow them to start
their instruction under saddle.
Riding
3-57. You should break all animals to riding and ride with regularity during
training before initial work under the pack. Since the mouths of young or
untrained animals are tender, you should not use bits during the initial
riding periods. Attach the reins to the halter or use a hackamore (a bridle
with a loop capable of being tightened about the nose in place of a bit).
Packing
3-58. After the animal has been ridden for about 10 days, you can mount a
packsaddle on him. For the first few days, do not load the packsaddle. Ensure
the animal is thoroughly familiar with the method of saddling and
unsaddling. Also make sure he stands quietly while packers are working
before you place any load on the saddle.
3-59. Training under load should be progressive. Initial loads should be light,
single-side loads such as sacks of oats. Do not attempt to condition the animal
for top loads until he is completely conditioned for full side loads. When the
animal is comfortable with this weight, add top loads to the side loads.
Gradually increase the load from day to day until the animal is carrying his
full payload of from 200 to 250 pounds. After you train the animal to stand,
train him to stand while being saddled and packed. If at first he does not
stand quietly, you may need to use the blind. As mentioned before, the blind
is an exceptional aid and you should only use it when the animal clearly
indicates the need. Never move an animal a single step while blinded.
3-16
FM 31-27
Gaiting
3-60. Animals individually led by dismounted drivers maintain a rate of
march of from 3 1/2 to 4 miles per hour and seldom move at a gait faster than
a walk. Those led by mounted drivers may be required to take any gait
demanded by the situation. The walk and amble are the most satisfactory
gaits for mules. The animals can maintain the walk for long periods at 4
miles per hour (a natural gait for the animal) and tend to disturb the load
less than at any other gait. The amble is an acquired gait, easily acquired by
the mule, that increases the rate of march to slightly over 5 miles per hour.
This gait is also easy on the load and hitches and, due to the increased rate of
march, is favored over the walk on fairly level going. Trainers teach the
amble to pack mules by increasing the rate of march gradually during the
training period. In hurrying to keep up to the column, mules will first break
into the amble for a few steps. These periods at the amble will gradually
increase until they become confirmed in this gait.
Swimming
3-61. Trainers must teach pack animals to swim boldly and freely. Although
they are naturally good swimmers, some animals are initially afraid of the
water and will resist entering it. When they do go into the water, such
animals fight their environment and swim very poorly. Introduce the animals
to the water quietly, coax them to wade through shallow water at first, and
then lead them into increasing depths gradually until they must swim.
Known good swimmers should accompany the green swimmers during this
phase of training to give confidence to the novices.
Battle Indoctrination
3-62. Trainers should try to mentally condition their pack animals to as many
of the sights, sounds, and smells of combat as possible. Once the animals
become accustomed to these sensations, you can feel assured about their
docility and good conduct in the field. Trainers must conduct this mental
conditioning or battle indoctrination, so that animals will not associate the
sight, sounds, or smells with harm or pain to themselves. Following are some
tips:
• Conduct a portion of the training in marching, packing, and unpacking
close to motor parks. The animal will then be subjected to the—
Sounds of motors being started and warmed up.
Pounding of metal on metal and an occasional backfire.
Smells of exhaust fumes and raw fuel.
Sight of many types of vehicles, both moving and at rest.
• Lead the animals as close to active firing ranges as safety will allow,
near rail yards and crossings, and in areas near operating airfields.
These areas get them used to loud, sharp sounds and the sight of flying
aircraft. Another way to accustom the animal to gunfire is to crack a
bullwhip near it.
3-17
FM 31-27
• Place cans containing pebbles, boxes of tin cans, or other noisy cargo on
the loads so that creaks, rattles, and unusual noises generated on the
load will not “spook” the animal.
• Subject the animals to such odors as iodine, ether, smoke, gasoline,
disintegrating flesh, and rotting vegetation.
Training for Balance
3-63. Units normally use pack animals when crossing over terrain that is
impassable by any type of motor vehicle. Traversing such ground requires a
well-developed sense of balance. The mule naturally has a fine sense of
balance. However, saddle and load will interfere with his natural balance
unless he has some training under load over difficult terrain and learns to
adjust to the actions of this dead weight on his back. Train the animal on
terrain that is as similar as possible to the terrain in the operational area.
Make him cross extremely narrow bridges, fallen trees, and ditches. Work
him on steep, narrow trails, corduroy roads, over swamps and boggy areas,
and along rocky slopes where you must select safe footing among loose stones.
Trainers should use judgment in handling pack animals on difficult terrain,
and they should avoid interfering with their natural balance. The mule, if left
to himself, usually shows better judgment than the average handler.
Therefore, let the mule pick his way through the very difficult terrain.
3-18
Chapter 4
Animal Health Management
Evaluation of the general state of any animal’s health is an ongoing
process accomplished through daily observation of behavior and routine
examination of specific areas of the animal’s anatomy. A rudimentary
understanding of anatomy and physiology, a few simple examination
techniques, and a familiarity with the behavioral patterns of the healthy
animal form the foundation of veterinary science. Aided by materials
contained in the basic first aid kit, handlers can treat pack animals
suffering from minor injury or disease.
ANIMAL BEHAVIOR
4-1. Animals exhibit behavior indicative of emotion and well-being. They
express anger, fear, and boredom with characteristic mannerisms. So, too, do
they express pain and disability. Regardless of the individual personality
traits developed by each animal, general behavioral patterns are common to
the species and are useful as tools to evaluate physical status.
HEALTHY ANIMAL BEHAVIOR
4-2. The behavior a well animal exhibits is the benchmark. The handler
must become familiar with its behavior patterns and be alert to changes in
emotional or physical well-being. The healthy animal looks and acts well,
reflecting mannerisms associated with humans. Emotions run the full
spectrum from sadness to happiness. Behavior patterns become especially
apparent when animals are observed in groups.
4-3. An animal shows its happiness by an initial dropping of the head,
followed by lifting the muzzle in a circular manner. The upper lip may curl
displaying the teeth in a classic “horse smile.” Prancing and lifting the tail
usually accompanies this behavior. The well animal, pleased with its
activities, may also prance with its ears pointed forward, nostrils flared, tail
up, and neck arched with head pointed down.
4-4. Intense absorption: nose, eyes, and ears all intently focused on the item
or surroundings indicates curiosity. Even the stance brings the body into
line. The animal will sway its head to better see an object directly to the
front.
4-5. Circling, pawing or stamping, head shaking, and sideward dancing
characterizes frustration. As frustration continues, the animal’s activity
results in sweating and unruliness. This behavior also typifies nervousness.
4-1
FM 31-27
SICK ANIMAL BEHAVIOR
4-6. The sick animal, whether its illness is emotional or physical in nature,
exhibits behavior indicative of its condition. An unhappy animal that is
otherwise healthy will bring illness on itself. Conversely, a sick animal will
exhibit mannerisms that aid in early awareness of injury and disease.
4-7. Signs of intense interest characterize fright. The animal will shift its
head from side-to-side, allowing better vision. It holds its head high and
makes audible sniffing sounds. Dancing and shying, often in a circular
motion, shivering, and tail swishing accompany increasing nervousness. Its
ears will be mobile, seeking the source of threat when it is unapparent. As
anxiety increases, profuse sweating occurs. The animal will attempt to flee
and, if restrained, may buck and kick. Under extreme conditions, its eyes will
roll, showing the whites. Ultimately, the animal becomes terror-stricken. At
this point it will scream and, if loose, will attempt to run through any
obstruction until it collapses in shock.
4-8. A more common problem is boredom. Unchecked, it leads to behavioral
problems that will remain a part of its personality. Chewing on wood such as
stall doors
(cribbing), drawing air into its stomach
(wind sucking), and
rocking side-to-side (weaving) are common traits adopted by a bored animal.
4-9. A horse demonstrates irritation by laying back its ears and swishing or
lashing its tail, often exaggerated on one side. The animal will tense its front
or hindquarters and lift a hoof in preparation for kicking. It can glare
threateningly and bite or kick with surprising swiftness and ferocity.
4-10. Pain elicits reaction according to location (internal or external) and
severity. With mild pain (fly bites, chafing, or early arthritis) and hoof pain
(such as a pebble caught in the shoe), the animal will shrug, shiver, or kick in
an effort to dislodge or soothe the area. It may flick its tail and nip at the
afflicted area as a means of removing the irritant. Overall activity is fairly
continuous, be it biting and bumping against an object or head tossing in
distraction. Head shaking and ear twitching may also represent a head injury
or uncomfortable bit.
4-11. An internal injury may exist when the animal shows signs of
generalized listlessness, melancholia, increased distraction, and flagging
(pointing the head) towards the affected side. The animal may lay its ears
back and nip or rub its side. It lifts its hind legs alternately and hunches its
abdomen in attempts to relieve the discomfort. Vocalizations such as groans
are common. If pain continues, such as colic pain, the groaning deepens and
the animal will bite itself on the side and roll on the ground, worsening the
condition.
4-12. Shifting its weight to the unaffected side and limping or refusing to
move indicates leg pain. The animal will also “point” or extend the affected
leg to try to relax it. The head will bob or swing to the side in an effort to
bring the afflicted side forward.
4-13. Signs of illness may include a dulling of the coat, decrease in appetite,
or such obvious symptoms as discharges from the eyes or nose, running sores,
or diarrhea. The animal will carry its head down and show a blankness in its
eyes. The legs tend to splay outward while standing and the ears point
4-2
FM 31-27
outward in a splayed fashion also. Progressive illness leads to increased
severity in symptoms. Leg splaying, head drooping, eye and coat dullness,
fever, shivering, sweating, swaying, and staggering are all manifested to
varying degrees.
OVERALL BEHAVIOR PATTERNS
4-14. Through examination of healthy animals and familiarity with their
behavior in natural surroundings, handlers gain early recognition of the sick
or injured animal. Neglecting small changes in behavior, coupled with
ignorance of common maladies, may result in delay of movement or loss of an
animal. Although each species demonstrates specific, unique patterns, all
animals of this type display similar behavior patterns.
PHYSICAL EXAMINATION
4-15. The physical examination of an animal proceeds in the same overall
manner as any physical exam. Certain precautions and allowances for the
animal’s natural fears and curiosity must be exercised. The examiner should
enlist help in controlling the animal and constantly remain alert for signs of
bolting, biting, and kicking. He should never assume a position between an
animal and a fixed object. By leaning or shying sideways or forward, the
animal can pin and injure the examiner or helper.
4-16. Examine the animal when it is quiet and rested. Excitement and heavy
exertion will drastically alter the animal’s temperature, respiration, and
pulse. When the physical examination is combined with routine grooming,
the animal will receive it with more cooperation. Also, during every rest
period and bivouac, examine every animal briefly for common maladies.
4-17. Follow an orderly sequence during each examination to preclude
overlooking any area. Ask the handler to comment on the animal’s feeding
habits, bowel and bladder habits, general demeanor, and any cough or
discharges. The handler should be aware of these areas. Record results of
physical examinations in chart form. Include immunizations and maintain an
extract version with the animal for future reference.
EQUIPMENT
4-18. A general examination may be performed without the use of any
medical equipment. However, when available, use the following items:
• Stopwatch.
• Veterinary rectal thermometer.
• Petroleum jelly or substitute.
• Stethoscope.
• Penlight or ophthalmoscope.
• Equine dental float (file).
• Rubber gloves.
• Several pieces of cloth or gauze.
• Twitch or hobbles for uncooperative animals.
4-3
FM 31-27
ROUTINE
4-19. Begin the examination with an overall look at the animal, noting
general demeanor, carriage, and gait. When unfamiliar with the particular
animal, ask the handler about changes in diet and elimination. Also, ask
about problems encountered during previous examinations, such as biting or
kicking, medical conditions, and injuries. Then examine specific areas of the
animal. Many examiners refer to the head, ears, eyes, nose, and throat as
HEENT.
Head
4-20. Look for signs of chafe from the halter such as lesions and areas of hair
loss. Note how the animal carries its head and if it shakes or rubs it.
Encephalitis or concussion and distemper
(lockjaw) are detectable by
confusion and loss of coordination.
Ears
4-21. Examine the ears gently because they are sensitive. Look for halter
chafe, lesions (external and internal), and discharge. Note how the animal
carries its ears and watch to see if it shakes its head or rubs its ears. Ear
mites, ear flies, and ticks are the main problems encountered.
Eyes
4-22. Perform the eye examination in two parts. First, do an overall
examination of the eye, its orbit, and the lids with available light. Check for
lesions, foreign matter, and discharges. Note the color of the conjunctiva and
the “third eyelid,” a whitish membrane that closes to cleanse the eye of
particles. Communicable eye infections, biting flies, and gnats pose the main
problems. Occasionally, lesions
(tumors) will grow on the inner eyelid,
requiring surgery. When an animal exhibits photosensitivity by squinting or
partially closing an eye, it may be suffering from conjunctivitis or other
problems, such as snow blindness. Next, using a light source such as a
flashlight, ophthalmoscope, or candle and working in shade, examine the
cornea. Shining the light from an angle, look for opacities and surface
irregularities. Shining the light from the front, observe the quality and clarity
of the reflected image in the eye. There is a fairly high incidence of cataracts,
especially among older animals.
Nose
4-23. The nostrils are sensitive and may be moist or dry, according to the
environment. Nasal discharge presents a draining moistness, which increases
in profusion when the animal’s head is down as in grazing. Discharge is
usually accompanied by noise, such as snorting or sneezing, and licking or
rubbing to clean the lip and nostrils. Sores are minimal unless inflicted by
branches or the lead rope. Animals recovering from pneumonia, strangles, or
milder respiratory infections may develop sinus infections. These infections
are characterized by drainage, which increases when the head is down. Tap
lightly with a knuckle on the bone just below each eye. Pain will be elicited in
an animal with infection.
4-4
FM 31-27
Throat
4-24. This examination includes the mouth, lips, gums, teeth, and tongue.
The lips may contain splinters or pieces of burrs. Check for areas of abrasion
around the mouth where the coat is rubbed away. Such abrasions may
indicate an ill-fitting halter or bit. Deformities, such as cleft lip or palate,
should be noted during the animal conformation check. Examine the teeth for
uneven wear, which occurs naturally but is also a common sign of cribbing
(gnawing). Normal wear causes uneven, sharp slopes of the molars, whereas
cribbing causes uneven wear on the incisors. Check the inner edges of the
lower molars (lingual) and the tongue. When the molars become sharp, the
tongue is often ulcerated by contact. Examine the outer edges (buccal) of the
upper teeth. Sharp edges here will ulcerate the inner cheek. In either case,
use a tooth float (rasp) to smooth the sharp surfaces. Speckling or spotting of
the tongue and redness are signs of infection or nephritis (an inflammation of
the kidneys). Other lesions of the tongue or cheeks are generally tumorous in
nature.
Neck and Mane
4-25. Examine the neck and mane for lesions and signs of chafe from contact
with tack items. Ticks and mites are frequent in this area because the animal
has difficulty dislodging them. Lymph glands are located in this region and
become enlarged from inflammation. Inflammation is somewhat difficult to
detect in the glands except in the case of strangles. Take the pulse using the
artery that runs along either side of the throat. The pulse will vary with a
rate of 36 to 40 beats a minute being normal at rest and a rate of 80 to 100
beats a minute being normal after exertion, especially at higher elevations.
Blood samples can be taken easily from the veins in the neck, and the large
muscles supporting each side of the neck are good injection sites.
Chest and Shoulders
4-26. Examine the chest and shoulders primarily for lesions caused by foliage
and saddle rigging. Note the carriage, which is the distribution of the weight
on the forelegs. Step back and record the respirations by observing the rise
and fall of the chest from the side. The animal must be rested and
acclimatized. Normal rates will vary according to species and altitude. The
normal rate of respiration at sea level is 8 to 16 breaths a minute. After
exertion, a rate of 30 to 40 breaths a minute is normal. An animal that coughs
or has noisy or staggered breathing requires an examination of the chest
(lung fields) with a stethoscope. Listen for gurgling, grating or rustling, or an
absence of sound.
Flanks and Abdomen
4-27. The flanks and abdomen receive the heaviest amount of wear from the
saddle and the associated rigging and loads. Thoroughly examine for signs of
chafe and loss of hair. A lesion in this area will rapidly become worse and
possibly become infected without early management. Cysts and boils will
require lancing and antibiotic dressings. Relief from further irritation is
essential. Do not put an ulcerated area back under blanket or harness until it
is fully healed and showing hair regrowth. An animal exhibits internal pain,
such as colic, the same way a human does with drawing-up and obvious
attention to the afflicted region. Be sure you know the animal’s recent history
4-5
FM 31-27
of appetite and thirst. Loss of appetite is a sure sign of disorder or malady.
When colic is suspected, use a stethoscope to examine the abdominal region
(if colic is present, there will be an absence of normal stomach noises) and
supplement with a rectal exam.
Forelegs and Hooves
4-28. Examine the forelegs and hooves by lifting the lower leg rearward.
Support the leg in one hand and examine the leg from sole upward. Pay
particular attention to the entire hoof and each joint of the leg. To examine
the hoof, you may need a hoof pick or similar device to clean the sole prior to
examination. Become familiar with the section on specific injuries common to
the legs and hooves found later in this chapter. Also, study the chapter on
conformation to increase awareness of specific hoof and bone deformities.
Hind Legs
4-29. The hind legs are best examined from slightly to the side, never directly
to the rear. Lift the leg rearward and examine the hoof. Return the hoof to
the ground and examine the leg from the bottom up. Pulling the tail down
and to the side will encourage the animal to stand with both hooves firmly on
the ground. Injuries and conformation problems are less common than on the
forelegs.
Temperature
4-30. While holding the tail down and to the side, take a rectal temperature
ensuring the thermometer is well-inserted and remains in place for three
minutes. Normal temperature for a horse is 99 to 101 degrees F (100 to 101.5
degrees F for a mule).
OVERALL OBJECTIVES
4-31. Grooming is an essential part of animal care. The daily grooming period
is the ideal time to perform a routine examination, excluding temperature,
pulse and respiration. These are checked only when illness is suspected.
Early detection and correction of problems, such as chafe, is essential in the
prevention of more serious disorders and possible loss of the animal. Never
overestimate the durability of the animal. A mule is more durable than a
horse. However, all animals are vulnerable to a wide variety of problems
caused by both the environment and infection passed from animal to animal.
Despite great size and strength, these animals are among the most
susceptible to injury and disease. Constant vigilance must be exercised to
maintain health and effectiveness of animals during sustained operations.
FIRST AID SUPPLIES
4-32. A basic first aid set should be carried specifically for use on the animals
because standard bandages are too small for most purposes. Place supplies in
a weatherproof container in sufficient quantity to care for 10 percent of the
animals. As with all critical items, duplication is suggested.
4-33. Figure 4-1, page 4-7, lists the minimum supplies and equipment needed
for treatment of a wounded animal. They include dressing changes since
4-6
FM 31-27
bandaging supplies (tape, cotton, gauze) will be expended rapidly and will
require restocking or supplementing.
4-34. The examiner should include and apply heavyweight sutures with the
same considerations as in humans. More sophisticated procedures require
additional supplies. In most instances, the same equipment carried for
treatment of humans is applicable to treatment of animals. Antibiotics and
steroidal anti-inflammatory medicines are a notable exception. With these
agents, it is either sensitivity to the drug or altered prescribing principles
that pose the exception. A veterinarian must approve all medications prior to
their inclusion in the kit. Because replenishment of veterinary supplies may
be difficult, you should include possible substitute or expedient materials,
resupplies, and caches in mission planning.
ITEM
QUANTITY
ITEM
QUANTITY
Absorbine Thrush Remedy
1 pt btl
(ODVWLF %DQGDJH Ý [
yds)
10 rolls
Absorbine Vet Liniment
1 pt btl
*DX]H 3DG Ý [ Ý nonsterile)
1 pkg/w100
Betadine Solution
1 pt btl
9HW :UDS Ý [ yds)
6 rolls
Betadine Surgical Scrub
1 pt btl
Gloves, Latex, Surgical (med)
4 pr
Bigeloil
1 pt btl
Gloves, Rubber (med)
1 pr
Blu-Kote
2 ea, 4 oz pump btl Penlight, Examination
2 ea
Clear Eyes
1 ea, 3.5 oz btl
Razor, Safety w/Blades
1 ea
Corona Ointment
1 ea, 14 oz btl
Stethoscope
1 ea
Fungisan
1 ea, 12 oz btl
Thermometer, Vet Max Registering
1 ea w/case
Isopropyl Alcohol
2 ea, 1 pt btl
Bandage, Scissors (5.5Ý
1 pr
Lubricating Jelly (KY)
1 ea, 8 oz tube
Blade, Scalpel (#2800)
6 ea
Phisoderm
1 ea, 5 oz btl
Clamp, Surgical (#97-436)
2 pr
Pine Tar
1 qt can
'UHVVLQJ )RUFHSV Ý
1 ea
Cotton, Roll
1 ea, 1 lb roll
Handle, Scalpel
1 ea
Cotton/Wood Swabs
250 ea
Scissors, Surgical (#PA55-364)
2 pr
Conforming Gauze Bandage
Tissue Forceps, Aillis (#16-6)
1 ea
Ý[
yds)
12 rolls
Adhesive Tape, Surgical
Conforming Gauze Bandage
Ý[
yds)
2 rolls
Ý[
yds)
2 rolls
Figure 4-1. Supplies and Equipment Needed to Treat a Wounded Animal
FIRST AID TREATMENT
4-35. In the administration of first aid, most principles of care directly
parallel treatment of humans; the major difference being in anatomical
structure. Ethics will play a lesser role in treatment in the field. The decision
to attempt radical procedures to save an animal or just destroy one that could
have been saved under normal circumstances will more likely be made.
Otherwise, the time involved for an animal to recover from lameness or the
debilitation that occurs as a result of a serious injury could hamper the unit’s
ability to accomplish its mission.
4-7
FM 31-27
OPEN WOUNDS
4-36. Bleeding, infection, and tissue loss are the main concerns in wounds
resulting from external trauma. Give particular attention to any open wound
on the hoof or hind leg. These wounds pose the highest threat of
contamination and subsequent infection from bacteria contained in feces.
Horses and mules are very susceptible to tetanus. Supplement treatment of
open wounds, especially punctures, with a tetanus booster.
LACERATIONS
4-37. These wounds, caused by a tearing of the skin, usually result in slight to
moderate bleeding. The vessels contract and limit the flow of blood to the
affected area. Inspect the injury to determine the severity, depth of
penetration, and degree of damage to underlying structures. Clean with soap
and water to remove all foreign material. When the wound is small and the
edges will remain closed, apply an antibiotic ointment and cover with a clean
dressing. Close larger wounds, and those where the edges gape open, with
suture or butterfly bandages. Apply antibiotic ointment and a clean dressing.
Keep the area dry and change the dressing daily.
INCISIONS
4-38. Incised wounds tend to bleed freely. The first priority is to STOP THE
BLEEDING. The examiner should use direct pressure, pressure dressings,
tourniquets, and ligation with the same indications and precautions as on
humans. Circulation to the lower leg is mainly superficial. Consequently, use
a tourniquet only when absolutely necessary and release it every 15 minutes.
Ligation should be accomplished as soon as practical to restore circulation to
the limb. When the wound is dirty, place a constricting band above it to
reduce bleeding and quickly, but thoroughly, clean the wound before closing
it with a dressing. Use sutures to close large or gaping incisions. When
available, give a tetanus booster.
PUNCTURE WOUNDS
4-39. The causative agent may remain in the wound or be withdrawn. In all
cases, the first step is to STOP THE BLEEDING. Evaluate the severity of
the wound and continue to control the bleeding. Puncture wounds are either
low or high velocity. Low velocity wounds impact only on the actual tissue
penetrated and tend to bleed freely. High velocity wounds impact on the
actual tissue penetrated and impart a shock wave into surrounding tissue.
This concussion tends to cause contraction of ruptured vessels, temporarily
reducing the immediate blood loss. Packing the wound with gauze will aid in
stopping blood loss when done in conjunction with standard pressure
dressings. Impaled objects can also aid in stopping blood loss and may be left
in place for a short period after being trimmed off flush and supported with a
dressing. However, if the object impedes joint function, it must be removed.
Do not put a topical antibiotic into a puncture wound; such an action causes
systemic absorption of a topical medicine. Clean and dress the wound.
Administer a tetanus booster, if available, especially in cases where
punctures could allow direct access of pathogens into the bloodstream.
4-8
FM 31-27
4-40. Animal handlers should follow specific steps when dressing wounds.
The procedure for applying routine dressings is as follows:
• Inspect the wound and take appropriate measures to stop the bleeding.
• Cleanse the wound and surrounding area with clean, warm water and
a nonirritating antibacterial soap. It is usually advisable to shave the
area surrounding the wound during cleansing.
• Apply a sulfonamide or other antibiotic topically.
• Cover the wound with gauze.
• Cover the gauze dressing with cotton padding.
• Wrap the area with roll gauze and secure with tape.
4-41. Remember that animals will tear off the dressing if it is loosely applied.
There are roll tapes specifically intended for use with animals. This tape (vet
wrap) sticks only to itself, diminishing the trauma of dressing changes. Also,
beware of overtightening the dressing, creating a tourniquet.
CLOSED WOUNDS
4-42. Closed wounds result from external mechanisms such as overuse,
hyperextension (straightening past the normal locking point of the joint), or
hyperflexion (bending beyond the normal range of motion). Injuries include
bruising, stretching, or tearing of connective tissue; joint dislocation; bursal
inflammation or rupture; cartilage damage; and various degrees of bone
fracture. Symptoms of these injuries are swelling, stiffness, and a partial or
complete loss of function.
4-43. Major second- and third-degree burns and displaced and open fractures
require specialized, lengthy treatment and recuperation. Destroying the
animal becomes a matter of operational necessity when conducting a mission.
ALLERGIC REACTIONS
4-44. Allergy or anaphylaxis (severe allergic reaction) stems from a variety of
causes. Most common are bites, stings, and skin absorption. Less common,
but more serious, are reactions caused by substances eaten by the animal and
entering the bloodstream.
Bites and Stings
4-45. Allergic reactions to insect bites and stings result in small blistered
areas (wheals) or generalized swelling (edema). The extent of swelling is
dependent on the number of bites or the toxicity of the venom injected. A
single fly bite will result in a wheal, whereas multiple bee stings will result in
generalized swelling. Snakebites and scorpion stings produce similar
reactions. Treatment is symptomatic. Apply ice to the affected area to reduce
swelling and slow the spread of venom. Give antihistamines to reduce the
reaction, especially when respiration is impaired. Generally, large animals
tolerate venom better than humans. However, antihistamines increase the
effect of snake venom and MUST NOT be administered. Give tetanus
antitoxin and broad-spectrum antibiotics to counteract bacterial infection
associated with snakebites. Emergency tracheotomy has been successfully
employed in cases of respiratory distress. Constricting bands will slow
4-9
FM 31-27
dissemination while increasing local necrosis and circulatory obstruction.
Anticonvulsants are indicated during the first two hours. After that, treat for
shock.
Urticaria (Hives)
4-46. Stinging nettle, poison ivy, and chemical irritants result in blistering or
rash formation. These rashes progress rapidly from localized to generalized
when an animal becomes sensitized from repeated or heavy exposure to the
irritant. Cold soaks and antihistamines will reduce the reaction, especially
when respiratory distress develops. Ingestion of a large amount of protein
will produce a similar effect. Gorging on food concentrates, spoiled hay, and a
variety of other ingested substances will result in an allergic reaction
(anaphylaxis). To treat the symptoms, pass a tube to remove the stomach
contents and give laxatives, antihistamines, and anticonvulsants. Restricting
the diet during recuperation will suffice in most cases.
BURNS
4-47. Except for burns over a large area or those affecting respiration, a
comparable wound in humans is more debilitating. The animal’s coat offers a
higher degree of protection and its skin is less sensitive. Therefore, an animal
will display fewer symptoms and recover more rapidly.
First-Degree Burns
4-48. These burns are characterized by reddening of the skin. Vesicle (blister)
formation is uncommon. Localized tenderness will necessitate refitting of tack
or shifting loads until the animal tolerates pressure on the afflicted area. No
other treatment is necessary.
Second-Degree Burns
4-49. Tissue damage from these burns is limited to superficial layers of the
skin. Vesicle formation occurs resulting in the peeling away of dead skin after
the fluid has drained and the blister dried. Pain lasting several hours after
initial injury subsides to localized tenderness. Treatment of the burn consists
of trimming the coat over the afflicted area and examining the wound. Apply
an appropriate topical medication (such as silvidene ointment). Cover the
area for
3 days with a clean, dry dressing to prevent vesicle rupture.
Additional padding is required under harness straps when the animal must
be harnessed. Drain all vesicles on the fourth day and allow drying for 5 days.
Continue to protect the wound during this time to prevent infection. Trim
away the dried skin on the tenth day after initial injury. Place padding under
tack until healing is completed.
Third-Degree Burns
4-50. These burns are characterized by charring of the flesh and coat. Severe
tissue damage extending into underlying layers occurs. Moderate to severe
pain, dehydration, and shock are symptoms. Treatment, when small areas
are involved, is generally successful. However, severe burns covering a large
percentage of the animal require clinical attention or destruction. Treat as
second-degree burns. Encourage fluid intake, adequate rest, and diet. Topical
burn preparations will lessen pain; however, novocaine (lidocaine) nerve
4-10
FM 31-27
blocks may be required for the first days. Observe for signs of dehydration,
infection, and shock.
LAMENESS
4-51. This general term describes many types of injury and conformation
faults. Basically, lameness is caused by pain in one or more legs.
Conformation faults, arthritis, and a variety of joint and tendon malfunctions
result in lameness, but no first aid treatment is possible. Consequently,
lameness, resulting from injury only, will be covered in this section.
4-52. Examine the animal in motion to isolate the limb(s) involved. The
animal will step quickly off a painful leg and swing towards its good side.
Observe for stiffened joints, reduced range of motion, nodding, limping, or
swaying gait. Examine suspect limbs from the sole upwards and always look
for a hoof injury first. Do the examination in three parts: inspect the sole, tap
the hoof, and flex the individual joints, watching for evidence of pain. Walk
the animal after each examination. If the gait is affected, focus on the last
area examined. This procedure is time-consuming but is the only practical
method for field use.
Hoof Lameness
4-53. The hoof is vulnerable to a variety of injuries and infection. An unshod,
untrimmed hoof will develop cracks. Injuries from overtrimming and
improper nailing occur during routine trimming and shoeing. An animal can
develop corns if it goes too long without reshoeing. While moving, impact
forces cause stress on the bones, suspensory ligaments, and tendons. Rocks
and a multitude of sharp objects bruise and pierce the sole or lodge under the
shoe. These are injuries for the farrier’s or the veterinarian’s care. Exceptions
are thrush and cracked heels as explained below.
4-54. Routine care of the hoof consists of regular trimming and shoeing.
During halts, inspect the sole and remove any objects that have lodged there,
especially in rocky terrain. Painting the wall (outside) of the hoof with hoof oil
will reduce cracking.
4-55. Thrush is a fungus or bacteria infecting the frog. It is characterized by a
dark, foul-smelling discharge from between the frog and the sole. Most
common among stabled animals, it is caused by standing in unsanitary
conditions. Treatment consists of thorough cleansing supplemented by
application of iodine to the infected area around the frog only.
4-56. Cracked heel is actually a skin condition affecting the pastern above the
heel of the hoof. Caused by continued incomplete drying of this area, it is seen
in animals pastured in wet or muddy fields. The skin develops dry scaling,
which degenerates into cracking, as in athlete’s foot. Treatment consists of
cleansing and thorough drying. Apply an ointment or petroleum jelly. The
problem is a result of dryness and chafing. Never treat with an agent that
will cause further drying of the area.
Lower Leg Lameness
4-57. Injury to the lower leg is a result of either stress, caused by a misstep or
prolonged travel on a hard surface, or trauma from hoof strikes inflicted by
4-11
FM 31-27
other animals or self-inflicted. Isolated occurrences result in temporary
lameness. Repeated or prolonged injury generally results in formation of
calluses or calcium deposits in the area. Treatment of isolated occurrences is
successful when time for adequate rest is allowed. Formation of calluses and
calcium deposits require care by a veterinarian and protracted periods of rest.
4-58. When, as the result of an inflammation, synovial fluid collects around a
joint or tendon, the condition is termed synovitis. Synovial fluid is produced
as a lubricant for joint motion. Inflammation will cause an overproduction of
this fluid, which is then trapped in and around the joint. Reabsorption occurs
naturally over time in most cases, provided inflammation is reduced. Needle
aspiration and cortisone injections are stop-gap measures and may result in
the eventual destruction of the joint. With early diagnosis and prompt
treatment, these conditions need not result in lameness. Treatment consists
of rest, ice packs, or cold soaks and reduction of load or variations in surface
traveled. Most of these conditions will leave a permanent deformity in the
form of enlarged joint capsules.
4-59. Sprains of the flexor tendons or suspensory ligament occur during
running or jumping but may be seen when tripping occurs on a wedged hoof.
Sprain describes a stretching, tearing, or complete rupture of the affected
tendon(s) or ligament. Symptoms consist of lameness, which is often severe,
and pain and swelling over the injured region. Inflammation will generate
warmth, detectable to the touch. In severe cases (rupture of the tendon), loss
of support occurs in the joint during weight bearing. Length of recovery
depends on the extent of the stretch or tear.
4-60. Treatment consists of complete rest, ice packs (twice daily), or cold
soaks, supplemented by supportive wrapping or casting of the leg. Recovery
from a moderate tear or complete rupture requires surgical repair. Needle
aspiration and cortisone injections have promoted healing in some cases.
PARASITIC INFESTATION
4-61. Parasites are classified according to location of residence: external
(ectoparasites) or internal (endoparasites). Of the two, internal parasites are
more debilitating, though it is external parasites that carry the most
infectious disease and present the greatest nuisance.
4-62. There are large numbers of different parasites. Of these, some affect
only a specific host. Others afflict any warm-blooded animal, including man.
ECTOPARASITES
4-63. These external parasites that reside on or just under the surface of the
skin by burrowing include insects such as flies, fleas, lice, mosquitoes, mites,
and ticks. The area around the eyes, ears, neck, and anus are the most
common sites of infestation because they are areas of secretion, and the skin
in these regions offers the easiest penetration.
4-64. Depending on the type of parasite, symptoms range from rashes and
blistered areas to patches of hair loss (alopecia). Animals displaying excessive
itching, hair loss, or rough, thickened skin should be suspected of hosting
4-12
FM 31-27
parasites. Closer examination will reveal blisters or burrows, dried blood, or
the insect itself.
4-65. Treat for parasites by applying topical insecticides. This treatment
works best on those parasites that remain on the host, such as mites. It is less
effective on flying insects because the brief feeding period reduces total
dosage absorbed. Insect repellents provide relief from these pests and are the
only practical solution in a field environment.
ENDOPARASITES
4-66. Internal parasites generally live within the intestinal tract. They
remain there throughout their life cycle or migrate out the anus as larva to
spend their adult cycle outside the host. Less common are the endoparasites
that live in other internal organs or surrounding muscle tissue. Regardless of
residence, the mouth is the most frequent point of entry.
4-67. Symptoms are subtle, except for the dramatic appearance of the
parasite exiting the anus or contained in manure deposited on the ground.
Evidence of unexplained weight loss, chronic tiredness, or dullness of coat is
frequently the result of parasites. These anemia-like symptoms result from
the loss of nutrients to the parasite, especially a large colony of parasites.
Untreated, these colonies debilitate the host, often causing blockages and
colic.
4-68. Treatment of internal parasites is more successful than treatment of
external parasites because a more consistent dosage of antiparasitic is
absorbed by the invading parasites. Preventive administration of
antiparasitics is a common practice and is the most convenient method.
DISEASES
4-69. Zoonoses are diseases that usually only affect animals but can be
transferred from animals to humans under natural conditions. Anthrax
(cattle fever) and rabies are excellent examples. People working with animals
are at particularly high risk for zoonotic diseases.
4-70. Currently, there are immunizations for most major infectious diseases
affecting horses, mules, and similar animals. The key to disease management
is to follow a schedule of routine inoculation and parasite control.
Additionally, proper sanitation and hygiene must be maintained.
4-71. Quarantine new and ill animals to prevent the spread of disease among
the healthy animals. Frequently, animals will develop flu-like symptoms after
being transported or stressed by changes in environment. Disease pathogens
congregate in food, bedding, and tack. Therefore, ensure that these items
remain clean and are not transferred from animal to animal without some
form of disinfection.
DISTEMPER
4-72. The common name for this disease is strangles. This infectious disease
occurs in dogs, cats, horses, and several other animals. The causative agent is
the bacteria Streptococcus equine, a strep bacteria similar to that causing
strep throat in man.
4-13
FM 31-27
4-73. Occurrence is most frequent among young animals but will occur in any
equine not previously exposed or immunized. The infectious period is 4
weeks. Incubation period is 3 to 6 days, with flu-like symptoms. A fever with
temperatures of 106 degrees F and inflammation of the lymph tracts and
mucosa occur. A nasal discharge follows rapidly and is quite heavy. As
inflammation of the lymph nodes in the neck continues, abscesses form. The
animal will also have a foul smell about it. These are classic symptoms of the
disease. The lymph tracts, which run the length of the neck bilaterally,
become so swollen that they appear rope-like under the skin. Central nervous
system (CNS) damage occurs in some cases. However, pneumonia is the
greatest cause of mortality. Mortality may approach 100 percent among
animals previously unexposed. Hence the great need for vaccination and
isolation of new horses, especially any having nasal discharge, from the herd.
4-74. Treatment is largely symptomatic. It is very important to get the
temperature down. Streptococcus responds very well to a variety of
penicillins and sulfonamides, but their use inhibits natural immune response
and prolongs the period of abscessed lymph nodes. Using hot packs to bring
the abscess to maturity is more appropriate. Next, incise and drain (I&D)
these mature abscesses using proper techniques to prevent the invasion of
other pathogens into the lymphatics. Preventive administration of antibiotics
to animals having direct contact with the infected one is recommended,
especially when the immunization history of the healthy animal is unknown.
TETANUS
4-75. An acute infectious disease, tetanus is caused by introduction of
contaminated soil into tissue and the bloodstream and affects the CNS. This
anaerobic neurotoxin is normally inactive and lives in a spore state. Usually
introduced through a wound, the disease causes tissue decay, which provides
the anaerobic environment required for reproduction. After reproduction, the
bacteria rupture, resulting in the release of the neurotoxin, migrates along
the nerves to the spinal cord.
4-76. Symptoms of tetanus, either ascending (motor nerve to spinal cord) or
descending (lymphatic to CNS), consist of a characteristic muscle spasm after
even mild stimulation and localized stiffness increases to generalized rigidity.
Especially prone to spasms are the muscles in the jaw and neck, giving rise to
the common name of lockjaw. Symptomatic progression leads to rigidity of
the ears, spine, and legs. The stance widens (sawhorse) and the nostrils
dilate. Closing (prolapse) of the third eyelid, profuse sweating, continued
excitation spasm, rapid respiration, cardiac irritability, and arrhythmia are
present in the latter stages.
4-77. Treatment is begun by preventive immunization of all animals, followed
by routine booster injection (tetanus toxoid). After an animal is wounded, it
should receive good wound care, consisting of thorough cleansing and
disinfecting of the wound site, followed by a tetanus booster. In animals that
have contracted the disease, treatment consists of drainage and disinfection
of the wound, removal of all dead tissue, and injection of tetanus toxoid and
tetanus antitoxin (1,500 to 3,000 immunizing unit [IU]). Treatment with
sedatives, barbiturates, and increased dosages of antitoxin (300,000 IU every
12 hours) has succeeded in moderately severe cases. Supplement treatment
4-14
FM 31-27
by keeping the animal in a darkened, quiet stall. Avoid any incidence of
startling the animal. Elevate food and water since the animal has difficulty
lowering its head. Recovery periods average 2 to 6 weeks.
EQUINE INFECTIOUS ANEMIA
4-78. Commonly known as swamp fever, equine infectious anemia is a viral
disease very common among horses worldwide. Transmission occurs from
blood-to-blood interaction such as in the use of contaminated syringes or
scalpels. It can reach epidemic proportions when transmitted by blood-
sucking flies.
4-79. The disease is characterized by flu-like, low-grade fevers, yellowing of
the gums, depression of appetite and demeanor, weight loss, and obvious
signs of anemia during microscopic blood examination. Continued weight
loss, enlarged spleen, swelling of the infected area, debilitation, and death
follow if the disease is untreated. Diagnosis through the use of a serological
test (Coggins test) is done in the clinical environment. This test shows the
presence of antibodies in the blood of an infected animal. Vaccines exist
although their effectiveness is questionable. Quarantine of any suspect or
new animal and symptomatic treatment is the only therapy. Control of
vectors, by use of insect repellents and insecticides, plus proper sterilization
of medical instruments will minimize the impact of this disease on the herd.
COLIC
4-80. Although not a disease, colic causes debilitation and occurs in sufficient
incidence to require more definitive explanation. Colic is a distention of the
bowel resulting from excessive gas production (flatulent colic), impaction of
feces or bowel obstruction from colonies of intestinal parasites (obstructive
colic), twisted intestine (torsional colic), or gorging or overfeeding (spasmodic
colic). Colic may also result from circulatory problems due to the inactivity of
bowel segments.
4-81. Regardless of the type of colic and its cause, the animal exhibits a
sudden loss of appetite, depression, and frank attention to the abdominal
region (refer to Internal Injury, page 4-2). Bowel sounds frequently diminish
or alter. Rectal examination may locate the obstructed region. Marked
distention of the flanks may be present, especially in young animals or in
severe stages.
4-82. Treatment is largely symptomatic. Keep the animal on its feet to reduce
the chance of complications. Pass a bloat tube (nasogastric) to relieve gastric
distention. Administer mineral oil (2 to 4 liters) by stomach tube to disperse
impactions. You may supplement the mineral oil by administering an osmotic
laxative
(magnesium sulfate) or an irritant (neostigmine). Analgesics, to
prevent self-injury, may be indicated (meperidine 0.5-1 mg/lb [1-2 mg/kg]
IM, phenylbutazone
1-2 mg/lb
[2-4 mg/kg] IV or similar drugs).
Decompression through the use of a large-bore needle
(trocharization)
inserted into the upper flank is effective in relief of severe distention.
Prevention, through proper diet, dental care, and parasite control, is the most
effective method of dealing with colic.
4-15

FM 31-27
IMMUNIZATION SCHEDULE
4-83. The following paragraphs list several diseases that plague animals and
provide a suggested immunization schedule.
• Encephalomyelitis, Eastern and Western strains: For all horses of all
ages, two injections each spring or summer, 7 to 14 days apart.
• Distemper (Strangles): Three weekly injections initially, followed by an
annual booster, until the horse is 5 years old. Incidents of anaphylaxis
(injection reaction) have occurred, to include hoof sloughing.
• Equine Influenza: Two injections initially (1 year old), 4 to 8 weeks
apart, followed by a booster each successive year.
• Venezuelan Equine Encephalomyelitis (VEE): One injection (yearly)
during spring or summer.
• Tetanus (Lockjaw): Two injections the first year, 4 to 8 weeks apart,
followed by a booster each successive year.
MEDICAL SUPPLY LIST
4-84. In addition to the supplies contained in the veterinary first aid kit,
Figure 4-2 lists the items that are consolidated into a single kit for use in
more definitive care.
Kit, Minor Surgical
NSN 6545-00-957-7650
Float, Dental, Vet
NSN 6515-00-938-4301
1HHGOH +\SRGHUPLF
JDO
Ý
NSN 6515-00-938-4411
1HHGOH +\SRGHUPLF
JDO Ý
NSN 6516-00-938-4378
1HHGOH +\SRGHUPLF
JDO
Ý
NSN 6515-00-938-4377
Set, IV Injection, Vet
NSN 6515-00-938-4678
Pump, Injection and Suction, Vet
NSN 6515-00-938-4718
Suture, Nonabsorbable, Surgical Size
NSN 6515-00-938-4722
Suture, Nonabsorbable, Surgical Size
NSN 6515-01-035-5601
Twitch, Chain
NSN 3770-00-191-8055
Clipper, Hair
NSN 3770-00-804-4700
Stethoscope, Bell/Diaphragm
NSN 6515-01-304-1027
Thermometer, Maximum Registering, Vet
NSN 6515-00-812-7000
Tube, Nasogastric, Vet
NSN 6515-01-153-5387
Gloves, Examination, Vet
NSN 8415-01-359-7935
The Merck Veterinary Manual
ISBN 0911910557
Figure 4-2. Consolidated List of Items Used for Definitive Care
4-16

FM 31-27
PHARMACOLOGICAL LISTING
4-85. Figure 4-3 lists antibiotics, antiparasitics, and antifungals used to treat
pack animals. It also lists the recommended drugs, dosages, and routes of
each item used.
Antibiotics
Penicillin
Sodium pcn G, IV, IM 10,000-20,000 IU/kg, q6 hrs
Potassium pcn G, po 25,000 IU/kg, q6 hrs
Procaine pcn G, IM, subq 10,000-30,000 IU/kg, q12-24 hrs
Benzathine pcn G, IM 10,000-40,000 IU/kg, q48-72 hrs
Ampicillin, IV, IM, subq 5-10 mg/kg, q8-12 hrs, oral 10-25 mg/kg,
q6-12 hrs
Amoxicillin, IM 4-7 mg/kg, q12-24 hrs
Cephalosporin
Cefazolin IV, IM 20-25 mg/kg, q6-8 hrs
Aminoglycosides
Gentamicin, IM, subq 1-2 mg/kg, q8 hrs
Kanamycin, IM, subq 4-5 mg/kg, q8 hrs
Tetracycline
Oxytetracycline, IV 5 mg/kg, q12-24 hrs
Sulfonamides
Sulfathiazole, po (initial) 66 mg/kg (maintenance) 66 mg/kg, q8 hrs
Sulfadiazine, po (initial) 50 mg/kg (maintenance) 50 mg/kg, q12 hrs
Antiparasitics
Anthelmintic
Thiabendazole po 44 mg/kg, q24 hrs or 22 mg/kg, q12 hrs
Antifungals
Iodine
Topical
Copper Sulfate
Topical
Tolnaftate
Topical
Figure 4-3. Pharmacological Listing
EUTHANASIA
4-86. The term “euthanasia” refers to the ending of a life, in a humane
manner, to relieve suffering from illness or injury. While caring for animals
during combat conditions, you may find that serious illness or injury will
necessitate the destruction of an animal that is beyond the scope of available
medical treatment. Euthanasia under field conditions is frequently a rather
brutal affair, without the poisonous gases and injectable venoms used in the
clinic. Despite this lack of “civilized” methods of destruction, every effort
should be taken to effect euthanasia as rapidly and painlessly as possible. In
addition, any personnel near the animal must exercise caution to avoid injury
to themselves should the animal be grievously wounded but not immediately
killed. The thrashing of these powerful animals will result in injury to
bystanders and could create panic among other animals stationed nearby.
Keep other animals as far away from the site as possible.
4-17
FM 31-27
4-87. A variety of methods are available for field euthanasia. Of these, most
are impractical because they require a very advanced degree of anatomical
expertise or require dosages of common drugs in amounts larger than would
logically be available. Consequently, simple mechanical methods of destruc-
tion are all that will be available to the average soldier.
SMALL ARMS FIRE
4-88. The most preferable method of expedient destruction is to shoot the
animal in the base of the skull. A bullet fired at a point centered on and
slightly above the eyes or from the side slightly above and behind the root of
the ear is also acceptable. Because of the penetration needed to enter the
skull, a rifle is more effective than a pistol for this purpose. Another area that
will result in death but will produce only grievous injury if improperly aimed
is the heart. This area is located low in the chest, just under the rear portion
of the foreleg.
HEMORRHAGE
4-89. Bleeding the animal out by severing the large blood vessels located in
the neck has been suggested as a silent method for use when detection is
likely. Although effective, this method is less humane than shooting. Expect
the animal to react violently during the initial
1 to
2 minutes of
hemorrhaging. Take the necessary precautions to avoid injury to others.
Along this line, it is entirely feasible to place a large bore needle, such as an
IV catheter, in the veins located in the animal’s neck (jugular) and bleed the
animal out in this manner. Although this method will be considerably slower
than a large incision of these veins, it will be virtually painless.
4-90. Equines, despite their immense size and strength, are fairly fragile
animals. Nearly any injury resulting in a fracture of the legs will necessitate
destruction of the animal. If the animal was otherwise healthy, the meat of
the animal may be used as food. Avoid eating animals who were ill or infested
with internal parasites. Examination of the liver and the external surfaces of
the intestines will offer evidence of parasitic colonies.
NOTE: When a veterinarian is available to the pack animal detachment,
obtain supply and instruction in the use of commercially available drugs that
produce euthanasia in a rapid, humane, and silent manner.
4-18
Chapter 5
Packing Equipment
This chapter explains some of the most commonly used packing
equipment, how it should be maintained, and how it should be fitted to
the animal. There are variations in equipment. However, the principles
for using it remain the same.
PACKSADDLES
5-1. The two types of packsaddles discussed in this chapter are the sawbuck
or crosstree and the Decker saddles. They are both very adaptable to different
types of loads and, therefore, are the best type to use in carrying cargo of
different weights and sizes. The Decker saddle can carry side loads, top loads,
or a combination of the two. Both saddles can accommodate standard packing
hitches with a minimum requirement for tying and threading lash ropes to
secure a load. They can be quickly and easily packed and unpacked. Both
saddles also require a harness.
SAWBUCK SADDLE
5-2. The sawbuck saddle is one of the oldest types of packsaddles still in use
throughout the world. It is the simplest and most easily constructed. The
sawbuck saddle consists of two side bars connected at the front and rear by
crosspieces (bucks) forming an “X” over the spine. The two side bars are called
“humane bars” if they are curved to fit the shape of the animal’s body. The
humane bars allow the saddle to fit the animal better and make carrying the
load more comfortable to the animal. Most sawbuck saddles produced today
have humane bars. Cargo is carried on the saddle in panniers, pannier bags
or boxes, hung from the bucks, or carried by hitches and slings.
DECKER SADDLE
5-3. The Decker saddle is made basically the same way as the sawbuck. The
difference is that it has metal hoops instead of crossbucks holding the
humane bars together (Figure 5-1, page 5-2). Some packers prefer the Decker
to the sawbuck saddle because the humane bars on the Decker can be
adjusted by bending the metal hoops to fit the animal better. The animal
carries cargo in nearly the same manner as on the sawbuck. The difference
with the Decker is that the panniers are hung over the hoops instead of the
crossbucks. Sometimes Decker saddles have “ears” welded to the hoops to
keep the panniers from slipping off or to run the sling rope around when
using one. The ears are pieces of metal stock approximately 2 inches long and
1/2 inch in diameter and are welded to the hoops near the top on either side.
Panniers with adjustable straps are sometimes secured to the Decker by
running the strap under the hoops and then fastening the buckle.
5-1

FM 31-27
Figure 5-1. Decker Saddle
SADDLE HARNESS
5-4. A variety of different straps form the harness. It holds and stabilizes the
saddle to the animal. The main components of the harness are the cinches,
breast collar, breeching, and crupper. The packer secures all of the straps
either directly to the saddle or to the rigging.
Rigging
5-5. The rigging is a leather strap that wraps around the crossbucks on the
sawbuck and around the hoops on a Decker. Secure it to the humane bars
with screws and allow the ends to hang below the bars. Attach the rigging
rings to the ends of the straps. Then secure the latigos (which are used to
secure the cinches) and the connecting straps (which help hold the breeching
and breast collar in place) to the rigging rings.
Cinches
5-6. Cinches are the part of the harness that hold the saddle to the animal
and provide stability to the saddle once it is packed. Most packsaddles have
two cinches, one in front and one in the rear. They fit around the belly or
barrel of the animal. Secure the cinches to the rigging rings by the latigos.
Breast Collar
5-7. The breast collar provides stability to the saddle while the animal is
traveling uphill. It keeps the saddle from moving rearward over the animal’s
kidneys and rump. The breast collar is usually made of leather or cotton duck
material and is approximately 4 inches wide. Two connecting straps from the
front of the humane bars secure the breast strap, which is usually made of
wool or tail and mane hair.
Breeching
5-8. The breeching fits around the animal’s hips and keeps the saddle from
moving forward over its withers while traveling downhill. The breeching is
made of leather or cotton duck material and is approximately four inches
wide. It is held in place by connecting straps, back straps, quarter straps, and
5-2

FM 31-27
hip straps. The connecting straps run from the rigging rings to the ends of the
breeching. The back straps run from the rear of the humane bars to a metal
ring (called a spider) that rests on the animal’s rump. The hip straps run
from the metal ring to the breeching.
Crupper
5-9. The crupper is a leather strap that runs under the animal’s tail and
attaches to the metal ring. It keeps the saddle from slipping forward.
Cruppers serve the same purpose as the breeching but are not widely used.
You can use them in place of, or with, the breeching.
HALTER AND PACKING EQUIPMENT
5-10. A halter is a control device that fits around an animal’s head and must
be placed on the animal prior to packing it. By controlling its head, a person
can control the animal. The halter is used mainly for leading rather than
riding an animal. Without one it would be next to impossible to maintain
control of an animal for any length of time. Halters are simple devices
constructed generally of nylon webbing or rope. Another essential item for
controlling an animal is the lead line or lead rope. A lead line is a piece of
rope usually 3/4 inch in diameter, made of pliable material, usually cotton or
nylon, and approximately 10 feet long. The line attaches to the halter under
the chin of the animal. It can either be permanently spliced into the lead line
ring or attached by means of a snap (Figure 5-2).
Figure 5-2. Halter With Lead Line
5-3
FM 31-27
5-11. To place a halter on an animal, hold the halter with the lead line ring
down, the closed end to the front of the animal’s nose, and the open end to the
rear of the animal’s head. Slip the closed end over the nose, bring the running
end of the open end over the back of the animal’s head behind his ears, and
attach it. It helps to keep one foot on the running end of the lead line to
prevent the animal from pulling the halter away as you are putting it on him.
5-12. Good pack equipment is essential to a succesful mission. Proper
adjustment of all equipment for the pack animal is necessary. There are
many variations of equipment, and the animal packer should be familiar with
all types. The following paragraphs explain the basic packing gear.
SADDLE PAD
5-13. The saddle pad provides the only protection between the loaded saddle
and the animal’s hide. Pack pads are usually thicker than riding pads
because a pack animal carries “dead” weight. A riding animal carries “live”
weight, which means that a rider will shift his weight as the animal traverses
different types of terrain. A pack load is “dead weight,” which means it will
not move with the animal. It is important that the saddle pad be made of a
material that will stay soft and not compress and get hard during use.
5-14. Some packers use what is called a cheater pad on animals that have
high withers. These small pads are usually made of tail and mane hair sewn
between two pieces of canvas. The cheaters can be placed between two
regular pack pads in the wither area to raise the front of the packsaddle off
the withers and yet have the saddle sit evenly on the pack animal’s back.
SADDLE COVER
5-15. The saddle cover, sometimes called a half breed, is used when it is
necessary to protect the animal’s flanks from the load or the saddle rigging. It
is commonly made of two pieces of canvas sewn together with slots cut in it so
that it will fit over the crossbucks or hoops. The saddle cover can have
padding sewn into it or it can have stuffing slits so that the user can fill it
with as much padding as is necessary for the load. It usually has sideboards
made of wood, 2 to 4 inches wide, attached near the bottom to provide further
protection to the animal’s flanks. The saddle cover can be placed over the
saddle once it is on the animal, or it can be placed over the humane bars and
under the rigging.
MANTA
5-16. A manta is the cover, usually made of canvas, that you place over the
entire load after securing the load to the packsaddle. It protects the load from
trees, bushes, rocks, or anything else the animal may brush against while it is
moving. The manta also provides a degree of protection for the load from rain
and snow. The size is generally 8 feet by 10 feet. Each manta has an assigned
cargo rope that goes with it. Mantas are folded four to a bundle with ropes
located in the center. However, you can use any size that will protect the
load.
5-4
FM 31-27
LASH ROPE AND CINCH
5-17. The lash rope and cinch secure the load and manta to the animal by
means of different types of packing hitches. The lash rope is usually 45 to 50
feet long, 1/2 to 5/8 inch in diameter, and made of manila or nylon. The lash
cinch is usually made of heavy cotton duck material with a ring at one end
and a hook at the other. The lash rope is spliced to the cinch at the end with
the ring.
SLING ROPE
5-18. The sling rope fastens to the front crossbuck on a sawbuck saddle or the
front hoop on a Decker. It secures loads that will not fit in panniers or secures
panniers that do not have straps. A sling rope is usually 33 feet long, 1/4 to
3/8 inch in diameter, and made of hemp, nylon, or polyester.
PANNIERS
5-19. Panniers are cargo containers that hang from the crossbucks on a
sawbuck saddle or the metal hoops on a Decker saddle. Some panniers do not
have straps to hold them to the saddle. If they don’t have straps, you can use
the sling rope to hold the panniers in place. The dimensions of most
commercially made panniers are approximately 26 inches long, 19 inches
high, and 12 inches deep. They are made of many different types of materials.
Some of the most popular are canvas, hard plastic, plywood covered with
fiberglass, or a wood frame covered with cowhide.
CARE OF EQUIPMENT
5-20. The packer has the primary responsibility for the care and preservation
of packsaddlery. You should perform the routine cleaning, preservation, and
daily inspection for the following equipment to ensure mission readiness:
5-21. Check saddles daily to ensure there are no cracked, broken, or loose
parts. Also check the crossbucks
(or hoops), humane bars, rigging, and
latigos. Tighten any loose items and repair or replace cracked or broken
parts. Clean any mud or other debris from the saddles that may have
collected during the day’s movement. The packer should check all parts of the
harness for signs of wear, breaks, cleanliness, and serviceability (Figure 5-3,
page 5-6).
5-22. Brush or shake out the saddle pads after you remove them from the
animal. Check them thoroughly for any foreign objects that can come in
contact with the animal’s hide. Lay the saddle pads where they can air out
and dry.
5-23. Treat the saddle cover in the same manner as you treat the saddle pad.
In addition, check the wooden bars for serviceability. Check the padding to
see if some should be added or taken out. Check the manta for rips, holes, and
general serviceability.
5-24. Check the lash and sling rope for signs of wear. Replace or repair them
immediately if there are signs of excessive wear. Breaking a lash or sling rope
on the trail is a sure way to cause a wreck. Try to keep the ropes as dry as
possible, especially if the rope is made of hemp. Wet weather causes hemp
5-5
FM 31-27
ropes to become hard to manage. Wet hemp ropes will dry and stretch out
leaving the pack loose or uneven. Don’t throw the ropes on the wet ground
while packing or unpacking an animal. Hang them on a tree limb or lay them
on a tarp or any dry surface until you are ready to use them.
Cinches
Check cinches for any broken strands. Check the cinch rings
for any signs of cracking or metal fatigue. Repair or replace any
damaged pieces.
Breast
Check the breast collar and connecting straps for any signs of
Collar
wear or debris collected during the day’s movement. Check the
fastening devices to ensure serviceability. Repair or replace
items as necessary.
Breeching
Check the breeching and all associated straps for cleanliness
and serviceability. Pay close attention to all fastening devices.
Repair or replace items as necessary.
Crupper
Check the crupper (if used) for cleanliness and serviceability.
Figure 5-3. Parts of the Harness
5-25. Check the lash cinch often for signs of the material fraying. Badly
frayed material can tear on the trail and cause a load to come loose. Frayed
material can also rub on the animal’s belly and cause a sore. Check the cinch
ring for signs of wear and metal fatigue. Replace or repair items as necessary.
5-26. Clean panniers and check them for overall serviceability. Most
important, check the straps and fasteners on the straps that hold them to the
saddle.
5-27. Keep all leather items clean and free of grit and dirt. In cleaning off
mud or excessive dirt, use a grooming brush or a blunt piece of wood. Use a
sponge, lukewarm water, and saddle soap. After cleaning, apply neat’s-foot oil
to the leather for both protection and appearance. Clean all metal parts as
well.
5-28. Keep equipment made from canvas and duck material free of dirt and
mildew. A frequent brushing will remove dirt. The best remedy for mildew is
air and sunlight.
FITTING AND ADJUSTING THE SADDLE
5-29. The proper positioning of the saddle and correct cinch adjustment are
very important factors. Improper adjustment may cause injury to the animal
or may affect the time and distance the animal can carry its load. Before
placing anything on the animal’s back, it is important to be sure that the
animal feels comfortable about it. Many will get skittish if they are
unfamiliar with the equipment. A good way to get the animal accustomed to
the equipment is to hold it in front of the animal and let him see it and smell
it. You should saddle the animal with the packer standing on the left (on-
side) of the animal. When making adjustments to the saddle or harness, you
will have to move to the right (off-side) of the animal. You should always
move around the rear of the animal when moving from one side to the other
5-6
FM 31-27
while saddling. To do this, get close to the animal and maintain contact with
it by keeping a hand on its rump. If the animal should kick while you are
moving around it, receiving a kick from a short distance is much better than
from a long distance after the full force of the kick has been generated.
GROOMING
5-30. Always groom the pack animal before saddling. While grooming, remove
any debris from the animal that may cause saddle sores. Also check for any
sores from the previous movement or sores that may have occurred during
the night. Treat the sores as necessary or ask the medic or vet for assistance.
If there is any question as to the ability of the animal to carry a load, ask the
medic or vet to make a determination. You do not want to aggravate existing
sores.
PAD PLACEMENT
5-31. Check the saddle pad thoroughly for any foreign objects before placing it
on the animal. Place the saddle pad square on the animal’s back forward of
where you want it to rest and then slide it rearward into position. Sliding the
pad rearward will make the hair lay naturally and prevent sores. The
forward portion of the pad should be over the withers with its forward edge
about a hand’s breadth in front of the rear edge of the shoulder blade.
5-32. The animal may need more than one pack pad or cheater pad depending
on the shape of its back. The best way to determine how many pads the
animal needs is to set the packsaddle on him and then check the clearance
between the saddle and his withers. Allow for the saddle settling down on the
pads after the animal is loaded. If there is any chance of the saddle forks
coming in contact with the top of the withers, put another pack pad under the
saddle. Be careful not to get too much padding on the withers so that the
packsaddle is pinching the withers from the pads being too thick. The
purpose of putting extra padding on a high withered animal is to raise the
packsaddle off the tops of the withers. If the pads being used are the same
thickness throughout you haven’t gained much. The pad must be thicker over
the withers and thinner towards the rear of the animal. A cheater pad sits on
the withers only and that is why it is usually the best thing to use for a high-
withered animal. Remember, pads always have a tendency to slip to the rear
of the animal.
SADDLE PLACEMENT
5-33. Place the saddle square on the pack pads allowing 4 to 6 inches of
padding to be exposed in the front and rear of the saddle. The forward edge of
the saddle will be approximately 2 to 3 inches to the rear of the shoulder
blades. It is important to ensure there is adequate saddle pad forward of the
saddle to protect the animal’s back from the leading edge of the saddle.
5-34. Fasten the cinches, the front one first, making sure there are no twists
in the off-side latigos or the cinches themselves. The front cinch should be a
hand’s breadth to the rear of the front leg.
5-7
FM 31-27
5-35. Tighten the cinches just enough to hold the saddle in place until the
breast collar and breeching are adjusted. At this time, also attach the
breeching and breast collar. The instructions for adjustment follow.
BREAST COLLAR
5-36. The breast collar should ride just above the point of the animal’s
shoulder and go around the breast below the animal’s neck. It should not be
tight; its only function is to keep the saddle from slipping back. Adjust the
breast collar so that it is snug when a front leg is fully extended. Ensure the
two connecting straps are adjusted to the same length so that the breast
collar rides evenly.
BREECHING
5-37. Once the saddle is in place and cinched lightly, adjust the breeching.
Perform the following steps to adjust the breeching:
5-38. Place the spider on the animal’s rump and adjust the back straps so that
it rests on the highest point of the animal’s shoulder. Ensure that both straps
are the same length so the ring will stay centered. Adjust the hip straps so
the breeching rides approximately halfway between the base of the tail and
the bottom of the hindquarters. Adjust the straps on both sides to the same
length to ensure the breeching rides level.
5-39. Attach the crupper if used. Lift the animal’s tail and slide the crupper
under it. Always be very careful when working around the animal’s hind end.
Some will want to try to kick. The best thing to do is stay very close to the
animal with your side touching the animal’s flank. The animal will telegraph
any intention to kick by tightening its muscles. Also watch the animal’s ears.
If he intends to kick, he will lay his ears back. As you lift the tail to slide the
crupper under it, talk to the animal reassuringly. Talking will help calm the
animal. The crupper should be snug against the base of the tail but not tight.
Ensure both connecting straps on the crupper are the same length so the
crupper will ride evenly.
5-40. Adjust the connecting straps. A good rule of thumb to follow for
adjusting the connecting straps is to make sure that, when the animal is
walking and one hind leg reaches its rearmost position in the stride, the
breech strap is firmly against the animal’s rump. The breeching should not be
so tight as to hinder the animal’s natural gait. However, if it is too loose it is
useless.
5-41. Connect the quarter straps to the front cinch ring. Adjust them snugly
to keep the front cinch from moving forward while the animal is moving.
Make sure the upper quarter strap is snug and the lower quarter strap has a
1-inch sag to it. After the initial adjustment of the breeching is made, you
must pull the animal’s tail out from under the breeching. See the method for
crupper adjustment above for the best method to do this.
5-42. The breeching is now adjusted approximately to where it should be.
Walk the animal around to check how the breeching is riding on the animal
and make adjustments as necessary.
5-8
FM 31-27
5-43. When traveling down long steep slopes, it may be necessary to tighten
the back and connecting straps some to keep the saddle from slipping over
the withers and shoulders.
CINCHING
5-44. Proper cinching is essential because the packsaddle covers so great an
area of moving surface. Excessive binding of the front cinch may injure the
back and sides, interfere with breathing, or cause cinch sores. You should use
the front cinch to secure the saddle in place and make sure it is tighter than
the rear cinch. The rear cinch keeps the saddle from rocking from front to
rear as the animal is walking; therefore, it does not need to be as tight as the
front cinch. Since the hind legs are the propelling members, the hindquarters
move from side to side and up and down. Make sure these movements are not
restricted by cinch pressure. There must be no interference with the animal’s
locomotion. Only experience can teach you how to determine the exact
amount of cinch pressure needed. A safe rule to follow is to give the front
cinch sufficient pressure to hold the saddle in place. Usually one finger
should pass easily between the front cinch and the animal’s chest.
5-45. Tighten the rear cinch enough to limit the rocking motions of the saddle
and to help prevent the saddle from slipping forward. Make sure the rear
cinch is not so tight that the whole hand cannot be slipped under it. In testing
cinch pressure, you should be able to insert a finger from the rear to the front
so that, when it is withdrawn, the hair does not ruffle. Ruffled hair may cause
sores. Excessive binding of the rear cinch will cause a pack animal to tire
quickly. It is very important to center the cinch on the animal’s belly. The
cinch rings on either side of the cinch should be the same distance from the
rigging when the cinch is pulled tight. This type of fit is called a ring-to-ring
check. An uneven cinch could cause cinch sores or cause the saddle to slip.
Secure the latigos on both sides of the saddle with a quick release knot. This
knot is important because it allows the load to be released quickly from an
animal if the load should fall onto its side or upside down. With other knots it
is necessary to cut the load away from the animal. Having to cut the load may
cause injury to the animal and will ruin the latigos or cinches on the saddle.
5-46. To fasten the cinch on the animal, run the latigo through the cinch ring
(the end of the latigo is run through the cinch ring so that it comes through
the ring towards the packer) and back up through the rigging ring (the end of
the latigo is run through the rigging ring so that it goes through the ring
towards the animal). If the latigos are long, or the animal has a small barrel,
you may have to wrap them more than once to take up the excess length of
the latigo. The knot used is a “half-Windsor.” To form this knot, bring the
running end of the latigo around the portion of the latigo running through the
rigging ring, up through the rear of the rigging ring, and down through the
loop just formed. Form the quick release by passing the running end of the
latigo up through the knot just formed (Figure 5-4, page 5-10).
5-9

FM 31-27
Figure 5-4. Latigos Fasten the Cinches to the Rigging Ring
FINAL ADJUSTMENTS
5-47. When the saddle is in the right position on the animal and the breast
collar, breeching, and cinches are snug, it is time to “untrack” the animal
prior to packing it. Many times an animal will force air into its lungs and
belly when it realizes that it is going to be saddled. It does this to make the
saddle fit more comfortably. Once the animal starts moving, it will expel the
air and the saddle will fit more loosely. If the animal is packed without
untracking it, the saddle could slip shortly after movement begins and the
whole load will have to be repacked. To untrack an animal, take it from the
place it was saddled and walk it around for approximately 30 seconds. Tie it
up and tighten the cinches again if needed. The animal is now ready to be
packed.
MARKING SADDLES
5-48. After fitting the saddle to the pack animal, mark it with the animal’s
name or number and use it with the same animal throughout the movement.
The same saddle pads and, if needed, cheater pads should be kept with the
animal so the saddle fits the same every time. This technique will save time
refitting the packsaddles every time the unit prepares to move.
UNSADDLING THE ANIMAL
5-49. Unsaddle the animal in the opposite sequence that it is saddled. By
following this sequence the saddle will be stored in a manner that will make
saddling the animal quick and easy the next time it is needed. Since the
breast strap, breeching, and cinches were adjusted properly when the animal
was saddled, the rider can maintain a proper fit if he loosens only the quarter
5-10
FM 31-27
straps, cinches, and breast collar (on-side strap and the strap going to the
hobble ring). Follow the procedures below to properly unsaddle an animal:
5-50. Unfasten the breast collar strap from the front hobble ring on the front
cinch. Unfasten the breast collar strap from the on-side connection. Take the
breast collar strap from around the neck of the animal. Run the on-side
breast collar strap under the bucks from the rear to the front leaving the
buckle visible at the rear of the saddle. Lay the excess strap on the animal’s
neck. Fold the excess breast collar into the center of the saddle between the
bucks.
5-51. Unfasten the quarter straps and hook them onto the rear rigging rings.
Unfasten the rear cinch. Put the running end of the latigo through the
rigging ring twice. Bring the running end around the latigo, up through the
rear of the rigging ring and down through the loop just formed. Repeat the
procedure for the front cinch.
5-52. Slide the saddle rearward to loosen the breeching. If a crupper is used,
unfasten the on-side strap and lift the animal’s tail to remove the breeching.
Lift the breeching over the rump and place the spider and crupper, if used,
between the bucks. Lay the breeching across the saddle between the bucks.
Fold the excess straps into the center of the saddle between the bucks. Fold
the cinches into the center of the saddle on top of the breeching.
5-53. Take in the portion of the breast strap that runs under the bucks and
loop it around the breeching and cinches folded into the center of the saddle.
Ensure the strap runs diagonally across the saddle so the strap will tighten
as much as possible. Secure the strap with the buckle.
5-54. The saddle is now ready to be put on the animal the next time it is
needed. Place it wherever it is to be stored.
5-55. Remove the saddle pads from the animal. Shake them out or brush
them. Place the pads over the saddle with the side that was against the
animal facing out so they will dry. If a sling rope is used, wrap it around the
bucks in a figure eight manner.
5-56. If the lash rope is not going to be used for a high line, the proper way to
roll it is as follows. Hold the lash cinch by the cinch ring and coil the rope.
Grasp the lash cinch by the hook and wrap it around the coiled rope once and
place the hook through the cinch ring. Hang it by the hook for storage.
SADDLING WITH A FITTED SADDLE
5-57. Saddling an animal with a saddle that has been fitted to it is much less
time-consuming than saddling and having to adjust the breeching. Figure
5-5, page
5-12, lists the steps for saddling with a fitted saddle.
5-11
FM 31-27
1. Properly groom the animal.
2. Place the saddle pad on the animal.
3. Place the saddle on the animal correctly.
4. Loosen the strap holding the cinches and rigging together between the
bucks.
5. Let the cinches fall to the off-side of the animal.
6. Pull the breeching from the stowed position and fit it around the rump
of the animal.
7. Ensure the saddle is in its proper position.
8. Attach the front cinch loosely.
9. Attach the rear cinch.
10. Attach the quarter straps to the front cinch ring.
11. Attach the crupper, if used.
12. Attach the breast collar.
13. Tighten the front cinch.
14. Since the saddle has already been adjusted to the animal, it should fit
properly without further adjustment. However, check the fit of the
saddle and all the rigging to make sure it does fit properly.
Figure 5-5. Steps for Saddling With a Fitted Saddle
5-12
Chapter 6
Horsemanship
This chapter discusses horsemanship and should help guide unfamiliar
personnel. In many cases, authorities vary on how to perform many
functions of good horsemanship, even when presented with the same
task. Tactical, environmental, social, and other factors influence how
animals are used in a combat environment. The descriptions of
equipment and techniques are based on the American-Western style of
riding. This style of riding is most familiar to U.S. soldiers and the most
easily adaptable to sustained combat operations.
The emphasis on American-Western style is one of functionality and
stability, but as in any style of riding, success is dependent on rider
performance. As in most cases, any basic flaws in technique can most
likely magnify during combat operations. A pack animal unit will have to
improvise equipment or adapt to indigenous equipment in many cases. A
basic knowledge of animals, equipment design and function, and tactics
should be sufficient for a detachment to perform their mission given any
set of circumstances. It should be noted that reading this chapter is in no
way any substitute for experience.
EQUIPMENT
6-1. The following equipment descriptions and instructions for use come
from the American-Western style of equipment. In the horse industry, these
items are known as tack. Variations of these items are commonplace but the
principles of their design and use remain constant.
BRIDLE AND REINS
6-2. The rider uses the bridle to control the animal when he rides. The bridle
consists of various lengths of leather or nylon that you can adjust to fit the
animal (Figure 6-1, page 6-2). Its basic components include the following:
6-3. The bit rests against the back of an animal’s mouth and controls the
animal by transferring pressure from the reins to the animal’s mouth. The
rider uses the reins or steering lines to command the animal. They are
generally leather, approximately 72 to 84 inches long, and can be either split
reins (not joined at the ends) or joined at the end. They are attached to the bit
at the side rings. The curb chain or strap gives the animal pressure on the
bottom of the jawbone when the reins are pulled and assists in stopping the
animal. Cheek straps run the length of the bridle. Their purpose is to join
the bit and the headpiece.
6-4. The headpiece runs behind the ears and gives long axis anchor to the
bridle. The browband runs across the forehead and holds the headpiece in
6-1

FM 31-27
place. The throatlash runs from the junction of the headpiece and the
browband on each side and under the animal’s throat. It serves to further
anchor the headpiece. The noseband fits around the animal’s nose several
inches behind the mouth. It serves to keep the animal from opening its mouth
too wide and to provide stability for the bridle.
Figure 6-1. Typical Horse Bridle and Standard Bit
NOTE: There are many types of bridles. The components identified are not
necessarily present on all bridles. Figure 6-2, page 6-3, explains how to put
the bridle on the animal.
SADDLE PAD
6-5. Riding pads are generally the same as the pads used on packing
animals. The average size is 30 by 30 inches. For information on the use and
care of saddle pads see Chapter 5.
6-2
FM 31-27
CHEATER PADS
6-6. Cheater pads can be used on riding animals as on packing animals. See
Chapter 5 for use of cheater pads.
1. Stand on the on-side of the animal, untie the animal, and remove the halter.
Place the reins behind the animal’s head and drape them over its neck or
your arm.
2. Unbuckle the throatlash.
3. Hold the headpiece in your right hand.
4. Hold the bit in your left hand with your thumb pointed up the axis of the
animal’s head.
5. Place your right hand on the animal’s head between the ears to keep it down.
6. With your left hand, open the animal’s mouth at the corner by putting your
thumb between its canine and back teeth (the taste of your thumb will cause
the animal to open its mouth). Then slide the bit in by pulling with the
headpiece in your right hand.
7. Slide the headpiece behind the ears and place the browband on the forehead.
8. Buckle the throatband loosely.
9. The bit should be adjusted so that the back of the animal’s mouth is drawn
up into a slight “smile.”
10. Pull loose any restricted mane that is caught under the bridle straps.
Figure 6-2. Steps for Putting the Bridle on the Animal
SADDLE
6-7. The modern Western saddle is a direct descendant of the deep-seat
saddle brought to the Americas by the Spanish Conquistadors in the
sixteenth century. Among the characteristics common to Western saddles are
the deep seat, saddle horn, long stirrups, and high cantle. It also comes with a
complement of tie-down straps to secure personal equipment to the saddle.
6-8. Western saddles are constructed of wood or synthetics for the tree
(frame) and stirrups and covered in leather. If the manufacturer has placed
padding in the bars of the saddle, a saddle pad still must be used.
6-9. The typical Western saddle will have one cinch to secure the saddle to
the animal and may or may not have a flank cinch. Figure 6-3, page 6-4,
explains the steps for saddling the animal.
RIDER’S EQUIPMENT
6-10. The problem encountered with equipping a U.S. soldier for mounted
operations is that no consideration has been given to the requirements for
this type of operation in quite some time. This time lapse can pose various
challenges in each mission.
6-11. Many items that are critical for dismounted use are critical to use while
mounted as well, but may not perform suitably in both situations. Boots are a
6-3
FM 31-27
prime example. Boots suited for dismounted operations may be detrimental to
mounted operations. The very nature of combat operations demands
interoperability. This section will address such difficulties. It will be the
responsibility of the commander who assigns a unit to perform mounted
operations to properly equip those units.
1. Ensure the animal is properly groomed.
2. Place the saddle pad on the animal.
3. Ensure the saddle is properly “rolled” for placement on the animal. Being
rolled means that the cinch, off-sides stirrup, and any tie-down straps are
pulled over the seat of the saddle.
4. Grasp the saddle by the front center under the horn and the rear center.
NOTE: If the animal is skittish, or if it doesn’t know the handler, allow it to see
and smell the saddle at this time. Make sure the animal is never surprised.
5. From the on-side set the saddle on the animal’s back. The front edge of the
saddle should be 1 to 2 inches from front edge of the pad and above the
rear of the withers. Grasp the front edge of the pad and lift it up into the tree
to allow a space for air to circulate under the pad.
6. Pull down the cinch and connect. Initially, snug the cinch tight enough to
secure it to the animal.
7. Connect the flank (rear) cinch, if one is present. It should rest just against
the animal’s flank and be secured snugly. Connect it to the front cinch in
the center with the connecting strap.
8. Lower the stirrups into place. Never drop them against the animal’s side.
9. Ensure that no saddle strings or any other objects are between the saddle
and the animal.
10. Walk the animal around for a short distance and then adjust the cinches
again. The main cinch should be tight enough that three fingers can be slid
underneath it without much effort.
11. After riding or waiting for a time, recheck the cinches. Exertion or
excitement may cause the animal’s girth size to change.
Figure 6-3. Steps for Saddling the Animal
Boots
6-12. Their leather construction, pull-on design, high one-piece uppers,
smooth sole, pointed toes, and high heels characterize boots normally
associated with American-Western style riding (often referred to as cowboy
boots). Boots normally associated with dismounted operations have treated
multipiece leather uppers, a lace-up design, lug soles, broad toes, short heels,
and are generally shorter than riding boots. Soles that provide traction and
footing on the ground can be dangerous when trying to dismount a horse. Lug
soles tend to catch on stirrups. Boots with buckles or those with hooks used
for speed lacing are not good because the buckles or hooks can catch on the
saddle. Boots designed for riding are totally unsuitable for carrying loads over
any irregular terrain while walking or for walking any appreciable distance.
Riding boots are more difficult to fit and break in as well. Standard military
boots, in most cases, will not accept spurs. Standard riding boots will not
6-4
FM 31-27
accept mountaineering equipment (for example, crampons, snowshoes, and
skis). Modifying stirrups is not advisable or simple to accomplish. The more
suitable approach would be to use military boots with the minimum amount
of lug required and shaving down the edges of the soles to prevent the
stirrups from becoming wedged into the lug. Use the widest stirrup available.
When using military boots, exercise care when removing the foot from the
stirrup and pay particular attention to how a low heel will affect the rider’s
ability to maintain the correct seat.
Spurs
6-13. Spurs are removable metal devices that attach to the heel of a rider’s
boots and assist in the use of his legs as riding aids. There are hundreds of
variations of spurs but two basic designs. The classic or cavalry type is a short
one-piece spur. The Western style is the star or wheel shape that rotates on a
pin. Spurs are not essential for riding but can be useful in controlling an
animal. Experience, tactical considerations, the animal’s training, and
availability of spurs will influence the choice of using them or not.
Inexperienced riders may tend to use spurs improperly, which can cause
more problems than are corrected. Inexperienced animals may not
understand what the rider is asking of them when spurs are applied. When
using spurs, never poke an animal with their points. Their purpose is to
enable the horse to better feel the commands of the rider’s legs. When
applying spurs to the animal’s flanks, use the side of the spur and roll it
upward. A military user must remember that spurs may not be usable with
his boots and will impair him when dismounted.
Chaps
6-14. Chaps are leather leggings worn to protect the legs while riding. Chaps
are not required for riding but do provide considerable protection against the
tendency to chafe the legs raw from the friction between the legs and the
stirrup fenders. They also protect the leg against foliage, limbs, and other
such items the rider can brush against while riding. Chaps come in two basic
designs. The first are shotgun chaps, which are narrow and zip up the side.
The second are open or bat-wing chaps that connect by ties at the side. The
shotgun type, if not too tight, provides the best compromise between tactical
use considerations and horse-related work. Shotgun chaps are quieter and
will not snag as easily when the rider dismounts. When doing farrier-type
work, bat-wings are preferred if a farrier’s apron is unavailable.
Uniform
6-15. Other than the items already addressed, the requirements for a suitable
uniform are the same as for conventional dismounted operations. Consider
some of the following points:
• ALWAYS wear leather gloves when leading pack animals.
• Wear a hat to protect the head from low limbs. It should not restrict
hearing or vision (particularly peripheral). A chinstrap is helpful since
wind and obstructions may cause the hat to be lost and recovery from
horseback is impossible. A good choice is the jungle hat or watch cap.
• Carry nothing in your rear trouser pockets.
6-5
FM 31-27
NOTE: Items such as load-carrying equipment (LCE) will be addressed in a
later section.
Necessary Bag
6-16. A necessary bag is a small kit carried by a rider to make field repairs to
tack or other equipment. It is normally carried in a saddlebag. There is no
specific item list, but typical contents are as follows:
• Leather punch or sharp awl.
• Assorted leather or sailmaker’s needles.
• Beeswax.
• Waxed sailmaker’s thread.
• Sewing palm.
• Rivets (for leather).
• Leather boot laces.
• Small bits and pieces of leather.
Saddlebags
6-17. Saddlebags are of particular importance to the military rider. There are
many different styles of saddlebags. Construction is usually of nylon, canvas,
or leather. For military uses, heavy nylon is preferable because it is rot
resistant, abrasion resistant and easily repaired. Saddlebags are attached to
the rear of the saddle and tied down with the saddle strings located to the
rear of the cantle. Locally fabricated models can be designed to work with
issued LCE, perhaps attaching to the rider’s back. Typical dimensions of
saddlebags are 11 inches wide by 11 inches long by 5 inches thick. When
used, as with pack loads, saddlebags must be balanced and sharp contents
packed away from the animal.
RIDING TECHNIQUES
6-18. As stated previously, this manual discusses the American-Western style
of riding. Riding basics for combat applications are no different from those for
pleasure riding. What makes a difference is the skill level required of the
rider. Combat conditions force the mounted soldier to be a master of the basic
skills of riding if he is expected to accomplish his mission. Riders must
conduct actual training and practice on a regular basis for the skills of a
mounted soldier to remain of high enough caliber to conduct combat
operations.
PREPARING TO MOUNT
6-19. Once a rider’s animal has been prepared to ride (for example, it is
properly groomed and all tack is on and properly adjusted), the rider must
ensure that he is ready to ride. All equipment he wishes to carry must
already be in place on the animal and himself.
6-6
FM 31-27
MOUNTING
6-20. Untie the animal from its hitch and hold both reins in the left hand
before mounting. From the on-side, stand just in front of the saddle, face to
the animal’s rear, and turn the stirrup around so you can place your left foot
into it. With your left foot in the stirrup, place your right hand on the saddle
horn and left hand on top of the animal’s neck. Swing your right leg over the
animal’s back. Place your right foot in the stirrup when seated.
NOTE: Only when seated properly in the saddle can the stirrup length be
judged to be proper or not. If proper, the knee will have a slight bend in it
(approximately 20 degrees) and the rider should just be able to see the tip of
the toe over the knee. Another way to tell if you are seated properly is to
stand in the stirrups. There should be enough room to place two fingers
between the saddle and your crotch. Ensure that the stirrup adjustment
hardware is secure after adjustments are made.
PROPER SEAT AND AIDS
6-21. The proper seat, or how the rider positions himself in the saddle, is very
important to proper riding. The animal will become confused with the
commands the rider gives and will not have the proper stability he needs to
traverse difficult terrain if the rider does not sit correctly.
6-22. The position of the rider in the saddle and the way he uses that position
is referred to as the “aids.” Mastering the aids is the single most important
function of riding in control. (Assuming, of course, that the animal has been
properly trained.) When in the saddle, the position of the rider’s body should
be as follows:
6-23. The legs are used to create and control the forward motion of the
animal and to assist in steering. When at the normal position, the legs should
lie against the animal’s side with the heel resting just behind the girth. The
feet are placed in the stirrup with the rider’s weight resting on the balls of his
feet. This position remains the same unless the rider must give the animal a
kick. The variance comes from the pressure delivered to the side of the
animal by squeezing the leg muscles. To increase forward motion, squeeze
more in equal amounts to both sides. When turning, keep the inside leg at the
girth, and the outside leg back. When halting, apply light pressure with both
legs. When applying any aid, cease the pressure when the animal responds.
6-24. The primary objective of how the rider distributes his weight is to
remain in contact with the animal and feel its movements so he can move
with the animal. The majority of the rider’s weight will be in the stirrups;
thus the saying “standing tall in the saddle.” The spine should be straight but
not stiff. The remaining weight should be distributed evenly in the seat. If the
rider is about to change pace, he should press down in the seat with his pelvis
momentarily, without leaning forward, to warn the animal. When riding
uphill, the rider must lean forward slightly and when riding downhill lean
slightly to the rear. In either case, the rider must not exaggerate the
movement but keep the weight in the seat. These adjustments are made to
assist the animal when it must change its center of gravity.
6-7
FM 31-27
6-25. The primary function of the hands as an aid is to control the reins.
Western style riding (and horses trained Western style) responds to the
technique known as
“neck-reining.” This style allows the reins to be
controlled with only one hand. The reins are held in the dominant hand
slightly above the saddle horn. The reins should be held with slight pressure,
just enough to maintain light contact with the animal’s mouth and low on the
neck. To turn the animal, the rider simply moves the rein hand in the
direction he wishes to turn. Do not over-rein. Just give sufficient pressure so
that the animal will understand what is expected. Some experts insist that
the animal responds to the pressure created by the reins on the neck while
others maintain that it is a combination of the movements that makes the
animal react. In any case, all aids (legs, weight, and hands) must be applied
simultaneously and with only enough pressure to achieve the desired effect.
PACES
6-26. As with anything, a rider must “learn to walk before he runs.” When
training a new rider, it must be done in a controlled environment such as a
corral. Start with the easiest pace first and progress only when a rider is
comfortable with the level at which he is working.
6-27. The rider gets the horse to start moving by making light contact with
the horse’s side by squeezing his legs. The rider must maintain the proper
seat and balance. Riding one hour a week, bareback, will improve a rider’s
balance rapidly. The rider must not allow his weight or rein hand to come too
far forward, as is often the tendency. Keep the shoulders square to the animal
always. A rider may hold the saddle horn if he needs to steady himself at first
but should NEVER use the reins for any purpose other than controlling his
mount.
6-28. Unless the animal has been started in a violent manner, he should
assume a walk when given the command to start out. Maintain all aids as
described above when riding at the walk. Also, be on the lookout for anything
that may be affecting the animal such as a piece of saddle string under the
pad. The rider must remember to
“stand” in the stirrups, keeping
approximately 2/3 of his weight on the balls of his feet.
6-29. To halt the horse, close the lower legs against the animal’s side and
lightly tighten, not pull, the reins. When the animal responds, release the
pressure but not the control. It will take a rider a little time to determine how
responsive any given animal is to this or any other command.
6-30. The jog and lope paces are two different paces, but are closely related.
The aids are the same as for any pace except that the rider’s weight shifts
slightly forward. In the jog the horse will bounce quite a bit and the rider
must learn to move with the animal. To initiate the jog from a walk, repeat
the steps used to start the animal from a halt into a walk. The lope is a more
relaxing riding pace for the rider. The animal will tend to bounce less and it
is easier for the rider to maintain the proper balance. The lope is slightly
faster than the jog and is initiated from the jog.
6-31. The gallop is the fastest pace of a ridden animal and the most
dangerous. It is very easy for a rider to lose control of an animal at the gallop
if the animal becomes overexcited, which is often the case when an animal is
6-8
FM 31-27
ordered to gallop. When at the gallop, maintain control with the aids as
previously described. The rider must transfer his weight from the seat to the
stirrups and the knees. Contact should be maintained on the reins.
6-32. The rider uses the rein back to make the animal move straight back. It
should not be used over any distance. It is always performed from the halt.
The rider performs the rein back by using an “elastic” and staggered pull on
the reins and positions his weight slightly forward of center.
LEADING A PACK STRING
6-33. One of the principle advantages of using animals in the era of modern
combat is that mounted elements can move large quantities of material in
areas not suitable for conventional transport. When using pack animals, it is
often preferable to lead them from horseback to take advantage of the
animal’s superior speed. Leading pack animals from horseback is not difficult
but you must observe the following rules:
6-34. Never tie a pack string to the lead (ridden) animal. If an accident
occurs or the pack string becomes frightened, you are in certain danger if you
cannot release the string. This point also applies to leading a single animal.
Always hold the lead line in one hand. Form a bight over the saddle horn if
needed but be sure that the lead line can be jettisoned immediately, if
required.
6-35. You should never move a pack string faster than the animals in it can
comfortably navigate obstacles or difficult terrain. Keep in mind, the pack
animals are carrying dead weight and, often, heavy loads. It is often
preferable to give the string more slack when traversing an obstacle so they
can pick their way.
6-36. It is preferable to have two riders per pack string, a puller and a drag
man. The puller observes the trail to the front to anticipate problems. More
important, the drag man observes the pack string and assists in correcting
any problems that may arise such as a shifted load. If a rider is alone and
does not have someone to watch the string for him, he can ride in a figure
eight to get a good look at the string.
6-37. Always be wary at halts! The majority of accidents occur at halts
when the animals have the freedom to mill about and can become entangled.
Never allow a lead line to run under the tail of any animal, pack or ridden.
6-38. If negotiating dense terrain (timber or rocks) and the pack animals
choose a different route than the lead animal, it is better to drop the lead
line and recatch the string than it is to become entangled in an obstacle with
the string.
6-39. Never allow the pack string to get in front of the rider because if the
string should become startled, the rider could get caught up in them.
6-40. The normal distance between the lead pack animal and the rider’s
animal varies according to terrain and the animals’ training and experience.
A rule of thumb is the lead pack animal’s nose should be even with the back
of the rider’s flank while traveling over easy terrain.
6-9
FM 31-27
COMBAT CONSIDERATIONS
6-41. There are too many types of missions and units that could be assigned
to mounted duty to allow this manual to encompass all aspects of military
riding. Weapons, climatic conditions, and table of organization and
equipment (TOE) will vary too greatly for this chapter to provide specific
standing operating procedures (SOP) and doctrine capable of covering all
applications. This document will try to assist the user in formulating his
procedures with general guidance.
WEAPONS
6-42. Individual weapons are as important to the mounted soldier, regardless
of his duty, as they are to the dismounted soldier. They must be ready to be
brought into action at all times. Achieving this state of readiness from
horseback poses certain difficulties. A soldier normally will carry his weapon
in his hands when in a high state of readiness. While mounted, a soldier’s
hands are often occupied. Also, there is the problem of keeping the weapon
free of the animal and the equipment surrounding the rider. For a rider there
is also the ever-present danger of being separated from his animal. So a
primary weapon cannot be kept attached to an animal.
Side Arms
6-43. There is a very real requirement for all mounted personnel to be issued
a side arm. The preferred method of carry is the shoulder holster. The holster
serves two functions. One, the weapon will be out of the way of tack and lines,
always making it instantly accessible. Two, the weapon will always be with
the soldier. Due to the large number of duties that mounted soldiers must
perform with their hands (to include tactical movement), a side arm, because
of its ever-present availability, becomes a necessity.
Personal Weapons
6-44. While the use of animals provides a commander a valuable asset for
getting individuals and equipment to a battle, fighting from horseback is not
considered a primary function of mounted soldiers today. However, when a
unit is in a hostile environment it must be ready to fight at anytime. For a
mounted unit this includes while on the move. As stated, side arms are a
requirement for mounted soldiers but they are insufficient as a primary
weapon.
6-45. The standard weapons of the U.S. military (M16A2, M4, M60 MG,
M203, and M249 squad automatic weapon [SAW]) have a serious defect in
their size for mounted operations. It is difficult to handle the reins of a horse
and a lead line while holding a large rifle. These weapons also demand a
certain degree of accuracy that is next to impossible to achieve from
horseback. To compromise between effective firepower and effective size,
carbines are recommended. U.S. M16 variants such as the CAR-15 are
acceptable or, if operations were conducted in a UW environment, an AK
folding stock variant would be acceptable. The ability of a submachine gun to
lay a heavy base of fire from an unstable position makes it a valuable choice.
A selective fire weapon with a folding stock, extended for accuracy when
required, is the ideal choice. A very good choice of immediate suppression
6-10
FM 31-27
weapon for the mounted unit is the U.S. M79 grenade launcher. It is much
shorter and lighter than the M203 and can be maneuvered with one hand. Its
compact size will allow it to be placed in a scabbard and still be quickly
brought to bear. Several M79s dispersed through a moving unit would greatly
improve that unit’s chance of surviving an ambush.
6-46. Another consideration would be the adoption of shotguns as standard
weapons for mounted troops conducting operations in dense terrain. Their
unequaled killing ability at close range and less severe accuracy requirement
would make them a good choice as a weapon for mounted troops. The M249
SAW would be a superior choice for a general fire support weapon than an
M60 due to its size. The box magazine of the M249 is recommended because a
belt of ammunition is too unwieldy around animals. The main problem with
any of the weapons described is still how their size relates to how they can be
carried effectively and still be brought into action when needed. As discussed
before, the selection of carbine style or folding stock weapons goes a long way
in helping with this problem. However, further mention must be made about
how these weapons should be carried. As stated before, a scabbard can be
used but only when enemy contact is highly unlikely, such as traveling in a
secure area. A cross-chest carry with a top-mounted sling is the best
choice. Great care must be made that weapons DO NOT endanger the rider
or his mount by becoming entangled in reins and lead lines or by hitting the
animal.
ADDITIONAL WEAPON CONSIDERATIONS
6-47. The nature of modern battle dictates that mounted units carry more
types of weaponry than the cavalry of old. Mortars, antiarmor weapons, air
defense weapons, and sniper weapons are just a few that must be considered.
Again the METT-TC factors determine what weapons will be carried and in
what fashion. This manual discusses only a few typical weapons and generic
considerations of each.
Antiarmor Weapons
6-48. U.S. antiarmor weaponry of any effect is generally too cumbersome to
be carried on horseback. The possible exception is the M72 light antitank
weapon (LAW). You can use the LAW in many different roles but is sufficient
against main armor vehicles in only selected manners. You can conveniently
attach one or two LAWs to the rear of a saddle, behind the seat, and rig them
to be quickly released for action. Backblast must be considered if LAWs are
fired around animals. The larger antiarmor weapons (M47 Dragon and TOW)
are, in all respects, too heavy and large to be mounted with a rider but can be
mounted on a pack animal. Keep in mind, though, that they cannot be
brought quickly to bear if needed.
Air Defense Weapons
6-49. The only air defense weapons suitable for mounted operations are the
man-portable generation of weapons
(for example, the Stinger or SA-7
GRAIL). These will be too unwieldy to be carried for any distance on a ridden
animal but can be packed easily on a pack animal with consideration given to
6-11
FM 31-27
speedy access. They should be placed within the pack animal strings where
the qualified users are as well.
Sniper Weapons
6-50. Sniper weapons are not fired from a mounted position and generally not
from a hasty position. They, usually, will not have to be brought quickly to
bear. The sensitivity of their sighting mechanisms demands that they be
protected when around animals.
PERSONAL EQUIPMENT
6-51. Standard U.S. personal equipment will serve a mounted soldier well
when certain considerations are given. In most cases, an assault vest is
preferable to the “web gear” style because it fits closer to the body. You can
carry all items higher and out of the way of lines and reins. A standard
ALICE pack is too large and heavy for the mounted soldier to carry. However,
it adapts easily to being packed on an animal. You can place it on packsaddles
just like panniers. You should carry all essential and sensitive items in your
LCE. Using saddlebags and a small “day-pack” style rucksack can greatly
enhance your ability to survive if your ALICE pack gets lost.
6-1. A mounted soldier carries the essential items with him. These include,
but are not limited to, the following:
• Knife.
• Water.
• Rope.
• Necessary bag.
• Personal hygiene kit.
• Required first aid supplies.
• Compass.
• Chemlights, all colors to include infrared.
ADDITIONAL EQUIPMENT
6-52. Modern combat operations depend on communications. If a soldier is
designated to carry unit radio equipment, it must be carried with him. For
this reason, commanders should make every effort to provide a mounted unit
with the smallest and lightest communications equipment.
NOTE: Never carry sensitive and/or classified communications items on a
pack animal.
6-12
Chapter 7
Techniques and Procedures
It is easier to demonstrate how to pack an animal than it is to try to
explain how to do it. The ONLY way to learn this skill is by attending a
school on packing or spending time with a knowledgeable person who can
show you how it is done.
TYING AND USING KNOTS
7-1. There are a variety of knots useful in packing; this section introduces a
few and is by no means inclusive. There are several knots most frequently
used and you may perhaps know, or learn, of others equally useful. As horses
and packing become more familiar, you may even come up with some of your
own invention. There is no one perfect way to throw a hitch or tie a sling; use
what feels comfortable and works best with the horse and the load you have
to pack.
7-2. You cannot learn to tie a knot just by reading about it. As with packing
and horse handling, the only way to learn this skill is by doing it. Figure 7-1,
page 7-2, and Figure 7-2, page 7-3, explain and illustrate several commonly
used knots. The recommended method is to get a length of rope and practice
tying the various knots until you become proficient.
WRAPPING CARGO WITH A MANTA
7-3. A manta is a tarp that is either lashed over the top of the load secured
on a packsaddle or used to wrap up cargo that is to be placed or slung on a
packsaddle. This cargo could be duffel bags, kit bags, sacks of grain, or hay
for the animals. Large duffel and sleeping bags that are to be slung on a pack
load should be wrapped regardless of the type of material with which they are
made. If you sling them next to a pack animal without wrapping them, they
will pick up the sweat and oil off the animal. Besides soiling the articles, they
will end up smelling like a sweaty packhorse.
7-4. If you can wrap a present, you can use a manta on any item you want to
put on a pack animal. Remember that the side next to the animal will have to
be flat and smooth. As in wrapping the present, take pride in the appearance
of the finished package. One-quarter-inch rope is usually used to tie the
manta load together. The following steps explain how to use a manta on a
bale of hay:
• Center the bale on the tarp diagonally.
• Wrap one side around the bale. Fold the other side so it reaches only to
the center of the bale.
• Fold the ends inward.
7-1
FM 31-27
• Make a loop around the bale, then pull tight.
• Make three half hitches around the bale, or two if it’s a small load.
• Tie off with a sliding clove hitch.
Hitch Knot or Slip
Used to tie a horse to the hitching rail.
Knot
NOTE: This knot will slip and tighten up; NEVER tie this knot or any other slip
knot around an animal’s neck; it could possibly choke the animal before the
knot could be released.
Round Turn With
Used with two half hitches to tie the end of a rope around an object such as a
Two Half Hitches
post, tree, or part of the packsaddle.
Bowline
Used in various ways and is one of the best knots for forming a single loop
that will not tighten or slip under strain. The ONLY knot that should ever be
tied around an animal’s neck. Forms a loop that may be of any length
desired. (When tying a horse to a tree or a picket pin, use the bowline since it
will not tighten.) The loop remains loose and will not wind up if the animal
walks in a circle around the tree or picket pin.
Clove Hitch
Used to fasten a rope to a pole, post, or similar object. Can be tied at the end
of a rope or at any point along the length of a rope.
Timber Hitch
Used for moving heavy timbers or poles. The more tension applied, the
tighter the hitch becomes. Will not slip, but will loosen easily when released.
Sheepshank
Used to shorten a rope without cutting it. Also used to take the strain off a
weak spot in a rope. It is a temporary knot unless the eyes are fastened to
the standing part on each end of the knot.
Double Sheet
Used to tie together the ends of ropes of equal or unequal diameter, to tie
Bend
wet ropes, or to tie a rope to an eye. Also used to tie the ends of several
ropes to one rope. Will not slip or draw tight under heavy loads.
Butterfly Knot
Used to form a fixed loop or loops in place along the length of a rope without
using the ends of the rope. Can be used to attach the middleman on a
climbing party, tighten installed ropes, and make tie points on a picket line.
Cat’s Paw
Used to form a loop along the length of a rope without using the ends of the
rope. It can be used to tighten installed ropes and to make tie points on a
picket line.
Dutchman and
Used to take the place of a pulley. The pulley knot can also be used to make
Double Dutchman
tie points on a picket line.
Quick-Tie and
Used when you need a knot that is quick to tie and quick to untie.
Quick-Release Tie
Square
Used only in simple applications. Used to tie packages and for binding rolls. It
is easy to tie, will not jam, and is always easy to untie.
Figure 7-1. Commonly Used Knots
7-2

FM 31-27
Figure 7-2. How to Tie Specified Knots
7-3
FM 31-27
7-5. The load can be slung using a basket or barrel sling. You can also use
short ropes to loop the load to the bucks, then tie off with a lash rope and box
hitch.
BUILDING LOADS
7-6. Whether you are packing one animal or 20, it takes a plan of attack. In
reality, a pack animal is packed in your mind before the actual pack is ever
loaded on the animal. Planning is the most important part of packing. You
should decide which animal will carry which load best, which will be your
lead pack, and which can be trusted to stand without trying to lie down or roll
while the others are loaded.
7-7. A very good method to follow in planning your pack loads is to lay out
several tarps or mantas on the ground to keep the items clean and dry. If you
have several personnel whose gear is being loaded in the packs, have them
put it all on the tarps. Explain that once you start to lay out the packs, they
cannot take anything out or add to the pile of gear without asking you first.
Any item taken out of a duffel bag you have already hefted for weight will
throw you off by the weight of that item. This amount could be just enough
weight variation to either sore the pack animal or slip the pack on the trail.
7-8. When preparing to pack, load the equipment each man is responsible for
onto one animal as neatly as possible, and if more than one animal is needed,
keep them together in the string. This practice makes things simple at
overnight halts and when the final destination is reached, so one man does
not have to go through the panniers of several different animals searching for
what he needs.
7-9. One of the many secrets of packing—possibly the most important—is to
keep the weight down at the bottom of the pack. This gives the packer a good
solid foundation on which to build the rest of the load. A good load for most
horses or mules is 160 to 170 pounds. However, if you have some small
animals in the pack string, this amount could be too much for them. We are
speaking of 1,100- to 1,200-pound packhorses and 800- to 1,000-pound mules.
In extreme circumstances, you can load an animal with up to 250 pounds;
however, this amount would limit his speed and endurance. The horse gear
(shoes, nails, hobbles, bells, picket chains, ropes) usually will fit in one set of
panniers (two panniers). Remember this set of panniers well, as it will be the
first item needed when you unpack at your destination. Try to keep all your
camp tools (shovel, ax, saw, currycomb, brush) on this pack load; it will save
you a lot of time when you arrive at your camp for the night. You will know
exactly where all your tools are.
7-10. When loading the bottom of box panniers, you want everything to fit as
snugly as possible to keep from rattling. A pile of gunnysacks close at hand is
good for chinking up any rattles. Distribute the items through several sets of
panniers, if necessary. Two layers of heavy items in a pannier are a big
bottom load. If you have plenty of pack animals and box panniers, one layer
of heavy items in several boxes will be better than trying to get it all on one
pannier. Pack lighter items on top to keep the weight mostly in the bottom of
the pannier.
7-4
FM 31-27
7-11. Canvas panniers come in all sizes, shapes, and forms. Their general use
in packing is to load them with bulky items that will not fit the box panniers.
The loading method as mentioned before is the same: keep the weight down
at the bottom. Just because a canvas pannier sometimes looks like a big sack,
do not make the serious mistake of loading it like a grocery bag. There is
nothing between the load in the canvas pannier and the pack animal but a
thin layer of canvas. Load the canvas pannier so it is smooth and flat on the
side next to the pack animal. If there are a lot of odd-shaped sleeping bags
and duffel bags, here is a good place to put them. This method is also the best
way to pack the grain for the animals. Having numbers on all the panniers is
a great help in keeping them in sets of two. Whether there are numbers on
the panniers or not, keep the sets together when you have finished loading.
7-12. When you have all the supplies, horse gear, grain, and other things
packed in the panniers and any sling loads wrapped, you are ready to finish
your pack loads with personal gear of the party. Select two items of equal
weight and put one in each pannier, all the time keeping in mind what each
pannier weighs. Next, you may need a top pack. Select two duffel bags or
sleeping bags of equal weight and place these on each pannier. Now is a good
time to recheck the weight of your panniers to make sure they are still equal.
Have a scale you can suspend from a tree limb to weigh the panniers; a
difference of only a few pounds between them can make all the difference
once you start down the trail. If you feel that both panniers together weigh
under approximately 150 pounds, find a third sleeping bag or duffel bag for a
center load. Lay this third item across both panniers, showing it as the center
load, place a manta and lash rope over the entire pile, and allow no one to
disturb it until you are ready to load it on a pack animal.
7-13. After you have gone through the pile of things to be packed, there will
probably be several items that look like they will not fit any of the loads you
have laid out. If they are small and light enough to make another pack load,
you can often find a place for them as you pack out the other loads. You will
have to keep these items in mind while loading the other panniers or you will
end up with one or two things left out.
SADDLING
7-14. Listed here are some techniques and lessons learned that will stand you
in good stead (see Chapter 5 for saddling details). There are quite a few
different types of packsaddles, and each has to be rigged differently to get the
pack on it. These saddles may have any number of different riggings and may
or may not have quarter straps. Whatever the type, all saddles must properly
fit the pack animal.
7-15. The padding between the pack animal and the saddle is a very
important piece of pack gear. Pack pads as a rule are larger and thicker than
regular riding pads, and for good reason. Once you pack the animal and the
load rests on these pads, they will stay there until the animal is unpacked.
Pack pads are made of many materials, the best being one that will stay soft
and not pack down. The most commonly used pads have a fiber or hollow hair
filling between two layers of light canvas.
7-5
FM 31-27
7-16. Whatever type of pad you are using, check it thoroughly for any foreign
objects before placing it on the animal. Sweat will build up but can be
scratched off with the currycomb. Wet pads will gall or cause sores on a pack
animal. Lay the saddle pads out where they can air out and dry when
possible. Always try to place the pack pads square on the packhorse, leaving
at least 4 inches to the front of the packsaddle. Depending on the shape of the
pack animal’s back, you may need more than one pack pad. The best way to
gauge is to set the packsaddle on the animal, then check the clearance
between the saddle and the animal’s withers; there should be enough space
for two fingers.
7-17. Allow for the saddle settling down on the pads after the animal is
loaded. If there is any chance of the saddle forks coming in contact with the
top of the withers, put another pack pad under the saddle. Also make sure
you do not put too much padding on the withers and cause the packsaddle to
pinch from being too thick. Most good pack pads are thin down the center of
the pads. Your aim in a high-withered animal is to raise the packsaddle off
the tops of the withers. Some packers use what is called a cheater, a small
pad usually made of a wool. You can place these cheaters between two
regular pack pads in the wither area to raise the front of the packsaddle off
the withers and yet have the saddle sitting evenly on the pack animal’s back.
7-18. Now is the time to again check the pack animals to see if the saddles on
them are rigged for the type load the animals will be carrying. If you have
one or two sling loads, you know you will need that many sling ropes on the
saddles and have them tied off ready to use in saddling the pack animal.
Recheck the pack pads to make sure they are loose over the withers of the
animal and that the packsaddle sits in the middle of the pads.
7-19. During all the loading of the panniers and other gear, DO NOT lead the
pack animal around to pick up parts of the load. It is a very serious mistake.
Once you begin loading an animal, wait until the pack load is lashed down
before ever moving him, or you will be picking up parts of your load from the
ground after they have slipped off.
7-20. If you are going to move the pack animal from where he was saddled to
where the pack load is sitting, pull the cinches up snug before you lead him to
the pack load, then finish tightening the cinches just before loading. This
technique is called “untracking” the animal. If pack animals that have been
saddled and standing with a loose cinch have the cinches tightened and are
then loaded without moving around first, they could experience some
discomfort from being pinched or having a fold in their skin caught under the
cinch. This pain will often cause them to throw the whole load off. When you
pull up the cinch on a pack animal, untrack him before you put the pack load
on him; moving around a bit allows the cinch to settle into place, and the
animal will be more comfortable. This practice also applies when the packing
is completed. You should be continually checking the animals and how the
loads are riding anyway, but especially watch the animal as he takes the first
few steps after being packed; if the load looks like it’s shifting, make
whatever adjustments are necessary.
7-21. Whenever possible, get some help in loading the panniers onto the
animals because when packing alone you will have to keep moving from side
7-6
FM 31-27
to side. While you are moving to the opposite side, the load on one side is
pulling the packsaddle over and pinching the animal’s withers. With a heavy
load, this could cause the animal enough discomfort to buck off the load or at
least turn the packsaddle.
7-22. Some panniers have ropes or straps that you can adjust to set the height
at which the panniers will sit on the pack animal, while others are slung with
the sling rope. Regardless of the method you use, the panniers must be even
in height on the pack animal. A pannier low on one side pulls the saddle in
that direction and either causes a sore on the animal or slips the entire pack.
After loading the panniers on the animal, step to the rear and check that they
are evenly placed.
7-23. With any center load, such as a duffel bag, make sure the opening is to
the front of the animal. The motion of the animal usually shifts things
around, and with the opening to the front, you can see if any items are
working their way out of the bag while on the trail. Regardless of what is
center packed, make sure that after the load is lashed down it will not rub the
animal.
7-24. The manta or pannier tarp is next. Pull the manta down evenly on both
sides of the boxes and tuck in the ends around the panniers. Keep checking to
make sure the pigtail on the packsaddle is clear and out where you can tie
into it. A good solid pack will look sloppy if you do not take the time to use the
manta neatly and tie it up right. Be as proud of a good-looking pack as you
would be of a well-wrapped present.
SLINGS AND HITCHES
7-25. The packer uses the “sling” to initially attach the load (panniers, manta,
hay) to the saddle. Once you do that, throw a manta across it and use a
“hitch” to secure the entire load to the animal. You then tie the sling to the
saddle and the hitch to the animal.
7-26. The basic purpose of a hitch is to secure the entire load to the
packsaddle and the animal as a balanced unit and still not have to use 100
feet of rope. You have to throw these hitches so they can be taken off the load
with little effort.
7-27. The different means of tying a load down on a pack animal are not as
confusing as they might sound. You will hear and read about such things as a
one-man diamond, half diamond, full diamond, double diamond, squaw hitch,
box hitch, and many other means of tying. You do not have to learn them all,
but if you learn one or two of the most commonly used hitches, you can tie
down almost any load you encounter.
7-28. To “throw a hitch,” means just that. You throw the loops and coils of
your hitch on the pack in such a way that when you give the hitch its last
pull, all the ropes pull tight. When you release the hitch to unpack the
animal, you don’t have to spend time unwinding or untying knots in the lash
rope.
7-29. Most new lash ropes are approximately 40 to 50 feet long. They come in
many diameters and are made of several materials. In most cases lash ropes
7-7
FM 31-27
are approximately
5/8 inch in diameter and either of manila or nylon
material. Polyester rope makes the best lash ropes because wet weather
makes grass or hemp ropes very difficult to handle.
7-30. If you pack an animal with wet slings or lash ropes made of hemp, you
may not go very far up the trail before the slings and hitches start to dry and
stretch out. This stretching will make your pack loose or uneven and could
cause a considerable delay in reaching your destination. In camp, or wherever
you find yourself, keep any hemp lash and sling ropes dry if at all possible.
Don’t throw them on the wet ground while packing an animal. Hang them on
a tree limb or lay them on a tarp or dry place until you are ready to use them.
7-31. The lash cinch (on the end of the lash rope) needs checking often for
signs of fatigue in the cinch materials. It has a ring in one end and a hook in
the other end to simplify the makings of a hitch. The lash cinch is really, in
most hitches, the beginning and the end of a hitch. The packer throws the
lash cinch across a loaded pack animal and very often the person on the off-
side forgets to duck or watch for it to come over. It does not take many knots
on the head to learn respect for this piece of pack gear.
7-32. Whatever hitch you use on the pack load must hold the ends, sides, and
bottom of the panniers, besides holding the top pack. If you balance the pack
on the animal properly, the lash rope can hold the pack down and together.
You cannot balance a pack with the lash rope. After you pack everything
inside so it won’t rattle or break and the wrapping is on, you are ready to
lash. You want something that looks good yet holds the wrapping and box
together. You have other loads to wrap, so it has to be tied up fast and simple
and yet hold tight.
7-33. Handling a lash rope while throwing a hitch can be dangerous if you
become tangled in the rope and the animal gets spooked or starts bucking.
Make sure you don’t have coils around your feet or arms, as they could cause
you to get dragged or seriously injured. The safest way to handle this
situation is to keep the tail, or excess, rope thrown out to the right while
throwing the hitch.
7-34. Whatever hitch you choose to use, always check the pigtail on the
packsaddle to make sure it is still clear and ready for use. Again, check the
entire load, front and rear, to see if it is sitting straight. If it looks like the
entire pack load has shifted to one side, lift up on the low sides and see if it
will rock back straight. If it doesn’t, completely repack the entire load. This
rechecking will save you time on the trail repacking where you may not have
help or a place to tie up. It can also prevent sores (rubbing a raw place on his
back or side) from developing on the animal. Check any loose rope or manta
ends sticking out and tuck them in.
7-35. The following are several methods of securing cargo. The first two are
slings; they are used to attach the load to the saddle. The next two are
hitches; they are used to secure the entire load to the horse. If you tie the
sling on a sawbuck saddle, you can tie the same sling onto a Decker saddle by
running the ropes through the loops at the top of the saddle rather than
behind the bucks. With a little imagination and ingenuity, you can adapt any
of the slings and hitches to whatever type saddle (to include riding saddles)
and load is on hand.
7-8
FM 31-27
BARREL SLING
7-36. If the saddle does not already have a sling rope attached to it, tie one
onto the sawbuck saddle by using a clove hitch in the center of the rope and
onto the Decker using two bowlines. Make sure the sling rope is around 50
feet long, though this may vary according to the size of the cargo.
7-37. Starting on the right side of the animal, make a large loop at the
forward end of the saddle, pass the rope behind the bucks to the rear, then
make another large loop at the rear of the saddle. Bring the rope back behind
the rear buck, then down to the sling ring (Figure 7-3, A, page 7-10).
NOTE: Repeat this procedure on the left side of the animal.
CAUTION
After running the ropes under the forks of a sawbuck
saddle, check the clearance between the ropes and the
withers to make sure the ropes will not rub the animal’s
back raw.
7-38. Slip the cargo through the loops, then tighten up by running the end
around the section of rope behind the bucks, pulling tight, and then tying off
onto the sling ring (Figure 7-3, B, page 7-10).
CROWFOOT SLING
7-39. As with the barrel sling, start by tying a sling rope onto the saddle.
Draw the rope around the cargo, through the back hoop, down between the
cargo and the animal, then back out and up the center of the outside of the
load.
7-40. Pull one loop through the horizontal portion of the rope, then pull
another loop through that one. Pull the first loop tight, then expand the
second to fit around the bottom of the cargo. Allow enough slack so the
bottom of the loop can pass through the cinch ring. Thread the end of the rope
through this loop. Pull the sling tight, then pull another loop through the
horizontal section, and secure it with two half hitches (Figure 7-4, page 7-11).
BOX HITCH
7-41. The packer begins the hitch by standing on the left side of the animal
and throwing the cinch over its back, catching it and pulling it under the
belly. The hitch does not tie off anywhere on the saddle.
DIAMOND HITCH
7-42. The diamond is useful for soft loads. The one-man diamond is easiest to
tie (Figure 7-5, page 7-12). Again, this hitch does not tie off anywhere on the
saddle.
7-43. This section is not meant to totally encompass slings and hitches—just
enough of the basics to suffice for the most commonly encountered situations.
As stated before, you cannot learn this skill by reading about it; you must find
7-9

FM 31-27
someone knowledgeable on the subject and have him demonstrate how it is
done.
Figure 7-3. Barrel Sling
7-10

FM 31-27
Figure 7-4. Crowfoot Sling
THE PACK STRING
7-44. Now that you have first class, well-balanced packs on the pack animals,
you need to make up the pack string. It helps to know your animals in
selecting which one you will use for a lead pack. Should you select an animal
that will not lead up on a slack rope, you will spend your time dragging this
animal along behind you all day. Many pack outfits using mules have a horse
they call the Bell Mare. You can put a bell on this particular horse and lead
just the one animal and the rest will usually follow. Using horses as pack
animals is another situation. Horses and mules form habits, just as teams do,
as to what position in the string they should be. If you know this position
when tying a string together, you will have a well-organized pack train going
up the trail. Often one of your pack animals will have a very fragile load that
needs special attention on the trail. You may find that this is the animal you
want as lead, so keep this in mind when loading out the packs.
7-45. An important safety rule to remember whenever you are afoot around
pack animals tied together is to always be in the clear. Many things can
happen, even with the most gentle pack stock. Two animals with box
panniers can definitely put the squeeze to you if you get between them. It
does not have to be the pack animal you are working on that causes the
trouble. It can be any one of the animals in the pack string. If one jumps or
bucks, the whole string, being tied together, has to go along. If you are in the
middle of several loaded pack animals, try to keep them standing apart and
in a line. Do not get in the middle of them when they are bunched up.
7-11

FM 31-27
Figure 7-5. Diamond Hitch
7-46. Never get off your saddle horse into a crowd of spooked and bucking
pack animals. You should try to keep them circling or headed straight out
until they settle down. You do not stand a chance afoot until you have them
where you can get a hold on the head of whichever animal is causing the
problem. You may feel helpless sitting on your saddle horse, watching all that
gear being thrown off and trampled, but just remember that you could very
easily be the one that is getting trampled or kicked.
7-12
FM 31-27
7-47. Tying the pack string together takes just a little common horse sense.
You want to give the animals all the room possible between them and yet not
have so much lead rope that they can get a leg over the rope when their
heads are down. A good gauge for the length of rope is to use the hoof of the
pack animal you are tying off to. If the animal you are tying off is standing
approximately nose to rump to the other animal and the lead rope is down
about to the hoof on the lead pack animal, this length is just about right.
7-48. You can tie the pigtail on a packsaddle in several ways. One opinion is
to run it through the rear forks of the packsaddle and down to the front
rigging rings. Installing a pigtail this way pulls only on the cinch and not on
the packsaddle. A nylon or polyester piece of 3/8-inch rope braided at the
rings makes a very substantial pigtail.
7-49. Often it is a good idea to have a “breakaway” in the end of the pigtail
where you will be tying the lead ropes of the pack string. You can make the
breakaway with light 1/4-inch hemp rope. Should there be an emergency
where the pack animal needs to break loose, it can usually break this light
rope.
7-50. When leading a string of pack animals, you want to be all eyes. The first
mile on the trail is the most important. This short distance helps you find out
if the packs are tight and well-balanced and if you missed some rattles in the
panniers. You will want to look back over the pack string about as much as
you look ahead. When you come to a turn in the trail, get a side view of the
packs. Often you can see something coming loose that can easily be fixed, but
if left unattended could cause a pack to slip or something to be lost on the
trail.
7-51. One of the most common mistakes a green packer makes is not giving
the pack string time. When you cross a ditch, rock, or downed trees in the
trail, your saddle horse most likely will just step over or around it and keep
right on going. Possibly the next pack animal (the lead) will keep up easily
enough, but the second pack animal will have to really hurry to get across the
obstacle. When it comes to the third animal, he will either have to jump or
pull back and so on down the line. When you cross or go around any obstacle
on the trail, slow up until all your pack animals have gotten around or over it.
7-52. If you have steep country to climb in, give the pack string a lot of time to
stop and get their breath. Pick a good spot where they are all standing square
on the trail. You cannot use your saddle horse as a gauge for when to stop to
breathe the pack string. The saddle horse may be carrying a 200-pound load,
but that load is in balance with him while he is climbing. The pack animal
has dead weight and needs more air to pack his load up the hill.
7-53. On long trips and especially when climbing, periodic rest stops will be
necessary but do not overdo them. Stopping for long periods on the trail can
cause more packs to needlessly slip. If you have to stop for lunch or whatever,
take the pack string apart and tie each animal to a tree. If at all possible,
keep the pack string in motion. The pack load is continuous on the animals
and the quicker it can be taken off, the better for the animals.
7-54. When you come to a stream or any fresh water, let the animals drink.
Do not just ride in and stop, make sure there is room for them all to drink at
7-13