Kia Niro Hybrid / Plug-in Hybrid (2022 year). Manual in english - page 16
Driving your vehicle
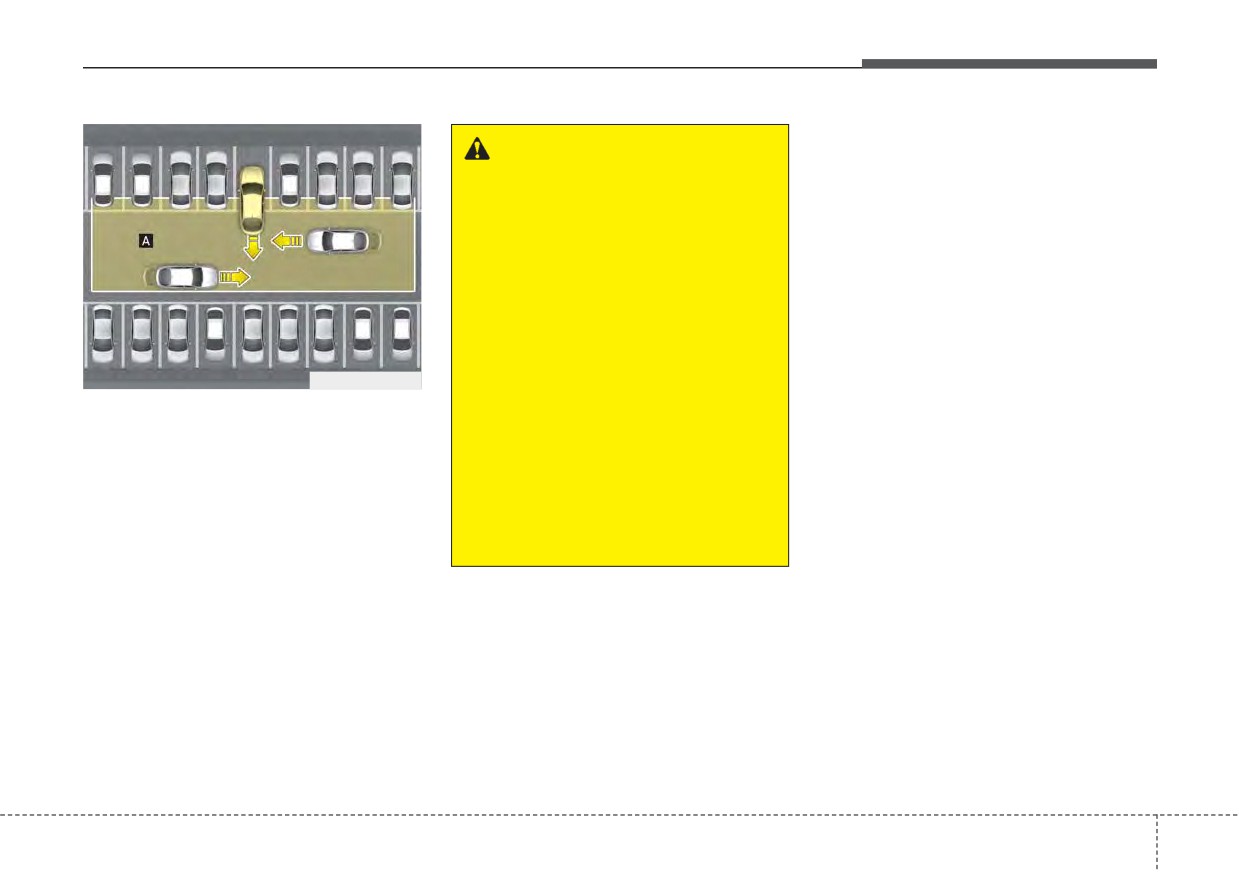
REAR CROSS-TRAFFIC COLLISION WARNING (RCCW) (IF EQUIPPED)
Rear Cross-Traffic Collision
WARNING
Warning setting and activation
•
Always be aware of road con-
Rear Cross-Traffic Collision
ditions while driving and be
Warning setting
warn for unexpected situa-
•
The driver can activate the function
tions even though RCCW is
by placing the START/STOP button
operating.
to the ON position and by selecting
•
Rear Cross-Traffic Collision
‘User Settings Driver Assistance
Warning is supplemental func-
Parking Safety Rear Cross-
tions to assist you. Do not
Traffic Safety’. Rear Cross-Traffic
entirely rely on the functions.
Collision Warning turn on and get
ODEP051413L
Always pay attention, while
activated.
Rear Cross-Traffic Collision Warning
driving, for your safety.
•
When the vehicle is turned off then
uses radar sensors to monitor the
•
Rear Cross-Traffic Collision
on again, the functions always get
approaching cross traffic from the left
Warning is not substitutes for
ready to be activated.
and right side of the vehicle when
proper and safe driving.
your vehicle is in reverse.
•
When the function is initially turned
Always drive safely and use
on and when the vehicle is turned
The blind spot detection range varies
caution when backing up the
off then on again, the warning light
relative to the approaching vehicle
vehicle.
will illuminate for 3 seconds on the
speed.
outside rearview mirror.
5
163
Driving your vehicle
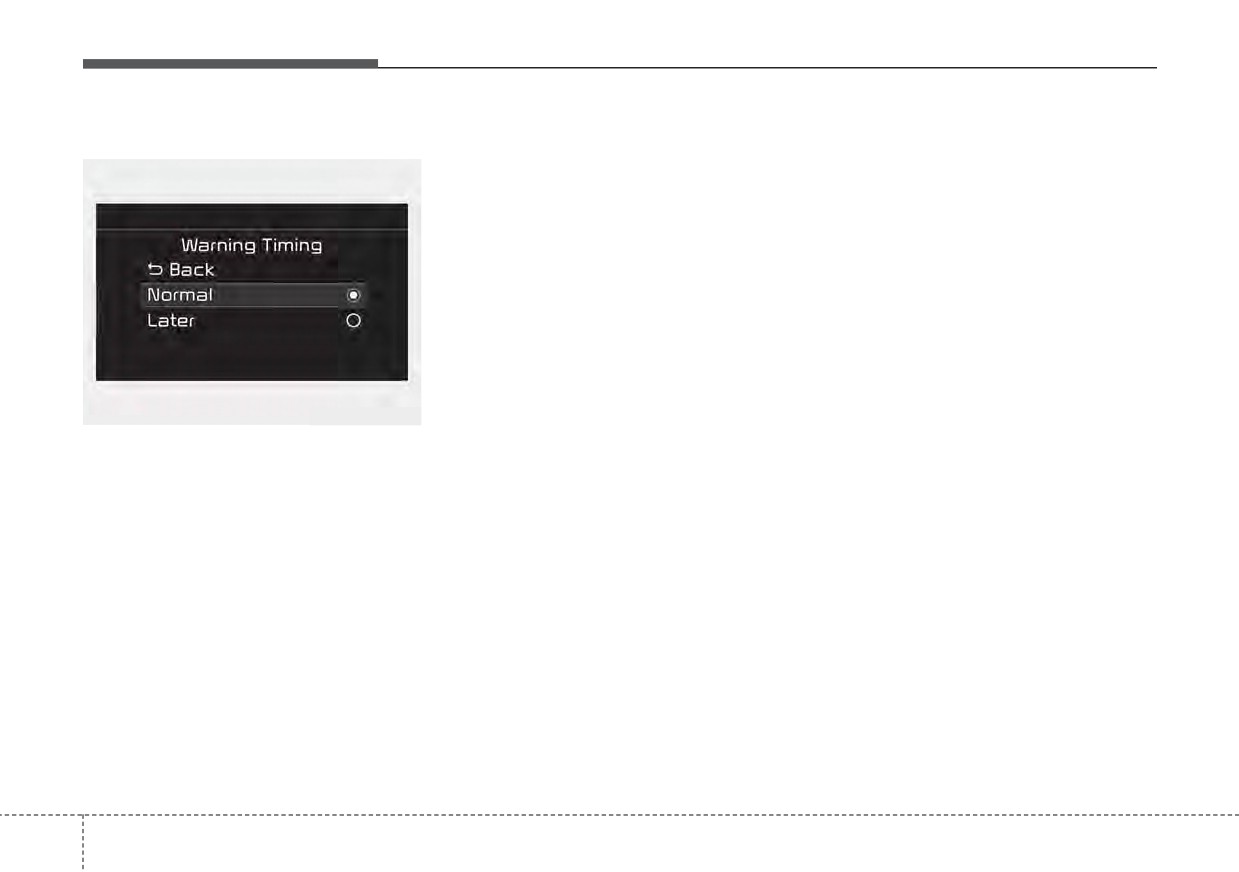
Warning Timing
- Normal:
Operating conditions
When this condition is selected, the
The function will activate when vehi-
initial Rear Cross-Traffic Collision
cle speed is below 7 mph (10 km/h)
Warning is activated normally. If this
and with the shift lever in R
setting feels too sensitive change the
(Reverse).
option to ‘Later’.
* Rear
Cross-Traffic
Collision
The warning activation time may feel
Warning will not activate when the
late if the side/rear vehicle abruptly
vehicle speed exceeds 7 mph (10
accelerates.
km/h). The function will activate
- Later:
again when the speed is below 5
Select this warning activation time
mph (8 km/h).
when the traffic is light and you are
driving in a low speed. However, if
OYG059344L
Rear Cross-Traffic Collision Warning’s
you change the warning activation
The driver can select the initial warn-
detecting range is approximately 0 ~
time, the warning activation time of
ing activation time in the Cluster by
vehicle's other function may also
82 ft. (0.5 ~ 20 m) An approaching
selecting
“User Settings
Driver
change. Check the warning activa-
vehicle will be detected if their vehicle
Assistance Warning Timing”. The
tion time before changing it.
speed is within 5 ~ 22.5 mph (8 km/h
options for the initial Rear Cross-
~ 36 km/h)
Traffic Collision Warning includes the
Note that the detecting range may
following:
vary under certain conditions. As
always, use caution and pay close
attention to your surroundings when
backing up your vehicle.
5
164
Driving your vehicle
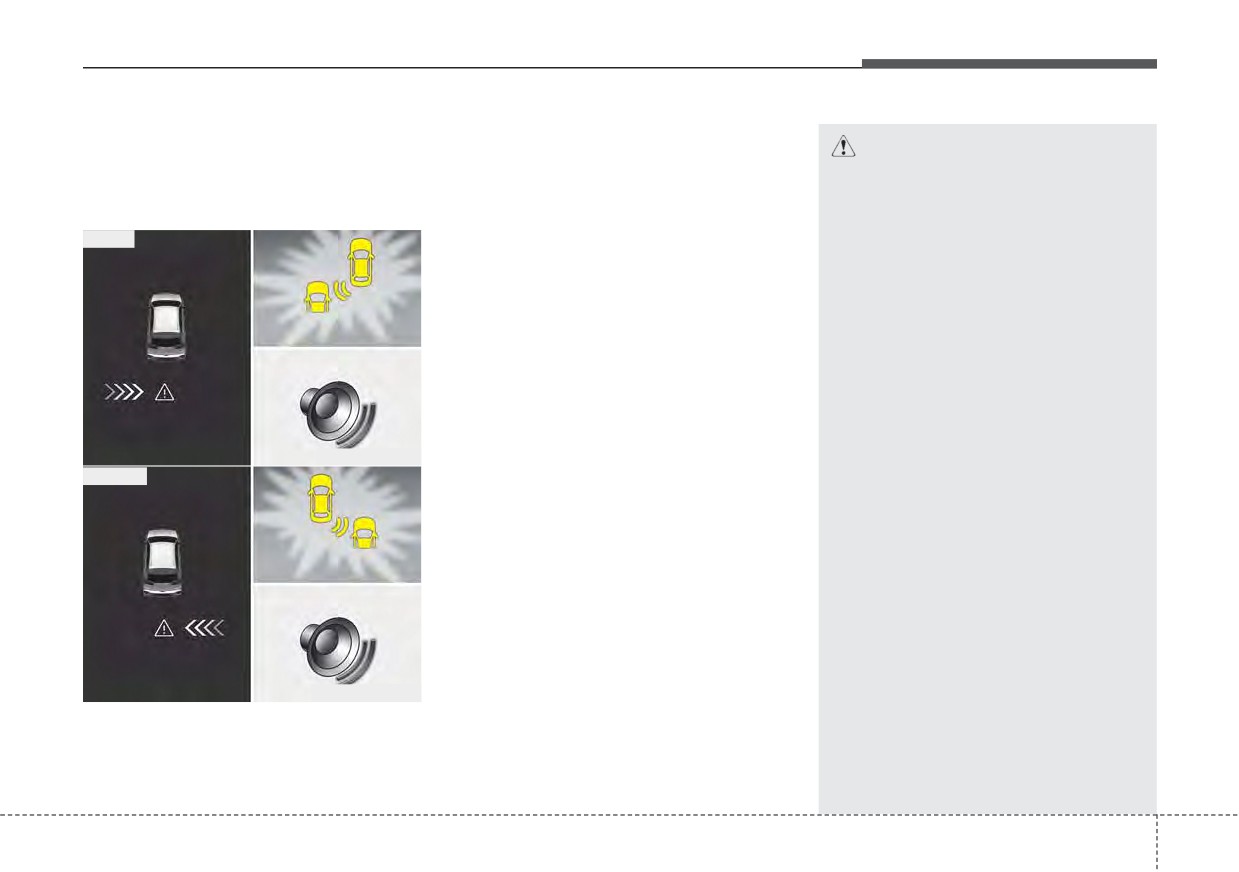
Warning message and func-
If the vehicle detected by the sensors
tion control
approaches from the rear left/right
CAUTION
side of your vehicle, the warning
•
When the operation condition
Rear Cross-Traffic Collision
chime will sound, the warning light
of Rear Cross-Traffic Collision
Warning
on the outside rearview mirror will
Warning is met, the warning
■ Left
blink and a message will appear on
will occur every time a vehicle
the LCD display. If the rear view cam-
approaches the side or rear of
era function is in activation, a mes-
your stopped (0 mph (0 km/h)
sage will also appear on the
vehicle speed) vehicle.
‘Infortainment System’.
•
The function’s warning or
brake may not operate properly
The warning will stop when:
if the left or right of your vehi-
cle's rear bumper is blocked by
-
The vehicle moving at the rear
a vehicle or obstacle.
left/right side of your vehicle is not
ODEP050385N
in the detection range.
•
The driver should always use
■ Right
extreme caution while operat-
-
The vehicle is right behind your
ing the vehicle, whether or not
vehicle.
the warning light on the outer
-
The vehicle is not driving towards
side view mirror illuminates or
your vehicle.
there is a warning alarm.
-
The vehicle’s approaching speed is
•
Playing the vehicle audio sys-
decreased.
tem at high volume may pre-
vent occupants from hearing
the function’s warning sounds.
•
If any other warning sound
ODEP050386N
such as seat belt warning
chime is already generated,
Rear Cross-Traffic Collision
Warning warning may not
sound.
5
165
Driving your vehicle
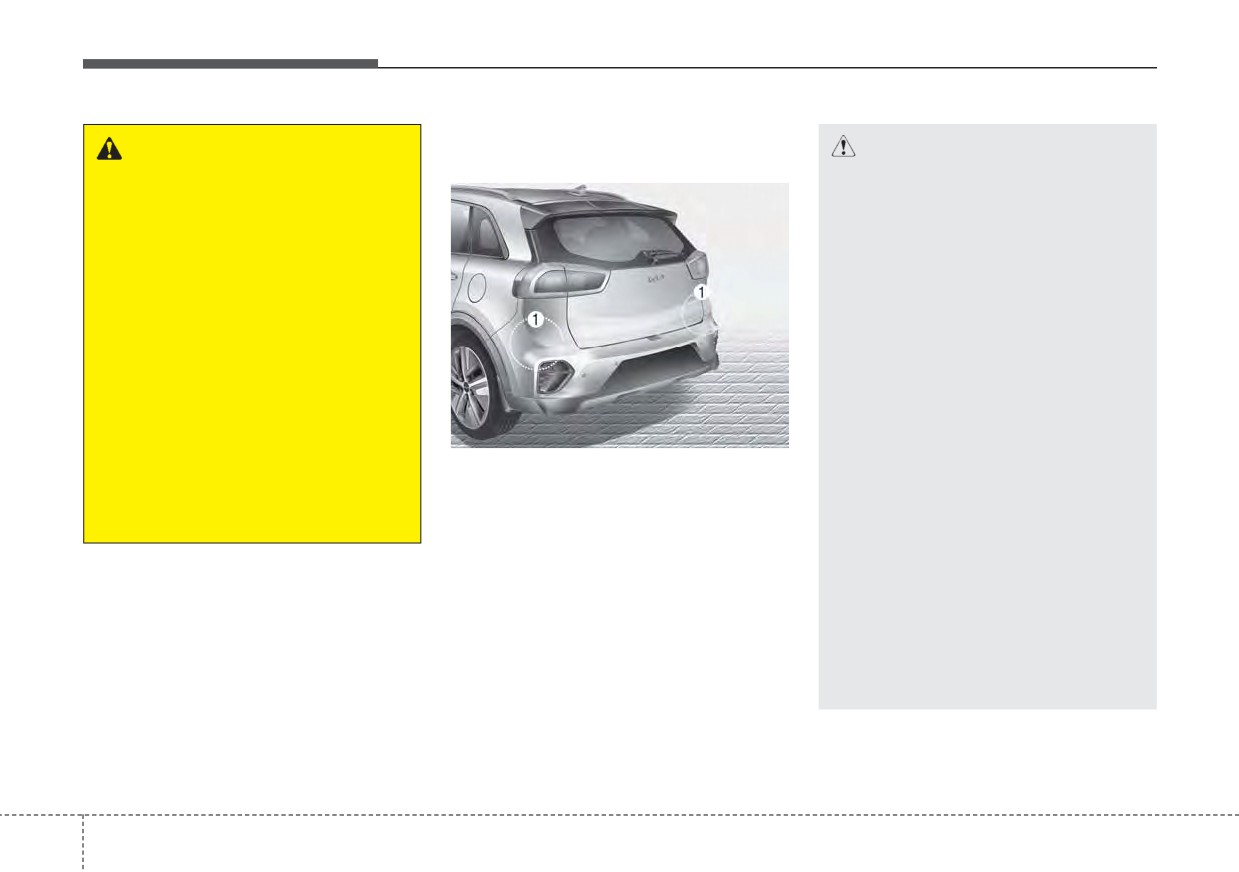
Detecting sensors
(Rear corner
WARNING
radars)
CAUTION
•
Drive safely even though the
•
Rear Cross-Traffic Collision
vehicle is equipped with Rear
Warning may not work proper-
Cross-Traffic
Collision
ly when the bumper has been
Warning. Do not solely rely on
damaged, or if the rear
the function but check your
bumper has been replaced or
surrounding when backing
repaired.
the vehicle up.
•
Rear Cross-Traffic Collision
•
The driver is responsible for
Warning may turn off due to
accurate brake control.
strong electromagnetic waves.
•
Always pay extreme caution
•
Always keep the sensors clean.
while driving. Rear Cross-
•
Never arbitrarily disassemble
Traffic Collision Warning may
the sensor component nor
ODEP051158
not operate properly or
apply any impact on the sen-
[1] : Rear corner radars
unnecessarily
operate
sor component.
depending on traffic and driv-
The rear corner radars are located
•
Be careful not to apply unnec-
ing conditions.
inside the rear bumper for detecting
essary force on the radar sen-
the side and rear areas.
sor or sensor cover. If the sen-
Always keep the rear bumper clean
sor is forcibly moved out of
for proper operation of the function.
proper alignment, the function
may not operate correctly. In
this case, a warning message
may not be displayed.
(Continued)
5
166
Driving your vehicle
A trailer or carrier is installed. (To use
(Continued)
Blind-Spot
Collision
Warning,
Take your vehicle to an author-
remove the trailer or carrier from your
ized Kia dealer and have the
vehicle.)
function checked.
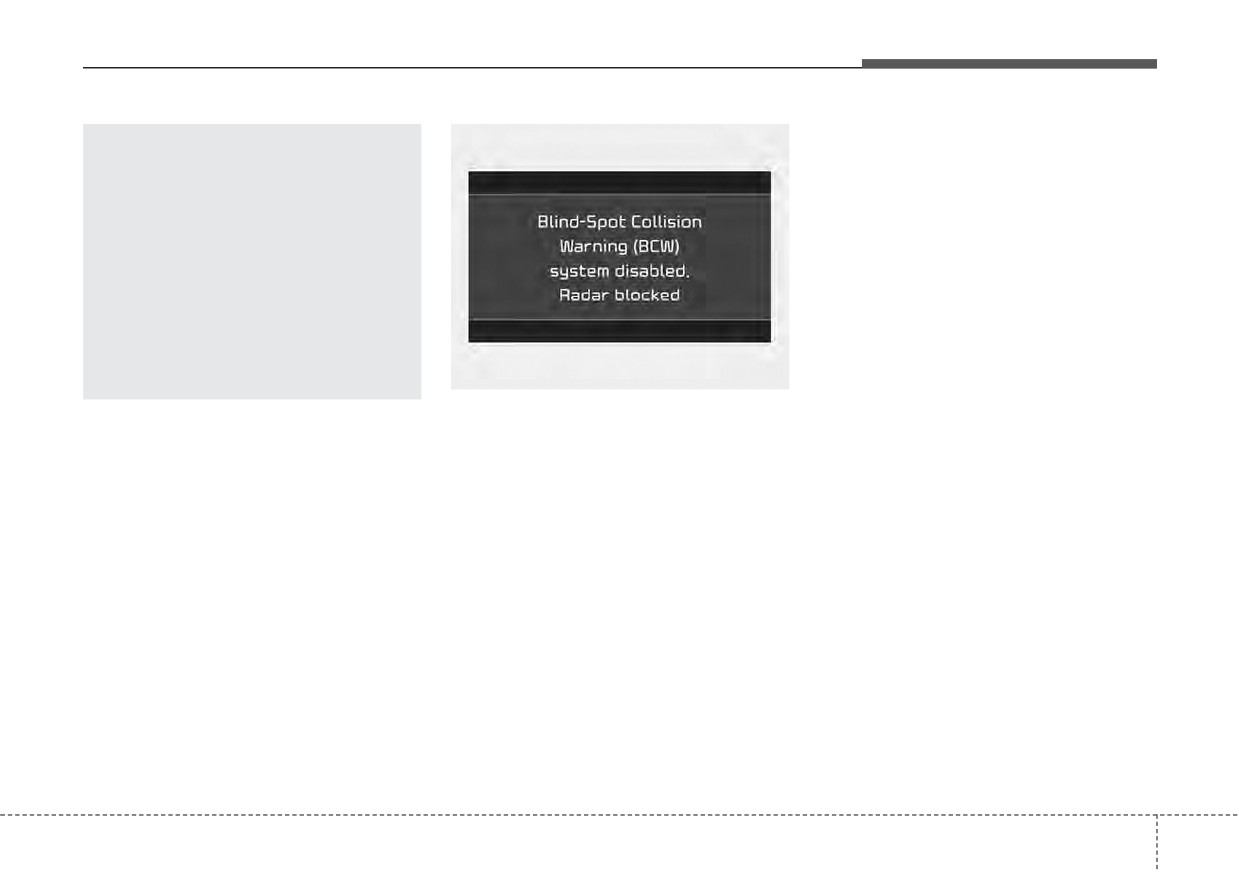
If any of these conditions occur, the
•
Do not apply foreign objects
light on Blind-Spot Safety button and
such as a bumper sticker or a
the function will turn off automatically.
bumper guard near the radar
When Blind-Spot Collision Warning
sensor or apply paint to the
canceled warning message is dis-
sensor area. Doing so may
played in the cluster, check to make
adversely affect the perform-
sure that the rear bumper is free from
ance of the sensor.
OJF058433L
any dirt or snow in the areas where
Blind-Spot Collision Warning (BCW)
the sensor is located. Remove any
system disabled. Radar blocked
dirt, snow, or foreign material that
could interfere with the radar sen-
• This warning message may appear
sors.
when:
After any dirt or debris is removed,
- One or both of the sensors on the
Blind-Spot Collision Warning should
rear bumper is blocked by dirt or
operate normally after about 10 min-
snow or a foreign object.
utes of driving the vehicle.
- Driving in rural areas where the
If the function does not work normal-
sensor does not detect another
ly even though the foreign sub-
vehicle for an extended period of
stance, trailer or carrier, or other
time.
equipment is removed, have the
- When there is inclement weather
function checked by an authorized
such as heavy snow or rain.
Kia dealer.
5
167
Driving your vehicle
■ Type A
Non-operating condition
•
The rear bumper is damaged, or
the sensor is out of the original
Outside rearview mirror may not
default position.
warn the driver when:
•
The vehicle height gets lower or
- The outside rearview mirror housing
higher due to heavy loading in a
is damaged or covered with debris.
liftgate, abnormal tire pressure,
- The window is covered with debris.
etc.
- The windows are severely tinted.
•
When the temperature of the rear
- The mirror is covered with dirt,
bumper is high.
snow, or debris.
•
When the sensors are blocked by
OJF058434L
other vehicles, walls or parking-lot
■ Type B
pillars.
Limitations of Rear Cross-Traffic
•
The vehicle drives on a curved road.
Collision Warning
•
The road pavement (or the periph-
The driver must be cautious in the
eral ground) abnormally contains
below situations, because the func-
metallic components (i.e. possibly
tion may not detect other vehicles or
due to subway construction).
objects in certain circumstances.
•
There is a fixed object near the
• When a trailer or carrier is
vehicle, such as a guardrail.
installed.
•
While going down or up a steep
OJF058435L
• The vehicle drives in inclement
road where the height of the lane is
weather such as heavy rain or
different.
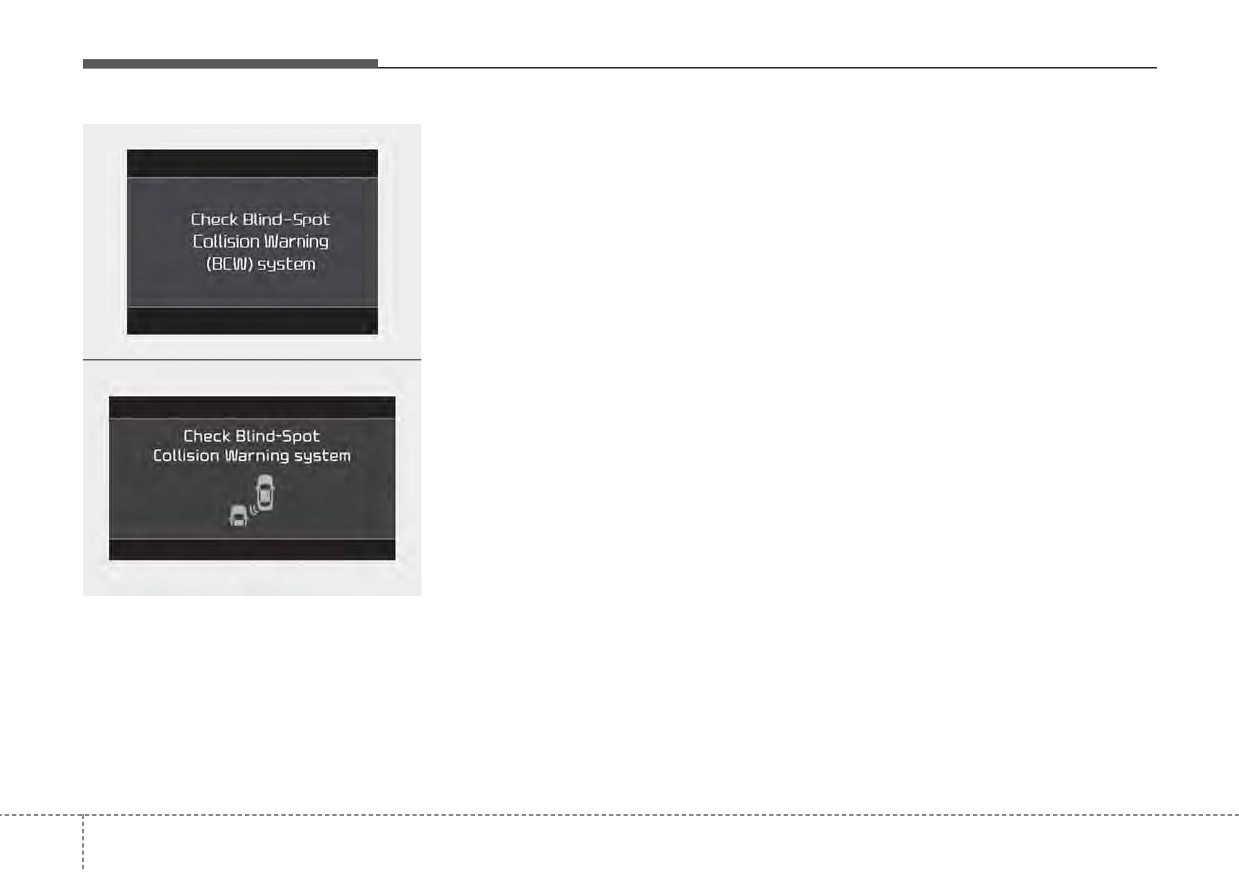
If there is a problem with Blind-Spot
snow.
Collision Warning, a warning mes-
•
Driving on a narrow road where
sage will appear and the light on the
• The sensor is polluted with rain,
trees or grass or overgrown.
snow, mud, etc.
switch will turn off. The function will
•
Driving in rural areas where the sen-
turn off automatically.
• The rear bumper where the sensor
sor does not detect another vehicle
is located is covered with a foreign
In this case, have the function
for an extended period of time.
object such as a bumper sticker, a
checked by an authorized Kia dealer.
•
Driving on a wet road.
bumper guard, a bike rack, etc.
5
168
Driving your vehicle
•
Driving on a road where the guardrail
•
The tire pressure is low or a tire is
or wall is in double structure.
damaged.
•
A big vehicle is near such as a bus
•
The brake is reworked.
or truck.
•
The vehicle sharply stops.
•
When the other vehicle approaches
•
Temperature is extremely low
very close.
around the vehicle.
•
When the other vehicle passes at a
•
The vehicle severely vibrates while
very fast speed.
driving over a bumpy road,
•
While changing lanes.
uneven/bumpy road, or concrete
patch.
•
If the vehicle has started at the
same time as the vehicle next to
•
The vehicle drives on a slippery
OJFHP058462N
you and has accelerated.
surface due to snow, water puddle,
[A] : Structure
•
When the vehicle in the next lane
or ice.
• Driving where there is a vehicle or
moves two lanes away from you OR
when the vehicle two lanes away
structure near
moves to the next lane from you.
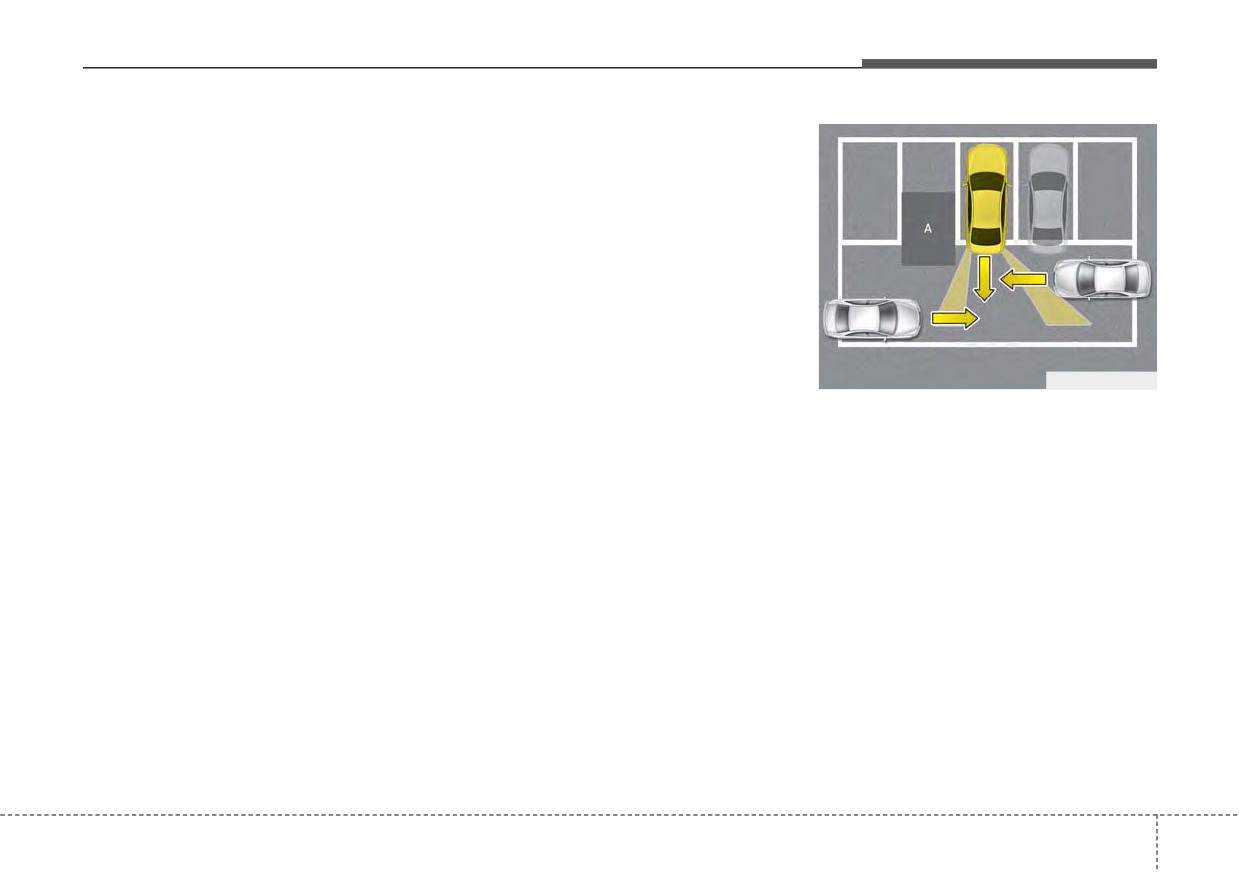
Rear Cross-Traffic Collision Warning
•
A motorcycle or bicycle is near.
may not operate properly when driv-
ing where there is a vehicle or struc-
• A flat trailer is near.
ture near.
•
If there are small objects in the
In certain instances, the function
detecting area such as a shopping
may not detect the vehicle approach-
cart or a baby stroller.
ing from behind and the warning or
•
If there is a low height vehicle such
brake may not operate properly.
as a sports car.
Always pay attention to your sur-
•
The brake pedal is depressed.
rounding while driving.
•
ESC (Electronic Stability Control)
is activated.
•
ESC (Electronic Stability Control)
malfunctions.
5
169
Driving your vehicle
OJFHP058463
OJFHP058464N
ODEP051162
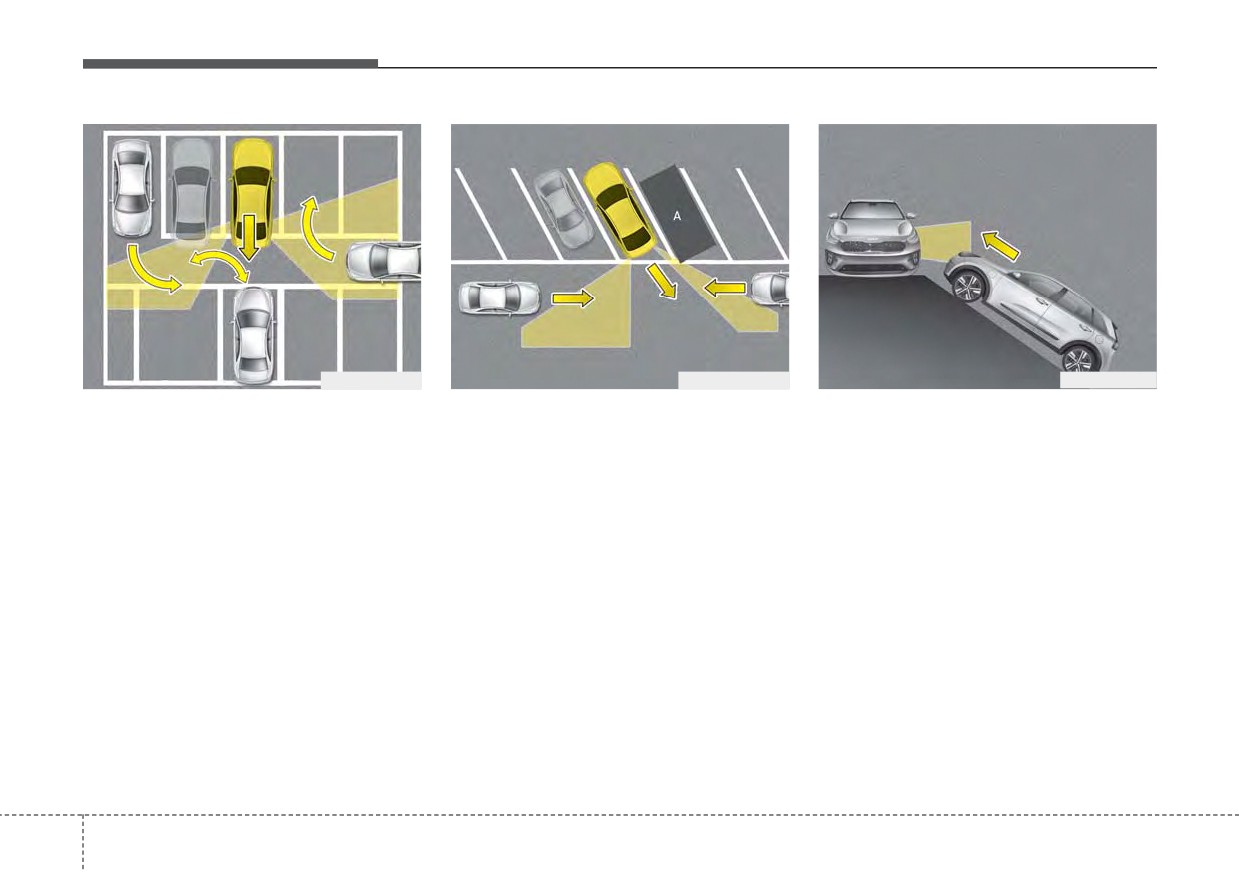
•
When the vehicle is in a complex
[A] : Vehicle
• When the vehicle is on/near a
parking environment
• When the vehicle is parked diago-
slope
Rear Cross-Traffic
Collision
nally
Rear Cross-Traffic Collision Warning
Warning may not operate properly
Rear Cross-Traffic Collision Warning
may not operate properly when the
when the vehicle is in a complex
may not operate properly when the
vehicle is on/near a slope.
parking environment.
vehicle is parked diagonally.
In certain instances, the function may
In certain instances, the function
In certain instances, when the diago-
not detect the vehicle approaching
may not be able to exactly deter-
nally parked vehicle is pulled out of
from the rear left/right and the warning
mine the risk of collision for the
the parking space, the function may
or brake may not operate properly.
vehicles which are parking or
not detect the vehicle approaching
Always pay attention to your sur-
pulling out near your vehicle (e.g. a
from the rear left/right of your vehi-
rounding while driving.
vehicle escaping beside your vehi-
cle. In this case, the warning or brake
cle, a vehicle parking or pulling out
may not operate properly.
in the rear area, a vehicle
Always pay attention to your sur-
approaching your vehicle making a
rounding while driving.
turn, etc.).
In this case, the warning or brake
may not operate properly.
5
170
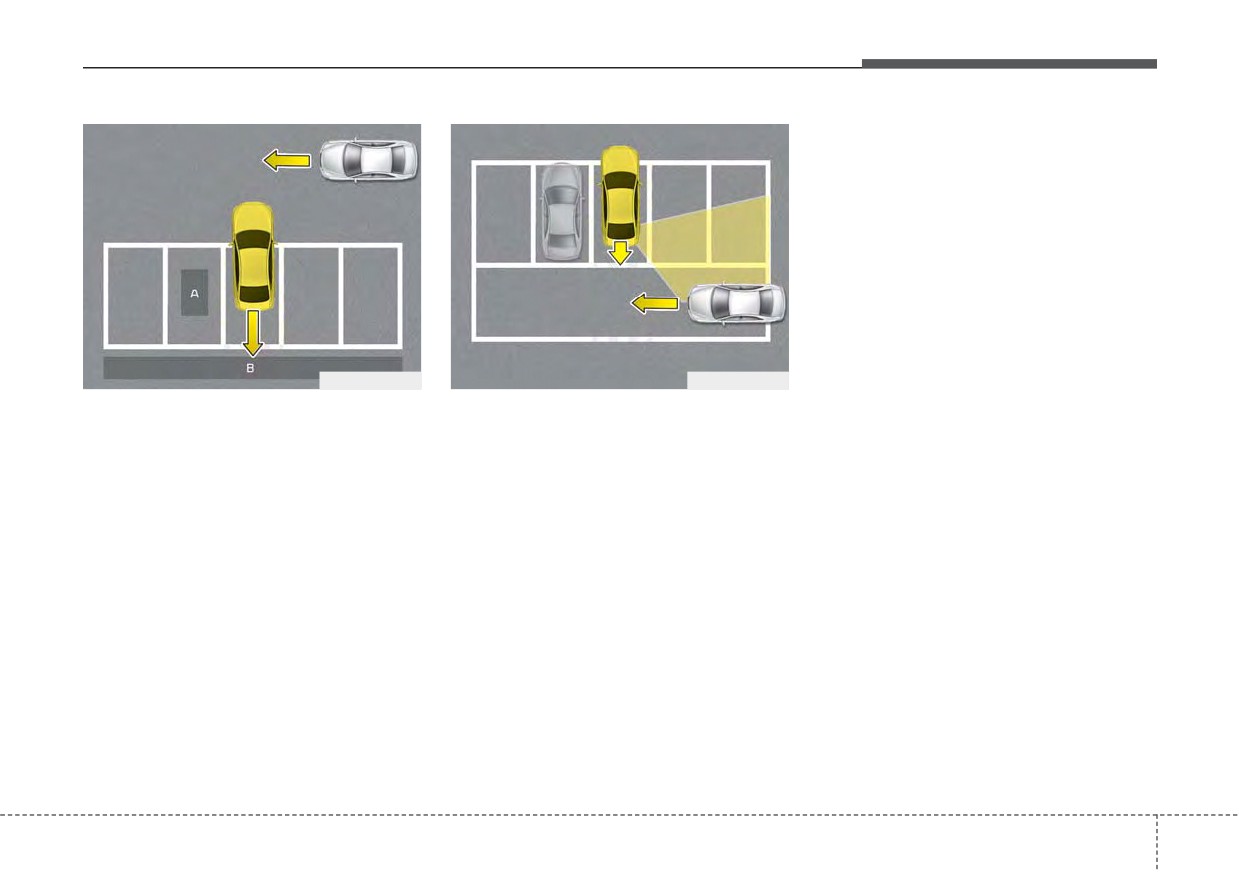
Driving your vehicle
This device complies with Part 15
of the FCC rules.
Operation is subject to the following
two conditions:
1. This device may not cause harmful
interference, and
2. This device must accept any inter-
ference received, including inter-
ference that may cause undesired
operation.
ODEP059309L
OJFHP058466
[A] : Structure, [B] : Wall
• When the vehicle is parked rear-
ward
• Pulling into the parking space
where there is a structure
If the vehicle is parked rearward and
the sensor detects the another vehi-
Rear Cross-Traffic Collision Warning
cle in the rear area of the parking
may not operate properly when pulling
space, the function can warn or con-
in the vehicle to the parking space
trol braking. Always pay attention to
where there is a structure at the back
the parking space while driving.
or side of your vehicle.
In certain instances, when backing
into the parking space, the function
may not detect the vehicle moving in
front of your vehicle. In this case, the
warning or brake may not operate
properly.
Always pay attention to the parking
space while driving.
5
171
Driving your vehicle
ECONOMICAL OPERATION
Your vehicle's fuel economy depends
•
Don't "ride" the brake pedal. This
•
Keep your vehicle in good condi-
mainly on your style of driving, where
can increase fuel consumption and
tion. For better fuel economy and
you drive and when you drive.
also increase wear on these com-
reduced maintenance costs, main-
ponents. In addition, driving with
tain your vehicle in accordance
Each of these factors affects how
your foot resting on the brake pedal
with the maintenance schedule in
many miles (kilometers) you can get
may cause the brakes to overheat,
chapter 8. If you drive your vehicle
from a gallon (liter) of fuel. To operate
which reduces their effectiveness
in severe conditions, more frequent
your vehicle as economically as pos-
and may lead to more serious con-
maintenance is required
(see
sible, use the following driving sug-
sequences.
chapter 8 for details).
gestions to help save money in both
fuel and repairs:
•
Take care of your tires. Keep them
•
Keep your vehicle clean. For maxi-
inflated to the recommended pres-
mum service, your vehicle should
•
Drive smoothly. Accelerate at a
sure. Incorrect inflation, either too
be kept clean and free of corrosive
moderate rate. Don't make "jack-
much or too little, results in unnec-
materials. It is especially important
rabbit" starts or full-throttle shifts
essary tire wear. Check the tire
that mud, dirt, ice, etc. not be
and maintain a steady cruising
pressures at least once a month.
allowed to accumulate on the
speed. Don't race between stop-
underside of the vehicle. This extra
lights. Try to adjust your speed to
•
Be sure that the wheels are
weight can result in increased fuel
the traffic so you don't have to
aligned correctly. Improper align-
consumption and also contribute to
change speeds unnecessarily.
ment can result from hitting curbs
corrosion.
or driving too fast over irregular
•
Avoid heavy traffic whenever pos-
sible. Always maintain a safe dis-
surfaces. Poor alignment causes
•
Travel lightly. Don't carry unneces-
faster tire wear and may also result
sary weight in your vehicle. Weight
tance from other vehicles so you
can avoid unnecessary braking.
in other problems as well as
reduces fuel economy.
greater fuel consumption.
This also reduces brake wear.
•
Don't let the engine idle longer
than necessary. If you are waiting
•
Drive at a moderate speed. The
(and not in traffic), turn off your
faster you drive, the more fuel your
engine and restart only when
vehicle uses. Driving at a moderate
you're ready to go.
speed, especially on the highway,
is one of the most effective ways to
reduce fuel consumption.
5
181
Driving your vehicle
•
Remember, your vehicle does not
• Use your air conditioning sparingly.
require extended warm-up. After
The air conditioning system is
WARNING - Engine off
the engine has started, allow the
operated by engine power so your
during motion
engine to run for 10 to 20 seconds
fuel economy is reduced when you
Never turn the engine off to
prior to placing the vehicle in gear.
use it.
coast down hills or anytime the
In very cold weather, however, give
• Opening windows at high speeds
vehicle is in motion. The power
your engine a slightly longer warm-
can reduce fuel economy.
steering and power brakes will
up period.
not function properly without
• Fuel economy is less in crosswinds
•
Don't "lug" or "over-rev" the engine.
the engine running.
and headwinds. To help offset
Lugging is driving too slowly in a
some of this loss, slow down when
In addition, turning off the
very high gear resulting in engine
driving in these conditions.
engine start/stop button while
bucking. If this happens, shift to a
driving could engage the steer-
lower gear. Over-revving is racing
ing wheel lock, resulting in loss
the engine beyond its safe limit.
Keeping a vehicle in good operating
of vehicle steering. Keep the
This can be avoided by shifting at
condition is important both for econ-
engine on and downshift to an
the recommended speed.
omy and safety. Therefore, have an
appropriate gear for an engine
authorized Kia dealer perform
braking effect.
scheduled inspections and mainte-
nance.
5
182
Driving your vehicle
SPECIAL DRIVING CONDITIONS
Hazardous driving conditions
• If stalled in snow, mud, or sand,
Reducing the risk of a rollover
use the second gear. Accelerate
When hazardous driving conditions
This multi-purpose passenger vehi-
slowly to avoid spinning the drive
are encountered such as water,
cle is defined as a Sports Utility
wheels.
snow, ice, mud, sand, or similar haz-
Vehicle (SUV). Utility vehicles have a
ards, follow these suggestions:
• Use sand, rock salt, or other non-
significantly higher rollover rate than
slip material under the drive
other types of vehicles. SUV's have
• Drive cautiously and allow extra
wheels to provide traction when
higher ground clearance and a nar-
distance for braking.
stalled in ice, snow, or mud.
rower track to make them capable of
• Avoid sudden braking or steering.
performing in a wide variety of off-
• When braking with non-ABS
road applications. Specific design
brakes pump the brake pedal with
WARNING - Downshifting
characteristics give them a higher
a light up-and-down motion until
Do not downshift with a dual
center of gravity than ordinary vehi-
the vehicle is stopped.
clutch transmission while driv-
cles. An advantage of the higher
Do not pump the brake pedal on a
ing on slippery surfaces. The
ground clearance is a better view of
vehicle equipped with ABS.
sudden change in tire speed
the road, which allows you to antici-
could cause the tires to skid
pate problems. They are not
and result in an accident.
designed for cornering at the same
speeds as conventional passenger
vehicles, any more than low-slung
sports vehicles are designed to per-
form satisfactorily in off-road condi-
tions. Due to this risk, driver and pas-
sengers are strongly recommended
to buckle their seat belts. In a rollover
crash, an unbelted person is signifi-
cantly more likely to die than a per-
son wearing a seat belt. There are
steps that a driver can make to
reduce the risk of a rollover.
5
183
Driving your vehicle
If at all possible, avoid sharp turns or
(Continued)
abrupt maneuvers, do not load your
WARNING
roof rack with heavy cargo, and
•
In a rollover crash, an unbelt-
Your vehicle is equipped with
never modify your vehicle in any way.
ed person is significantly
tires designed to provide safe
more likely to die than a per-
ride and handling capability. Do
son wearing a seat belt. Make
not use a size and type of tire
WARNING - Rollover
sure everyone in the vehicle is
and wheel that is different from
As with other Sports Utility
properly buckled up.
the one that is originally
Vehicles (SUV), failure to oper-
installed on your vehicle. It can
ate this vehicle correctly may
affect the safety and perform-
result in loss of control, an acci-
ance of your vehicle, which
dent or vehicle rollover.
could lead to steering failure or
•
Utility vehicles have a signifi-
rollover and serious injury.
cantly higher rollover rate
When replacing the tires, be
than other types of vehicles.
sure to equip all four tires with
the tire and wheel of the same
•
Specific design characteris-
size, type, tread, brand and
tics (higher ground clearance,
load-carrying capacity. If you
narrower track, etc.) give this
nevertheless decide to equip
vehicle a higher center of
your vehicle with any tire/wheel
gravity than ordinary vehicles.
combination not recommended
•
A SUV is not designed for cor-
by Kia for off road driving, you
nering at the same speeds as
should not use these tires for
conventional vehicles.
highway driving.
•
Avoid sharp turns or abrupt
maneuvers.
(Continued)
5
184
Driving your vehicle
Rocking the vehicle
Smooth cornering
CAUTION - Vehicle rocking
If it is necessary to rock the vehicle
Avoid braking or gear changing in
Prolonged rocking may cause
to free it from snow, sand, or mud,
corners, especially when roads are
engine overheating, transaxle
first turn the steering wheel right and
wet. Ideally, corners should always
damage or failure, and tire dam-
left to clear the area around your
be taken under gentle acceleration. If
age.
front wheels. Then, shift back and
you follow these suggestions,
tire
forth between R (Reverse) and any
wear will be held to a minimum.
forward gear in vehicles equipped
with a dual clutch transmission. Do
CAUTION - Spinning tires
not race the engine, and spin the
Do not spin the wheels, espe-
wheels as little as possible. If you are
cially at speeds more than 35
still stuck after a few tries, have the
mph (56 km/h). Spinning the
vehicle pulled out by a tow vehicle to
wheels at high speeds when the
avoid engine overheating and possi-
vehicle is stationary could
ble damage to the transaxle.
cause a tire to overheat which
could result in tire damage that
WARNING - Sudden
may injure bystanders.
Vehicle Movement
Do not attempt to rock the vehi-
The ESC system should be turned
cle if people or objects are near-
OFF prior to rocking the vehicle.
by. The vehicle may suddenly
move forward or backwards as it
becomes unstuck.
5
185
Driving your vehicle
Driving at night
Driving in the rain
•
A heavy rainfall will make it harder
to see and will increase the dis-
Because night driving presents more
Rain and wet roads can make driving
tance needed to stop your vehicle,
hazards than driving in the daylight,
dangerous, especially if you’re not
so slow down.
here are some important tips to
prepared for the slick pavement.
remember:
Here are a few things to
consider
•
Keep your windshield wiping
when driving in the rain:
equipment in good shape. Replace
•
Slow down and keep more dis-
your windshield wiper blades when
tance between you and other vehi-
they show signs of streaking or
cles, as it may be more difficult to
missing areas on the windshield.
see at night, especially in areas
where there may not be any street
•
If your tires are not in good condi-
lights.
tion, making a quick stop on wet
pavement can cause a skid and
•
Adjust your mirrors to reduce the
possibly lead to an accident. Be
glare from other driver's head-
sure your tires are in good shape.
lights.
•
Turn on your headlights to make it
•
Keep your headlights clean and
easier for others to see you.
properly aimed. (On vehicles not
equipped with the automatic head-
•
Driving too fast through large pud-
light aiming feature.) Dirty or
dles can affect your brakes. If you
improperly aimed headlights will
must go through puddles, try to
make it much more difficult to see
drive through them slowly.
at night.
•
If you believe you may have gotten
•
Avoid staring directly at the head-
your brakes wet, apply them lightly
lights of oncoming vehicles. You
while driving until normal braking
could be temporarily blinded, and it
operation returns.
will take several seconds for your
eyes to readjust to the darkness.
5
186
Driving your vehicle
Driving in flooded areas
Highway driving
WARNING - Tire tread
Avoid driving through flooded areas
Tires
unless you are sure the water is no
Always check the tire tread
Adjust the tire inflation pressures to
before driving your vehicle.
higher than the bottom of the wheel
specification. Low tire inflation pres-
hub. Drive through any water slowly.
Worn-out tires can result in loss
sures will result in overheating and
of vehicle control. Worn-out tires
Allow adequate stopping distance
possible failure of the tires.
because brake performance may be
should be replaced as soon as
Avoid using worn or damaged tires
possible. For further information
affected.
which may result in reduced traction
and tread limits, refer to "Tires
After driving through water, dry the
or tire failure.
and wheels" in chapter 8.
brakes by gently applying them sev-
Never exceed the maximum tire
eral times while the vehicle is moving
inflation pressure shown on the tires.
slowly.
Fuel, engine coolant and engine oil
High speed travel consumes more
WARNING - Under/over
fuel than urban motoring. Do not for-
Driving off-road
inflated tires
get to check both the engine coolant
Drive carefully off-road because your
Always check the tires for proper
and engine oil.
vehicle may be damaged by rocks or
inflation
before
driving.
roots of trees. Become familiar with
Underinflated or overinflated
the off-road conditions where you
Drive belt
tires can cause poor handling,
are going to drive before you begin
A loose or damaged drive belt may
loss of vehicle control, and sud-
driving.
result in overheating of the engine.
den tire failure leading to acci-
dents, injuries, and even death.
For proper tire pressures, refer to
“Tires and wheels” in chapter 9.
5
187
Driving your vehicle
WINTER DRIVING
Severe weather conditions in the
Snowy or icy conditions
Snow tires
winter result in greater wear and
To drive your vehicle in deep snow, it
If you mount snow tires on your vehi-
other problems. To minimize the
may be necessary to use snow tires
cle, make sure they are radial tires of
problems of winter driving, you
or to install tire chains on your tires.
the same size and load range as the
should follow these suggestions:
If snow tires are needed, it is neces-
original tires. Mount snow tires on all
sary to select tires equivalent in size
four wheels to balance your vehicle’s
and type of the original equipment
handling in all weather conditions.
tires. Failure to do so may adversely
Keep in mind that the traction provid-
affect the safety and handling of your
ed by snow tires on dry roads may
vehicle. Furthermore, speeding,
not be as high as your vehicle's orig-
rapid acceleration, sudden brake
inal equipment tires. You should drive
applications, and sharp turns are
cautiously even when the roads are
potentially very hazardous practices.
clear. Check with the tire dealer for
maximum speed recommendations.
During deceleration, use engine
braking to the fullest extent. Sudden
Do not install studded tires without
brake applications on snowy or icy
first checking local, state and munic-
roads may cause skids to occur. You
ipal regulations for possible restric-
need to keep sufficient distance
tions against their use.
between the vehicle in operation in
front of your vehicle. Also, apply the
brake gently. It should be noted that
installing tire chains on the tire will
provide a greater driving force, but
will not prevent side skids.
Tire chains are not legal in all states.
Check state laws before fitting tire
chains.
5
188
Driving your vehicle
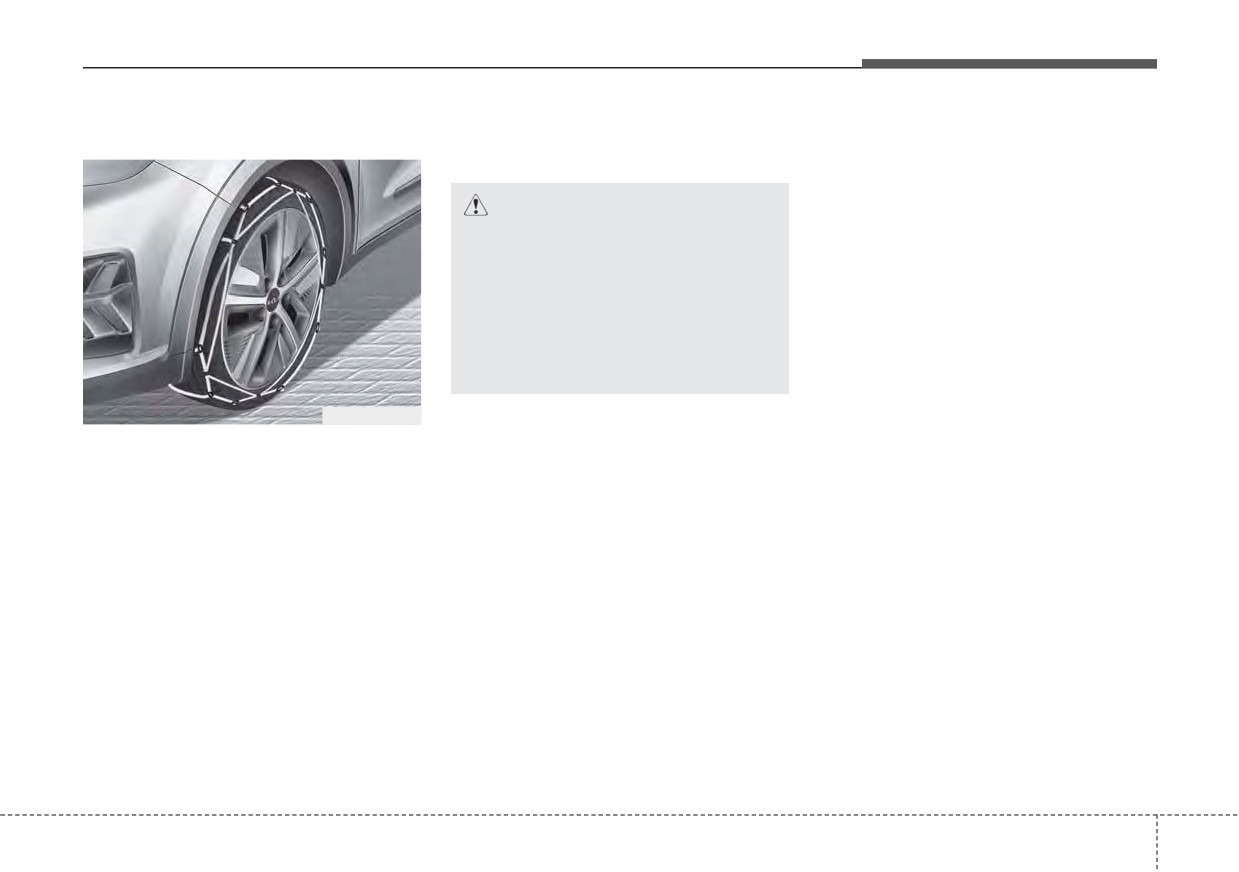
Tire chains
When using tire chains, install tire
Chain installation
chains only on the front tires.
When installing chains, follow the
manufacturer's instructions and
mount them as tightly as you can.
CAUTION - Snow chains
Drive slowly with chains installed. If
Make sure the snow chains are
you hear the chains contacting the
the correct size and type for
body or chassis, stop and tighten
your tires. Incorrect snow
them. If they still make contact, slow
chains can cause damage to the
down until it stops. Remove the
vehicle body and suspension
chains as soon as you begin driving
and may not be covered by your
on cleared roads.
vehicle manufacturer warranty.
When mounting snow chains, park
the vehicle on level ground away
ODEP051062
The snow chain connecting hooks
from traffic. Turn on the vehicle
Since the sidewalls of radial tires are
may be damaged from contacting
Hazard Warning flashers and place a
thinner, they can be damaged by
vehicle components causing the
triangular emergency warning device
mounting some types of snow chains
snow chains to come loose from the
behind the vehicle if available.
on them. Therefore, the use of snow
tire. Make sure the snow chains are
Always place the vehicle in P (Park),
tires is recommended instead of
SAE class “S” certified.
apply the parking brake and turn off
snow chains. Do not mount tire
Always check chain installation for
the engine before installing snow
chains on vehicles equipped with
proper mounting after driving
chains.
aluminum wheels; snow chains may
approximately 0.3 to 0.6 miles (0.5 to
cause damage to the wheels. If snow
1 km) to ensure safe mounting.
chains must be used, use wire-type
Retighten or remount the chains if
chains with a thickness of less than
they are loose.
0.47 in (12 mm). Damage to your
If your vehicle has 18 inch tires, do
vehicle caused by improper snow
not use tire chains.
chain use is not covered by your
vehicle manufacturers warranty.
They can damage your vehicle
(wheel, suspension and body).
5
189
Driving your vehicle
• The use of chains may adversely
Use high quality ethylene gly-
Change to "winter weight" oil
affect vehicle handling.
col coolant
if necessary
• Do not exceed 20 mph (30 km/h)
Your vehicle is delivered with high
In some climates it is recommended
or the chain manufacturer’s recom-
quality ethylene glycol coolant in the
that a lower viscosity "winter weight"
mended speed limit, whichever is
cooling system. It is the only type of
oil be used during cold weather. See
lower.
coolant that should be used because
chapter
9 for recommendations. If
• Drive carefully and avoid bumps,
it helps prevent corrosion in the cool-
you aren't sure what weight oil you
holes, sharp turns, and other road
ing system, lubricates the water
should use, consult an authorized
hazards, which may cause the
pump and prevents freezing. Be sure
Kia dealer.
vehicle to bounce.
to replace or replenish your coolant
in accordance with the maintenance
• Avoid sharp turns or locked-wheel
Check spark plugs and ignition
schedule in chapter 8. Before winter,
braking.
system
have your coolant tested to assure
that its freezing point is sufficient for
Inspect your spark plugs as
CAUTION
- Snow chains
the temperatures anticipated during
described in chapter 8 and replace
• Chains that are the wrong size
the winter.
them if necessary. Also check all
or improperly installed can
ignition wiring and components to be
damage your vehicle's brake
sure they are not cracked, worn or
Check battery and cables
lines, suspension, body and
damaged in any way.
wheels.
Winter puts additional burdens on
• Stop driving and retighten the
the battery system. Visually inspect
chains any time you hear them
the battery and cables as described
hitting the vehicle.
in chapter 8. The level of charge in
your battery can be checked by an
authorized Kia dealer or a service
station.
5
190
Driving your vehicle
To keep locks from freezing
Don’t let your parking brake
Carry emergency equipment
freeze
To keep the locks from freezing,
Depending on the severity of the
squirt an approved de-icer fluid or
Under some conditions your parking
weather, you should carry appropri-
glycerine into the key opening. If a
brake can freeze in the engaged
ate emergency equipment. Some of
lock is covered with ice, squirt it with
position. This is most likely to happen
the items you may want to carry
an approved de-icing fluid to remove
when there is an accumulation of
include tow straps or chains, flash-
the ice. If the lock is frozen internally,
snow or ice around or near the rear
light, emergency flares, sand, shov-
you may be able to thaw it out by
brakes or if the brakes are wet. If
el, jumper cables, window scraper,
using a heated key. Handle the heat-
there is a risk the parking brake may
gloves, ground cloth, coveralls, blan-
ed key with care to avoid injury.
freeze, apply it only temporarily while
ket, etc.
you put the gear shift lever in P (Park,
Dual clutch transmission) and block
Use approved window washer
TRAILER TOWING
the rear wheels so the vehicle cannot
anti-freeze in system
We do not recommend using this
roll. Then release the parking brake.
To keep the water in the window
vehicle for trailer towing.
washer system from freezing, add an
Don't let ice and snow accu-
approved window washer anti-freeze
solution in accordance with instruc-
mulate underneath
tions on the container. Window wash-
Under some conditions, snow and
er anti-freeze is available from an
ice can build up under the fenders
authorized Kia dealer and most auto
and interfere with the steering. When
parts outlets. Do not use engine
driving in severe winter conditions
coolant or other types of anti-freeze
where this may happen, you should
as these may damage the paint fin-
periodically check underneath the
ish.
vehicle to be sure the movement of
the front wheels and the steering
components are not obstructed.
5 191
Driving your vehicle
VEHICLE LOAD LIMIT
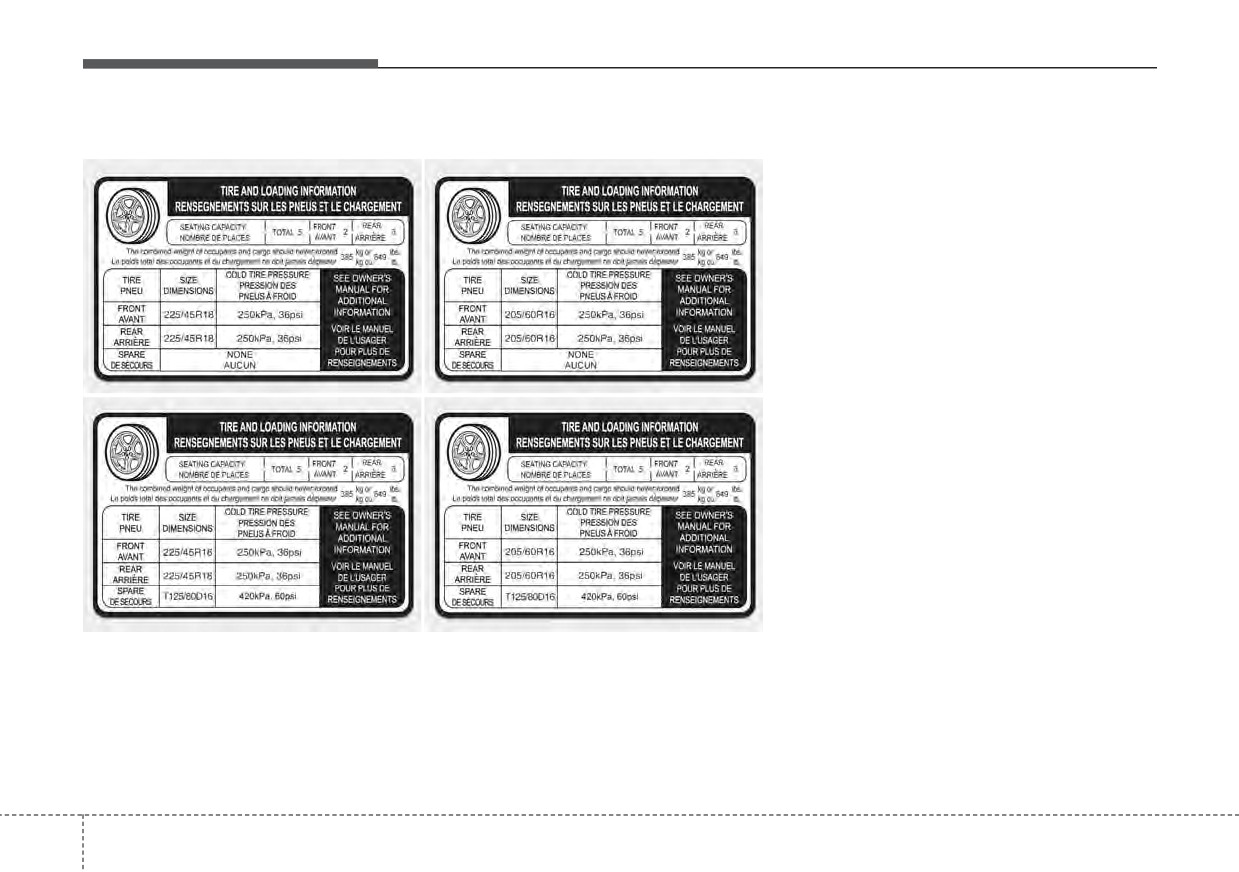
Tire and loading information label
Vehicle capacity weight:
849 lbs. (385 kg)
Vehicle capacity weight is the maxi-
mum combined weight of occupants
and cargo. If your vehicle is equipped
with a trailer, the combined weight
includes the tongue load.
Seating capacity:
Total : 5 persons
(Front seat : 2 persons,
Rear seat : 3 persons)
Seating capacity is the maximum
number of occupants including a
driver, your vehicle may carry.
However, the seating capacity may
be reduced based upon the weight of
all of the occupants, and the weight
of the cargo being carried or towed.
Do not overload the vehicle as there
is a limit to the total weight, or load
ODE067042N/ODE067043N/ODE067055N/ODE067056N
limit including occupants and cargo,
the vehicle can carry.
The label located on the driver's door sill gives the original tire size, cold tire
pressures recommended for your vehicle, the number of people that can be
in your vehicle and vehicle capacity weight.
5
192
Driving your vehicle
Towing capacity:
Steps for Determining Correct
(5) Determine the combined weight
We do not recommend using this
Load Limit -
of luggage and cargo being
loaded on the vehicle. That
vehicle for trailer towing.
(1) Locate the statement "The com-
weight may not safely exceed the
bined weight of occupants and
available cargo and luggage load
Cargo capacity:
cargo should never exceed XXX
capacity calculated in Step 4.
kg or XXX lbs.'' on your vehicle's
The cargo capacity of your vehicle
placard.
(6) If your vehicle will be towing a
will increase or decrease depending
trailer, load from your trailer will
on the weight
and
the
number
of
(2) Determine the combined weight
be transferred to your vehicle.
occupants.
of the driver and passengers that
Consult this manual to determine
will be riding in your vehicle.
how this reduces the available
(3) Subtract the combined weight of
cargo and luggage load capacity
the driver and passengers from
of your vehicle.
XXX kg or XXX lbs.
(4) The resulting figure equals the
available amount of cargo and
WARNING - Loose cargo
luggage load capacity. For exam-
Do not travel with unsecured
ple, if the "XXX" amount equals
objects in the passenger com-
1400 lbs. and there will be five
partment of your vehicle (e.g.
150 lb passengers in your vehi-
suit cases or unsecured child
cle, the amount of available cargo
seats). These items may strike
and luggage load capacity is 650
an occupant during a sudden
lbs.
stop or crash.
(1400-750 (5 x 150) = 650 lbs.)
5
193
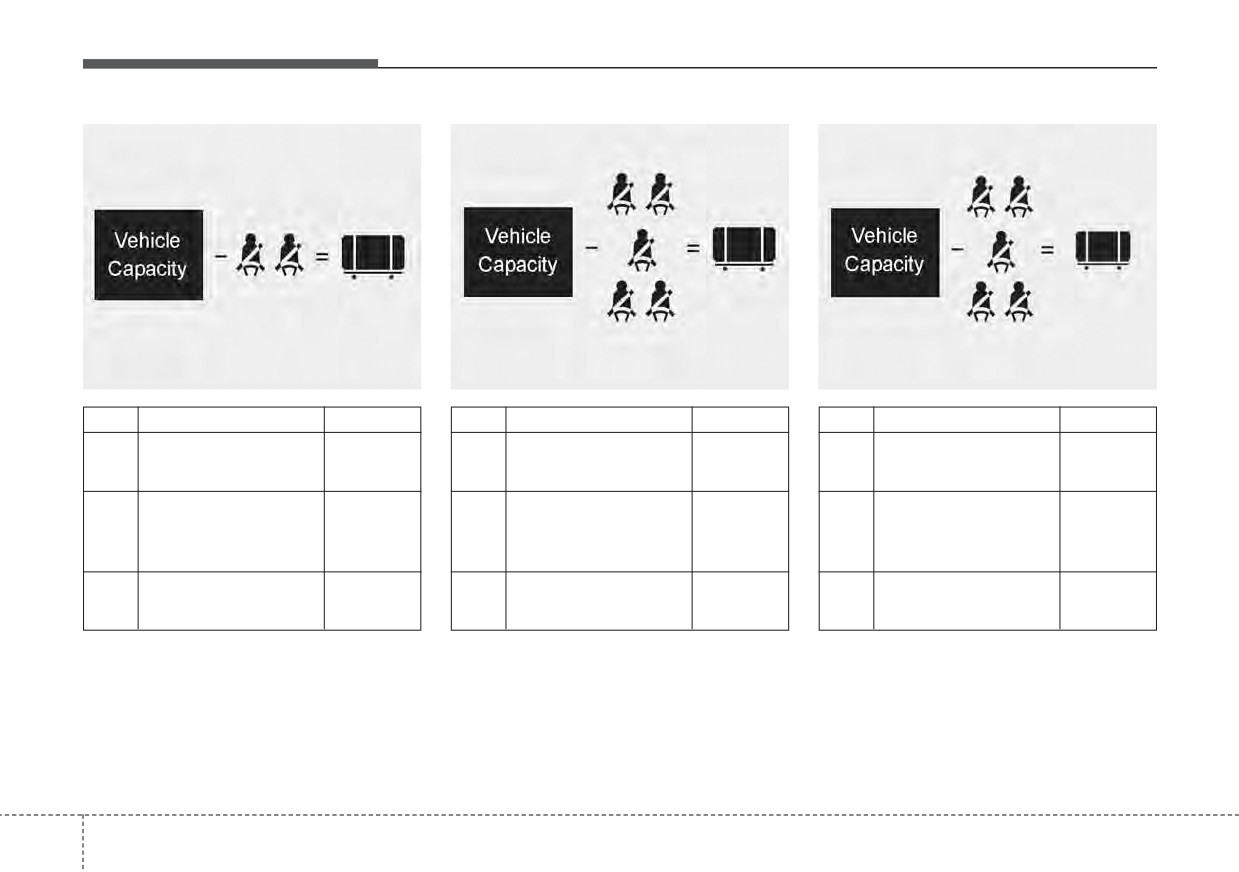
Driving your vehicle
Example 1
Example 2
Example 3
A
B
C
A
B
C
A
B
C
C190F01JM
C190F02JM
C190F03JM
Item
Description
Total
Item
Description
Total
Item
Description
Total
Vehicle Capacity
849 lbs
Vehicle Capacity
849 lbs
Vehicle Capacity
849 lbs
A
A
A
Weight
(385 kg)
Weight
(385 kg)
Weight
(385 kg)
Subtract Occupant
Subtract Occupant
Subtract Occupant
300 lbs
750 lbs
805 lbs
B
Weight
B
Weight
B
Weight
(136 kg)
(340 kg)
(365 kg)
150 lbs (68 kg) × 2
150 lbs (68 kg) × 5
161 lbs (73 kg) × 5
Available Cargo and
549 lbs
Available Cargo and
99 lbs
Available Cargo and
44 lbs
C
C
C
Luggage weight
(249 kg)
Luggage weight
(45 kg)
Luggage weight
(20 kg)
Refer to your vehicle’s tire and loading information label for specific information about your vehicle's capacity weight
and seating positions. The combined weight of the driver, passengers and cargo should never exceed your vehicle's
capacity weight.
5
194
Driving your vehicle
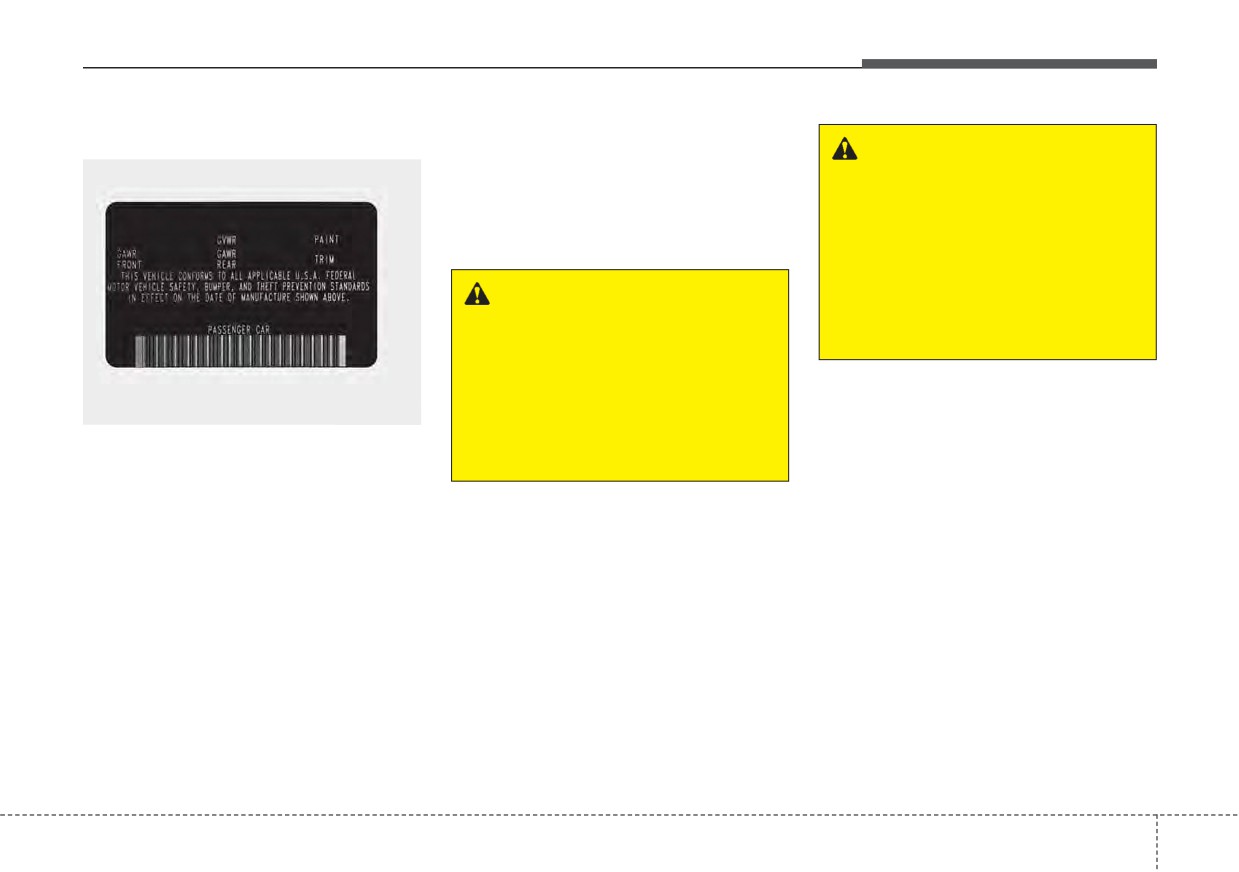
Certification label
To find out the actual loads on your
front and rear axles, you need to go to
WARNING - Over loading
a weigh station and weigh your vehi-
Do not overload your vehicle.
cle. Your dealer can help you with this.
Overloading your vehicle can
Be sure to spread out your load equal-
cause heat buildup in your vehi-
ly on both sides of the centerline.
cle's tires and possible tire fail-
ure, increased stopping dis-
tances and poor vehicle han-
WARNING - Over loading
dling--all of which may result in
Never exceed the GVWR for
a crash.
your vehicle, the GAWR for
either the front or rear axle and
vehicle
capacity
weight.
✽ NOTICE
OJFA055280
Exceeding these ratings can
Overloading your vehicle may cause
affect your vehicle’s handling
The certification label is located on
damage. Repairs would not be cov-
and braking ability.
the driver's door sill at the center pillar.
ered by your warranty. Do not over-
This label shows the maximum allow-
load your vehicle.
The label will help you decide how
able weight of the fully loaded vehi-
much cargo and installed equipment
cle. This is called the GVWR (Gross
your vehicle can carry.
Vehicle Weight Rating). The GVWR
includes the weight of the vehicle, all
If you carry items inside your vehicle
occupants, fuel and cargo.
- like suitcases, tools, packages, or
This label also tells you the maxi-
anything else - they are moving as
mum weight that can be supported
fast as the vehicle. If you have to stop
by the front and rear axles, called
or turn quickly, or if there is a crash,
Gross Axle Weight Rating (GAWR).
the items will keep going and can
cause an injury if they strike the driv-
er or a passenger.
5
195
Driving your vehicle
VEHICLE WEIGHT
This chapter will guide you in the
Base curb weight
GAWR
proper loading of your vehicle and/or
(Gross axle weight rating)
This is the weight of the vehicle
trailer, to keep your loaded vehicle
including a full tank of fuel and all
This is the maximum allowable
weight within its design rating capa-
standard equipment. It does not
weight that can be carried by a single
bility, with or without a trailer. Properly
include passengers, cargo, or option-
axle (front or rear). These numbers
loading your vehicle will provide max-
al equipment.
are shown on the compliance label.
imum return of the vehicle design
The total load on each axle must
performance. Before loading your
never exceed its GAWR.
vehicle, familiarize yourself with the
Vehicle curb weight
following terms for determining your
This is the weight of your new vehicle
vehicle's weight ratings, with or with-
GVW (Gross vehicle weight)
when you picked it up from your deal-
out a trailer, from the vehicle's speci-
er plus any aftermarket equipment.
This is the Base Curb Weight plus
fications and the compliance label:
actual Cargo Weight plus passen-
gers.
Cargo weight
This figure includes all weight added
GVWR
to the Base Curb Weight, including
(Gross vehicle weight rating)
cargo and optional equipment.
This is the maximum allowable
weight of the fully loaded vehicle
GAW (Gross axle weight)
(including all options, equipment,
This is the total weight placed on
passengers and cargo). The GVWR
each axle (front and rear) - including
is shown on the certification label
vehicle curb weight and all payload.
located on the driver’s door sill.
5
196
What to do in an emergency
Road warning
6-2
If you have a flat tire (with spare tire)
6-19
• Hazard warning flasher
6-2
• Jack and tools
6-19
In case of an emergency while driving
6-3
• Removing and storing the spare tire
6-20
• If the engine stalls at a crossroad or crossing
6-3
• Changing tires
6-20
• If you have a flat tire while driving
6-3
If you have a flat tire (with Tire Mobility Kit) . . 6-28
• If the engine stalls while driving
6-3
• Introduction
6-29
If the engine will not start
6-4
• Notes on the safe use of the Tire Mobility Kit
6-30
• If engine doesn't turn over or turns over slowly
6-4
• Components of the Tire Mobility Kit
6-32
• If engine turns over normally but does not start
6-4
• Using the Tire Mobility Kit
6-33
• Distributing the sealant
6-35
Emergency starting
6-5
• Checking the tire inflation pressure
6-36
• Before Jump Starting (For Hybrid)
6-5
• Technical Data
6-38
• Method to disconnect the (-) cable for regular
maintenance (For Hybrid)
6-7
Towing
6-39
• Jump starting
6-8
• Towing service
6-39
• Push-starting
6-10
• Removable towing hook
6-40
If the engine overheats
6-11
• Emergency towing
6-41
6
If an accident occurs
6-44
Tire Pressure Monitoring System (TPMS)
6-13
• Check tire pressure
6-13
• Low tire pressure telltale
6-15
• Low tire pressure position telltale
6-15
• Changing a tire with TPMS
6-17
What to do in an emergency
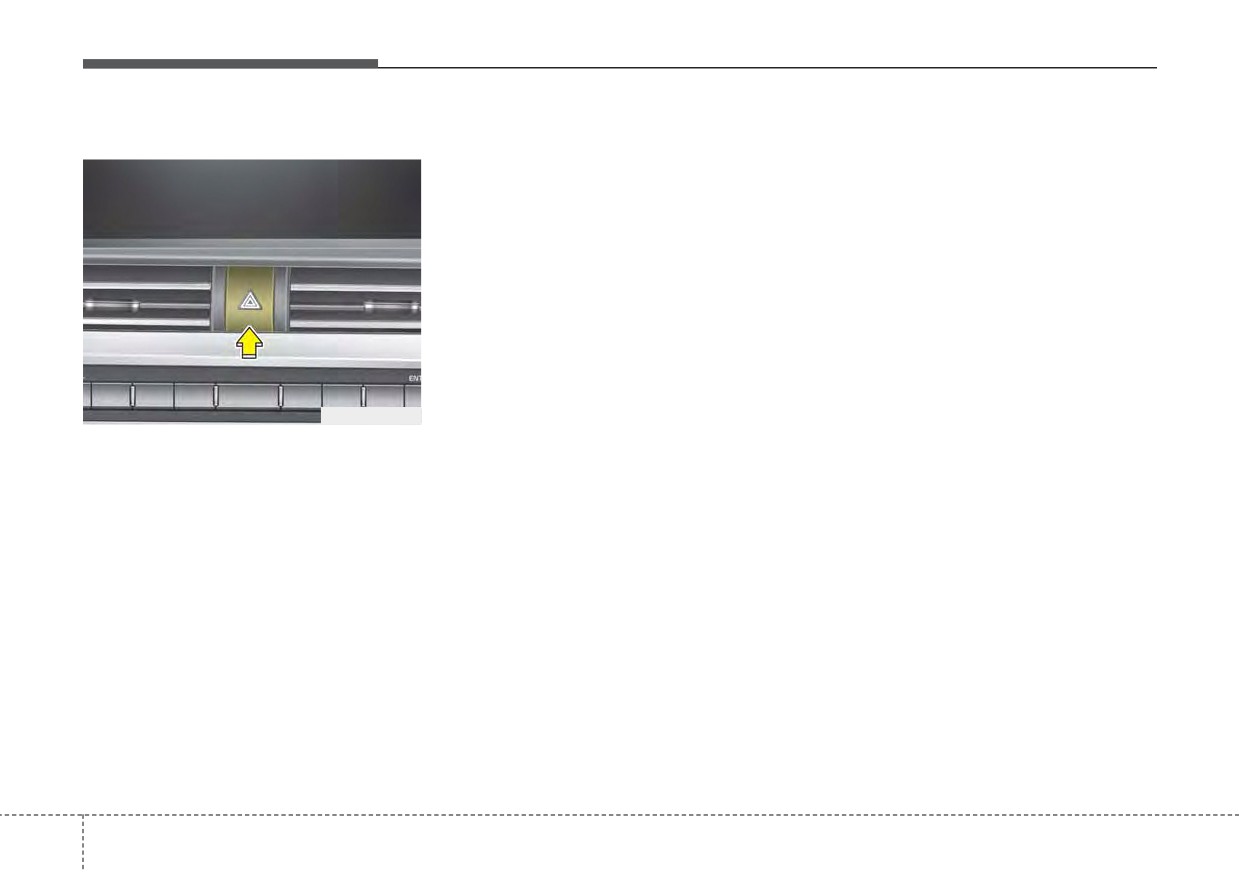
ROAD WARNING
Hazard warning flasher
Depress the flasher switch with the
ignition switch in any position. The
flasher switch is located in the center
facia panel. All turn signal lights will
flash simultaneously.
•
The hazard warning flasher oper-
ates whether your vehicle is run-
ning or not.
•
The turn signals do not work when
the hazard flasher is on.
•
Care must be taken when using
the hazard warning flasher while
ODEP069001
the vehicle is being towed.
The hazard warning flasher serves
as a warning to other drivers to exer-
cise
extreme caution when
approaching, overtaking, or passing
your vehicle.
It should be used whenever emer-
gency repairs are being made or
when the vehicle is stopped near the
edge of a roadway.
6
2
What to do in an emergency
IN CASE OF AN EMERGENCY WHILE DRIVING
If the engine stalls at a cross-
2. When the vehicle is stopped, turn
If the engine stalls while driv-
road or crossing
on your emergency hazard flash-
ing
ers, set the parking brake and put
If the engine stalls at a crossroad or
1. Reduce your speed gradually,
the transmission in P (Park).
crossing, set the shift lever in the N
keeping a straight line. Move cau-
3. Have all passengers get out of the
(Neutral) position and then push the
tiously off the road to a safe place.
vehicle to a safe place.
vehicle. Be sure they all get out on
2. Turn on your emergency flashers.
the side of the vehicle that is away
from traffic.
3. Try to start the hybrid system
If you have a flat tire while
again. If your vehicle will not start,
4. When changing a flat tire, follow
driving
contact an authorized Kia dealer
the instruction
provided
later
in
or seek other qualified assistance.
If a tire goes flat while you are driv-
this section.
ing:
1. Take your foot off the accelerator
✽ NOTICE
pedal and let the vehicle slow
If there was a check engine light and
down while driving straight ahead.
loss of power or stall and if safe to do
Do not apply the brakes immedi-
so, wait at least 10 seconds to restart
ately or attempt to pull off the road
the vehicle after it stalls. This may
as this may cause a loss of con-
reset the car so it will no longer run
trol. When the vehicle has slowed
at low power (limp home) condition.
to such a speed that it is safe to do
so, brake carefully and pull off the
road. Drive off the road as far as
possible and park on firm level
ground. If you are on a divided
highway, do not park in the median
area between the two traffic lanes.
6
3
What to do in an emergency
IF THE ENGINE WILL NOT START
If engine doesn't turn over or
If engine turns over normally
turns over slowly
WARNING - Push/
but does not start
pull start
1. Be sure the shift lever is in N
1. Check the fuel level.
(Neutral) or P
(Park) and the
Do not push or pull the vehicle
2. With the ignition switch in the
to start it. Push or pull starting
emergency brake is set.
LOCK position, check all connec-
may cause the catalytic con-
2. Check the battery connections to
tors at the ignition coils and spark
verter to overload and create a
be sure they are clean and tight.
plugs. Reconnect any that may be
fire hazard.
disconnected or loose.
3. Turn on the interior light. If the light
dims or goes out when you oper-
3. Check the fuel line in the engine
ate the starter, the battery is dis-
compartment.
charged.
4. If the engine still does not start,
4. Check the starter connections to
call an authorized Kia dealer or
be sure they are securely tight-
seek other qualified assistance.
ened.
5. Do not push or pull the vehicle to
start it. See instructions for "Jump
starting".
6
4
What to do in an emergency
EMERGENCY STARTING
Before Jump Starting
• To charge 12V battery, keep driving
After starting the vehicle
(HEV
(For Hybrid)
or idling the car more than 30 min-
Ready), the
12V battery is being
utes.
charged whether the engine is run-
Over discharge of 12V battery
ning or not. Although there is no
If you do not start the vehicle imme-
engine-sound, it is not necessary to
diately after pressing the
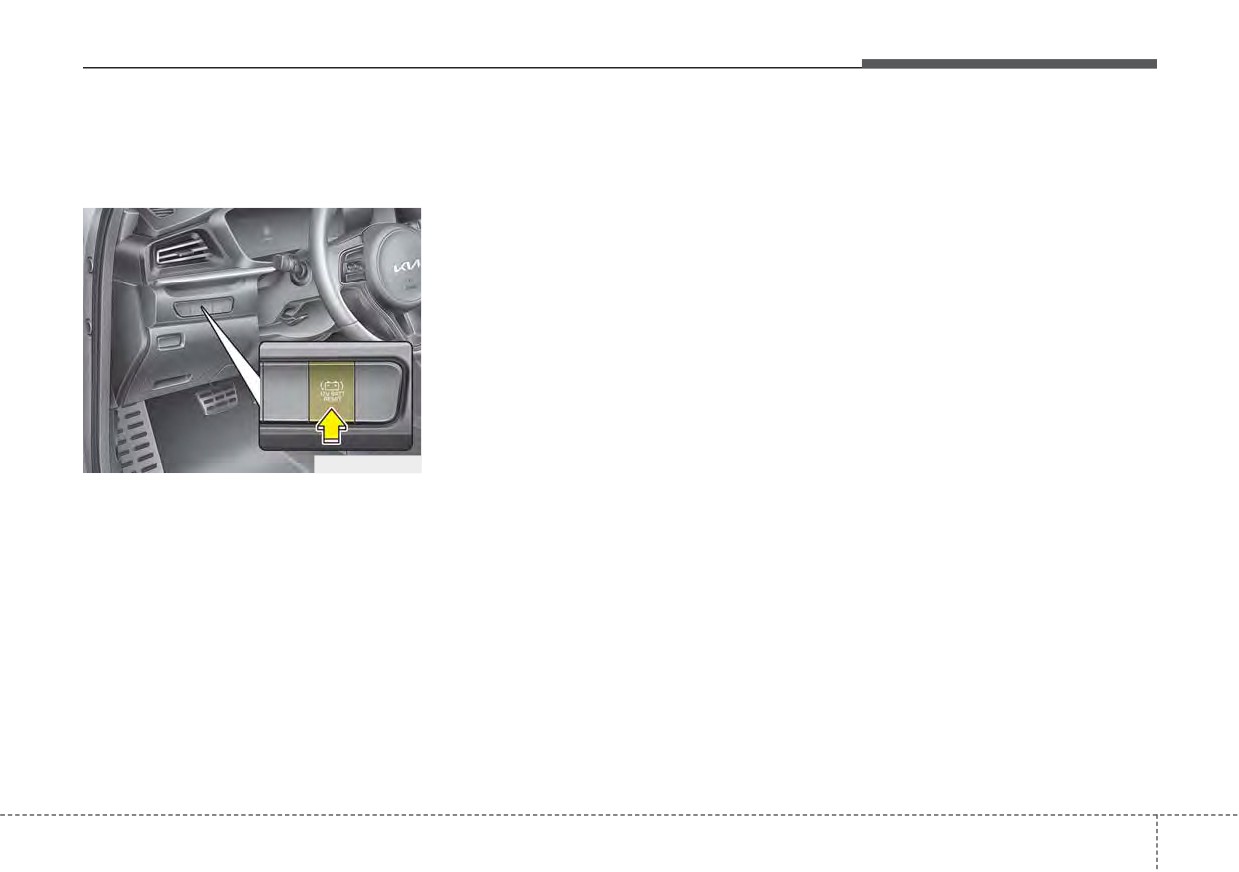
“12V Batt
step on the accelerator pedal.
Reset” switch (1), the power of 12V
battery is automatically disconnected
Once the 12V battery is fully dis-
after few seconds to save the 12V
charged and reconnected, the 12V
battery from additional discharge. If
battery is initialized.
the 12V battery is disconnected prior
to starting the vehicle, press “12V
Batt Reset” switch (1) again and then
immediately start the car as
explained above.
Repeated use of the
“12V Batt
ODEP041042N
Reset” switch (1) without a sufficient
engine ON cycle
(30 Min+) may
- Press the reconnection
cause over discharge of the 12V bat-
(“12V Batt Reset”) switch (1) :
tery, which will prevent car starting. If
This car has a reconnection switch
the 12V battery is over discharged to
which can reset the over discharged
a point that the reset does not work,
12V battery and enable getting the
try to jump-start the vehicle. (refer to
car started without jump-start.
jump-starting)
• Press the “12V Batt Reset” switch
(1) located on the lower left dash.
• Immediately start car by stepping
on the brake pedal and pressing
the Start switch within few seconds.
6
5
What to do in an emergency
The following items should be reset
Charging method for 12V battery
after the battery has been discharged
CAUTION
(A) It is recommended to charge the
or the battery has been disconnected.
•
The use of an improper charg-
12V battery by starting and run-
• Auto up/down window
ning the vehicle
(HEV Ready
er with a voltage and current
Mode) for a minimum of 30 min-
range higher than specified
• Sunroof
utes if a 12V reset, or jump start
may cause overheating and
• Trip computer
has been used.
damage to the 12V battery.
• Climate control system
(B) If you cannot start the vehicle :
•
The use of an incorrect charg-
• Driver position Memory System
er will lead to a power shut-off
• Audio
to save the 12V battery. Stop
• After connecting the jumper cables
using the incorrect charger
at the recommended locations, you
once the power of the vehicle
As explained above, if the vehicle
should press
“12V batt Reset”
is shut off.
cannot be started after pressing the
switch (1) to charge the battery.
“12V Batt Reset” switch (1) due to
• The voltage range of the charger
over discharge, try to jump-start
should be 13.3~14V and its current
(refer to Jump-starting).
range should be less than 60A.
(13.8V is recommended).
6
6
What to do in an emergency
External power source using 12V
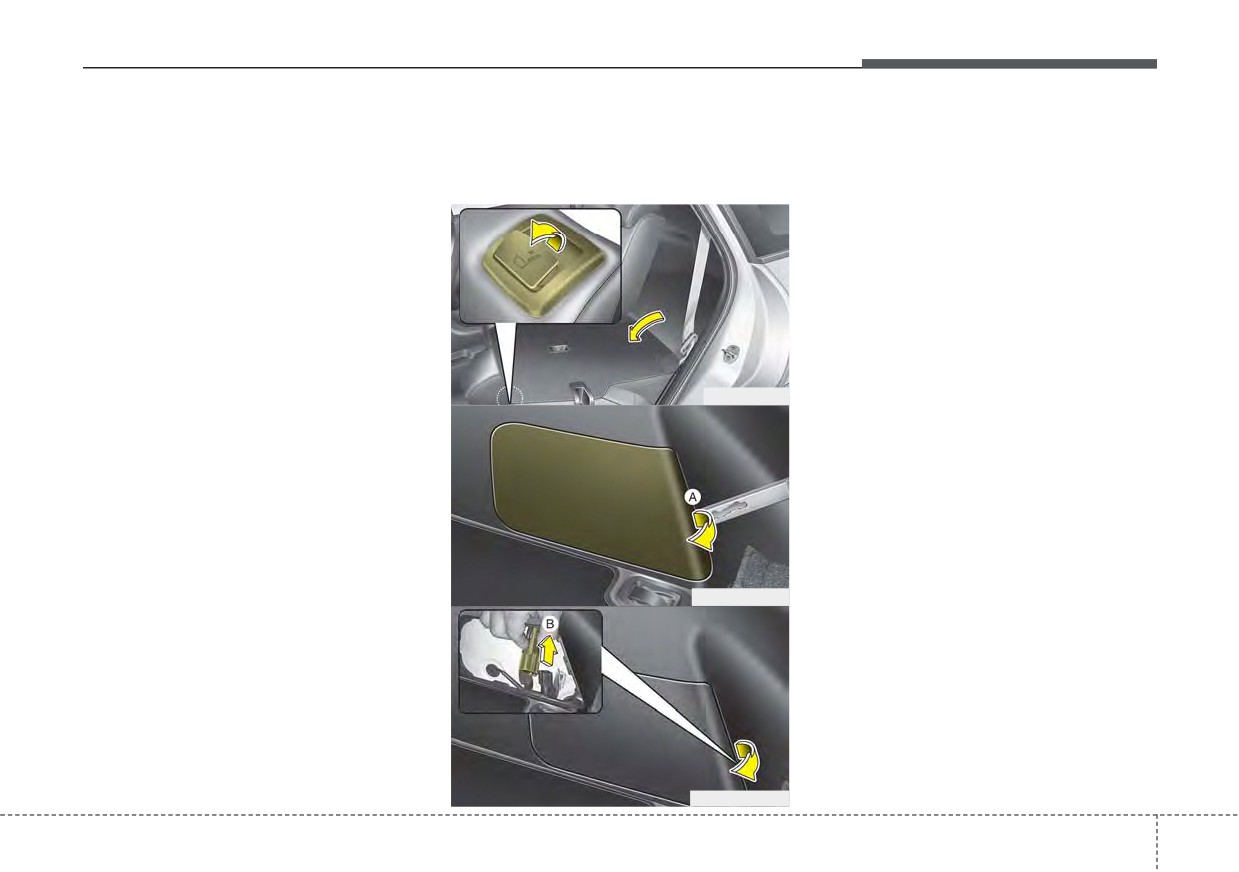
Method to disconnect the (-)
When the vehicle is under regular
battery
cable for regular maintenance
maintenance, make sure to separate
(Except the use of dash cameras)
(For Hybrid)
the (-) cable inside the luggage room
before maintenance.
The use of external power acces-
sories may reduce performance and
function of the vehicle. Especially,
Procedures to separate the (-) cable
the use of dash cameras may cause
is as below :
a shut off the power of the vehicle
• Fold the rear left side seat.
prior to the dash camera’s automatic
• Using the key or (-) screwdriver,
shut-down.
remove the service cover (A) on
If the power of the car is shut off,
the luggage trim.
start the vehicle as explained above
ODE036021
• Separate the (-) cable (B).
(refer to “Over discharge of 12V bat-
tery”).
Reassemble in the reverse order of
disassembly.
ODE046170N
ODE046171N
6
7