Kia Niro Hybrid / Plug-in Hybrid (2022 year). Manual in english - page 9
Features of your vehicle
REVERSE PARKING DISTANCE WARNING (PDW) (IF EQUIPPED)
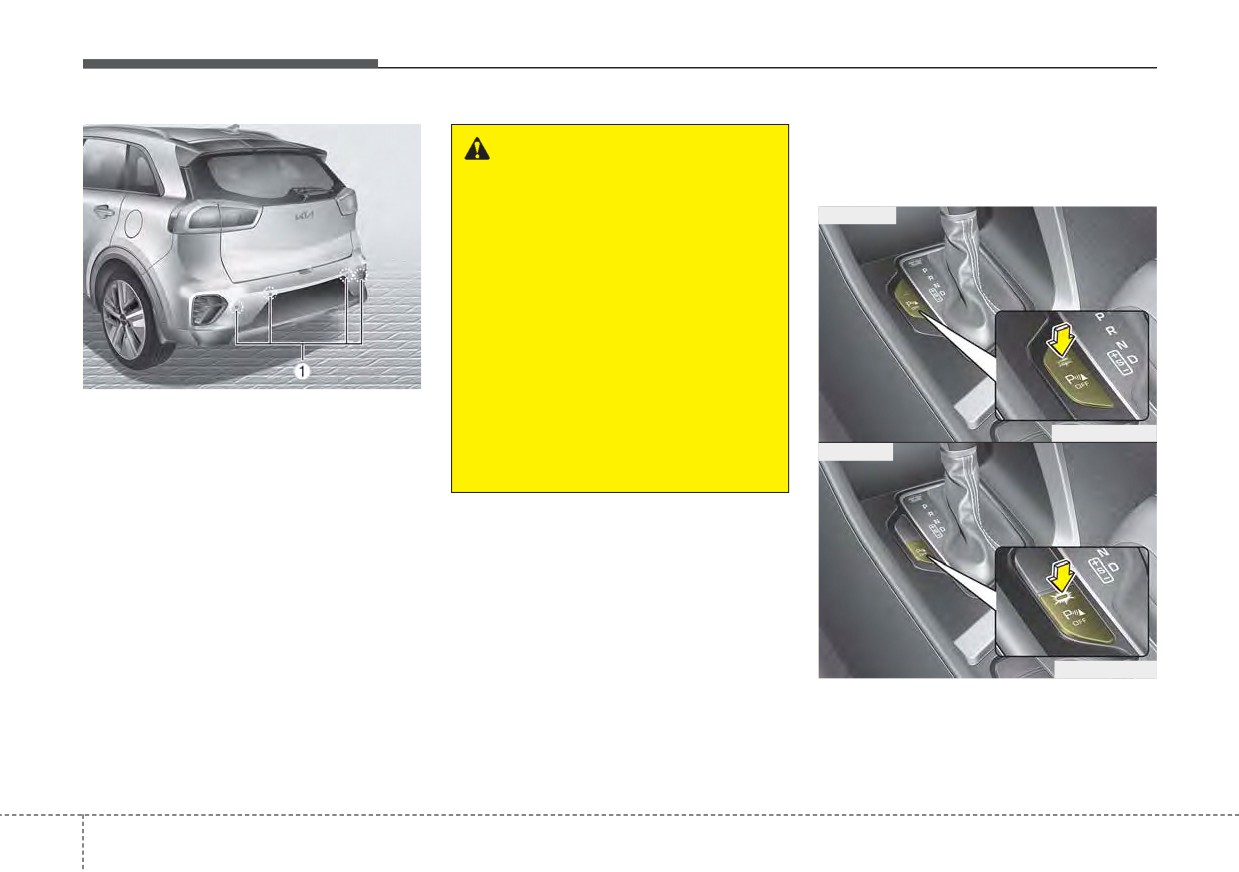
Reverse Parking Distance
WARNING
Warning operation
- Reverse Parking Distance
Operating condition
Warning
■ Type A
Never rely solely on Reverse
Parking Distance Warning.
Always perform a visual inspec-
tion to make sure the vehicle is
clear of all obstructions before
moving the vehicle in any direc-
tion. Stop immediately if you are
ODEP041400N
aware of a child or other person
anywhere near your vehicle.
Reverse Parking Distance Warning
Some objects may not be
assists the driver during backward
ODEP049610N
movement of the vehicle by chiming if
detected by the sensors, due to
■ Type B
the object's size or material.
any object is sensed within a distance
of
48 inches (120 cm) behind the
vehicle.
This function is a supplemental func-
tion and it is not intended to nor does
it replace the need for extreme care
and attention of the driver. The sens-
ing range and objects detectable by
rear ultrasonic sensors (➀) are limited.
ODEP049607N
Whenever backing-up, pay as much
attention to what is behind you as you
Press the Parking Distance Warning
would in a vehicle without a Reverse
Off button to turn off the Reverse
Parking Distance Warning.
Parking Distance Warning. The indi-
cator light on the button will turn on.
4
122
Features of your vehicle
•
This function will activate when
Reverse Parking Distance
The detecting range may decrease
backing up with the ignition switch
Warning not operation
when:
or ENGINE START/STOP button to
1. The sensor is covered with foreign
Reverse
Parking
Distance
the ON position.
Warning may not operate properly
matter such as snow or water.
If the vehicle is moving at a speed
(The sensing range will return to
when:
over 3 mph (5 km/h), the function
normal when removed.)
1. Moisture is frozen to the sensor. (It
may not be activated correctly.
2. Outside air temperature is
will operate normally once the
•
The sensing distance while the
moisture clears.
extremely hot or cold.
back-up warning function is in
2. The sensor is covered with foreign
operation is approximately 48 inch-
The following objects may not be
matter, such as snow or water, or
es (120 cm) at the rear bumper
recognized by the sensor:
the sensor cover is blocked. (It will
center area, 24 in (60 cm) at the
operate normally when the materi-
1. Sharp or slim objects such as
rear bumper both side area.
al is removed or the sensor is no
ropes, chains or small poles.
•
When more than two objects are
longer blocked.)
2. Objects which tend to absorb the
sensed at the same time, the clos-
3. Driving on uneven road surfaces
sensor frequency such as clothes,
est one will be recognized first.
(unpaved roads, gravel, bumps,
sound absorbent material or snow.
gradient).
3. Undetectable objects smaller than
Types of warning sound
4. Objects generating excessive
40 in (100 cm) in height and nar-
• When an object is 24 in to 48 in (60
noise (vehicle horns, loud motor-
rower than 6 in (15 cm) in diame-
cm to
120 cm) from the rear
cycle engines, or truck air brakes)
ter.
bumper: Buzzer beeps intermit-
are within range of the sensor.
tently.
5. Heavy rain or water spray exists.
• When an object is 12 in to 24 in (30
6. Wireless transmitters or mobile
cm to
60 cm) from the rear
phones are within range of the
bumper: Buzzer beeps more fre-
sensor.
quently.
7. The sensor is covered with snow.
• When an object is within 12 in (30
8. Trailer towing
cm) of the rear bumper:
Buzzer sounds continuously.
4
123
Features of your vehicle
Reverse Parking Distance
✽ NOTICE
Self-diagnosis
Warning precautions
This function can only sense objects
If you don’t hear an audible warning
•
Reverse Parking Distance Warning
within the range and location of the
sound or if the buzzer sounds inter-
may not sound consistently
sensors. It cannot detect objects in
mittently when shifting the gear to
depending on the speed and
other areas where sensors are not
the R (Reverse) position, this may
shapes of the objects detected.
installed. Also, small or slim objects,
indicate a malfunction in Reverse
such as poles or objects located
Parking Distance Warning. If this
•
Reverse Parking Distance Warning
between sensors may not be detected
occurs, have your vehicle checked by
may malfunction if the vehicle
by the sensors.
an authorized Kia dealer as soon as
bumper height or sensor installa-
Always visually check behind the
possible.
tion has been modified or dam-
vehicle when backing up.
aged. Any non-factory installed
Be sure to inform any drivers of the
equipment or accessories may also
✽ NOTICE
vehicle that may be unfamiliar with
interfere with the sensor perform-
the function regarding the func-
Your new vehicle warranty does not
ance.
tion’s capabilities and limitations.
cover any accidents or damage to
•
The sensor may not recognize
the vehicle or injuries to its occu-
objects less than
12 in (30 cm)
pants due to a Reverse Parking
from the sensor, or it may sense an
Distance Warning malfunction.
incorrect distance. Use caution.
Always drive safely and cautiously.
•
When the sensor is frozen or cov-
ered with snow, dirt, or water, the
sensor may be inoperative until the
material is removed using a soft
cloth.
•
To prevent damage, do not push,
scratch or strike the sensor.
4
124
Features of your vehicle
LIGHTING
Battery saver function
Headlight escort function
Daytime running light
(if equipped)
The purpose of this feature is to pre-
The Daytime Running Lights (DRL)
vent the battery from being dis-
If you turn the ignition switch to the
can make it easier for others to see the
charged if the lights are left in the ON
ACC or OFF position with the head-
front of your vehicle during the day.
position.
lights ON, the headlights remain on
DRL can be helpful in many different
for about 5 minutes. However, if the
driving conditions, and it is especially
The system automatically shuts off
driver's door is opened and closed,
helpful after dawn and before sunset.
the parking lights after the engine is
the headlights are turned off after 15
off and the driver’s door is opened.
The DRL system will turn the dedi-
seconds.
cated lamp OFF when:
However, the position lamps stay ON
The headlights can be turned off by
even when the driver-side door is
1. The headlight switch is on
opened if the light switch is operated
pressing the lock button on the trans-
2. The engine is off
mitter
(or smart key) one more or
after the engine is turned off.
3. The front fog light is on.
turning the light switch to the OFF
If necessary, to keep the lamps on
position.
4. Engaging the Parking Brake
turn the position lamps OFF and ON
again using the headlamp switch on
the steering column after the engine
is turned off.
4
125
Features of your vehicle
Lighting control
Parking & Tail light (
)
Headlight position (
)
OUM044055
OUMA046054
OUMA046056
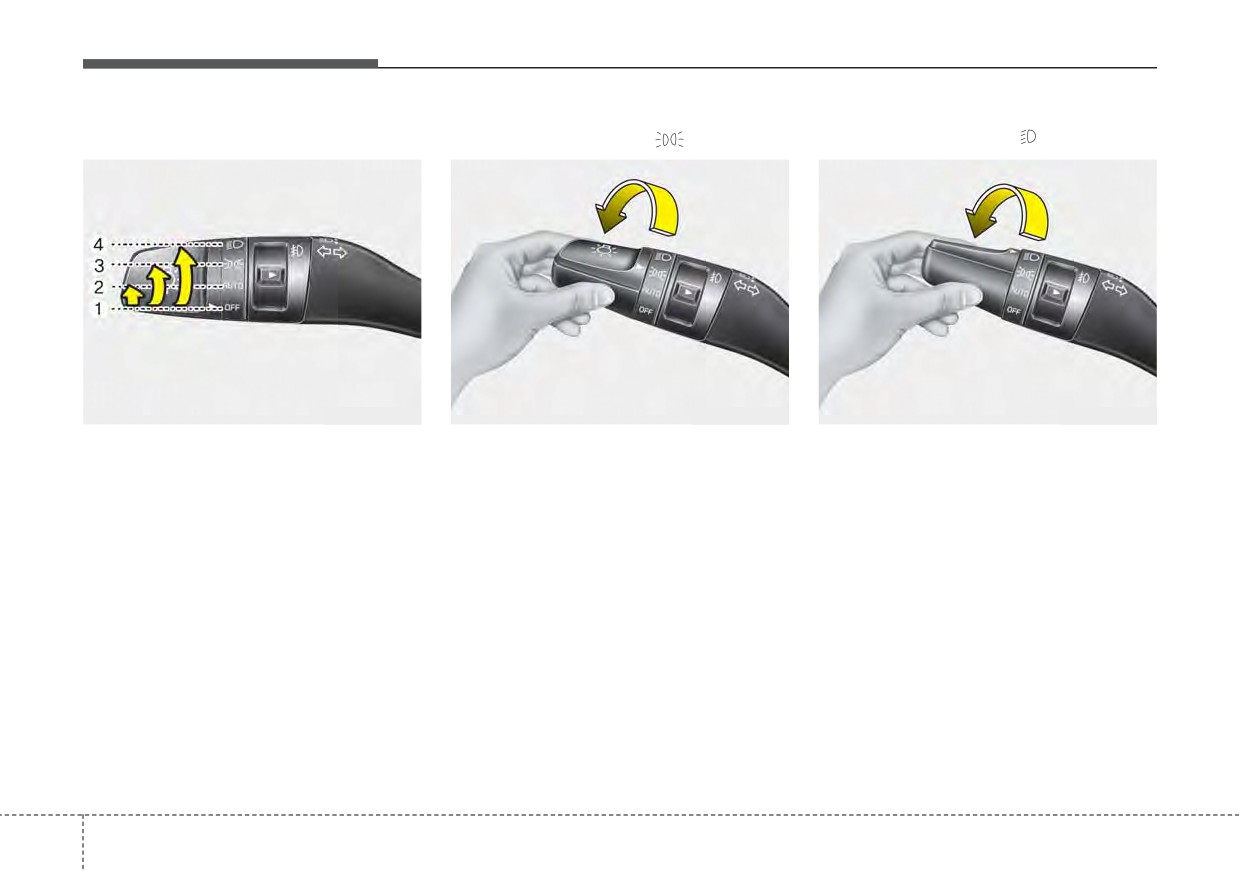
The light switch has a Headlight and
When the light switch is in the park-
When the light switch is in the head-
a Parking light position.
ing light position, the tail, license and
light position, the head, tail, license
instrument panel lights will turn ON.
lights will turn ON.
To operate the lights, turn the knob at
the end of the control lever to one of
the following positions:
✽ NOTICE
(1) OFF position
The ignition switch must be in the ON
(2) Auto light position
position to turn on the headlights.
(3) Parking & Tail light
(4) Headlight position
4
126
Features of your vehicle
Auto light position
High beam operation
CAUTION
•
Never place anything over the
sensor
(1) located on the
instrument panel as this will
ensure better auto-light sys-
tem control.
•
Don’t clean the sensor using a
window cleaner, the cleaner
may leave a light film which
could interfere with sensor
operation.
•
If your vehicle has window tint
ODEP049408N
OUM044059
or other types of metallic coat-
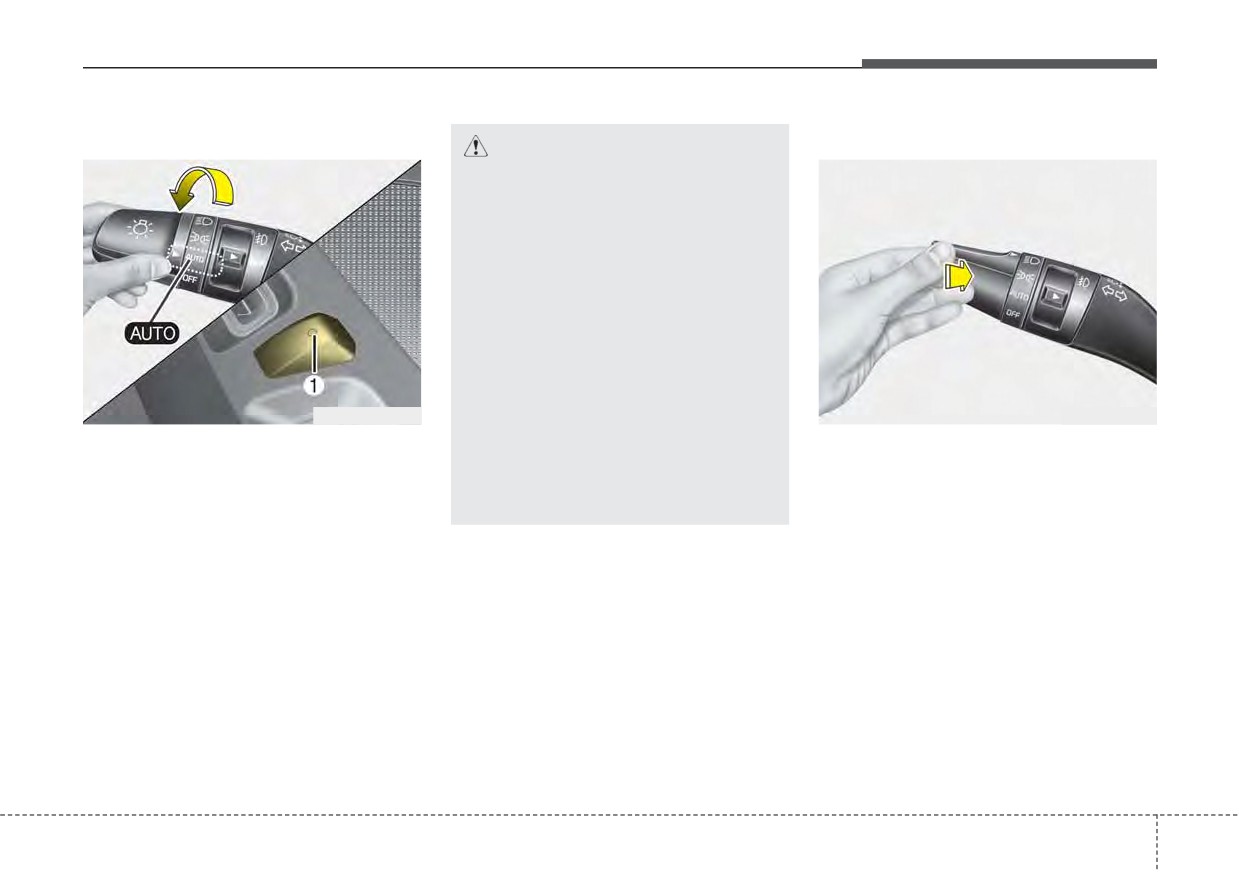
When the light switch is in the AUTO
To turn on the high beam headlamp,
ing on the front windshield,
light position, the taillights and head-
the Auto light system may not
push the lever away from you. The
lights will turn ON or OFF automati-
lever will return to its original position.
work properly.
cally depending on the amount of
The high beam indicator will light
light outside the vehicle.
when the headlight high beams are
When the light switch is positioned at
switched on.
an auto light position, at first, the
To prevent the battery from being
wiper will turn on and then, after 5
discharged, do not leave the lights
seconds the head lamp will turn on
on for a prolonged time while the
automatically.
engine is not running.
If the head lamp has been turned on
due to this function of the vehicle, the
head lamp will turn off 60 seconds
after the wiper has been turned off.
4
127
Features of your vehicle
High Beam Assist (HBA)
WARNING - High beams
(if equipped)
Do not use high beams when
there are other vehicles in front
of or approaching your vehicle.
Using high beams could
obstruct the other driver’s
vision.
OUM044058
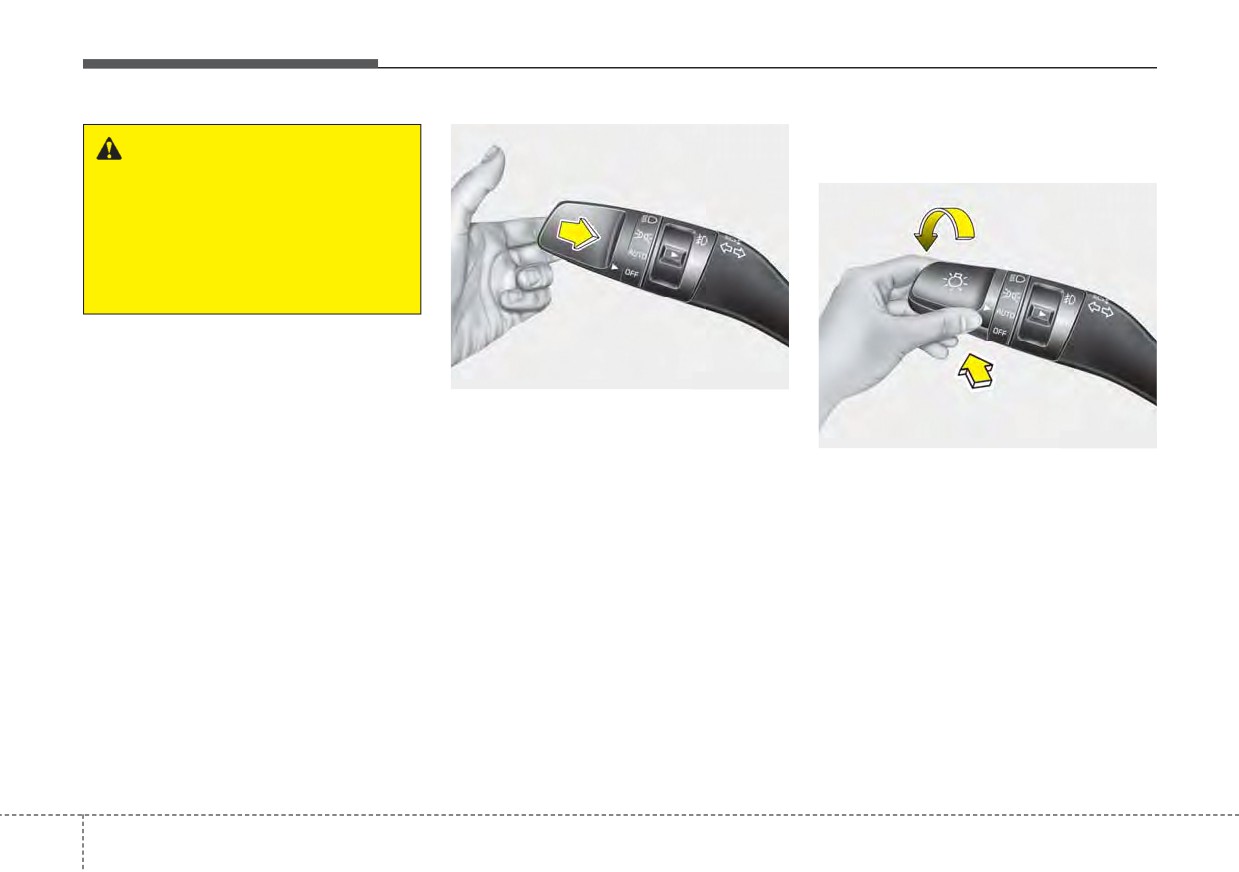
To flash the headlights, pull the lever
towards you. It will return to the nor-
OUMA048554
mal
(low beam) position when
released. The headlight switch does
High Beam Assist is a function that
not need to be on to use this flashing
automatically adjusts the headlamp
feature.
range (switches between high beam
and low beam) according to the
brightness of other vehicles and road
conditions.
4
128
Features of your vehicle
Operating condition
The high beam switches to low beam
The function may not operate nor-
1.Place the light switch in the AUTO
in the below conditions.
mally in the below conditions.
position.
•
When High Beam Assist is off.
•
When the light from the on-coming
2.Turn on the high beam by pushing
•
When the light switch is not in the
or front vehicle is not detected
because of lamp damage, hidden
the lever away from you.
AUTO position.
from sight, etc.
The High Beam Assist (
) indica-
•
When the headlamp is detected
•
When the lamp of the on-coming or
tor will illuminate.
from the on-coming vehicle.
front vehicle is covered with dust,
3.High Beam Assist will turn on when
•
When the tail lamp is detected
snow or water.
vehicle speed is above 25 mph (40
from the front vehicle.
•
When the light from the on-coming
km/h).
•
When the surrounding is bright
or front vehicle is not detected
• If the lever is pushed away when
enough high beams are not need-
because of exhaust fume, smoke,
High Beam Assist is operating,
ed.
fog, snow, etc.
High Beam Assist will turn off and
•
When streetlights or other lights
•
When the front window is covered
the high beam will be on continu-
are detected.
ously. The High Beam Assist (
with foreign matters such as ice,
•
When vehicle speed is below 15
dust, fog, or is damaged.
) indicator will turn off.
mph (24 km/h).
• If the lever is pulled towards you
•
When there is a similar shape lamp
•
When headlamp / taillamp of bicy-
with the front vehicle’s lamps.
when High Beam Assist is oper-
cle/motorcycle is detected
ating, High Beam Assist will turn
•
When it is hard to see because of
off.
fog, heavy rain or snow.
4.If the light switch is placed to the
•
When the headlamp is not repaired
headlamp position, High Beam
or replaced at an authorized deal-
Assist will turn off and the low
er.
beam will be on continuously.
•
When headlamp aiming is not
properly adjusted.
•
When driving on a narrow curved
road or rough road.
4
129
Features of your vehicle
•
When driving downhill or uphill.
✽ NOTICE
Turn signals and lane change
•
When only part of the vehicle in
•
Do not place any accessories,
signals
front is visible on a crossroad or
stickers or tint the windshield.
curved road.
•
Have the windshield glass replaced
•
When there is a traffic light, reflect-
from an authorized dealer.
ing sign, flashing sign or mirror.
•
Do not remove or damage related
parts of High Beam Assist.
•
When the road conditions are bad
•
Be careful that water doesn’t get
such as being wet or covered with
into the High Beam Assist unit.
snow.
•
Do not place objects on the dash-
•
When the front vehicle’s head-
board that reflect light such as
lamps are off but the fog lamps on.
mirrors, white paper, etc. The
•
When a vehicle suddenly appears
function may malfunction if sun-
from a curve.
light is reflected.
OUM044060
•
When the vehicle is tilted from a
•
At times, High Beam Assist may
flat tire or being towed.
not work properly, always check
The ignition switch must be on for the
the road conditions for your safe-
turn signals to function. To turn on
•
When Lane Keeping Assist warn-
ty. When the function does not
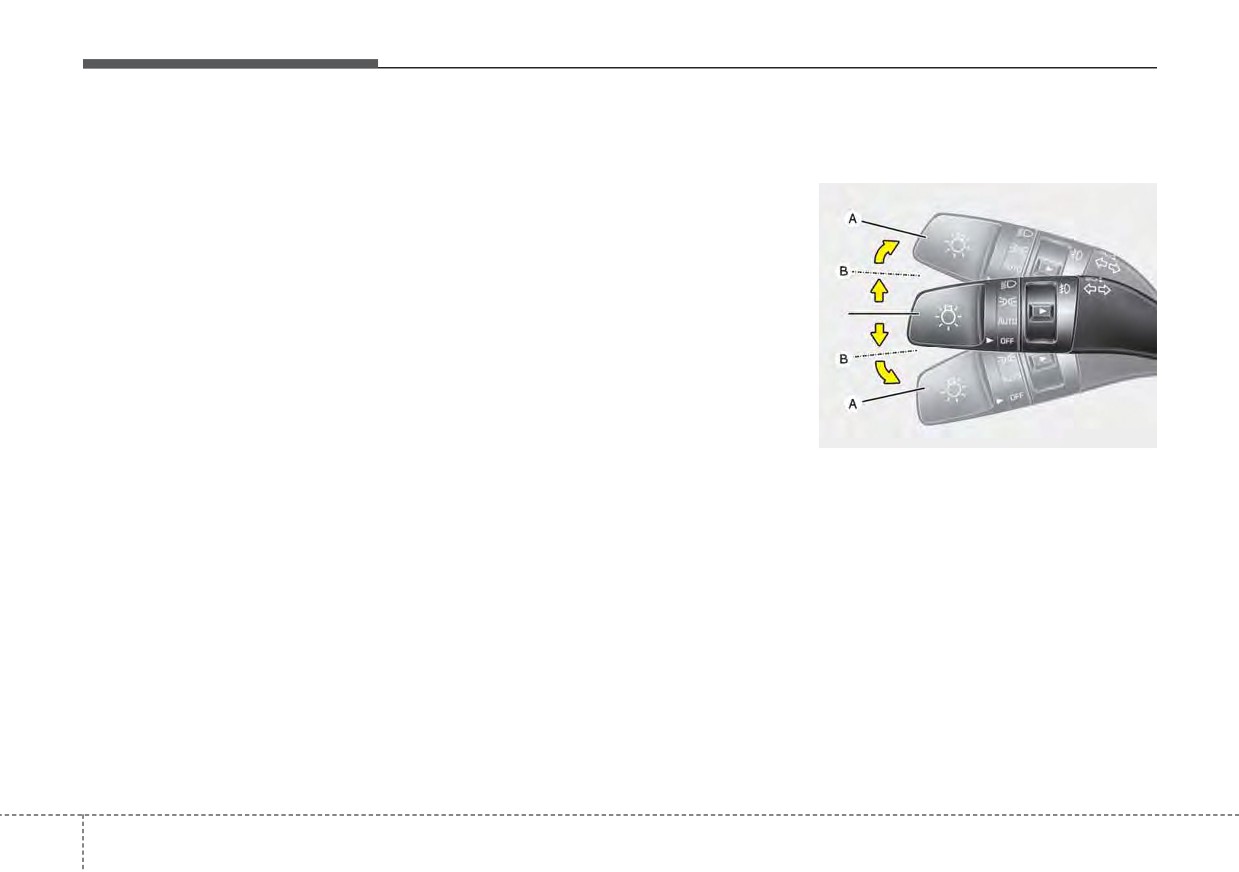
the turn signals, move the lever up or
ing light illuminates. (if equipped)
operate normally, manually
down (A). The green arrow indicators
change between the high beam
on the instrument panel indicate
and low beam.
which turn signal is operating.
They will self-cancel after a turn is
completed. If the indicator continues
to flash after a turn, manually return
the lever to the OFF position.
To signal a lane change, move the
turn signal lever slightly and hold it in
position (B). The lever will return to
the OFF position when released.
4
130
Features of your vehicle
If an indicator stays on and does not
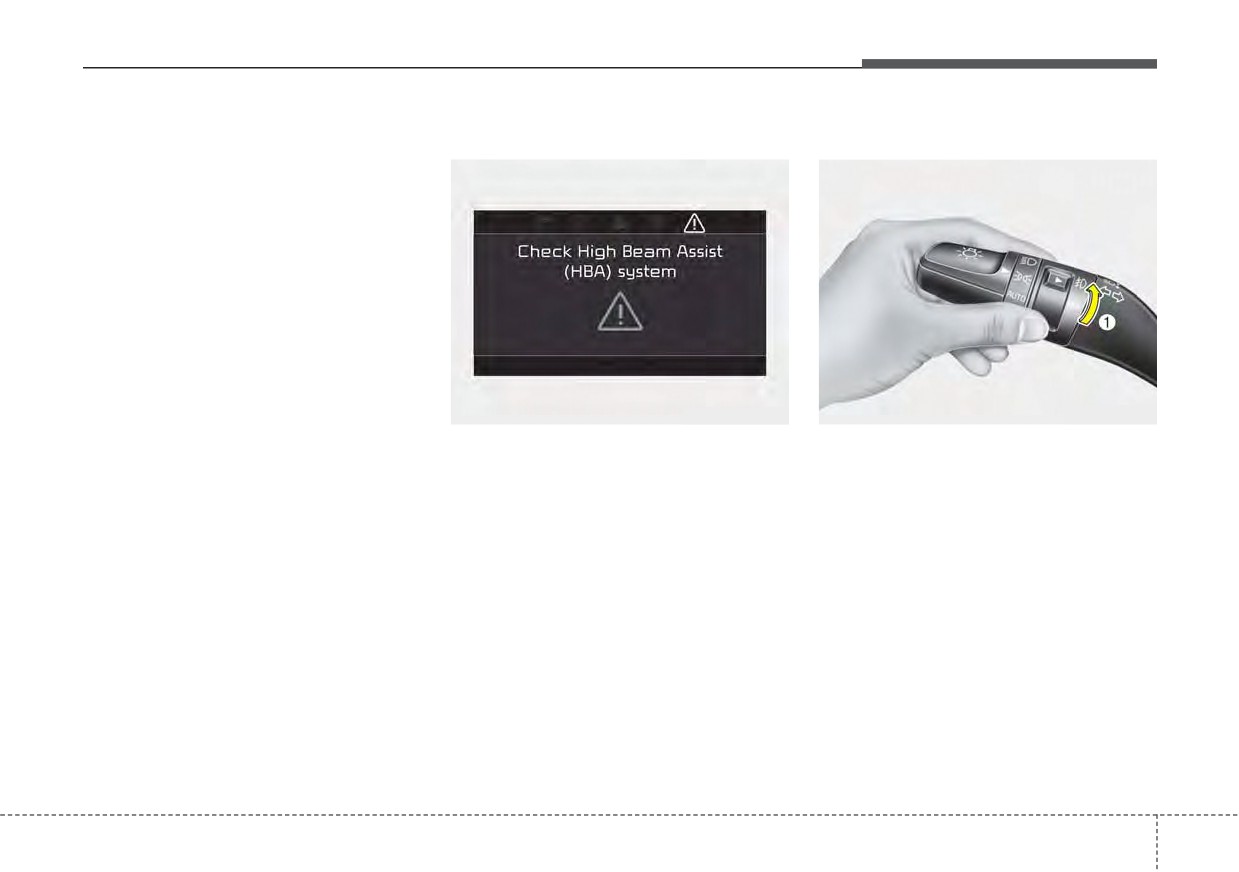
Check headlight
Front fog light (if equipped)
flash or if it flashes abnormally, one of
the turn signal bulbs may be burned
out and will require replacement.
✽ NOTICE
If an indicator flash is abnormally
quick or slow, a bulb may be burned
out or have a poor electrical connec-
tion in the circuit.
ODEP049575L
ODE046458N
This warning message illuminates if
Fog lights are designed to provide
there is a malfunction
(burned-out
improved visibility when visibility is
bulb except LED lamp or circuit mal-
poor due to fog, rain or snow, etc. The
function) with the headlamp. In this
fog lights will turn on when the fog light
case, have your vehicle inspected by
switch (1) is turned to the on position
an authorized Kia dealer.
after the headlight is turned on.
To turn off the fog lights, turn the fog
light switch
(1) to the ON position
✽ NOTICE
again.
• When replacing the bulb, use the
When in operation, the fog lights
same wattage bulb.
consume large amounts of vehicle
For more information, refer to
electrical power. Only use the fog
“BULB WATTAGE” in chapter 8.
lights when visibility is poor.
• If a different wattage bulb is
installed on the vehicle, this warn-
ing message is not displayed.
4
131
Features of your vehicle
WIPERS AND WASHERS
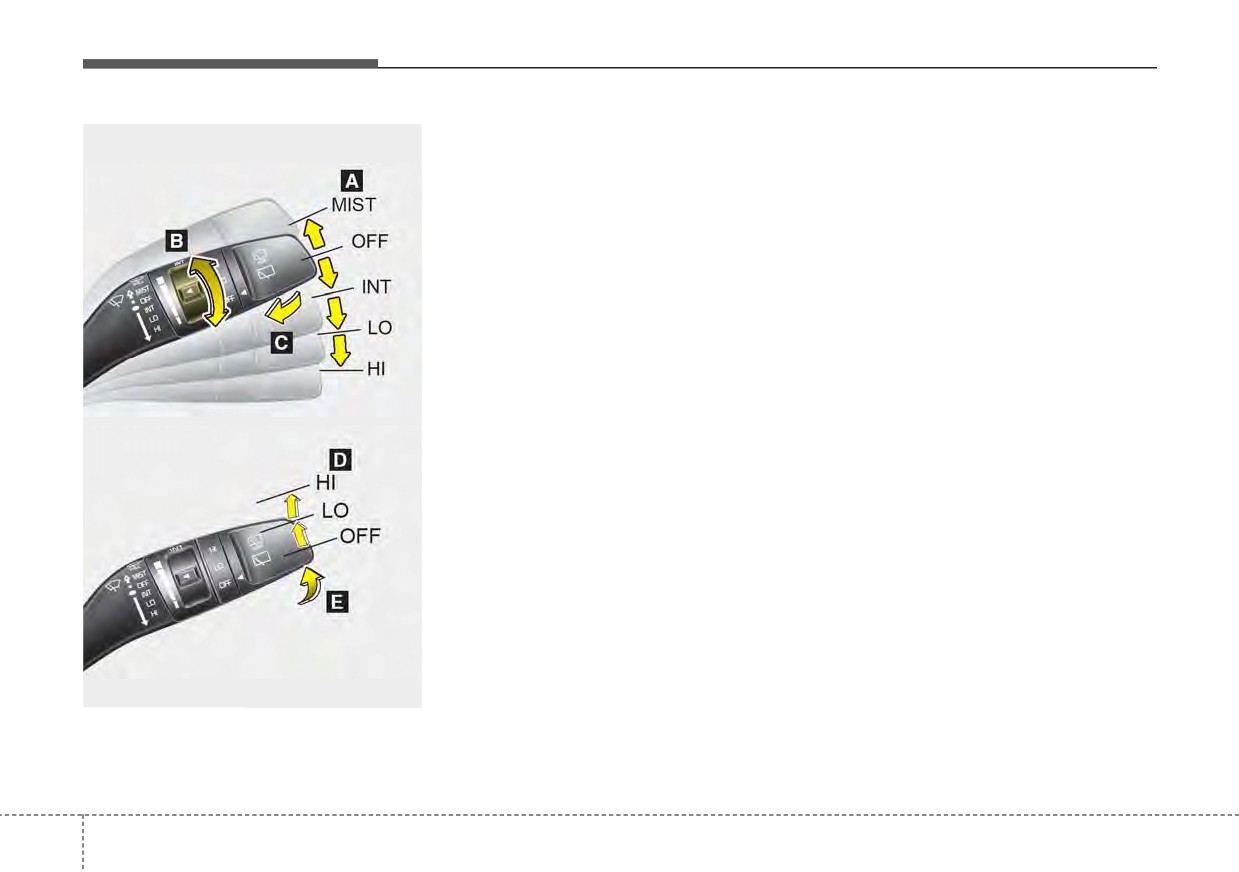
A : Wiper speed control (front)
Windshield wipers
Windshield wiper/washer
· MIST - Single wipe
Operates as follows when the igni-
· OFF - Off
tion switch is turned ON.
· INT - Intermittent wipe
MIST : For a single wiping cycle,
move the lever to this (MIST)
· LO - Low wiper speed
position and release it. The
· HI - High wiper speed
wipers will operate continu-
ously if the lever is held in this
B : Intermittent control wipe time
position.
adjustment
OFF : Wiper is not in operation
INT : Wiper operates intermittently at
C : Wash with brief wipes (front)*
the same wiping intervals. Use
this mode in light rain or mist.
Rear window wiper/washer
To vary the speed setting, turn
D : Rear wiper/washer control*
the speed control knob.
· HI - Continuous wipe
LO : Normal wiper speed
· LO - Intermittent wipe*
HI : Fast wiper speed
· OFF - Off
E : Wash with brief wipes (rear)*
* if equipped
OQL045407/OQL045464
4
132
Features of your vehicle
✽ NOTICE
Front windshield washers
The reservoir filler neck is located in
the front of the engine compartment
If there is heavy accumulation of
on the passenger side.
snow or ice on the windshield, defrost
the windshield for about 10 minutes,
or until the snow and/or ice is
CAUTION - Washer pump
removed before using the windshield
To prevent possible damage to
wipers to ensure proper operation.
the washer pump, do not oper-
If you do not remove the snow
ate the washer when the fluid
and/or ice before using the wiper
reservoir is empty.
and washer, it may damage the
wiper and washer system.
OQL045409
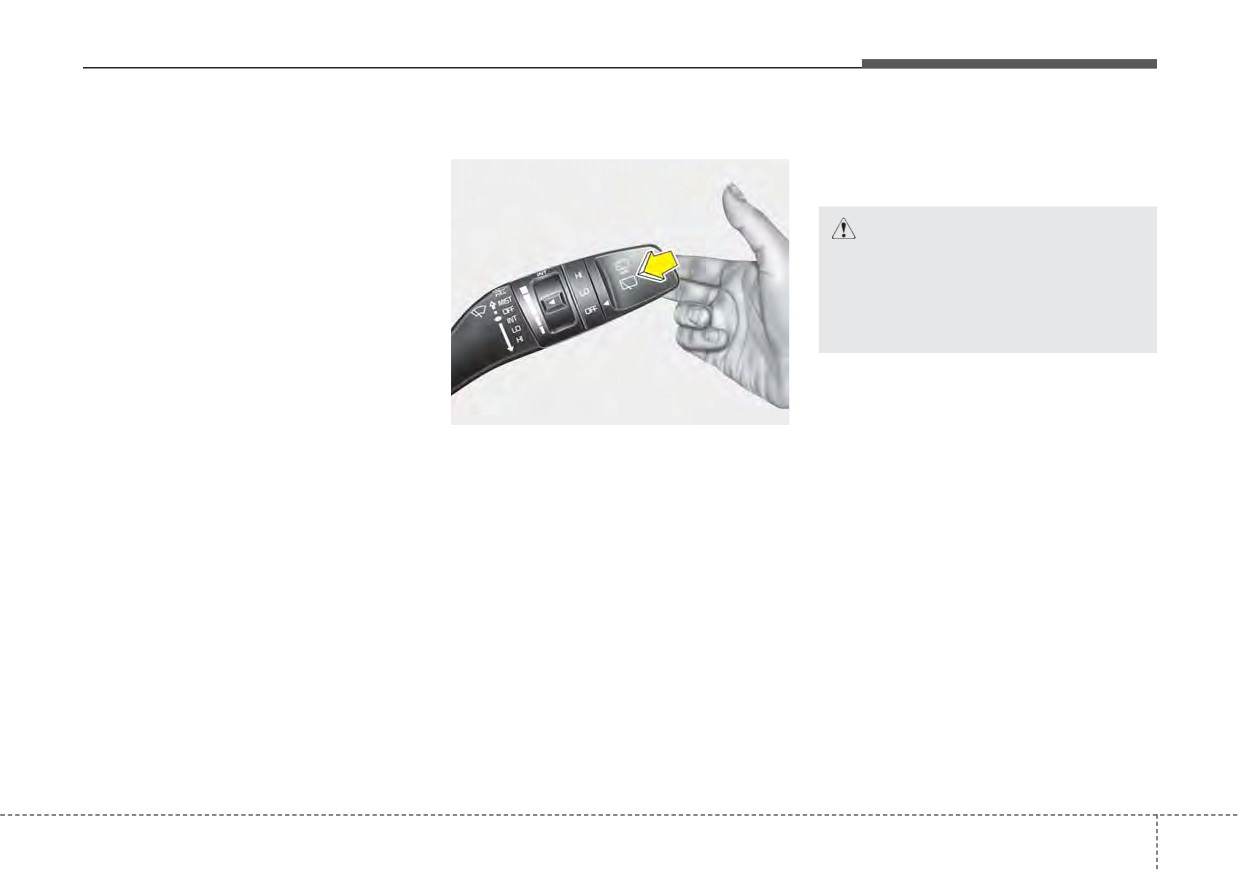
In the OFF position, pull the lever
gently toward you to spray washer
fluid on the windshield and to run the
wipers 1-3 cycles.
Use this function when the wind-
shield is dirty.
The spray and wiper operation will
continue until you release the lever.
If the washer does not work, check
the washer fluid level. If the fluid level
is not sufficient, you will need to add
appropriate non-abrasive windshield
washer fluid to the washer reservoir.
4
133
Features of your vehicle
Rear window wiper and wash-
WARNING - Obscured
CAUTION - Wipers &
er switch
visibility
windshields
Do not use the washer in freez-
•
To prevent possible damage
ing temperatures without first
to the wipers or windshield,
warming the windshield with
do not operate the wipers
the defrosters; the washer solu-
when the windshield is dry.
tion could freeze on the wind-
•
To prevent damage to the wiper
shield and obscure your vision.
blades, do not use gasoline,
kerosene, paint thinner, or
other solvents on or near them.
•
To prevent damage to the
wiper arms and other compo-
nents, do not attempt to move
OQL045465
the wipers manually.
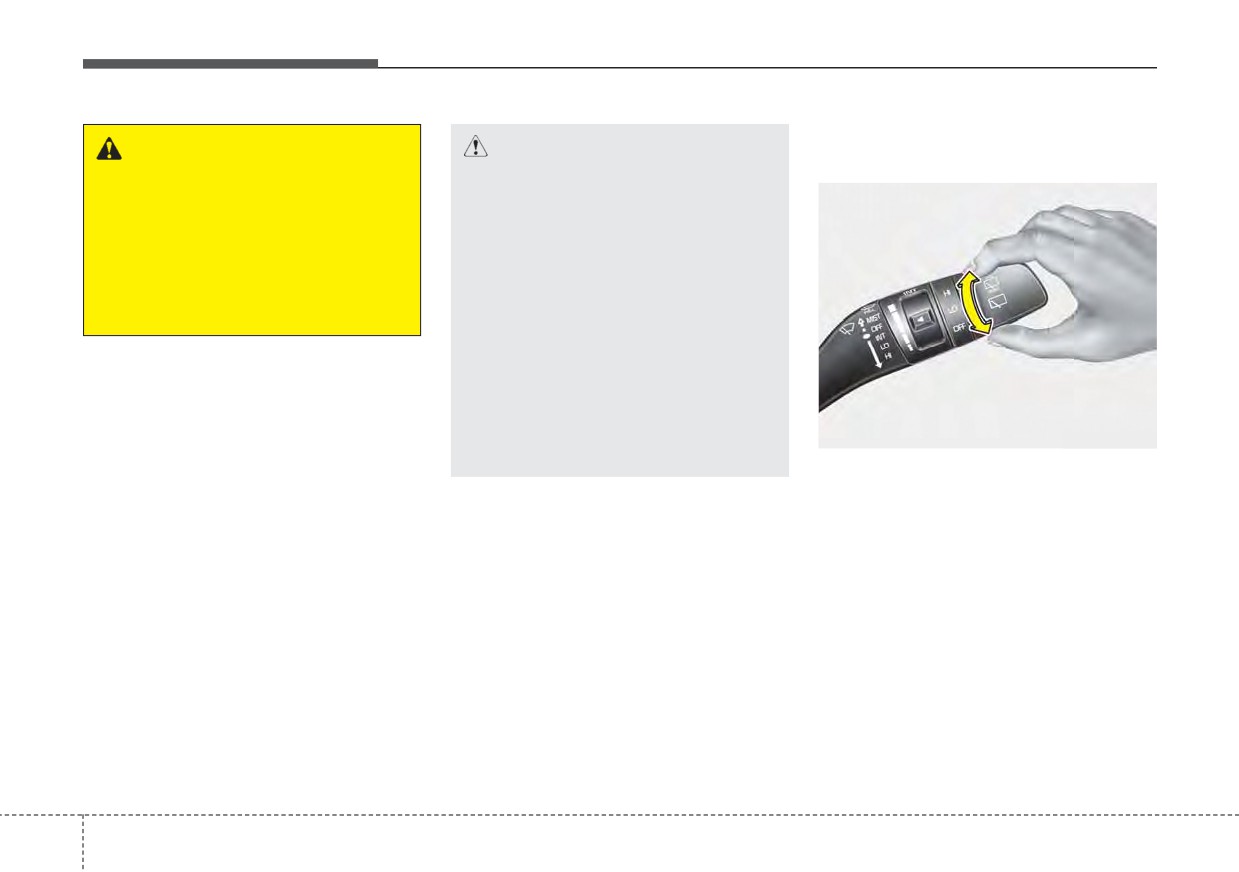
The rear window wiper and washer
switch is located at the end of the
wiper and washer switch lever. Turn
the switch to the desired position to
operate the rear wiper and washer.
HI : Continuous wipe
LO : Intermittent wipe
OFF : OFF
4
134
Features of your vehicle
OQL045466
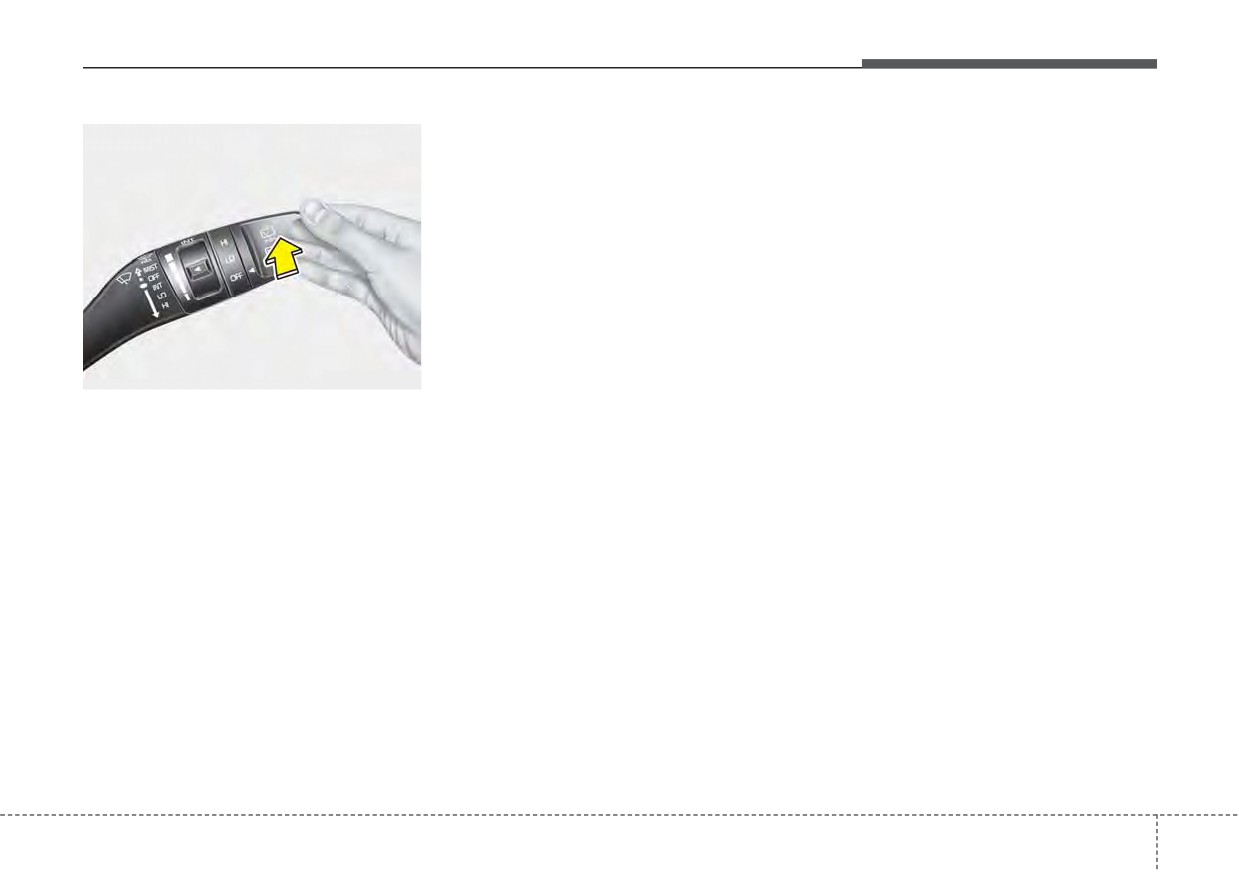
Push the lever away from you to
spray rear washer fluid and to run the
rear wipers 1 ~ 3 cycles. The spray
and wiper operation will continue
until you release the lever
4
135
Features of your vehicle
INTERIOR LIGHTS
Do not use the interior lights for
Automatic turn off function
Map lamp
extended periods when the engine is
The interior lights automatically turn
■ Type A
not running.
off approximately
20 minutes after
It may cause battery discharge.
the ignition switch is turned off, if the
lights are in the ON position.
WARNING - Interior
If your vehicle is equipped with the
Lights
theft alarm system, the interior lights
automatically turn off approximately
Do not use the interior lights
5 seconds after the system is armed.
when driving in the dark.
Accidents can occur because
your review may be obscured
ODE046409L
by the interior lights.
■ Type B
ODEP049410
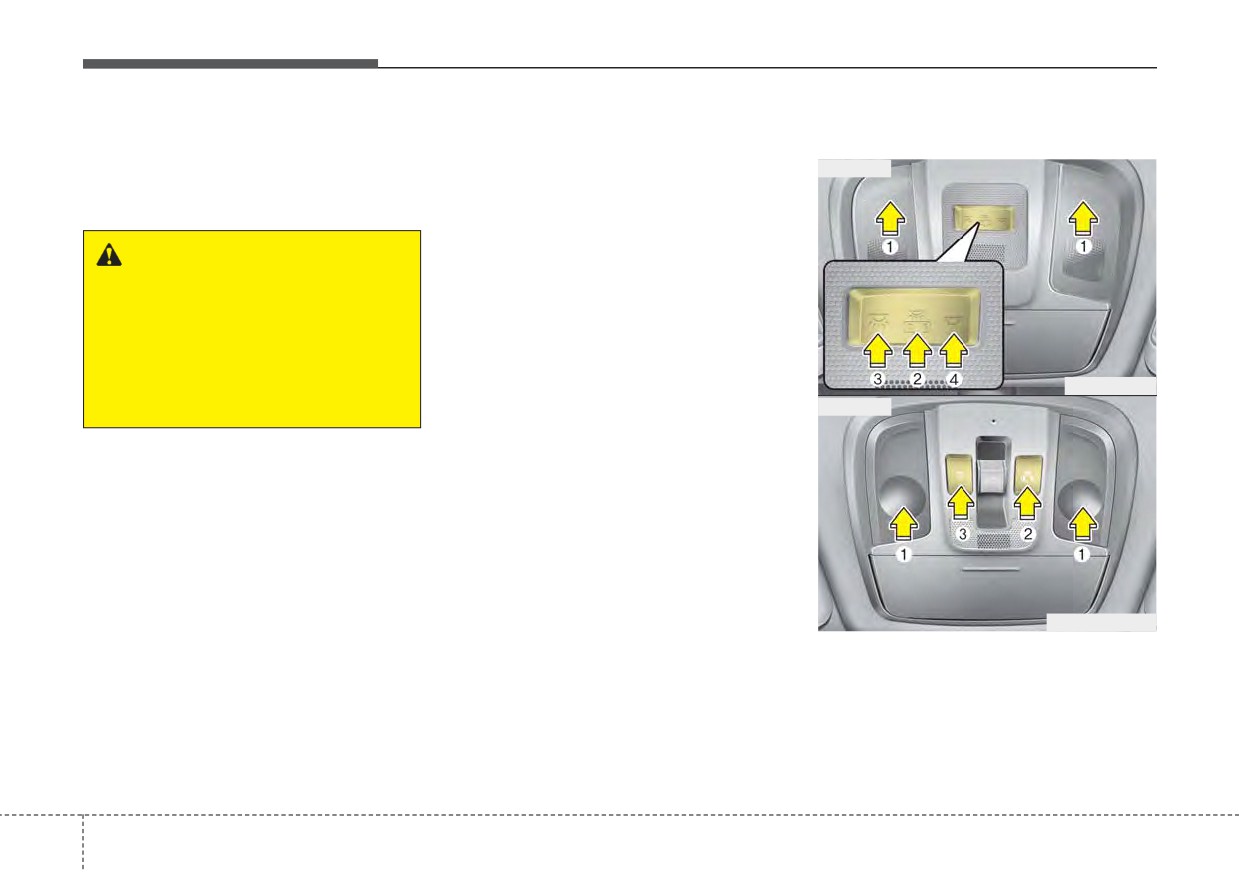
• Press the lens (1) to turn ON the
map lamp.
To turn the map lamp OFF press
the lens (1) again.
4
136
Features of your vehicle
✽ NOTICE
Room lamp
•
(2) : DOOR mode
The DOOR mode and ROOM mode
■ Type A
-
The map lamp and room lamp
can not be selected at the same time.
come on when a door is opened.
The lamps go out after approxi-
Front Room Lamp:
mately 30 seconds.
• Type A
-
The map lamp and room lamp
(3): Press this switch to turn the
come on for approximately 30 sec-
front and rear room lamps
onds when doors are unlocked
on.
with a transmitter or smart key as
long as the doors are not opened.
(4): Press this switch to turn the
front and rear room lamps
ODE046411
-
The map lamp and room lamp will
off.
■ Type B
stay on for approximately 20 min-
utes if a door is opened with the
ignition switch in the ACC or
• Type B
LOCK/OFF position.
(3): Press this switch to turn the
-
The map lamp and room lamp will
front and rear room lamps on
stay on continuously if the door is
and off.
opened with the ignition switch in
the ON position.
-
The map lamp and room lamp will
go out immediately if the ignition
ODEP047468
switch is changed to the ON posi-
tion or all doors are locked.
•
: The light stays on at all times.
-
To turn off the DOOR mode, press
the DOOR button (2) once again
(not pressed).
4
137
Features of your vehicle
Liftgate room lamp
Vanity mirror lamp
ODEP049412
OQL045416
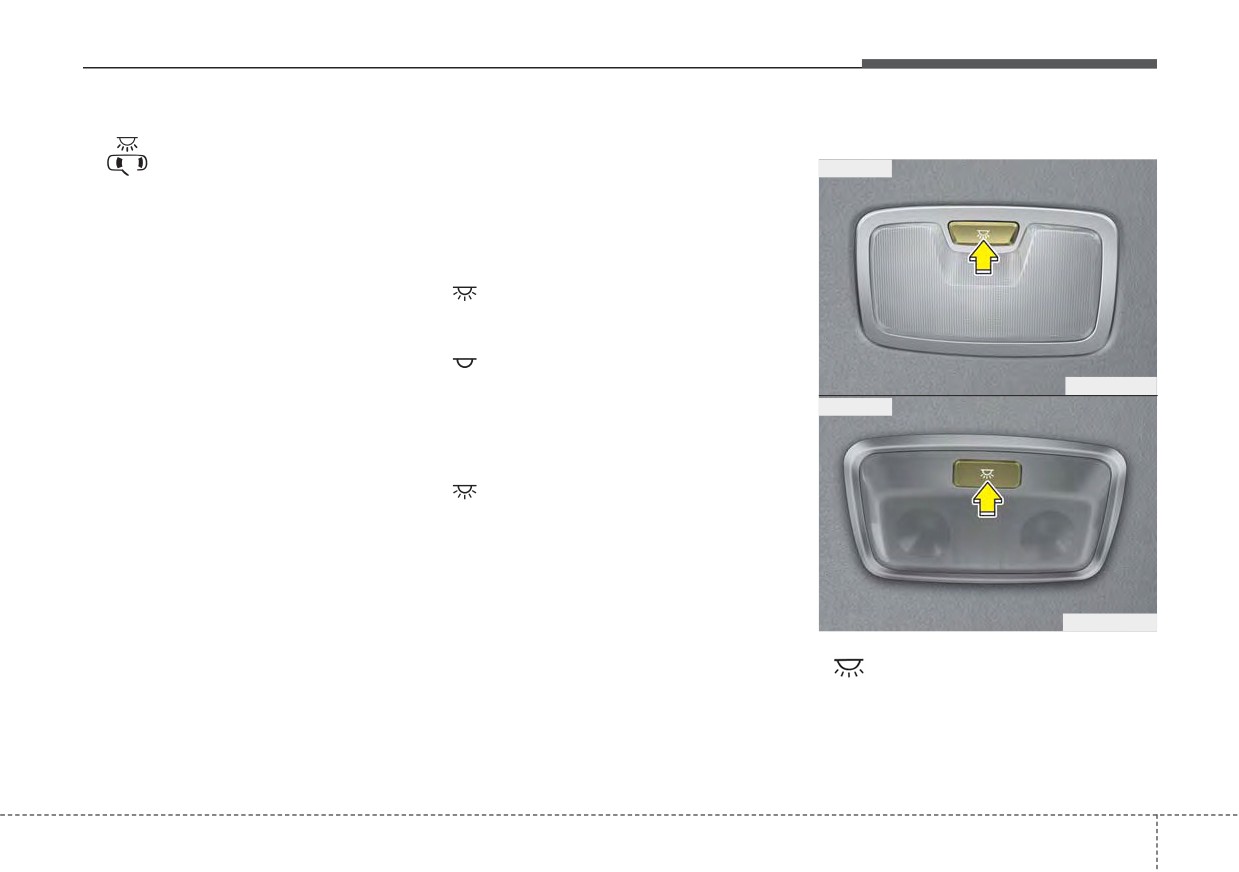
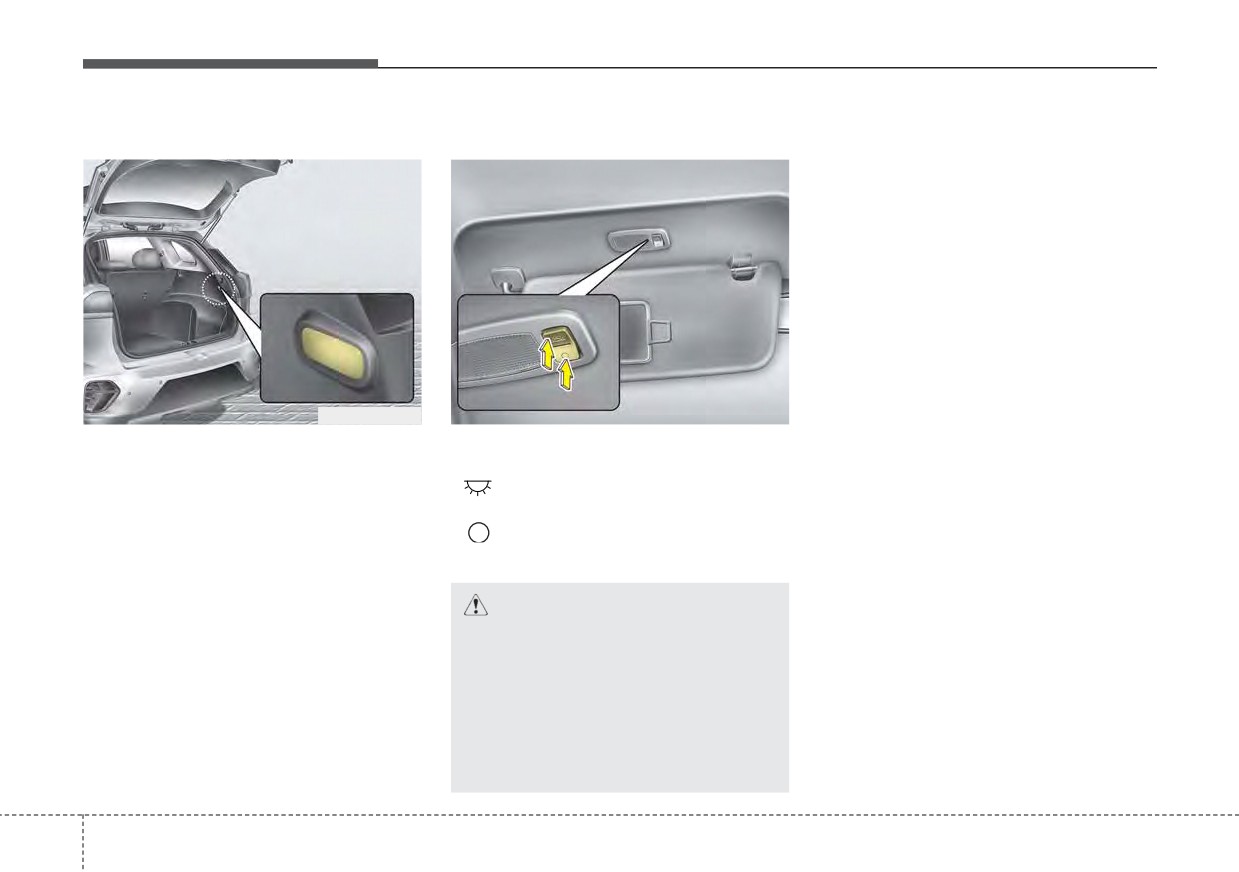
The liftgate room lamp comes on
Push the switch to turn the light on or
when the liftgate is opened.
off.
•
: The lamp will turn on if this
button is pressed.
✽ NOTICE
•
: The lamp will turn off if this
The liftgate lamp comes on as long
button is pressed.
as the liftgate lid is open. To prevent
unnecessary charging system drain,
CAUTION - Vanity mirror
close the liftgate lid securely after
lamp
using the liftgate.
Always have the switch in the
off position when the vanity mir-
ror lamp is not in use. If the sun
visor is closed without the lamp
off, it may discharge the battery
or damage the sun visor.
4
138
Features of your vehicle
WELCOME SYSTEM (IF EQUIPPED)
Headlight (Headlamp) escort
Interior light
Pocket lamp (if equipped)
function
When the interior light switch is in the
When all doors are locked and
The headlights
(and/or taillights)
DOOR position and all doors (and lift-
closed, the pocket lamp will come on
remain on for approximately 5 min-
gate) are locked and closed, the
for 15 seconds if any of the below is
utes after the ignition key is removed
room lamp will come on for 30 sec-
performed.
or turned to the ACC or LOCK posi-
onds if any of the below is performed.
• With the smart key system
tion. However, if the driver’s door is
• With the smart key system
- When the door unlock button is
opened and closed, the headlights
- When the door unlock button is
pressed on the smart key.
are turned off after 15 seconds.
pressed on the smart key.
- When the button of the outside
The headlights can be turned off by
- When the button of the outside
door handle is pressed.
pressing the lock button on the trans-
door handle is pressed.
mitter or smart key twice or turning
off the light switch from the headlight
At this time, if you press the door lock
or Auto light position.
At this time, if you press the door lock
button, the lamps will turn off imme-
button, the lamps will turn off imme-
diately.
diately.
4
139
Features of your vehicle
DEFROSTER
Rear window defroster
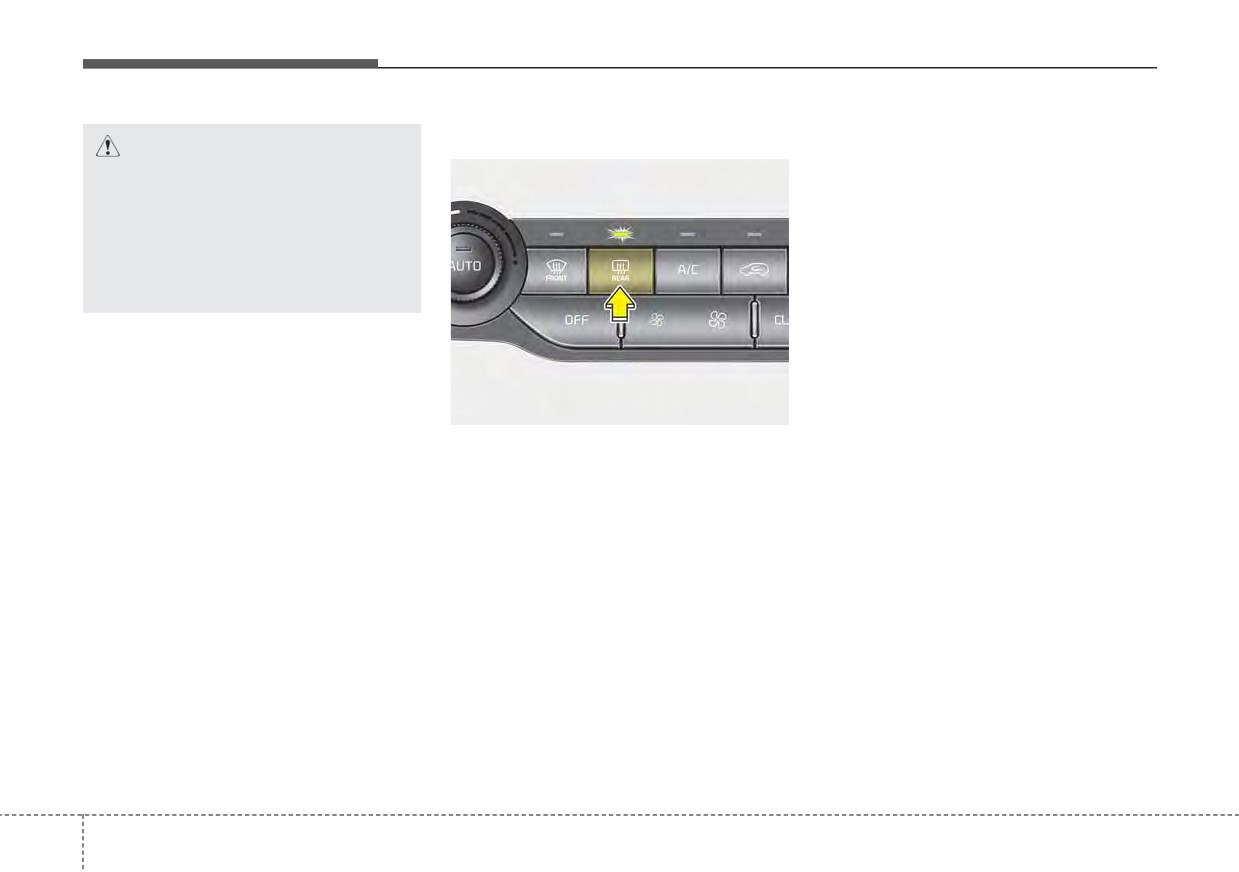
To activate the rear window
CAUTION -
Conductors
defroster, press the rear window
To prevent damage to the con-
defroster button located in the center
ductors bonded to the inside
facia switch panel. The indicator on
surface of the rear window,
the rear window defroster button illu-
never use sharp instruments or
minates when the defroster is ON.
window cleaners containing
If there is heavy accumulation of
abrasives to clean the window.
snow on the rear window, brush it off
before operating the rear defroster.
If you want to defrost and defog the
The rear window defroster automati-
front windshield, refer to “Windshield
cally turns off after approximately 20
defrosting and defogging” in this sec-
minutes or when the ignition switch is
tion.
turned off. To turn off the defroster,
ODE046301
press the rear window defroster but-
The defroster heats the window to
ton again.
remove frost, fog and thin ice from
the rear window, while the engine is
Outside rearview mirror defroster
running.
(if equipped)
If your vehicle is equipped with the
outside rearview mirror defrosters,
they will operate at the same time
you turn on the rear window
defroster.
4
140
Features of your vehicle
AUTOMATIC CLIMATE CONTROL SYSTEM
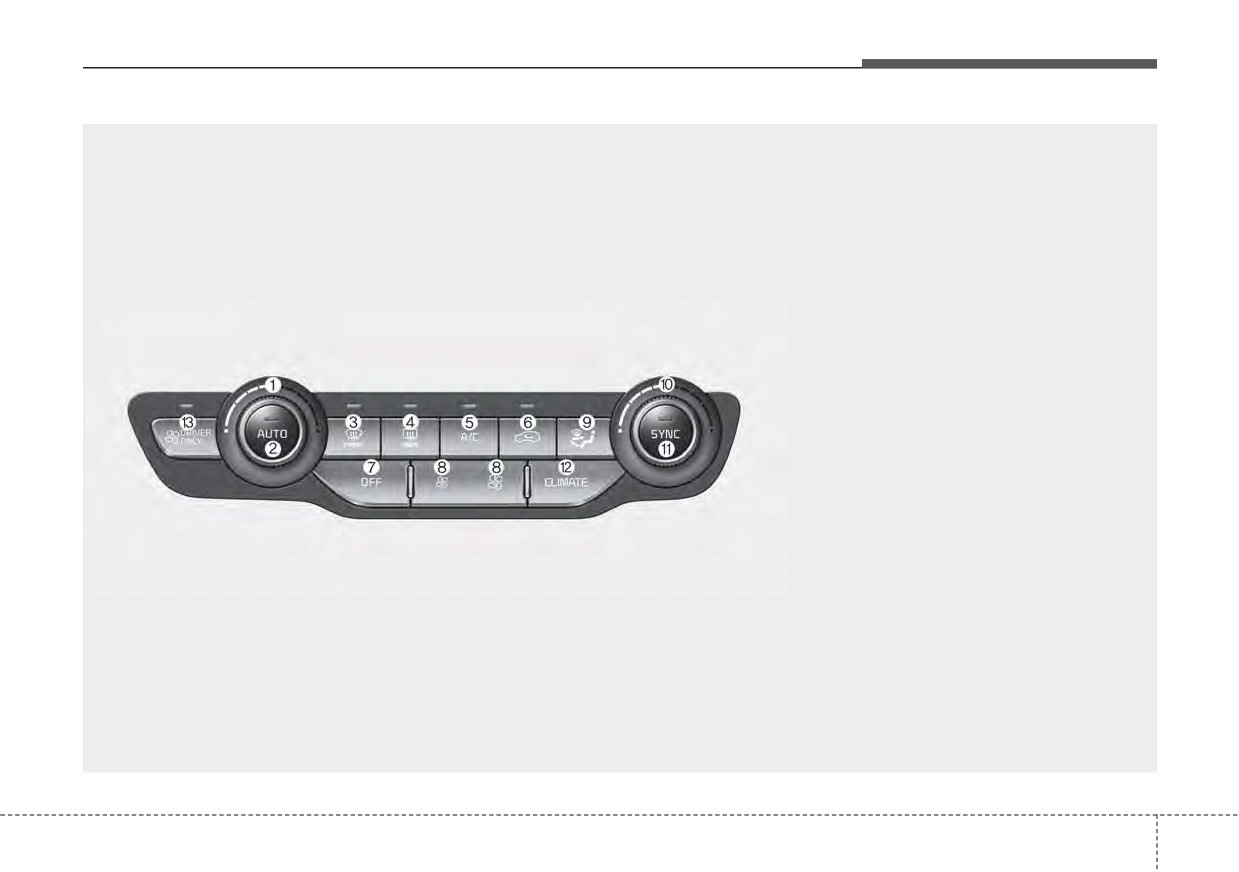
1. Driver’s temperature control knob
2. AUTO (automatic control) button
3. Front windshield defroster button
4. Rear window defroster button
5. Air conditioning button
6. Air intake control button
7. OFF button
8. Fan speed control button
9. Mode selection button
10. Passenger's temperature control knob
11. SYNC temperature control selection but-
ton
12. Climate button
13. Driver only select button
✽ NOTICE
Operating the blower when the
ignition switch is in the ON posi-
tion could cause the battery to dis-
charge. Operate the blower when
the engine is running.
ODEP049300N
4
141
Features of your vehicle
Automatic heating and air con-
■ Driver’s side
■ Passenger’s side
✽ NOTICE
ditioning
•
To turn the automatic operation
off, select any button or switch of
the following:
- Mode selection button
- Air conditioning button
- Front windshield defroster button
(Press the button one more time
to deselect the front windshield
defroster function. The ‘AUTO’
sign will illuminate on the infor-
ODE046305
mation display once again.)
2. Turn the temperature control knob
- Air intake control button
- Fan speed control switch
to the desired temperature.
ODE046302
The selected function will be con-
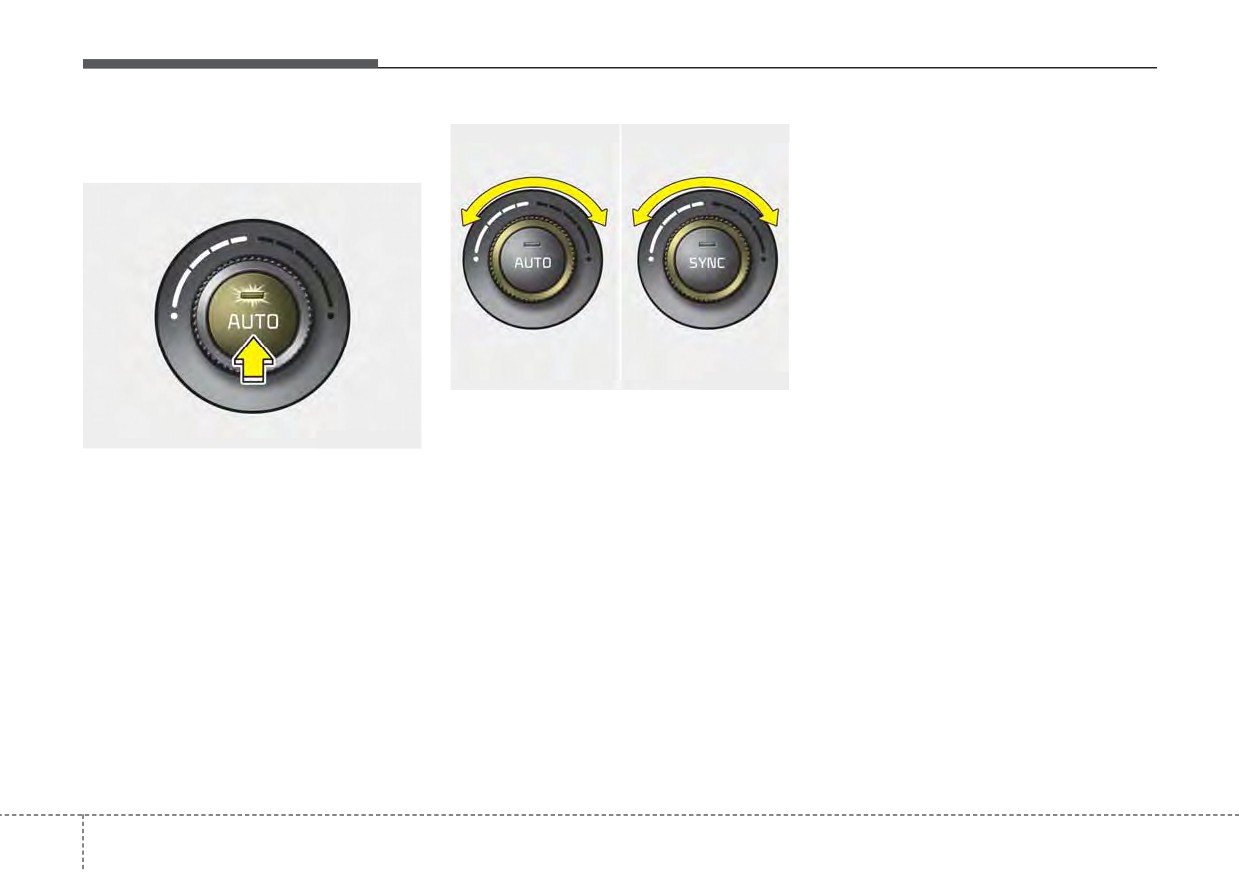
1. Press the AUTO button. The
trolled manually while other func-
modes, fan speeds, air intake and
tions operate automatically.
air-conditioning will be controlled
•
For your convenience and to
automatically by setting the tem-
improve the effectiveness of the
perature.
climate control, use the AUTO
button and set the temperature to
73°F (23°C).
4
142
Features of your vehicle
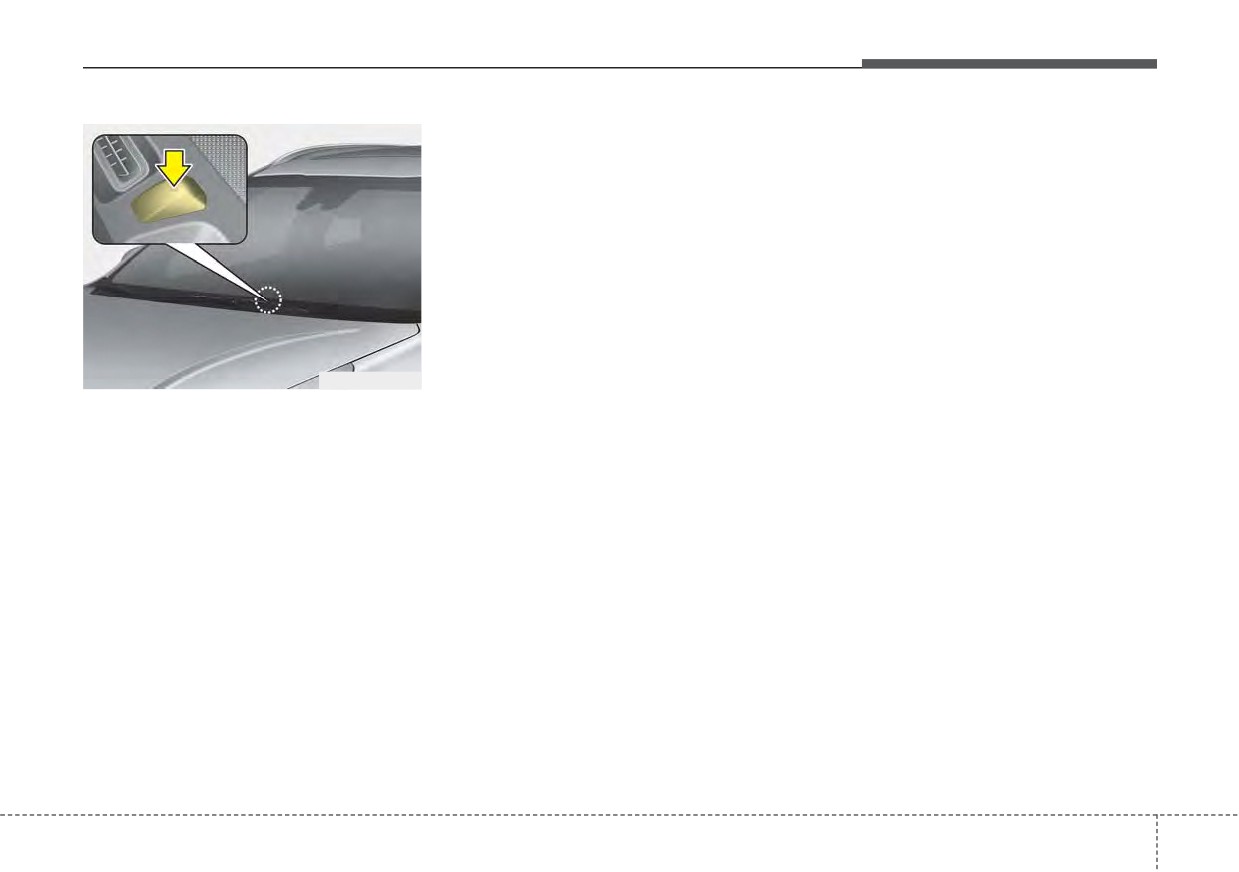
ODEP049414
✽ NOTICE
Never place anything over the sensor
located on the instrument panel to
ensure better control of the heating
and cooling system.
4
143
Features of your vehicle
Manual heating and air condi-
tioning
The heating and cooling system can
be controlled manually by pressing
buttons or turning knob(s) other than
the AUTO button. In this case, the
system works sequentially according
to the order of buttons or knob(s)
selected.
1. Start the engine.
2. Set the mode to the desired posi-
tion.
For improving the effectiveness of
heating and cooling;
- Heating:
- Cooling:
3. Set the temperature control to the
desired position.
(if equipped)
(if equipped)
4. Set the air intake control to the
outside (fresh) air position.
ODEP041318L
5. Set the fan speed control to the
desired speed.
6. If air conditioning is desired, turn
the air conditioning system on.
Press the AUTO button in order to
convert to full automatic control of
the system.
4
144
Features of your vehicle
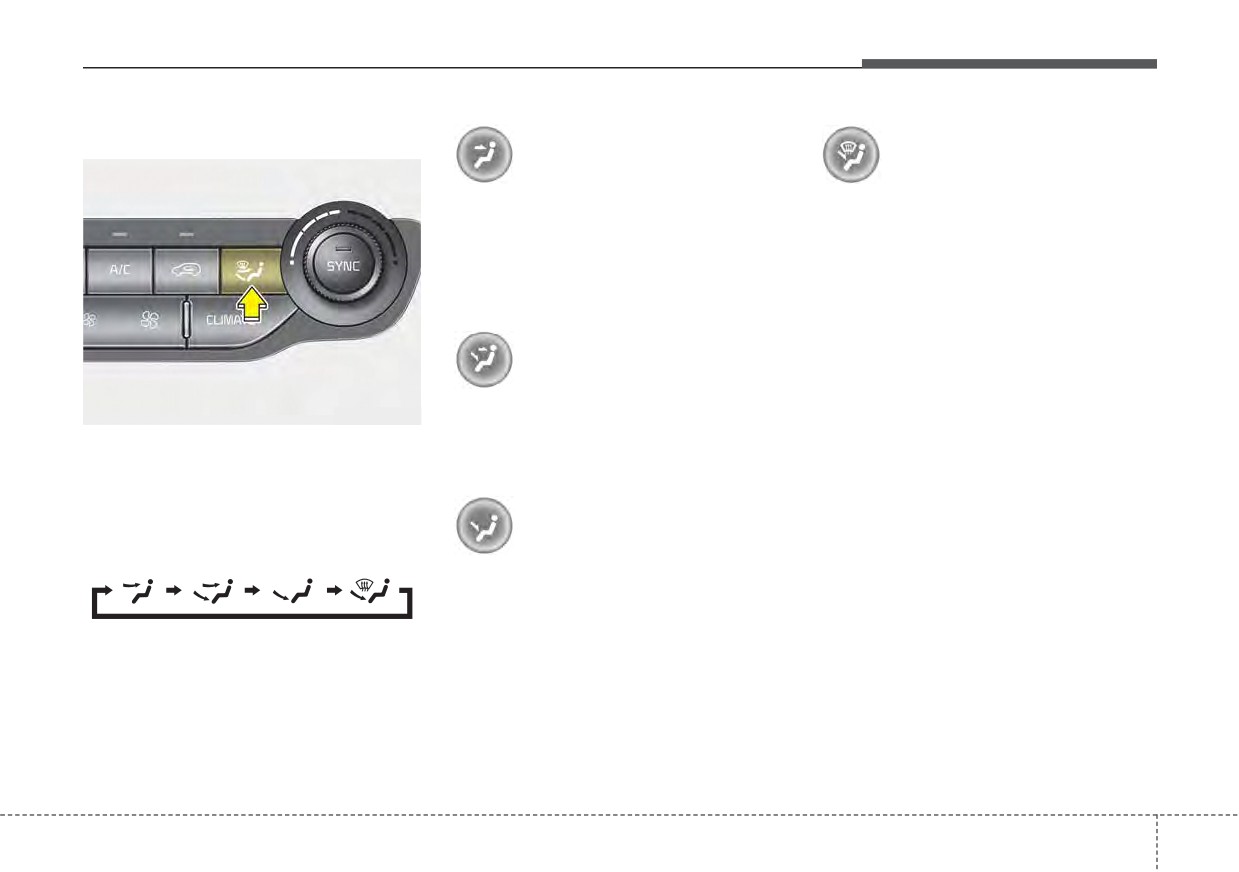
Mode selection
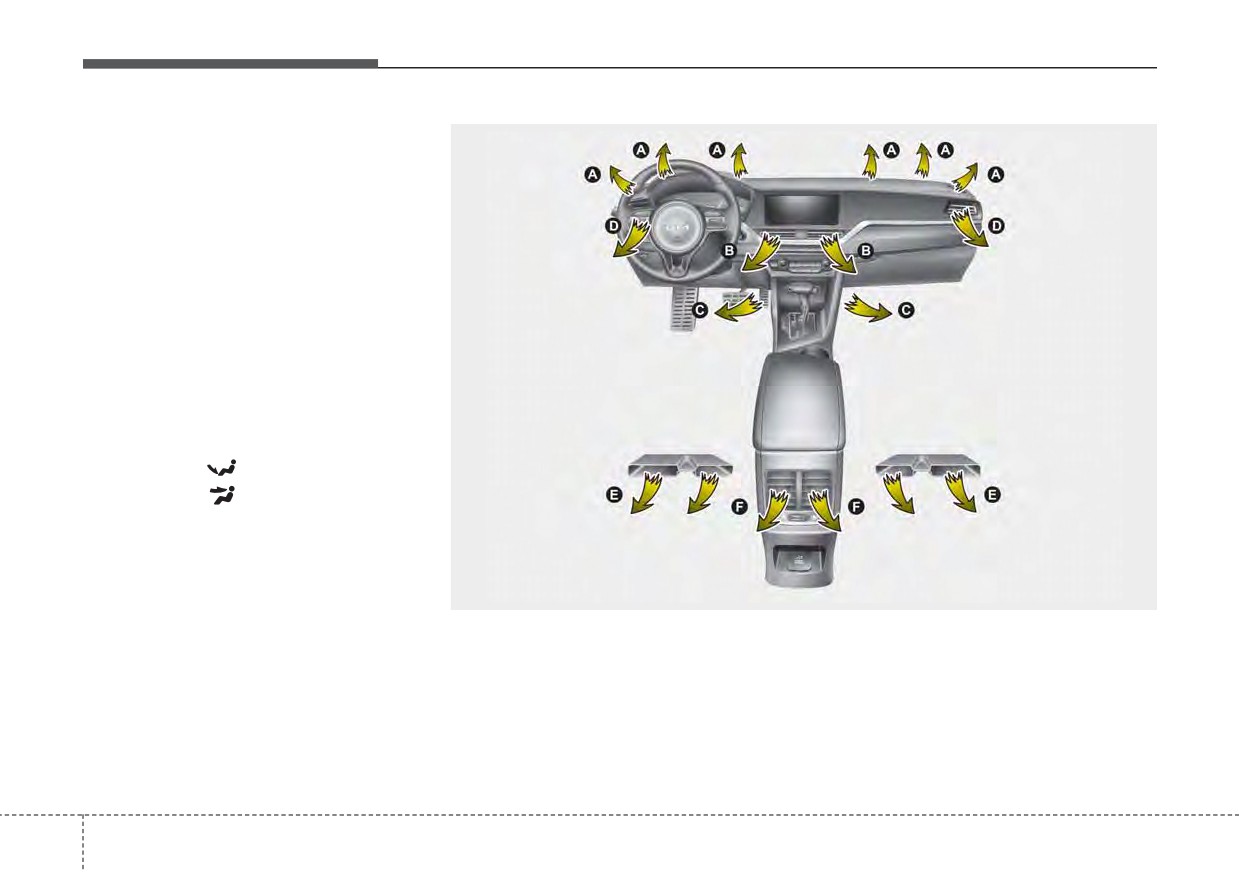
Floor/Defrost-Level
Face-Level (B, D)
(A, C, D, E, F)
Most of the air flow is directed to the
Air flow is directed toward the upper
floor and the windshield with a small
body and face. Additionally, each
amount directed to the side window
outlet can be controlled to direct the
defrosters.
air discharged from the outlet.
✽ NOTICE - 2nd row outlet
vents (E,F)
Bi-Level (B, C, D, E, F)
(if equipped)
• The air flow of the 2nd row outlet
ODE046304
Air flow is directed towards the face
vents is controlled by the front cli-
The mode selection button controls
and the floor.
mate control system and delivered
the direction of the air flow through
through the inside air duct of the
the ventilation system.
floor (E, F).
• The air flow of the 2nd row outlet
The air flow outlet port is converted
Floor-Level (A, C, D, E, F)
vents (E, F) may be weaker than
as follows:
the instrument panel vents for the
long air duct.
Most of the air flow is directed to the
floor, with a small amount of the air
being directed to the windshield and
side window defrosters.
4
145
Features of your vehicle
Temperature control
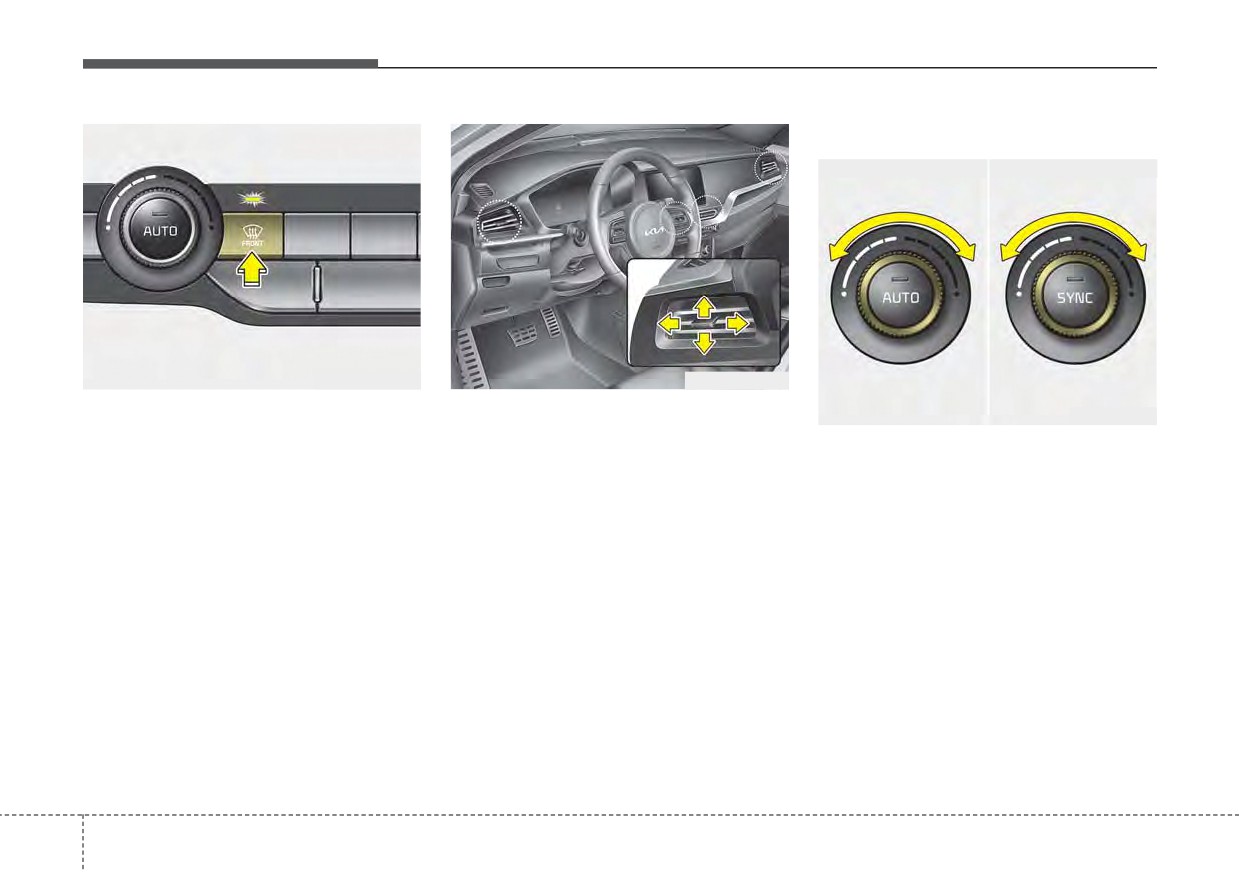
■ Driver’s side
■ Passenger’s side
ODEP049303
ODEP041319L
Defrost-Level (A, D)
Instrument panel vents
ODE046305
Most of the air flow is directed to the
The outlet vents can be opened or
The temperature will increase to the
windshield with a small amount of air
closed separately using the thumb-
maximum (HI) by turning the knob to
directed to the side window defrosters.
wheel.
the extreme right.
Also, you can adjust the direction of
The temperature will decrease to the
air delivery from these vents using
minimum (Lo) by turning the knob to
the vent control lever as shown.
the extreme left.
When turning the knob, the tempera-
ture will increase or decrease by
1°F/0.5°C. When set to the lowest
temperature setting, the air condi-
tioning will operate continuously.
4
146
Features of your vehicle
✽ NOTICE
Adjusting the driver and passenger
side temperature individually
When starting the vehicle in cold
weather using manual temperature
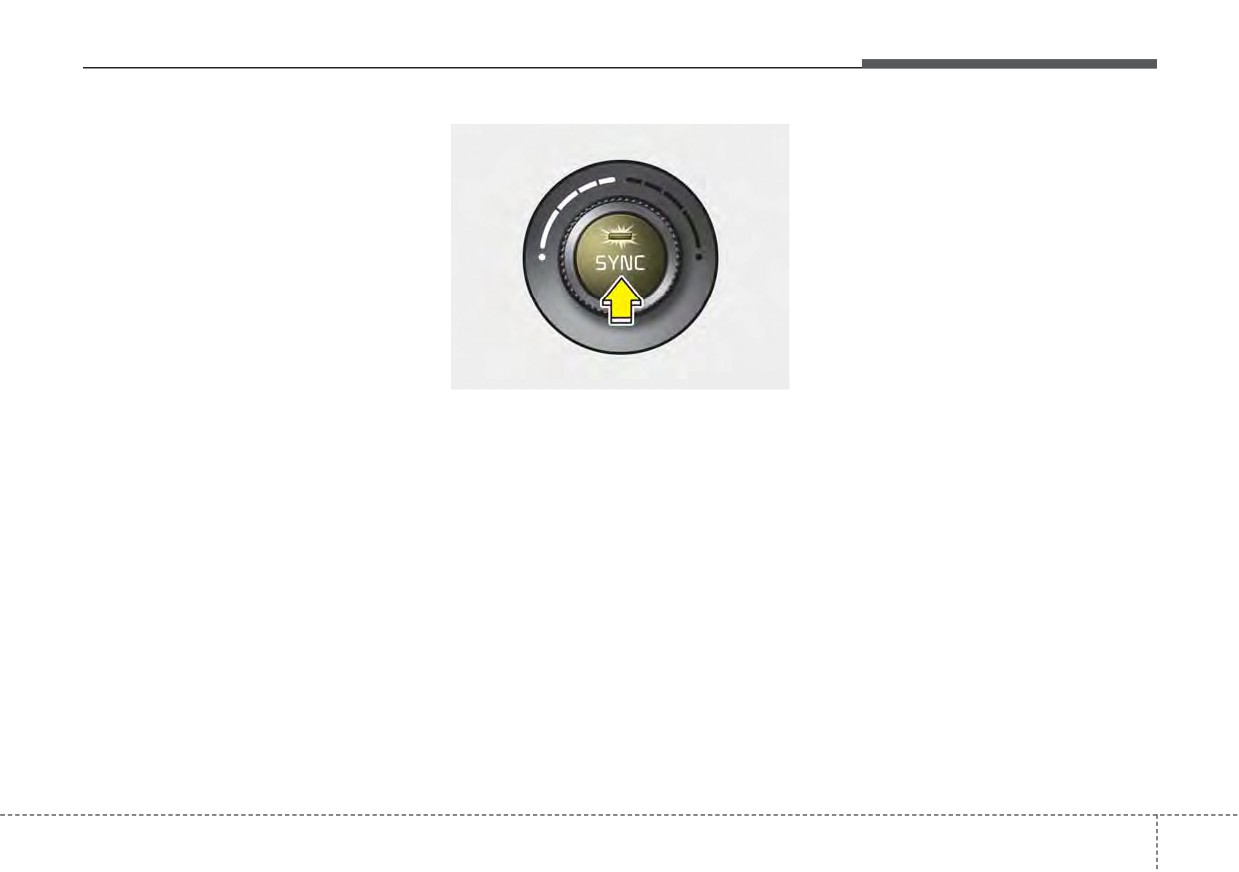
• Press the “SYNC” button again to
control, operate the system in the fol-
adjust the driver and passenger
lowing method to improve heating.
side temperature individually. The
- Turn off or lower the blower, right
illumination of button turns off.
after starting the engine.
• Operate the driver side tempera-
- Allow the engine to warm up dur-
ture control knob to adjust the driv-
ing this time since the air flow from
er side temperature.
the heater is still cold.
• Operate the passenger side tem-
- After a few minutes of engine
perature control knob to adjust the
warm up, turn on or set the fan to
ODE046306
passenger side temperature.
a higher level and adjust the tem-
Adjusting the driver and passenger
perature setting to hot.
side temperature equally
Temperature conversion
• Press the “SYNC” button to adjust
You can switch the temperature
the driver and passenger side tem-
perature equally.
mode from Centigrade to Fahrenheit
as follows:
The passenger side temperature
While pressing the OFF button,
will be set to the same temperature
press the AUTO button for 3 seconds
as the driver side temperature.
or more. The display will change from
• Turn the driver side temperature
Centigrade to Fahrenheit, or from
control knob. The driver and pas-
Fahrenheit to Centigrade. If the bat-
senger side temperature will be
tery has been discharged or discon-
adjusted equally.
nected, the temperature mode dis-
play will reset to Fahrenheit.
4
147
Features of your vehicle
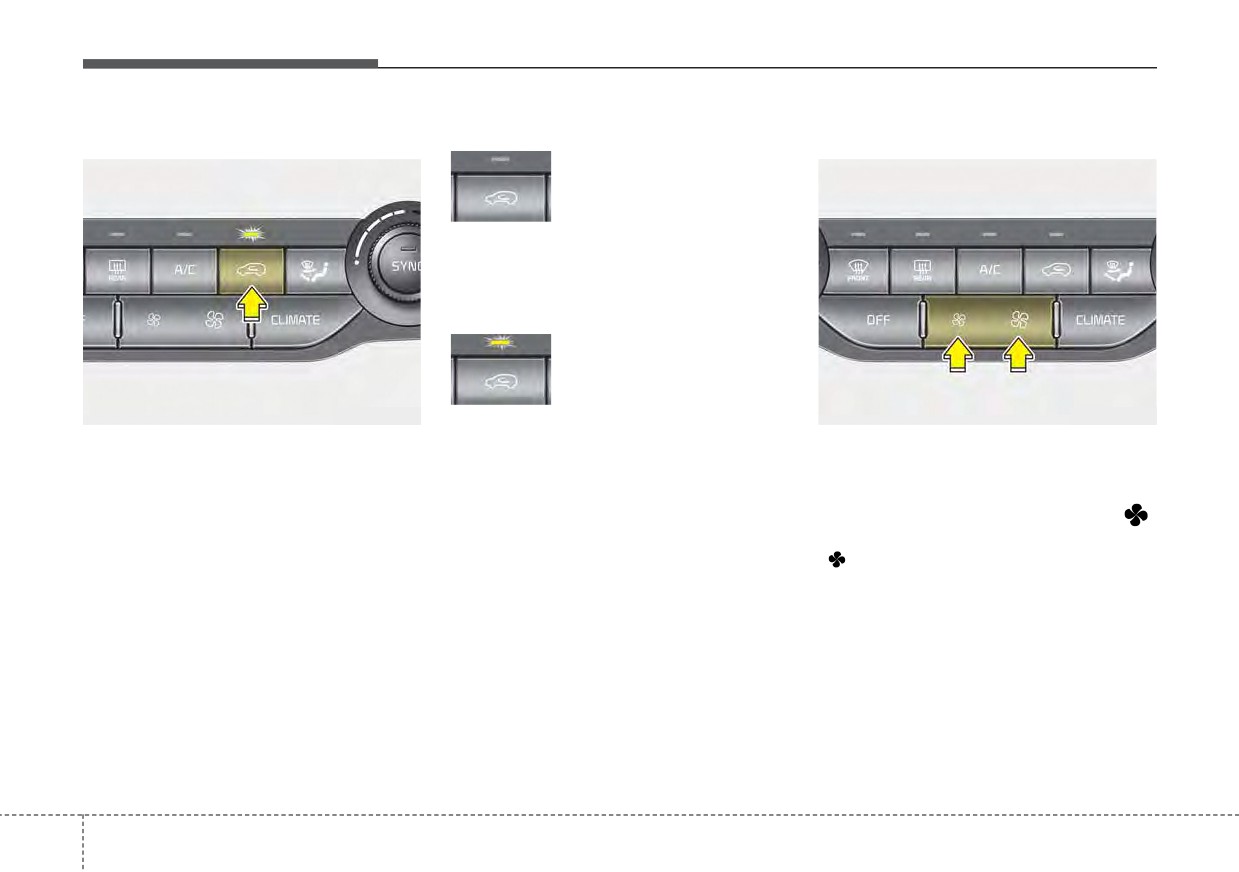
Air intake control
Outside (fresh) air position
Fan speed control
With the outside (fresh)
air position selected, air
enters the vehicle from
outside and is heated or
cooled according to the
function selected.
Recirculated air position
With the recirculated air
position selected, air
from the passenger com-
partment will be drawn
ODE046307
ODE046308
through the heating sys-
This is used to select the outside
The fan speed can be set to the
tem and heated or
(fresh) air position or recirculated air
cooled according to the
desired speed by operating the fan
position.
speed control button.
function selected.
To change the air intake control posi-
To change the fan speed, press (
)
tion, push the control button.
Prolonged operation of the heater in
the button for higher speed, or push
the recirculated air position (without
(
) the button for lower speed. To
air conditioning selected) may cause
turn the fan speed control off, press
fogging of the windshield and side
the front blower OFF button.
windows and the air within the pas-
senger compartment may become
stale.
In addition, prolonged use of the air
conditioning with the recirculated air
position selected will result in exces-
sively dry air in the passenger com-
partment.
4
148
Features of your vehicle
Air conditioning
OFF mode
WARNING - Recirculated
Air
Continued use of the climate
control system in the recirculat-
ed air position can cause
drowsiness or sleepiness, and
loss of vehicle control. Set the
air intake control to the outside
(fresh) air position as much as
possible while driving.
ODE046309
ODE046310
WARNING - Sleeping with
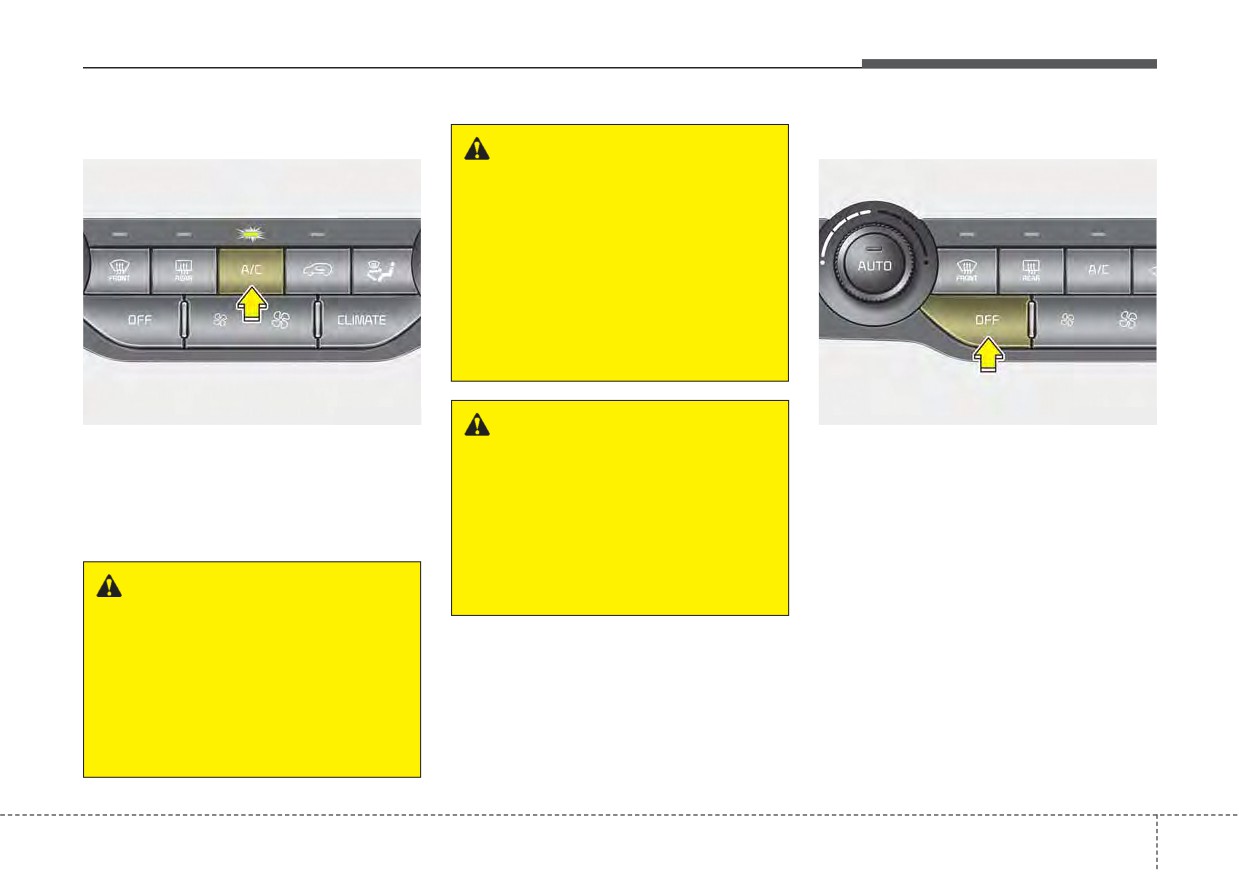
Press the A/C button to turn the air
Press the front blower OFF button to
A/C on
conditioning system on
(indicator
turn off the front air climate control
Do not sleep in a vehicle with
light will illuminate).
system. However, you can still oper-
the air conditioning or heating
ate the mode and air intake buttons
Press the button again to turn the air
on as this may cause serious
as long as the ignition switch is in the
conditioning system off.
harm or death due to a drop in
ON position.
your oxygen level and/or body
WARNING - Reduced
temperature.
Visibility
Continuous use of the climate
control system in the recirculat-
ed air position may allow
humidity to increase inside the
vehicle which may fog the glass
and obscure visibility.
4
149
Features of your vehicle
Climate information screen
Driver Only
System operation
selection (if equipped)
Ventilation
1.Set the mode to the
position.
2.Set the air intake control to the out-
side (fresh) air position.
3.Set the temperature control to the
desired position.
4.Set the fan speed control to the
desired speed.
Heating
ODEP049312
1.Set the mode to the
position.
ODE046311
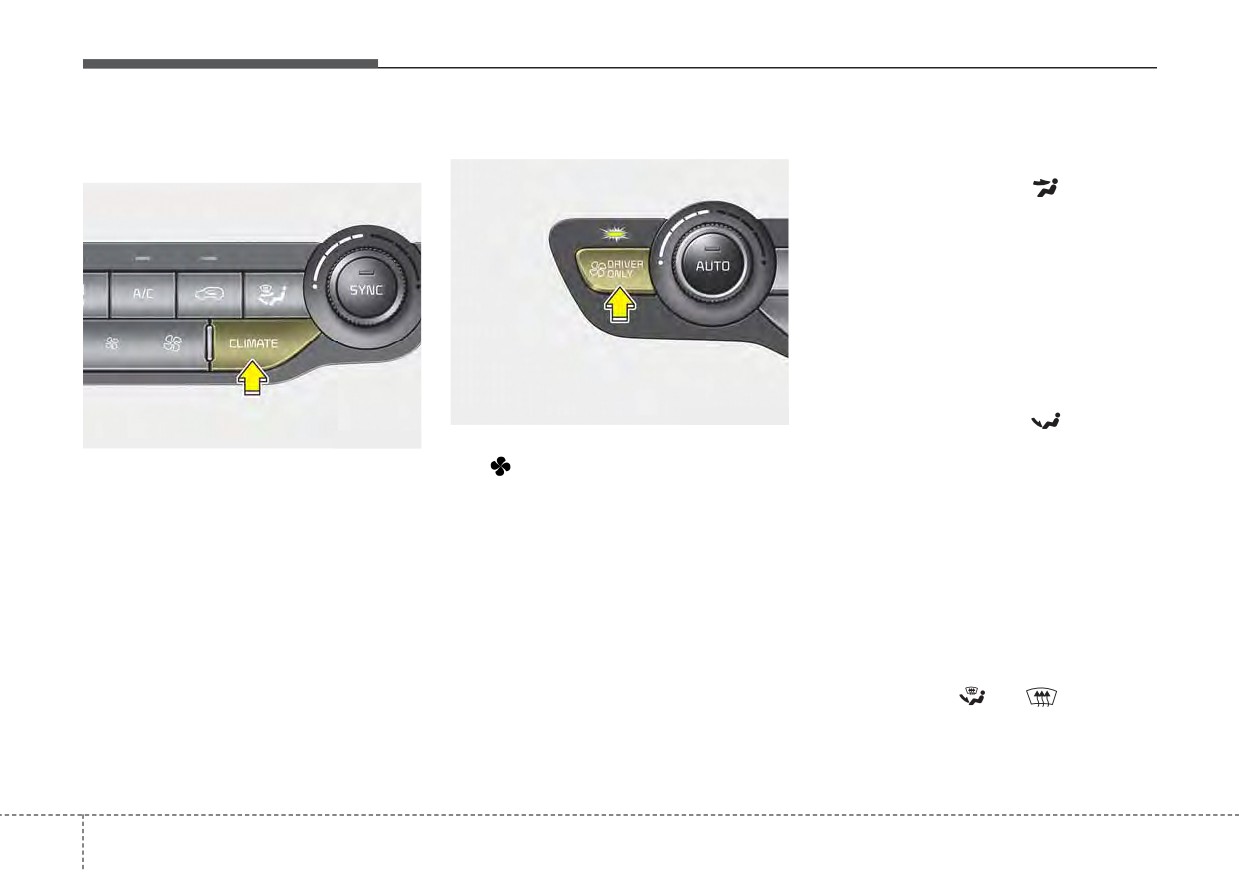
If you press the DRIVER ONLY but-
2.Set the air intake control to the out-
Press the climate information screen
ton(
) and the indicator light illumi-
side (fresh) air position.
selection button to display climate
nates, cold air mostly blows in the
3.Set the temperature control to the
information on the screen.
direction of the driver’s seat.
desired position.
However, some of the cold air may
come out of other seats’ ducts to
4.Set the fan speed control to the
keep indoor air pleasant.
desired speed.
If you use the button with no passen-
5.If dehumidified heating is desired,
ger in the front passenger seat, ener-
turn the air conditioning system (if
gy consumption will be reduced.
equipped) on.
• If the windshield fogs up, set the
mode to the
or
position.
4
150
Features of your vehicle
Operation Tips
Air conditioning
CAUTION
•
To keep dust or unpleasant fumes
All Kia Air Conditioning Systems are
from entering the vehicle through
filled with R-1234yf refrigerant.
•
The refrigerant system should
the ventilation system, temporarily
only be serviced by trained
1.Start the engine. Press the air con-
set the air intake control to the
and certified technicians to
ditioning button.
recirculated air position. Be sure to
insure proper and safe opera-
2.Set the mode to the
position.
return the control to the fresh air
tion.
position when the irritation has
3.Set the air intake control to the out-
•
The refrigerant system should
passed to keep fresh air in the
side air or recirculated air position.
be serviced in a well-ventilat-
vehicle. This will help keep the driv-
4.Adjust the fan speed control and
ed place.
er alert and comfortable.
temperature control to maintain
•
The air conditioning evapora-
•
Air for the heating/cooling system
maximum comfort.
tor (cooling coil) shall never
is drawn in through the grilles just
• When maximum cooling is desired,
be repaired or replaced with
ahead of the windshield. Care
set the temperature control to the
one removed from a used or
should be taken that these are not
extreme left position, set the mode
salvaged vehicle and new
blocked by leaves, snow, ice or
control to the MAX A/C position,
replacement MAC evaporators
other obstructions.
then set the fan speed control to
shall be certified (and labeled)
•
To prevent interior fog on the wind-
the highest speed.
as meeting SAE Standard
shield, set the air intake control to
J2842.
the fresh air position and fan speed
to the desired position, turn on the
air conditioning system, and adjust
the temperature control to desired
temperature.
4
151
Features of your vehicle
Air conditioning system operation tips
• Operating the air conditioning sys-
CAUTION
tem in the recirculated air position
•
If the vehicle has been parked in
•
When using the air condition-
provides maximum cooling; howev-
direct sunlight during hot weather,
ing system, monitor the tem-
open the windows for a short time
er, continual operation in this mode
perature gauge closely while
may cause the air inside the vehi-
to let the hot air inside the vehicle
driving up hills or in heavy
escape.
cle to become stale.
traffic when outside tempera-
• During cooling operation, you may
•
To help reduce moisture inside of
tures are high. Air condition-
occasionally notice a misty air flow
the windows on rainy or humid
ing system operation may
because of rapid cooling and
days, decrease the humidity inside
cause engine overheating.
humid air intake. This is a normal
the vehicle by operating the air
Continue to use the blower fan
system operation characteristic.
conditioning system.
but turn the air conditioning
•
During air conditioning system
system off if the temperature
operation, you may occasionally
Automatic ventilation
gauge indicates engine over-
notice a slight change in engine
heating.
The system automatically selects the
speed as the air conditioning com-
•
When opening the windows in
outside (fresh) air position when the
pressor cycles. This is a normal
humid weather, air condition-
climate control system operates over
system operation characteristic.
a certain period of time (5 minutes)
ing may create water droplets
•
Use the air conditioning system
in low temperature with the recircu-
inside the vehicle. Since
every month only for a few minutes
lated air position selected.
(when
excessive water droplets may
to ensure maximum system per-
floor mode or bi-level mode)
cause damage to electrical
formance.
equipment, air conditioning
should only be used with the
•
When using the air conditioning
windows closed.
system, you may notice clear water
dripping (or even puddling) on the
ground under the passenger side
of the vehicle. This is a normal sys-
tem operation characteristic.
4
152
Features of your vehicle
To cancel or reset the Automatic
Sunroof inside air recircula-
Recirculated air at washer
Ventilation
tion (if equipped)
fluid spray
When the air conditioning system is
The outside
(fresh) air position is
To prevent the odor from entering to
on, select Face Level (
) mode
automatically selected when the sun-
inside the vehicle, the ventilation sys-
and while pressing the A/C button,
roof is opened.
tem changes to Recirculated Air
press the air intake control button 5
When you select the recirculated air
Mode for a while when the wind-
times within 3 seconds.
position, the system maintains the
shield washer fluid sprayed.
When the automatic ventilation func-
recirculated air position for 3 minutes
However, at low outside temperature,
tion is canceled, the indicator light
and then automatically converts to
to prevent from windshield fogging,
blinks 3 times at an interval of 0.5
the outside (fresh) air position.
the system continues to outside air
seconds.
mode.
When the sunroof is closed, the air
The air intake will be automatically
intake position will return to the orig-
controlled to the fresh air position,
inal position that was selected.
System setting
and the flow and air conditioning will
1. ENGINE START/STOP button is
be automatically controlled.
On or ignition switch ON.
When the automatic ventilation func-
tion is selected, the indicator light
2. Select Floor-Level (
) air flow
blinks 6 times at an interval of 0.25
direction by pressing
seconds.
Mode Selection button.
The air intake will be automatically
3. With pressing Air Conditioning but-
controlled to the fresh air position,
ton, press the Recirculated Air but-
and the flow and air conditioning will
ton more than 4 times within 2
be automatically controlled.
seconds.
After the battery has been dis-
4. If the system is set up, the indica-
charged or separated, the automatic
tor on Recirculated Air button will
ventilation function will be reset, so
blinks 6 times.
please selected, according to you
preference.
4
153