Kia Niro Hybrid / Plug-in Hybrid (2022 year). Manual in english - page 7
Features of your vehicle
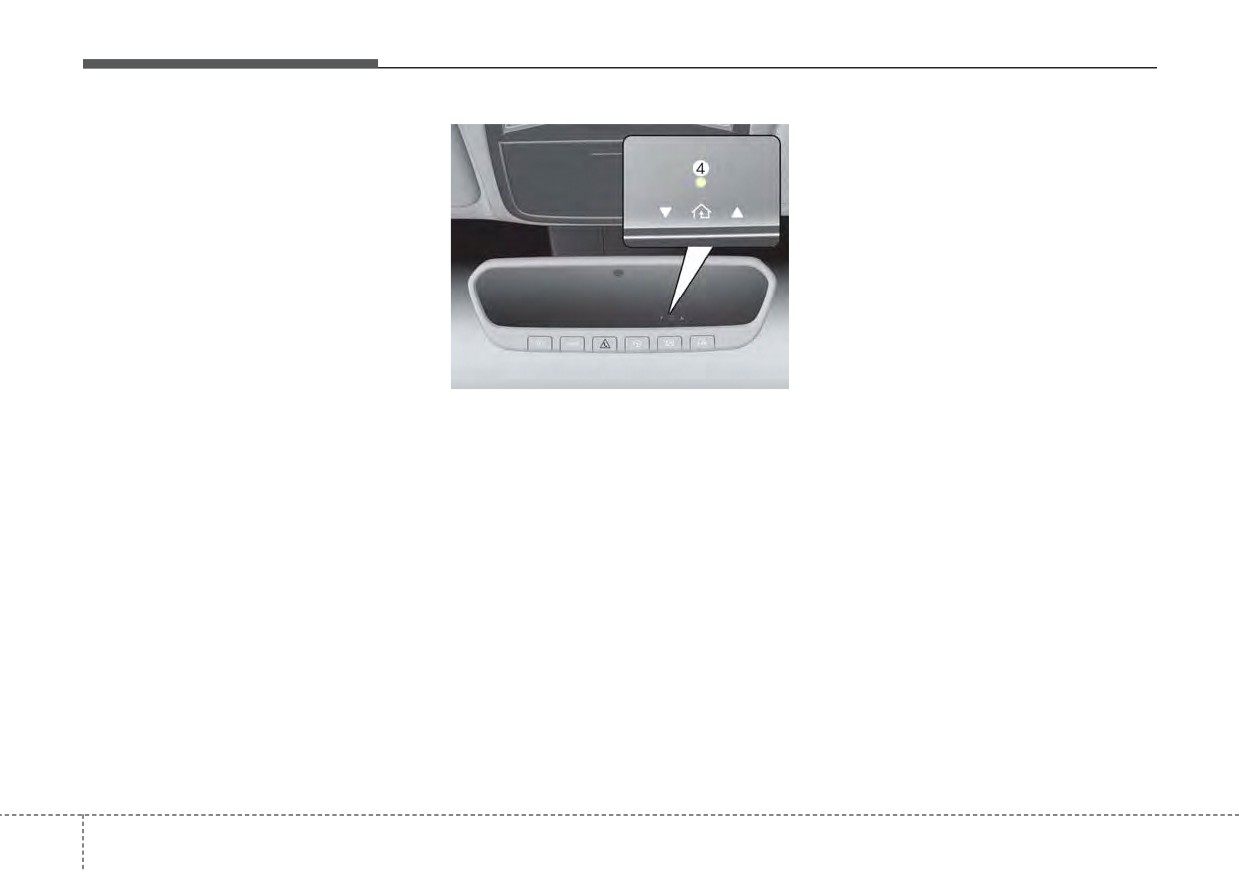
2.Press and hold the button you wish
✽ NOTICE
to program about 15-25 seconds
•
Some garage door openers may
until the LED flashes in Orange for
require you to press the program
several times.
button on the mirror up to three
3.Hold the Garage Door Opener
times right after the programming
Original Transmitter (OT) near the
is completed to operate the garage
HomeLink Mirror.
door.
•
The indicator (4) is turned ON in
Orange and flashes for about
60seconds, during the program-
ming mode and if a programming
ODEP060040N
is not successful within the 60 sec-
4.Press the Original Transmitter (OT)
onds, the programming mode will
button until the indicator
(4) is
be abort.
turned continuously ON or flashes
in Green for approximately 10 sec-
onds and it indicates the program-
ming is completed.
4
58
Features of your vehicle
Gate operator & Canadian pro-
Operating HomeLink®
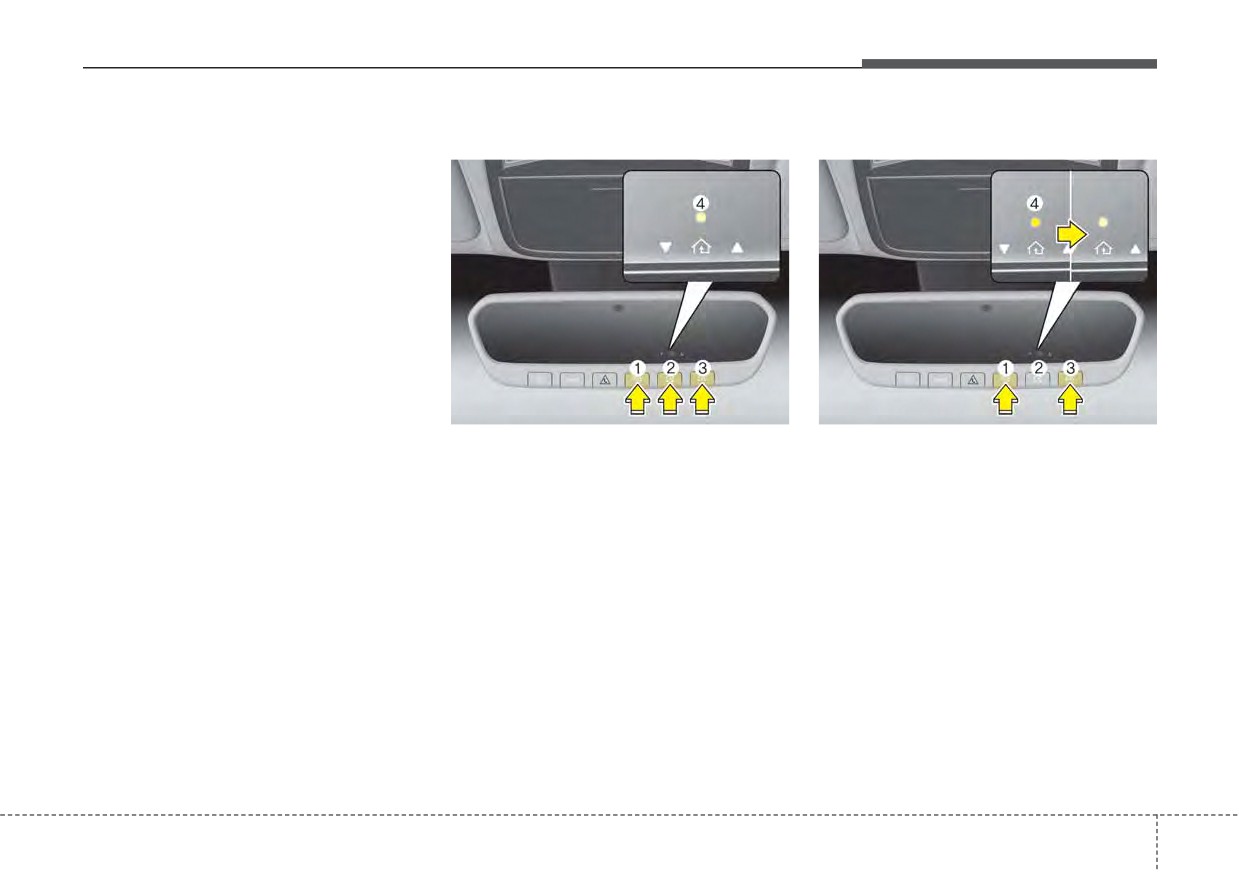
Erasing HomeLink® buttons
gramming
During programming, your handheld-
transmitter may automatically stop
transmitting. Continue to press the
Integrated HomeLink® Wireless
Control System button while you
press and re-press
(“cycle”) your
handheld transmitter every two sec-
onds until the frequency signal has
been learned. The indicator light will
flash slowly and then rapidly after
several seconds upon successful
ODEP060039N
ODEP060041N
training.
1.Press and release one of the
1.Press and hold the button (1) and
HomeLink buttons (1, 2 or 3) that
(3) simultaneously.
programed.
2.The indicator (4) is turned continu-
2.The HomeLink indicator
(4) will
ously ON in orange for about 10
operate as below:
seconds.
• Indicates Green and is continu-
3.Then the indicator
(4) color
ously ON (Fixed Code Garage
changes to Green and flashes rap-
Door Opener)
idly.
• Flashes in Green rapidly (Rolling
Release the buttons once the
Code Garage Door Opener)
green indicator flashes.
4.Now HomeLink button (1), (2) and
(4) memories are all cleared.
4
59
Features of your vehicle
NVS® is a registered trademark and
This device complies with Part 15
Two Way Communication
Z-Nav™ is a trademark of the
of the FCC Rules.
Programming
Gentex Corporation, Zeeland,
Operation is subject to the following
1.Complete
the
HomeLink
Michigan. HomeLink® is a registered
three conditions:
“Programming” first.
trademark owned by Johnson
1. This device may not cause harmful
2.Before the first
10 times the
Controls, Incorporated, Milwaukee,
interference, and
HomeLink button is pressed after
Wisconsin.
the programming, the following
2. This device must accept any inter-
FCC ID: NZLZTVHL3
ference received, including inter-
steps MUST occur to program two
IC: 4112A-ZTVHL3
way communication. (only for some
ference that may cause undesired
operation.
older garage doors)
3. The transceiver has been tested
and complies with FCC and
Industry Canada rules. Changes
or modifications not expressly
approved by the party responsible
for compliance could void the
user's authority to operate the
device.
4
60
Features of your vehicle
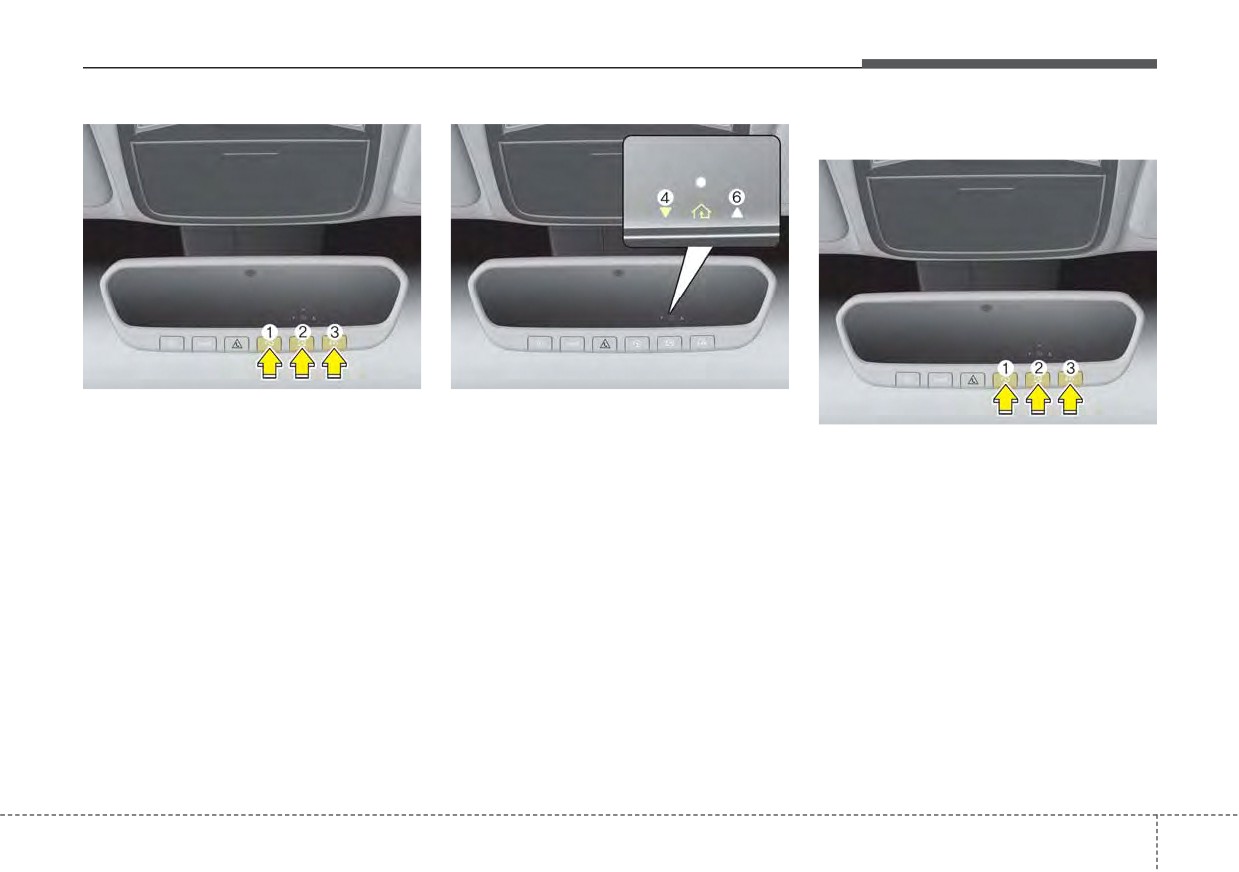
Operating Two Way Communication
ODEP060042N
ODEP060043N
3.Press and release the pro-
5.If the both indicator (4) and (6) are
ODEP060042N
grammed HomeLink button to acti-
flashing rapidly for about
5 sec-
1.Press and release (1), (2) or (3)
vate the garage door.
onds, the two way synchronization
button.
4.Once the garage door is stopped,
is completed.
press and release the “Lean” or
“Smart” button on the Garage door
✽ NOTICE
opener within 1 minute from the
Some newer garage door openers
time of pressing the programmed
provides automatic two way com-
HomeLink button on the rearview
munication synchronization while
mirror.
just programming the OT (Original
Transmitter).
4
61
Features of your vehicle
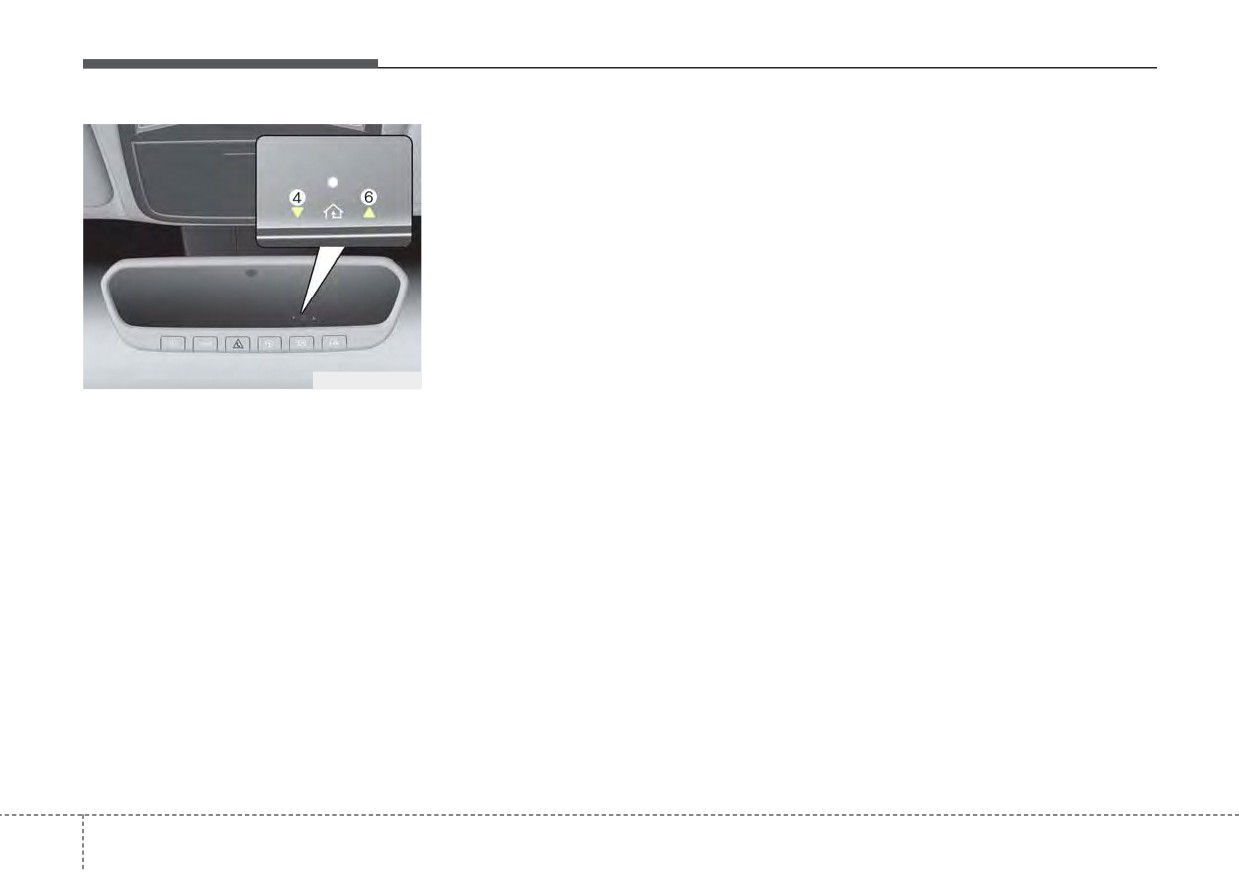
- If the indicator (4) or (6) does not
Recalling Garage Door Status
turn to Green, it indicates that the
Homelink mirror provides a way to
last status of garage door was not
view the last stored message from
received properly (HomeLink mir-
the garage door opener. In order to
ror tries to receive the last status
recall the last known status of the
of garage door for seconds.).
last activated device, press the but-
tons “1 and 2” OR “2 and 3” simulta-
neously.
•
If the indicator (4) is ON continu-
ously in Green, it indicates that the
last activated device was “closed”
ODEP060044N
properly.
2.The indicator (4) and (6) operates
•
If the indicator (6) is ON continu-
as below:
ously in Green, it indicates that the
- If the indicator
(4) flashes in
last activated device was “open”
Orange, it indicates that the
properly.
garage door is “closing”.
- If the indicator (4) is ON continu-
ously in Green, it indicates that
the garage door is “closed”.
- If the indicator
(6) flashes in
Orange, it indicates that the
garage door is “Opening”.
- If the indicator (6) is ON continu-
ously in Green, it indicates that
the garage door is “Opened”.
4
62
Features of your vehicle
✽ NOTICE
Outside rearview mirror
CAUTION - Rearview
Two way communication range dis-
Be sure to adjust the mirror angles
mirror
tance between “vehicle” and “garage
before driving.
Do not scrape ice off the mirror
door opener” is 3,937 in (100 m).
Your vehicle is equipped with both
face; this may damage the sur-
The range may be reduced or
left-hand and right-hand outside
face of the glass. If ice should
increased due to obstacle conditions
rearview mirrors. The mirrors can be
restrict the movement of the mir-
around the garage door opener, such
adjusted remotely with the remote
ror, do not force the mirror for
as houses or trees.
switch. The mirror heads can be fold-
adjustment. To remove ice, use a
ed back to prevent damage during an
deicer spray, a sponge or soft
automatic vehicle wash or when
cloth with very warm water.
passing through a narrow street.
The right outside rearview mirror is
convex. Objects seen in the mirror
If the mirror is jammed with ice, do
are closer than they appear.
not adjust the mirror by force. Use an
Use your interior rearview mirror or
approved spray de-icer (not radiator
direct observation to determine the
antifreeze) to release the frozen
actual distance of following vehicles
mechanism or move the vehicle to a
when changing lanes.
warm place and allow the ice to melt.
WARNING - Mirror
adjustment
Do not adjust or fold the outside
rearview mirrors while the vehi-
cle is moving. This could result
in loss of control.
4
63
Features of your vehicle
Adjusting outside rearview mirror
Reverse parking aid function
CAUTION -
Outside mirror
(if equipped)
•
The mirrors stop moving when
they reach the maximum
adjusting angles, but the
motor continues to operate
while the switch is pressed.
Do not press the switch longer
than necessary, the motor
may be damaged.
•
Do not attempt to adjust the
outside rearview mirror by
hand. Doing so may damage
ODEP049028
the parts.
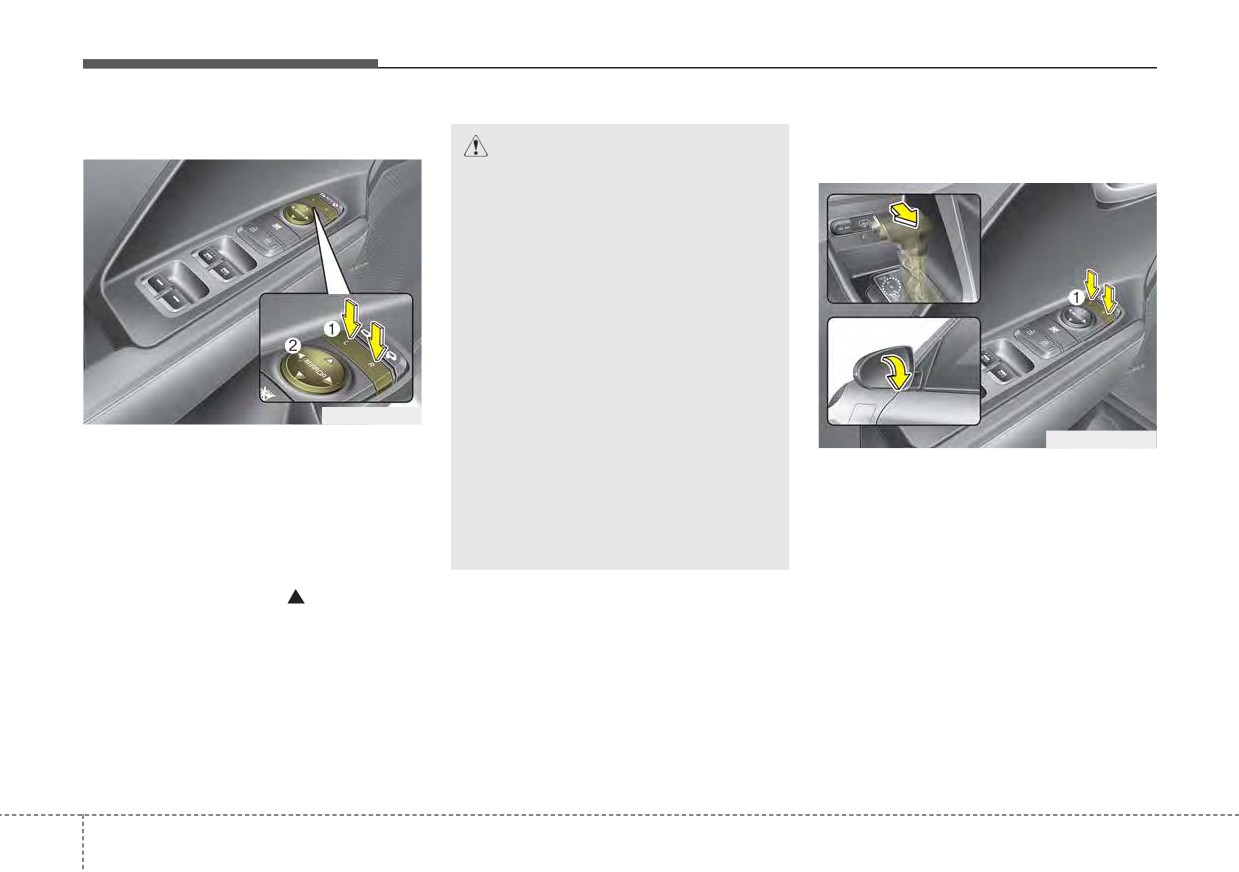
The electric remote control mirror
ODEP049609N
•
When the mirror control, press
switch allows you to adjust the posi-
When you shift the shift lever to the R
exactly “”(2) marking area.
tion of the left and right outside
(Reverse) position, the outside
Otherwise, the mirror will
rearview mirrors. To adjust the posi-
rearview mirror(s) will move down-
move to unintended direction
tion of either mirror, press the R or L
ward to aid reverse parking.
or malfunction.
button (1) to select the right side mir-
According to the position of the out-
ror or the left side mirror, then press a
side rearview mirror switch (1), the
corresponding point “
”
(2) on the
outside rearview mirror(s) will oper-
mirror adjustment control to position
ate as follows:
the selected mirror up, down, left or
Left or Right : When the remote con-
right.
trol outside rearview mirror switch is in
the left or right position, both outside
After adjustment, press the R or L
button again to prevent the inadver-
rearview mirrors will move downward.
tent adjustment.
Neutral
: When neither switch is
selected, the outside rearview mir-
rors will not move.
4
64
Features of your vehicle
✽ NOTICE
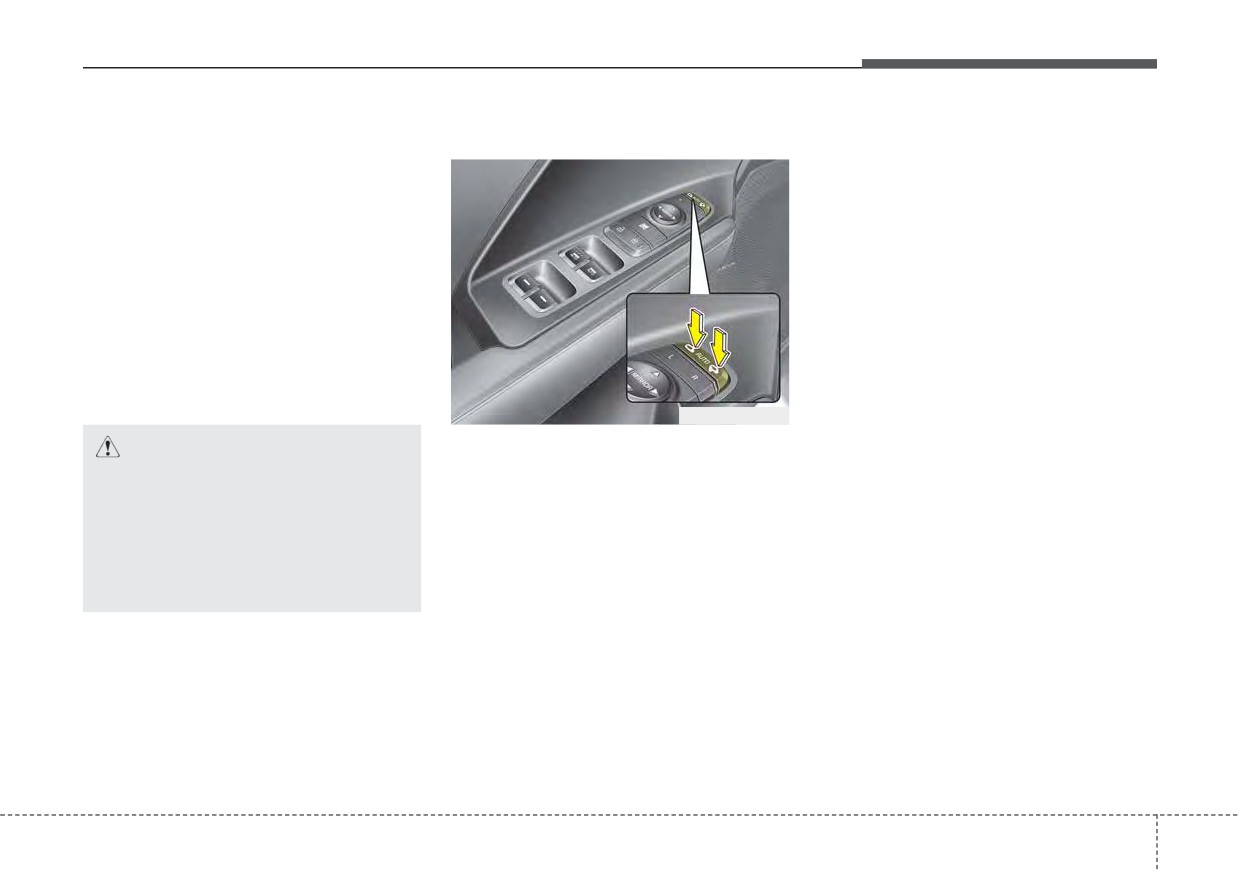
Folding the outside rearview mirror
Center (AUTO) :
The outside rearview mirrors will
The mirror will fold or unfold automat-
automatically revert to their original
ically as follows:
positions under the following condi-
•
Without smart key system
tions:
- The mirror will fold or unfold when
1. ENGINE START/STOP button or
the door is locked or unlocked by
ignition switch is changed to the
the transmitter. (if equipped)
ACC or OFF position.
• With smart key system
2. Shift lever is moved to any posi-
tion except R.
- The mirror will fold or unfold when
3. Remote control outside rearview
the door is locked or unlocked by
mirror switch is placed in the
the smart key.
middle position.
- The mirror will fold or unfold when
ODEP049030L
the door is locked or unlocked by
Electric type (if equipped)
CAUTION
the button on the outside door
The outside rearview mirror can be
handle.
If outside rearview mirror is
folded or unfolded by pressing the
positioned at the outermost
- The mirror will unfold when you
switch
when the ENGINE
(left/right/bottom), the automat-
approach the vehicle (all doors
START/STOP button is in the ON posi-
ic mirror control function may
closed and locked) with a smart
tion as below.
not properly work while vehicle
key in possession. (if equipped)
move backward.
Left : The mirror will unfold.
Right : The mirror will fold.
4
65
Features of your vehicle
CAUTION - Electric type
outside rearview mirror
The electric type outside
rearview mirror operates even
though the ignition switch is in
the LOCK position or the
ENGINE START/STOP button is
in the OFF position. However, to
prevent unnecessary battery
discharge, do not adjust the
mirrors longer than necessary
ODE046029
while the engine is not running.
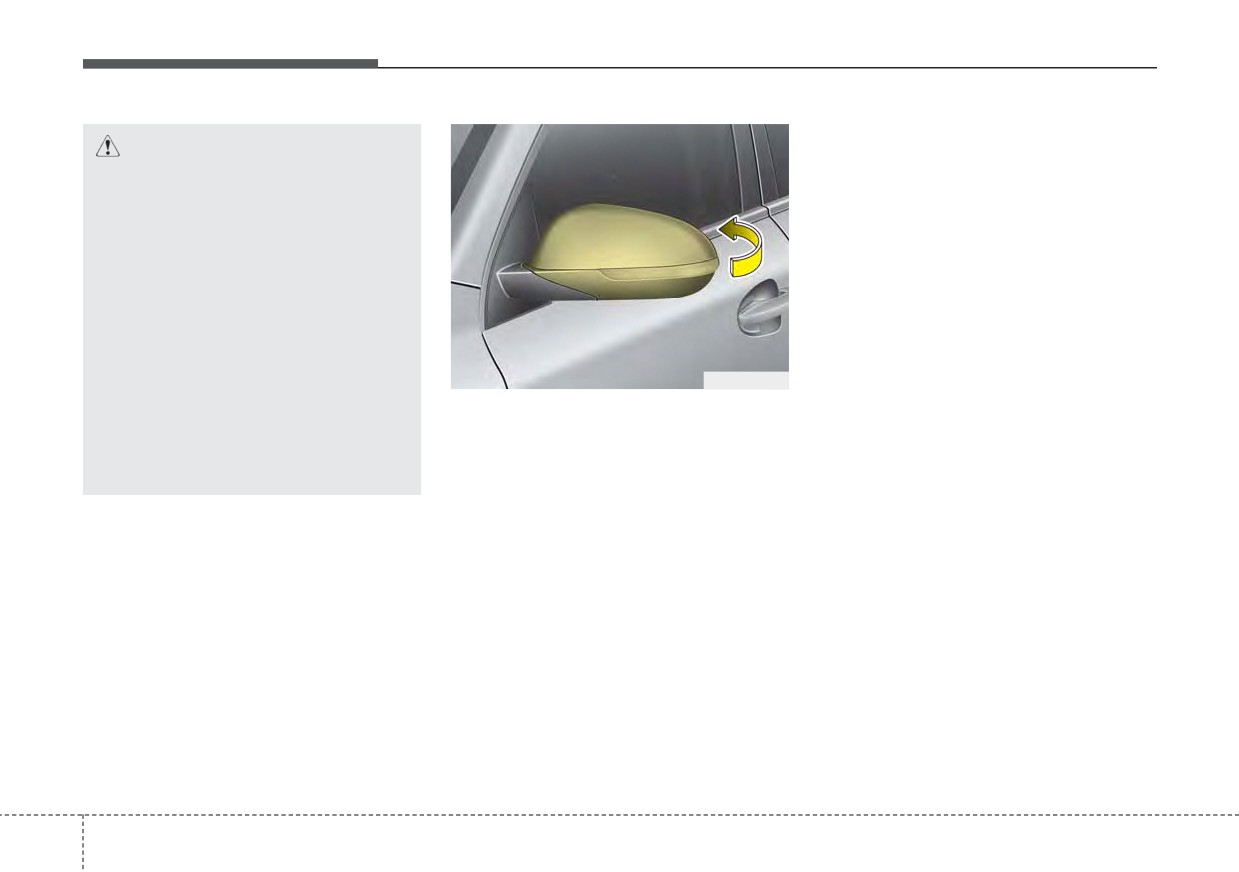
Manual type (if equipped)
Do not fold an electric type out-
To fold the outside rearview mirror,
side rearview mirror by hand as
grasp the housing of the mirror and
this could cause motor failure.
then fold it toward the rear of the
vehicle.
4
66
Features of your vehicle
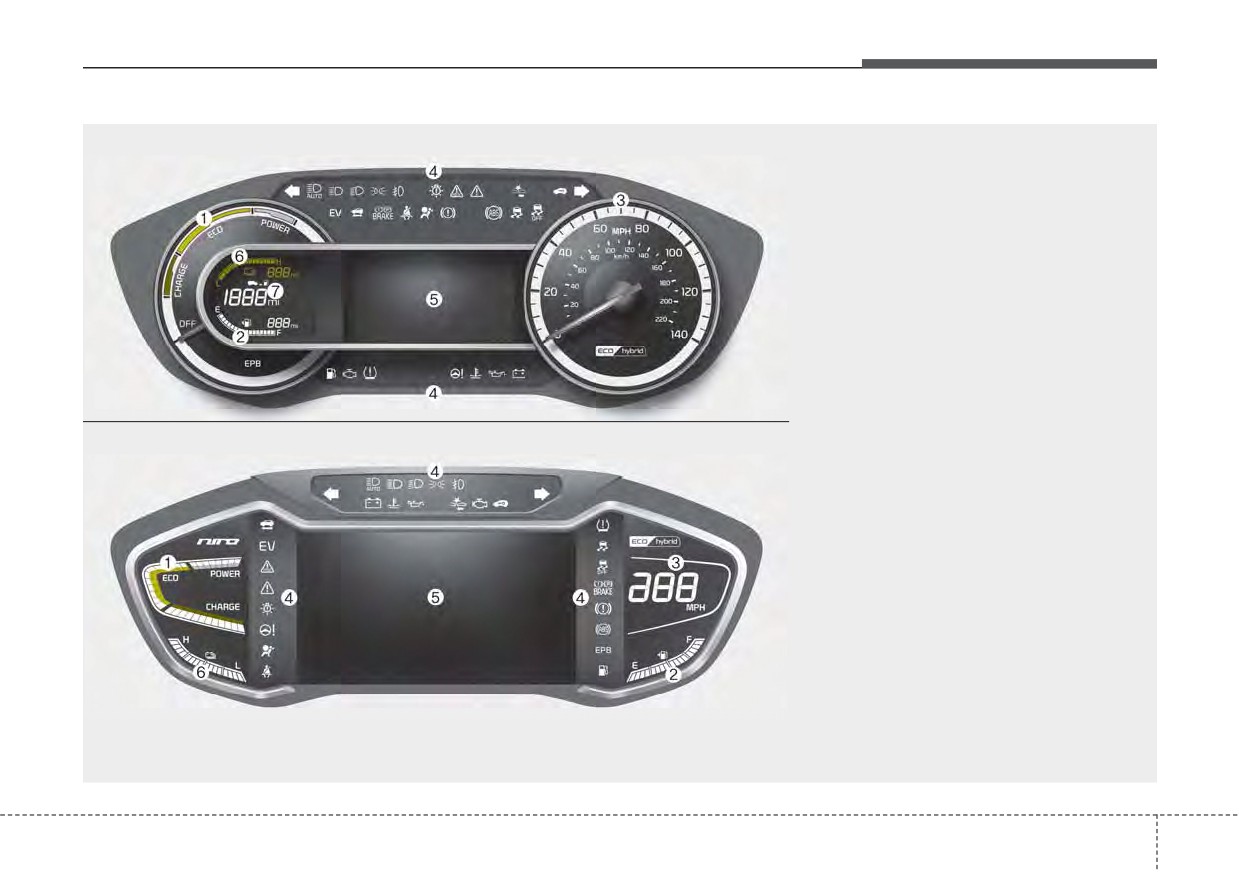
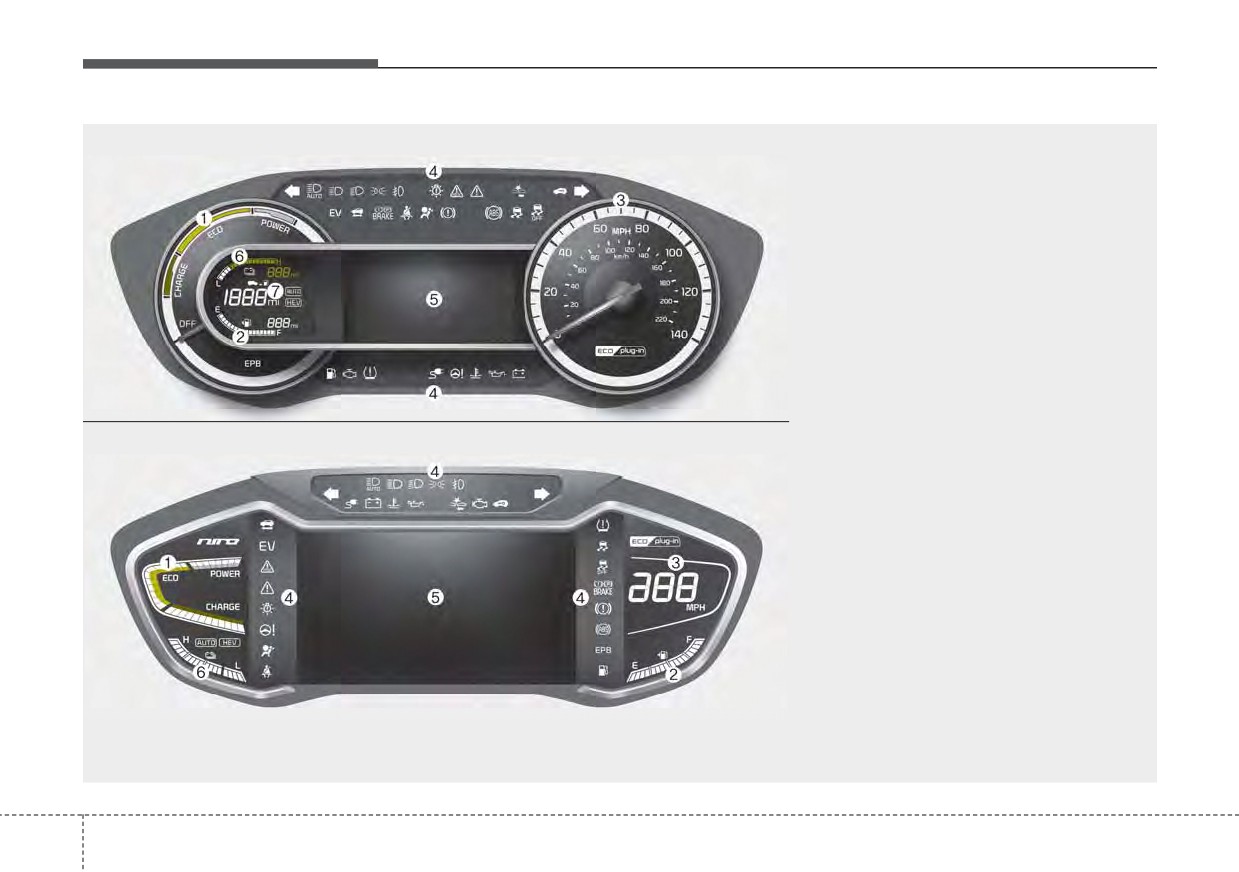
INSTRUMENT CLUSTER
■ Type A for Hybrid
1. Hybrid system gauge
2. Fuel gauge
3. Speedometer
4. Warning and indicator lights
5. LCD display
■ Type B for Hybrid
6. Battery SOC (State of Charge) gauge
7. Distance To Empty
❈ For more details, refer to the “Gauges” in
this chapter.
❈ The actual cluster and contents of the LCD display in the vehicle may differ from the illustration.
ODEP049100N/ODEP049538N
4
67
Features of your vehicle
■ Type A for Plug-in Hybrid
1. Hybrid system gauge
2. Fuel gauge
3. Speedometer
4. Warning and indicator lights
5. LCD display
■ Type B for Plug-in Hybrid
6. Battery SOC (State of Charge) gauge
7. Distance To Empty
❈ For more details, refer to the “Gauges” in
this chapter.
❈ The actual cluster and contents of the LCD display in the vehicle may differ from the illustration.
ODEP049182N/ODEP049183N
4
68
Features of your vehicle
Instrument Cluster Control
Gauges
Adjusting Instrument Cluster
Speedometer
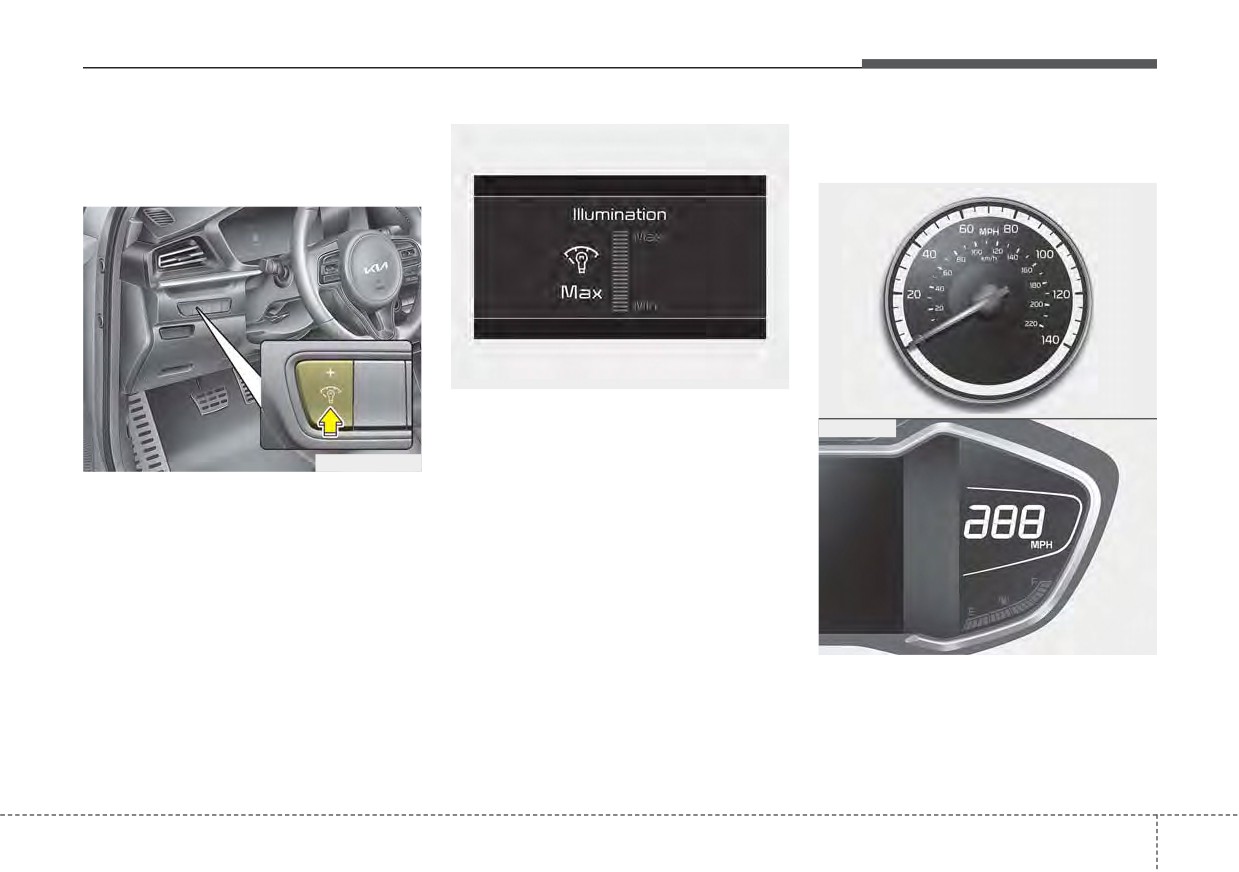
Illumination
■ Type A
ODEP049543L
•
If you hold the illumination control
ODEP049105N
button (“+” or “-”), the brightness
■ Type B
will be changed continuously.
ODEP041545N
•
If the brightness reaches to the
The brightness of the instrument
maximum or minimum level, an
panel illumination is changed by
alarm will sound.
pressing the illumination control but-
ton
(“+” or
“-”) when the ignition
switch or ENGINE START/STOP but-
ton is ON, or the taillights are turned
on.
ODEP049539N
The speedometer indicates the
speed of the vehicle and is calibrated
in miles per hour (mph) and/or kilo-
meters per hour (km/h).
4
69
Features of your vehicle
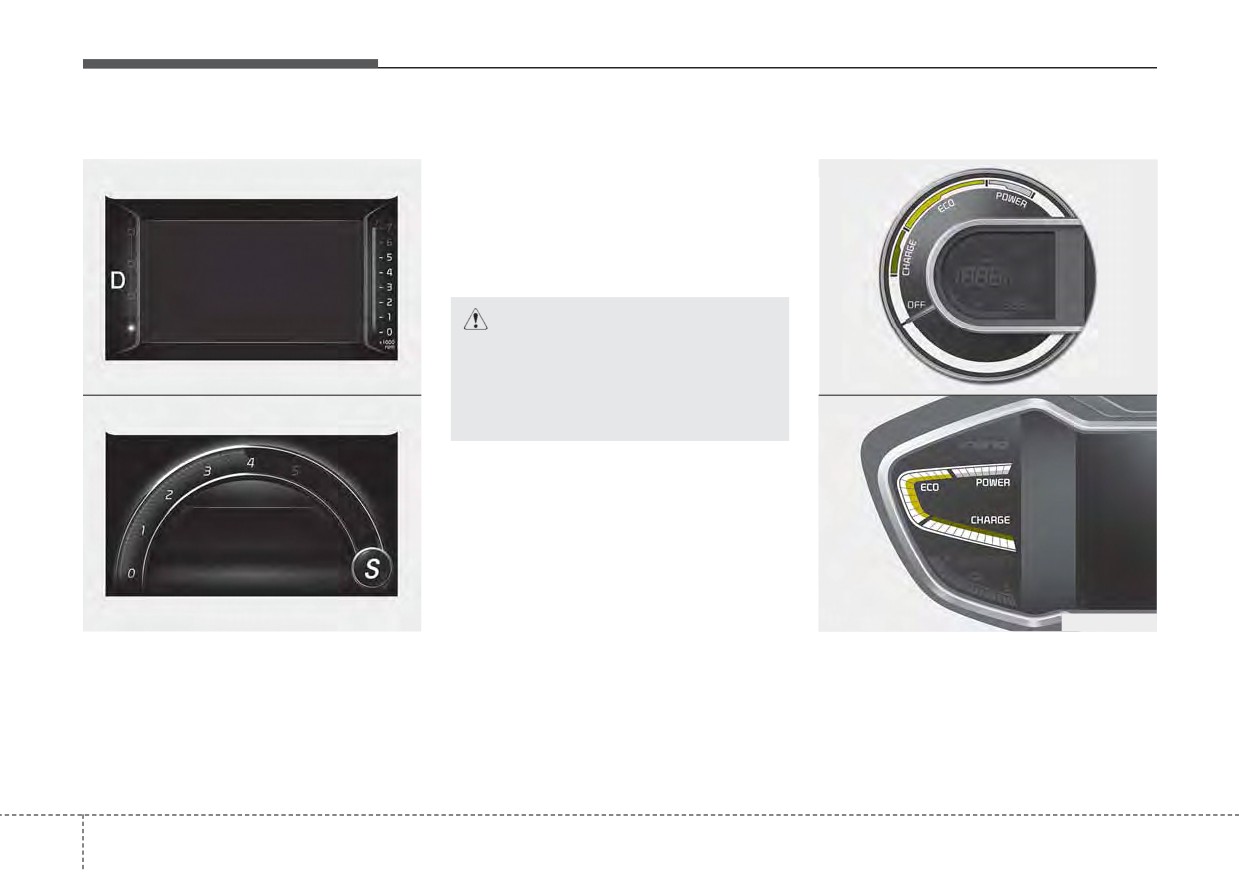
Tachometer (if equipped)
When moving the shift lever to the Hybrid System Gauge
“S”
(SPORT) mode, the engine
■ Type B - ECO mode selected
■ Type A
tachometer is displayed while switch-
ing to SPORT mode.
Use the tachometer to select the cor-
rect shift points and to prevent lug-
ging and/or over-revving the engine.
CAUTION
Do not operate the engine with-
in the tachometer's RED ZONE.
ODEP049529L
ODEP049106
This may cause severe engine
■ Type B - SPORT mode selected
■ Type B
damage.
ODEP049215N
ODEP049186
The tachometer indicates the
The hybrid system gauge indicates
approximate number of engine revo-
whether the current driving condition
lutions per minute (rpm).
is fuel efficient or not.
4 70
Features of your vehicle
• CHARGE : Shows that the energy
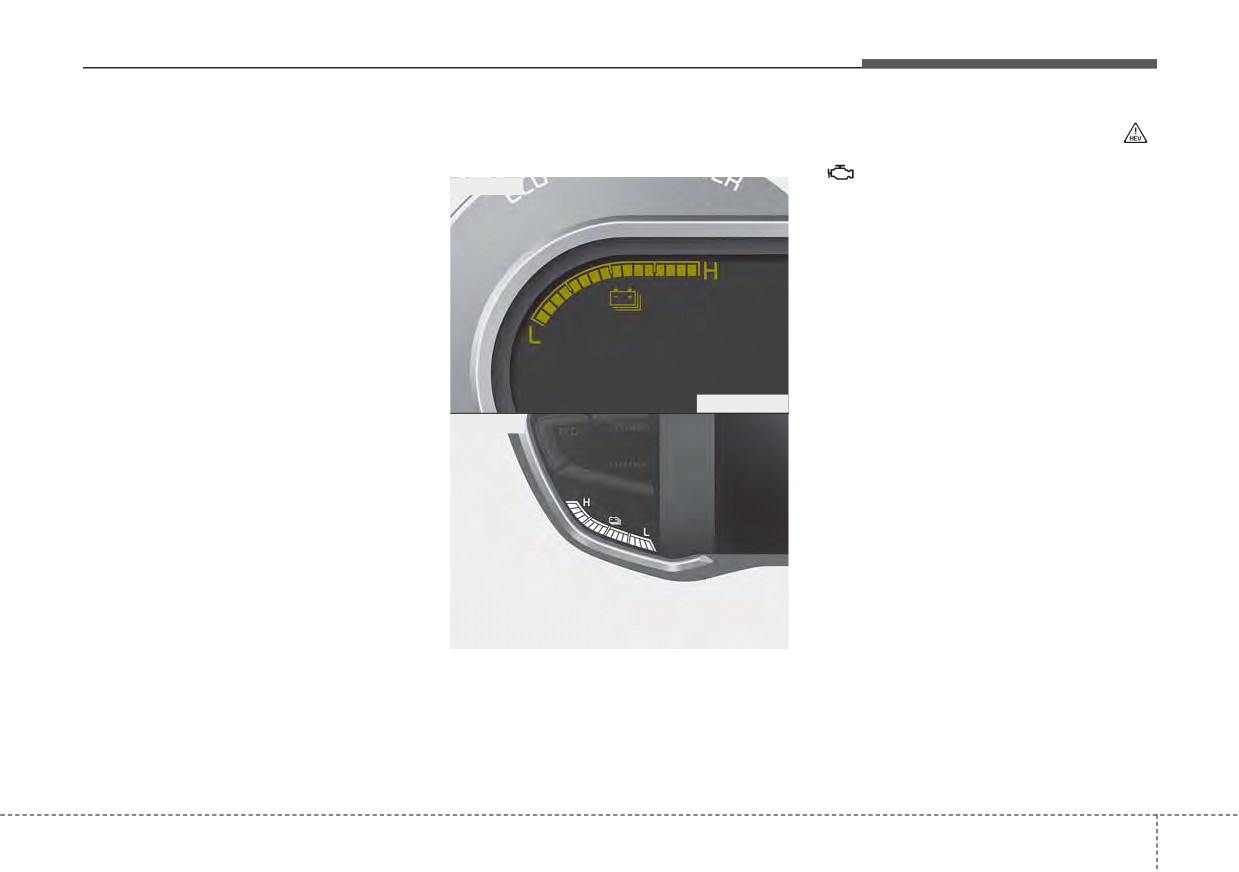
Hybrid Battery SOC
However, if the Service Indicator (
)
made by the vehicle is
(State of Charge) Gauge
and Malfunction Indicator Lamp (MIL)
being converted to
(
) turn on when the SOC gauge is
■ Type A
electrical
energy.
near the “L (Low)” level, have your
(Regenerated energy)
vehicle inspected by an authorized
Kia dealer.
• ECO : Shows that the vehicle is
being driven in an Eco-
friendly manner.
✽ NOTICE
• POWER : Shows that the vehicle is
Never try to start the vehicle if the
exceeding the Eco-
fuel tank is empty. In this condition,
friendly range.
the engine cannot charge the high
voltage battery of the hybrid system.
ODE046107
If you try to start the vehicle when
✽ NOTICE
■ Type B
the fuel is empty, the high voltage
The "EV" indicator comes on or off
battery will become discharged and
based on the hybrid system gauge.
be damaged.
•
“EV” indicator ON : Vehicle is
using the electric motor or the
gasoline engine is stopped.
•
“EV” indicator OFF : Vehicle is
using the gasoline engine.
ODEP049530L
This gauge indicates the remaining
hybrid battery power. If the SOC is
near the “L (Low)” level, the vehicle
automatically operates the engine to
charge the battery.
4
71
Features of your vehicle
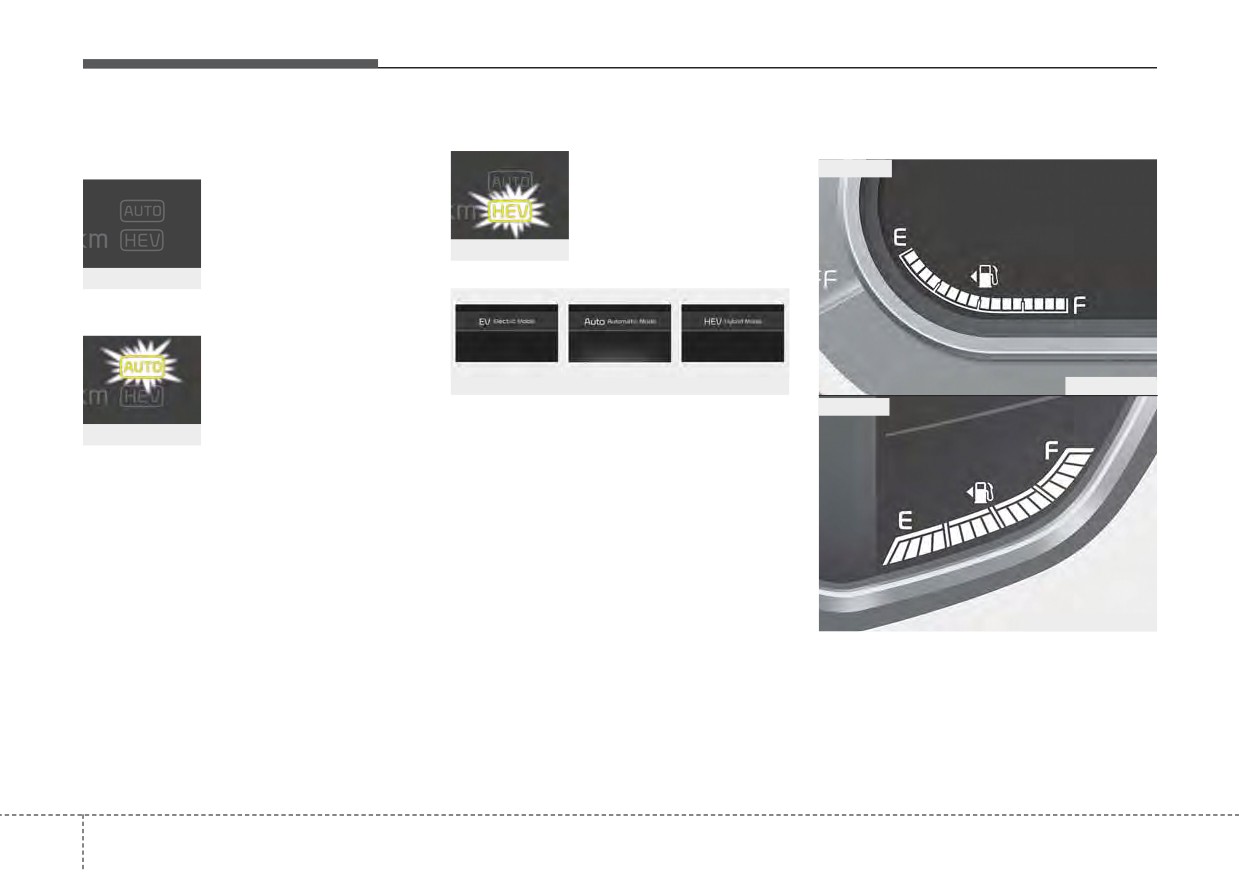
Plug-in hybrid mode indicator
• CS (Charge Sustaining, Hybrid) mode
Fuel Gauge
• CD (Charge Depleting, Electric) mode
: The
high-voltage
■ Type A
(hybrid) battery and
: The
high-voltage
gasoline engine is
(hybrid) battery is used
used to drive the vehi-
to drive the vehicle.
ODEP049549L
cle.
ODEP049550L
• AUTO mode
: The AUTO mode will
be
automatically
selected from either
ODEP049189L/ODEP049541L/ODEP049190L
ODE046108
from Electric
(CD)
■ Type B
A corresponding message is displayed
mode or Hybrid (CS)
ODEP049548L
to indicate the selected mode.
mode by the system
according to the driv-
ing condition.
ODEP049188L
This gauge indicates the approxi-
mate amount of fuel remaining in the
fuel tank.
4
72
Features of your vehicle
✽ NOTICE
✽ NOTICE - Fuel gauge
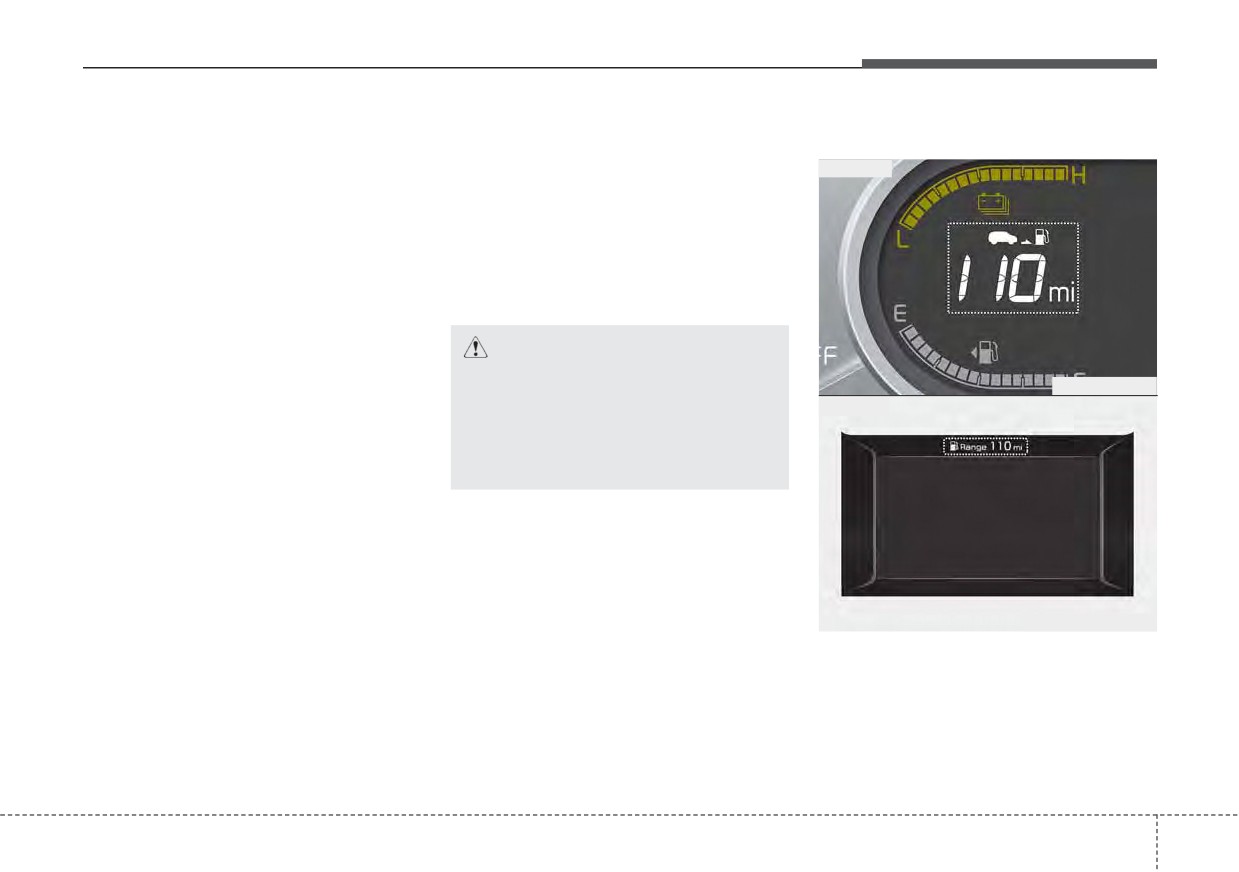
Distance to empty
• The fuel tank capacity is given in
Running out of fuel can expose vehi-
■ Type A
chapter 8.
cle occupants to danger. You must
• The fuel gauge is supplemented by
obtain additional fuel as soon as pos-
a low fuel warning light which will
sible after the warning light comes
illuminate when the fuel tank is
on or when the gauge indicator
nearly empty.
comes close to the
“E (Empty)”
• On inclines or curves, the fuel
level.
gauge pointer may fluctuate or the
low fuel warning light may come
CAUTION - Low fuel
on earlier than usual due to the
movement of fuel in the tank.
Avoid driving with an extremely
ODEP049142N
low fuel level. Running out of
■ Type B
fuel could cause the engine to
misfire, damaging the catalytic
converter.
✽ NOTICE
Fuel display may not be accurate if
vehicle is being fueled while in an
incline.
ODEP049561N
• The distance to empty is the esti-
mated distance the vehicle can be
driven with the remaining fuel.
- Distance range : 1 ~ 9,999 mi. or
1 ~ 9,999 km
4
73
Features of your vehicle
•
If the estimated distance is below 1
✽ NOTICE
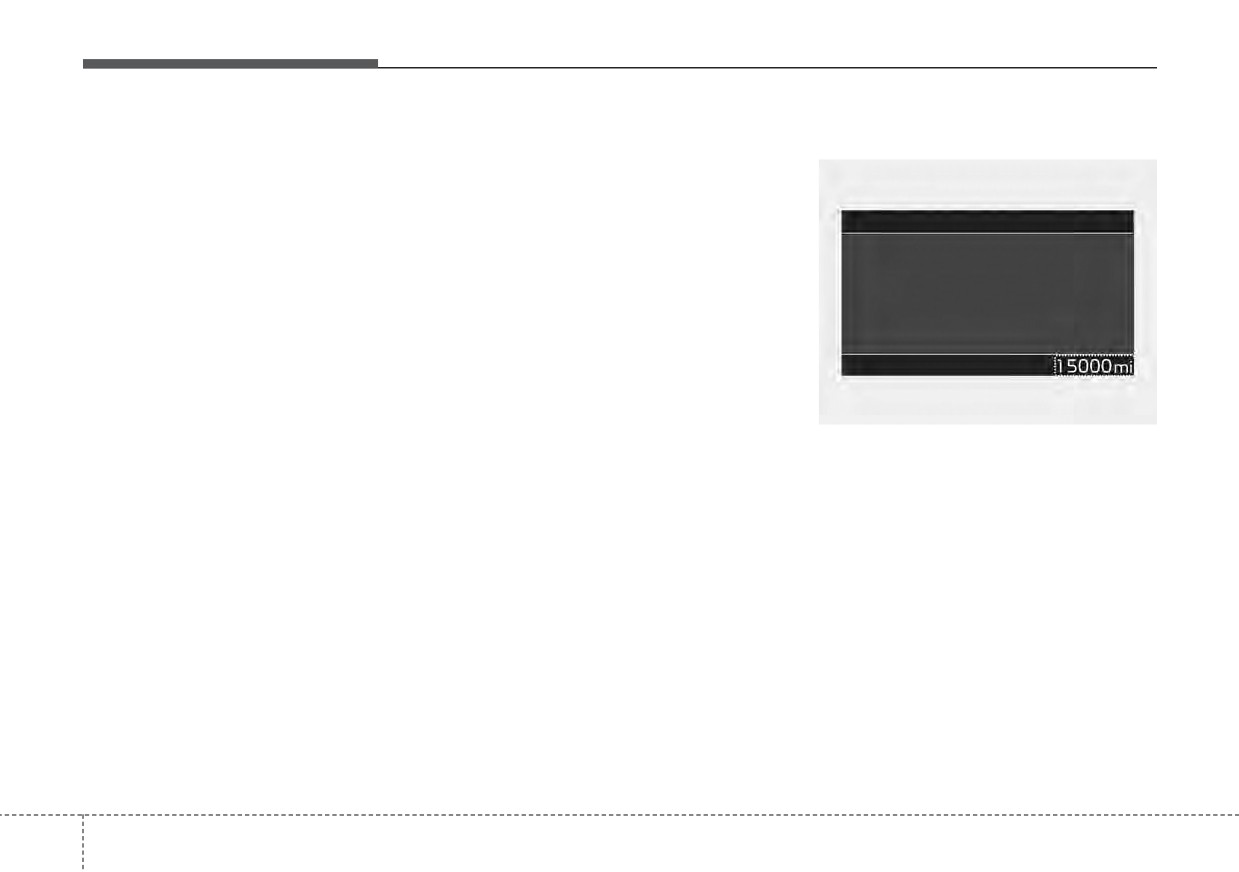
Odometer
mi.(1 km), the trip computer will
•
If the vehicle is not on level ground
display “----” as distance to empty.
or the battery power has been
•
If the level of the remaining fuel is
interrupted, the distance to empty
more than three-quarters, more
function may not operate correct-
than 0.8 gallons (3 liters) of fuel
ly.
must be refilled for the fuel gauge
•
The distance to empty may differ
to change. In other cases, more
from the actual driving distance as
than 1.6 gallons (6 liters) of fuel
it is an estimate of the available
must be refilled for the vehicle to
driving distance.
change the fuel gauge.
•
The fuel economy and distance to
empty may vary significantly
based on driving conditions, driv-
ODEP049597N
ing habits, and condition of the
vehicle.
The odometer Indicates the total dis-
tance that the vehicle has been driv-
en and should be used to determine
when periodic maintenance should
be performed.
- Odometer range
:
0
~ 999,999
miles or 1,599,999 kilometers.
4
74
Features of your vehicle
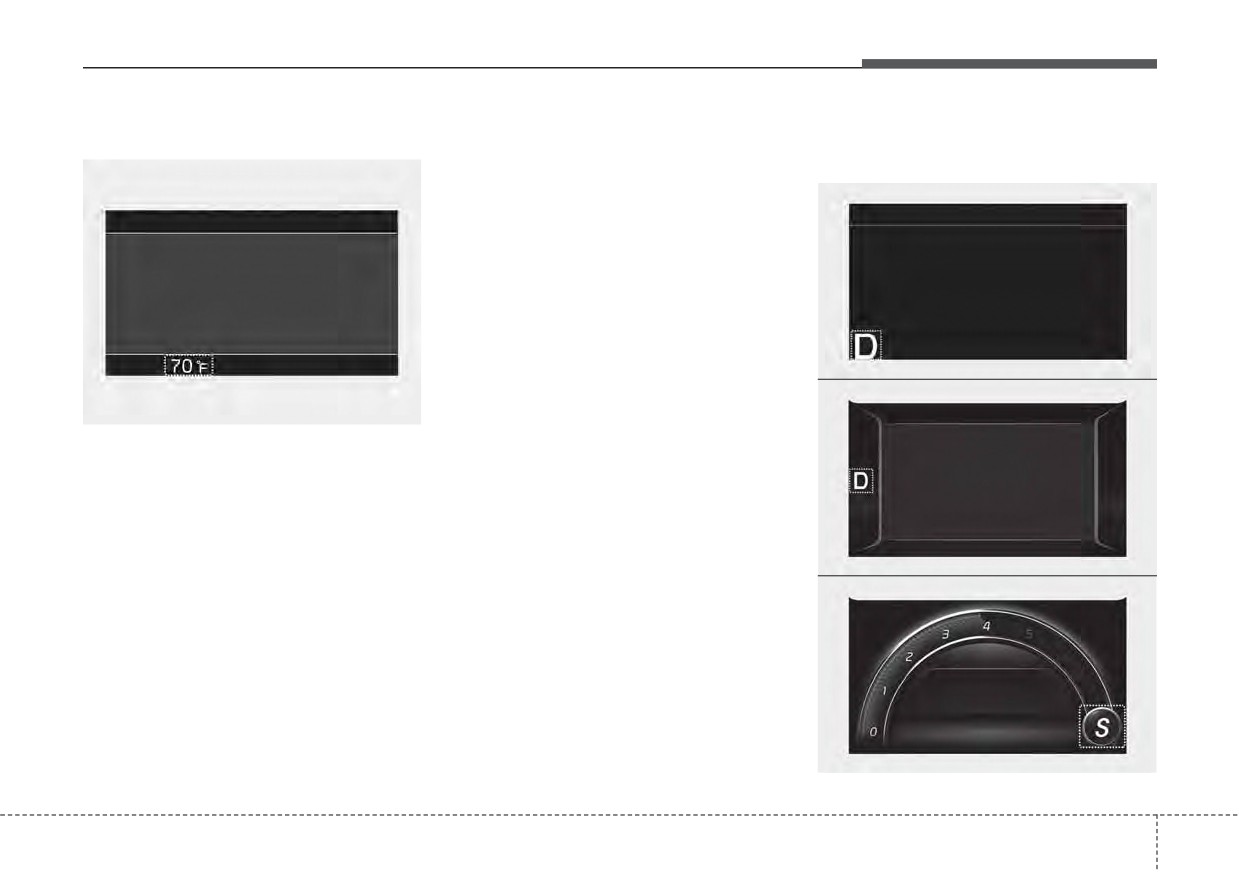
Outside Temperature Gauge
The temperature unit (from °C to °F Dual clutch transmission shift
or from °F to °C) can be changed by
indicator
using the “User Settings” mode of the
■ Type A
LCD display.
❈ For more details, refer to “LCD dis-
play” in this chapter.
ODEP049557L
■ Type B - ECO mode selected
ODEP049598N
This gauge indicates the current out-
side air temperatures by 1°F (1°C).
- Temperature range : -40 ~ 140°F (-40
~ 60°C)
The outside temperature on the dis-
play may not change immediately
ODEP049558L
■ Type B - SPORT mode select
like a general thermometer to pre-
vent the driver from being distracted.
ODEP049191N
4
75
Features of your vehicle
This indicator displays which shift
lever is selected.
• Park : P
• Reverse : R
• Neutral : N
• Drive : D
• Sport mode : S
4
76
Features of your vehicle
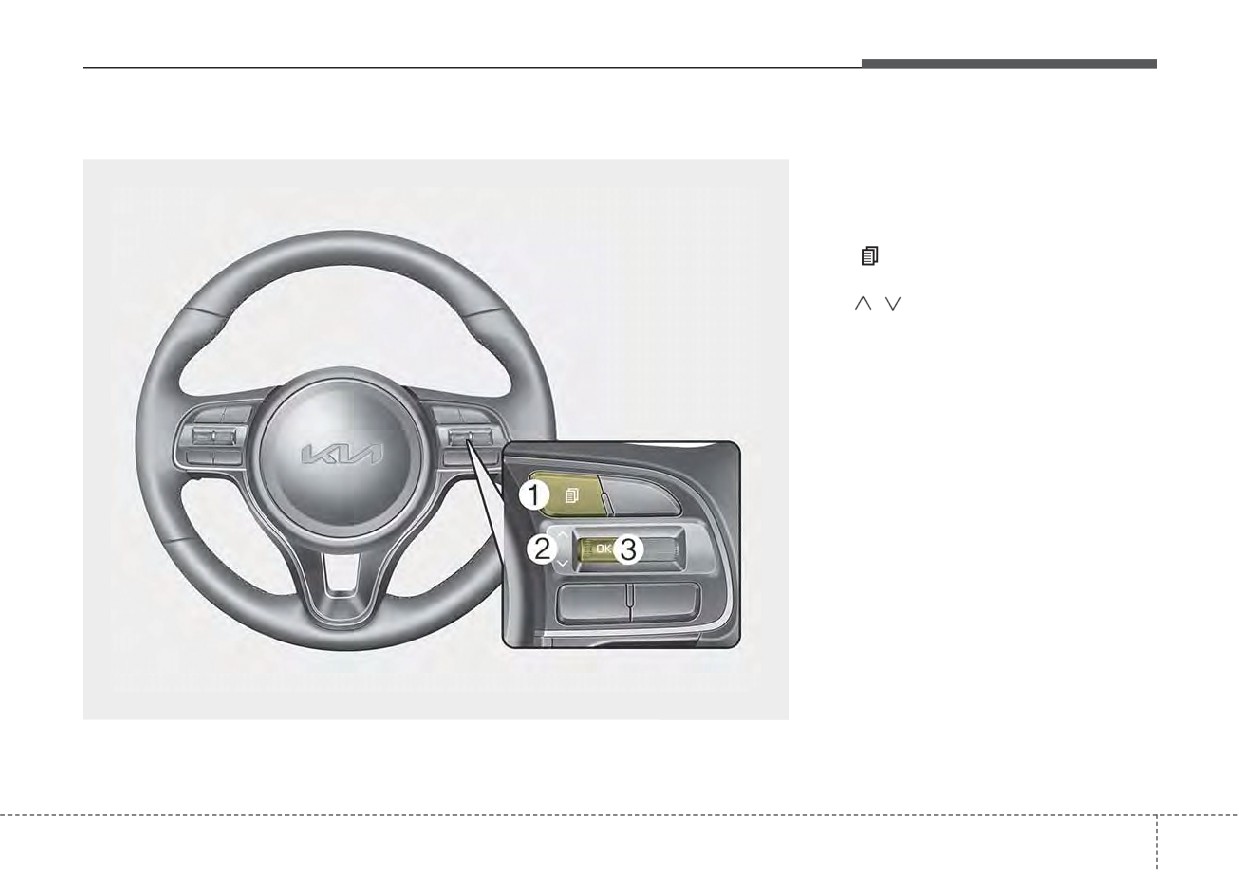
LCD DISPLAY
LCD Display Control
The LCD display modes can be
changed by using the control but-
tons.
(1)
: MODE button for changing
modes
(2)
/
: MOVE switch for changing
items
(3) OK : SELECT/RESET button for
setting or resetting the select-
ed item
ODEP041103L
4
77
Features of your vehicle
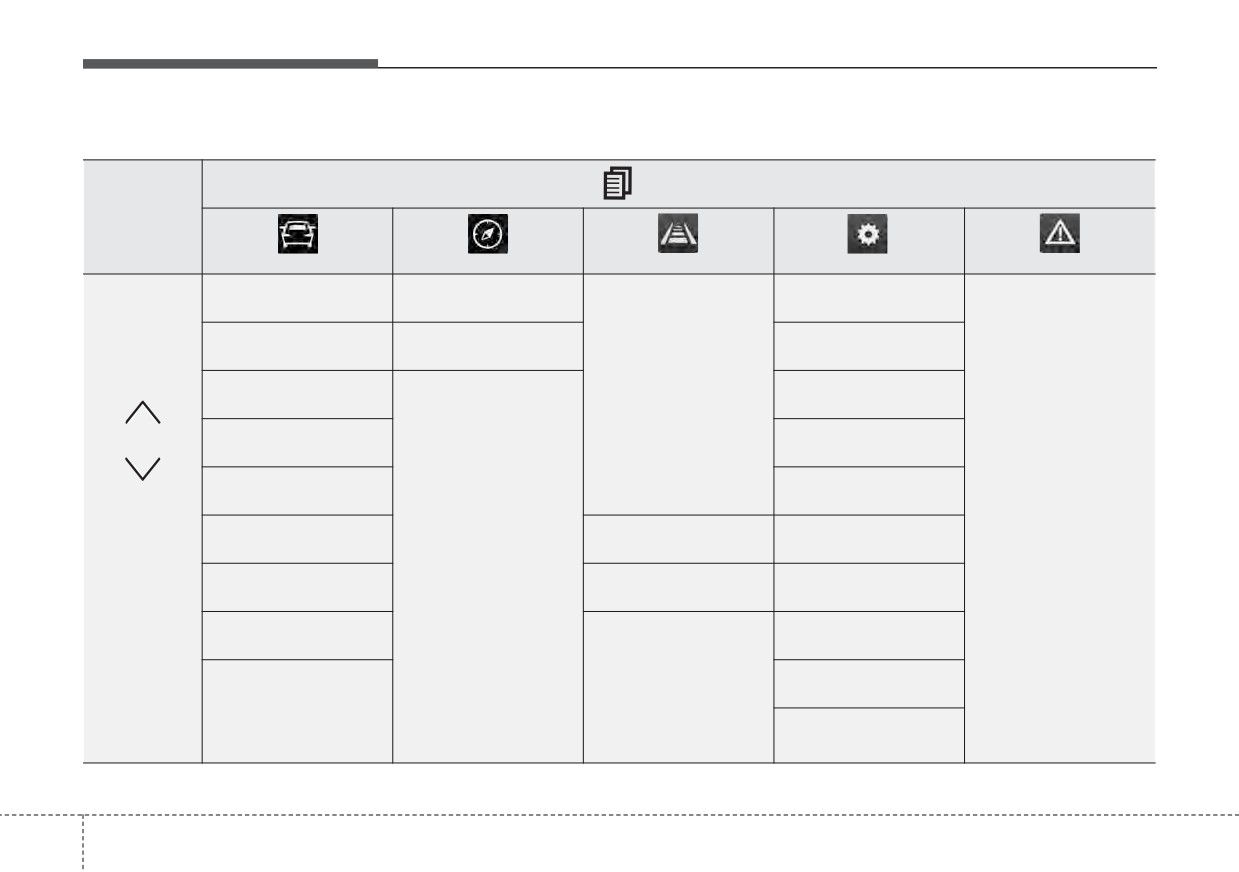
LCD Display Modes
Mode
Trip Computer
TBT
Driving Assist
User Settings
Master warning
The Master Warning
Range
Route Guidance
Driver Assistance
• Lane Departure
mode displays warn-
Warning
ing messages related
Fuel Economy
Destination Info
Door
• Lane Keeping Assist
to the vehicle when
one or more functions
• Smart Cruise Control
Accumulated Info
Lights
is not operating nor-
• Lane Following
mally.
Assist
Drive Info
Sound
• Highway Driving
Assist
Digital Speedometer
Convenience
Driver Attention
Driving Style
Service Interval
Up/Down
Warning
Energy Flow
TPMS
Other
Engine Temperature
Language
Reset
❈ The information provided may differ depending on which functions are applicable to your vehicle.
4
78
Features of your vehicle
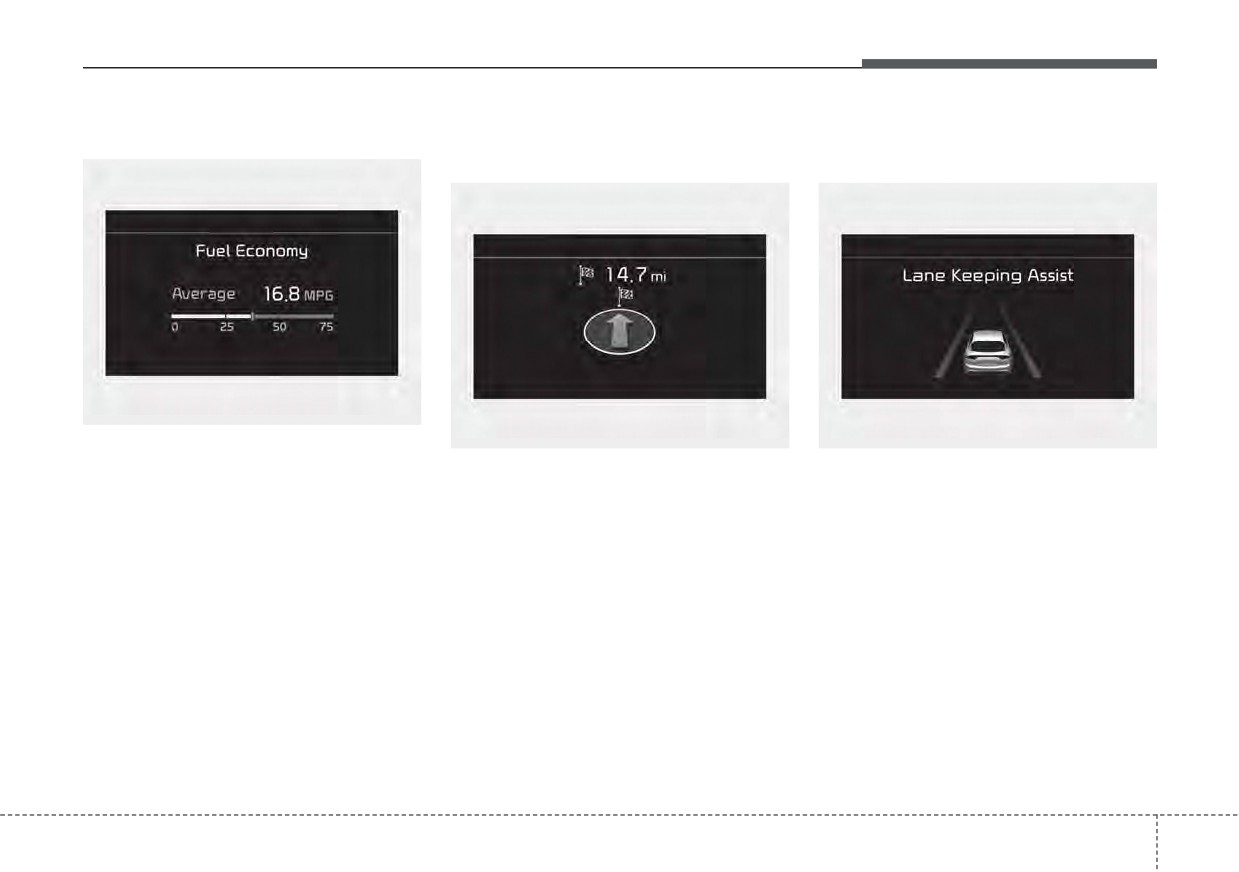
Trip computer mode
Turn By Turn (TBT) mode
Driving Assist mode
(if equipped)
(if equipped)
ODEP049599N
The trip computer mode displays
ODEP049573N
ODEP049574L
information related to vehicle driving
This mode displays the state of the
This mode displays the state of :
parameters including fuel economy,
navigation.
•
- Lane Departure Warning
tripmeter information and vehicle
speed.
- Lane Keeping Assist
- Smart Cruise Control
❈ For more details, refer to
“Trip
- Lane Following Assist
Computer” in this chapter.
- Highway Driving Assist
• Driver Attention Warning
❈For more details, refer to each
function information in chapter 5.
4
79
Features of your vehicle
• Tire Pressure
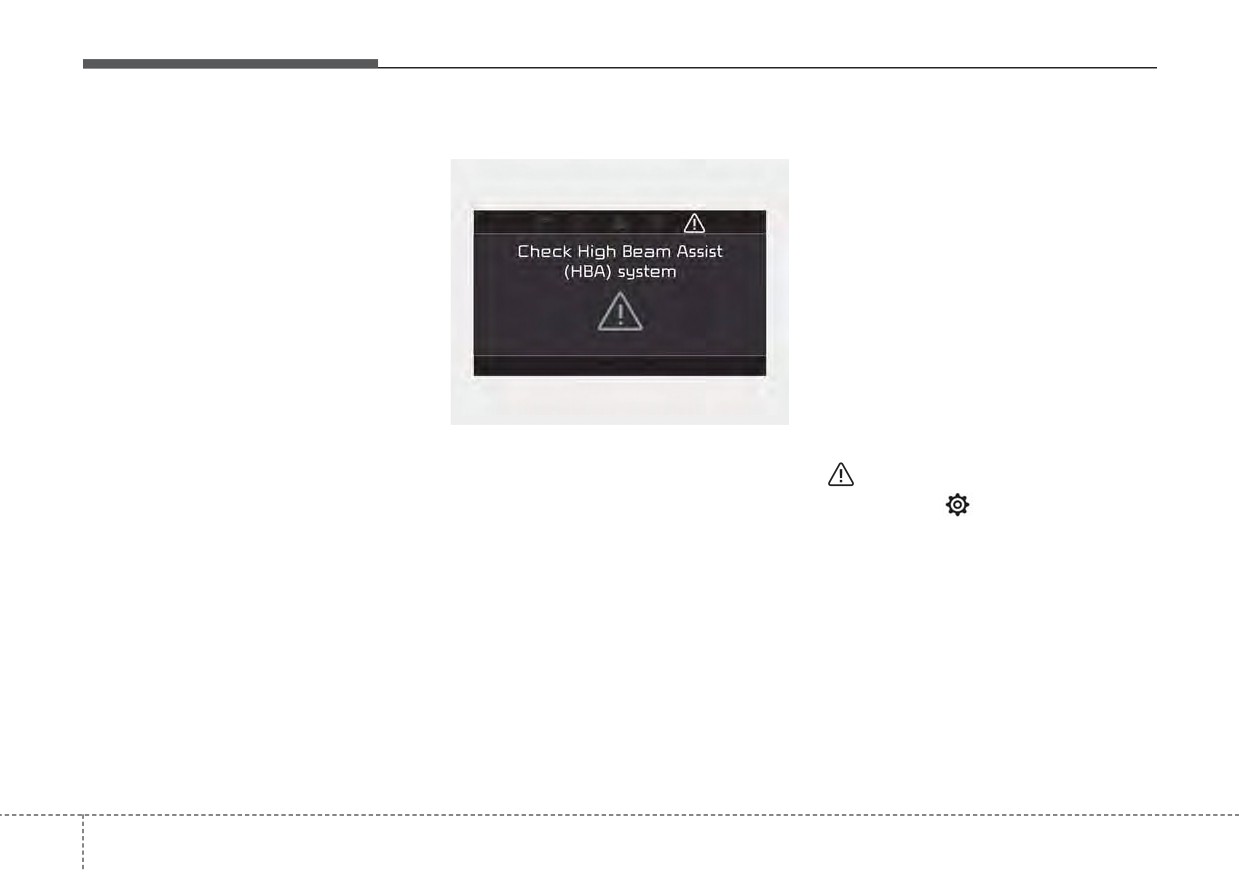
Master warning mode
• High Beam Assist malfunction
(if
equipped)
❈For more details, refer
to
“Tire
Pressure Monitoring
System
• Tire Pressure Monitoring System
(TPMS)” in chapter 6.
(TPMS) malfunction
• Smart Cruise Control malfunction (if
equipped)
• Smart Cruise Control radar blocked
(if equipped)
• Highway Driving Assist malfunction
(if equipped)
• Lane Following Assist malfunction (if
equipped), etc.
ODEP049575L
This warning light informs the driver
At this time, a Master Warning icon
the following situations.
(
) will appear beside the User
• Forward Collision-Avoidance Assist
Settings icon (
), on the LCD display.
malfunction (if equipped)
If the warning situation is solved, the
• Forward Collision-Avoidance Assist
master warning light will be turned
radar blocked (if equipped)
off and the Master Warning icon will
• Blind-Spot Collision Warning mal-
disappear.
function (if equipped)
• Blind-Spot Collision Warning radar
blocked (if equipped)
• Lamp malfunction
• LED headlamp malfunction
(if
equipped)
4
80
Features of your vehicle
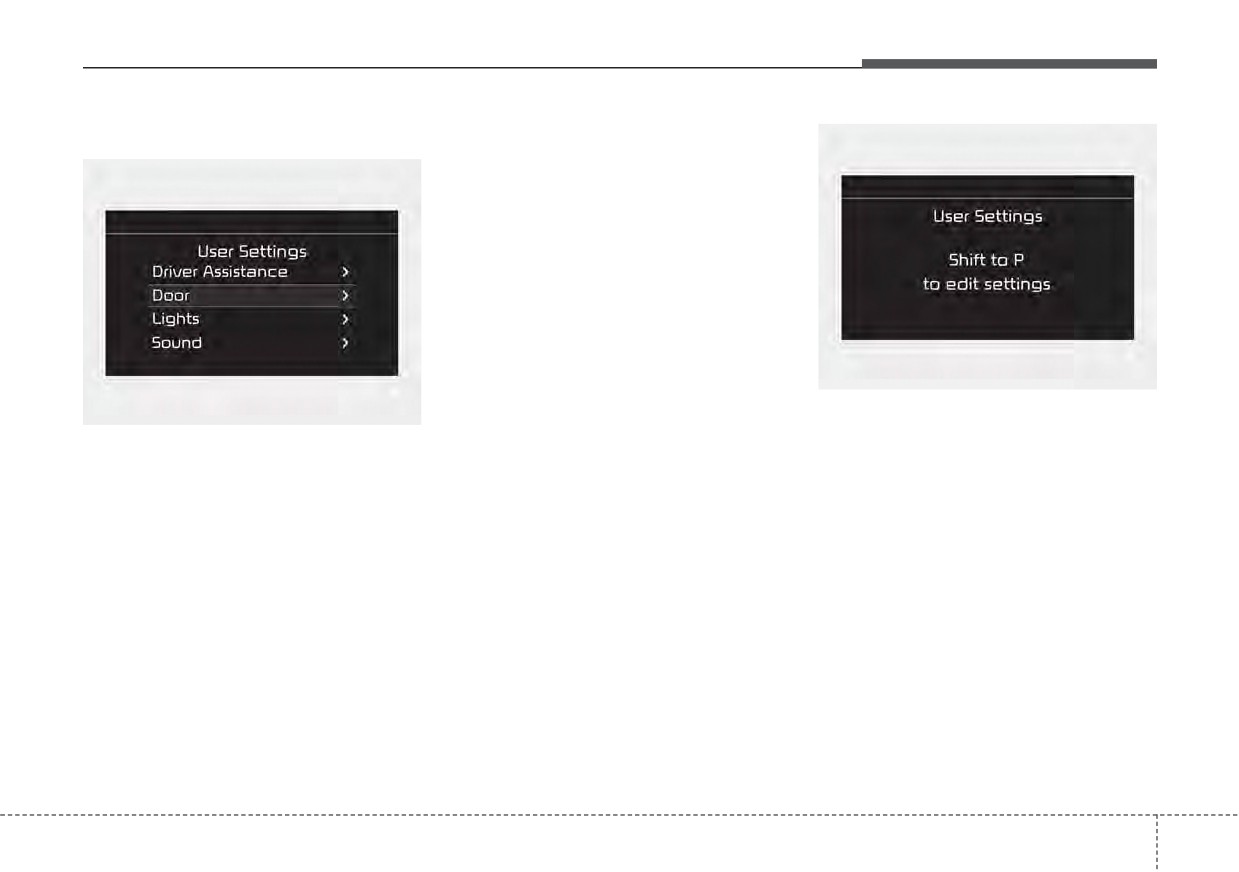
User settings mode (if equipped)
The information provided may differ
depending on which functions are
applicable to your vehicle.
ODEP049584L
Shift to P to edit settings
ODEP049586L
This warning message appears if
In this mode, you can change the
you try to adjust the User Settings
settings of the instrument cluster,
while driving.
doors, lamps, etc.
For your safety, change the User
1. Driver Assistance
Settings after parking the vehicle,
2. Door
applying the parking brake and mov-
3. Lights
ing the shift lever to P (Park).
4. Sound
5. Convenience
6. Service Interval
7. Other
8. Language
9. Reset
4
81
Features of your vehicle
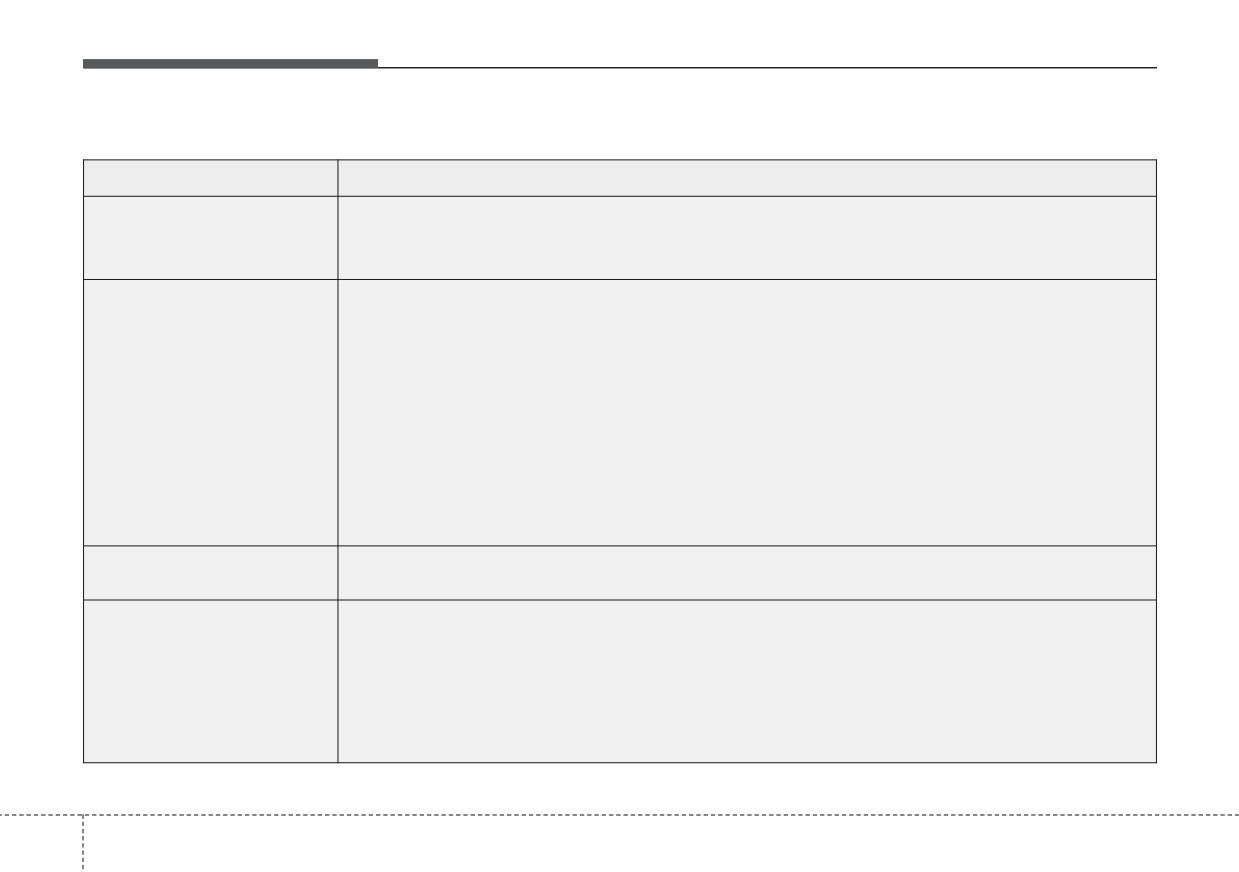
1. Driver Assistance (if equipped)
Items
Explanation
• Fast/Normal/Slow
SCC Reaction
To adjust the sensitivity of Smart Cruise Control.
❈ For more details, refer to “Smart Cruise Control (SCC)” in chapter 5.
• Lane Following Assist
To select the function.
❈ For more details, refer to “Lane Following Assist (LFA)” in chapter 5.
• Highway Driving Assist
Driving Assist
To select the function.
❈ For more details, refer to “Highway Driving Assist (HDA)” in chapter 5.
• Highway Auto Curve Slowdown
To select the function.
❈ For more details, refer to “Navigation-based Smart Cruise Control (NSCC)”in chapter 5.
• Normal/Later
Warning Timing
To select when to provide a warning for all driver assistance function.
• Leading Vehicle Departure Alert
To select the function.
❈ For more details, refer to “Leading vehicle departure alert” in chapter 5.
Driver Attention Warning
• Low Activity Warning
To select the function.
❈ For more details, refer to “Driver Attention Warning (DAW)” in chapter 5.
❈ The information provided may differ depending on which functions are applicable to your vehicle.
4
82
Features of your vehicle
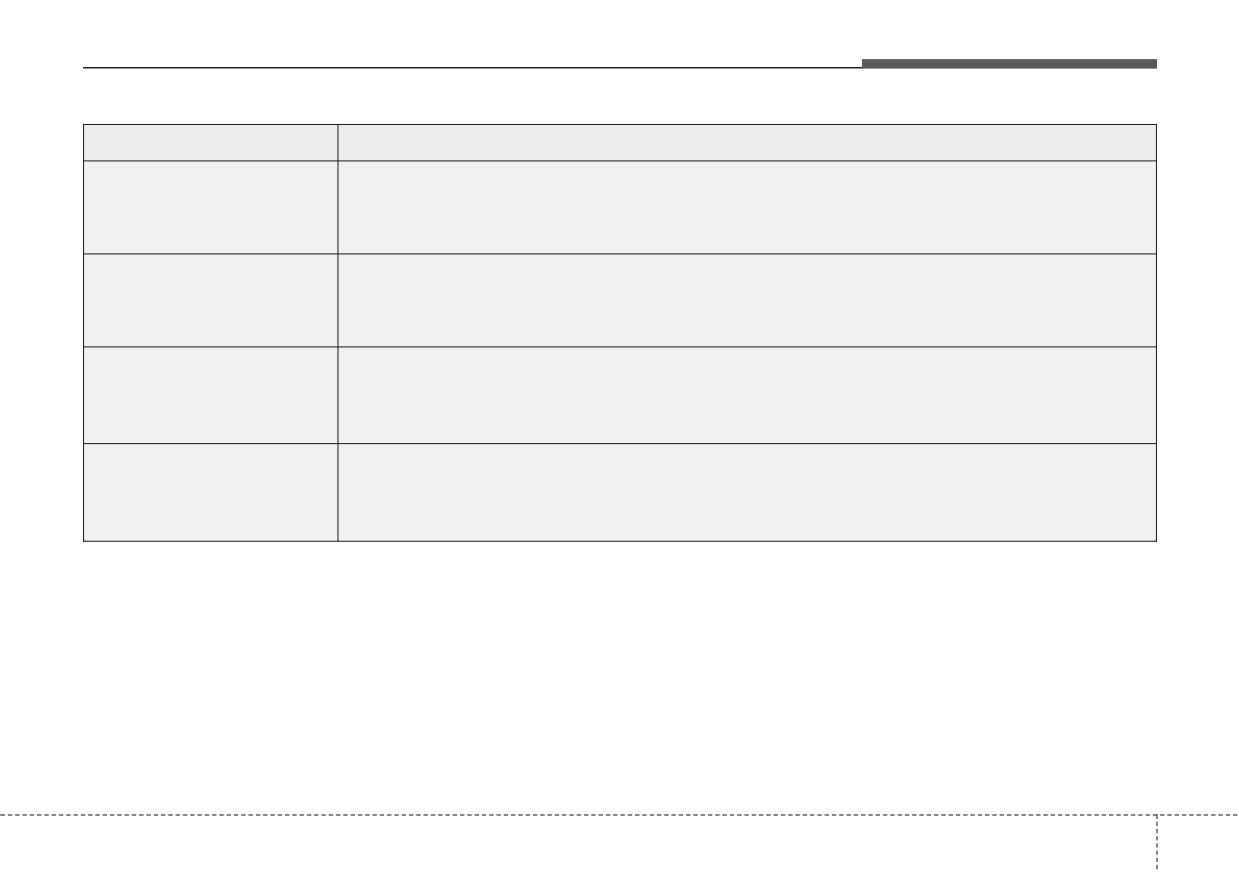
Items
Explanation
• Active Assist/Warning Only/Off
Forward Safety
To select the function.
❈ For more details, refer to “Forward Collision-Avoidance Assist (FCA)” in chapter 5.
• Lane Keeping Assist/Lane Departure Warning/Off
Lane Safety
To select the function.
❈ For more details, refer to “Lane Keeping Assist (LKA)” in chapter 5.
• Warning Only/Off
Blind-Spot Safety
To select the function.
❈ For more details, refer to “Blind-Spot Collision Warning (BCW)” in chapter 5.
• Rear Cross-Traffic Safety
Parking Safety
To select the function.
❈ For more details, refer to “Rear Cross-Traffic Collision Warning (RCCW)” in chapter 5.
❈ The information provided may differ depending on which functions are applicable to your vehicle.
4
83
Features of your vehicle
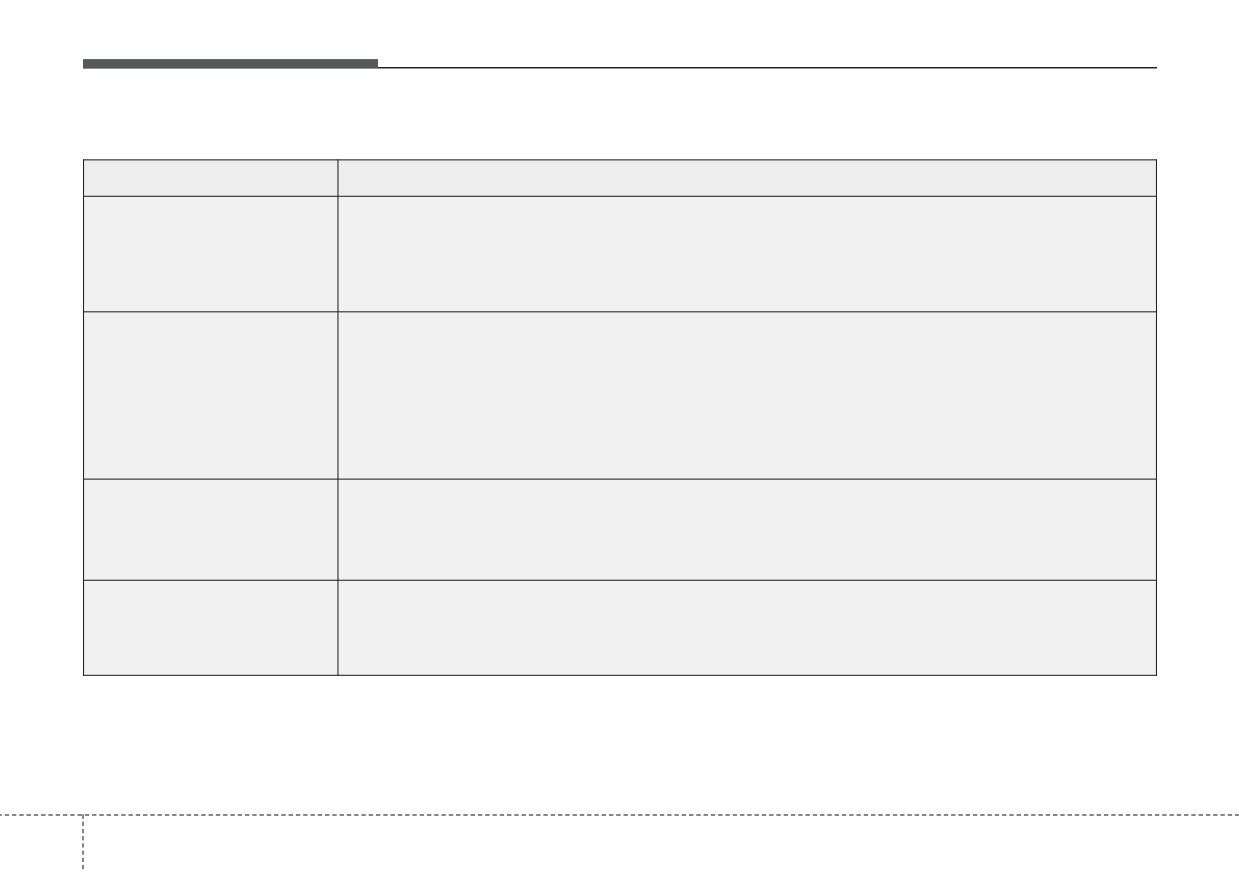
2. Door
Items
Explanation
• Enable on shift: All doors will be automatically locked if the vehicle is shifted from the P (Park)
position to the R (Reverse), N (Neutral), or D (Drive) position.
Automatically Lock
• Enable on speed: All doors will be automatically locked when the vehicle speed exceeds 9.3 mph
(15 km/h).
• On shift to P: All doors will be automatically unlocked if the gear is shifted to the P (Park) posi-
tion.
• Vehicle off/On key out : All doors will be automatically unlocked when the ENGINE START/STOP
Automatically Unlock
button is set to the OFF position or the ignition key is removed from the
ignition switch.
• Off : The auto door unlock operation will be canceled.
• If this item is checked, the two press unlock will be activated.
Two Press Unlock
Press the door unlock button once to unlock the driver's door, and press the button once more
within 4 seconds to unlock the rest of the doors.
• If this item is checked, the horn feedback will be activated.
Horn Feedback
After locking the door by pressing the lock button on the transmitter, if you press the lock button
(if equipped)
again within 4 seconds, the warning sound will operate once to indicate that all doors are locked.
❈ The information provided may differ depending on which functions are applicable to your vehicle.
4
84
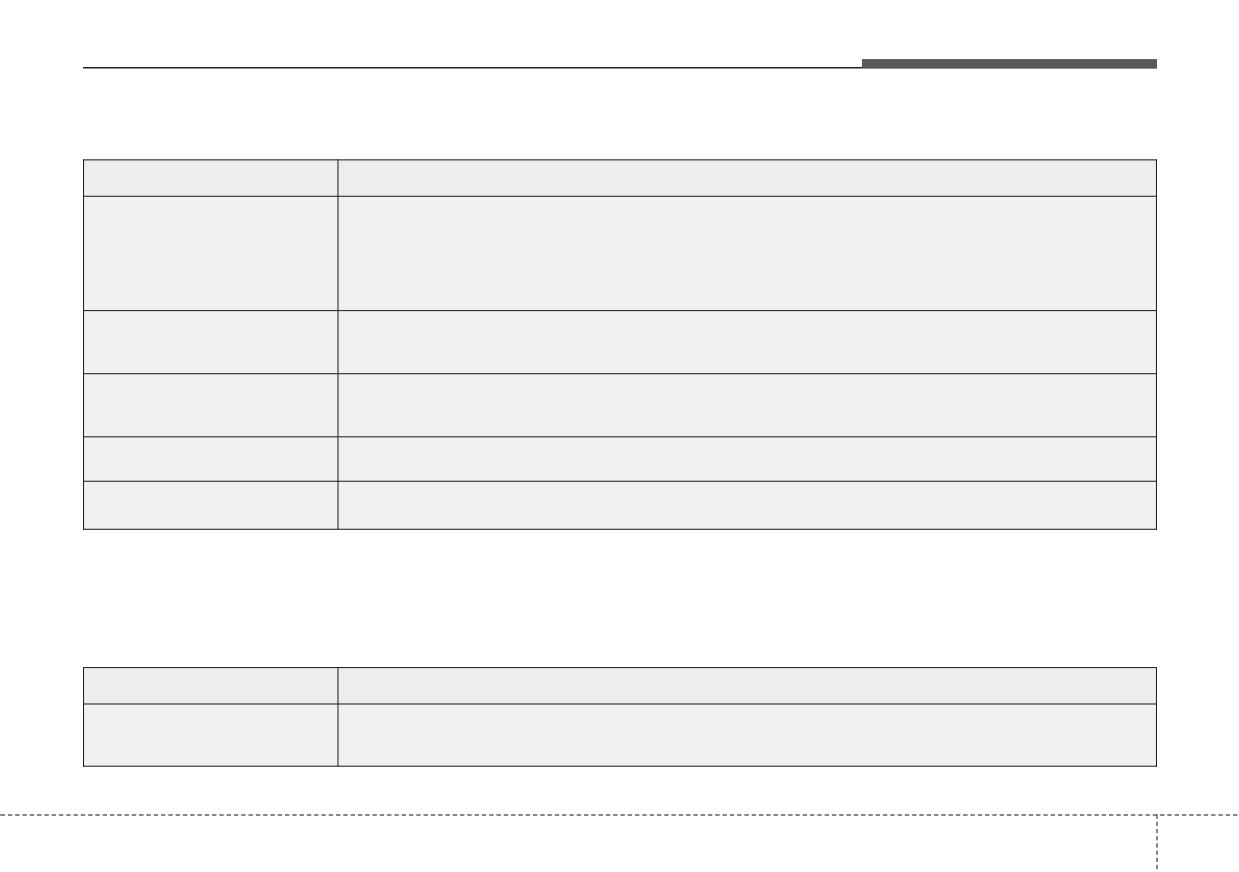
Features of your vehicle
3. Lights (if equipped)
Items
Explanation
• Off : The one touch turn signal function will be deactivated.
•
3, 5, 7 Flashes : The turn signal indicator will blink 3, 5, or 7 times when the turn signal lever is
One Touch Turn Signal
moved slightly.
❈ For more details, refer to “Lighting” in this chapter.
• Adjust the brightness of the Ambient light.
Ambient Light Brightness
- Off/Level 1,2,3,4
• Select the color of the ambient light.
Ambient Light Color
- White, Gray, Blue, Eco Green, Bronze, Red
Headlight Delay
To activate or deactivate the headlight delay function.
High Beam Assist
To activate or deactivate High Beam Assist function.
❈ The information provided may differ depending on which functions are applicable to your vehicle.
4. Sound
Items
Explanation
Parking Distance Warning
• Adjust the Park Distance Warning system volume (High/Low).
Volume
❈ The information provided may differ depending on which functions are applicable to your vehicle.
4
85
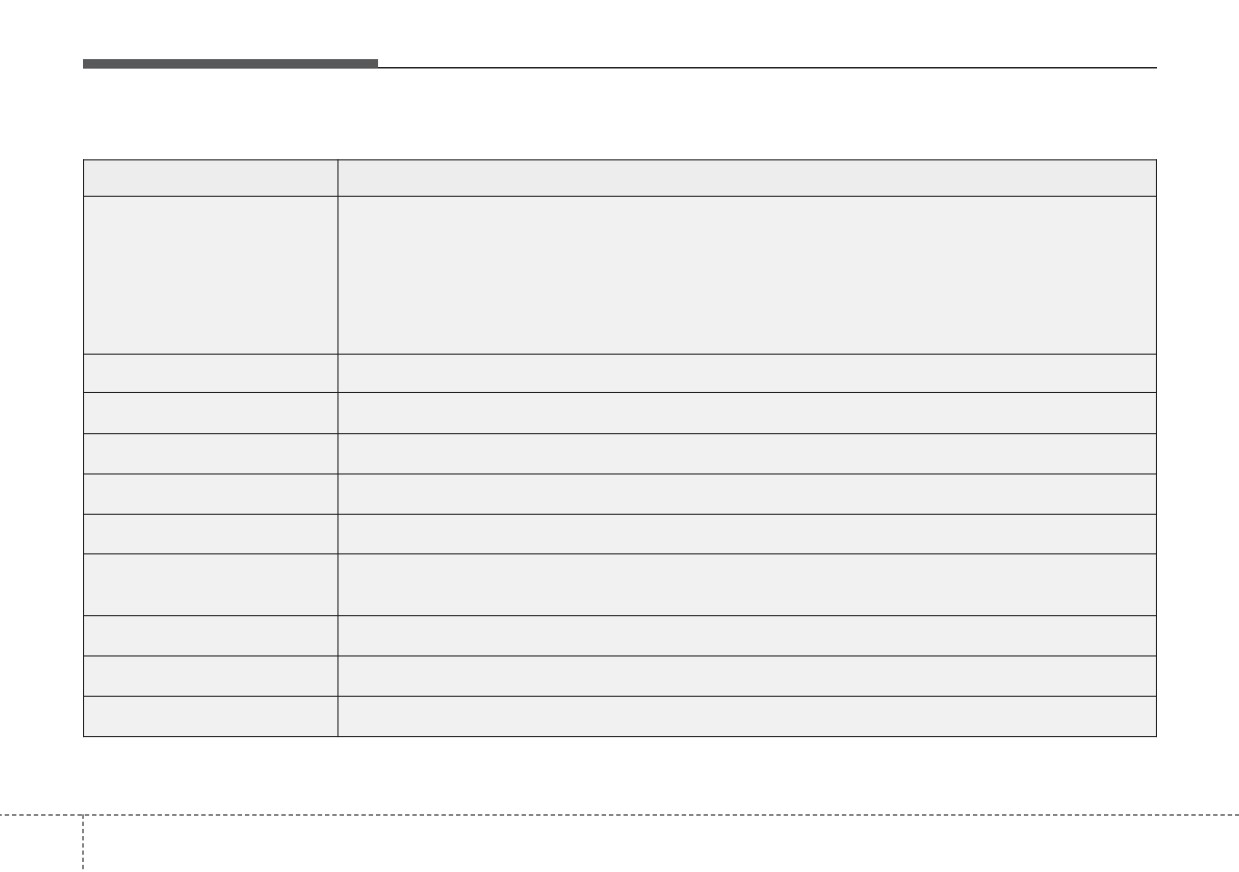
Features of your vehicle
5. Convenience (if equipped)
Items
Explanation
• Off : The seat easy access function will be deactivated.
• Normal/Extended: When you turn off the engine, the driver's seat will automatically move rear-
ward short (Normal) or long (Extended) for you to enter or exit the vehicle more comfortably.
Seat Easy Access
If you change the ignition key or ENGINE START/STOP button from OFF to ACC position, the
driver’s seat will return to the original position.
❈ For more details, refer to “Driver Position Memory System” in chapter 3.
Welcome Mirror/Light
• If this item checked, the Welcome Mirror/Light will be activated.
Wireless Charging System
• If this item checked, the wireless charging system in the front seat will be activated.
Wiper/Lights Display
• If this item checked, the Wiper/Lights Display will be activated.
Auto Rear Wiper (in R)
• If this item checked, the Auto rear wiper will be activated.
Gear Position Pop-up
• If this item is checked, the Gear position pop-up display will be activated.
• Enable Coasting Guide : To activate or deactivate the Coasting guide.
Coasting Guide
• Sound : To activate or deactivate the Coasting guide sound.
Start Coasting
• Choose the initial guiding time for Coasting guide. (Early/Normal/Late)
Icy road warning
• If this item is checked, the Icy road warning display will be activated.
Rear Occupant Alert
• If this item is checked, the Rear Occupant Alert (ROA) display will be activated.
❈ The information provided may differ depending on which functions are applicable to your vehicle.
4
86
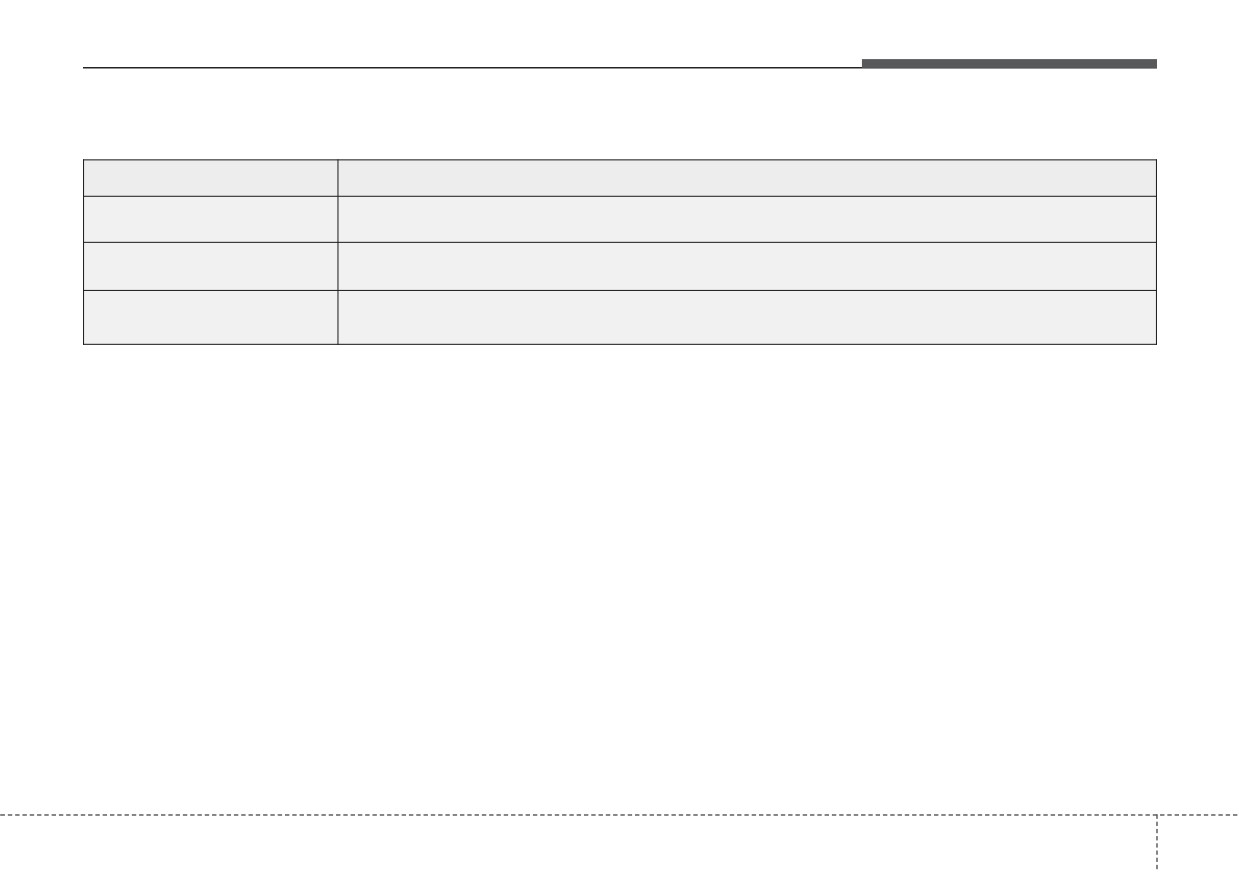
Features of your vehicle
6. Service Interval (if equipped)
Items
Explanation
Enable Service Interval
If this item is checked, the Service Interval function will be activated.
Adjust Interval
If the service interval menu is activated, you may adjust the time and distance.
Reset
To reset the service interval function.
✽ NOTICE
To use the service interval menu, consult an authorized Kia dealer.
If the service interval is activated and the time and distance is adjusted, messages are displayed in the following sit-
uations each time the vehicle is turned on.
- Service in: Displayed to inform the driver the remaining mileage and days to service.
- Service required: Displayed when the mileage and days to service has been reached or passed.
If any of the following conditions occur, the mileage and number of days to service may be incorrect.
- The battery cable is disconnected.
- The battery is discharged.
- The fuse switch is turned off.
4
87
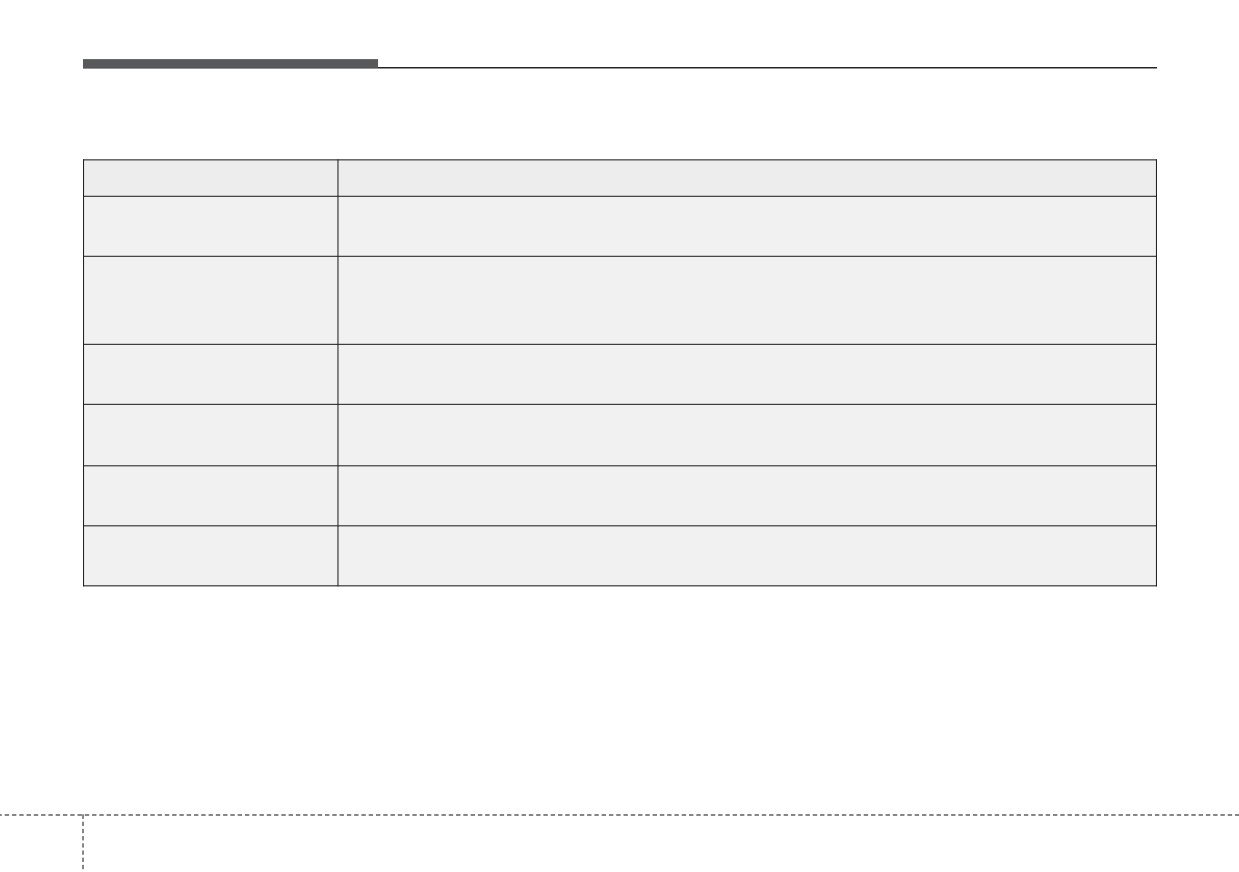
Features of your vehicle
7. Other (if equipped)
Items
Explanation
AUX. Battery Saver+
• If this item is checked, the Aux. Battery Saver+ function will be activated.
(if equipped)
• If this item checked, the average fuel economy will reset automatically after refueling or after igni-
Fuel Economy Reset
tion.
❈ For more details, refer to “Trip Computer” in this chapter.
• MPH, km/h
Speed Unit
To select Speed unit.
• US gallon, UK gallon, km/L, L/100km,
Fuel Economy Unit
To select the Fuel economy unit.
•
°F, °C
Temperature Unit
To select the Temperature unit.
• psi, kPa, bar
Tire Pressure Unit
To select the Tire Pressure Unit.
❈ The information provided may differ depending on which functions are applicable to your vehicle.
4
88
Features of your vehicle
8. Language (if equipped)
Items
Explanation
Language
• To select language.
9. Reset
Items
Explanation
You can reset the menus in the User Settings mode. All menus in the User Settings mode are reset
Reset
to factory settings, except language and service interval.
4
89