Toyota C-HR (2019 year). Manual - part 25
 

  Index      Toyota     Toyota C-HR - service manual 2019 year in english


Search            


Content   ..  23  24  25  26   ..


Toyota C-HR (2019 year). Manual - part 25


385

6-3. Do-it-yourself maintenance

6

Mainten

ance an

d ca

re

Checking interval
Inspect and replace the air conditioning  filter  according to  the  maintenance
schedule. In dusty areas or areas with heavy traffic flow, early replacement
may be required. (For scheduled maintenance information, please refer to the
“Schedule maintenance guide” or “Owner’s Manual Supplement”.)

If air flow from the vents decreases dramatically
The filter may be clogged. Check the filter and replace if necessary.

NOTICE

When using the air conditioning system
Make sure that a filter is always installed.
Using the air conditioning system without a filter may cause damage to the
system.

When removing the glove box
Always follow the specified procedure to remove the glove box (

P. 382). If

the  glove  box  is  removed  without  following  the  specified  procedure,  the
hinge of the glove box may become damaged.

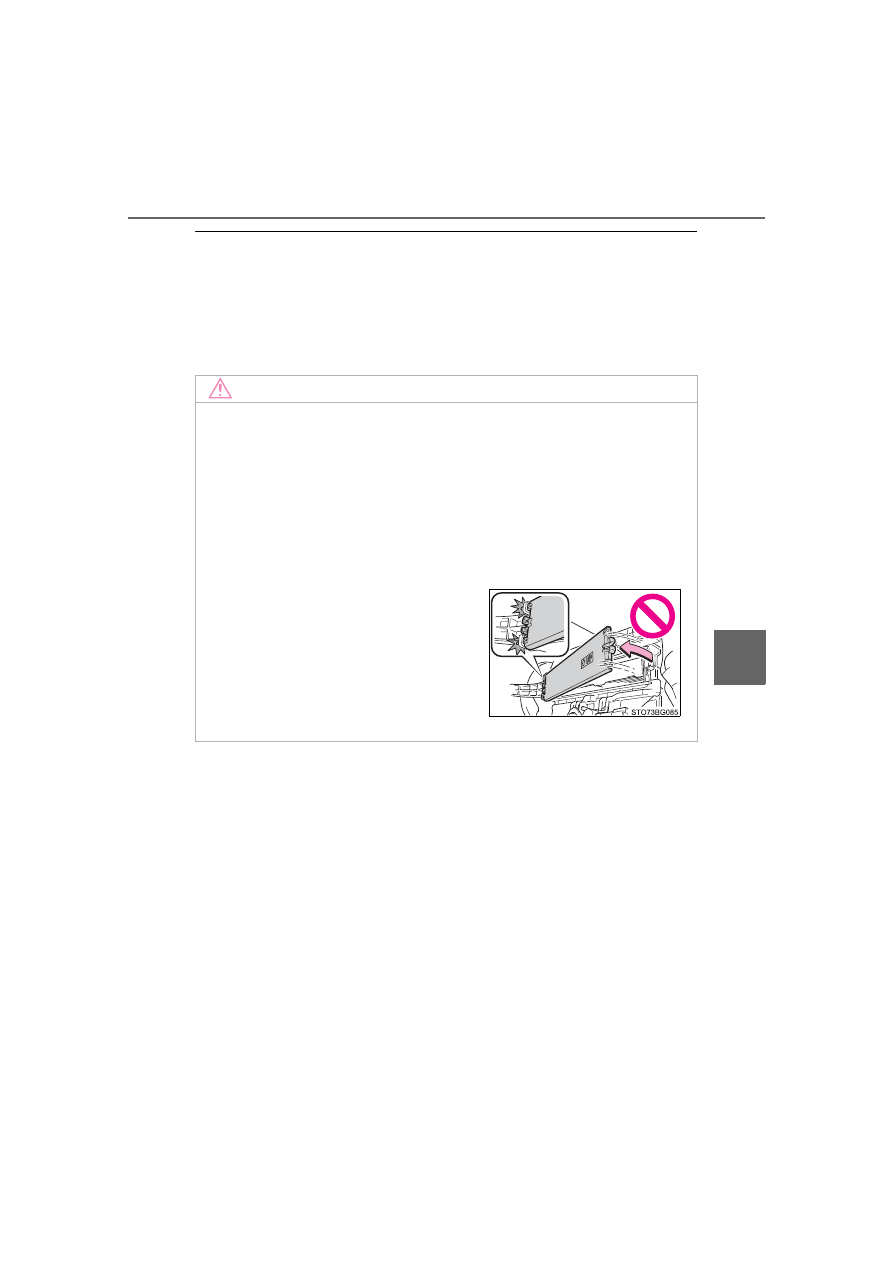
To prevent damage to the filter cover

When moving the filter cover in the direc-
tion  of  arrow  to  release  the  fitting,  pay
attention  not  to apply excessive  force  to
the  claws.  Otherwise,  the  claws  may  be
damaged.

386

6-3. Do-it-yourself maintenance

Wireless remote control/electronic key 

battery

● Flathead screwdriver
● Small flathead screwdriver
● Lithium battery

Vehicles without a smart key system: CR1620
Vehicles with a smart key system: CR2032

Vehicles without a smart key system

Remove the cover.

To  prevent  damage  to  the  key,
cover the tip of the screwdriver with
a rag.

Remove the battery cover.

Replace the battery with a new one if it is depleted.

You will need the following items:

Replacing the battery

1

2

387

6-3. Do-it-yourself maintenance

6

Mainten

ance an

d ca

re

Remove  the  depleted  battery
using  a  small  flathead  screw-
driver.

Insert  a  new  battery  with  the  “+”
terminal facing up.

When installing, reverse the steps listed.

Vehicles with a smart key system

Release  the  lock  and  take  out
the mechanical key.

Remove the cover.

Use  an  appropriate  sized  flathead
screwdriver.  Forceful  prying  may
deform the cover.
To  prevent  damage  to  the  key,
cover the tip of the screwdriver with
a rag.

3

4

1

2

388

6-3. Do-it-yourself maintenance

Remove the depleted battery.

When  removing  the  cover,  if  the
battery cannot be seen due to the
electronic key module attaching to
the  upper  cover,  remove  the  elec-
tronic  key  module  from  the  cover
so  that  the  battery  is  visible  as
shown in the illustration. 
Use  an  appropriate  sized  flathead
screwdriver  when  removing  the
battery.
Insert a new battery with the “+” terminal facing up.

When installing, reverse the steps listed.

Use a CR1620 (vehicles without a smart key system) or CR2032 (vehicles
with a smart key system) lithium battery

Batteries can be purchased at your Toyota dealer, local electrical appliance
shops or camera stores.

Replace only with the same or equivalent type recommended by the manu-
facturer.

Dispose of used batteries according to local laws.

If the key battery is depleted 
The following symptoms may occur:

The  smart  key  system  (if  equipped)  and  wireless  remote  control  will  not
function properly.

The operational range will be reduced.

3

4

389

6-3. Do-it-yourself maintenance

6

Mainten

ance an

d ca

re

WARNING

Removed battery and other parts
These parts are small and if swallowed by a child, they can cause choking.
Keep away from children. Failure to do so could result in death or serious
injury.

NOTICE

For normal operation after replacing the battery
Observe the following precautions to prevent accidents:

Always work with dry hands.
Moisture may cause the battery to rust.

Do not touch or move any other component inside the remote control.

Do not bend either of the battery terminals.

390

6-3. Do-it-yourself maintenance

Checking and replacing fuses

Turn the engine switch off.
Open the fuse box cover. 

Engine compartment type A fuse box

While  pushing  the  2  claws,  lift
up the cover.

When closing the cover, make sure
to attach the 2 claws.

Engine compartment type B fuse box

While  pushing  the  3  claws,  lift
up the cover.

When closing the cover, make sure
to attach the 3 claws.

Engine compartment type C fuse box

While  pushing  the  2  claws,  lift
up the cover.

When closing the cover, make sure
to attach the 2 claws.

If any of the electrical components do not operate, a fuse may
have blown. If this happens, check and replace the fuses as nec-
essary.

1
2

391

6-3. Do-it-yourself maintenance

6

Mainten

ance an

d ca

re

Left side instrument panel

Remove the lid.

Make sure to press the claw during
removal or installation.

Remove  the  fuse  with  the  pull-
out tool.

Only type A fuses can be removed
using the pullout tool.

3

392

6-3. Do-it-yourself maintenance

Check if the fuse is blown.

Normal fuse
Blown fuse

Except for type E:
Replace the blown fuse with a new fuse of an appropriate amperage rat-
ing. The amperage rating can be found on the fuse box lid.
Type E:
Contact your Toyota dealer.

4

Type A

Type B

Type C

Type D

Type E

393

6-3. Do-it-yourself maintenance

6

Mainten

ance an

d ca

re

After a fuse is replaced

If the lights do not turn on even after the fuse has been replaced, a bulb may
need replacement. (

P. 394)

If the replaced fuse blows again, have the vehicle inspected by your Toyota
dealer.

If there is an overload in a circuit
The fuses are designed to blow, protecting the wiring harness from damage.

When replacing light bulbs
Toyota recommends that you use genuine Toyota products designed for this
vehicle. Because certain bulbs are connected to circuits designed to prevent
overload,  non-genuine  parts  or  parts  not  designed  for  this  vehicle  may  be
unusable.

WARNING

To prevent system breakdowns and vehicle fire
Observe the following precautions.
Failure to do so may cause damage to the vehicle, and possibly a fire or
injury.

Never use a fuse of a higher amperage rating than that indicated, or use
any other object in place of a fuse.

Always use a genuine Toyota fuse or equivalent.
Never replace a fuse with a wire, even as a temporary fix.

Do not modify the fuses or fuse boxes.

NOTICE

Before replacing fuses
Have  the  cause  of  electrical  overload  determined  and  repaired  by  your
Toyota dealer as soon as possible.

394

6-3. Do-it-yourself maintenance

Light bulbs

Check the wattage of the light bulb to be replaced. (

P. 469)

Front

Front turn signal lights
Headlights
Front side marker lights
Side turn signal lights

You may replace the following bulbs yourself. The difficulty level
of replacement varies depending on the bulb. If necessary bulb
replacement  seems  difficult  to  perform,  contact  your  Toyota
dealer.
For more information about replacing other light bulbs, contact
your Toyota dealer.

Preparing for light bulb replacement

Bulb locations

395

6-3. Do-it-yourself maintenance

6

Mainten

ance an

d ca

re

Rear

Rear side marker lights
Rear turn signal lights
Back-up lights
License plate lights

Headlights

Turn  the  bulb  base  counter-
clockwise.

Unplug  the  connector  while
pressing the lock release.

Replacing light bulbs

1

2

396

6-3. Do-it-yourself maintenance

Replace  the  light  bulb,  and
install the bulb base.

Align the 3 tabs on the light bulb
with the mounting and insert.

Turn  and  secure  the  bulb
base.

Shake  the  bulb  base  gently  to
check  that  it  is  not  loose,  turn
the headlights on once and visu-
ally confirm that no light is leak-
ing through the mounting.

Front side marker lights

Turn  the  bulb  base  counter-
clockwise.

Remove the light bulb.

When installing, reverse the steps listed.

3

4

1

2

3

397

6-3. Do-it-yourself maintenance

6

Mainten

ance an

d ca

re

Front turn signal lights

Turn  the  bulb  base  counter-
clockwise.

Remove the light bulb.

When installing, reverse the steps listed.

1

2

3

398

6-3. Do-it-yourself maintenance

Rear turn signal lights and rear side marker lights

Open  the  back  door  and
remove the cover.

To  prevent  damaging  the  vehi-
cle,  wrap  the  flathead  screw-
driver with a tape.

Remove  the  2  screws  and
pull  the  light  unit  toward  the
rear of the vehicle to remove
it.

Turn  the  bulb  base  counter-
clockwise.

Rear turn signal lights
Rear side marker lights

Remove the light bulb.

Rear turn signal lights
Rear side marker lights

When  installing  the  light  bulb,  install  by  conducting 

  and 

with the directions reversed.

1

2

3

4

5

3

4

399

6-3. Do-it-yourself maintenance

6

Mainten

ance an

d ca

re

Install the lamp assembly.

Align  the  guide  (

)  and  pins

(

) on the lamp assembly with

the mounting when installing it.

Install the 2 screws.

Install the cover.

6

7

8

400

6-3. Do-it-yourself maintenance

Back-up lights

Open  the  back  door  and
remove the cover.

To  prevent  damaging  the  vehi-
cle,  wrap  the  flathead  screw-
driver with a tape.

Turn  the  bulb  base  counter-
clockwise.

Remove the light bulb.

When installing, reverse the steps listed.

1

2

3

4


Content   ..  23  24  25  26   ..