Suzuki Grand Vitara JB416 / JB420 / JB419. Service manual - part 509
 

  Index      Suzuki     Suzuki Grand Vitara JB416 / JB420 / JB419 - service and repair manual 2007 year


Search            copyright infringement  


Content   ..  507  508  509  510   ..


Suzuki Grand Vitara JB416 / JB420 / JB419. Service manual - part 509


9I-1 Sun Roof / T-Top / Convertible Top: 

Body, Cab and Accessories

Sun Roof / T-Top / Convertible Top

General Description

Power Sliding (Sun) Roof System Description

S6JB0A9901001

The controller is included in the sliding roof motor unit.
The sliding roof functions are controlled with the sliding roof position data. Sliding roof position and sliding direction are 
detected by the controller referring to pulse signals from motor.
Initialization of the sliding roof position data is required in the following situation to reset anti-pinching function: battery 
cable or motor connector is disconnected since the sliding roof position data is deleted without power supply to the 
motor. Refer to “How to reactivate the system to prevent being pinched by the sunroof” in Sunroof section of Owner’s 
manual to initialize the sliding roof position data.

Diagnostic Information and Procedures

Power Sliding (Sun) Roof System Symptom Diagnosis

S6JB0A9904001

Repair Instructions

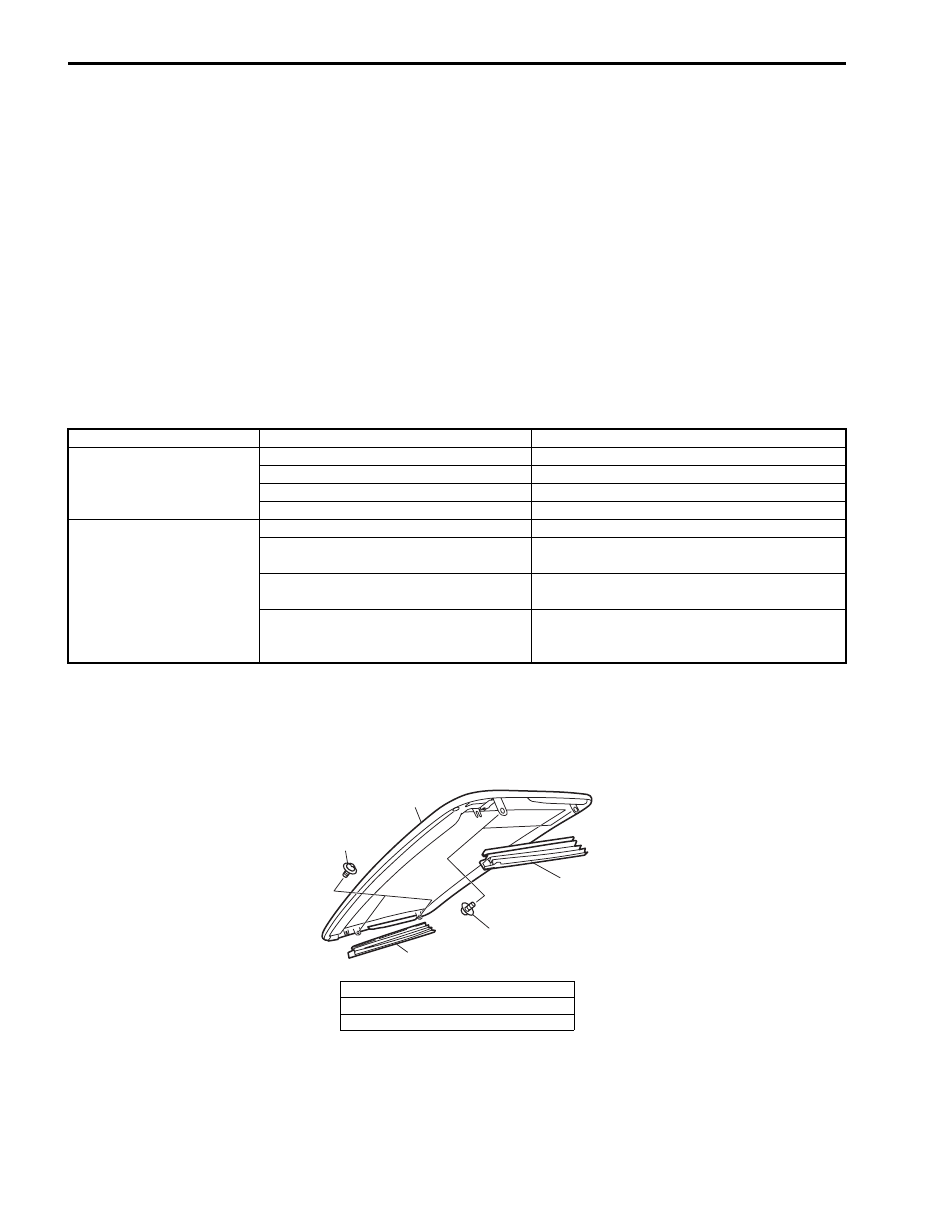
Sliding (Sun) Roof Glass Components

S6JB0A9906001

Condition

Possible cause

Correction / Reference Item

Sliding roof does not 
operate (sliding roof 
motor runs OK)

Foreign object stuck in sliding roof rail

Remove or clean stuck object.

Mis-installation of sliding roof rail

Install correctly.

Conflicts of sliding roof parts

Fix conflicts.

Mis-installation of sliding roof drive cable Install correctly.

Sliding roof does not 
operate (sliding roof 
motor does not run)

Circuit fuse blown

Replace fuse to check for short.

Sliding roof switch faulty

Check sliding roof switch referring to “Sliding 
(Sun) Roof Switch Inspection”.

Wiring or grounding faulty

Check circuit referring to “Sliding (Sun) Roof 
System Circuit and Motor Inspection”
.

Sliding roof motor faulty

Check sliding roof motor referring to “Sliding 
(Sun) Roof System Circuit and Motor 
Inspection”.

1. Sliding roof glass
2. Bolt
3. Sliding roof cover

1

2

3

2

3

I5JB0A990001-01

Sun Roof / T-Top / Convertible Top:  9I-2

Sliding (Sun) Roof Glass Removal and 
Installation

S6JB0A9906002

Removal

1) Open sunshade (1) fully and tilt up sliding roof.

2) Disconnect negative (–) cable at battery.
3) Remove sliding roof covers.
4) Remove sliding roof glass by removing bolts 

(TORX

® T25) (1).

Installation
For installation, reverse removal procedure, noting the 
following points.

1) Tighten glass fixing bolts temporarily.
2) Initialize sliding roof position data referring to 

Owner’s Manual.

3) Position sliding roof glass by closing sliding roof 

glass completely.

4) Tighten glass fixing bolts after sliding roof glass 

adjustment referring to “Sliding (Sun) Roof Glass 
Adjustment”.

Sliding (Sun) Roof Glass Adjustment

S6JB0A9906003

1) Loosen sliding roof glass fixing screws (at 4 

locations) and move sliding roof glass (1) up and 
down 2 to 3 times. In this way, sliding roof glass can 
be positioned in both vertical and horizontal 
directions by elasticity of sliding roof weather strip.

2) Position sunroof glass by such dimensions with 

respect to roof panel surface as specified below.

Sliding roof glass position (between glass roof 
and roof panel)
“a”: 0 mm (0.0 in.)

3) After installing all parts and adjusting properly, check 

sunroof for proper operation (open, close and up).

1

I5JB0A990002-01

1

I5JB0A990003-01

I5JB0A990004-01

9I-3 Sun Roof / T-Top / Convertible Top: 

Sliding (Sun) Roof Switch Inspection

S6JB0A9906004

Check switch for continuity between terminals as shown 
below.

Sliding (Sun) Roof Motor Removal and 
Installation

S6JB0A9906005

Removal

1) Remove spot lamp assembly from head lining.
2) Disconnect coupler (3) and remove sliding roof 

motor (1) by removing 2 bolts (2).

Installation
For installation, reverse removal procedure, noting the 
following points.
• Connect coupler to sliding roof motor securely.
• Initialize sliding roof position data referring to “How to 

reactivate the system to prevent being pinched by the 
sunroof” in Sunroof section of Owner’s manual.

Sliding (Sun) Roof System Circuit and Motor 
Inspection

S6JB0A9906006

1) Check that sliding roof switch is in good condition 

referring to “Sliding (Sun) Roof Switch Inspection”.

2) Connect connector to sliding roof switch.
3) Disconnect connector from sliding roof motor.
4) Measure voltage and resistance between each 

terminals of sliding roof motor connector (1).
If each voltage and/or resistance are within specified 
value, sliding roof system circuit is in good condition 
and proceed next step.
If each voltage and/or resistance are out of specified 
value, repair sliding roof system circuit.

Sliding roof system circuit specification with 
connector disconnected

SLIDE
OPEN

N

TILT
 UP

1

2

3

Switch

Terminal

1

2

3

I5JB0A990005-01

2

3

1

I5JB0A990006-01

Measurement 

terminal

Measurement 

condition

Reference value

5(+) – 7(–)

Ignition switch 
turned OFF and 
ON

10 – 14 V

8(+) – 7(–)

Ignition switch 
turned ON

10 – 14 V

9 – 7

Ignition switch 
turned OFF and 
sliding roof 
switch from OFF 
to “SLIDE 
OPEN”

Infinity

0 – 1 

10 – 7

Ignition switch 
turned OFF and 
sliding roof 
switch from OFF 
to “TILT UP”

Infinity

0 – 1 

7 – vehicle body 

ground

Ignition switch 
turned OFF

0 – 1 

[A]: Viewed from harness side

1

2

3

4

5

6

9

8

7

10

1

[A]

I5JB0A990007-01

Sun Roof / T-Top / Convertible Top:  9I-4

5) Connect connector to sliding roof motor (1).
6) Measure each voltage between terminals of sliding 

roof motor connector (2) with ignition switch ON.
If each voltage is out of specified value, replace 
sliding roof motor.

Sliding roof motor out put voltage

Sliding (Sun) Roof Assembly Components

S6JB0A9906007

Measurement 

terminal

Measurement 

condition

Reference value

9(+) – 7(–)

Sliding roof 
switch from OFF 
to “SLIDE 
OPEN”

10 – 14 V

 (OFF)

0 V

 (“SLIDE OPEN”)

10(+) – 7(–)

Sliding roof 
switch from OFF 
to “TILT UP”

10 – 14 V

 (OFF)

0 V

 (“TILT UP”)

[A]: Viewed from harness side

1

2

3

4

5

6

9

8

7

10

1

2

[A]

I5JB0A990008-01

1

2

2

8

9

10

12

13

14

5

4

3

14

13

12

8

9

7

10

6

11

11

I5JB0A990009-02

1. Sliding roof glass

6. Sunshade

11. No.1 peace

2. Sliding roof cover

7. Drip channel

12. Rail stopper

3. Sliding roof housing

8. Panel bracket

13. Housing cover

4. Sliding roof motor

9. Shoe

14. Guide block


Content   ..  507  508  509  510   ..