Suzuki Grand Vitara JB416 / JB420 / JB419. Service manual - part 501
 

  Index      Suzuki     Suzuki Grand Vitara JB416 / JB420 / JB419 - service and repair manual 2007 year


Search            copyright infringement  


Content   ..  499  500  501  502   ..


Suzuki Grand Vitara JB416 / JB420 / JB419. Service manual - part 501


9E-15 Glass / Windows / Mirrors: 

Front Door Window Regulator Removal and 
Installation

S6JB0A9506005

Removal

1) Remove door glass referring to “Front Door Glass 

Removal and Installation”.

2) Disconnect power window motor lead wire at 

coupler.

3) Remove regulator mounting screws (1), and then 

remove front door window regulator (2).

Installation
Reverse removal procedure noting the following 
instruction.

• Apply grease to sliding portions of window regulator.

:  Grease 99000–25011 (SUZUKI Super Grease A)

• Tighten front door window regulator attaching screws.

Front door window regulator screw tightening 
order
(a) 

 (c)  (b)

Front Door Window Regulator Inspection

S6JB0A9506006

Check the following parts for wear, damage, smooth 
operation and lubrication:
• Check regulator sliding and rotating parts.
• Check rollers.

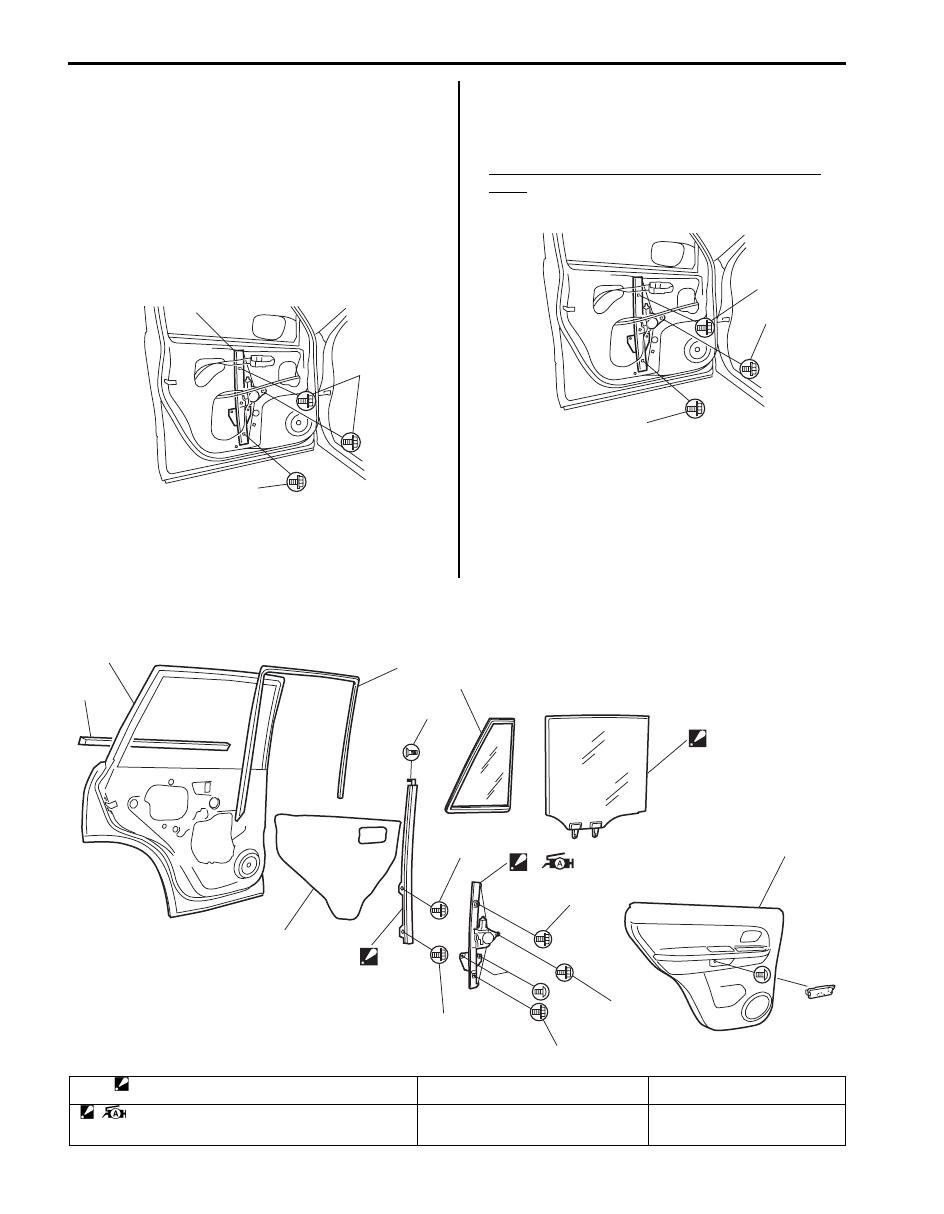
Rear Door Window Components

S6JB0A9506007

1

1

2

I5JB0A950016-01

(b)

(a)

(c)

I5JB0A950017-01

8

7

3

9

1

4

2

5

“a”

“b”

“3”

“c”

“1”

“2”

6

I5JB0A950018-01

1. Door glass

: Tightening order rear to front.

4. Door trim

7. Door panel

 2. Window regulator assembly

: Apply lithium grease 99000-25011 to sliding part.
: Tightening order “1” 

→ “2” → “3”.

5. Door sealing cover

 8. Rear door outer weather-strip

Glass / Windows / Mirrors:  9E-16

Rear Door Glass Removal and Installation

S6JB0A9506008

Removal

1) Remove door trim screw cover (1).
2) Remove door trim screw (2).

3) Remove door trim (1) as shown.

4) Remove door sealing cover (1).

5) Detach rear part of glass run from door sash (1), and 

remove door sash (1).

6) Remove door glass (2) as shown.

Installation
Reverse removal procedure noting the following 
instructions.
• If there is deformity for glass run, replace it with a new 

one.

• Tighten rear door window mounting screw (a) first and 

then (b).

3. Glass run

6. Door sash

: Tightening order “a” 

→ “b” → “c”.

9. Rear door partition glass.

2

1

I5JB0A950019-01

I5JB0A950020-01

1

I5JB0A950021-01

1

1

2

I5JB0A950022-01

(a)

(b)

I5JB0A950023-01

9E-17 Glass / Windows / Mirrors: 

• Tighten door sash mounting screw and bolts in order 

of (a), (b) and (c).

• Secure door sealing cover (1) with adhesive (2).

• Install rear door trim.

Rear door trim attaching order
(1) 

 (2)  (3)  (4)  (5)  (6)  (7)

Rear Door Window Regulator Removal and 
Installation

S6JB0A9506009

Removal

1) Remove door glass referring to “Rear Door Glass 

Removal and Installation”.

2) Disconnect power window motor lead wire at coupler 

and loosen clamp.

3) Loosen regulator mounting screws (1), and then 

remove rear window regulator (2).

Installation
Reverse removal procedure noting the following.
• Apply grease to sliding and rotating portions of 

window regulator.

:  Grease 99000–25011 (SUZUKI Super Grease A)

• Tighten rear door window regulator mounting screws 

in order of (a), (b) and (c).

• Tighten rear door window mounting screw (1) first and 

then (2).

Rear Door Window Regulator Inspection

S6JB0A9506010

Check the following point:
• Check regulator sliding and rotating parts.
• Check rollers for wear and damage.

1

1

2

(a)

(b)

(c)

I5JB0A950024-02

1

2

I5JB0A950025-01

1

2

3

4

5

6

7

I5JB0A950026-01

1

2

I5JB0A950027-01

“2”

(b)

(a)

(c)

“1”

I5JB0A950028-01

Glass / Windows / Mirrors:  9E-18

Rear End Door Window Components

S6JB0A9506011

Rear End Door Glass Removal and Installation

S6JB0A9506012

Refer to “Windshield Removal and Installation” as 
removal and installation procedures are basically the 
same. However, note the following.
• Observe the following precautions when applying 

adhesive (1) along glass (2) edge.

• Adhesive (1) should be applied evenly especially in 

height.

• Be careful not to damage primer (3).
• With the position of fastener (4) properly aligned, 

install glass (2) on rear end door panel (5).

• Press glass against body quickly after adhesive (1) is 

applied.

Adhesive amount specifications and position for 
rear end door glass
Width “a”: 7 mm (0.28 in.)
Height “b”: 14 mm (0.55 in.)
Width “c”: 16 mm (0.63 in.)
Position “d”: 15 mm (0.59 in.) for glass upper and 
bottom section
Position “e”: 8 mm (0.31 in.)

I5JB0A950029-01

1. Rear end door glass

2. Fastener

b

3

1

3

1

3

1

3

1

b

3

1

1

2

1

2

5

4

1

2

4

1

1

“a”

“a”

“c”

“d”

“c”

“a”

“e”

“b”

“b”

“c”

“a”

“e”

“c”

“d”

“b”

“e”

“c”

“a”

I5JB0A950030-01


Content   ..  499  500  501  502   ..