Renault Kangoo E-Tech (2023 year). Manual in english - page 1

C O N T E N T S
Sections
Getting to know your vehicle
1
Driving
2
Your comfort
3
Maintenance
4
Practical advice
5
Technical specifications
6
Alphabetical index
7
0.11
CarManuals2.co

Section 1: Getting to know your vehicle
Electric vehicle: presentation, important recommendations, charging, programming
1.2
Key, radio frequency remote control: general information, use, deadlocking
1.23
Card: general information, use, deadlocking
1.28
Opening and closing the doors
1.44
Locking, unlocking the opening elements
1.50
Automatic locking when driving
1.53
Headrests, front seats
1.54
Seat belts
1.64
Additional methods of restraint
1.70
in addition to the front seat belts
1.70
to the rear seat belts
1.76
side
1.77
Child safety: general information
1.79
choosing a child seat mounting
1.82
fitting a child seat, general information
1.85
Child seats: attachment by seat belt or by Isofix system. .
1.87
deactivating, activating the front passenger airbag.
1.110
Audible and visual signals
1.113
Driving position
1.114
Warning lights
1.118
Instrument panel
1.118
displays and indicators, trip computer
1.128
vehicle settings customisation menu
1.138
Clock and outdoor temperature
1.141
Steering wheel, Power-assisted steering
1.143
Rear view mirrors
1.145
Camera rear view
1.149
Exterior lighting and signals
1.153
Headlight beam adjustment
1.159
Washers, wipers
1.161
1.1
CarManuals2.co
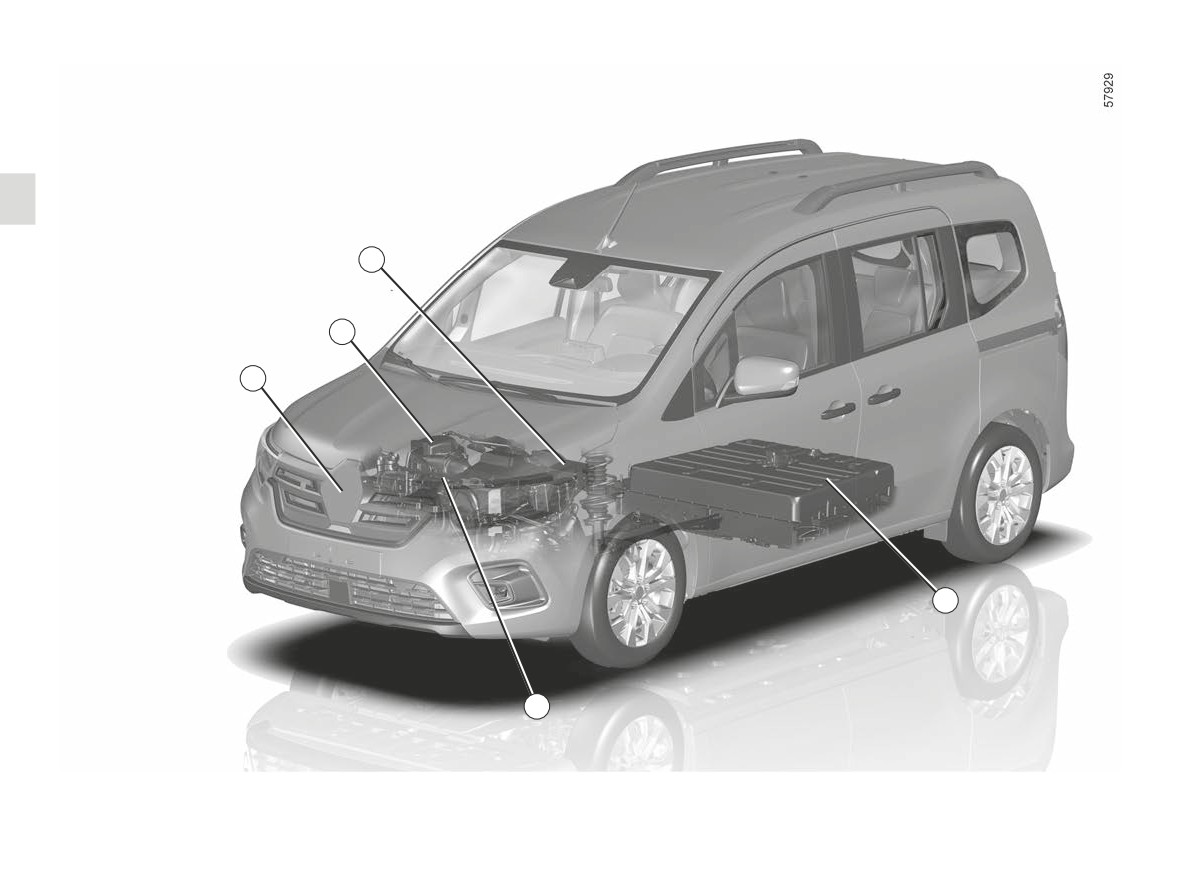
ELECTRIC VEHICLE: introduction (1/6)
3
2
1
4
1 Electric charging connection
2 Electric motor
5
3 Secondary 12V battery
4 400 V traction battery
5 Orange “400 V” electrical power cables
1.2
CarManuals2.co
ELECTRIC VEHICLE: introduction (2/6)
Electric vehicles have special features,
but operate in a similar manner to con-
6
7
ventional vehicles.
The main difference in electric vehicles
is the exclusive use of electric energy
instead of fuel, as used in convention
vehicles.
We therefore recommend that you read
these instructions describing your elec-
tric vehicle carefully.
8
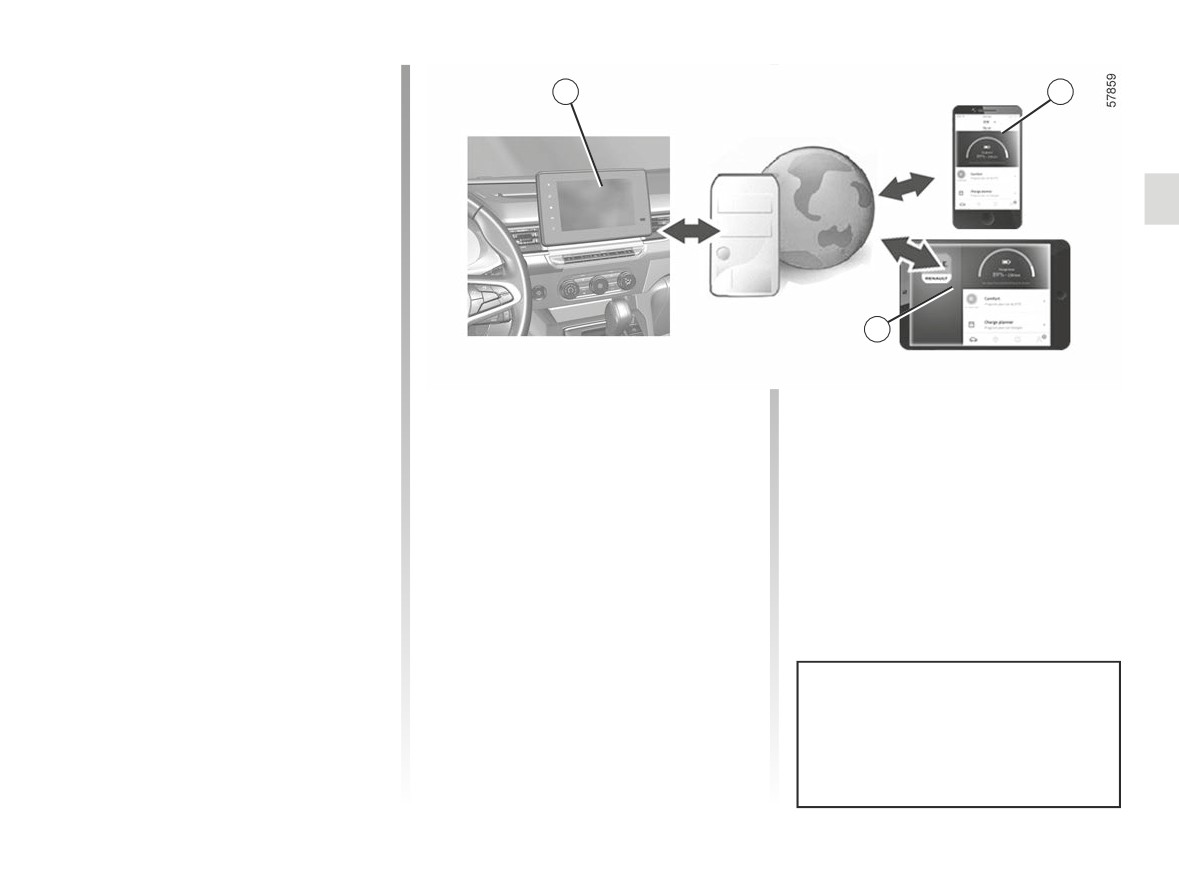
Connected services
You can access these services by:
(depending on the vehicle)
- external digital devices (mobile tele-
Your electric vehicle has connected
phones 7, tablets 8 etc.);
services that provide information and/
- the vehicle multimedia screen 6.
or control:
For more information, refer to the mul-
- your vehicle’s charging status with
timedia equipment instructions or con-
low battery warning;
tact an Approved Dealer.
- the traction battery charging pro-
gramming, based on certain choices
on offer;
- remaining vehicle range;
- ...
You can subscribe to a connected
service or extend it at any time by
consulting an authorised dealer.
1.3
CarManuals2.co

ELECTRIC VEHICLE: introduction (3/6)
Batteries
400 V traction battery
Secondary 12V battery
Your electric vehicle has two types of
This battery stores the energy neces-
The second battery on your vehicle is
battery:
sary to operate the motor in your elec-
a secondary 12 V battery: this supplies
tric vehicle properly. As with any bat-
the energy required to operate vehicle
- a 400V traction battery;
tery, it discharges after use, and must
equipment (lights, windscreen wipers,
- secondary 12 V battery.
be regularly recharged.
ABS, etc).
You do not have to wait until the traction
battery hits the reserve level in order to
recharge it.
Charging times vary depending on the
type of specific wall unit socket or public
terminal you connect to.
Your vehicle range will depend on the
charge level of the traction battery, and
also on your driving style ➥ 2.22.
1.4
CarManuals2.co
ELECTRIC VEHICLE: introduction (4/6)
A
9
The vehicle drive system
in an electric vehicle uses
a direct voltage of approxi-
mately 400 volts.
This system can get hot during
and after switching off the ignition.
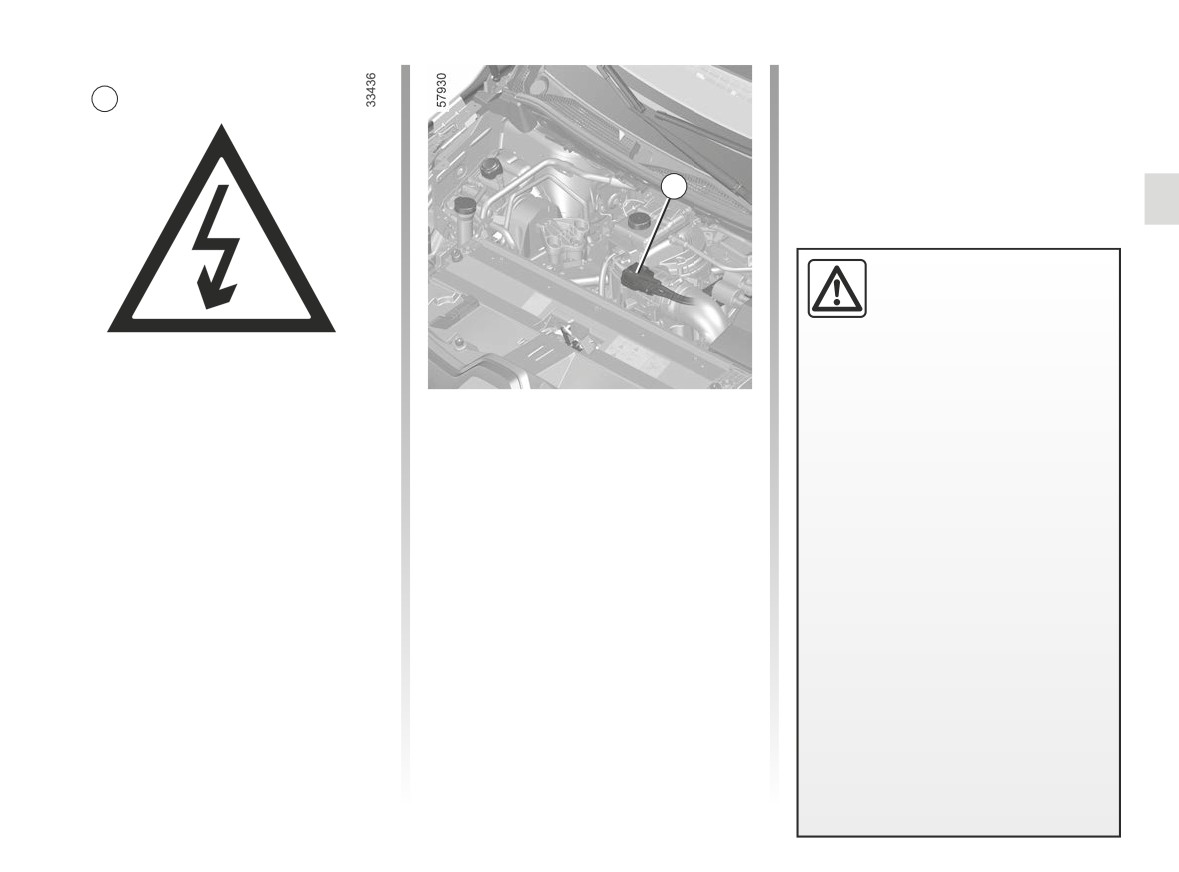
The A symbol denotes the electrical el-
“400 volt” electrical circuit
Respect warning messages given
ements of your vehicle which may pres-
on the labels in the vehicle.
The 400 V electrical circuit is denoted
ent health risks.
All interventions or modifications to
by orange cables 9 and parts bearing
the 400V electrical system (com-
the ṑ symbol.
ponents, cables, connectors, trac-
tion battery) are strictly prohibited
due to the risks they present to your
safety. Please contact an authorised
dealer.
The risk of serious burns or elec-
tric shocks can lead to death.
1.5
CarManuals2.co
ELECTRIC VEHICLE: introduction (5/6)
Driving
Bad weather, flooded roads:
As with a vehicle fitted with an auto-
10
Do not drive through floods
matic gearbox, you will have to get
if the depth of water is
used to not using your left foot, and not
above the lower edge of
using this foot to brake.
the wheel rims.
When driving, if you lift your foot off the
accelerator pedal or depress the brake
pedal, the motor generates electrical
current during deceleration, and this
energy is used to brake the vehicle and
recharge the traction battery ➥ 2.16.
Special feature:
Obstructions to the driver
After a maximum charge of the battery
On the driver’s side, only
and during the first few miles of using
use mats suitable for the
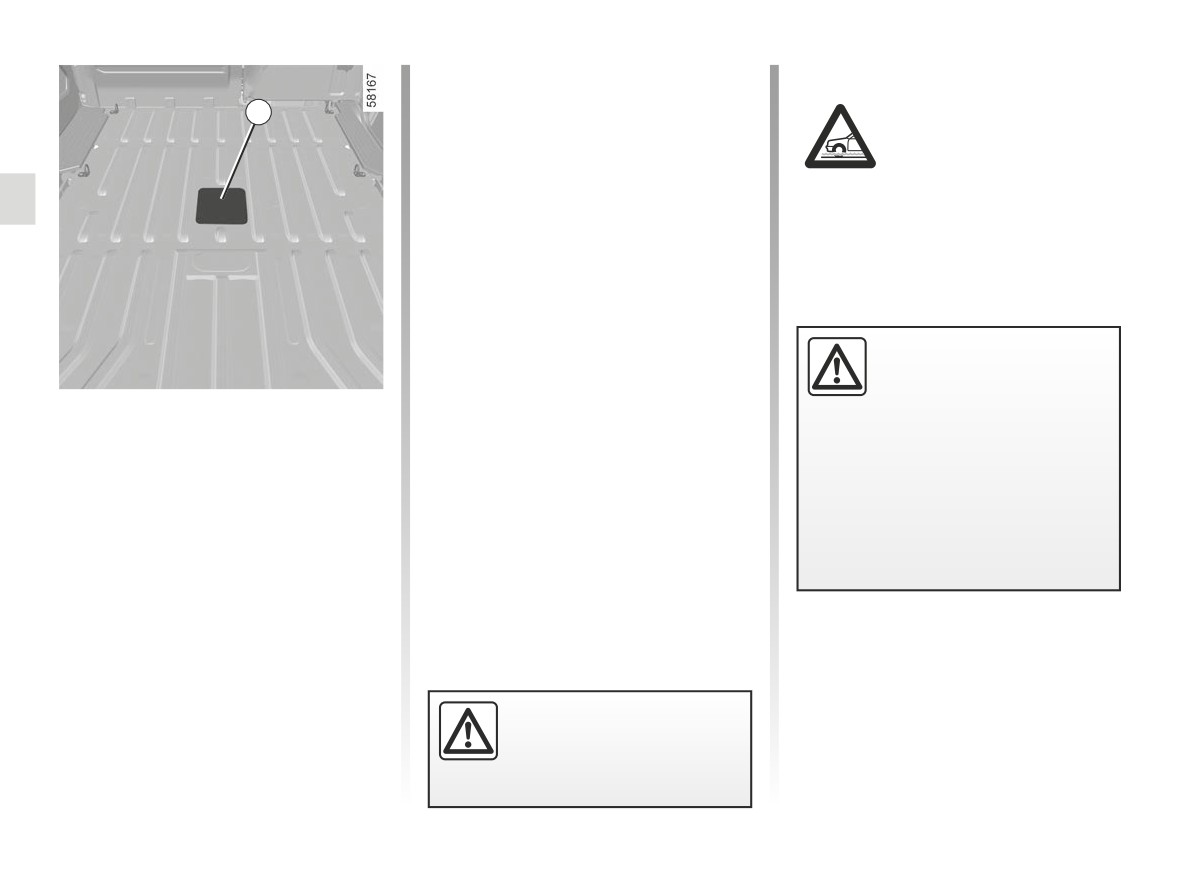
The access flap 10 is reserved exclu-
the vehicle, the engine brake will be
vehicle, attached with the
sively for approved dealers.
temporarily reduced. Please adapt your
pre-fitted components, and check
Do not open it and ensure that the
driving style appropriately.
the fitting regularly. Do not lay one
access flap 10 is always accessible.
mat on top of another.
There is a risk of wedging the
pedals.
The engine brake should
under no circumstances be
used as a substitute for the
brake pedal.
1.6
CarManuals2.co

ELECTRIC VEHICLE: introduction (6/6)
Noise
Pedestrian horn
Electric vehicles are particularly quiet.
The pedestrian horn enables you to
You will not yet necessarily be used to
warn others of your presence - espe-
it, and neither will other road users. It
cially pedestrians and cyclists.
is difficult for them to hear the vehicle
When the engine is started, the pedes-
when it is moving.
trian horn is activated automatically.
As the motor is silent, you will hear
The sound is triggered when the vehi-
noises that you are not used to hearing
cle speed is between about 1 and
(aerodynamic noises, tyre noise, etc.).
19 mph (1 and 30 km/h).
Each time the ignition is switched off,
In the event of a fault with the pedes-
the ventilation will be switched off after
trian horn, the message
“Failure
about ten seconds.
Outside sound” is displayed on the
instrument panel. Consult an approved
dealer.
Your electric vehicle is
silent. Before leaving it, with
your foot on the brake, stop
the engine.
RISK OF SERIOUS INJURY.
1.7
CarManuals2.co

IMPORTANT RECOMMENDATIONS
Please read these instructions carefully. Failure to follow these instructions may lead to a risk of fire, serious injury
or electric shock which may present a risk to life.
In the event of an accident or impact
In the event of an accident or an impact to the underside of the vehicle (e.g.: striking a post, raised kerb or other street furni-
ture), this may damage the electric circuit or the traction battery.
Have the vehicle checked by an authorised dealer.
Never touch the “400 volt” components or orange cables which are exposed and visible inside or outside the vehicle.
In the event of serious damage to the traction battery, leaks may occur:
- never touch the liquids (fluids, etc.) coming from the traction battery;
- in the event of contact with the body, wash the affected area with plenty of water and consult a doctor as soon as possible.
In the event of an impact, even slight, against the charging flap and/or valve, have them checked by an authorised dealer as
soon as possible.
In the event of fire
In the event of fire, make everyone evacuate the vehicle immediately and contact the emergency services, informing them that
this is an electric vehicle.
Only use extinguishing agents ABC or BC that are permitted for use with electrical fires. Do not use water or other extinguish-
ing agents.
In the event of damage to the electrical circuit, please call an authorised dealer.
All towing operations ➥ 5.39.
Washing the vehicle
Never wash the engine compartment, the charging connection or the traction battery with a high-pressure jet.
This risks damaging the electric circuit.
Never wash the vehicle while it is charging.
Never wash the charging lead while the vehicle is charging.
Never clean the charging lead while the lead is not connected, in order to prevent corrosion of the charging pins.
Risk of electric shock and a risk to life.
1.8
CarManuals2.co
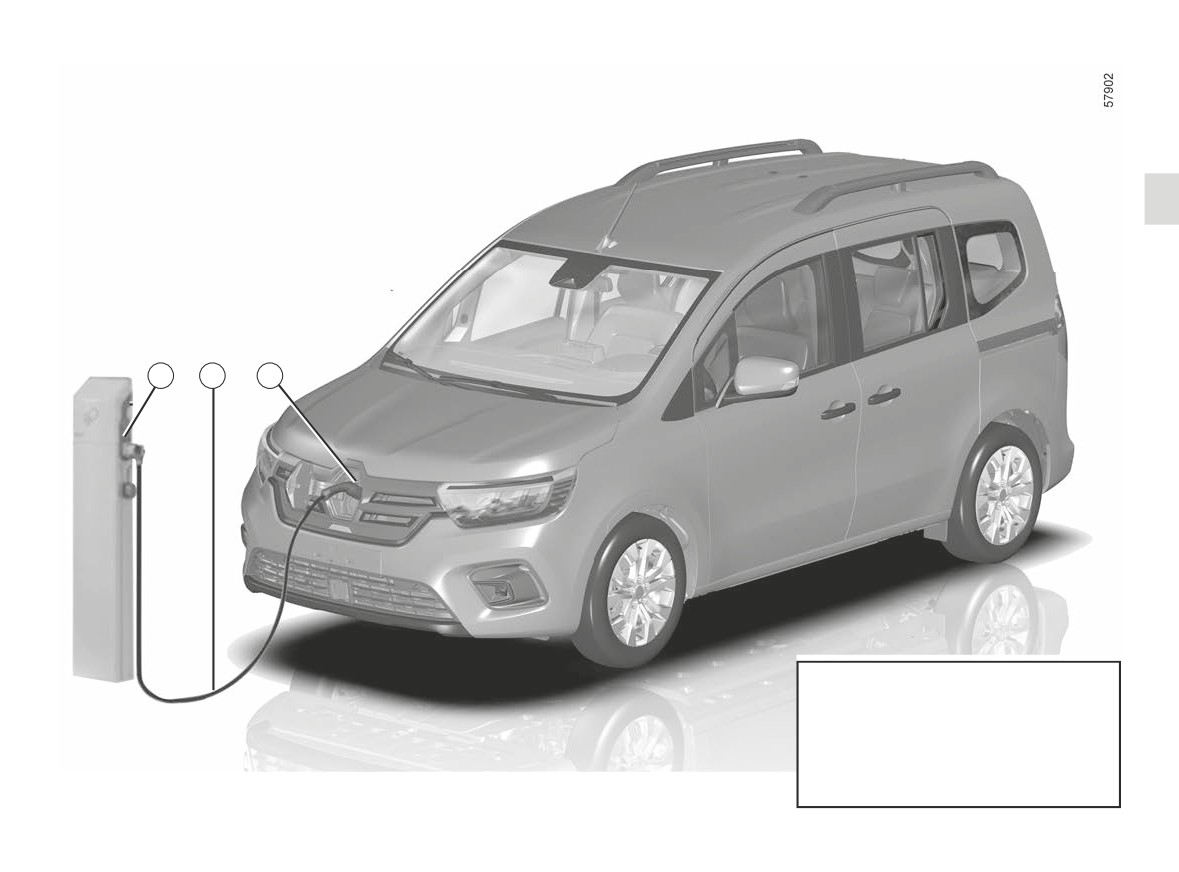
ELECTRIC VEHICLE: charging (1/12)
Charging schematic diagram
1 Specific wall socket or recharging ter-
minal
2 Charging cord
3 Electric charging connection
1
2
3
If you have any questions regarding
the equipment needed for charging,
please ask an authorised dealer.
1.9
CarManuals2.co

ELECTRIC VEHICLE: charging (2/12)
Important recommendations for charging your vehicle
Please read these instructions carefully. Failure to follow these instructions may lead to a risk of fire, serious injury
or electric shocks which could result in death.
Charging
Do not do anything to the vehicle during charging (washing, working in the engine compartment, etc.).
In the event of the presence of water, signs of corrosion or foreign bodies in the charging cord connector or in the vehicle charg-
ing socket, do not charge the vehicle. Fire hazard.
Do not attempt to touch the cord contacts, the domestic socket or the vehicle charging socket, or introduce objects into them.
Never plug the charging cord into an adapter, multiple socket or extension lead.
The use of generators is prohibited.
Do not remove or change the vehicle charging socket or the charging cord. Fire hazard.
Do not modify or perform any action on the installation during charging.
In the event of an impact, even slight, against the charging socket or valve, have them checked by an authorised dealer as
soon as possible.
Take care of the cord: do not tread on it, immerse it in water or pull on it or let anything knock against it.
Check regularly that the charging lead is in good condition.
In the event of damage to the charging lead (corrosion, browning, cuts, etc.), to the unit or to the vehicle's electrical charging
socket, do not use them. Please see an authorised dealer to replace them.
In the event of non-activation of the charging flap locking mechanism and/or unlocking of the vehicle's electric charging socket,
please contact an approved dealer.
1.10
CarManuals2.co
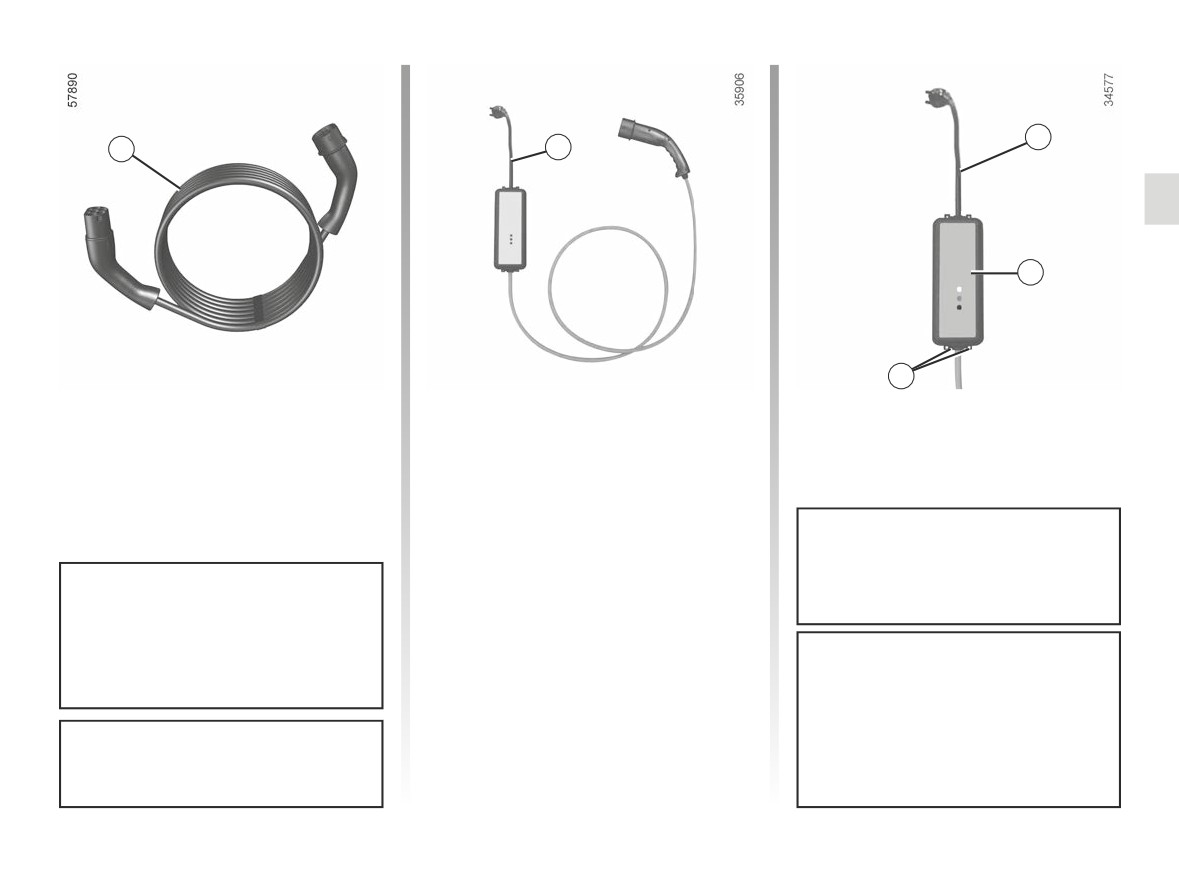
ELECTRIC VEHICLE: charging (3/12)
B
A
B
D
C
Charging cord A
Charging cord B
Always read the charging cord instruc-
tions carefully before using it B.
This lead is specific to your vehicle and
This cord allows:
designed for connecting to wall sockets
- standard charge, on a socket used
or public terminals to enable standard
only for the vehicle (16 A charge);
charging of the traction battery.
- occasional charging using a domes-
tic socket (8 A, 10 A charging), for
Never leave the socket hanging by
example when you are not at home.
the cord. Use the hooks C to attach
Sockets must be fitted as stated in the
it.
We recommend that you use a
instructions in the instructions supplied
charging cord that enables a stand-
with the charging cord B.
ard charge to charge the traction
battery.
If a charging cord malfunctions
during the charging process (red
warning light on the unit D), stop
Each charging lead is stored in the
charging immediately. Please refer
luggage compartment of the vehicle
to the cord instructions.
➥ 3.41.
1.11
CarManuals2.co

ELECTRIC VEHICLE: charging (4/12)
Important recommendations for charging your vehicle
Please read these instructions carefully. Failure to follow these instructions may lead to a risk of fire, serious injury
or electric shocks which could result in death.
Choice of charging cord
The standard charging cords supplied with the vehicle have been designed specifically for this vehicle. It is designed to protect
you against the risks of electric shock that can lead to death or fire.
Do not use with the charging leads of previous vehicles as they are not adapted. For safety reasons, the use of a charging cord
not recommended by the manufacturer is strictly forbidden. Failure to follow this instruction can lead to risks of fire or elec-
tric shock that can prove fatal. For information on a charging cord suited to your vehicle, please consult an authorised dealer.
Using the charging lead B
Please read the instructions that come with the charging cord carefully to learn about precautions you must take when using
the product and the technical specifications required when fitting the socket.
Installation
Power supply systems
Only use charging terminals which conform to the IEC 61851-1 standard and connecting points protected by:
- a type A 30 mA residual differential current system specific to the socket used;
- an overcurrent protection device;
- protection against overvoltage relating to lightning in exposed areas (IEC 62305-4).
Wall socket
Have a special wall socket installed by a qualified professional.
In the case of domestic charging
Have a qualified professional check that each socket to which you will connect the charging cord complies with the standards
and regulations in force in your country and that it complies with the specifications described previously in the information on
“Power supply systems”.
1.12
CarManuals2.co
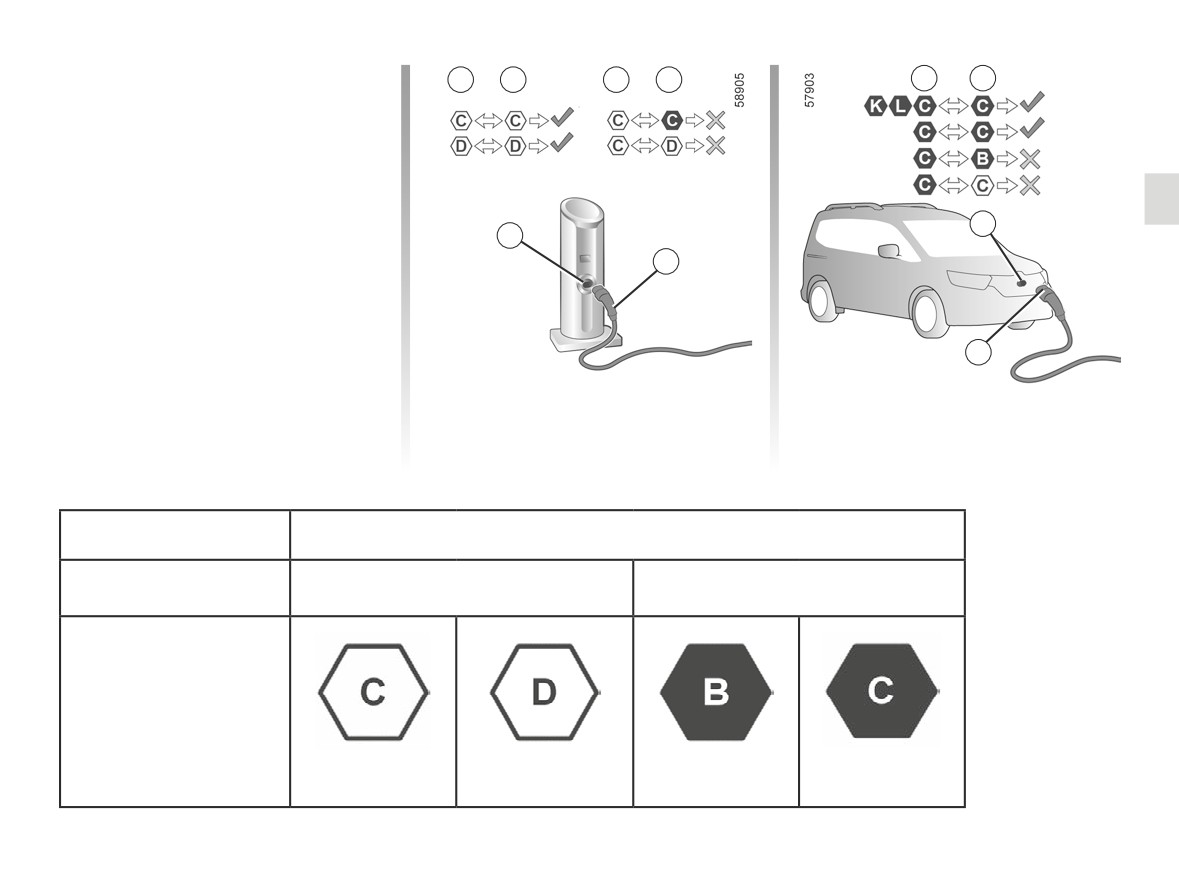
ELECTRIC VEHICLE: charging (5/12)
Charging types that conform
4
5
4
5
3
6
to European standards
Alternating current (AC)
If the information is displayed on the
vehicle charging flap, follow the instruc-
tions below.
Before plugging in a charging lead,
3
4
check that:
- the colour and one of the letters of
5
the inlet socket 4 correspond to the
colour and one of the letters on the
end 5 of the lead;
- the colour and one of the letters of
6
the inlet socket 3 correspond to the
colour and one of the letters on the
end 6 of the lead.
Charging type
Alternating current (AC)
Connection
Charging terminal 4/Charging lead 5
Vehicle 3/Charging lead 6
Charging types that con-
form to European stand-
ards (for all other cases,
please consult an ap-
proved dealer).
1.13
CarManuals2.co
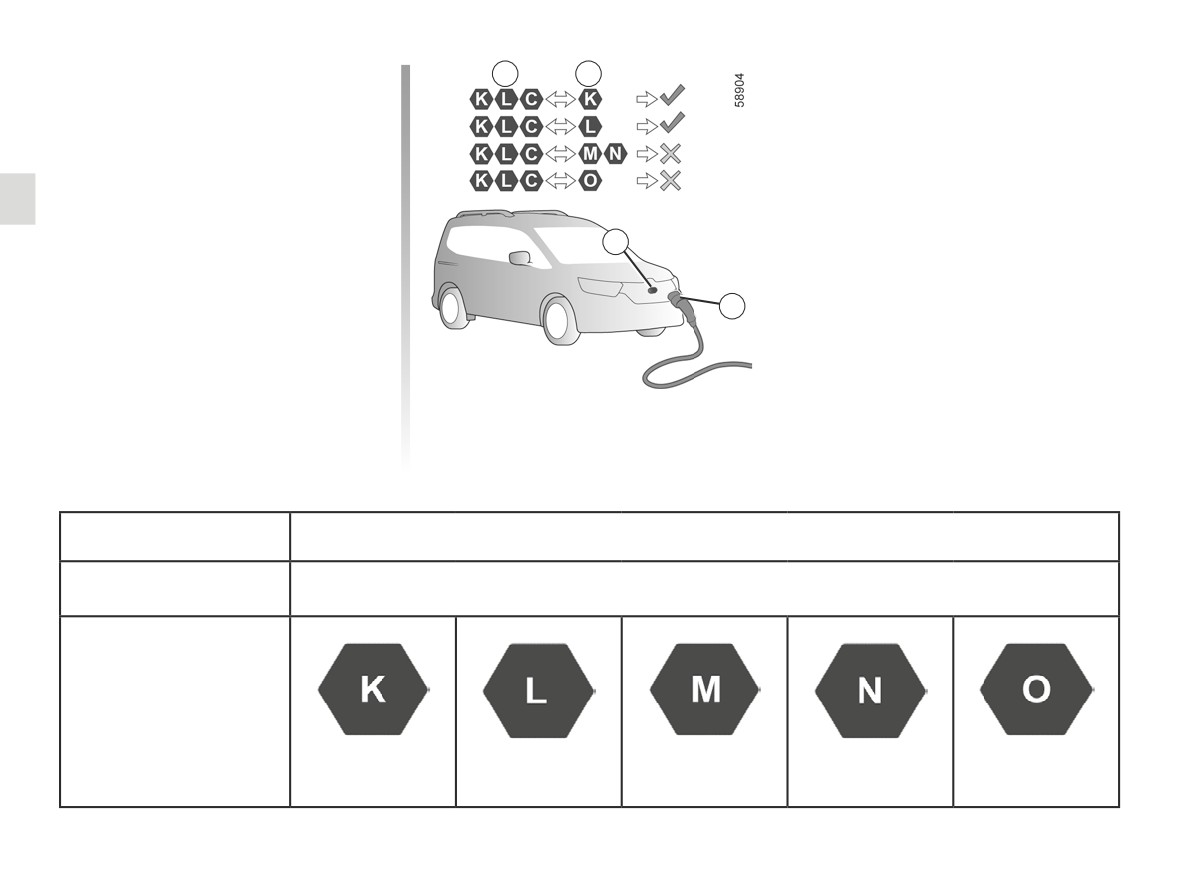
ELECTRIC VEHICLE: charging (6/12)
Charging types that conform
3
6
to European standards
(continued)
Direct current (DC)
If the information is displayed on the
vehicle charging flap, follow the instruc-
tions below.
Before plugging in a charging lead,
3
make sure that the colour and one of
the letters of the inlet socket 3 corre-
spond to the colour and one of the let-
6
ters on the end 6 of the charging lead.
Charging type
Direct current (DC)
Connection
Vehicle 3/Charging lead 6
Charging types that con-
form to European stand-
ards (for all other cases,
please consult an ap-
proved dealer).
1.14
CarManuals2.co
ELECTRIC VEHICLE: charging (7/12)
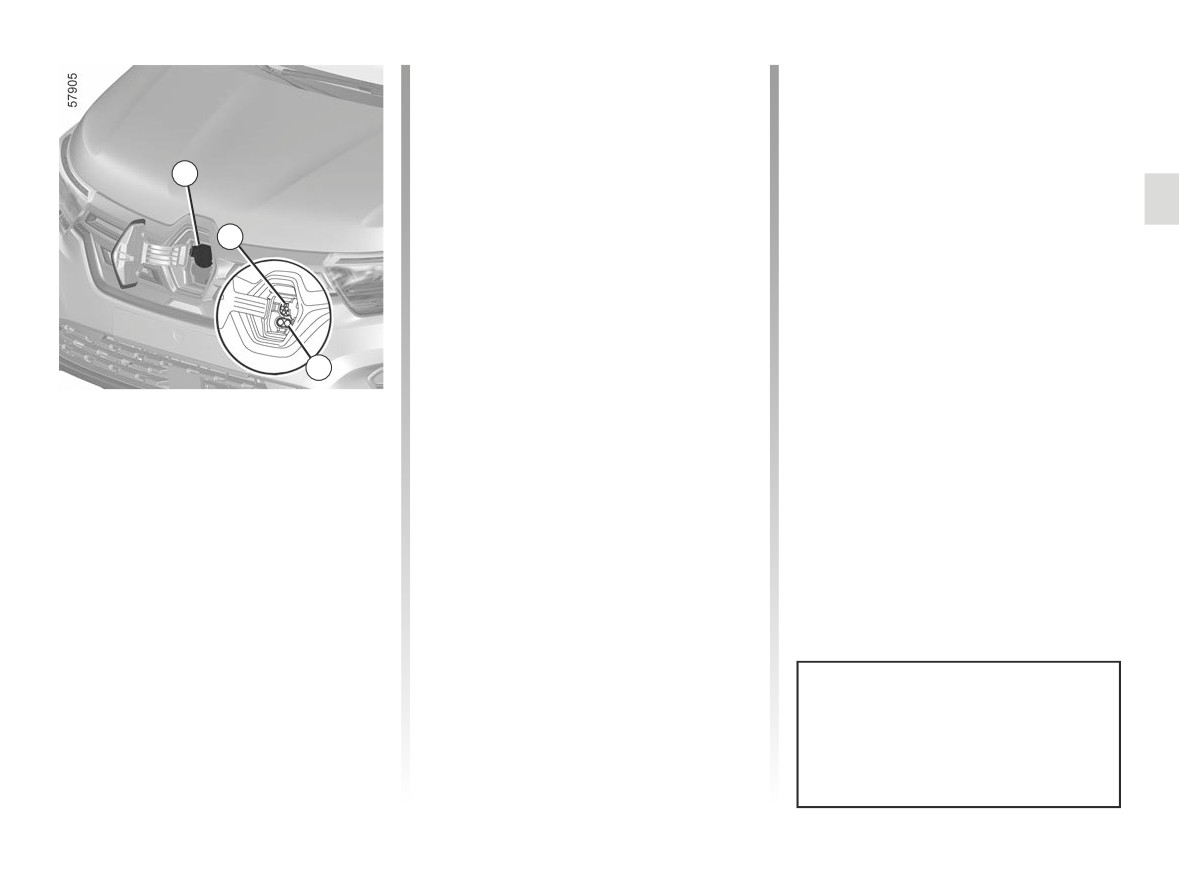
The vehicle is equipped with two charg-
If the vehicle is parked for more than
ing connections located at the front of
three months with near zero charge, it
the vehicle (depending on the vehicle):
may become impossible to charge the
battery.
- E socket for charging up to 22 kW;
To preserve the service life of your trac-
3
- F socket for direct current charging.
tion battery, avoid parking the vehi-
Note: on vehicles fitted with an 11 kW
cle for more than one month with high
charger, connecting the charging cable
charge, especially when the weather is
E
to the E socket and to a 22 kW recharg-
very hot.
ing terminal will enable the vehicle to be
Favour charging the traction battery
charged at a maximum of 11 kW.
after driving and/or in mild tempera-
tures. Otherwise, charging may take a
Precautions
longer period of time or even become
Avoid charging and parking your ve-
impossible.
F
hicle in extreme temperatures (hot or
Recommendations
cold).
Electric charging
- In high temperatures, try to park and
Under extreme conditions, charging
connection 3
recharge the vehicle in a shaded/
may take several minutes before start-
covered location;
Note: If in a snowy
environment,
ing (time required for the traction bat-
- charging can be performed in the
remove snow from the vehicle charging
tery to cool down or warm up).
rain or snow;
area before plugging in or disconnect-
When the vehicle is parked for more
- activating the air-conditioning in-
ing. Snow in the socket may block the
than seven days in temperatures below
creases the charging time required.
insertion of the charging cord plug.
about -25°C, charging the traction bat-
tery can become impossible.
In the absence of any protection
against overvoltage, you are recom-
mended not to charge the vehicle in
stormy weather (lightning, etc).
1.15
CarManuals2.co
ELECTRIC VEHICLE: charging (8/12)
The charging cord is automatically
locked with the vehicle. This will make it
impossible to unplug the cord from your
vehicle.
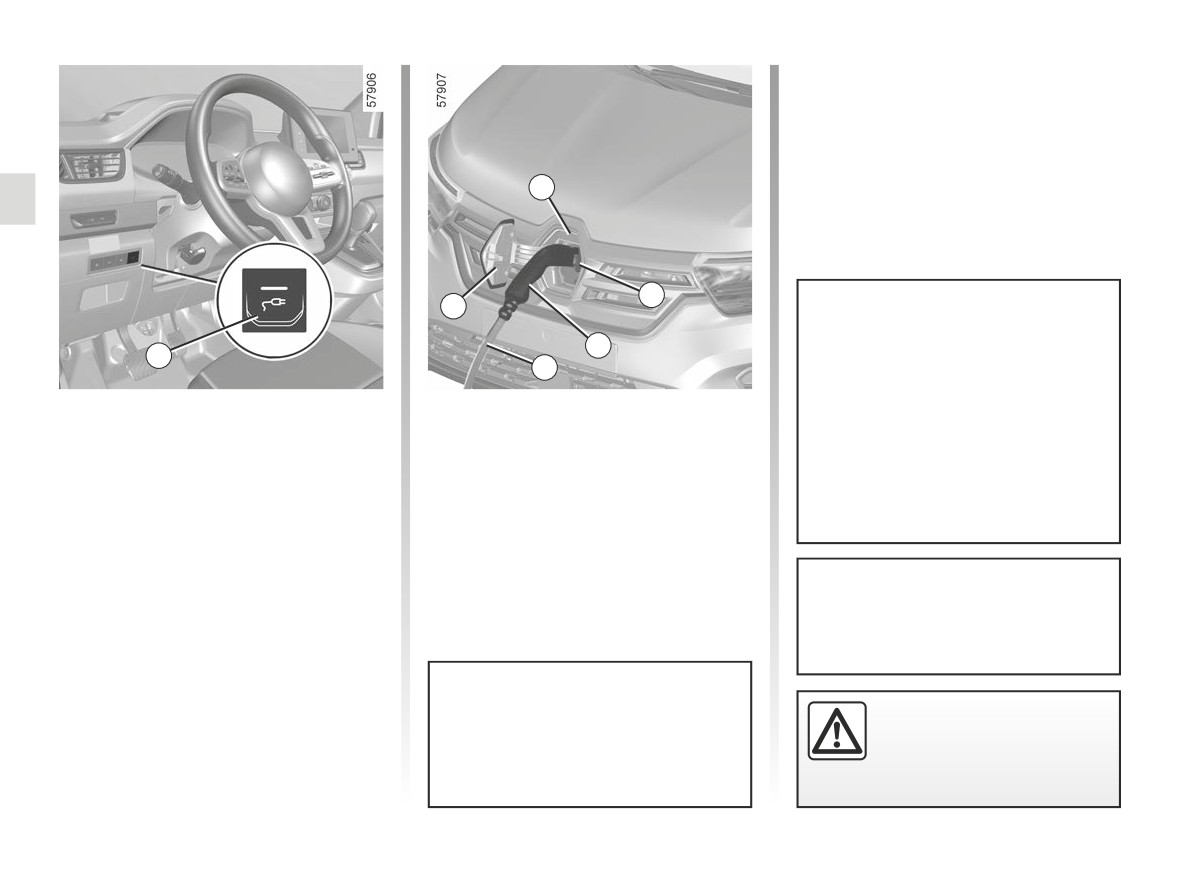
During charging, the warning light 7
7
flashes in blue.
8
10
For direct current charging (DC),
9
6
the length of the charging cable be-
2
tween your vehicle and the charg-
ing terminal must not exceed
Recharging the traction
-
grab the handle 9;
30 metres.
battery
–
plug in the vehicle cord. The warning
If there is any doubt about the length
light 7 flashes in yellow;
Vehicle stationary, ignition off:
of the cable, consult the owner of
-
after you hear a locking click, check
the DC charging terminal.
- take the charging cord located in the
that the charging cord is properly
boot of your vehicle;
plugged in. To check the locking, pull
- press the switch 6 or, depending on
gently on the handle 9.
the vehicle, press the electric charg-
ing socket unlocking button on the
card ➥ 1.28, to unlock the charging
Make sure you fully uncoil the charg-
flap 10;
ing cord to limit its heating.
- open valve 8;
- plug in the end of the cord to the
power supply;
Do not use the charging flap 10 to
Do not use an extension
suspend the charging cord 2 while
lead, multiple socket or
recharging the vehicle.
adapter.
Fire hazard.
1.16
CarManuals2.co
ELECTRIC VEHICLE: charging (9/12)
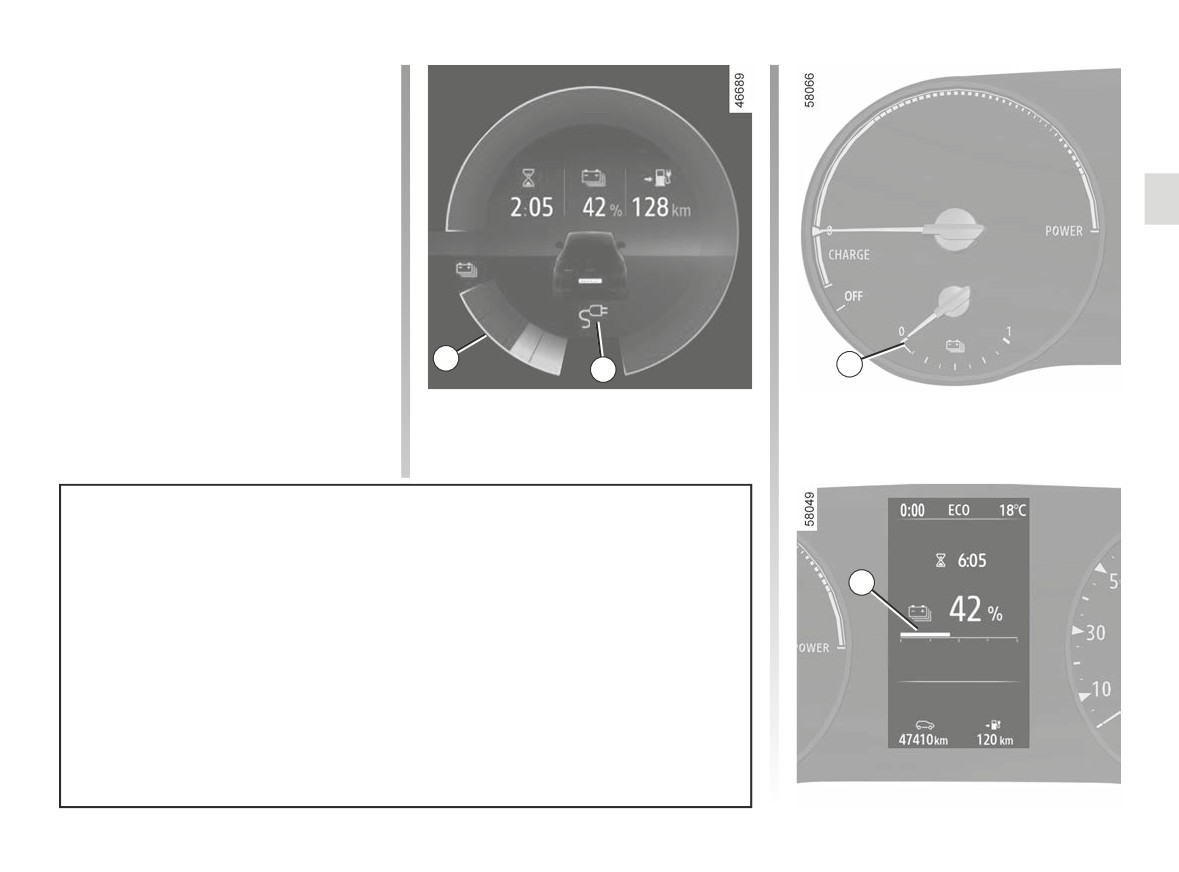
When charging starts, the following
information is displayed on the instru-
ment panel:
- the energy level on the battery warn-
ing light 11;
- the battery refill rate;
- an estimate of the remaining charg-
ing time (this is not displayed after
about 95% charge);
- depending on the vehicle, the warn-
ing light 12 indicates that the vehicle
is connected to a power supply;
- your vehicle range will vary accord-
ing to the charge level.
11
12
11
The traction battery charging time depends on the amount of energy remaining
and the power delivered by the charging terminal. The information is displayed on
the instrument panel during charging ➥ 1.122.
11
Note: under certain conditions, the actual charging time may be longer than the
charging time displayed on the instrument panel. This depends on:
- the quality of the electrical network;
- the initial charge level;
- the exterior temperature is too cold;
- ...
In the event of a problem with the charging cable, we recommend that you re-
place it with a cable that is identical to the original. Consult an approved dealer.
1.17
CarManuals2.co
ELECTRIC VEHICLE: charging (10/12)
Operating faults
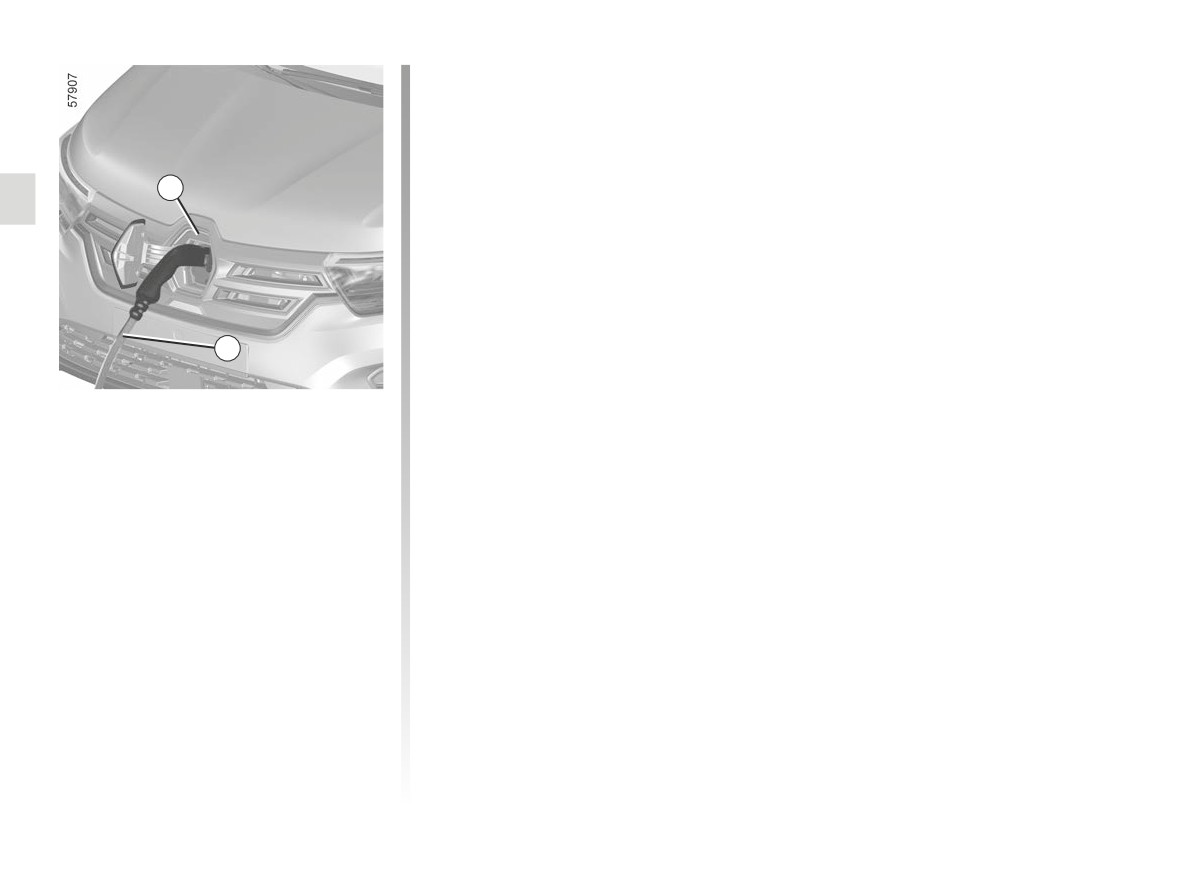
When the warning light 7 flashes in red:
- disconnect the cable
2 from the
socket 3 and from the power supply
according to the procedure de-
7
scribed on the following page;
- re-connect the cable 2 to the same
supply source or to one nearby.
If the 7 warning light continues to flash
in red, contact an approved dealer.
2
The display on the instrument panel
disappears after a few seconds. It re-
appears when the doors are unlocked.
Once charging is complete, the warning
light 7 appears continuously in green.
You do not need to wait until the charge
is at reserve levels to recharge your ve-
hicle.
1.18
CarManuals2.co
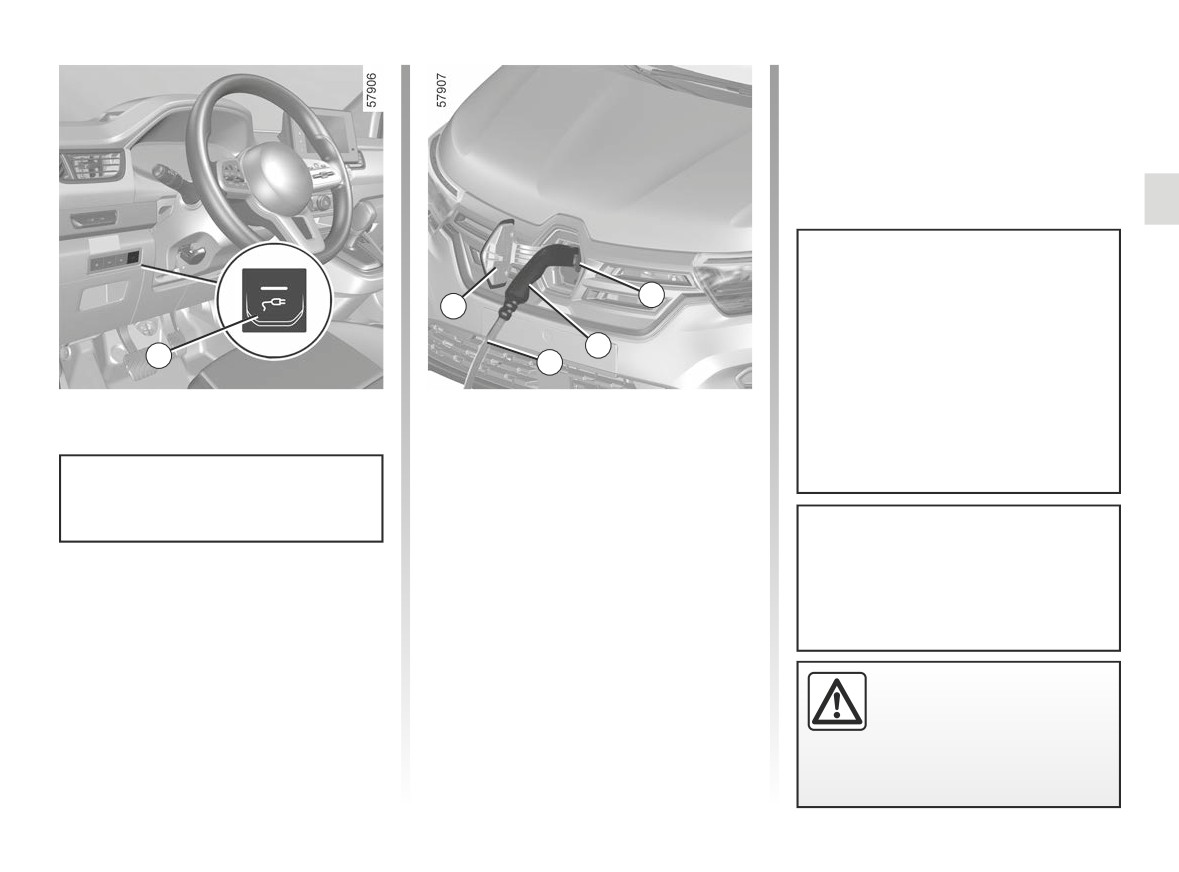
ELECTRIC VEHICLE: charging (11/12)
Note: immediately after a long charge
of the traction battery, the cable may be
hot. Please use the handles.
In the event of an unexpected
8
10
charging interruption (charging fault,
faulty recharging terminal, etc.), dis-
9
connect the cable 2 and ensure that
6
2
the charging flap is properly closed
and locked 10 before attempting to
Precautions to take when removing
-
unplug the charging lead 2 from the
recharge or before starting the ve-
from the socket
vehicle;
hicle.
-
the valve 8 must be closed;
It is imperative to follow the unplug-
-
you must close the 10 charging flap
ging steps in order.
and press on it in order to lock it;
-
unplug the lead 2 from the power
- Press the switch 6 or, depending on
supply 1;
After pressing the charging cord un-
the vehicle, press the electric charg-
locking button, you have 30 seconds
-
store the cable 2 in the luggage com-
ing socket unlocking button on the
to unplug it before it locks again.
partment.
card ➥ 1.28, to unlock the charging
flap and release the charging cable 2
from the vehicle;
To avoid disturbing the
– grab the handle 9;
charging
monitoring
system, do not install any
antistatic strip to the vehi-
cle.
1.19
CarManuals2.co
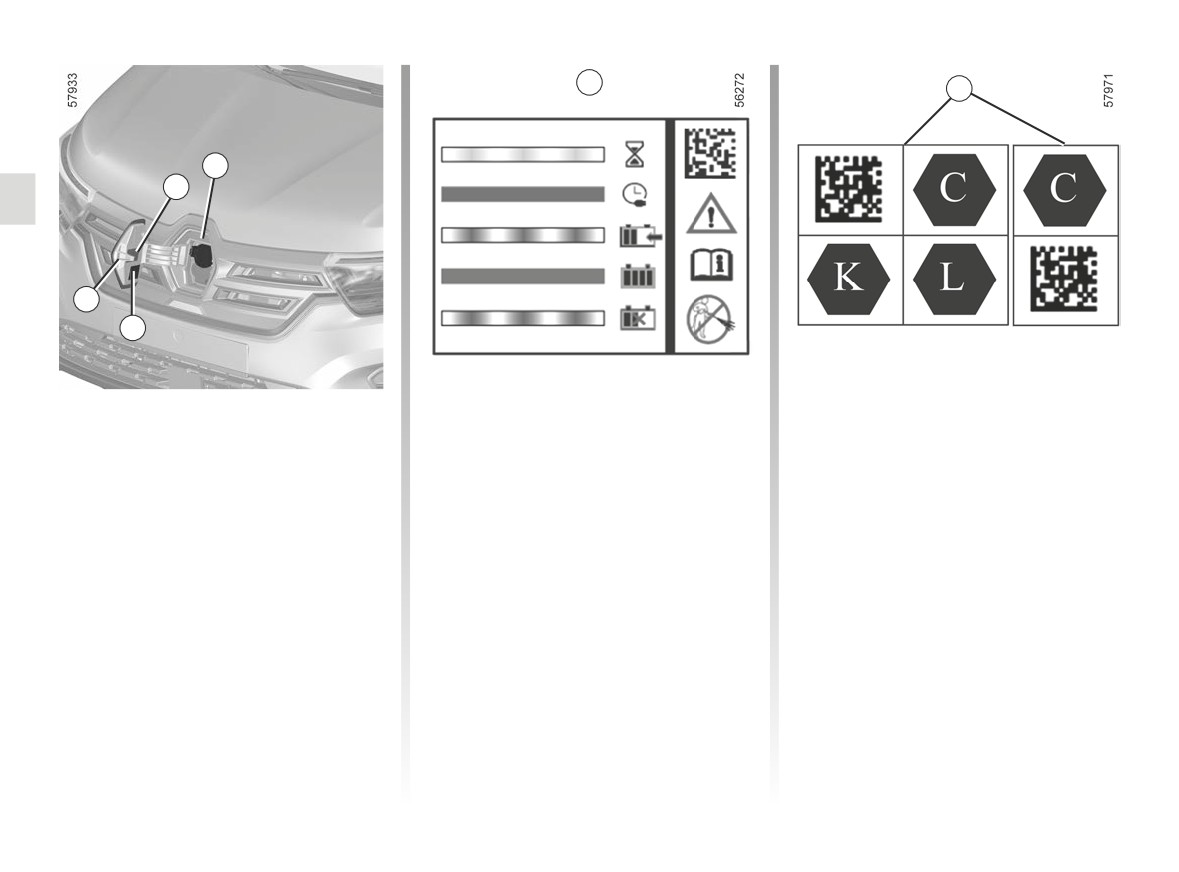
ELECTRIC VEHICLE: charging (12/12)
13
14
7
14
10
13
Label 13
The label 13 located on the right-hand
- connect to a domestic socket, an al-
side reminds you of the following in-
ternating current charging terminal
The label 13 located on the charg-
structions:
or a direct current charging terminal;
ing flap 10 displays details on how the
- do not wash the charging flap using
- for any information on charging,
charging operation is indicated by the
a high-pressure water jet;
please consult your vehicle user
status of the warning light 7:
- with the vehicle stationary, the valve
manual.
- flash in yellow: the lead is plugged
and the charging flap can be open;
into the vehicle and the system car-
- when the vehicle is being driven, the
ries out its checks;
Label 14
valve and the charging flap must be
- flashing in blue: charging is in pro-
closed;
Depending on the vehicle, one of
gress;
- open the flap to connect the charging
the 14 labels is located on the charg-
- illuminated continuously in blue:
lead;
ing flap 10.
charge programming is activated;
- close the flap again once discon-
- illuminated continuously in green:
nected;
the vehicle is fully charged;
- flashing in red: operating fault.
1.20
CarManuals2.co
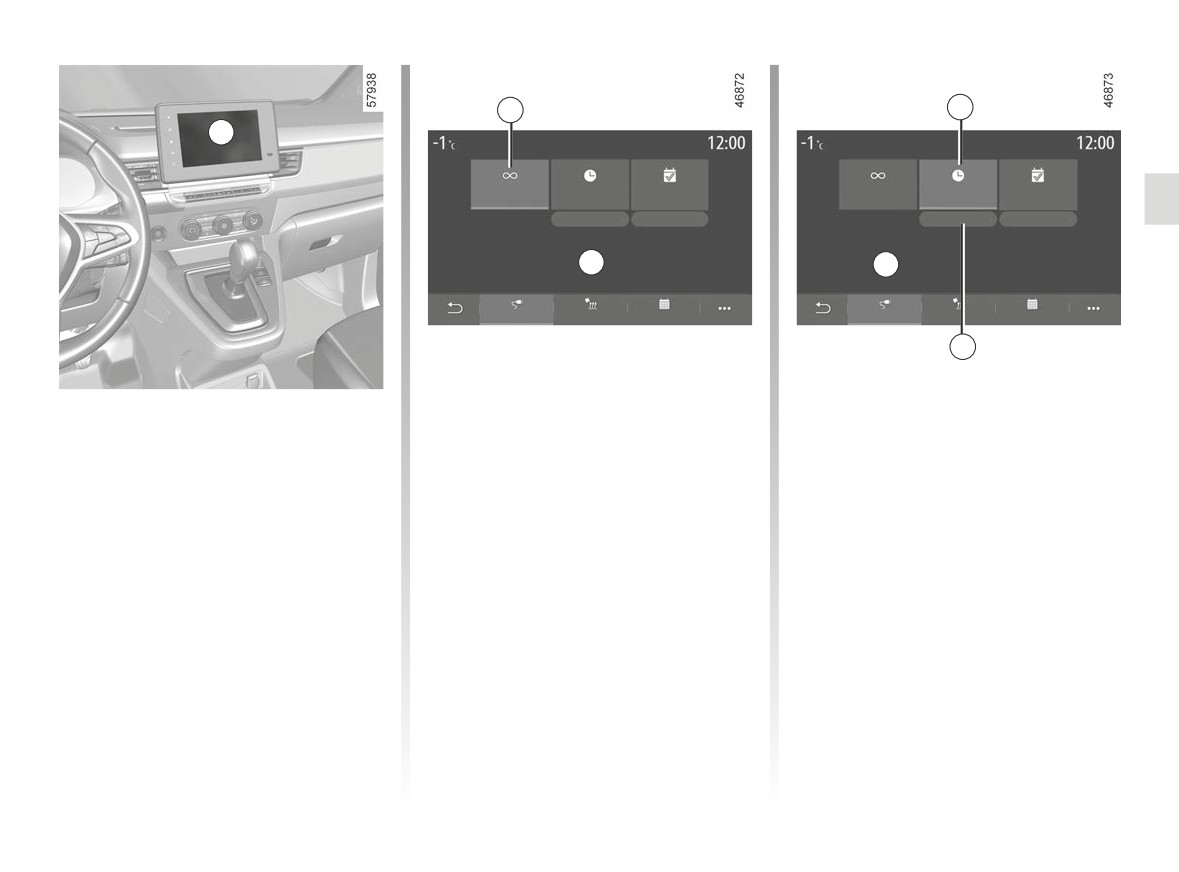
ELECTRIC VEHICLE: programming charging (1/2)
2
3
1
Program
Program
Immediate
Postponed
Program
Immediate
Postponed
Program
charge
charging
charge
charging
Edit
Edit
Edit
Edit
Charging will begin when the vehicle is plugged in
Charging will start at
12:34
A
B
Charge
Climate
Calendar
Charge
Climate
Calendar
4
Charging programming
“Immediate charging” 2
“Postponed charging” 3
With the vehicle stationary and the
With the vehicle connected to a power
You can programme the start time for
engine on, from the “Settings” menu
supply, charging starts.
charging.
on the multimedia screen 1, select the
Area A informs you that “Immediate
Press “Edit” 4 to open the settings to
Vehicle” tab. Use the “EV program-
charging” is activated.
set the start time for charging.
ming” menu to configure charging for
Please refer to the multimedia instruc-
Set the start time for charging then
your vehicle.
tions for further information.
press “Save” to confirm.
When the programming is confirmed,
Area B shows the time programmed for
the indicator light
lights up on
charging to start.
the instrument panel.
With the vehicle connected to a power
Note: charging will start if the engine is
source and the engine switched off,
shut down and the vehicle is connected
charging starts at the scheduled time.
to a power supply and access is author-
ised.
1.21
CarManuals2.co
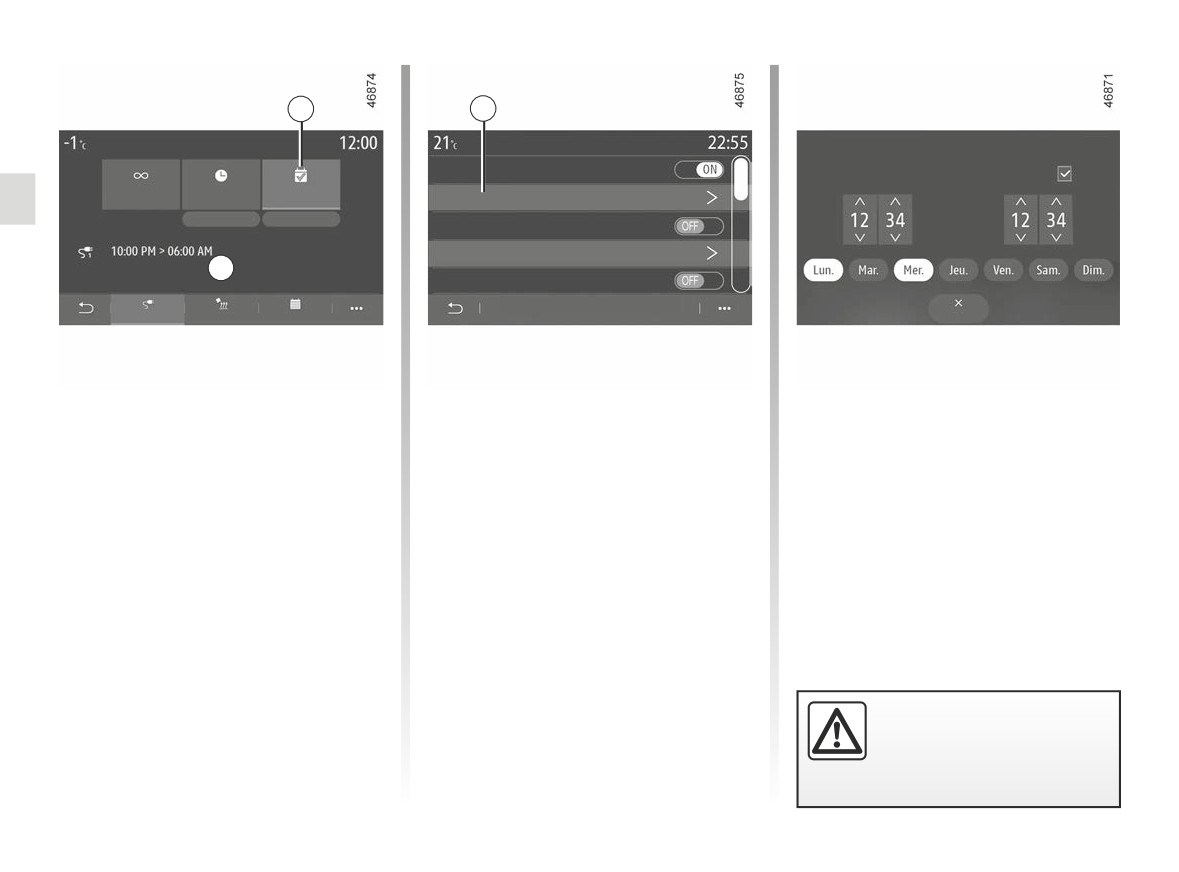
ELECTRIC VEHICLE: programming charging (2/2)
5
6
EV programming
Program
Charging programming
Charging programme 1
Start at
End at
Immediate
Postponed
Program
12:34 PM -> 12:24 AM
L M M J V S D
charge
charging
Edit
Edit
Charging programme 2
L M M J V S D
10:00 PM -> 06:00 AM
L M M J V S D
C
Charging programme 3
Charge
Climate
Calendar
Close
“Program” 5
Set the charging start and end times as
Programmed times are displayed in
well as the days to which these times
area C.
You can save several programmed
will apply. Press “Save” to confirm.
charging times per week.
With the vehicle connected to a power
Note: if the start and end times are
source and the engine switched off,
Select the programme time 6 that you
identical, charging time is 24 hours. You
charging starts at the scheduled time.
wish to change to access the settings.
can’t confirm a charging programme if
You can disable one of your saved pro-
you don’t select a day of the week.
grammes by pressing “OFF".
For safety reasons, carry
out these operations when
the vehicle is stationary.
1.22
CarManuals2.co
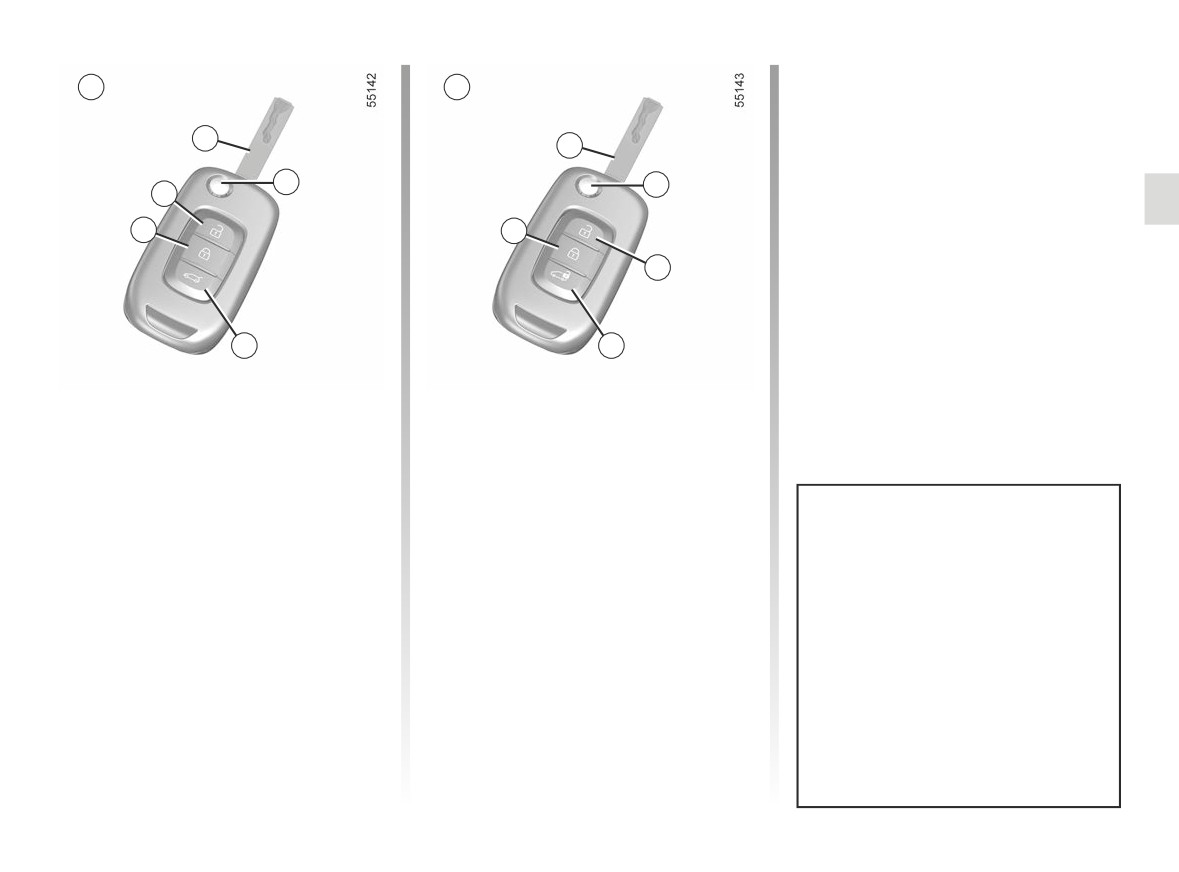
KEY, RADIO FREQUENCY REMOTE CONTROL: general information (1/2)
4 Locking/unlocking using the switch-
A
B
blade key. To release the insert from
its housing, press button 4, it comes
3
out automatically. Press button 4 and
3
guide the insert back into its housing.
4
4
7 Unlocking the sliding side doors and
2
the rear hinged doors.
1
1
6
5
7
Depending on the vehicle, there are
Key, Remote control B
two types of keys, key A or key B.
1
Locks all the opening elements.
Key, Remote control A
6
Unlocking all the opening elements,
1 Locks all the opening elements.
in Access mode, or unlocking the
2 Unlocks all the opening elements.
front doors, in Secure mode.
3 Driver’s door and ignition key.
3
Driver’s door and ignition key.
4 Locking/unlocking using the switch-
Remote control B
blade key. To release the insert from
There are two ways to use the
its housing, press button 4, it comes
remote control: Access mode and
out automatically. Press button 4 and
Secure mode.
guide the insert back into its housing.
To switch between the remote con-
5 Unlocking/locking the luggage com-
trol user modes, use the “Access”
partment only.
menu from the trip computer or,
depending on the vehicle, from
the multimedia screen. The default
mode is Access mode.
1.23
CarManuals2.co

KEY, RADIO FREQUENCY REMOTE CONTROL: general information (2/2)
Radio frequency remote control
operating range
This varies according to the surround-
ings: take care not to lock or unlock the
Replacement and additional keys
doors by inadvertently pressing the but-
or remote controls.
tons on the remote control.
You must only contact an approved
dealer:
Driver’s responsibility
Note: if any opening element (door or
- If you need to replace a key it will
when parking or stopping
luggage compartment) is open or not
be necessary to take the vehicle
the vehicle
properly shut, locking is unsuccessful
and all of its keys to an approved
and the hazard warning lights and side
Never leave an animal,
Dealer in order to initialise the
indicator lights do not flash.
child or adult who is not self-suffi-
system.
cient alone on your vehicle, even for
Interference
- Depending on the vehicle, you
a short time.
Interference by factors in the immediate
have the option of using up to
vicinity (external installations or the use
four remote controls.
They may pose a risk to themselves
of equipment operating on the same
or to others by starting the engine,
Remote control unit failure
activating equipment such as the
frequency as the remote control) may
Make sure that the correct battery
electric windows or locking the
affect the operation of the remote con-
type is being used, and that the
doors.
trol.
battery is in good condition and in-
Also, in hot and/or sunny weather,
serted correctly. These batteries
please remember that the tempera-
have a service life of approximately
ture inside the passenger compart-
two years.
ment increases very quickly.
How to change the battery ➥ 5.28.
RISK OF DEATH OR SERIOUS
INJURY.
The key must not be used for any
Advice
function other than those described
Avoid leaving the remote control in
in the handbook (removing the cap
hot, cold or humid areas.
from a bottle, etc.).
1.24
CarManuals2.co
RADIO FREQUENCY REMOTE CONTROL: use (1/2)
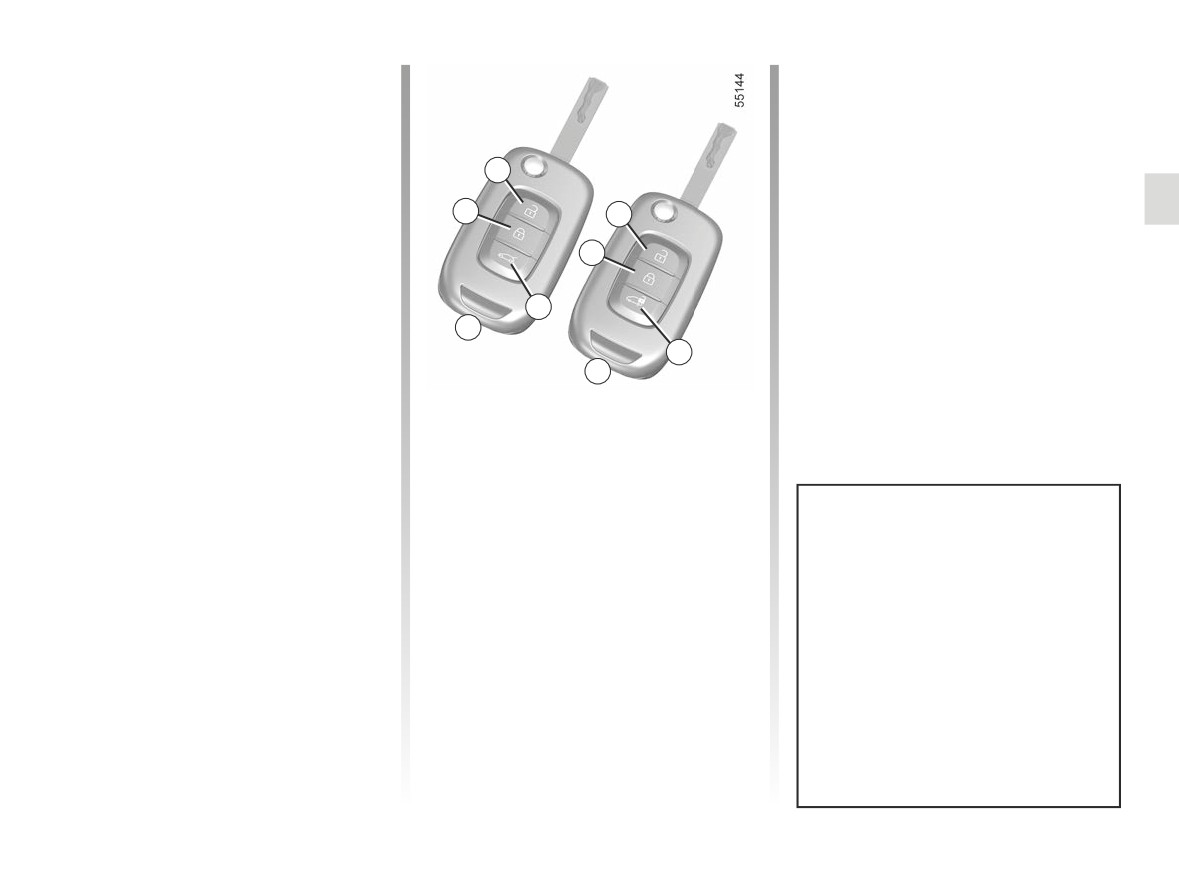
Remote control A or, depending on the
Remote control A
vehicle, remote control B locks or un-
Press button 2 to unlock all the opening
locks the doors. It is powered by a bat-
elements.
tery which can be replaced. ➥ 5.28.
Remote control B
2
Press button 4 once to:
Locking the doors
- unlock all the opening elements, in
1
Access mode;
Press locking button 1.
4
- unlock the front doors, in Secure
The hazard lights and side repeaters
1
mode.
flash twice to indicate that the doors
have locked and, on some vehicles,
the door mirrors fold in automatically.
3
A
Note: if any opening element (door or
5
luggage compartment) is open or not
B
properly shut, locking is unsuccessful
and the hazard warning lights and side
Unlocking the rear area
indicator lights do not flash.
Using the remote control B,
press
button 5 to unlock the sliding side doors
Unlocking/locking the
and the rear hinged doors.
luggage compartment only
Using the remote control A, press
Unlocking the doors
Remote control B
button 3 to unlock/lock the luggage
The hazard lights and side repeaters
compartment door only.
flash once to indicate that the doors
There are two ways to use the
have unlocked and, on some vehicles,
remote control: Access mode and
the door mirrors fold out automatically.
Secure mode.
To switch between the remote con-
trol user modes, use the “Access”
menu from the trip computer or,
depending on the vehicle, from
the multimedia screen. The default
mode is Access mode.
1.25
CarManuals2.co

RADIO FREQUENCY REMOTE CONTROL: use (2/2)
Driver’s responsibility
when parking or stopping
the vehicle
Never leave an animal,
child or adult who is not self-suffi-
cient alone on your vehicle, even for
a short time.
They may pose a risk to themselves
or to others by starting the engine,
activating equipment such as the
electric windows or locking the
doors.
Also, in hot and/or sunny weather,
While the engine is on, the buttons
please remember that the tempera-
on remote control A or, depending
ture inside the passenger compart-
on the vehicle, on remote control B
ment increases very quickly.
are inactive.
RISK OF DEATH OR SERIOUS
INJURY.
Depending on the vehicle, the door
mirrors fold in/out automatically
when the vehicle is locked/unlocked
➥ 1.145.
1.26
CarManuals2.co
RADIO FREQUENCY REMOTE CONTROL UNIT: deadlocking
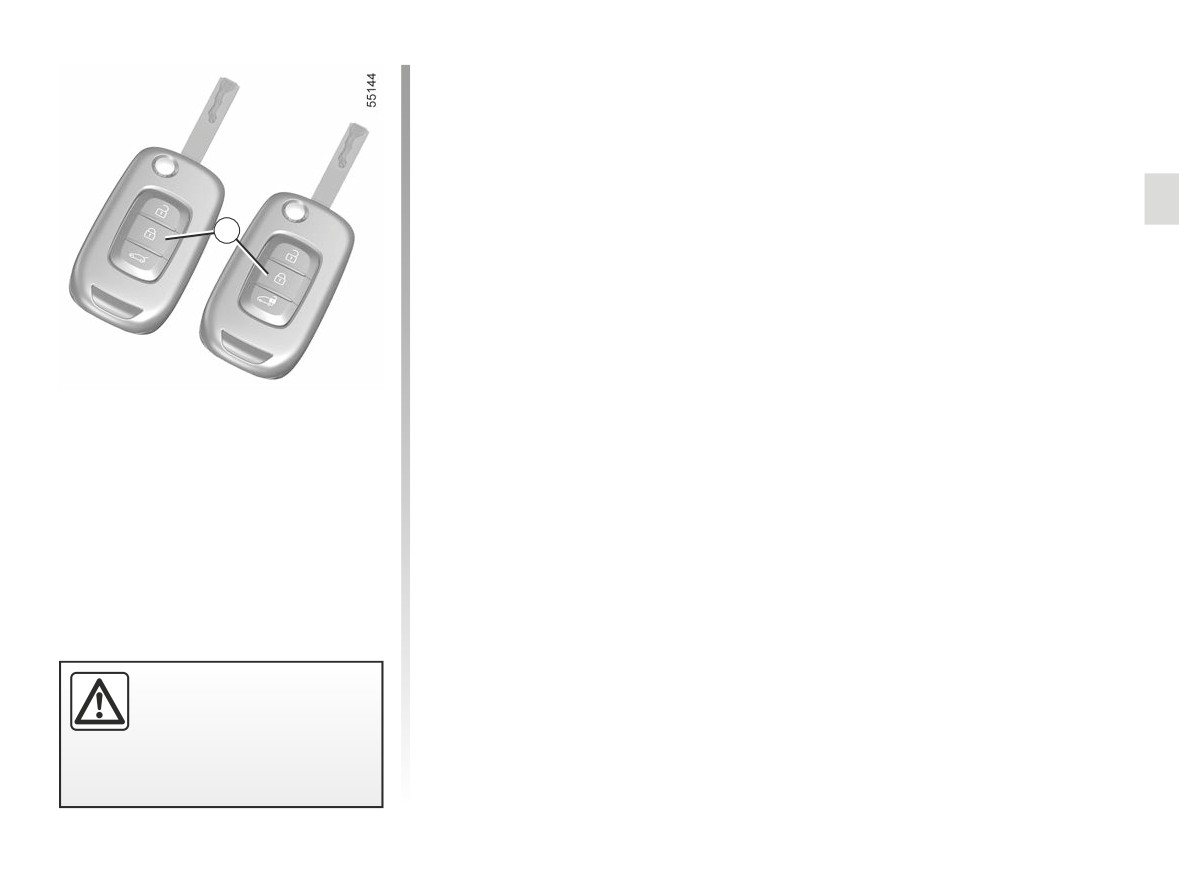
If the vehicle is equipped with a dead-
locking function, this allows you to lock
the opening elements and to prevent
the doors from being unlocked using
the interior handles (for example, by
breaking the window and then trying to
open the door from the inside).
1
To do this, press button 1 twice in quick
succession.
The hazard warning lights and side in-
dicator lights give two slow flashes and
three quick flashes to indicate locking.
Depending on the vehicle, the door mir-
rors fold in automatically when the vehi-
cle is locked ➥ 1.145.
Never use deadlocking if
someone is still inside the
vehicle.
1.27
CarManuals2.co
CARD: general information (1/4)
A
B
1
5
4
4
2
2
3
6
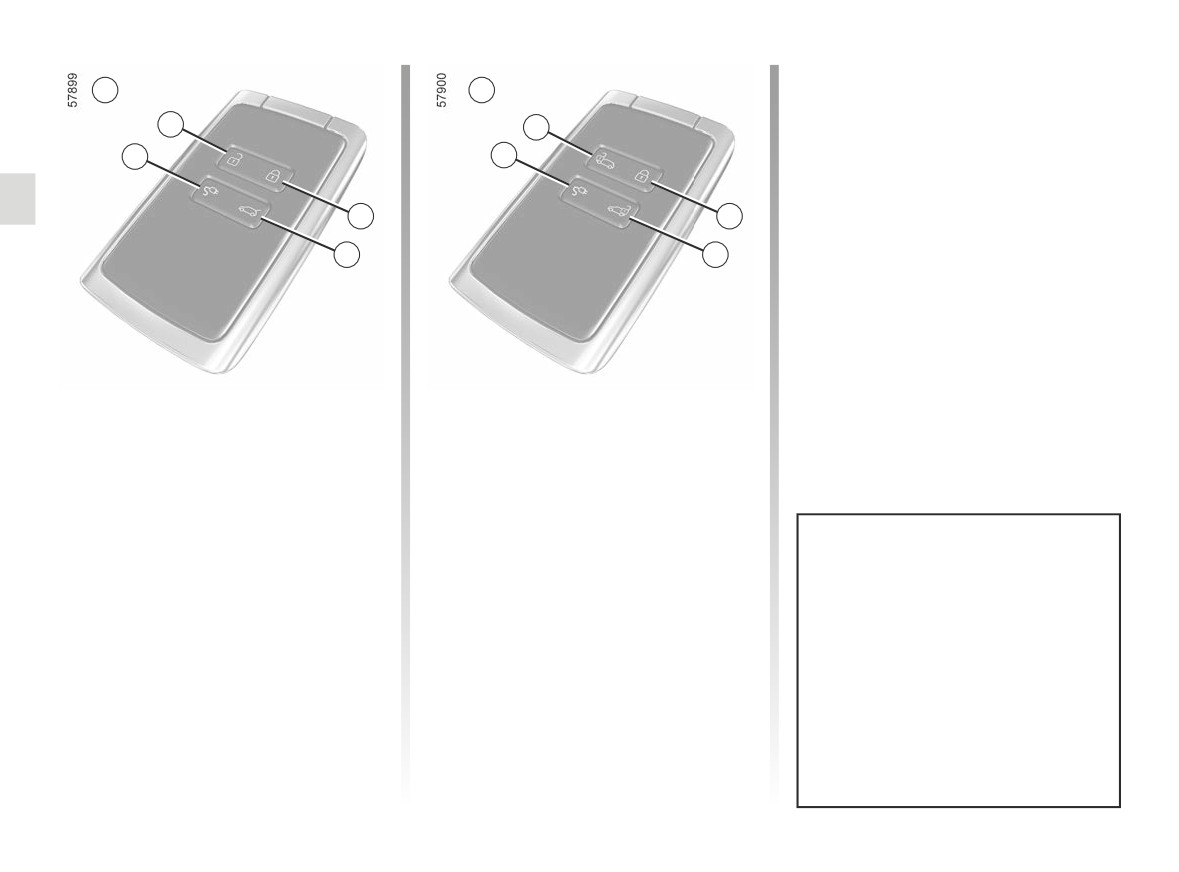
Depending on the vehicle, there are
B card
two types of cards, card A or card B.
4
Unlocking the electric charging
socket.
A card
5
Unlocking all the front doors in
1 Unlocking the doors and tailgate.
Secure mode, or unlocking all the
opening elements in Access mode.
2 Locking all doors and tailgate.
2
Locks all the opening elements.
3 Unlocking/locking the luggage com-
B card
partment only or, depending on the
6
Unlocking the rear area (sliding side
There are two ways to use the card:
vehicle, unlocking the rear area
doors and rear hinged doors).
Access mode and Secure mode.
(sliding side doors and rear hinged
doors).
To switch between the card user
modes, use the “Access” menu from
4 Unlocking the electric charging
the trip computer or, depending on
socket.
the vehicle, from the multimedia
screen. The default mode is Secure
mode.
1.28
CarManuals2.co

CARD: general information (2/4)
The card is used for:
card operating range
Battery life
- locking/unlocking the opening ele-
This varies according to the environ-
Make sure that the correct battery type
ments (doors, luggage compartment)
ment: take care not to accidentally lock
is being used, and that the battery is in
and the electrical charging socket;
or unlock the vehicle by inadvertently
good condition and inserted correctly.
pressing the buttons on the card.
Its service life is approximately two
years: it should be replaced when the
Note: if a door or the boot is open or not
message “Keycard Battery Low” ap-
properly shut, locking is not carried out.
pears on the instrument panel ➥ 5.30.
A beep sounds and the hazard warning
lights and side repeaters do not flash.
Interference
Interference by factors in the immediate
vicinity (external installations or the use
of equipment operating on the same
frequency as the card) may disrupt its
operation.
Advice
Avoid leaving the card in hot, cold or
humid areas.
Keep the card with you.
Do not keep the card in a place
where it could be bent or dam-
aged accidentally, such as in a back
pocket of a garment.
When the battery is flat, you can still
lock/unlock and start your vehicle.
➥ 1.50 ➥ 2.3.
1.29
CarManuals2.co

CARD: general information (3/4)
Driver’s responsibility
when parking or stopping
the vehicle
Never leave an animal,
child or adult who is not self-suffi-
cient alone in your vehicle, even for
a short time.
They may pose a risk to themselves
or to others by starting the engine,
activating equipment such as the
electric windows or locking the
doors, for example.
Replacement: need for an
Also, in hot and/or sunny weather,
additional card
please remember that the tempera-
ture inside the passenger compart-
If you lose your card or require an-
ment increases very quickly.
other, you can obtain one from an
authorised dealer.
RISK OF DEATH OR SERIOUS
INJURY.
If a card is replaced, it will be neces-
sary to take the vehicle and all its
cards to an approved Dealer to ini-
tialise the system.
You may use up to four cards per
vehicle.
1.30
CarManuals2.co
CARD: general information (4/4)
7
C
9
10
8
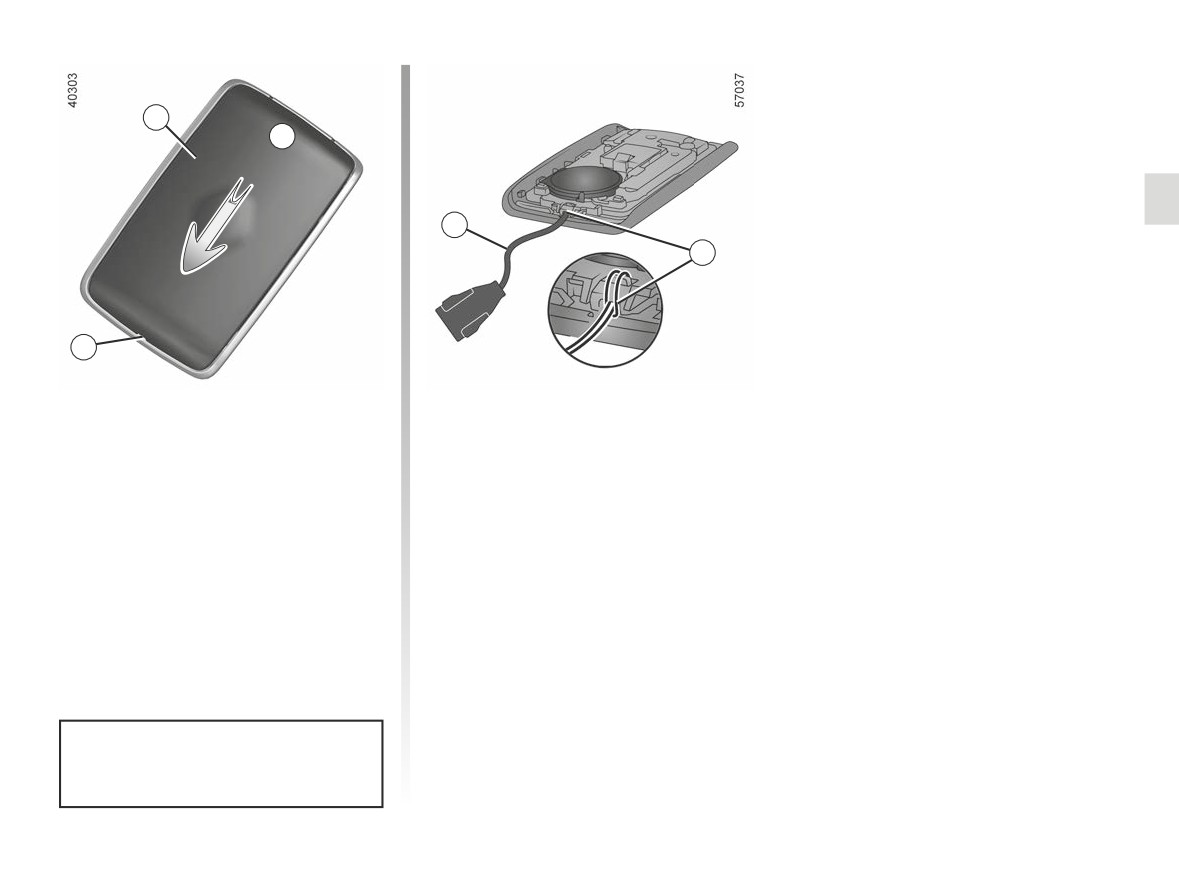
Fitting a strap 9
Insert the hand strap into the 10 com-
ponent and pass the end of the strap
Slide the rear casing
7 downwards
through the buckle.
while pressing on zone C.
Position the hand strap at the open-
ing 8 and close the cartridge.
Note: check that the diameter of the
hand strap cord 9 will fit the opening 8.
Never insert screwdriver-type tools
into the 8 opening.
1.31
CarManuals2.co
“HANDS-FREE” CARD: use (1/11)
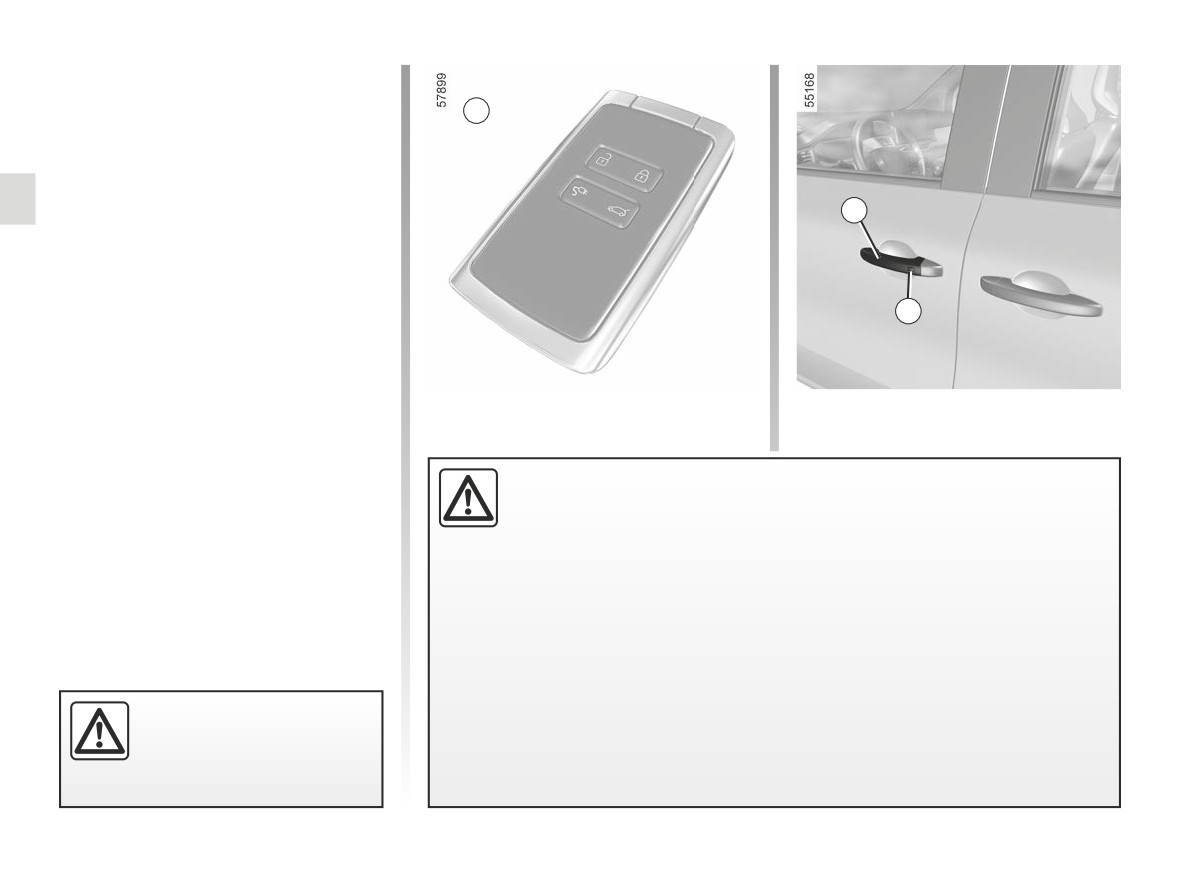
A card
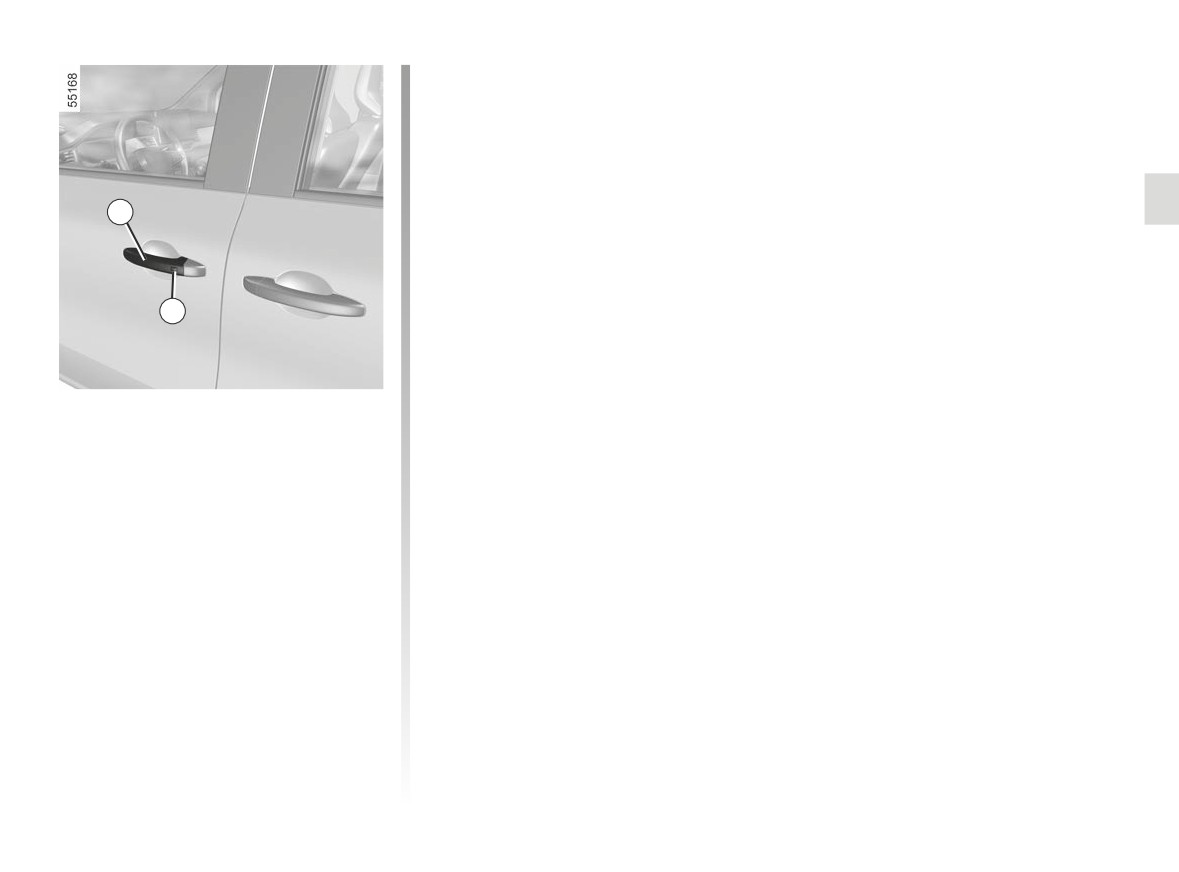
There are three ways to unlock/lock the
A
vehicle:
- “hands-free”, when approaching and
moving away from the vehicle;
- in “hands free” mode, depending on
the vehicle, using button 2 on the
1
door handle 1;
- using the card in remote control
mode.
Deactivating/activating the «hands-
2
free» mode
Depending on the vehicle, from the trip
computer or the multimedia screen you
can deactivate/activate the following:
- unlocking when approaching the ve-
hicle;
- locking when moving away from the
vehicle;
Driver’s responsibility when parking or stopping the vehicle
- the “hands-free” locking and unlock-
Never leave an animal, child or adult who is not self-sufficient alone in
ing completely.
your vehicle, even for a short time.
You can also disable/activate the
They may pose a risk to themselves or to others by starting the engine,
sound signal that is emitted upon lock-
activating equipment such as the electric windows or locking the doors, for ex-
ing when moving away from the vehi-
ample.
cle ➥ 1.138.
Also, in hot and/or sunny weather, please remember that the temperature inside
the passenger compartment increases very quickly.
RISK OF DEATH OR SERIOUS INJURY.
Never leave your vehicle
with the card inside.
1.32
CarManuals2.co
“HANDS-FREE” CARD: use (2/11)
5
3
4
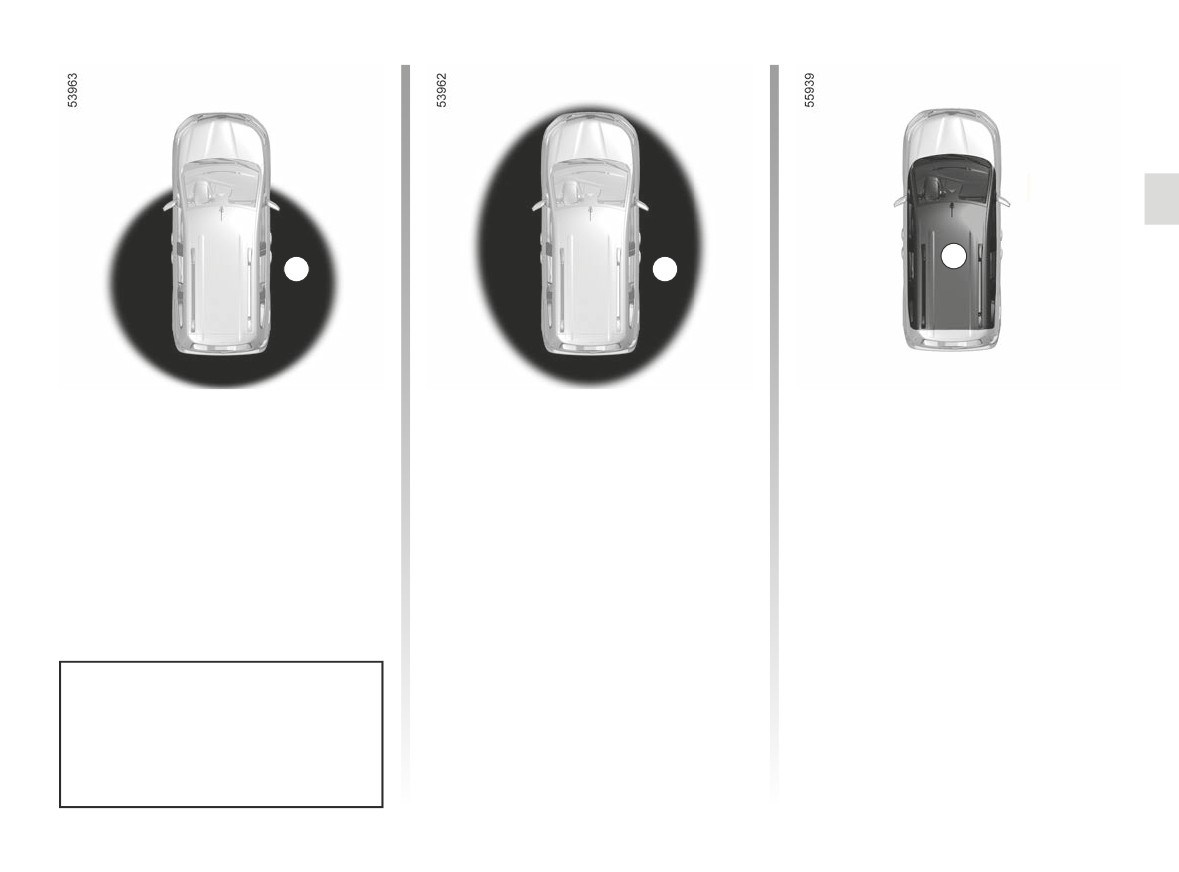
Hands-free unlocking, when
Hands-free locking when moving
The vehicle cannot be remotely locked
approaching the vehicle;
away from the vehicle
if the card is within the area 5.
With the card in access zone 3, the ve-
With the card on you, doors and lug-
hicle will unlock. Unlocking is indicated
gage compartment door closed, move
by one flash of the hazard warning
away from the vehicle: it will lock auto-
lights and the indicator lights.
matically once you have left the access
zone 4.
Note: the distance at which the vehicle
locks depends on the surroundings.
To indicate that the vehicle has been
locked, the hazard warning lights
flash twice and then light up for ap-
proximately four seconds, and a beep
Depending on the vehicle, the door
sounds in confirmation.
mirrors fold in/out automatically
when the vehicle is locked/unlocked
➥ 1.145.
1.33
CarManuals2.co
“HANDS-FREE” CARD: use (3/11)
A
1
6
3
2
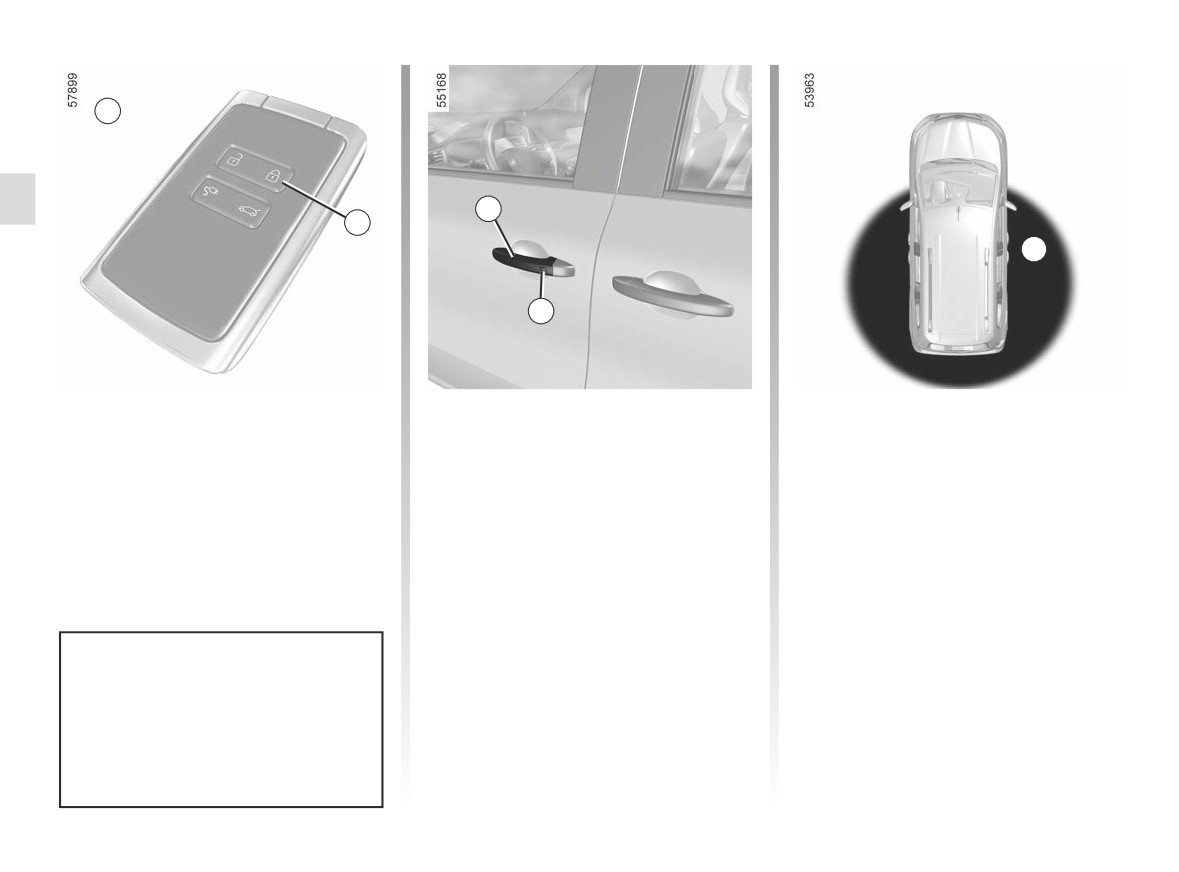
If the card has been within the detection
“Hands-free” unlocking/locking
With the vehicle unlocked, press
area 4 for approximately 15 minutes,
using button 2
button 2 once to lock the vehicle.
remote locking is disabled.
(depending on the vehicle)
The hazard warning lights flash twice
To lock the vehicle, press the 6 button
With the card in zone 3 and the vehi-
to indicate that the vehicle is locked
on the card or, depending on the vehi-
cle locked, press button 2 on the door
and, depending on the vehicle, the door
cle, press the 2 button on the handle 1.
handle 1 to unlock the vehicle.
mirrors automatically fold in.
Pressing the tailgate button once un-
locks the entire vehicle and opens the
tailgate.
The hazard lights and side repeaters
flash once to indicate that the doors
have unlocked and, on some vehicles,
Do not store the card anywhere it
the door mirrors fold out automatically.
may come into contact with other
electronic equipment
(computer,
phone etc.) as this could hinder its
operation.
1.34
CarManuals2.co
“HANDS-FREE” CARD: use (4/11)
Special features relating to “hands-
free” locking
After locking in “hands-free” mode, you
have to wait approximately three sec-
onds before being able to unlock the
vehicle again. During these three sec-
onds, the door handles can be tried to
1
make sure that the vehicle is locked
properly.
Note: if a door or the boot is open or not
properly shut, locking is not carried out.
2
A beep sounds and the hazard warning
lights and side repeaters do not flash.
Special features of the unlocking
system
After eight days of non-use, approach
unlocking is disabled.
Use the card in remote control mode
(see following pages) or, depending on
the vehicle, press the 2 button (on front
door handle) to unlock the vehicle and
reactivate “hands-free” mode.
1.35
CarManuals2.co
“HANDS-FREE” CARD: use (5/11)
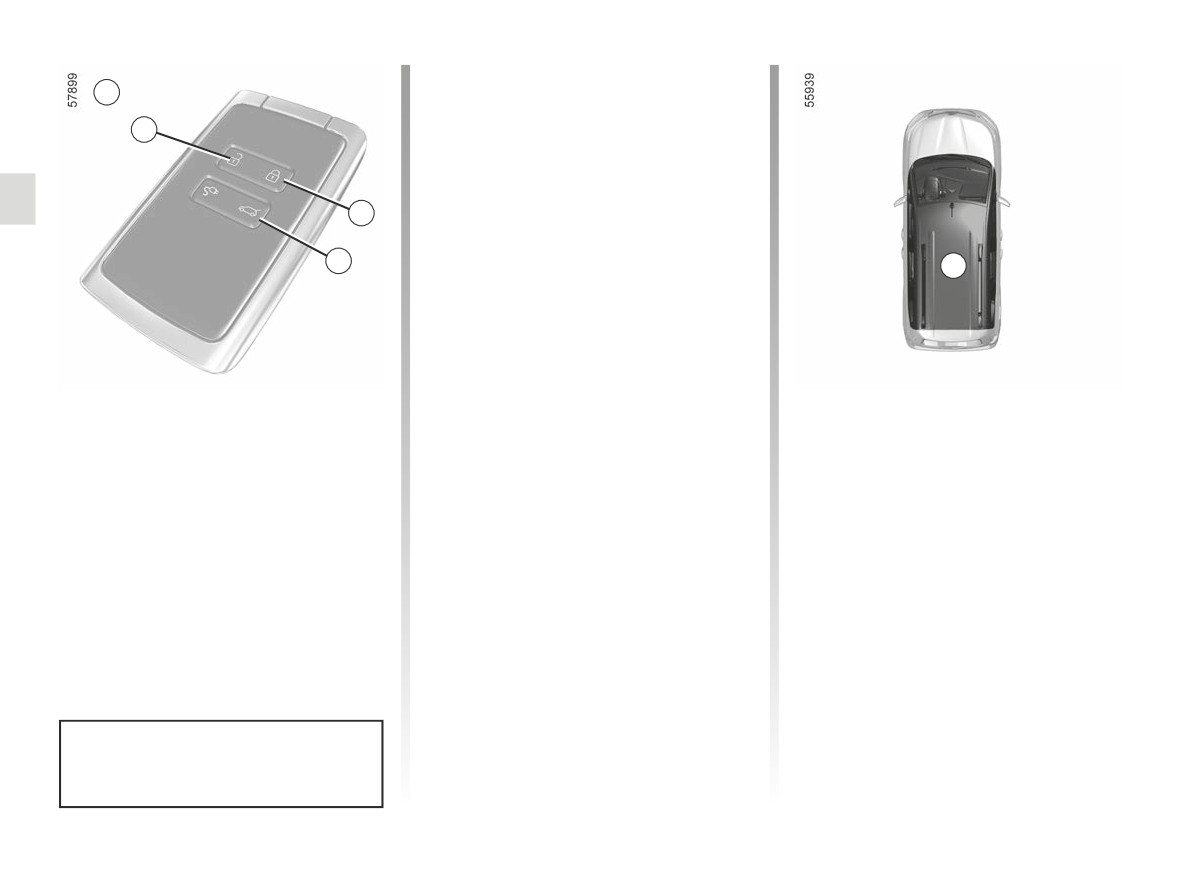
Locking using the card
A
With the doors and boot closed, press
button 6: the vehicle locks.
7
The hazard warning lights flash twice
to indicate that the vehicle is locked
and, depending on the vehicle, the door
6
mirrors automatically fold in.
Note:
8
5
- the maximum distance at which the
vehicle locks depends on the sur-
roundings;
- if a door or the boot is open or not
properly shut, locking is not carried
out. A beep sounds and the hazard
Using the card as a remote
warning lights and side repeaters do
If, while the engine is running, a door
not flash.
is opened and closed, and the card is
control A
no longer in the zone 5, the message
Unlocking with the card
Keycard Not Detected indicates that
Unlocking/locking the boot
the card is not inside the vehicle. This
Press button 7.
only or, depending on the
will, for example, prevent you from driv-
The hazard lights and side repeaters
vehicle, unlocking the rear
ing away after dropping off a passenger
flash once to indicate that the doors
area
who has kept the card on them.
have unlocked and, on some vehicles,
the door mirrors fold out automatically.
Press the 8 button to unlock/lock the
The warning disappears when the card
boot only or, depending on the vehicle,
is detected again.
to unlock the rear area.
The card buttons are deactivated
when the engine is running.
1.36
CarManuals2.co
“HANDS-FREE” CARD: use (6/11)
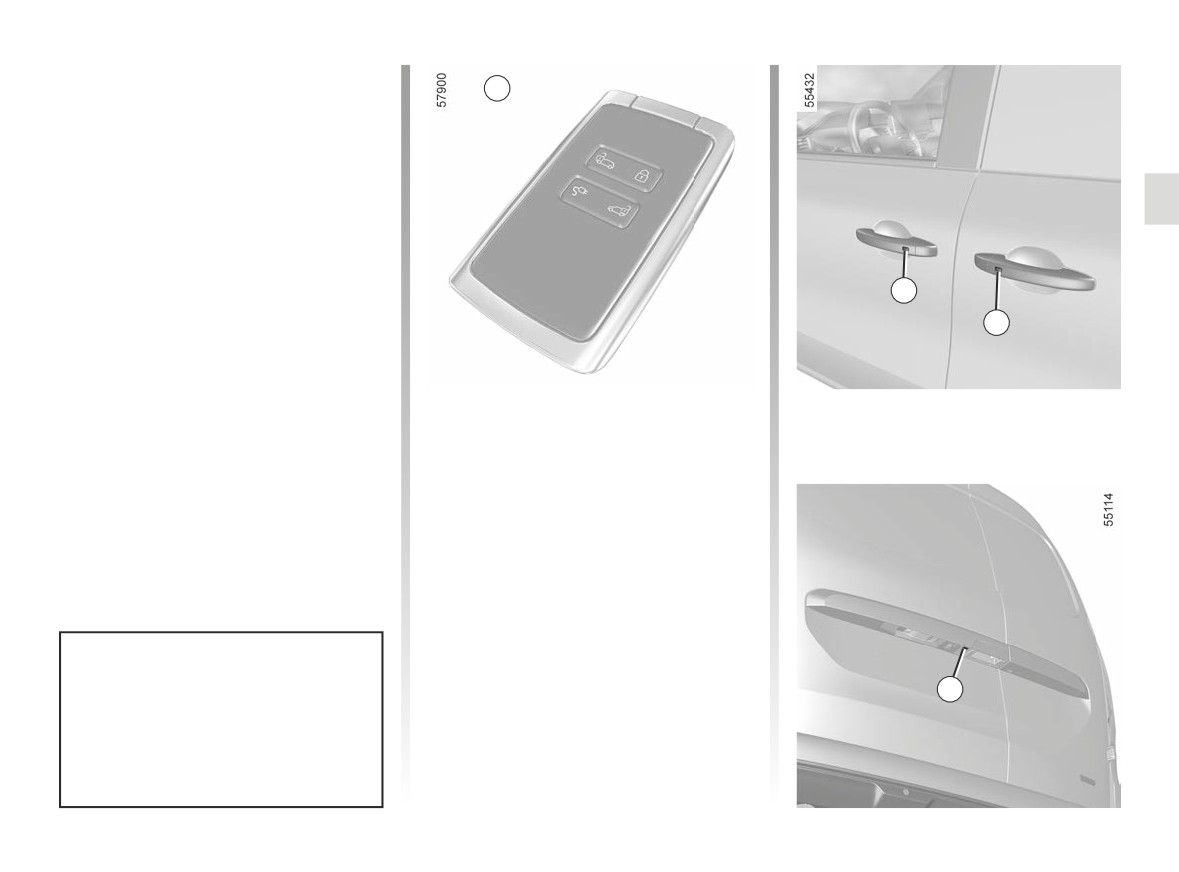
B card
B
Unlocking the vehicle
There are two ways to unlock the ve-
hicle:
- in “hands-free” mode, using the but-
tons on the door handles;
- using the card in remote control
mode.
Locking the vehicle
There are four ways to lock the vehicle:
9
- in “hands-free” mode, when moving
away from the vehicle;
10
- in
“hands-free” mode, using the
button 9 on one of the front door han-
dles;
- in
“hands-free” mode, using the
Deactivating/activating the «hands-
button 10 on the handle of one of
free» mode
the sliding side doors or using the
Depending on the vehicle, from the trip
button 11 on the rear hinged door;
computer or the multimedia screen you
- using the card in remote control
can deactivate/activate the following:
mode.
- locking when moving away from the
vehicle;
- locking and unlocking by pressing
button 9 on one of the front door han-
dles.
You can also disable/activate the sound
signal that is emitted upon locking when
Do not store the card anywhere it
moving away from the vehicle ➥ 1.138.
11
may come into contact with other
electronic equipment
(computer,
phone etc.) as this could hinder its
operation.
1.37
CarManuals2.co
“HANDS-FREE” CARD: use (7/11)
12
12
11
9
10
12
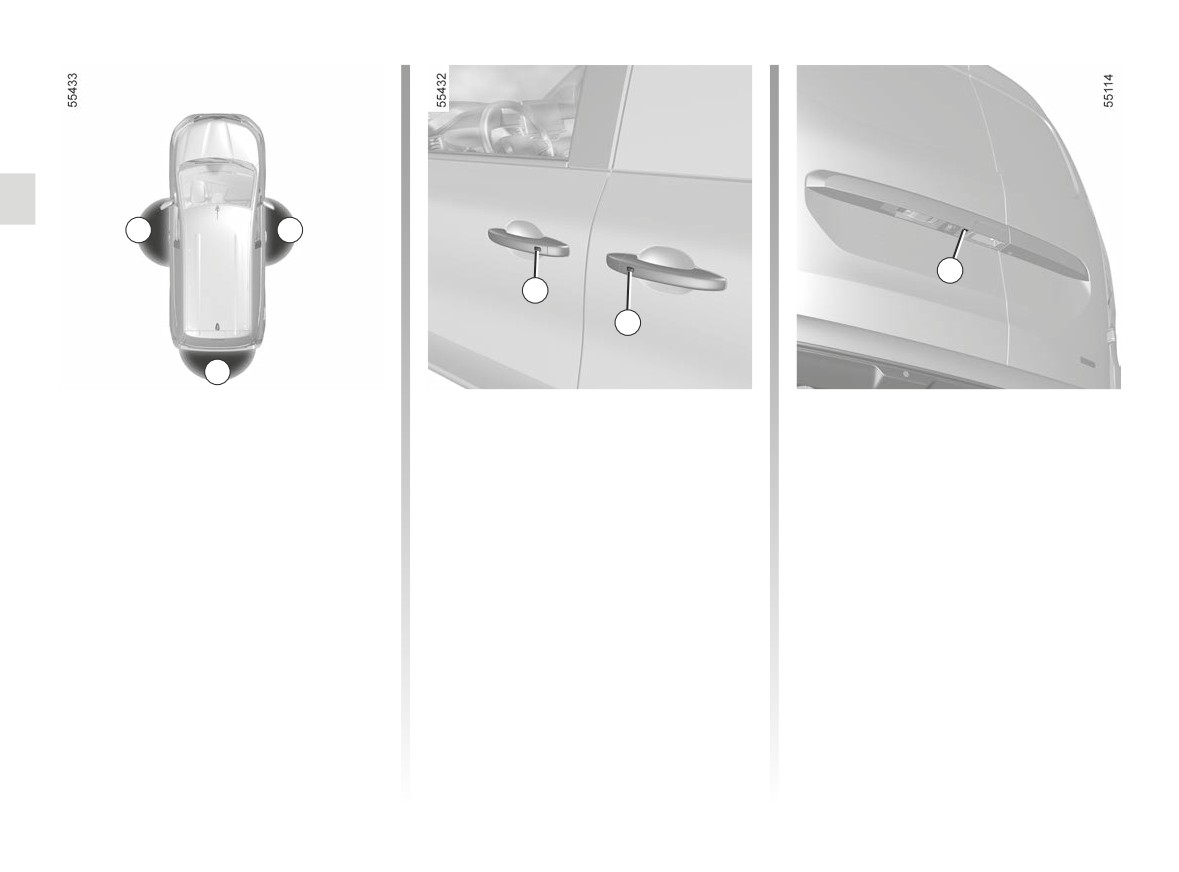
“Hands-free” unlocking
The hazard lights and side repeaters
Note: “hands-free” unlocking will not
flash once to indicate that the doors
work if the card is not present within
With the card in the access zone 12:
have unlocked and, on some vehicles,
the detection zone 12 of the button
- press the 9 button on the handle of
the door mirrors fold out automatically.
pressed.
one of the front doors to unlock the
front doors in secure mode, or all the
opening elements in access mode;
- press the 10 button on the handle of
one of the sliding side doors or, on
the 11 button of the rear hinged door
to unlock the rear area in secure
mode or all the opening elements in
access mode.
1.38
CarManuals2.co
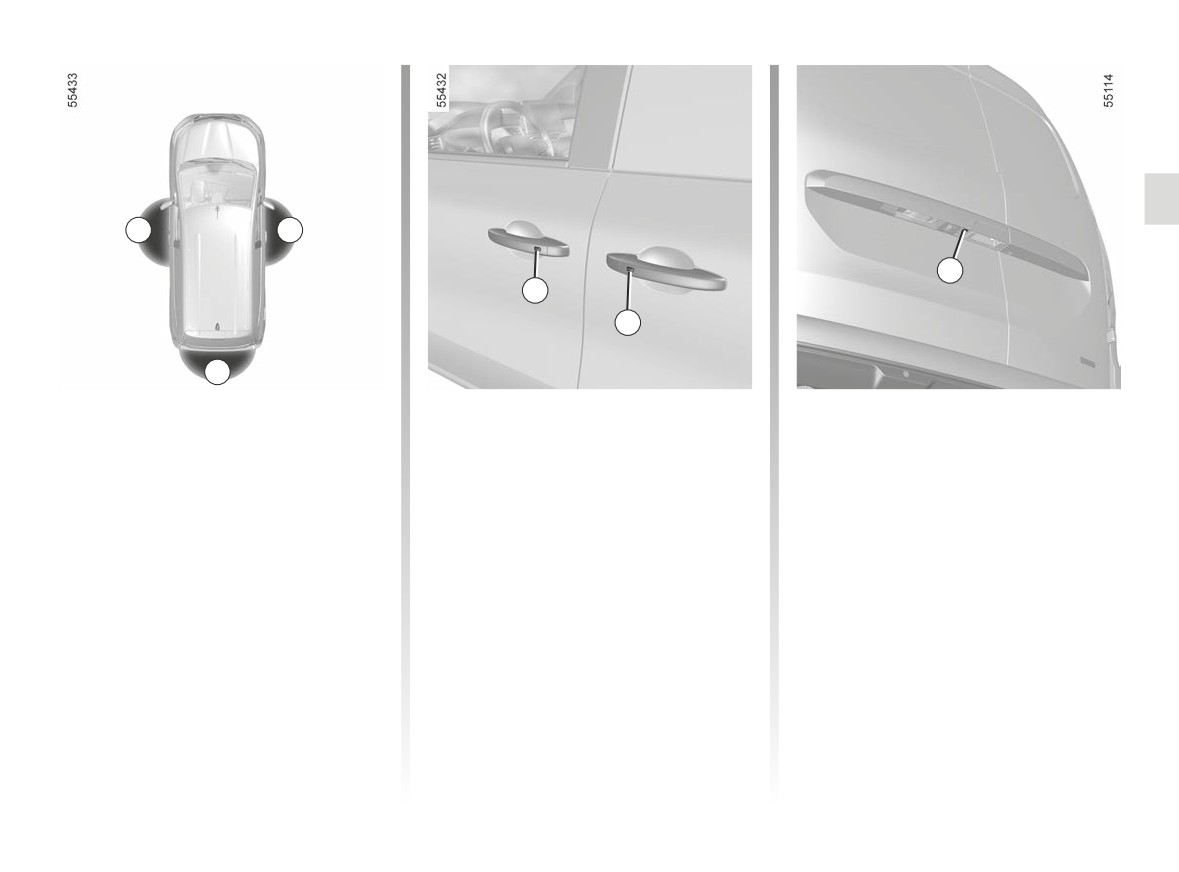
“HANDS-FREE” CARD: use (8/11)
12
12
11
9
10
12
“Hands-free” locking
Secure mode
The hazard warning lights flash twice
to indicate that the vehicle is locked
With the vehicle unlocked, all the open-
If one of the front doors is open, press
and, depending on the vehicle, the door
ing elements closed, press button 9, 10
the 9, 10 or 11 button to lock the rear
mirrors automatically fold in.
or 11 once to lock all the opening ele-
area.
ments.
Note: “hands-free” locking will not work
If one of the opening elements in the
if the card is not present within the de-
rear area is open, press the 9, 10 or 11
tection zone 12 of the button pressed.
button to lock the front doors.
Special features relating to “hands-
Access mode
free” locking
If a door or the boot is open or not prop-
After locking in hands-free mode, you
erly shut, locking using the 9, 10 or 11
have to wait approximately three sec-
button is not carried out.
onds before being able to unlock the
vehicle again.
1.39
CarManuals2.co
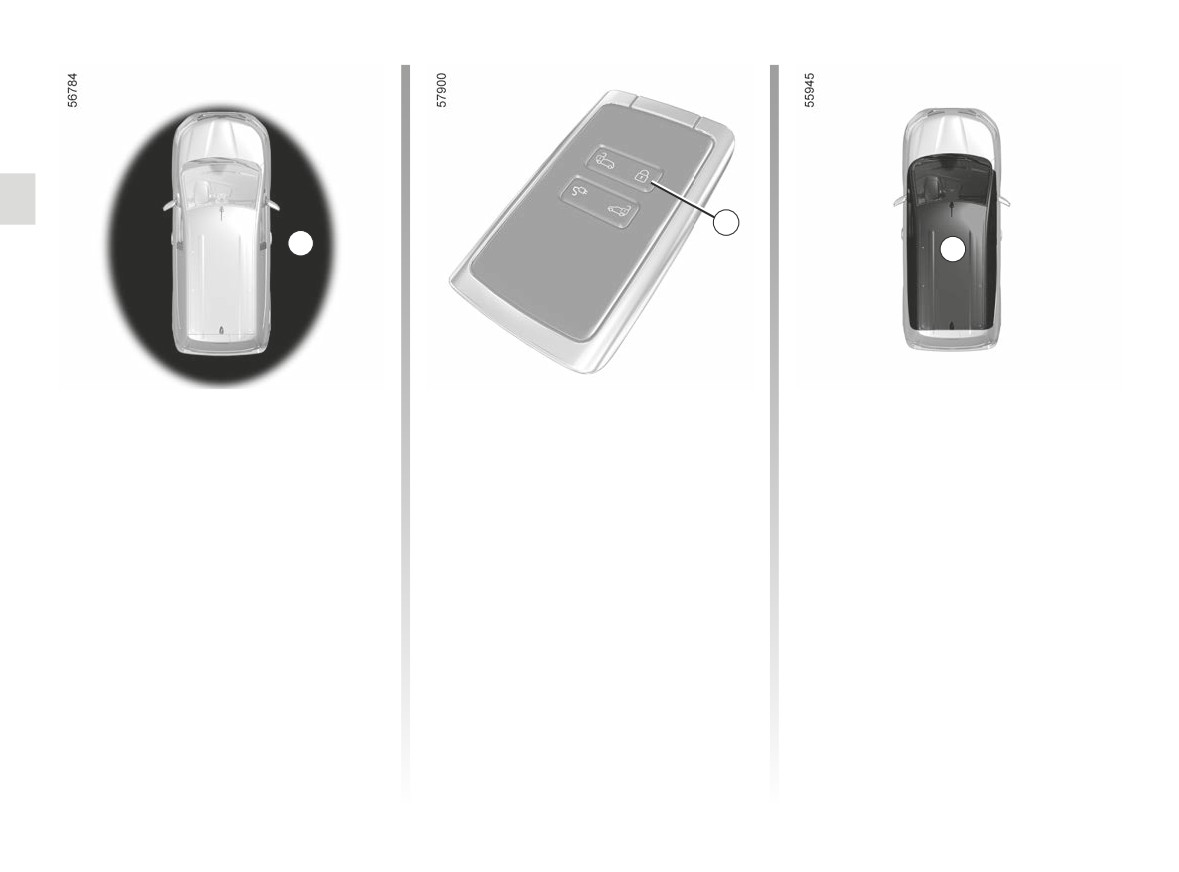
“HANDS-FREE” CARD: use (9/11)
14
13
15
Hands-free locking when moving
If the card has been within the detection
The vehicle cannot be remotely locked
away from the vehicle
area 13 for approximately 15 minutes,
if the card is within the area 15.
remote locking is disabled. To lock the
With the card on you, doors and lug-
Note: if an opening element is open or
vehicle, press button 14 on the card.
gage compartment door closed, move
not properly shut, “hands-free” locking
away from the vehicle: it will lock auto-
when moving away from the vehicle
matically once you have left the access
is not carried out. The hazard warning
zone 13.
lights and indicator lights do not flash.
Note: the distance at which the vehicle
locks depends on the surroundings.
To indicate that the vehicle has been
locked, the hazard warning lights
flash twice and then light up for ap-
proximately four seconds, and a beep
sounds in confirmation.
1.40
CarManuals2.co
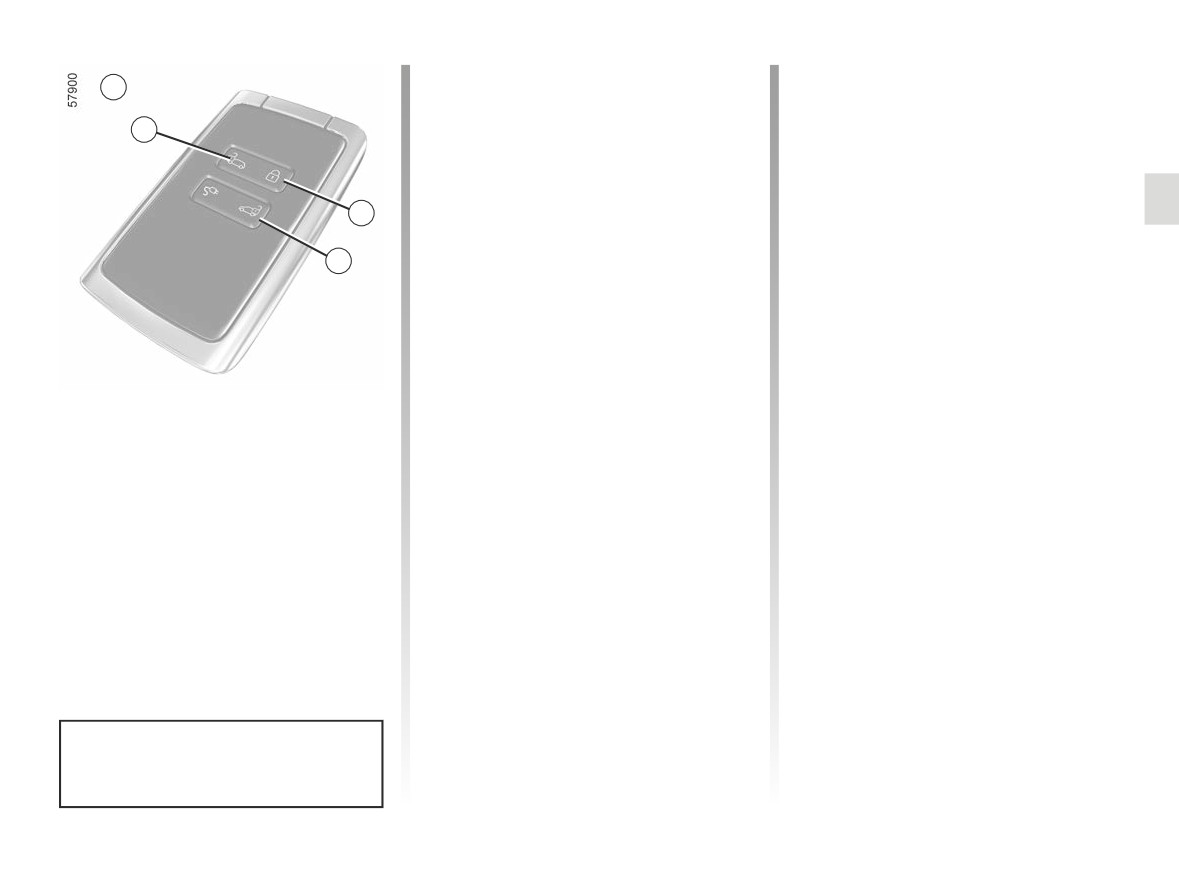
“HANDS-FREE” CARD: use (10/11)
Unlocking with the card
Locking using the card
B
Press button 16 to unlock the sliding
With all the opening elements closed,
side doors and the rear hinged doors.
press the 14 button: the vehicle locks.
17
The hazard warning lights flash twice
Secure mode
to indicate that the vehicle is locked
Press button 17 to unlock the front
and, depending on the vehicle, the door
14
doors.
mirrors automatically fold in.
Access mode
Note:
16
Press button 17 to unlock all the open-
- the maximum distance at which the
ing elements.
vehicle locks depends on the sur-
roundings;
The hazard lights and side repeaters
flash once to indicate that the doors
- if a door or the boot is open or not
have unlocked and, on some vehicles,
properly shut, locking using the 14
the door mirrors fold out automatically.
button is not carried out. A beep
Using the card as a remote
sounds and the hazard warning lights
and side repeaters do not flash.
control B
There are two modes of use: Secure
mode and Access mode.
To switch between the card user
modes, use the “Access” menu from
the trip computer or, depending on the
vehicle, from the multimedia screen.
The default mode is Secure mode.
The card buttons are deactivated
when the engine is running.
1.41
CarManuals2.co
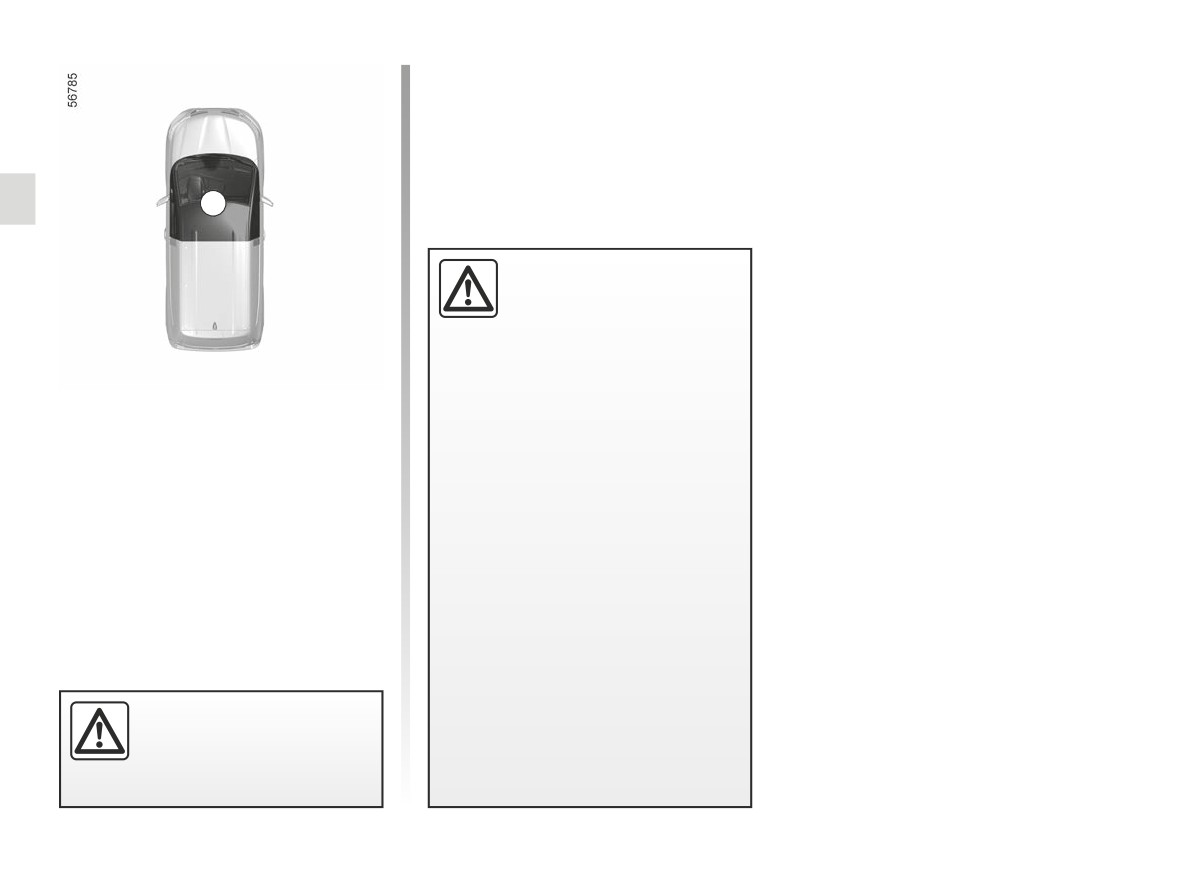
“HANDS-FREE” CARD: use (11/11)
18
Driver’s responsibility
when parking or stopping
the vehicle
Never leave an animal,
child or adult who is not self-suffi-
cient alone in your vehicle, even for
a short time.
If, while the engine is running, a door
They may pose a risk to themselves
is opened and closed, and the card is
or to others by starting the engine,
no longer in the zone 18, the message
activating equipment such as the
“Keycard Not Detected” indicates that
electric windows or locking the
the card is not inside the vehicle. This
doors, for example.
will, for example, prevent you from driv-
Also, in hot and/or sunny weather,
ing away after dropping off a passenger
please remember that the tempera-
who has kept the card on them.
ture inside the passenger compart-
The warning disappears when the card
ment increases very quickly.
is detected again.
RISK OF DEATH OR SERIOUS
INJURY.
Never leave your vehicle
with the card inside.
1.42
CarManuals2.co
“HANDS-FREE” CARD: DEADLOCKING
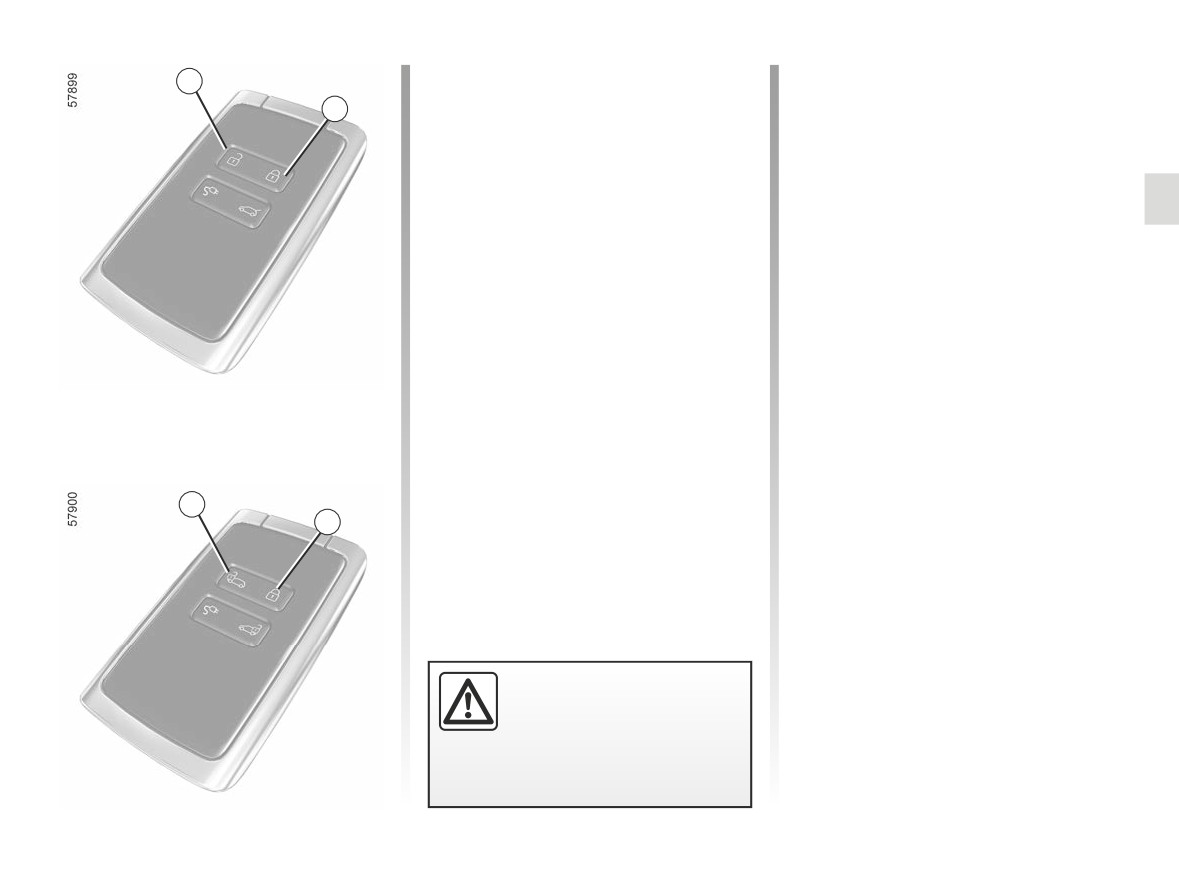
If the vehicle is equipped with a dead-
To activate deadlocking
1
locking function, this allows you to lock
Press button 2 twice in quick succes-
2
the opening elements and to prevent
sion.
the doors from being unlocked using
the interior handles (for example, by
Locking is confirmed by two slow
breaking the window and then trying to
flashes and three quick flashes of
open the door from the inside).
the hazard warning lights and indicator
lights.
Depending on the vehicle, the door mir-
rors fold in automatically when the vehi-
cle is locked ➥ 1.145.
To deactivate deadlocking
Press the 1 button.
The hazard warning lights flash once
to indicate that the doors have been un-
locked.
1
2
Never use deadlocking if
someone is still inside the
vehicle.
1.43
CarManuals2.co
OPENING AND CLOSING THE DOORS (1/6)
Door/tailgate open buzzer
When the vehicle is stationary, the
2
warning light appears on the instrument
2
panel accompanied by a warning light
indicating which of the opening ele-
ments (door(s), luggage compartment)
are open or incorrectly closed.
Once the vehicle reaches a speed
of approximately 6 mph (10 km/h), a
1
warning light indicates if the door(s)
or luggage compartment are open
or not properly closed, along with the
message “WARNING: Boot Open” or
“WARNING: Door Open” and a beep
will sound for around 40 seconds or
Front doors
Opening from the inside
until the door/luggage compartment is
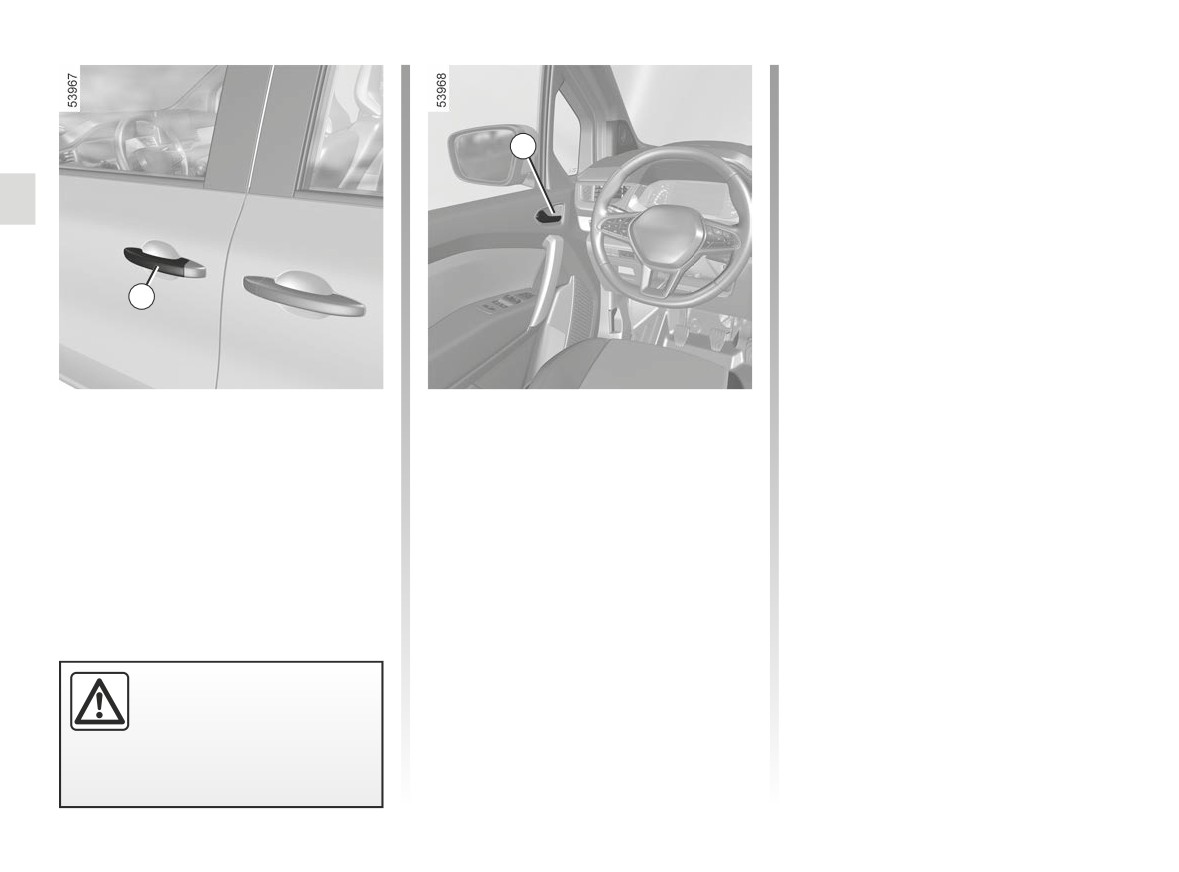
Unlock the door and pull handle 2.
closed.
Opening from the outside
With the doors unlocked or, depending
on the vehicle, the card on you, hold the
Lights-on reminder buzzer
handle 1 and pull it towards you.
If you have switched off the ignition
and left the lights switched on, a re-
minder buzzer will sound when a door
is opened.
Special note
Depending on the vehicle, accessories
(e.g. radio) stop working either when
As a safety precaution,
the engine is switched off or when the
the doors should only be
doors are locked, or when the driver’s
opened or closed when the
door is opened.
vehicle is stationary.
1.44
CarManuals2.co
OPENING AND CLOSING THE DOORS (2/6)
Recommendations con-
cerning the sliding side
door
The following precautions
A
must be taken when opening and
closing the doors or any other open-
ing element:
4
-
Check that nobody, no animal or
object is at risk of being harmed
when you perform this manoeu-
B
vre.
-
Never use anything but the han-
3
dles on the inside and outside of
the door to operate it.
Sliding side door
Child safety
-
Take care when both opening
(depending on the vehicle)
and closing the door.
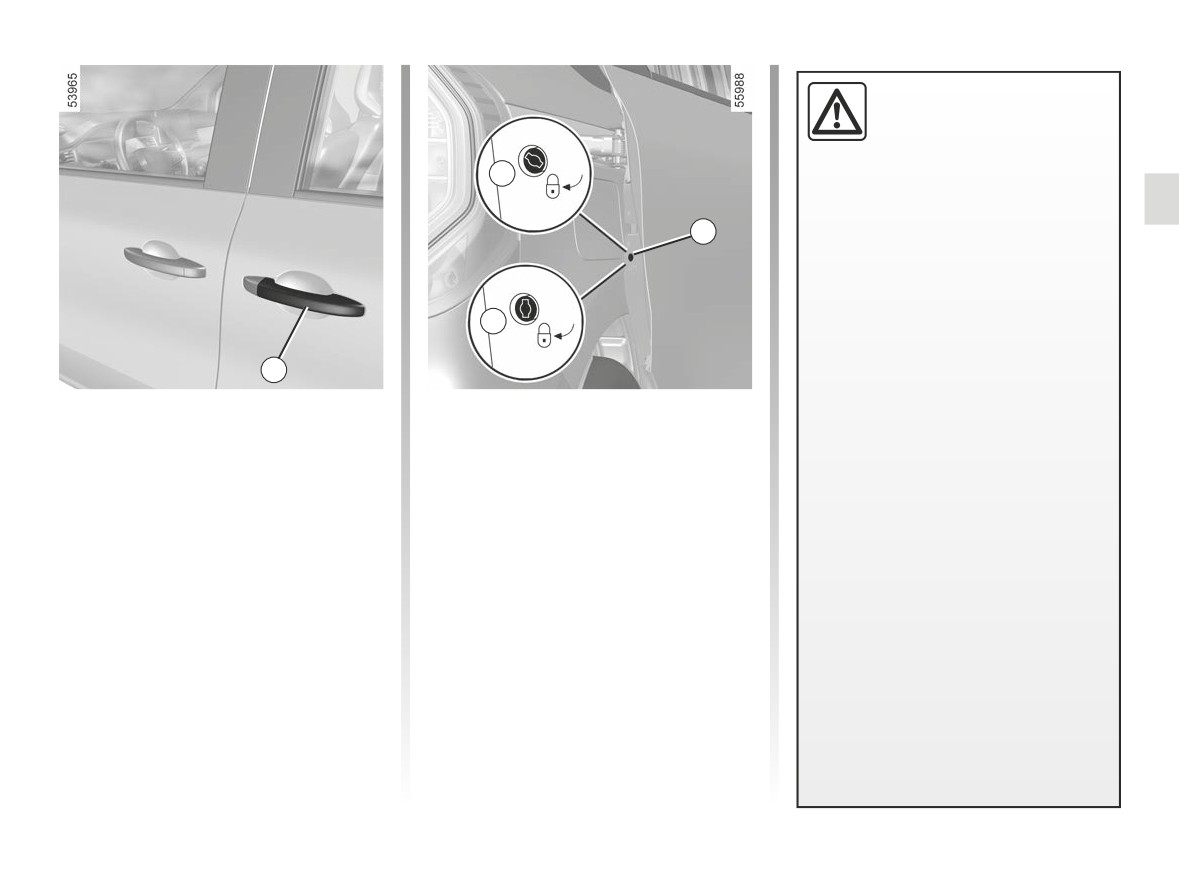
Opening the doors from the outside
To make it impossible for the sliding side
Unlock the door and pull handle 3,
-
Caution: when the vehicle is
doors to be opened from the inside, use
then slide the door towards the rear of
parked on a slope, open the door
the key to turn the lock 4 (position B)
the vehicle until it locks in position. To
with care until it is fully open and
and close the door.
unlock the doors ➥ 1.25 ➥ 1.32.
latches into its locking position;
Check from the inside that all the
-
Before moving off, always ensure
doors are locked. The door can only be
that the sliding door is properly
opened from the outside of the vehicle.
closed.
To open the sliding side doors from the
-
Do not use the lower support as a
inside, turn the lock 4 (position A) using
step.
the key.
1.45
CarManuals2.co
OPENING AND CLOSING THE DOORS (3/6)
5
6
7
7
7
C
D
Sliding side door
Manual locking
(continued)
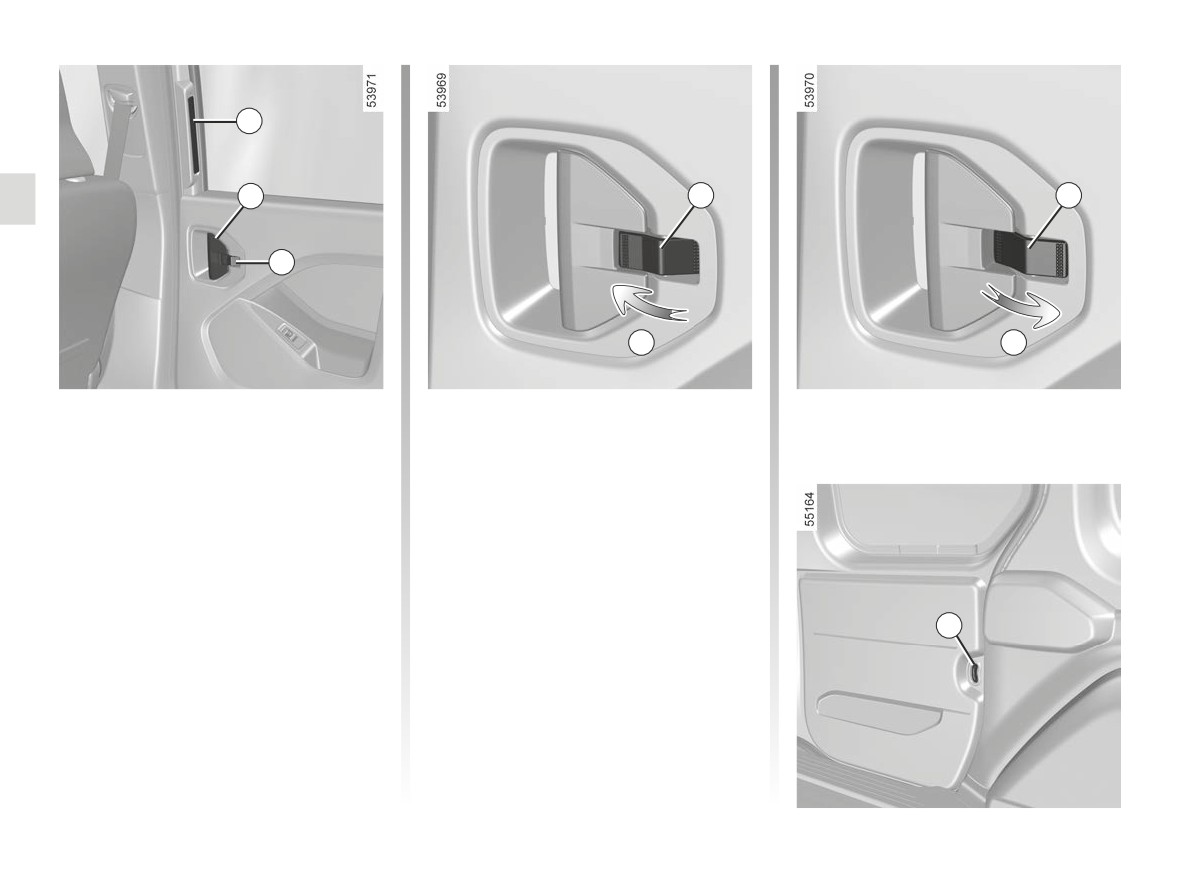
With the 7 button in the unlocked posi-
tion, turn it towards the front of the vehi-
Opening from the inside
cle (movement C).
With the door unlocked, pull the
handle 6 or, depending on the vehi-
Manual unlocking
cle, activate the control 8, then slide
With the button 7 in the locked position,
the door towards the rear of the vehicle
turn it towards the rear of the vehicle
until it locks into the open position.
(movement D).
Closing from the inside
8
Push handle 5 towards the front of
the vehicle until the door is completely
closed.
1.46
CarManuals2.co
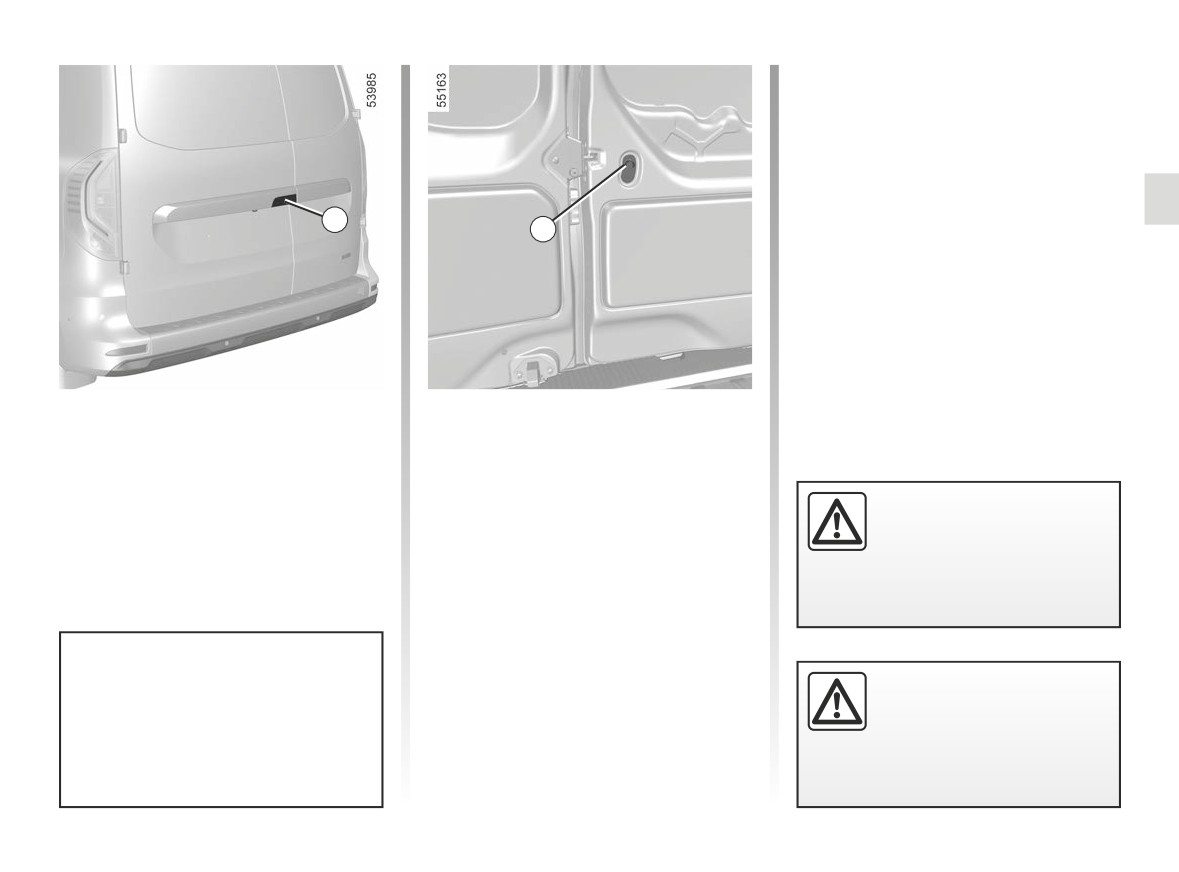
OPENING AND CLOSING THE DOORS (4/6)
9
10
Rear hinged doors
Opening the large door from the
inside
Opening the large door from the
Depending on the vehicle, activate con-
outside
trol 10.
Unlock the door and pull handle 9. To
Do not leave the hinged
unlock the doors ➥ 1.25 ➥ 1.32.
rear doors open in case of
strong winds.
Risk of injury.
For your safety, check that
Before opening the rear hinged
all the vehicle’s doors are
doors, ensure that there is enough
properly closed before
space around to allow the doors to
starting the engine.
be opened.
1.47
CarManuals2.co
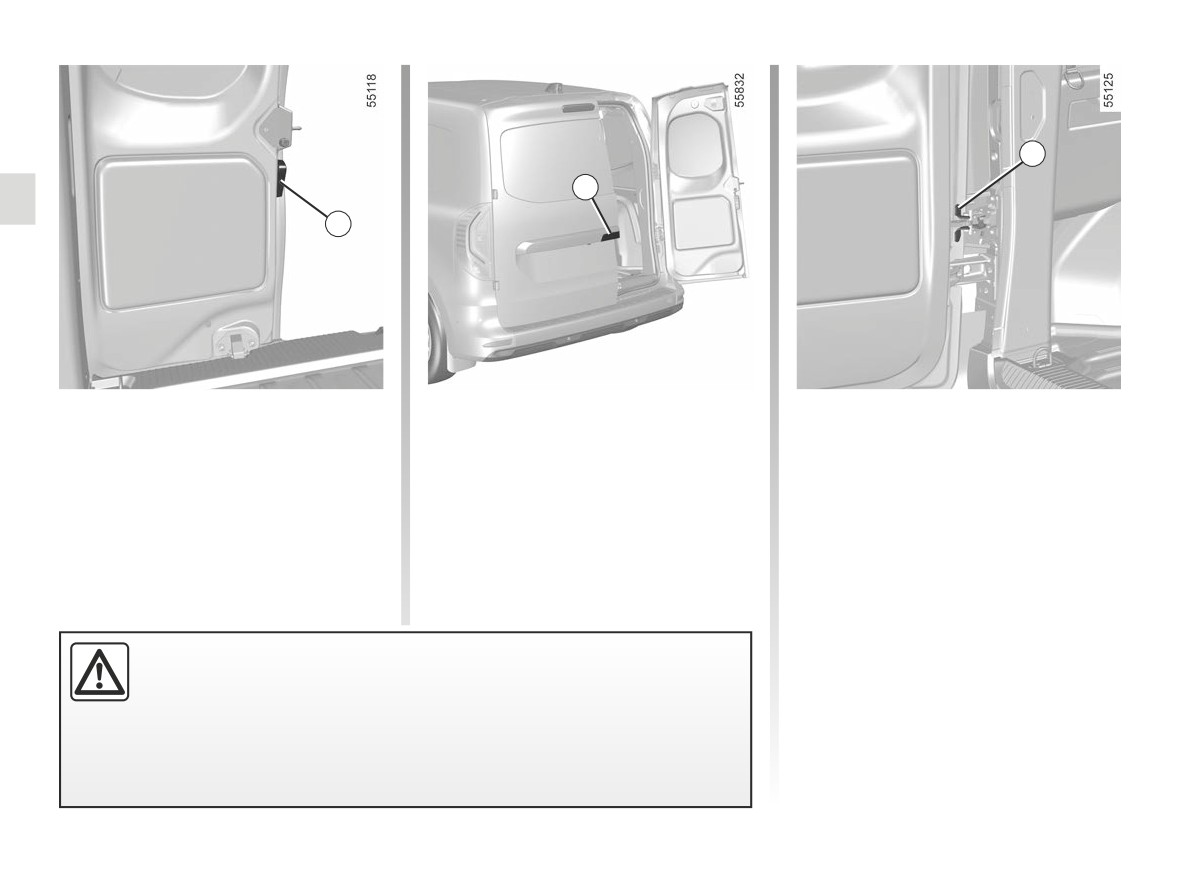
OPENING AND CLOSING THE DOORS (5/6)
12
9
11
Rear hinged doors
Driving with the small door open
Opening the doors to the maximum
(continued)
position
While the small door is open, close the
large door.
For each door, press lever 12 to release
Opening the small door
the door check strap. Open the door as
After use, open the large door using
Move the lever 11 to open the small
far as possible.
handle 9 and close the small door
door.
before closing the large door.
Closing manually from the outside
First close the small door and then
close the large door.
Move the doors until the door check
strap is fully engaged on the door
If the vehicle is parked on the hard shoulder and a luggage compartment
striker plate. Make sure that the door
door is open, the rear lights may be obscured.
check strap is properly engaged before
You should make other road-users aware of your vehicle by using a warn-
closing the hinged doors.
ing triangle or other equipment specified by the road traffic regulations of
the country concerned.
1.48
CarManuals2.co
//////////////////////////////////////////