Renault Captur (2023 year). Manual in english - page 2
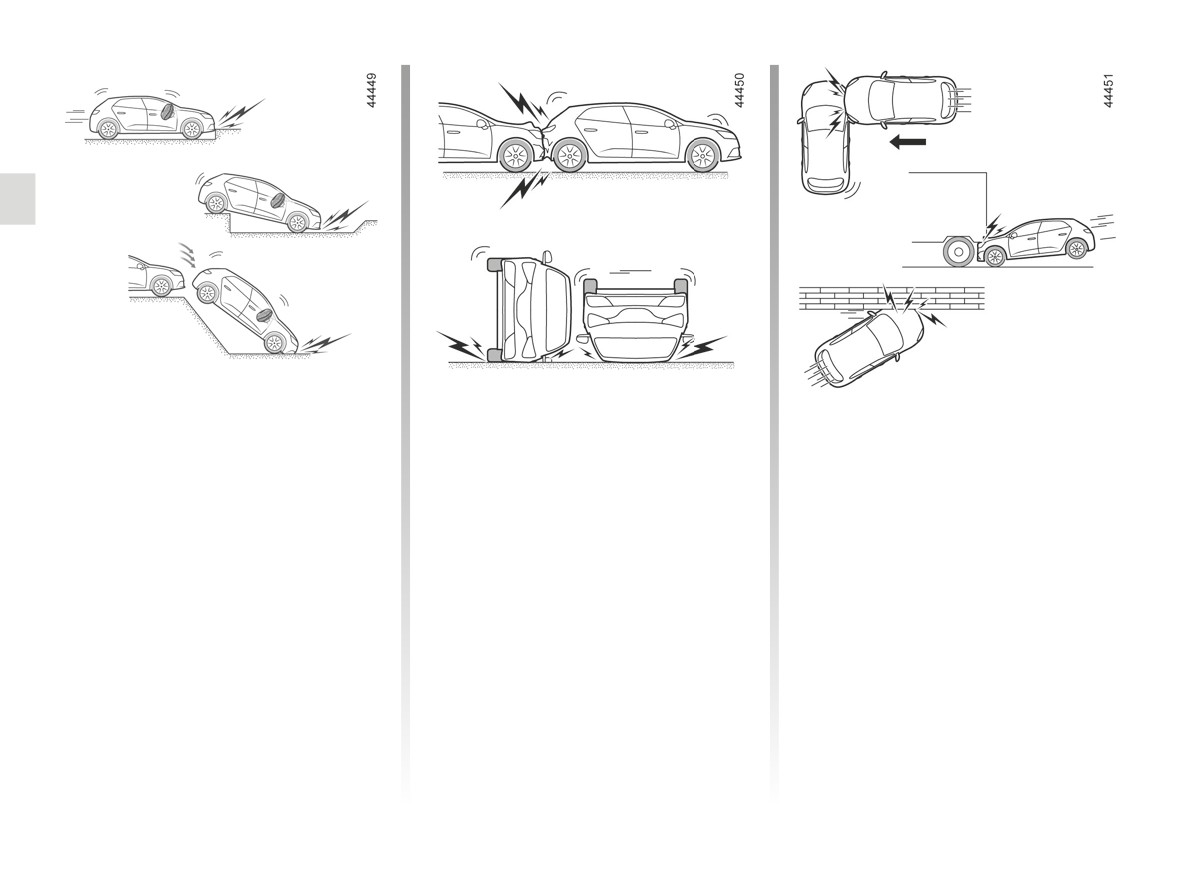
METHODS OF RESTRAINT IN ADDITION TO THE FRONT SEAT BELTS (5/6)
In the following examples, the pre-
In the following examples, there is a
- side impact to the front or rear of the
tensioners or the airbags could op-
risk that pretensioners orairbags may
vehicle;
erate:
not be triggered:
- frontal impact, under the tail of a
- impact under vehicle such as pave-
- rear impact, however severe;
lorry;
ment;
– the vehicle overturning;
- frontal impact against an obstacle
- potholes;
with a sharp angle;
- drop or hard landing;
- ...
- stones;
– ...
1.32
CarManuals2.co
METHODS OF RESTRAINT IN ADDITION TO THE FRONT SEAT BELTS (6/6)
All of the warnings below are given so that the airbag is not obstructed in any way when it is inflated and also to prevent
the risk of serious injuries caused by items which may be dislodged when it inflates.
Warnings concerning the driver’s airbag
- Do not modify the steering wheel or the steering wheel boss.
- Do not cover the steering wheel boss under any circumstances.
- Do not attach any objects (badge, logo, clock, telephone holder, etc.) to the steering wheel boss.
- The steering wheel must not be removed (except by qualified personnel from our Network).
- Do not sit too close to the steering wheel when driving: sit with your arms slightly bent (see “Adjusting your driving position”
➥ 1.23). This will allow sufficient space for the airbag to deploy correctly and be fully effective.
Warnings concerning the passenger airbag
- Do not attach or glue any objects (badge, logo, clock, telephone holder, etc.) to the dashboard on or near the airbag.
- Do not place anything between the dashboard and the passenger (pet, umbrella, walking stick, parcels, etc.).
- The passenger must not put his or her feet on the dashboard or seat as there is a risk that serious injuries may occur. In
general, parts of the body should be kept away from the dashboard (knees, hands, head, etc.).
- The devices in addition to the front passenger seat belt should be reactivated as soon as a child seat is removed, to ensure
the protection of the passenger in the event of an impact.
A REAR-FACING CHILD SEAT MUST NOT BE FITTED TO THE FRONT PASSENGER SEAT UNLESS THE
RESTRAINT SYSTEMS IN ADDITION TO THE FRONT PASSENGER SEATBELT ARE DEACTIVATED ➥ 1.51.
1.33
CarManuals2.co
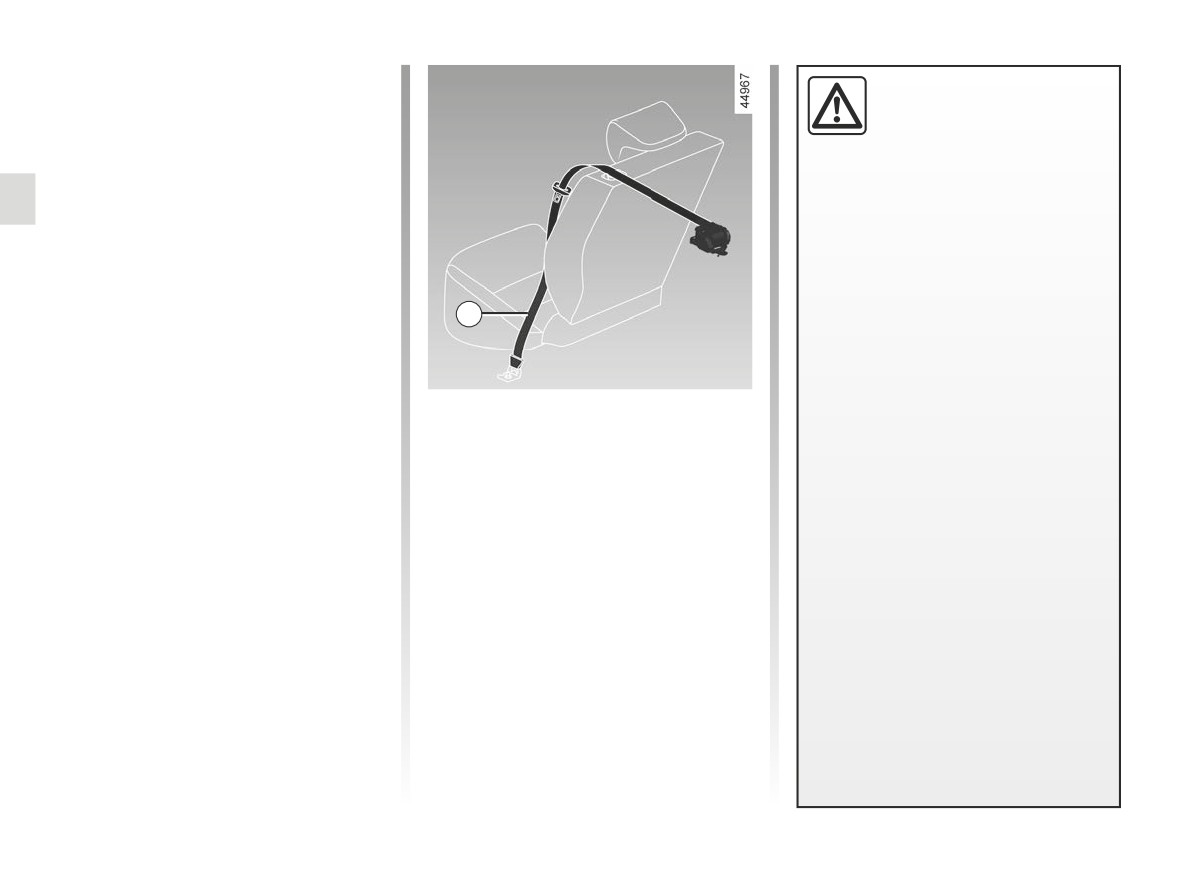
METHODS OF RESTRAINT IN ADDITION TO THE REAR SEAT BELTS
Depending on the vehicle, they will con-
- Have the entire restraint
sist of:
system checked following
- side seat belt inertia reel preten-
an accident.
sioners;
- No operation whatso-
- chest force limiters.
ever is permitted on any part
These systems are designed to act in-
of the system
(pretensioners,
dependently or together when the vehi-
airbags, computers, wiring) and
cle is subjected to a frontal impact.
the system components must not
be reused on any other vehicle,
Depending on the severity of the
even if identical.
impact, the system can trigger:
1
-
Only qualified personnel from our
- seat belt locking;
Network may work on the airbags;
- the seat belt inertia reel pretensioner
otherwise the system may trigger
(which engages to correct seat belt
accidentally and cause injury.
slack).
Side seat belt pretensioners
-
The electric trigger system may
only be tested by a specially
The pretensioners hold the seat belt
Force limiter
trained technician using special
against the body, holding the occupant
equipment.
Above a certain severity of impact, this
more securely against the seat, thus in-
-
When the vehicle is scrapped,
mechanism is used to limit the force of
creasing the seat belt’s efficiency.
contact an approved dealer for
the belt against the body so that it is at
With the ignition on, following a signif-
disposal of the pretensioner and
an acceptable level.
icant frontal impact and depending on
airbags gas generators.
the severity of the impact, the system
may trigger the seat belt inertia reel
pretensioner 1, which instantly retracts
the seat belt.
1.34
CarManuals2.co
SIDE PROTECTION DEVICES
Side Airbag
This airbag may be fitted to each of the
front seats and is activated at the sides
of the seats (door side) to protect the
occupants in the event of a severe side
impact.
Curtain Airbag
This is an airbag fitted (depending on
the vehicle) along the upper sides of
the vehicle - they inflate along the front
and rear door side windows to protect
the passengers in the event of a severe
side impact.
Warning relating to the side airbag
- Fitting seat covers: seats equipped with an airbag require covers spe-
cifically designed for your vehicle. Contact an approved dealer to find
out if these covers are available. The use of any covers other than those
designed for your vehicle (including those designed for another vehicle) may
affect the operation of the airbag and reduce your protection.
-
Do not place any accessories, objects or even pets between the seatback, the
door and the internal fittings. Do not cover the seatback with any items such as
clothes or accessories. This may prevent the air bag from operating correctly
or cause injury when the airbag is deployed.
-
No work or modification whatsoever may be carried out on the seat or internal
fittings, except by qualified personnel from an approved Dealer.
-
This airbag operates through slits in the front seatbacks (door side): never
insert any objects in these slits.
1.35
CarManuals2.co
ADDITIONAL METHODS OF RESTRAINT
All of the warnings below are given so that the airbag is not obstructed in any way when it is inflated and also to prevent
the risk of serious injuries caused by items which may be dislodged when it inflates.
The airbag is designed to complement the action of the seat belt. Both the airbag and the seat belt are integral parts
of the same protection system. It is therefore essential to wear seat belts at all times. If seat belts are not worn, the oc-
cupants are exposed to the risk of serious injury in the event of an accident. It may also increase the risk of minor su-
perficial injuries occurring when the airbag is deployed, although such minor injuries are always possible with airbags.
If the vehicle should overturn or in the event of a rear impact, however severe, the pretensioners and airbags are not always
triggered. Impacts to the underside of the vehicle, e.g. from pavements, potholes or stones, can all trigger these systems.
- No work or modification whatsoever may be carried out on any part of the airbag system (airbags, pretensioners, computer,
wiring harness, etc.), except by qualified Network personnel.
- To ensure that the system is in good working order and to avoid accidental triggering of the system which may cause injury,
only qualified Network personnel may work on the airbag system.
- As a safety precaution, have the airbag system checked if your vehicle has been involved in an accident, or is stolen or
broken into.
- When selling or lending the vehicle, inform the user of these points and hand over this handbook with the vehicle.
- When scrapping your vehicle, contact your approved Dealer for disposal of the gas generator(s).
1.36
CarManuals2.co
CHILD SAFETY: General information (1/2)
Carrying children
Please ensure that you comply with the
legislation of your country.
Children, and adults, must be correctly
seated and strapped in for all journeys.
The children being carried in your vehi-
cle are your responsibility.
Driver’s responsibility
A child is not a miniature adult. Children
To prevent the doors being
when parking or stopping
are at risk of specific injuries as their
opened, use the “Child lock”
the vehicle
muscles and bones have not yet fin-
feature. ➥ 1.14.
ished growing. The seat belt alone
Never leave an animal,
would not provide suitable protection.
child or adult who is not self-suffi-
Use an approved child seat and ensure
cient alone on your vehicle, even for
you use it correctly.
a short time.
A collision at
31 mph
They may pose a risk to themselves
(50 km/ h) is the same
or to others by starting the engine,
as falling a distance of
activating equipment such as the
10 metres.
electric windows or by locking the
Transporting a child without
doors.
a restraint is the equivalent of allow-
Special features of LPG
Also, in hot and/or sunny weather,
ing him or her to play on a fourth-
versions
please remember that the tempera-
floor balcony without railings.
The vehicle’s LPG installa-
ture inside the passenger compart-
Never travel with a child held in your
tion may lead to changes to
ment increases very quickly.
arms.
the vehicle’s features compared to
RISK OF DEATH OR SERIOUS
the petrol version.
In the event of an accident, you will
INJURY.
not be able to keep hold of the child,
This may relate to the number of
even if you yourself are wearing a
seats and the installation of child
seat belt.
seats.
If your vehicle has been involved in
Please contact an authorised dealer.
a road accident, replace the child
seat and have the seat belts and
ISOFIX anchorage points checked.
1.37
CarManuals2.co
CHILD SAFETY: General information (2/2)
Using a child seat
Before fitting a child seat, read the
manual and respect its instructions. If
The level of protection offered by the
you experience any difficulties during
child seat depends on its ability to re-
installation, contact the manufacturer
strain your child and on its installation.
of the equipment. Keep the instructions
Incorrect installation compromises the
with the seat.
protection it offers the child in the event
of harsh braking or an impact.
Before purchasing a child seat, check
that it complies with the regulations for
the country you are in and that it can
be fitted in your vehicle. Consult an ap-
proved dealer to find out which seats
are recommended for your vehicle.
The regulations on transporting chil-
dren are specific to each country. The
Never leave a child unat-
use of a child seat during transport de-
tended in the vehicle.
pends on the age and/or the size and/
Check that your child is
or weight of the child.
always strapped in and that
For children who do not need to be
the belt or safety harness used is
Set a good example by always fas-
transported in a child seat, make sure
correctly set and adjusted. Avoid
tening your seat belt and teaching
that the seat belt is correctly adjusted
wearing bulky clothing which could
your child:
and fastened.
cause the belts to slacken.
- to strap themselves in correctly;
In all cases, you must comply with the
Never let your child put their head or
regulations of the particular country you
- to always get in and out of the car
arms out of the window.
are in.
at the kerb, away from busy traf-
Check that the child is in the correct
fic.
position for the entire journey, espe-
Do not use a second-hand child
cially if asleep.
seat or one without an instruction
manual.
Check that there are no objects in
the vicinity of the child seat which
could impede its operation.
1.38
CarManuals2.co
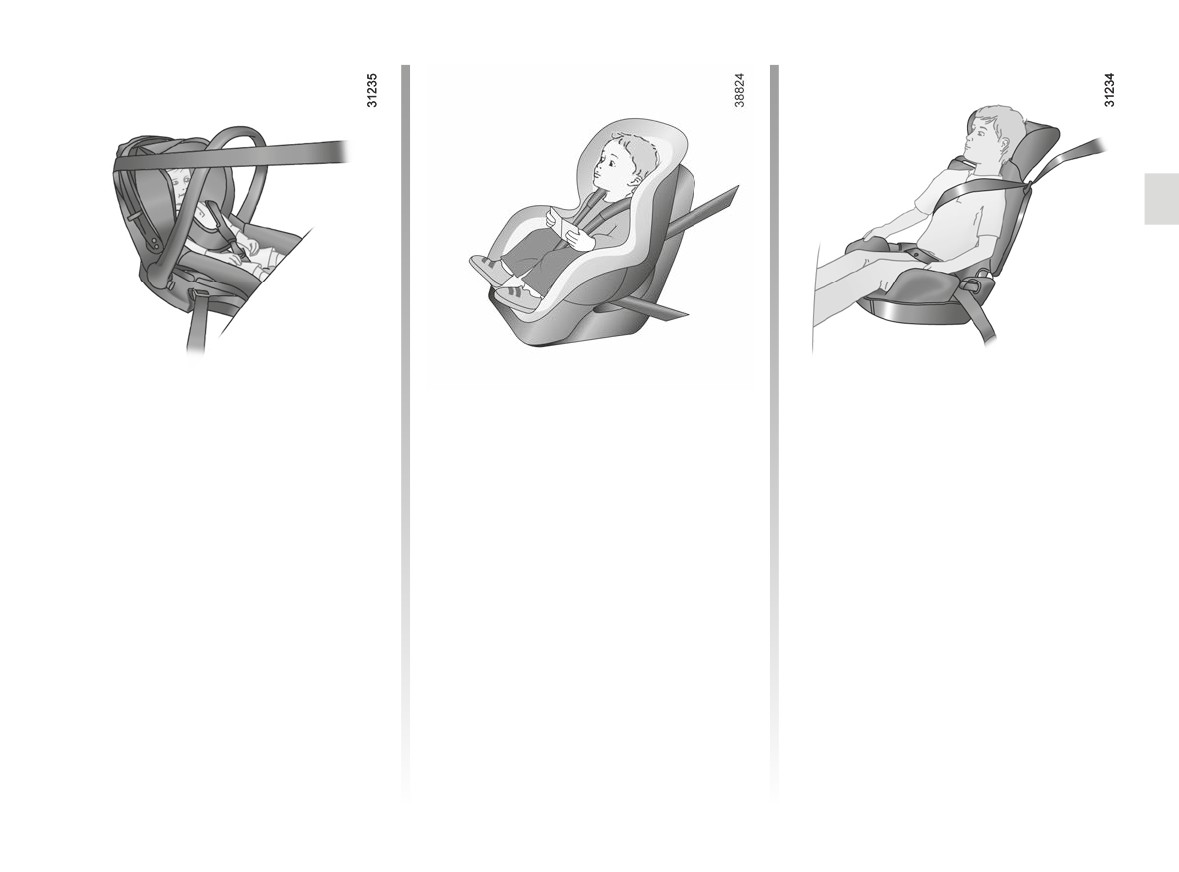
CHILD SAFETY: choosing a child seat
Rear-facing child seats
Forward-facing child seats
Booster cushions
A baby’s head is, proportionally, heavier
Up to 18 kg or 4 years, the child may
From 15 kg or 4 years, the child can
than that of an adult and its neck is very
travel on a forward-facing seat. Choose
travel using a booster seat, which will
fragile. Transport the child in this po-
a seat according the child’s size: their
enable the seat belt to be adapted
sition for as long as possible (until the
head and abdomen are the areas which
to suit his/her size and shape. The
age of 2 at the very least). It supports
must be most protected. A forward-fac-
booster seat cushion must be fitted with
both the head and the neck.
ing child seat which is firmly attached to
guides to position the seat belt on the
the vehicle will reduce the risk of impact
child’s thighs rather than the stomach.
Choose a bucket type seat for best side
to the head. Ensure your child travels in
It is recommended that you use a seat-
protection and change it as soon as the
a forward-facing seat with a harness for
back fitted with a belt strap guide which
child’s head is higher than the shell.
as long as their size permits.
can be adjusted in terms of height to
position the seat belt in the centre of the
Choose a bucket type seat for optimum
shoulder. It must never rest on the neck
side protection.
or on the arm.
Choose a bucket type seat for optimum
side protection.
1.39
CarManuals2.co
CHILD SAFETY: choosing a child seat mounting (1/3)
There are two ways of attaching child
Attachment via the seat belt
seats: via the seat belt or using the
The seat belt must be adjusted to
ISOFIX system.
ensure that it is effective in the event of
harsh braking or an impact.
Ensure that the strap paths indicated
by the child seat manufacturer are re-
spected.
Always check that the seat belt is cor-
rectly fastened by pulling it up, then
pulling it out fully whilst pressing on the
child seat.
Check that the seat is correctly held by
moving it from side to side and back
to front: the seat should remain firmly
fixed.
Check that the child seat has not been
installed at an angle and that it is not
The seat belt must never
resting against a window.
be twisted or the tension
relieved. Never pass the
shoulder strap under the
arm or behind the back.
Check that the seat belt has not
been damaged by sharp edges.
If the seat belt does not operate nor-
mally, it will not protect the child.
Do not use the child seat
Consult an approved dealer. Do not
if it may unfasten the seat
use this seat until the seat belt has
belt restraining it: the base
been repaired.
of the seat must not rest on
the buckle and/or catch of the seat
belt.
1.40
CarManuals2.co
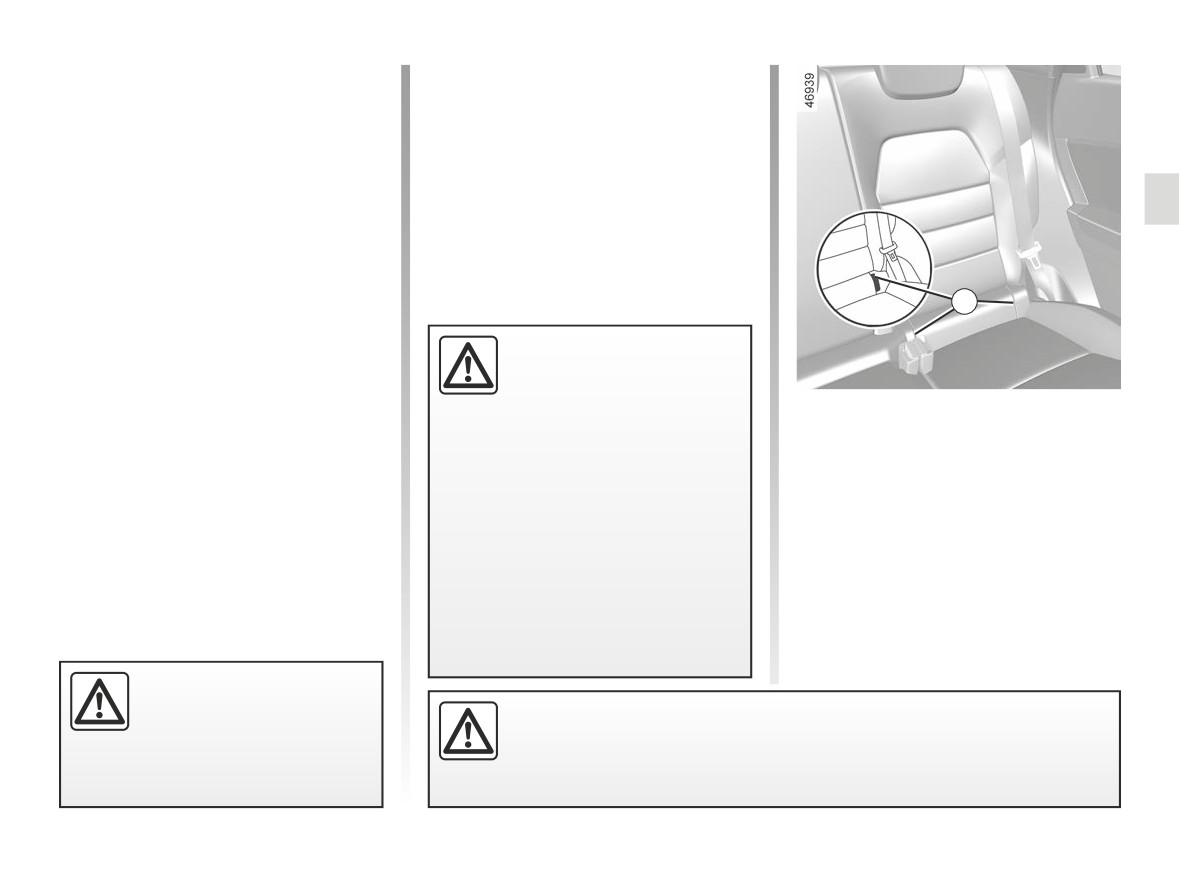
CHILD SAFETY: choosing a child seat mounting (2/3)
Attachment using the ISOFIX
Attach the child seat with the ISOFIX
system
locks, if these are provided. The ISOFIX
system allows quick, easy, safe fitting.
Approved child seats ISOFIX are stand-
ardised in accordance with current reg-
The ISOFIX system consists of 2 rings
ulations if any of the four cases below
and, in some cases, a third ring.
applies:
- ISOFIXuniversal 3-point forward-fac-
ing seat;
- ISOFIXsemi-universal 2-point seat;
- specific;
- i-Size which has either:
1
- a strap which attaches to the third
ring of the seat concerned;
The ISOFIX anchorage
- or a strut that rests on the vehi-
points have been exclu-
cle floor, compatible with the ap-
sively designed for child
proved seat i-Size, the role of
seats with the ISOFIX
The two rings are located behind the
which is to prevent the child seat
system. Never fit a different type of
zip fasteners 1 between the seat back
from moving in the event of a col-
child seat, seat belt or other objects
and seat base and are identified by a
lision.
to these anchorage points.
In the latter three cases check that your
marking.
Check that nothing is obstructing
child seat can be installed by consulting
the anchorage points.
the list of compatible vehicles.
If your vehicle has been involved in
a road accident, have the ISOFIX
anchorage points checked and re-
place your child seat.
No modifications may be
made to the component
Before using an ISOFIX child seat that you purchased for another vehi-
parts of the restraint system
cle, check that its installation is authorised. Consult the list of vehicles
(seat belts, ISOFIX and
which can be fitted with the seat from the equipment manufacturer.
seats and their mountings) originally
fitted.
1.41
CarManuals2.co
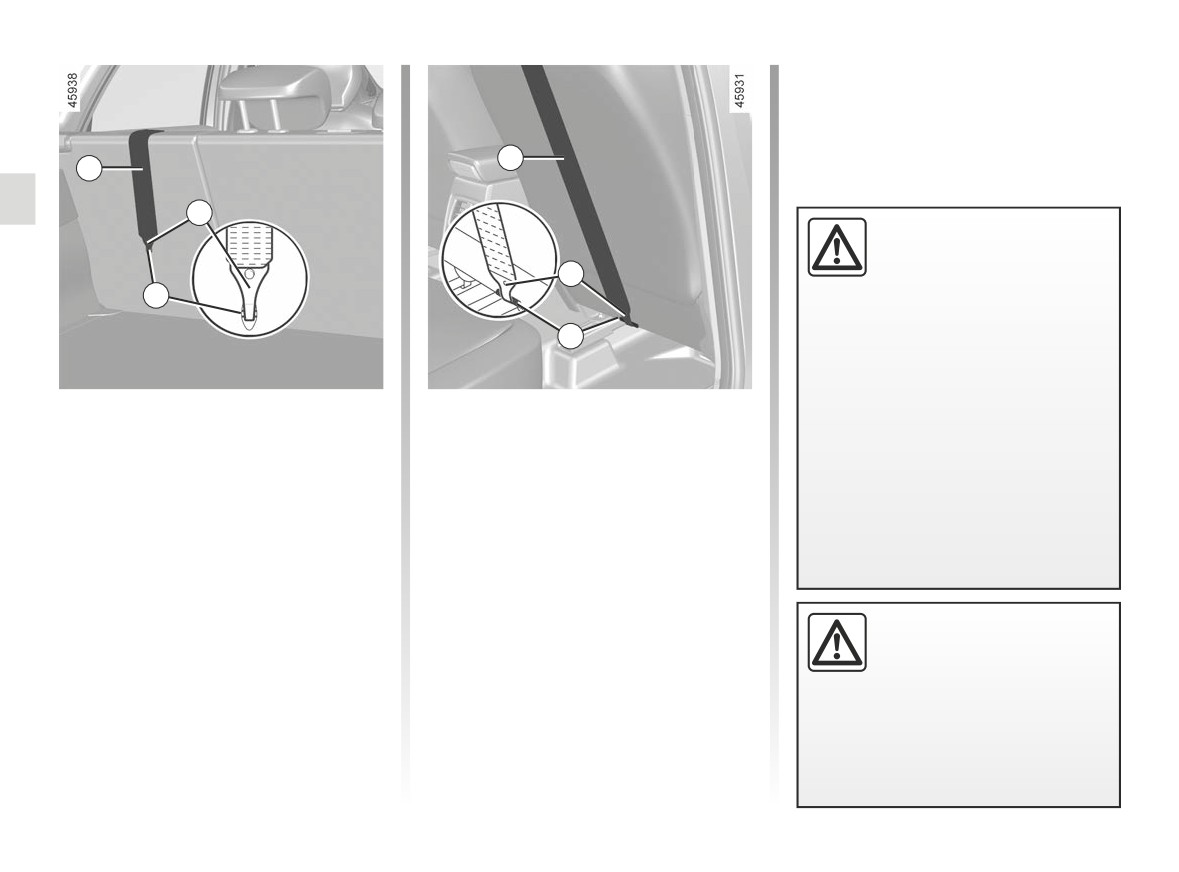
CHILD SAFETY: choosing a child seat mounting (3/3)
2
2
3
The ISOFIX anchorage
points have been exclu-
sively designed for child
3
seats with the ISOFIX
4
system. Never fit a different type of
child seat, seat belt or other objects
4
to these anchorage points.
Check that nothing is obstructing
the anchorage points.
Attachment using the ISOFIX
Front passenger seat
If your vehicle has been involved in
system (continued)
Attach the 3 hook of the upper strap 2 to
a road accident, have the ISOFIX
The third ring 4 is used to attach the
the ring 4 marked with the symbol.
anchorage points checked and re-
upper strap 2 on some child seats.
place your child seat.
All seats
Rear seats
Pull the upper strap 2 so that the back
The upper strap 2 should be positioned
of the child seat comes into contact with
between the seatback and the rear
the back of the vehicle seat.
parcel shelf. To do so, remove the rear
parcel shelf ➥ 3.38.
Check that the seatback
Attach the 3 hook on one of the 4 rings
of the forward-facing child
marked with the symbol.
seat is in contact with the
back of the vehicle seat.
In this case, the child seat may not
always rest on the base of the vehi-
cle seat.
1.42
CarManuals2.co
CHILD SAFETY: fitting a child seat, general information (1/2)
Some seats are not suitable for fitting
The types of child seat indicated may
After installing the child seat, when this
child seats. The diagram on the follow-
not be available. Before using a differ-
is possible, you can move the vehi-
ing page shows you how to attach a
ent child seat, check with the manufac-
cle seat forward if necessary (so as to
child seat.
turer that it can be fitted.
leave enough space in the rear seats
for passengers or other child seats).
In the front seat
For a rear-facing child seat, do not let
The laws concerning children travel-
it touch the dashboard or move it to the
ling in the front passenger seat differ in
furthest forward position.
every country. Consult the legislation in
Do not change other settings after in-
Fit the child seat in a rear
force and follow the indications on the
stalling the child seat.
seat wherever possible.
diagram on the following page.
Make sure the child seat or
Before fitting a child seat in this seat (if
the child’s feet do not pre-
authorised):
vent the front seat from locking cor-
- lower the seat belt as far as possible;
rectly. ➥ 1.21.
- move the seat as far back as possi-
Check that when installing the child
ble;
seat in the vehicle it is not at risk of
- gently tilt the seatback away from
coming loose from its base.
vertical (approximately 25°);
If you have to remove the headrest,
- on equipped vehicles, raise the seat
check that it is correctly stored so
base as far as possible.
that it does not come loose under
harsh braking or impact.
Always fully raise the seat headrest so
that it does not interfere with the child
Always attach the child seat to the
seat ➥ 1.92.
vehicle even if it is not in use so that
it does not come loose under harsh
braking or impact.
RISK
OF
DEATH
OR
SERIOUS INJURY: before
fitting a rear-facing child
seat in this seat, make sure
that the front passenger airbag has
been deactivated. ➥ 1.51.
1.43
CarManuals2.co
CHILD SAFETY: fitting a child seat, general information (2/2)
In the rear side seat
Always remove the headrest from the
rear seat on which the child seat is
A carrycot can be installed across the
positioned. ➥ 3.34. If necessary, posi-
vehicle and will take up at least two
tion the rear seat as far back as pos-
seats. Position the child with his or her
sible. This must be done before fitting
feet nearest the door.
the child seat. Check that the child seat
Move the front seat as far forward as
is resting against the back of the rear
possible to install a rear-facing child
seat.
seat, then move back the seat in front
as far as it will go, although without al-
lowing it to come into contact with the
child seat.
For the safety of the child in the for-
ward-facing position:
- move the relevant seat backwards
as far as possible;
- move the seat in front of the child
A child seat with floor sup-
forwards, and set the position of the
ports must never be in-
Fit the child seat in a rear
seatback to avoid contact between
stalled on the rear centre
seat wherever possible.
the seat and the child’s legs.
seat.
To install an ISOFIX seat in
RISK OF DEATH OR SERIOUS
this seat, unbuckle the seat
INJURY.
belt by hand before engaging the
bolts.
When fitting a child seat
(Group 2 or 3 booster seat),
Fitting a seat ISOFIX in
check that the seat belts
the rear-left seat means
Ensure that the child seat
operate
(wind) correctly
the middle seat cannot be
or the child’s feet do not
➥ 1.23. If necessary, adjust the posi-
used. The central seat belt
prevent the front seat from
tion of the vehicle seat.
will no longer be either accessible or
locking correctly. ➥ 3.35 or
useable.
➥ 1.21.
1.44
CarManuals2.co
CHILD SEATS: attachment by seat belt (1/3)
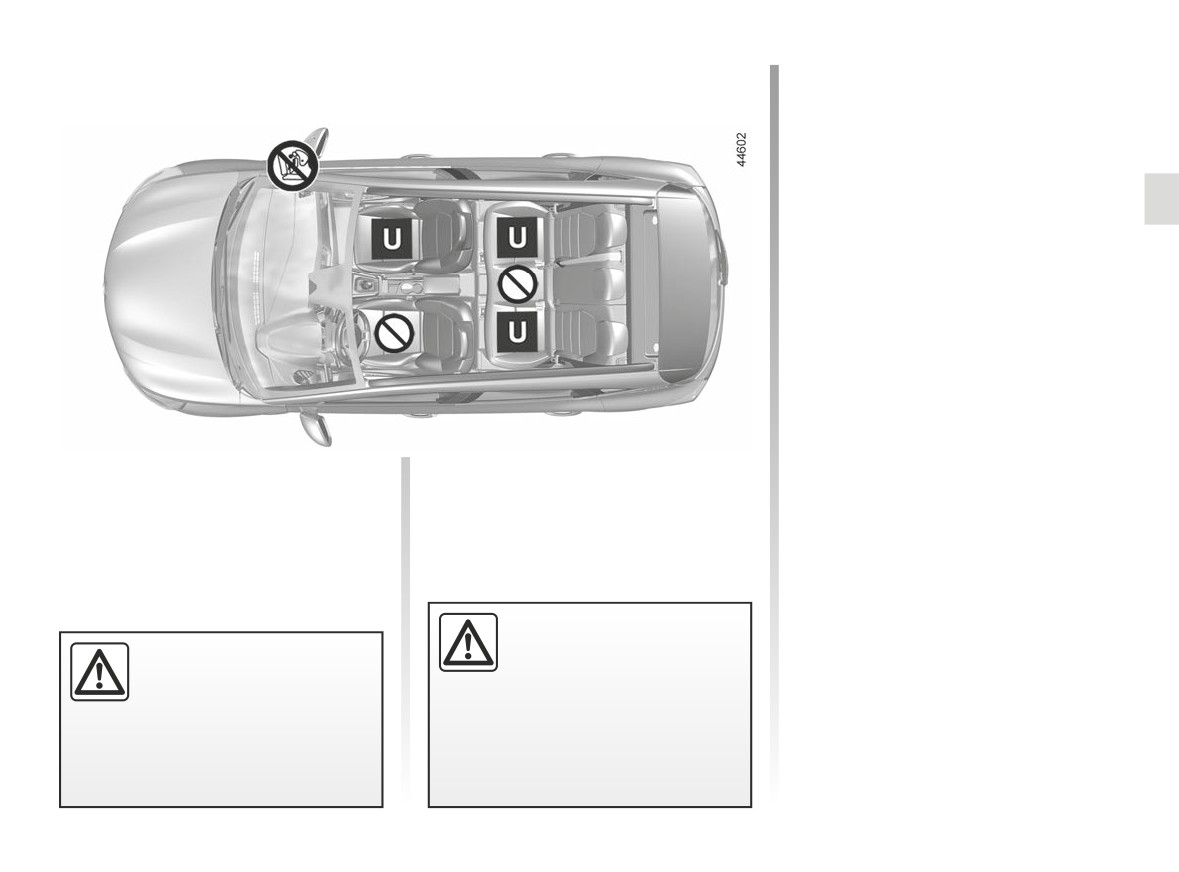
Fitting diagram
³
Check the status of the airbag
before fitting a child seat or allowing a
passenger to use the seat.
Seat not suitable for fitting
²
child seats.
Child seat attached using the belt
¬
Seat which allows a child seat
with “Universal” approval to be attached
by a seat belt.
Using a child safety system
which is not approved for
RISK OF DEATH OR
this vehicle will not correctly
SERIOUS INJURY: before
protect the baby or child.
fitting a rear-facing child
They risk serious or even fatal injury.
seat in this seat, make sure
that the front passenger airbag has
been deactivated. ➥ 1.51.
1.45
CarManuals2.co
CHILD SEATS: attachment by seat belt (2/3)
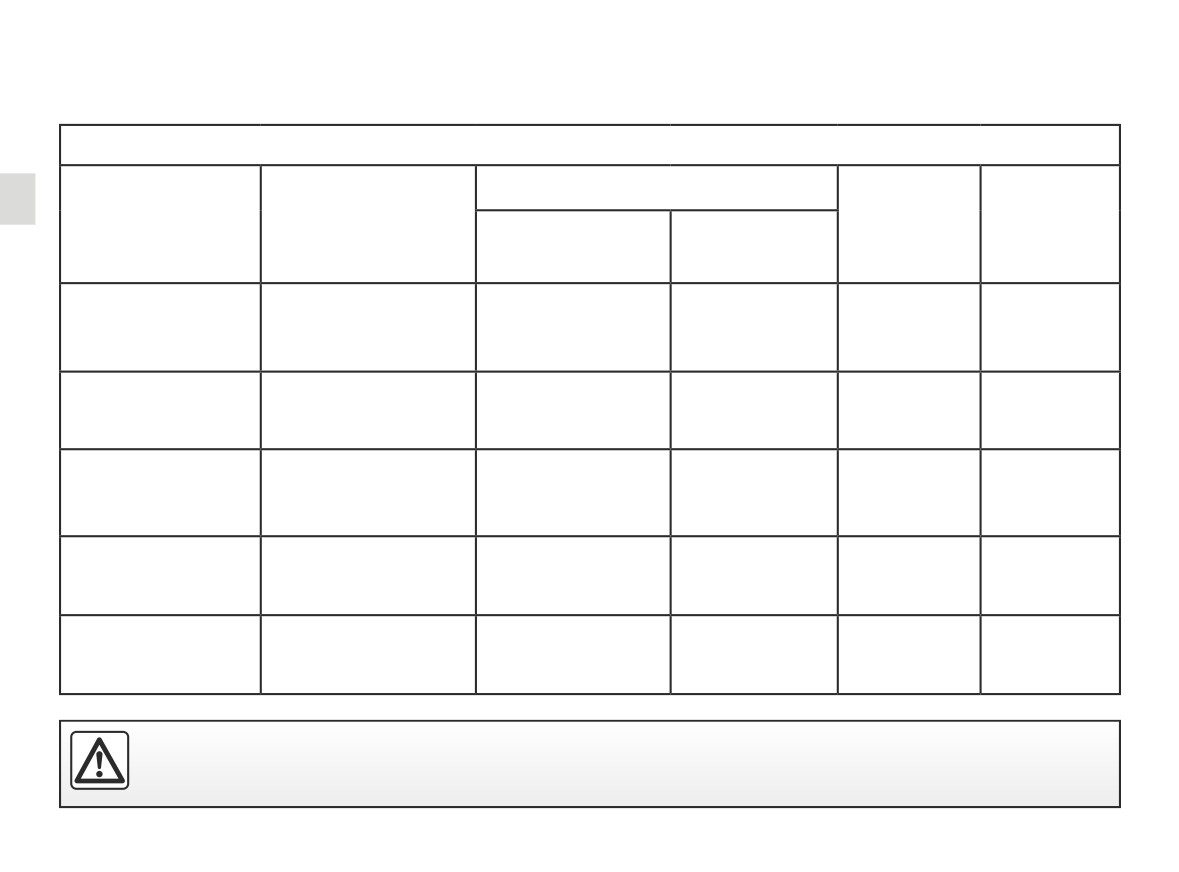
The table below summarises the information already shown on the diagram on the previous page, to ensure the regula-
tions in force are respected.
Five-seater version
Front passenger seat
Rear side
Rear centre
Type of child seat
Weight of the child
With airbag
seats
seat
With airbag disabled
activated
Carrycot
fitted
across the vehicle
< 10 kg
X
X
U (2)
X
Group 0
Rear-facing shell
seat
< 10 kg and < 13 kg
U (1) (5)
X
U (3)
X
Groups 0 or 0 +
Shell seat/rear-facing
seat
< 13 kg and 9 to 18 kg
U (1) (5)
X
U (3)
X
Groups 0+ and 1
Forward-facing seat
9 to 18 kg
X
U (5)
U (4)
X
Group 1
Booster seat
15 to 25 kg and 22 to
X
U (5)
U (4)
X
Groups 2 and 3
36 kg
(1) RISK OF DEATH OR SERIOUS INJURY: before fitting a rear-facing child seat in this seat, make sure that the front
passenger airbag has been deactivated. ➥ 1.51.
1.46
CarManuals2.co
CHILD SEATS: attachment by seat belt (3/3)
X = Seat not suitable for fitting child seats of this type.
U = Seat which allows a child seat with “Universal” approval to be installed using a seat belt; check that it can be fitted.
(2) A carrycot can be installed across the vehicle and will take up at least two seats. Position the child with his or her feet nearest
the door.
(3) If necessary, position the vehicle seat as far back as possible. In order to install a rear-facing child seat, move the front seat
as far forward as possible, then move the front seat back as far as it will go, without allowing it to come into contact with the
child seat.
(4) In all situations, remove the rear headrest of the seat on which the child seat is positioned. This must be done before fitting the
child seat. ➥ 3.34. Move the seat in front of the child forwards, move the seatback forward to avoid contact between the seat
and the child’s legs.
(5) Raise the seat to the maximum and position it as far back as possible, tilting the seatback slightly (approximately 25°).
1.47
CarManuals2.co

CHILD SEATS: fitted using theISOFIX SYSTEM (1/3)
The table below summarises the information already shown in the diagram on the following pages, to ensure the appli-
cable regulations are respected.
Front passenger seat
Weight of
Seat size
Rear side
Rear centre
Type of child seat
Without airbag
the child
ISOFIX
With airbag
seats
seat
or with airbag
activated
deactivated
Carrycot
fitted
F, G
across the vehicle
< 10 kg
X
X
X
X
[L1, L2]
Group 0
Rear-facing shell
E
seat
< 13 kg
IL (1) (4)
X
IL (2)
X
[R1]
Groups 0 or 0 +
Shell seat/rear-facing
< 13 kg and 9 to
C, D
seat
IL (1) (4)
X
IL (2)
X
18 kg
[R3, R2]
Groups 0+ and 1
A, B, B1
Forward-facing seat
9 to 18 kg
X
IUF - IL (1)
IUF - IL (2) (3)
X
Group 1
[F3, F2, F2X]
Booster seat
15 to 25 kg and
[B2]
X
IUF - IL (1)
IUF - IL (2) (3)
X
Groups 2 and 3
22 to 36 kg
Seat i-Size
i-U (1) (4)
i-UF (1)
i-U (2) (3)
X
1.48
CarManuals2.co
CHILD SEATS: fitted using theISOFIX SYSTEM (2/3)
X = Seat not suitable for fitting child seats of this type.
IUF/IL = On equipped vehicles, seat which allows an approved “Universal/semi-universal” or “vehicle specific” child seat to be at-
tached using the ISOFIX system; check that it can be fitted.
i-U = Suitable for “universal” front-facing and rear-facing i-Size restraint devices.
i-UF = Suitable only for “universal” front-facing and rear-facing i-Size restraint devices.
(1) Raise the seat to the maximum and position it as far back as possible, tilting the seatback slightly (approximately 25°).
(2) If necessary, position the vehicle seat as far back as possible. In order to install a rear-facing child seat, move the front seat
as far forward as possible, then move the front seat back as far as it will go, without allowing it to come into contact with the
child seat.
(3) In all situations, remove the rear headrest of the seat on which the child seat is positioned. This must be done before fitting the
child seat. ➥ 3.34. Move the seat in front of the child forwards, move the seatback forward to avoid contact between the seat
and the child’s legs.
The size of the ISOFIX child seat is indicated by a letter:
- A, B, B1 [F3, F2, F2X]: for forward-facing seats in Group 1 (9 to 18 kg);
- CandD [R3,R2]: rear-facing seats or shell seats in Group 0+ (less than 13 kg) or Group 1 (9 to 18 kg);
- E [R1]: rear-facing shell seats in group 0 (less than 10 kg) or 0+ (less than 13 kg);
- F, G [L1, L2]: carrycots in group 0 (less than 10 kg);
- [B2]: boosters in groups 2 and 3 (15 to 25 kg and 22 to 36 kg).
(4) RISK OF DEATH OR SERIOUS INJURY: before fitting a rear-facing child seat in this seat, make sure that the front
passenger airbag has been deactivated. ➥ 1.51
1.49
CarManuals2.co
CHILD SEATS: fitted using theISOFIX SYSTEM (3/3)
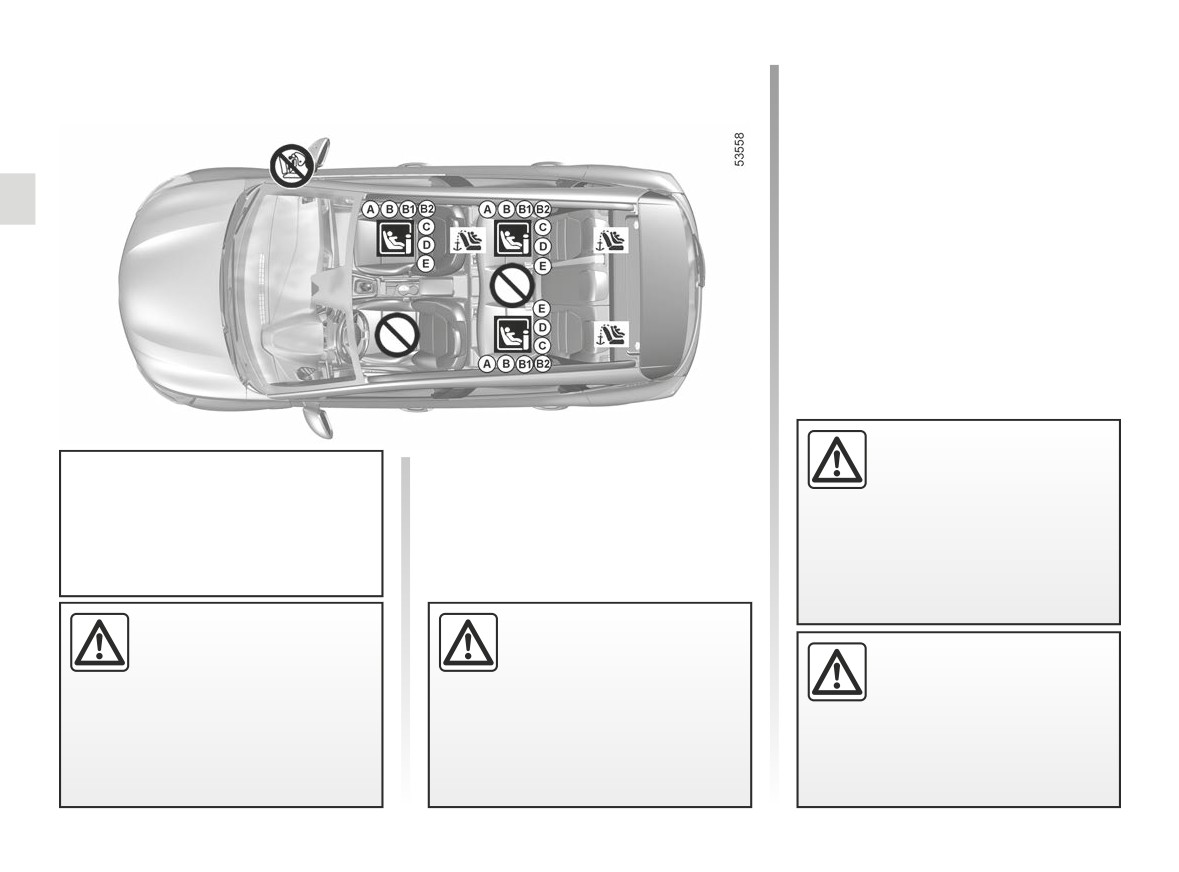
Fitting diagram
Child seat fitted using the ISOFIX
mounting
Seat which allows an ISOFIX
child seat to be fitted.
±
The rear seats are fitted with
an anchorage point which allows a
forward-facing ISOFIX child seat with
universal approval to be attached. The
anchoring points are located on the
passenger seatback for the front seat
and on the bench seatback for the rear
seats.
Fit the child seat in a rear
Seat which does not allow a
seat wherever possible.
²
child seat to be fitted.
For the front passenger seat, the
To install an ISOFIX seat in
use of a child seat with a floor sup-
this seat, unbuckle the seat
port is recommended to avoid trig-
belt by hand before engaging the
gering the seat belt warning signal.
bolts.
Using a child safety system
RISK OF DEATH OR
which is not approved for
SERIOUS INJURY:
Fitting a seat ISOFIX in
this vehicle will not correctly
before fitting a rear facing
the rear-left seat means
protect the baby or child.
child seat on the front pas-
the middle seat cannot be
They risk serious or even fatal injury.
senger seat, check that the airbag
used. The central seat belt
has been deactivated ➥ 1.51
will no longer be either accessible or
useable.
1.50
CarManuals2.co
CHILD SAFETY: deactivating, activating AIRBAG front passenger (1/3)
The passenger airbag may
only be activated or deacti-
vated when the vehicle is
1
stationary, with the igni-
tion off.
2
If it is interfered with when the ve-
hicle is being driven, indicator lights
å
Switch the ignition off then on again
to reset the airbag in accordance
with the lock position.
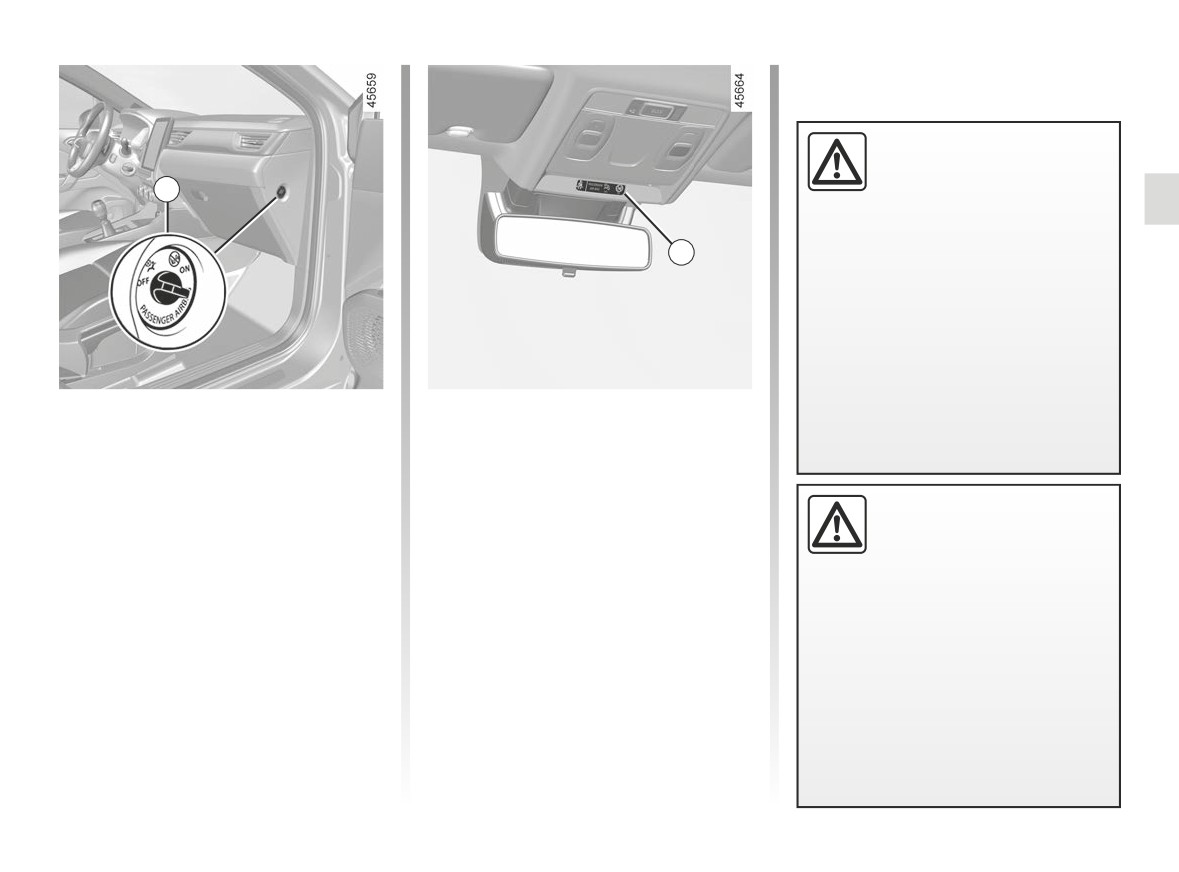
Deactivating the front
To deactivate the airbag: with the
vehicle stationary and the ignition
passenger airbag
switched off, push and turn lock 1 to
Before installing a child seat on the
the OFF position.
front passenger seat:
When the ignition is switched on, it is
DANGER
- check that the child seat can be in-
essential to check that the warning
stalled on this seat;
Since operation of the front
light
¹
is illuminated on the dis-
passenger airbag is not
- it is essential to deactivate the
play 2.
compatible with the po-
airbagfor a rear-facing child seat.
sition of a rear-facing child seat,
This light remains permanently lit to
NEVER fit a rear-facing child re-
let you know that you can fit a child
straint system in a seat protected
seat.
by an ACTIVATED front AIRBAG.
This can lead to the DEATH of the
CHILD or SERIOUS INJURY.
1.51
CarManuals2.co
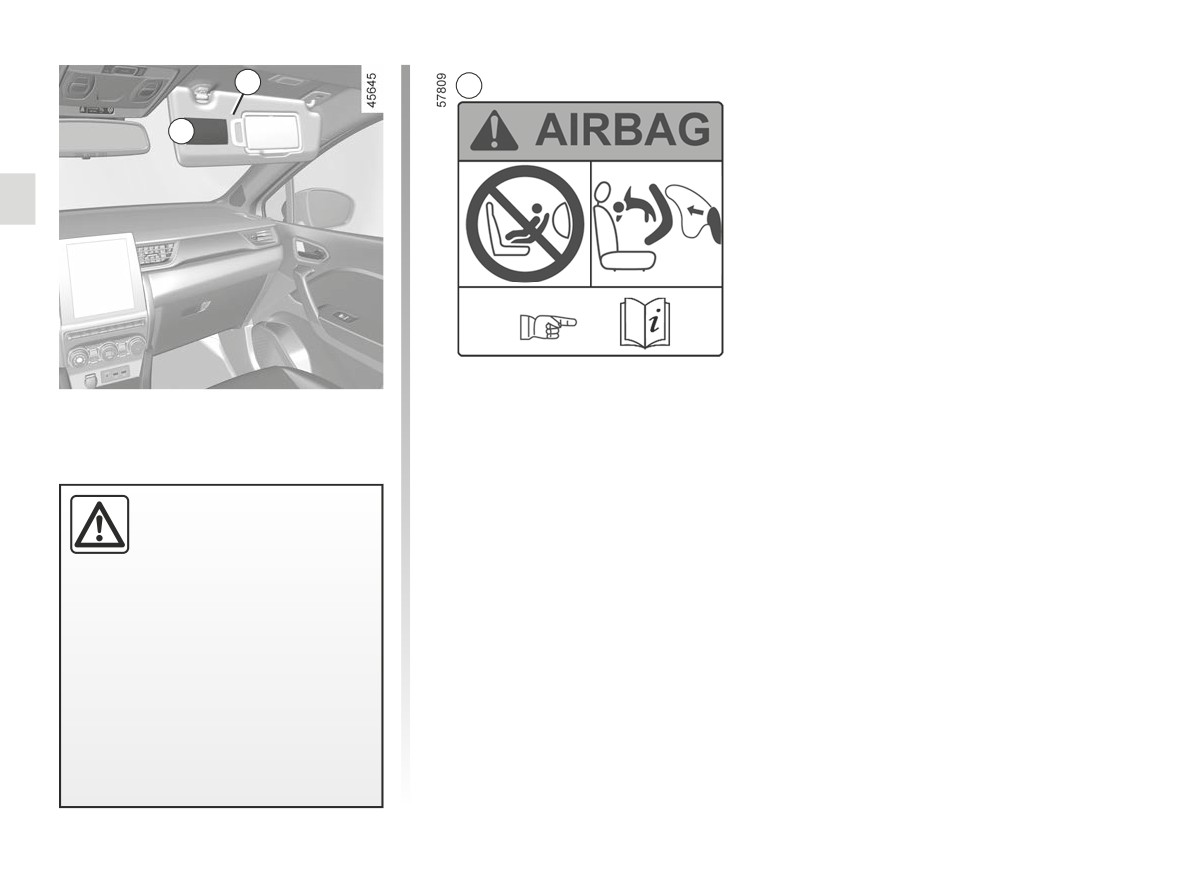
CHILD SAFETY: deactivating, activating AIRBAG front passenger (2/3)
3
A
A
The markings on the dashboard and
labels A on each side of the passen-
ger sun visor 3 (example: label shown
above) remind you of these instruc-
tions.
DANGER
Since operation of the front
passenger airbag is not
compatible with the po-
sition of a rear-facing child seat,
NEVER fit a rear-facing child re-
straint system in a seat protected
by an ACTIVATED front AIRBAG.
This can lead to the DEATH of the
CHILD or SERIOUS INJURY.
1.52
CarManuals2.co
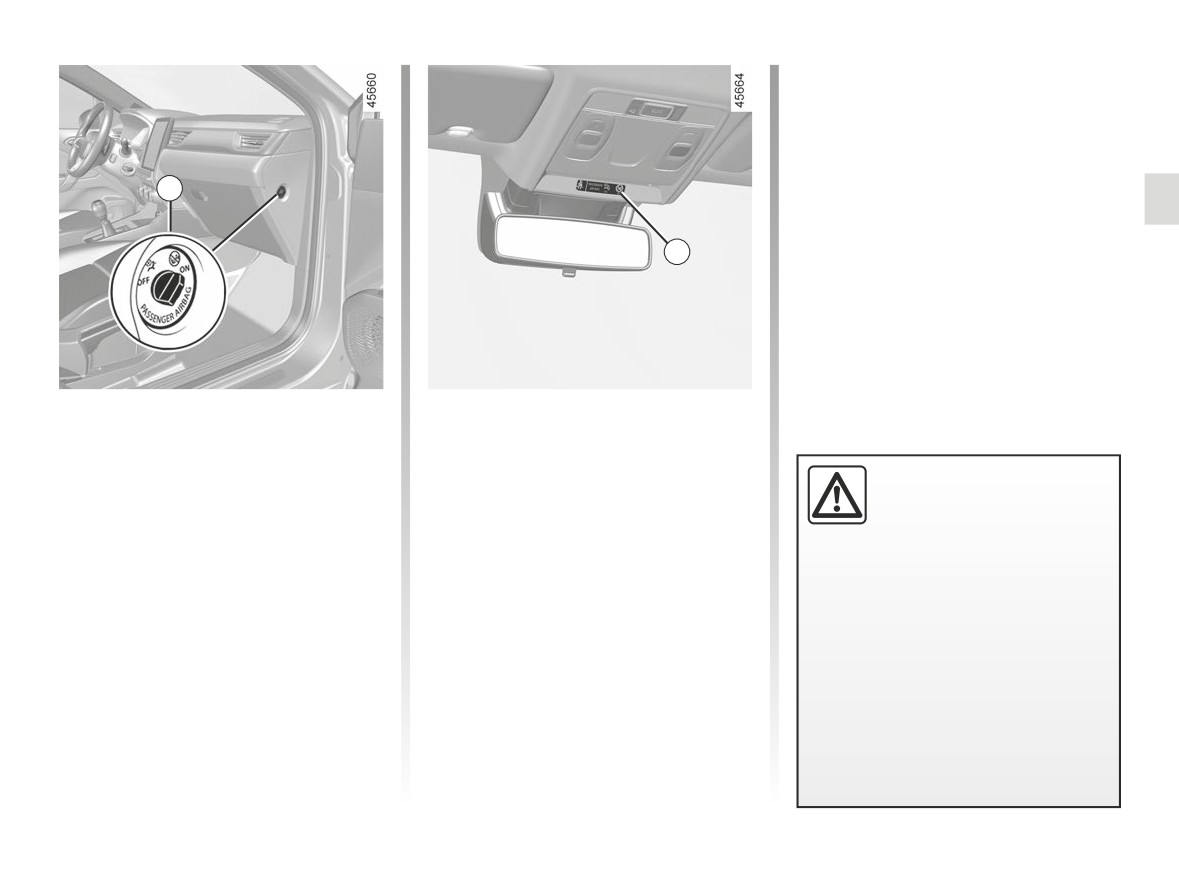
CHILD SAFETY: deactivating, activating AIRBAG front passenger (3/3)
Operating faults
It is forbidden to fit a rear-facing child
seat to the front passenger seat if the
airbag activation/deactivation system is
faulty.
1
Allowing any other passenger to sit in
that seat is not recommended.
Contact your approved dealer as soon
2
as possible.
Activating the front
To restart the airbag: vehicle
stopped, ignition switched off, press
passenger airbag
and turn the lock to 1 position ON.
You should reactivate the airbag as
When the ignition is switched on, you
The passenger airbag may
soon as you remove the child seat from
only be activated or deacti-
the front passenger seat to ensure the
must check that the ¹
warning
vated when the vehicle is
protection of the front passenger in the
light is off and that the warning light
stationary with the igni-
event of an impact.
tion off.
lights up on the display 2 after
each start-up for around 1 minute.
If it is interfered with when the ve-
hicle is being driven, indicator lights
The front passenger airbag is activated.
å
Switch the ignition off then on again
to reset the airbag in accordance
with the lock position.
1.53
CarManuals2.co
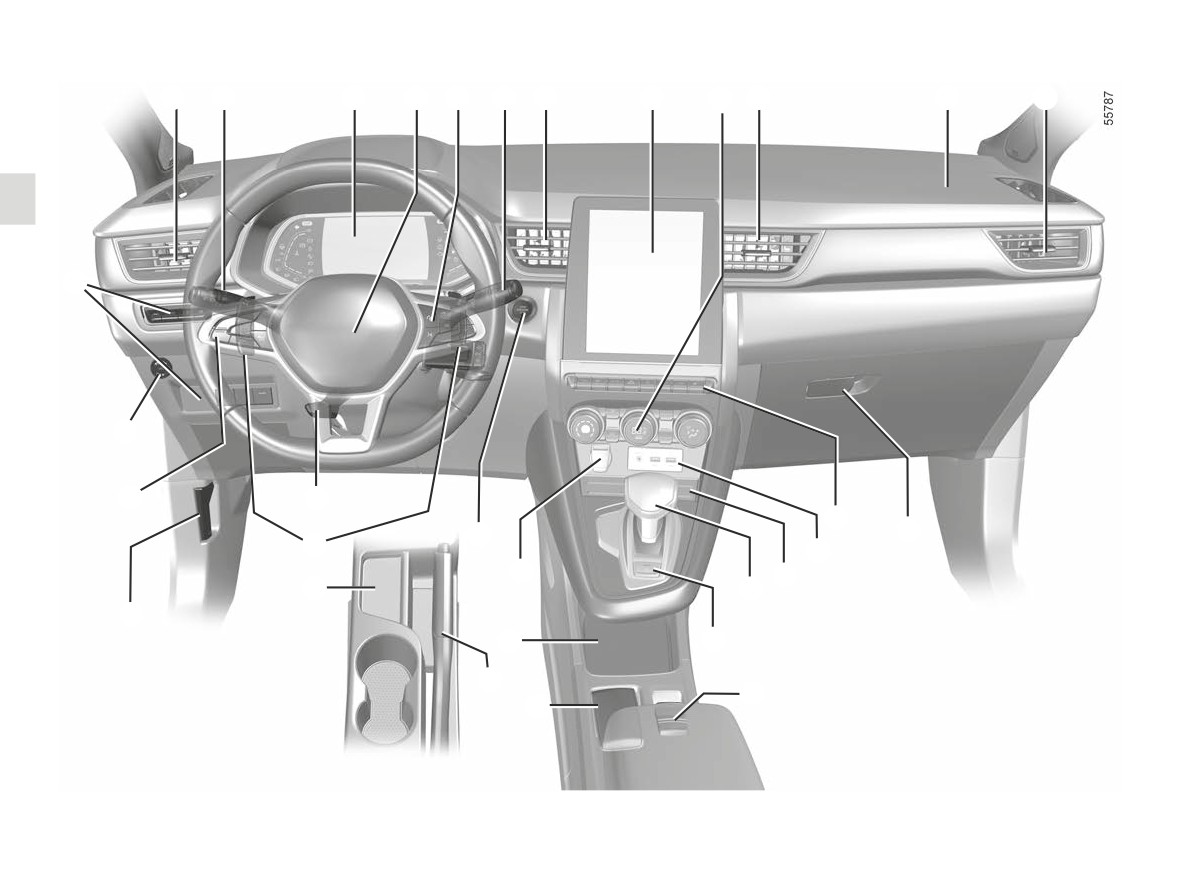
DRIVING POSITION: LEFT-HAND DRIVE (1/2)
1
2
3
4
5
6
7
8
9
7
10
1
28
27
26
23
12
22
11
24
13
21
14
18
15
25
20
16
19
17
18
1.54
CarManuals2.co
DRIVING POSITION: LEFT-HAND DRIVE (2/2)
The equipment fitted, described below, DEPENDS ON THE VERSION AND COUNTRY.
1
Side air vents.
12
Controls for:
20
Charging zone/telephone storage.
2
Stalk for:
- front seat heating;
21
Accessories socket.
- direction indicator lights;
- activation/deactivation of the
22
Engine start/stop button.
- exterior lights;
Stop and Start function;
23
Control for adjusting steering
- rear fog lights.
- activation/deactivation, depend-
wheel height and reach.
3
Instrument panel.
ing on the vehicle, of the ECO or
24
Automatic gearbox paddles
4
Driver airbag and horn location.
MULTI-SENSE mode;
25
Bonnet release control.
5
Controls for:
- hazard warning lights;
26
Main switch and controls for the
- on-board computer information
- electric door locking;
Cruise control/speed limiter, adap-
read-out and vehicle settings
- activation/deactivation of the
tive cruise control and
“Lane
customisation menu,
parking distance control;
Centring” functions.
- remote radio and navigation
- activating/deactivating the 360°
27
LPG control.
system.
camera;
28
Controls for:
6
Steering column stalk for wind-
- ...
- lighting rheostat for control
screen and rear screen wash/
13
USB sockets.
instru- ments;
wiper.
14
Storage compartment.
- headlight beam height remote
7
Centre air vents.
15
Gearstick.
adjustment;
8
Multimedia screen.
16
Parking position button on the au-
- activation/deactivation of the
9
Heating or air conditioning con-
tomatic gearbox.
steering wheel heating;
trols.
17
Controls for:
- activation/deactivation of Lane
10
Passenger airbag location.
- activating/deactivating the elec-
Keeping Assist/Lane Departure
11
Glove compartment
tronic parking brake;
Warning;
- activation/deactivation of the
- heated windscreen.
function autohold.
18
“Hands-free” card holder.
19
Handbrake.
1.55
CarManuals2.co
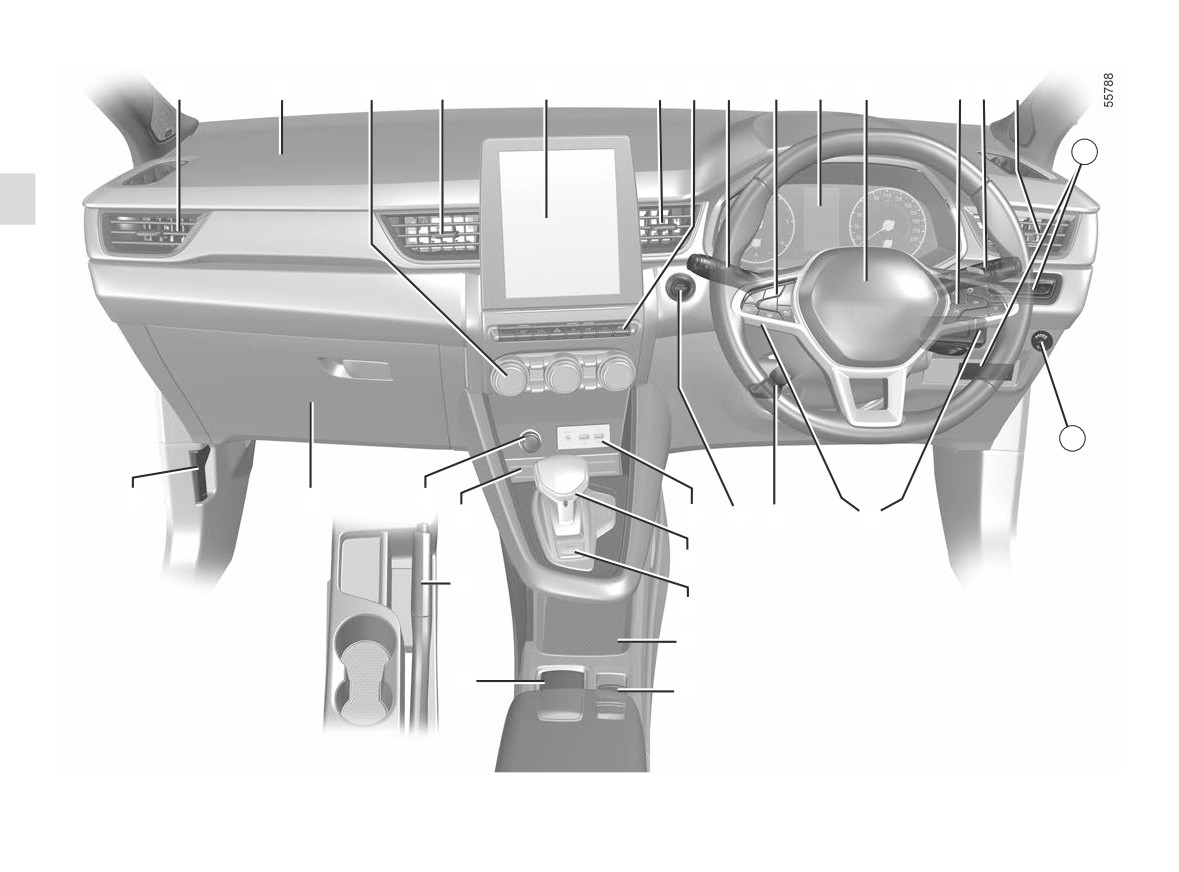
DRIVING POSITION: RIGHT-HAND DRIVE (1/2)
1
2
3
4
5
4
6
7
8
9
10
11 12
1
13
14
28
27
26
25
18
17
16
15
19
24
20
21
23
22
1.56
CarManuals2.co
DRIVING POSITION: RIGHT-HAND DRIVE (2/2)
The equipment fitted, described below, DEPENDS ON THE VERSION AND COUNTRY.
1
Side air vents.
8
Main switch and controls for the
14
LPG control.
2
Passenger airbag location.
Cruise control/speed limiter, adap-
15
Automatic gearbox paddles.
3
Heating or air conditioning con-
tive cruise control and
“Lane
16
Control for adjusting steering
trols.
Centring” functions.
wheel height and reach.
4
Centre air vents.
9
Instrument panel.
17
Engine start/stop button.
5
Multimedia screen.
10
Driver airbag and horn location.
18
USB sockets.
6
Controls for:
11
Controls for:
19
Gearstick.
- front seat heating;
- on-board computer information
20
Parking position button on the au-
- activation/deactivation of the
read-out and vehicle settings
tomatic gearbox.
Stop and Start function;
customisation menu,
21
Charging zone/telephone storage
- activation/deactivation, depend-
- remote radio and navigation
22
Controls for:
ing on the vehicle, of the ECO or
system.
- activating/deactivating the elec-
MULTI-SENSE mode;
12
Steering column stalk for wind-
tronic parking brake;
- hazard warning lights;
screen and rear screen wash/
- activation/deactivation of the
- electric door locking;
wiper.
function autohold.
- activation/deactivation of the
13
Controls for:
23
“Hands-free” card holder.
parking distance control;
- lighting rheostat for control
24
Handbrake.
- activating/deactivating the 360°
instru- ments;
25
Storage compartment.
camera;
- headlight beam height remote
26
Accessories socket.
- ...
adjustment;
27
Glovebox.
7
Stalk:
- activation/deactivation of the
28
Bonnet release control.
- direction indicator lights;
steering wheel heating;
- exterior lights;
- activation/deactivation of Lane
– rear fog lights.
Keeping Assist/Lane Departure
Warning;
– heated windscreen
1.57
CarManuals2.co
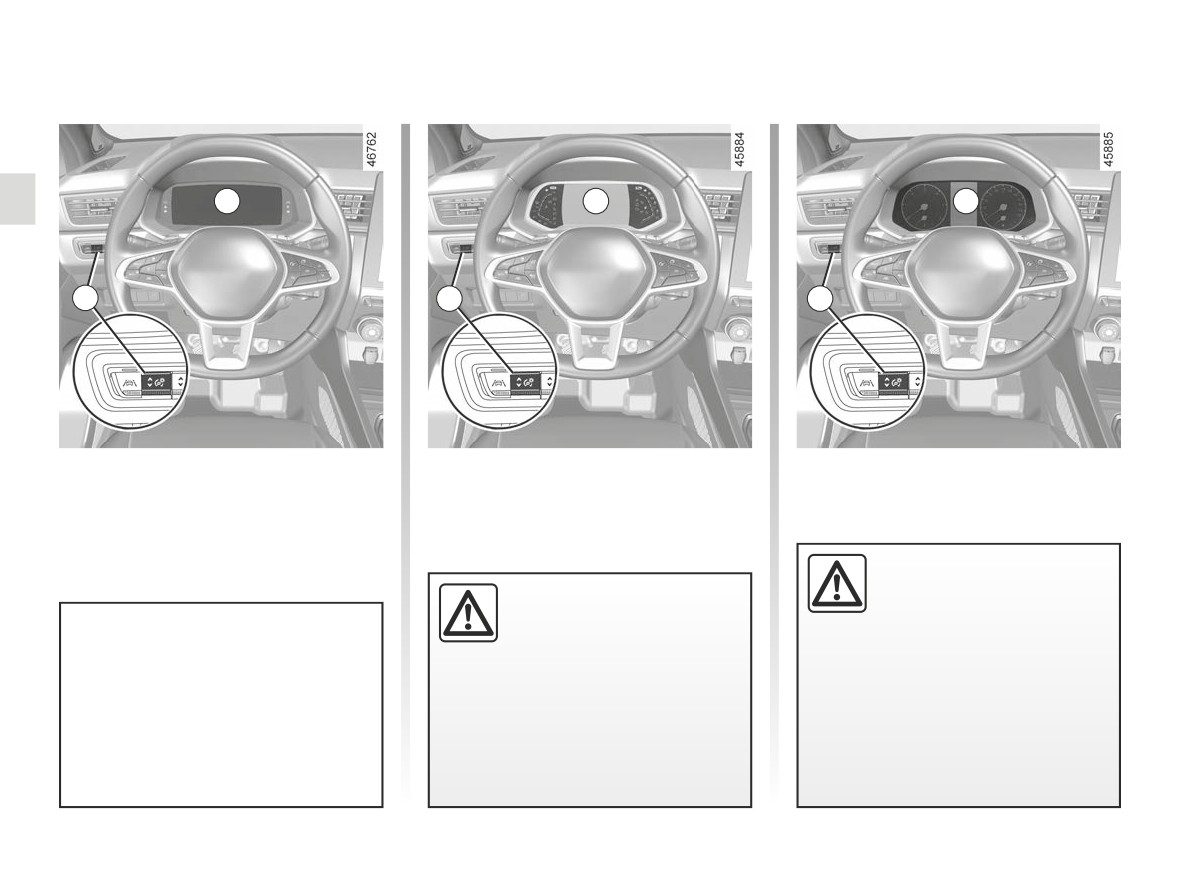
WARNING LIGHTS (1/6)
The display of information shown below DEPENDS ON THE VEHICLE EQUIPMENT AND COUNTRY.
A
B
C
1
1
1
Instrument panel A, B or C : it illumi-
In some cases, the appearance of a
nates when the ignition is switched on.
warning light is accompanied by a mes-
Press or lift the 1 switch as many times
sage on the instrument panel.
as required to adjust the intensity.
If no lights or sounds are ap-
parent, this indicates a fault
For your safety, the warning
in the instrument panel. This
light® requires you to
indicates that it is essential
stop immediately as soon
to stop immediately (as soon as traf-
Warning light
means you
as traffic conditions allow.
fic conditions allow). Ensure that the
should drive very carefully to an
Switch off the engine and do not re-
vehicle is correctly immobilised and
authorised dealer as soon as
start it. Call an approved Dealer.
contact an approved Dealer.
possible. If you fail to follow this
recommendation, you risk damag-
ing your vehicle.
1.58
CarManuals2.co
WARNING LIGHTS (2/6)
The display of information shown below DEPENDS ON THE VEHICLE EQUIPMENT AND COUNTRY.
Side light warning light
Indicator lightairbag
Brake circuit fault warning
š
å
D
light
It lights up when the ignition or
Main beam headlight tell-
the engine is switched on and goes off
It lights up when the ignition or the
á
tale
after a few seconds.
engine is switched on and goes off after
a few seconds.
Dipped beam headlight tell-
If it does not come on when the igni-
k
tale
tion is switched on, or comes on when
If it comes on during braking and is ac-
the engine is running, there is a fault in
companied by the
®
warning light
Rear fog lights tell-tale
the system.
and a beep, it indicates that the fluid
level in the circuit is low or that there is
Contact your approved Dealer as soon
Automatic main beam head-
a braking system fault.
as possible.
light indicator light ➥ 1.93
Stop as soon as traffic conditions allow
STOP light
Left-hand direction indicator
®
and consult an approved dealer.
-
tell-tale
This lights up when the igni-
Battery charge warning light
tion or engine is switched on and goes
Right-hand direction indica-
Ú
˜
out as soon as the engine is running. It
It lights up when the ignition or
tor tell-tale light
comes on with other warning lights and/
the engine is switched on and goes off
or messages, and is accompanied by
after a few seconds.
a beep.
If it comes on on the road, accompa-
It requires you to stop immediately, for
nied by the
®
warning light and a
your own safety, as soon as traffic con-
beep, this indicates an overload or dis-
ditions allow. Switch off the engine and
charge in the electrical circuit.
do not restart it.
Stop as soon as traffic conditions allow
Contact an approved Dealer.
and contact an approved Dealer.
1.59
CarManuals2.co
WARNING LIGHTS (3/6)
The display of information shown below DEPENDS ON THE VEHICLE EQUIPMENT AND COUNTRY.
Oil pressure warning light
Warning light
If you fail to follow this recommenda-
À
It lights up when the ignition or
tion, you risk damaging your vehicle.
This lights up when the igni-
the engine is switched on and goes off
tion or engine is switched on and goes
Handbrake “on” and elec-
after a few seconds.
}
out as soon as the engine is running.
tronic parking brake warn-
If it comes on on the road, accompa-
It can light up in conjunction with other
ing light ➥ 2.24 ➥ 2.25
nied by the
®
warning light and
warning lights and/or messages on the
Gear change indicators
a beep, stop immediately and cut the
instrument panel. It means you should
This lights up to advise
ignition.
drive very care- fully to an approved
you to change to a higher gear (arrow
Dealer as soon as possible. If you fail
Check the oil level. If the level is normal,
pointing upwards) or lower gear (arrow
to follow this recommendation, you risk
the warning light is related to something
pointing downwards) ➥ 2.30.
damaging your vehicle.
else.
Warning light for the elec-
Warning light
Call an approved Dealer.
tronic stability program
If it appears in red during driv-
(ESC) and traction control system
Variable power-assisted
ing and is accompanied by the
®
U
steering warning light
It lights up when the ignition or the
indicator light, you must, for your safety,
engine is switched on and goes off after
It lights up when the ignition or the
stop as soon as traffic conditions allow.
a few seconds.
engine is switched on and goes off after
Switch off the engine and do not restart
a few seconds.
There are several reasons for the warn-
it. Call an approved Dealer. If it appears
ing light to appear: ➥ 2.46.
If it comes on while driving, alongside
in yellow during driving and is accom-
the warning light
®
, this means
Warning light for non-availa-
an approved dealer as soon as possi-
bility of the electronic stabil-
there is a system fault.
Contact an authorised dealer.
ble. Meanwhile, drive with care.
ity program (ESC) and traction con-
trol system
“AUTOHOLD” system warn-
ing ➥ 2.29
Door status warning light
1.60
CarManuals2.co
WARNING LIGHTS (4/6)
The display of information shown below DEPENDS ON THE VEHICLE EQUIPMENT AND COUNTRY.
Anti-lock braking warning
Preheating warning light
If the light becomes orange while driv-
x
light
É
(Diesel version)
ing and a beep sounds, fill up with fuel
as soon as possible. There is only ap-
It lights up when the ignition or the
This should come on when the igni-
proximately 31 miles (50 km) worth of
engine is switched on and goes off after
tion is switched on. It indicates that the
fuel left.
a few seconds.
heater plugs are in operation.
If it lights up when you are driving, it in-
Mode warning light ECO
It goes out when preheating is com-
dicates a fault in the anti-lock braking
plete. The engine can be started.
It comes on when ECO mode
system.
is active ➥ 2.30.
Toxic Fume Filter System
Braking will then be as normal, without
Ä
Warning Light
Freewheel indicator light
the ABS. Contact an approved Dealer
as soon as possible.
On vehicles that are equipped, this light
➥ 2.30
comes on when the engine is started
Particle filter system warn-
and, depending on the vehicle, when
ing light ➥ 2.16 ➥ 2.18
the ignition is switched off while the
Warning light for reagent
engine is in the standby phase ➥ 2.12
level and faults in the ex-
then it goes out.
haust gas reduction system ➥ 1.113
- If it lights up continuously, consult
your approved dealer as soon as
Tyre pressure loss warning
possible;
➥ 2.40
- If it flashes, reduce the engine speed
until the light stops flashing. Contact
your approved Dealer as soon as
possible ➥ 2.38.
Low fuel level warning light
L
It lights up orange when the ig-
nition or the engine is switched on and
goes off after a few seconds.
1.61
CarManuals2.co
WARNING LIGHTS (5/6)
The display of information shown below DEPENDS ON THE VEHICLE EQUIPMENT AND COUNTRY.
Coolant temperature warn-
Speed limiter warning light
Assisted parking brake fault
Ô
ing light
Ð
➥ 2.94
light ➥ 2.146
This lights up blue when you switch on
Cruise control warning light
Overspeed warning light
the ignition or start the engine.
Ï
➥ 2.98
➥ 1.64
If it turns red, stop and let the engine
Adaptive cruise control
Lane departure system
idle for a minute or two.
warning light Stop and Go
warning light ➥ 2.51
➥ 2.103
The temperature should lower and the
Lane Keeping Assist system
warning light should return to a blue
Engine standby warning
warning light ➥ 2.56
colour. If not, stop the engine. Let the
light ➥ 2.12
(Depending on vehicle)
engine cool down before checking the
Unavailability of engine
Indicator of failure or
coolant.
standby warning light ➥ 2.12
unavailability of active emergency
Contact an approved Dealer.
braking ➥ 2.82
Brake pedal warning light
Ó
This lights up when the brake
d
etection warning light
pedal should be depressed ➥ 2.151.
➥ 2.56
1.62
CarManuals2.co
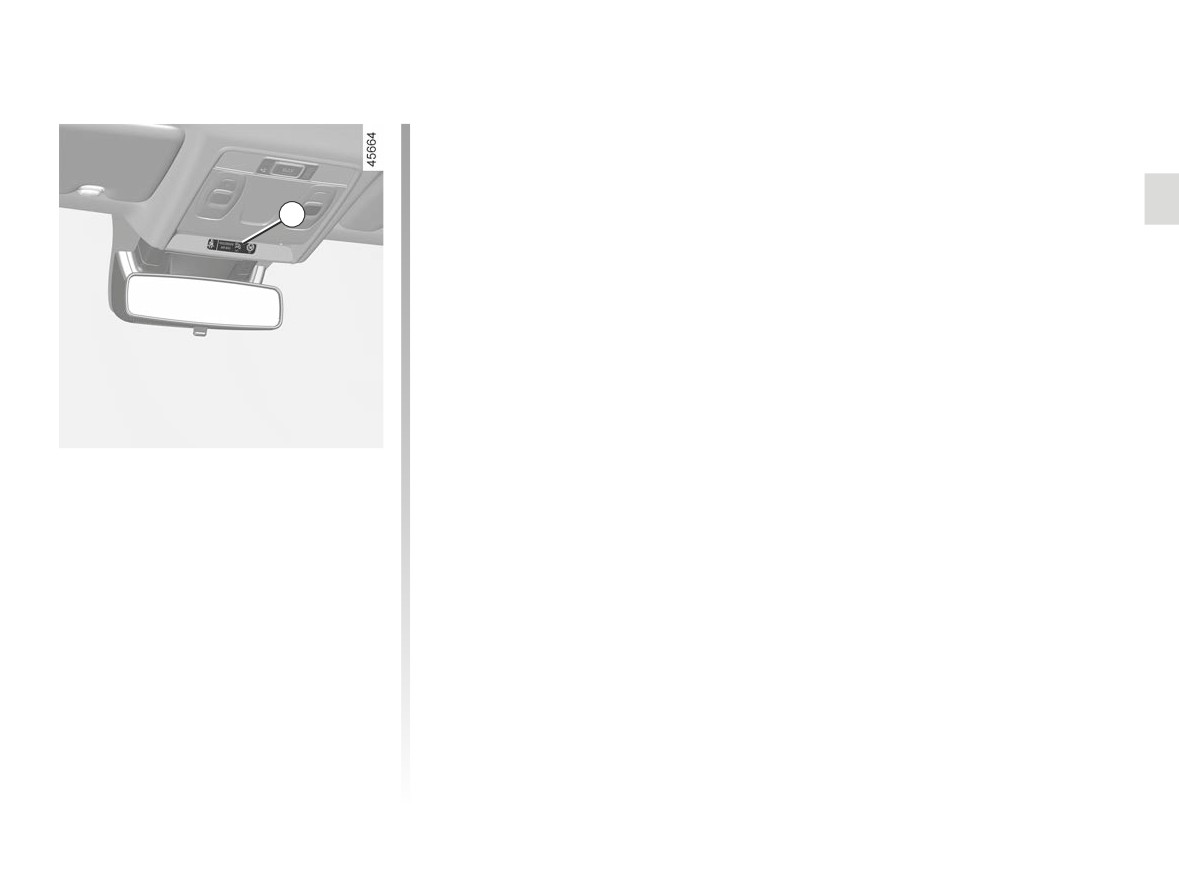
WARNING LIGHTS (6/6)
The display of information shown below DEPENDS ON THE VEHICLE EQUIPMENT AND COUNTRY.
Seat belt reminder warning
ß
lights ➥ 1.23
D
On display D
Passenger Airbag ON
➥ 1.51
Passenger Airbag OFF
¹
➥ 1.51
1.63
CarManuals2.co
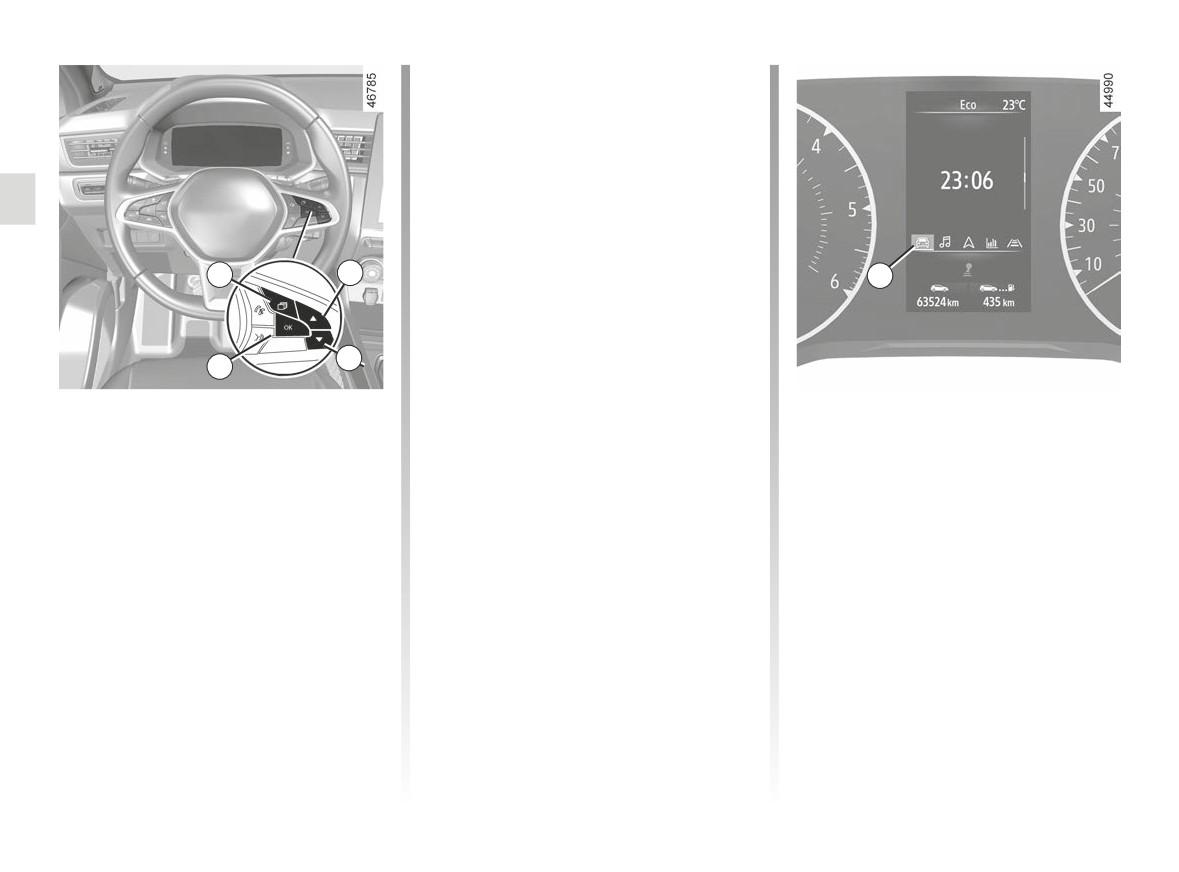
DISPLAYS AND INDICATORS (1/7)
Instrument panel in miles
(option to switch to km/h)
Vehicles not fitted with a multimedia
screen
- With the ignition off, press the
2
switch as many times as required to
reach the vehicle tab 5;
- press 3 or 4 repeatedly to access
“Settings”, then press 1 “OK”;
2
3
5
- repeat the same operation to access
“DASHBOARD”, then “Units”.
4
1
Engine oil level low warning
Vehicles fitted with a multimedia
screen.
When the engine is started, the instru-
ment panel display alerts you if the min-
Please refer to the multimedia instruc-
imum oil level is reached. ➥ 4.4.
tions to select the audio system.
The first time the warning appears, it
Note: in both cases, once the battery
can be cleared by pressing 1 "OK ".
is switched off, the on-board computer
automatically returns to the original unit
Subsequent warnings will disappear
of measurement.
automatically after around 30 seconds.
To return to the previous mode, repeat
the same operation.
Please refer to the multimedia instruc-
tions for more information.
1.64
CarManuals2.co
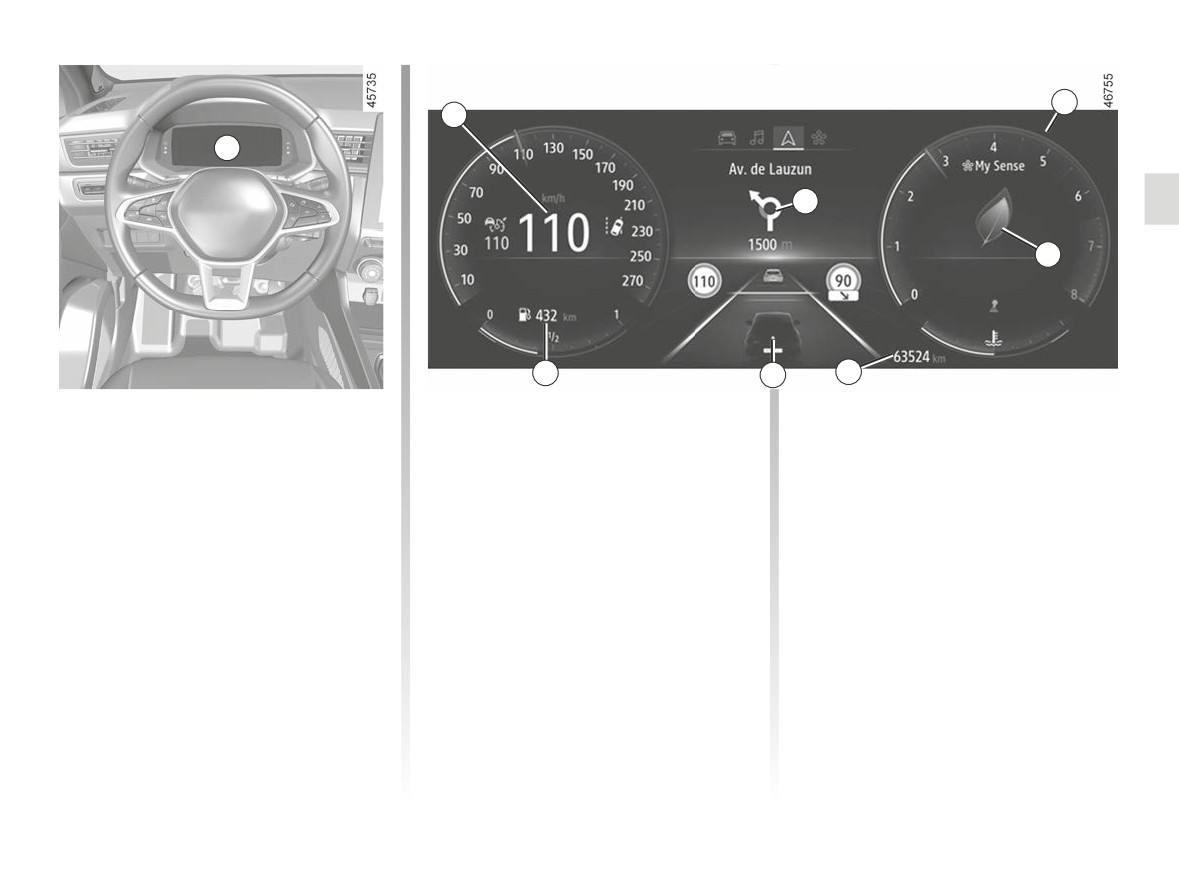
DISPLAYS AND INDICATORS (2/7)
7
6
A
12
8
11
10
9
Instrument panel A
Rev counter 7
Total mileage recorder 9 ➥ 1.75
(graduations x 1000)
It lights up when the ignition is switched
Depending on the selected customisa-
Trip computer 10 ➥ 1.71
on. In some cases, the appearance of a
tion, it may not be displayed.
warning light is accompanied by a mes-
Estimated mileage with remaining
sage.
Overspeed buzzer
fuel 11
Depending on the vehicle, you can cus-
Depending on the vehicle and coun-
The value is displayed after driving
tomise your instrument panel with the
400 metres. ➥ 1.75.
content and colours of your choice.
try, the
warning light is dis-
For vehicles fitted with a multimedia
played and a beep sounds. This beep
Trip computer and multimedia
screen, refer to the multimedia instruc-
sounds as soon as the vehicle is trav-
information 12
tions.
elling at over 75 mph (120 km/h). This
Depending on the vehicle, you can dis-
For vehicles not fitted with a multimedia
warning light remains lit for as long as
play information from the multimedia
screen ➥ 1.83.
the vehicle is travelling at over 74 mph
screen (compass, telephone, naviga-
(120 km/h).
tion, etc.) or information from the trip
Speedometer 6
computer.
Driving style indicator 8 ➥ 2.30
Please refer to the multimedia instruc-
tions for more information.
1.65
CarManuals2.co
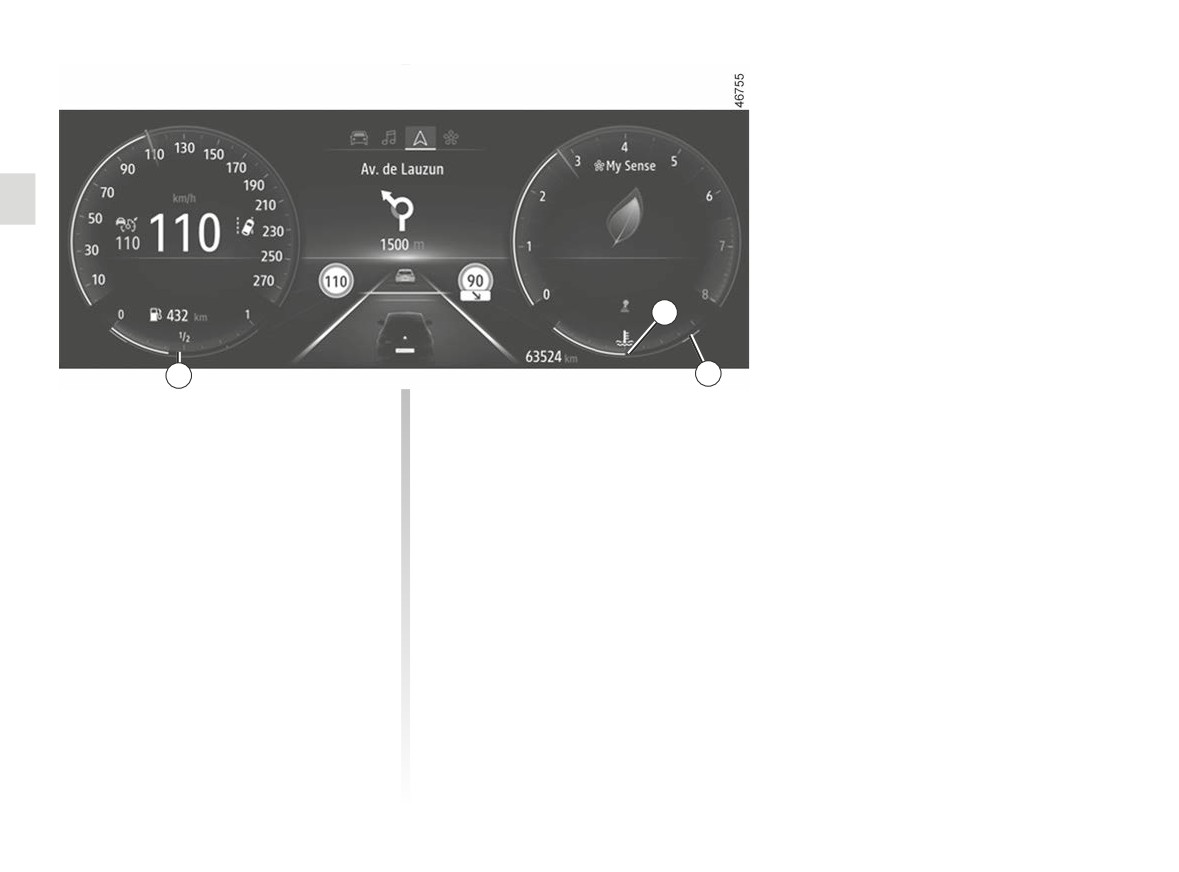
DISPLAYS AND INDICATORS (3/7)
14
15
13
Coolant temperature indicator 14
Fuel gauge 15
In normal use, indicator 14 should be
If the level is at the minimum, warn-
before area 13. Under “intensive” op-
ing light M
integrated in the indica-
erating conditions, the needle may ap-
tor comes on orange, accompanied by
proach this zone. This is not serious
a beep. Fill up as soon as possible.
unless the warning light
®
comes
on accompanied by a message on the
instrument panel and a beep.
1.66
CarManuals2.co
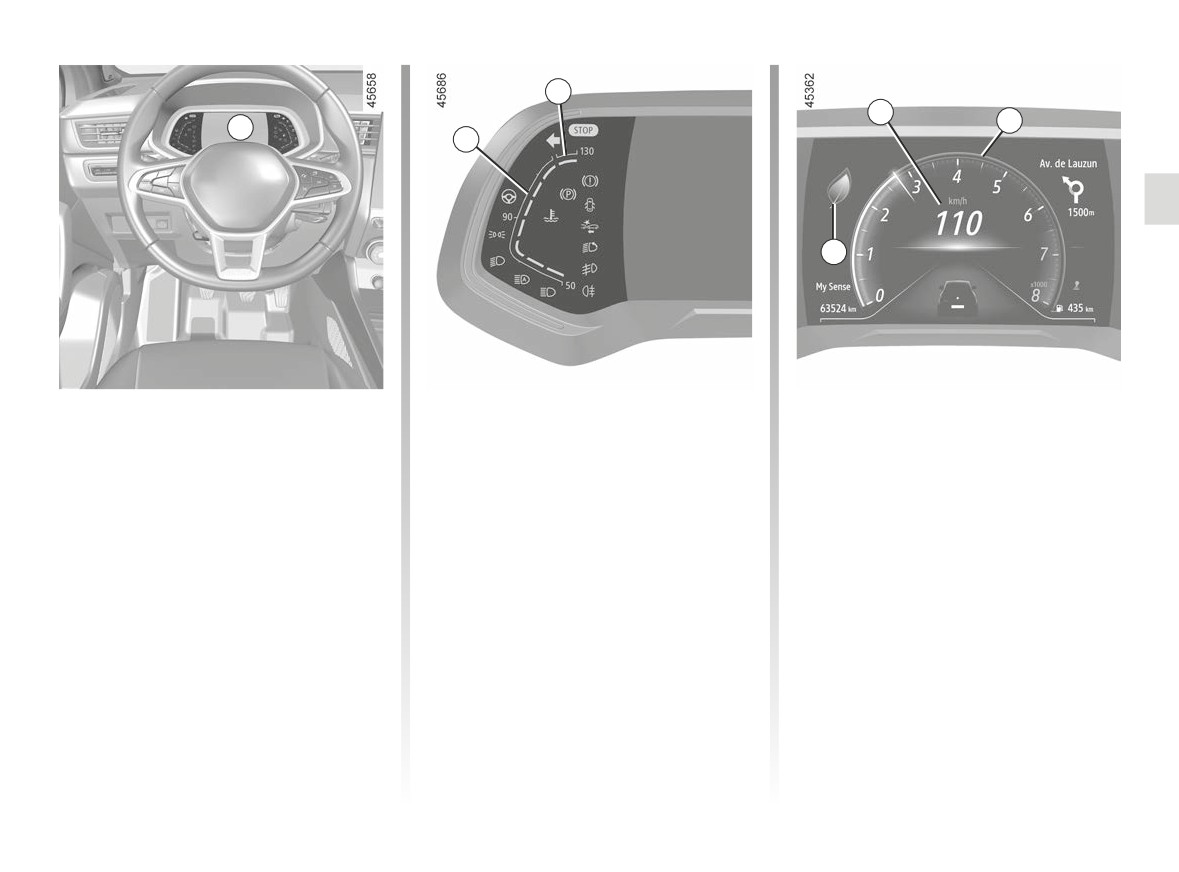
DISPLAYS AND INDICATORS (4/7)
17
18
B
19
16
20
Instrument panel B
Coolant temperature indicator 16
Overspeed buzzer
Depending on the vehicle and coun-
It lights up when the ignition is switched
In normal use, indicator 16 should be
on. In some cases, the appearance of a
before area 17. Under "intensive" op-
try, the
warning light is dis-
warning light is accompanied by a mes-
erating conditions, the needle may ap-
played and a beep sounds. This beep
sage.
proach this zone. This is not serious
sounds as soon as the vehicle is trav-
Depending on the vehicle, you can cus-
unless the warning light
®
comes
elling at over 75 mph (120 km/h). This
tomise your instrument panel with the
on accompanied by a message on the
warning light remains lit for as long as
content and colours of your choice.
instrument panel and a beep.
the vehicle is travelling at over 74 mph
For vehicles fitted with a multimedia
(120 km/h).
screen, refer to the multimedia instruc-
Speedometer 18
tions.
Depending on the style selected, the
Rev counter 19
For vehicles not fitted with a multimedia
display varies.
(graduations x 1000)
screen ➥ 1.83.
This is displayed differently according
to how the instrument panel is custom-
ised. Depending on the style selected,
it may not be displayed.
Driving style indicator 20 ➥ 2.30
1.67
CarManuals2.co
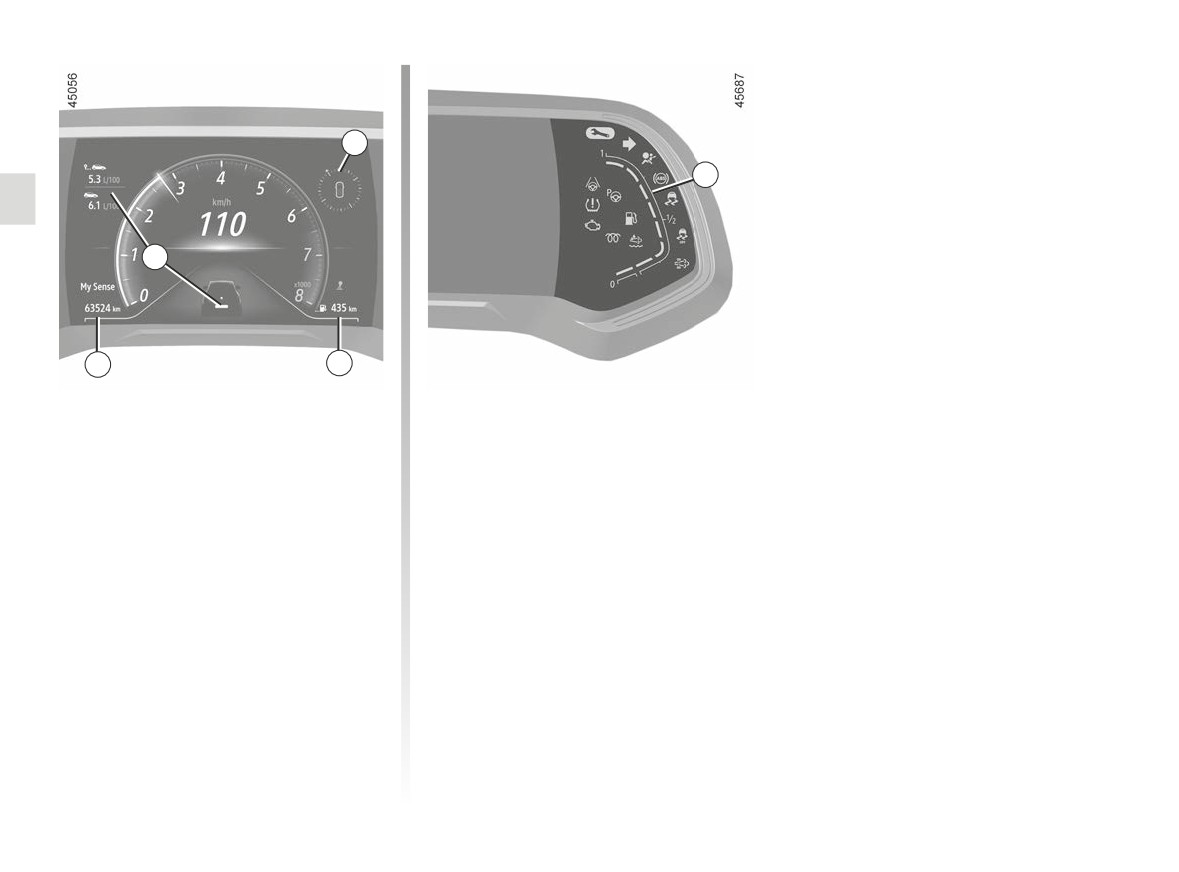
DISPLAYS AND INDICATORS (5/7)
21
25
24
23
22
Multimedia information 21
Fuel gauge 25
Depending on the vehicle, you can dis-
If the level is at the minimum, warn-
play information from the multimedia
screen (the compass, telephone, navi-
ing light M
integrated in the indica-
gation, etc.).
tor comes on orange, accompanied by
Please refer to the multimedia instruc-
a beep. Fill up as soon as possible.
tions for more information.
Estimated mileage with remaining
fuel 22
The value is displayed after driving 400
metres. ➥ 1.75.
Total mileage recorder 23 ➥ 1.75
Trip computer 24 ➥ 1.71
1.68
CarManuals2.co
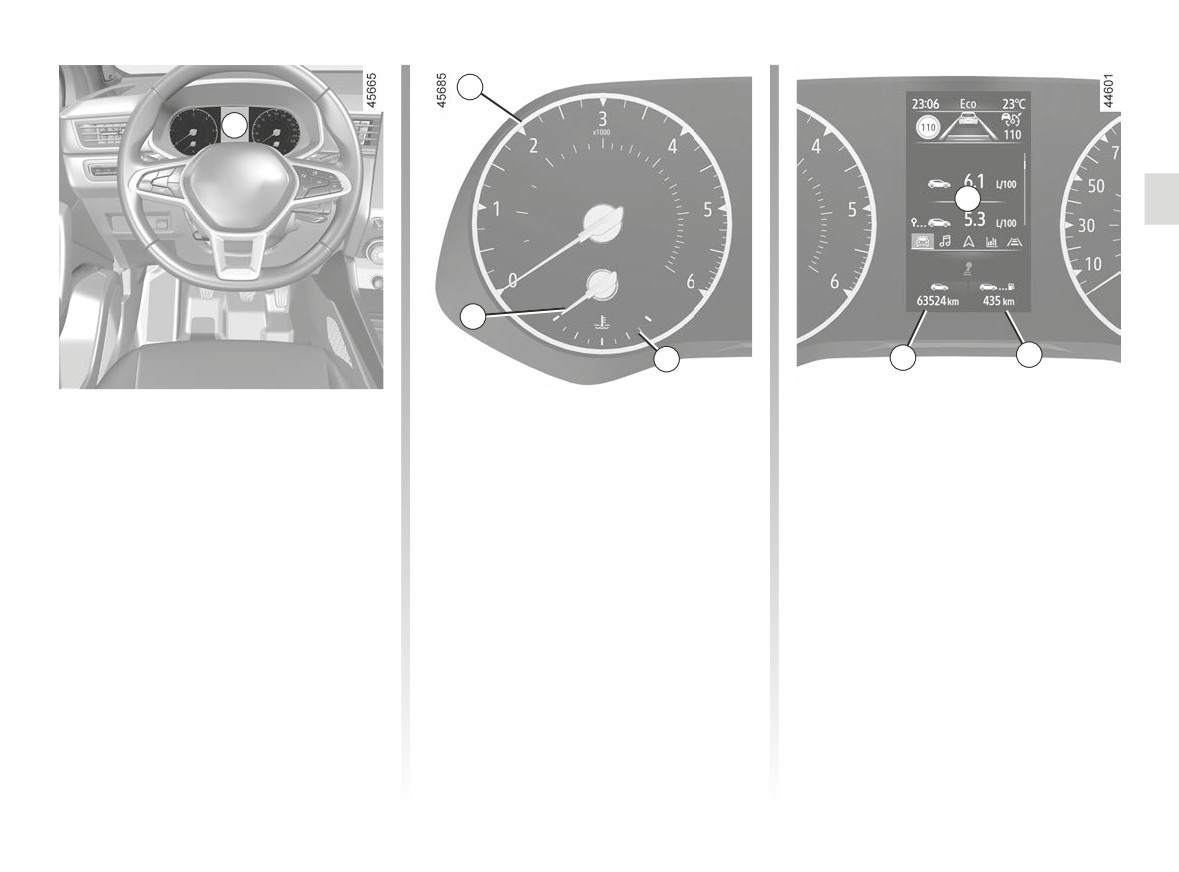
DISPLAYS AND INDICATORS (6/7)
26
C
29
28
27
31
30
Instrument panel C
Rev counter 26
Trip computer 29
(graduations x 1000)
➥ 1.71
It lights up when the ignition is switched
on. In some cases, the appearance of a
Coolant temperature indicator 28
Estimated mileage with remaining
warning light is accompanied by a mes-
fuel 30
In normal use, the indicator 28 should
sage.
The value is displayed after driving
be before the red zone 27. Under “in-
Depending on the vehicle, you can cus-
400 metres.
tensive” operating conditions, the
tomise your instrument panel with col-
➥ 1.75
needle may approach this zone. This
ours of your choice. For vehicles fitted
is not serious unless the warning light
Total mileage recorder 31
with a multimedia screen, refer to the
®
comes on accompanied by a
➥ 1.75
multimedia instructions.
message on the instrument panel and
For vehicle not fitted with a navigation
a beep.
system ➥ 1.83.
1.69
CarManuals2.co
DISPLAYS AND INDICATORS (7/7)
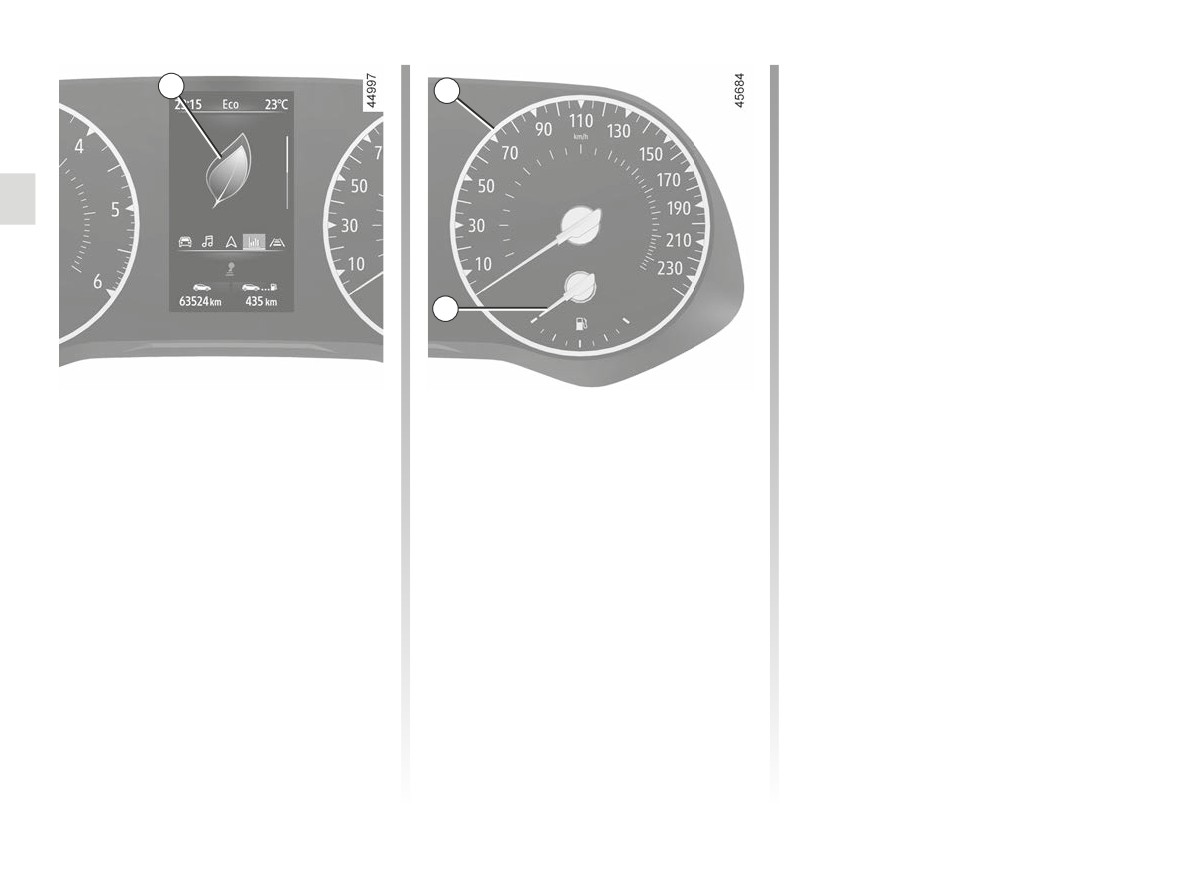
Fuel gauge 34
32
33
If the level is at the minimum, warn-
M
integrated in the indica-
ing light
tor comes on orange, accompanied by
a beep. Fill up as soon as possible.
34
Driving style indicator 32 ➥ 2.30
Speedometer 33
Overspeed buzzer
Depending on the vehicle and coun-
try, the
warning light is dis-
played and a beep sounds. This beep
sounds as soon as the vehicle is trav-
elling at over 75 mph (120 km/h). This
warning light remains lit for as long as
the vehicle is travelling at over 74 mph
(120 km/h).
1.70
CarManuals2.co
TRIP COMPUTER: general information (1/4)
A
B
C
1
2
2
1
1
2
4
4
3
3
4
3
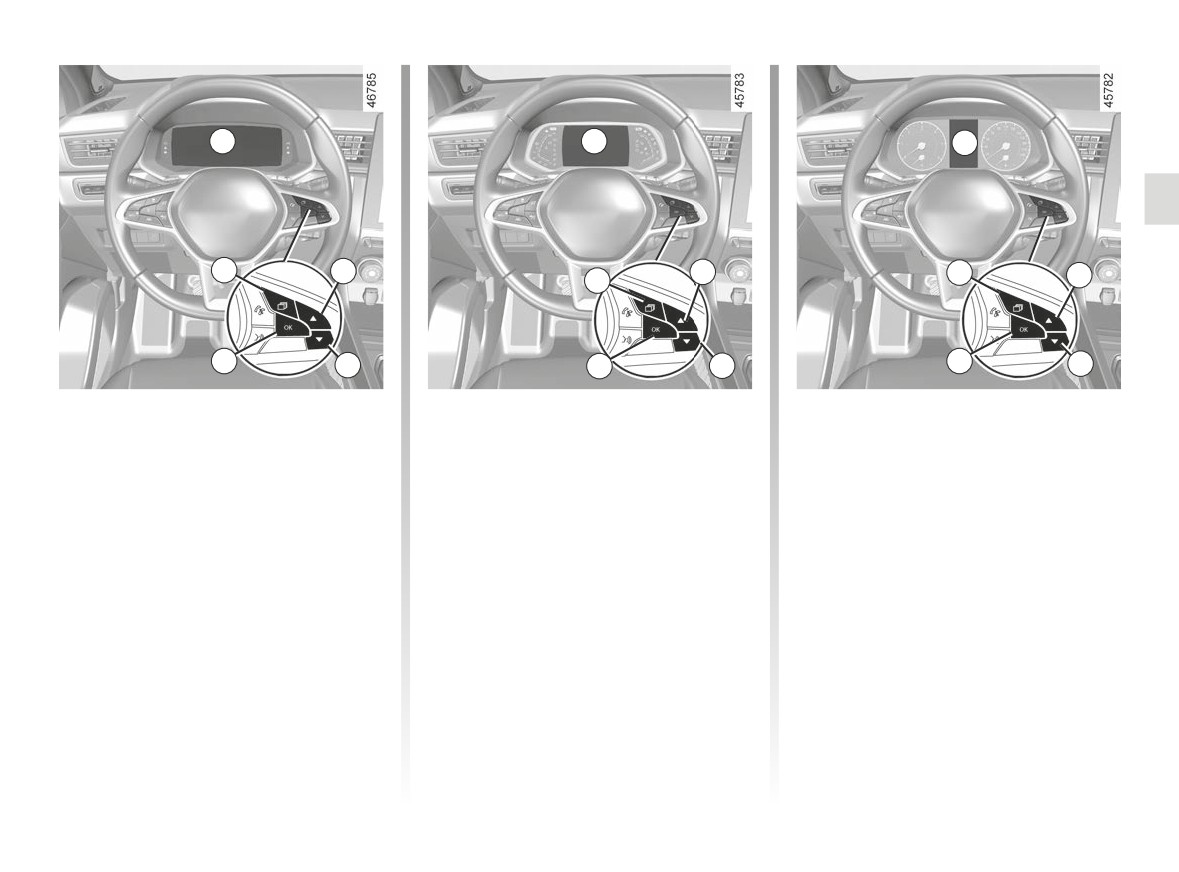
Trip computer A, B or C
Depending on the vehicle, this includes
the following functions:
- distance travelled;
- journey settings;
- information messages;
- operating fault messages
(con-
- warning messages (connected to the
®
warning light);
– vehicle settings customisation menu
➥ 1.83.
All these functions are described on the
following pages.
1.71
CarManuals2.co
TRIP COMPUTER: general information (2/4)
A
5
A
1
2
7
6
4
3
8
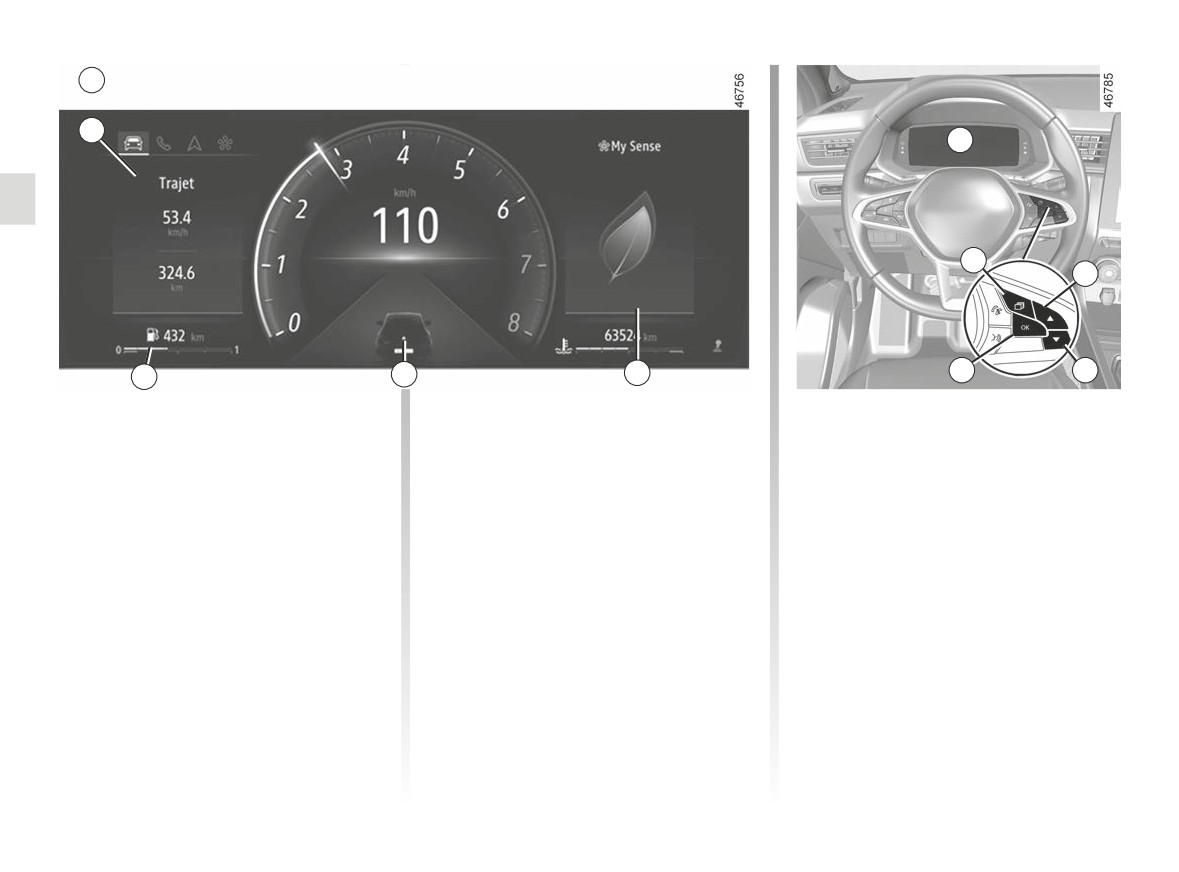
Vehicle fitted with Ainstrument
panel
The functions will be distributed in
zones 5, 6, 7, and 8. The location of the
zones differs depending on the style
selected.
Press the 1 switch to browse between
areas 5 and 6, then select the functions
by pressing the 2 or 3 switch repeat-
edly.
1.72
CarManuals2.co
TRIP COMPUTER: general information (3/4)
B
5
C
B
1
1
6
2
2
4
3
8
7
4
3
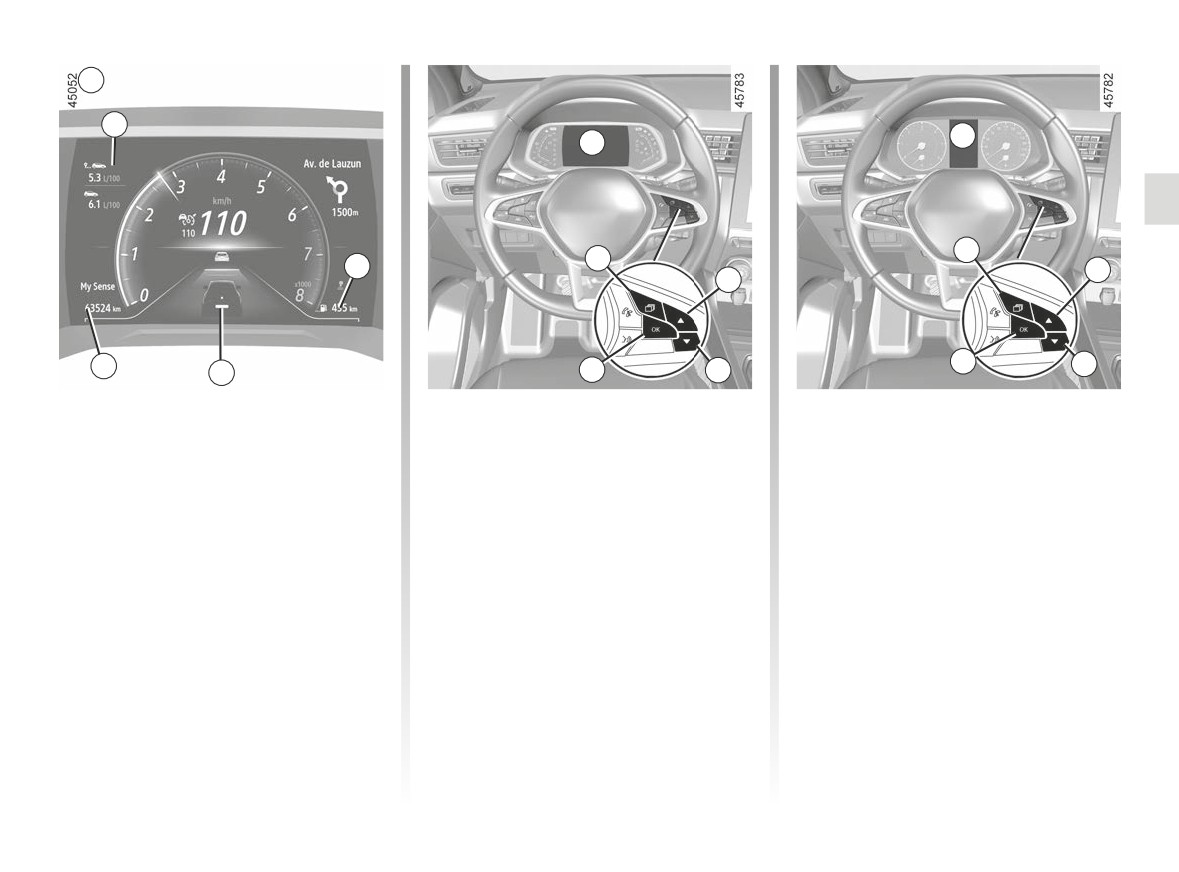
Vehicle fitted with Binstrument
Vehicle fitted with Cinstrument
panel
panel
The functions will be distributed in
Press the switch 1 as many times as re-
zones 5, 6, 7, and 8.
quired to reach the “Vehicle” tab.
Press switch 1 to browse between the
Press repeatedly using control 2 or 3,
zones and select the functions by re-
then if necessary use switch 4 to con-
peatedly pressing switch 2 or 3.
firm.
1.73
CarManuals2.co