Renault Arkana (2023 year). Manual in english - page 1
Welcome to your new vehicle
This driver’s handbook contains the information necessary:
- for you to familiarise yourself with your vehicle, to use it to its best advantage and to benefit fully from the all the functions and
the technical developments it incorporates.
- to ensure that it always gives the best performance by following the simple, but comprehensive advice concerning regular main-
tenance.
- to enable you to deal quickly with minor faults not requiring specialist attention.
It is well worth taking a few minutes to read this handbook to familiarise yourself with the information and guidelines it contains
about the vehicle and its functions and new features. If certain points are still unclear, our Network technicians will be only too
pleased to provide you with any additional information.
To help you, you will find the following symbols:
and
These appear in the vehicle and indicate that you should consult the manual for detailed information and/or
limits on operations with respect to your vehicle’s equipment.
➥ anywhere in the manual indicates a transfer to a page.
anywhere in the manual indicates a hazard, danger or a safety recommendation.
The descriptions of the models given in this handbook are based on the technical specifications at the time of writing. This hand-
book covers all items of equipment (both standard and optional) available for these models but whether or not these are
fitted to the vehicle depends on the version, options selected and the country where the vehicle is sold.
This handbook may also contain information about items of equipment to be introduced later in the model year.
The diagrams in the user manual are provided as examples.
Enjoy driving your new vehicle.
Translated from English. Copying or translation, in part or in full, is forbidden unless prior written permission has been obtained from the car manufac-
turer.
0.1
CarManuals2.co
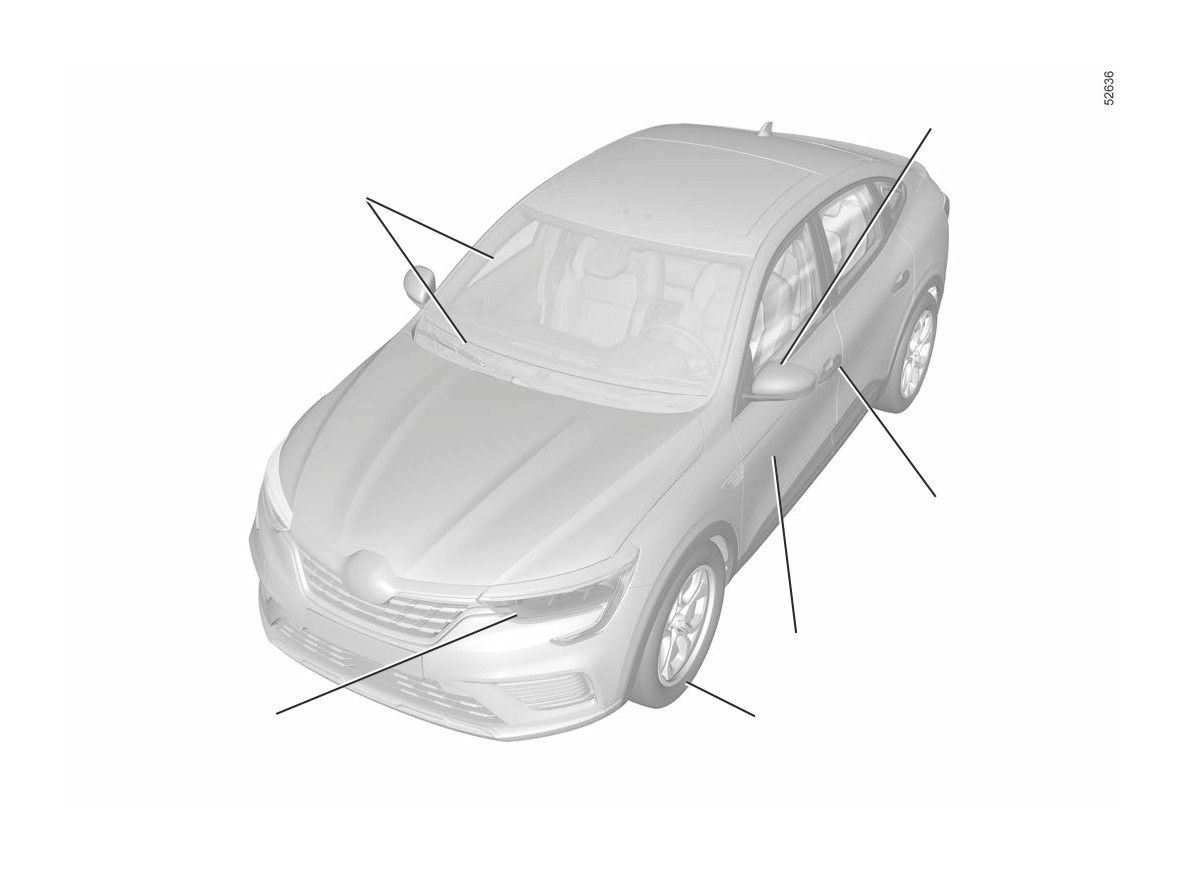
EXTERIOR
Rear view mirrors
➥ 1.90
Electric windows ➥ 3.18
Windscreen wipers ➥ 1.99
Demisting ➥ 3.5 and ➥ 3.9
Key/Remote control ➥ 1.2
Card ➥ 1.6
Locking/unlocking the doors
➥ 1.16
Bodywork maintenance ➥ 4.15
Tyres ➥ 5.10
Lights: operation ➥ 1.92
Lights: replacement ➥ 5.13
L
Filling with fuel ➥ 1.104
0.2
CarManuals2.co
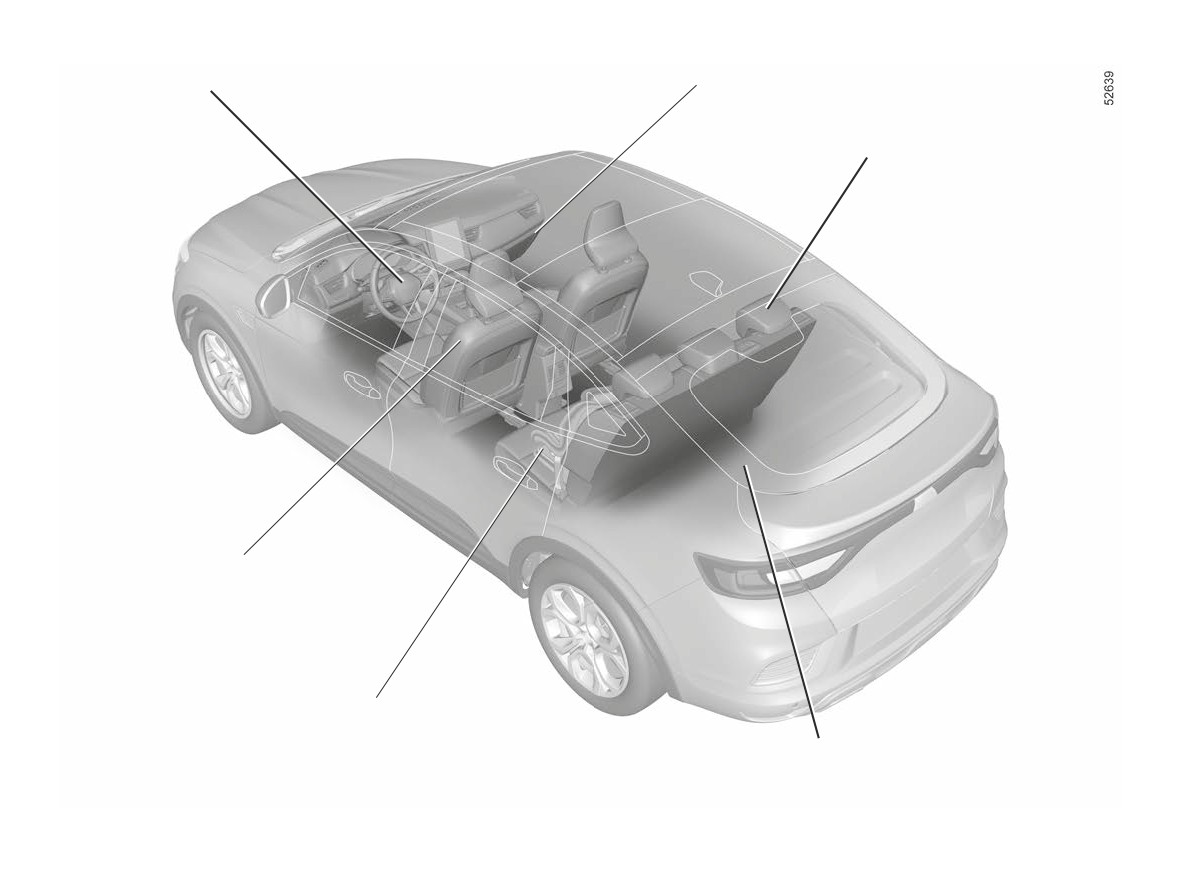
PASSENGER COMPARTMENT
Adjusting your driving position ➥ 1.28
Passenger compartment storage/fittings ➥ 3.26
Rear bench seat ➥ 3.32
Rear headrests ➥ 3.31
Front seats ➥ 1.25
Front headrests ➥ 1.24
Child safety ➥ 1.41
Luggage compartment storage/fittings ➥ 3.35
0.3
CarManuals2.co
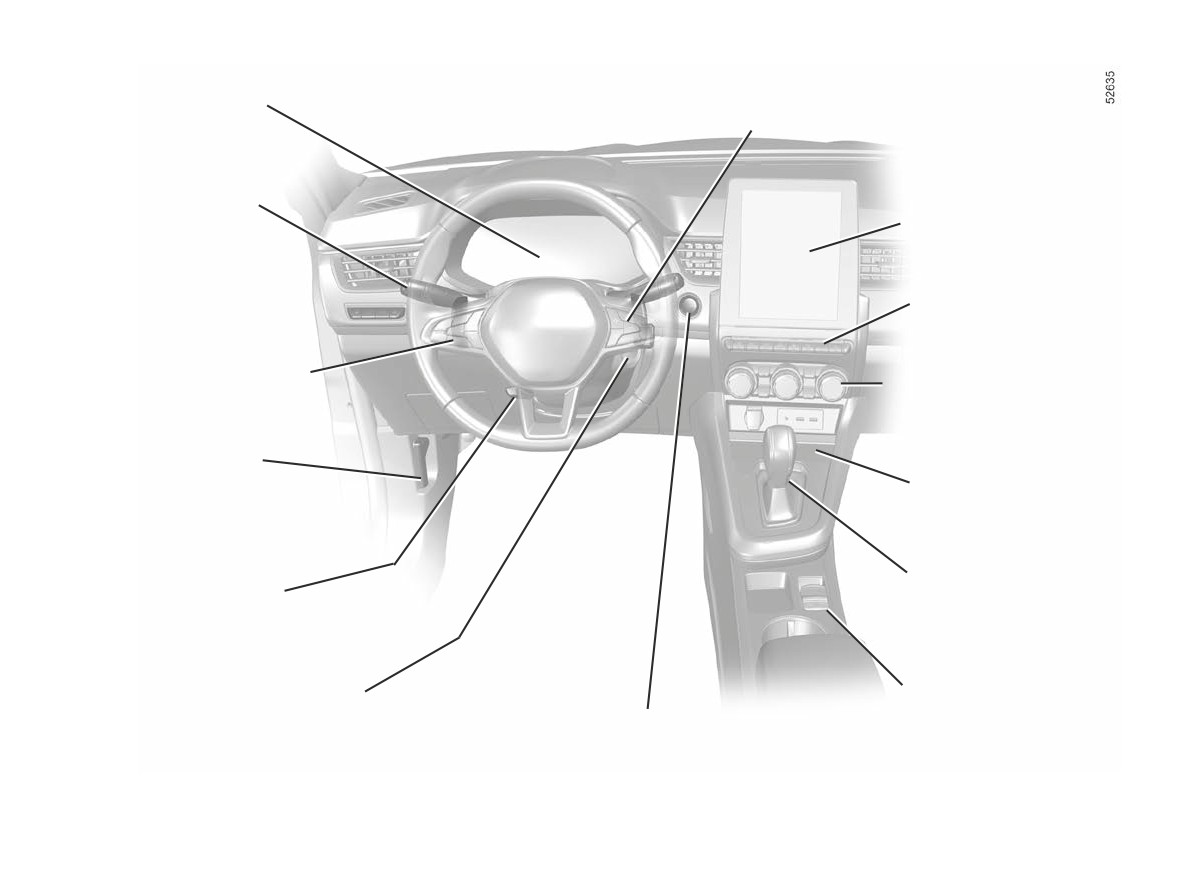
DRIVER’S POSITION
Instrument panel ➥ 1.62
Trip computer controls ➥ 1.75
Exterior lighting ➥ 1.92
Multimedia screen ➥ 3.15
Heated seats ➥ 1.25
Cruise control ➥ 2.84
Stop and Go adaptive cruise
control ➥ 2.89
Heating/Air conditioning
system ➥ 3.5 and ➥ 3.9
Speed limiter ➥ 2.81
Bonnet release ➥ 4.2
Telephone charging zone
➥ 3.26
Gearstick ➥ 2.138
Steering wheel adjustment ➥ 1.88
Parking brake ➥ 2.14
Key ignition switch ➥ 2.3
Engine start/stop button ➥ 2.8
0.4
CarManuals2.co
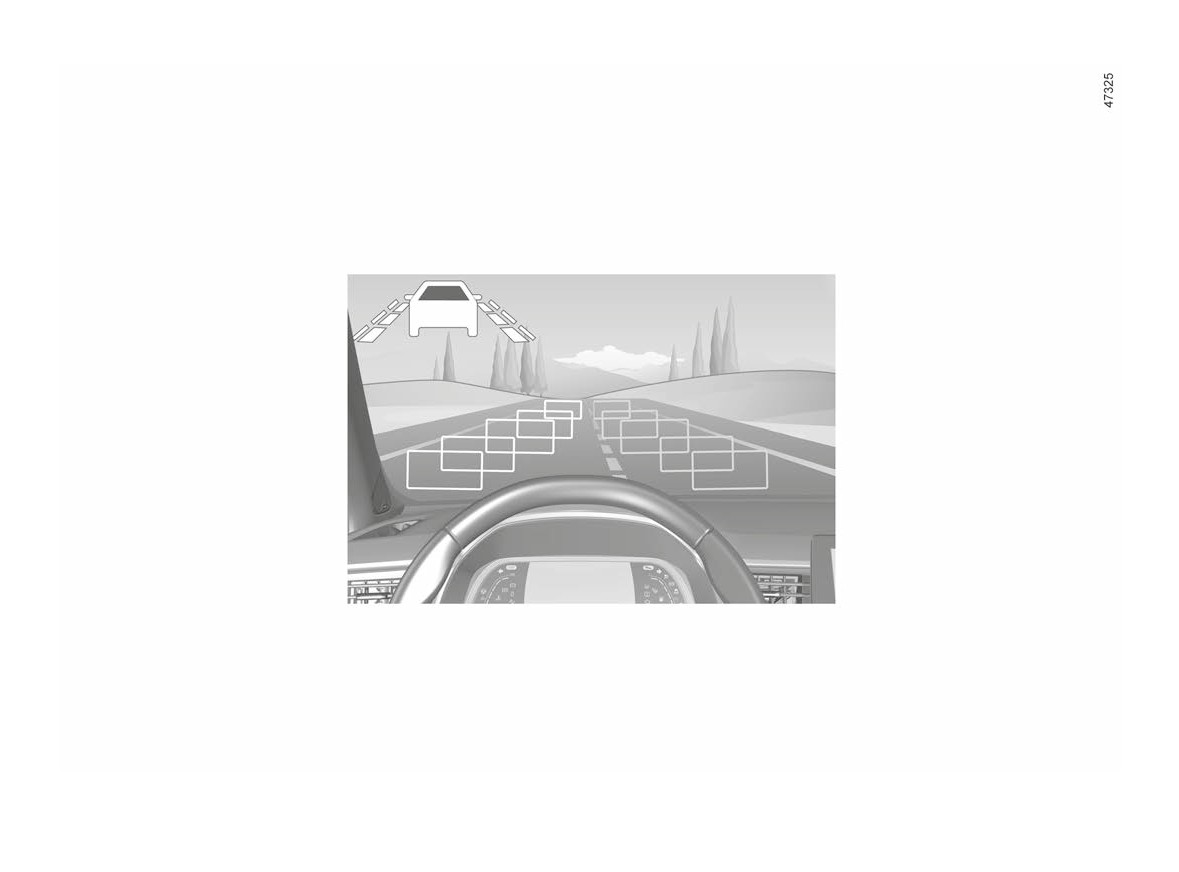
DRIVING AIDS
ABS (anti-lock braking system)
Speed limiter ➥ 2.81
ESC (electronic stability control)
Braking assistance
Hill start assistance
Detection of road signs ➥ 2.77
➥ 2.32
Cruise control ➥ 2.84
AUTOHOLD ➥ 2.18
Stop and Go adaptive cruise con-
trol ➥ 2.89
Lane departure warning ➥ 2.37
Highway and traffic jam compan-
ion ➥ 2.103
Lane Keeping Assist ➥ 2.42
Parking distance control ➥ 2.119
Active emergency braking
➥ 2.69
Reversing camera ➥ 2.126
Blind spot warning ➥ 2.48
Parking exit warning ➥ 2.129
Assisted parking ➥ 2.133
Stop and Start ➥ 2.8
Tyre pressure loss warning
Safe distance alert ➥ 2.55
➥ 2.28
0.5
CarManuals2.co
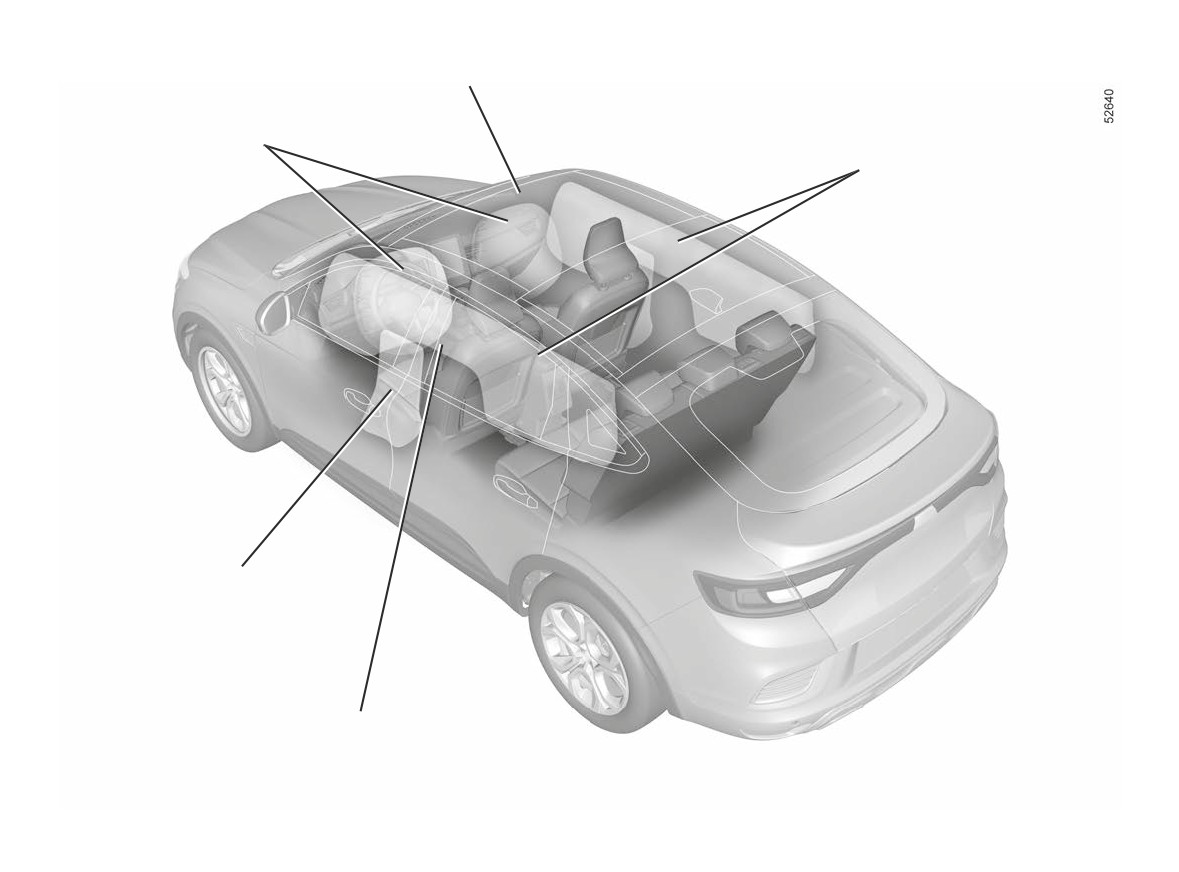
SAFETY ON BOARD
Inhibiting the front passenger airbag ➥ 1.55
Front Airbags ➥ 1.33
Curtain Airbags ➥ 1.39
Side Airbags ➥ 1.39
Seat belts ➥ 1.28
0.6
CarManuals2.co
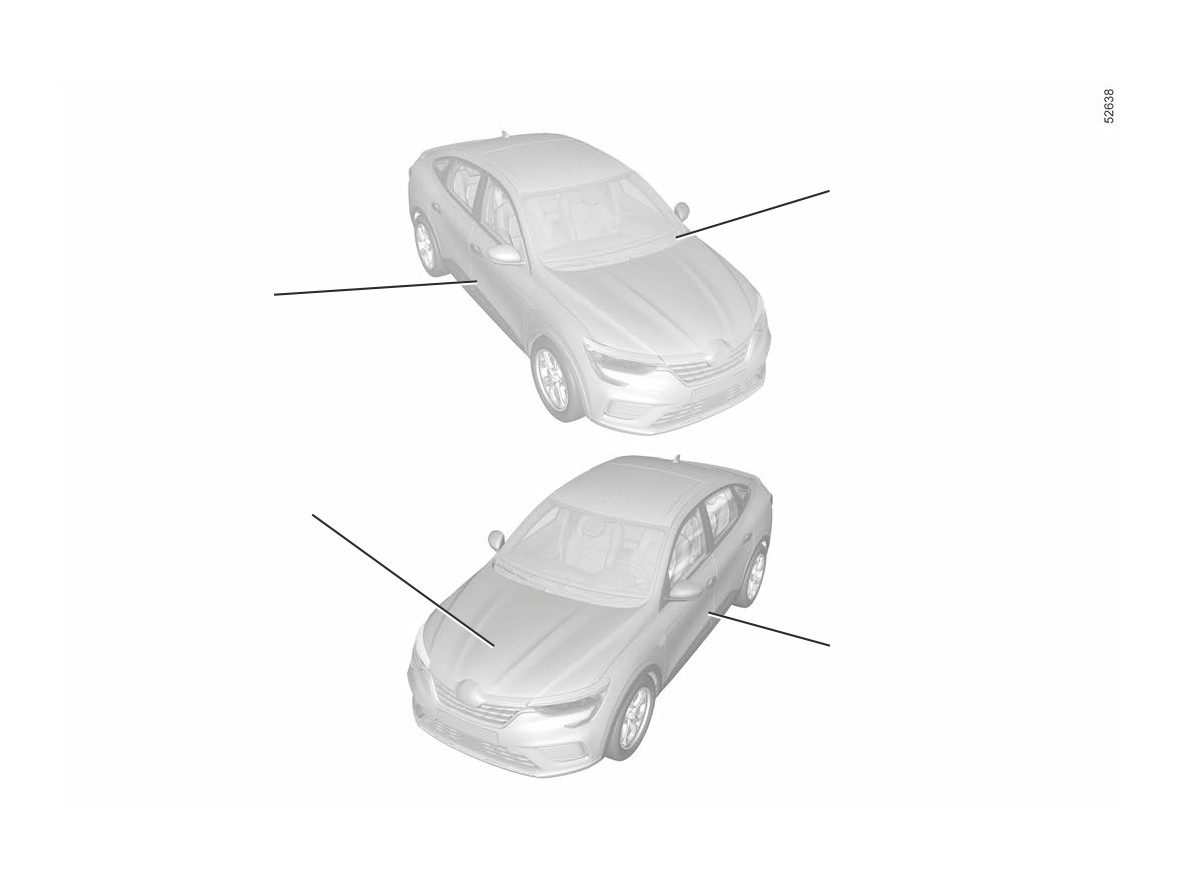
IDENTIFYING A VEHICLE - LABELS
Review of a vehicle identification number ➥ 6.2
Vehicle identification plate ➥ 6.2
Engine identification plate ➥ 6.3
Tyre pressure labels ➥ 2.28 and ➥ 4.10
0.7
CarManuals2.co
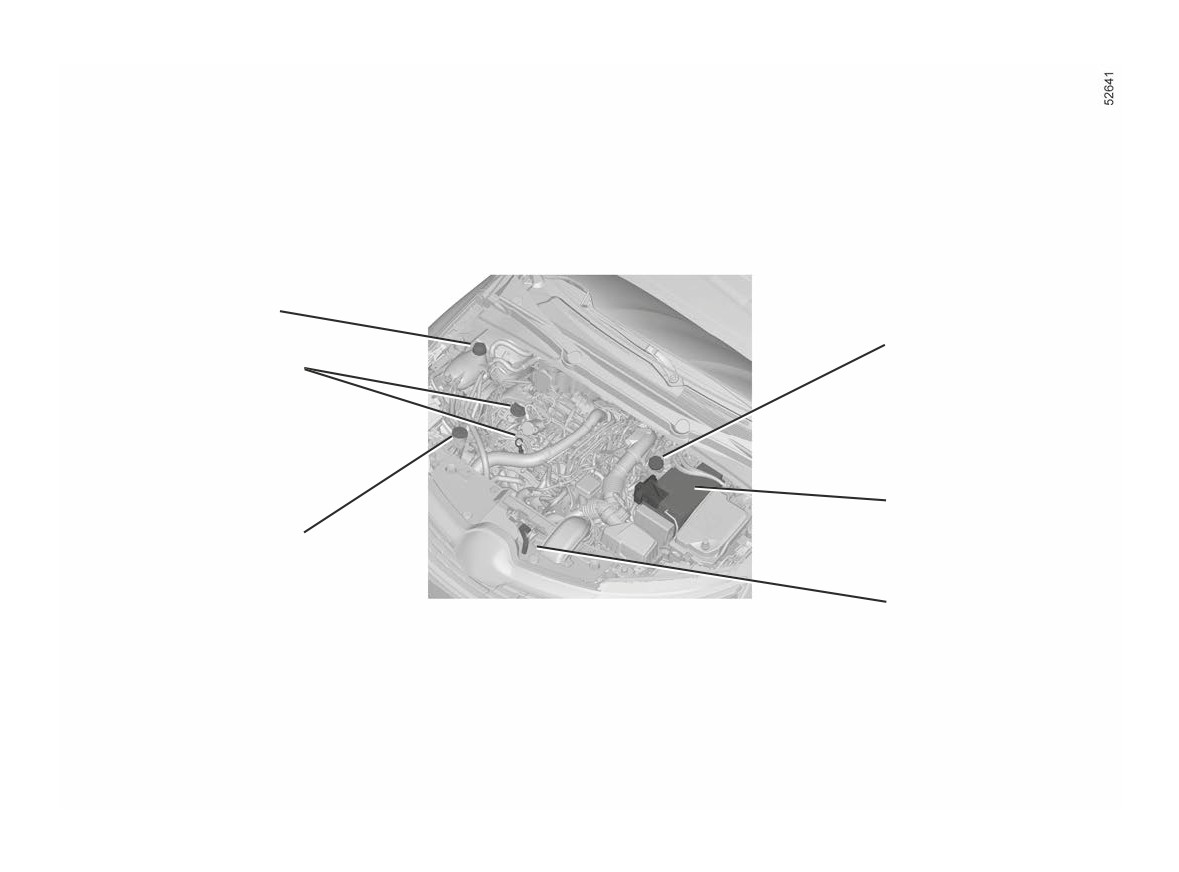
THE ENGINE COMPARTMENT (routine maintenance)
Coolant level ➥ 4.7
Brake fluid ➥ 4.7
Engine oil filler cap ➥ 4.5
Engine oil dipstick ➥ 4.4
Battery ➥ 4.12
Windscreen washer fluid ➥ 4.7
Opening the bonnet ➥ 4.2
0.8
CarManuals2.co
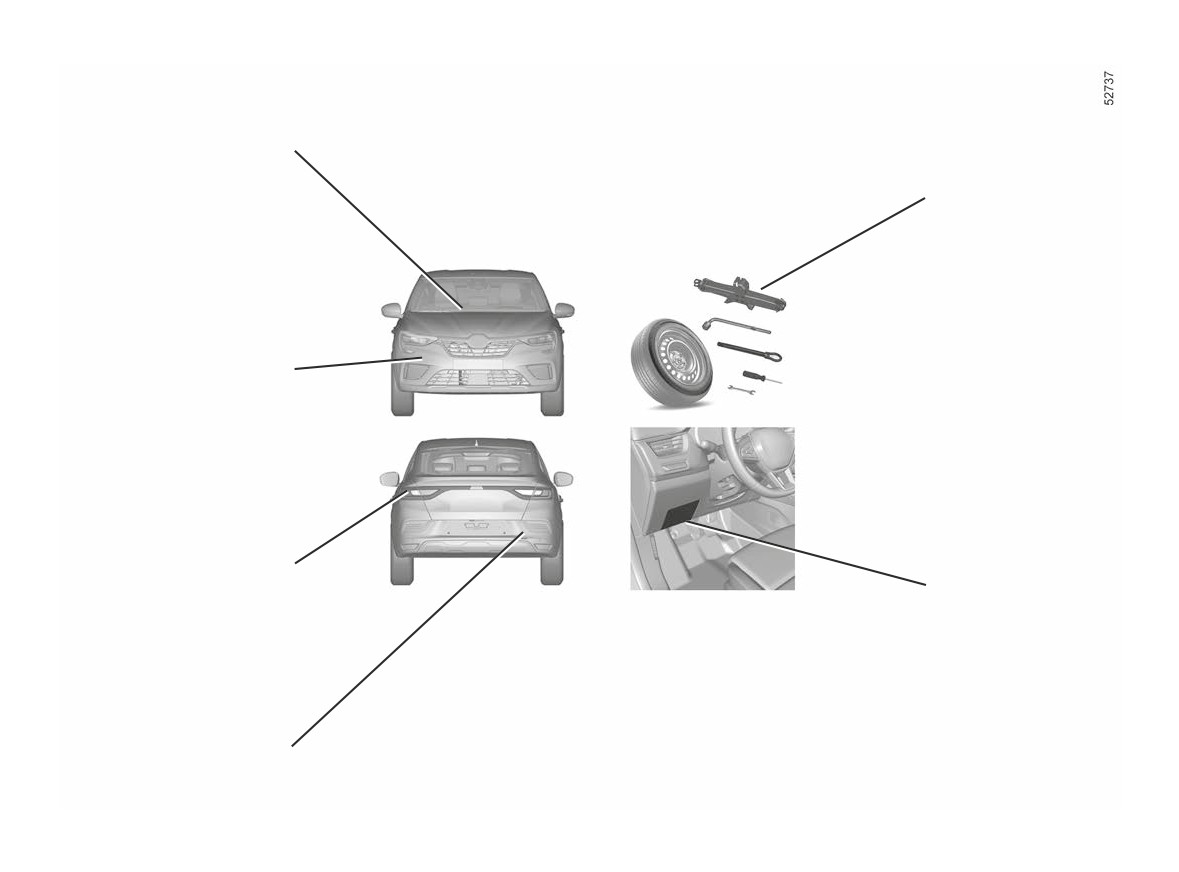
BREAKDOWN RECOVERY
Replacing windscreen wiper
Puncture:
blade(s) ➥ 1.99
Tools ➥ 5.7
Emergency spare
wheel ➥ 5.2
Changing a wheel
➥ 5.8
Front towing point ➥ 5.30
Replacement of the direc-
tion indicator lights ➥ 5.14
Fuses ➥ 5.25
Rear towing point ➥ 5.30
0.9
CarManuals2.co
C O N T E N T S
Sections
Getting to know your vehicle
1
Driving
2
Your comfort
3
Maintenance
4
Practical advice
5
Technical specifications
6
Alphabetical index
7
0.11
CarManuals2.co
Section 1: Getting to know your vehicle
Key, radio frequency remote control: general information, use, deadlocking
1.2
Card: general information, use, deadlocking
1.6
Opening and closing the doors
1.14
Locking, unlocking the opening elements
1.16
Automatic locking when driving
1.20
Vehicle settings personalisation menu
1.21
Headrests - Seats
1.24
Seat belts
1.28
Additional methods of restraint
1.33
in addition to the front seat belts
1.33
to the rear seat belts
1.38
side
1.39
Child safety: general information
1.41
Choosing a child seat mounting
1.44
Fitting a child seat, general information
1.47
Child seats: attachment by seat belt or by Isofix system. .
1.49
Deactivating, activating the front passenger airbag.
1.55
Driving position
1.58
Instrument panel
1.62
Displays and indicators
1.68
Trip computer
1.75
Clock and outdoor temperature
1.86
Steering wheel, Power-assisted steering
1.88
Rear view mirrors
1.90
Exterior lighting and signals
1.92
Audible and visual signals
1.97
Headlight beam adjustment
1.98
Washers, wipers
1.99
Fuel tank (filling with fuel)
1.104
1.1
CarManuals2.co
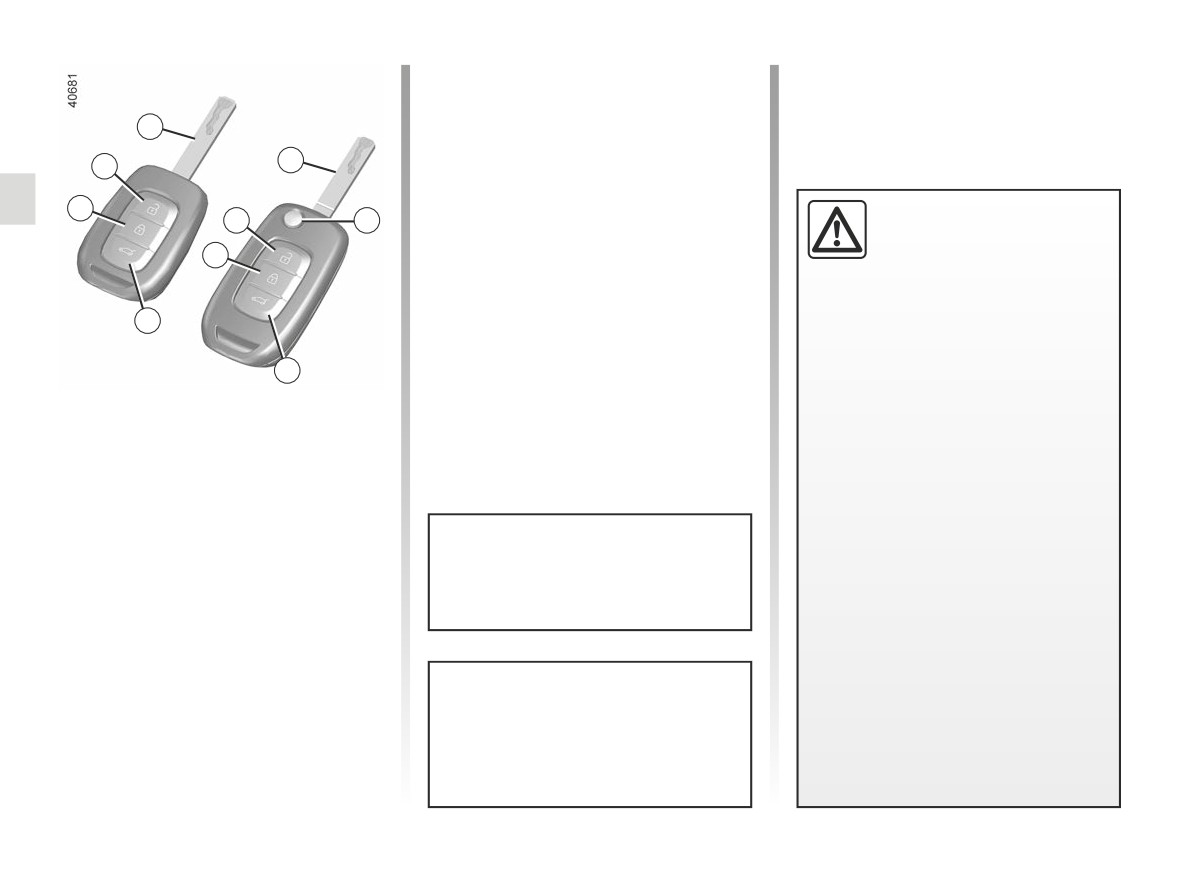
KEY, RADIO FREQUENCY REMOTE CONTROL: general information (1/2)
3
3
2
1
Driver’s responsibility
2
4
when parking or stopping
1
the vehicle
Never leave an animal,
child or adult who is not self-suffi-
5
cient alone on your vehicle, even for
a short time.
5
They may pose a risk to themselves
or to others by starting the engine,
1 Locks all the opening elements.
activating equipment such as the
2 Unlocks all the opening elements.
electric windows or locking the
doors.
3 Driver’s door and ignition key.
Also, in hot and/or sunny weather,
5 Locking/unlocking the tailgate only.
please remember that the tempera-
Remote control with switchblade
ture inside the passenger compart-
key:
Advice
ment increases very quickly.
4 Locking/unlocking using the switch-
Avoid leaving the remote control in
RISK OF DEATH OR SERIOUS
blade key. To release the insert from
hot, cold or humid areas.
INJURY.
its housing, press button 4, it comes
out automatically. Press button 4 and
guide the insert back into its housing.
The key must not be used for any
function other than those described
in the handbook (removing the cap
from a bottle, etc.).
1.2
CarManuals2.co
KEY, RADIO FREQUENCY REMOTE CONTROL: general information (2/2)
Radio frequency remote
control operating range
This varies according to the surround-
ings: take care not to lock or unlock the
doors by inadvertently pressing the but-
tons on the remote control.
Replacement and additional keys
Note: if a door or the boot is open or not
or remote controls.
properly shut, locking is not carried out.
A beep sounds and the hazard warning
You must only contact an approved
lights and side repeaters do not flash.
dealer:
- If you need to replace a key it will
Interference
be necessary to take the vehicle
Interference by factors in the immediate
and all of its keys to an approved
vicinity (external installations or the use
Dealer in order to initialise the
of equipment operating on the same
system.
frequency as the remote control) may
- Depending on the vehicle, you
affect the operation of the remote con-
have the option of using up to
trol.
four remote controls.
Remote control unit failure
Make sure that the correct battery
type is being used, and that the
battery is in good condition and in-
serted correctly. These batteries
have a service life of approximately
two years.
How to change the battery ➥ 5.18
1.3
CarManuals2.co
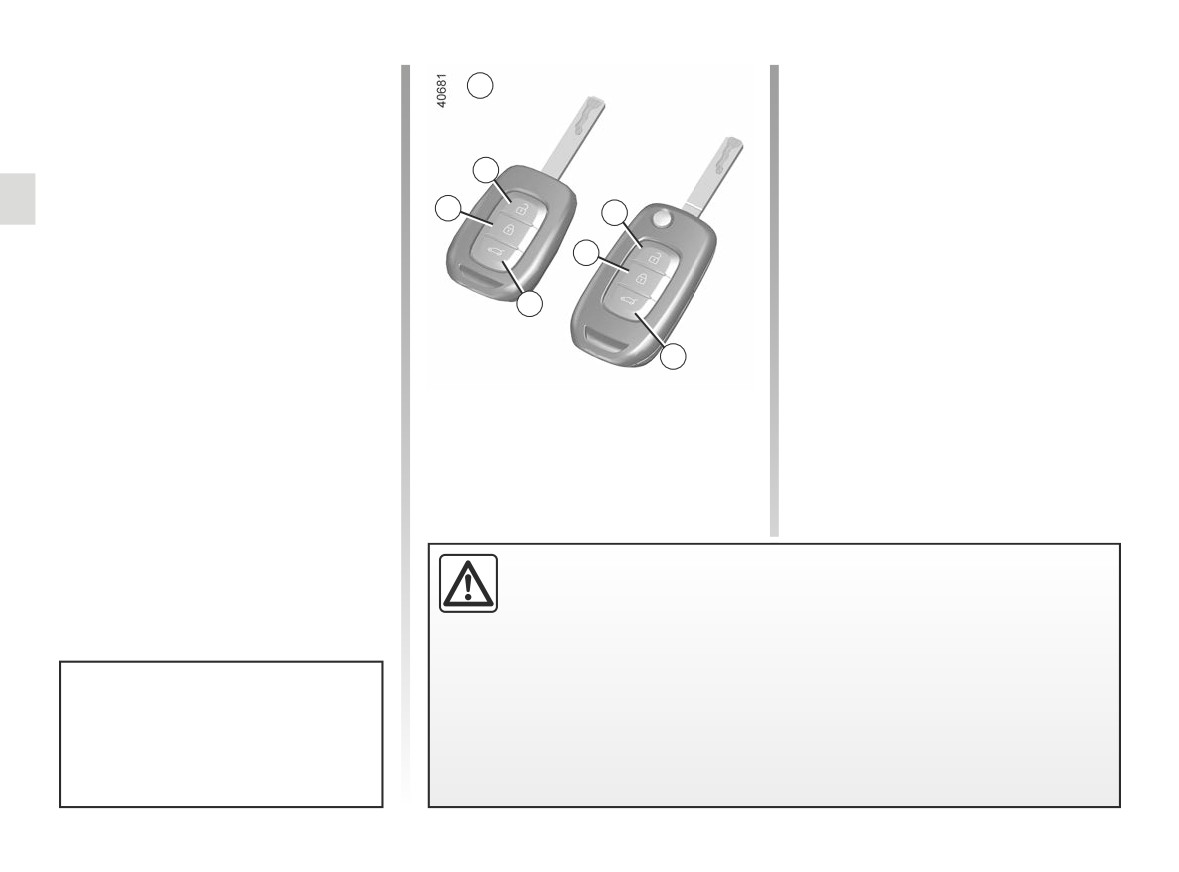
RADIO FREQUENCY REMOTE CONTROL: use
The remote control A can be used to
Unlocking the doors
A
lock or unlock the doors and boot. It is
Pressing button 2 unlocks the doors
powered by a battery which can be re-
and tailgate.
placed. ➥ 5.18
The hazard lights and side repeaters
2
flash once to indicate that the doors
Locking the doors
have unlocked and, on some vehicles,
1
2
Press locking button 1.
the door mirrors fold out automatically.
The hazard lights and side repeaters
1
flash twice to indicate that the doors
Note:
have locked and, on some vehicles,
With the ignition on and engine running
the door mirrors fold in automatically.
3
➥ 2.3, buttons on the remote control
Pressing the 1 button twice locks the
are not activated.
vehicle and closes the front and rear
3
windows and, depending on the vehi-
cle, the sunroof.
Locking/unlocking only the
Note: if a door or the boot is open or not
boot
properly shut, locking is not carried out.
Press the button 3 to lock/unlock the
A beep sounds and the hazard warning
boot only.
lights and side repeaters do not flash.
Driver’s responsibility when parking or stopping the vehicle
Never leave an animal, child or adult who is not self-sufficient alone on
your vehicle, even for a short time.
They may pose a risk to themselves or to others by starting the engine,
activating equipment such as the electric windows or locking the doors.
Also, in hot and/or sunny weather, please remember that the temperature inside
Depending on the vehicle, the
the passenger compartment increases very quickly.
door mirrors fold in/out automati-
cally when the vehicle is locked/un-
RISK OF DEATH OR SERIOUS INJURY.
locked. ➥ 1.90
1.4
CarManuals2.co
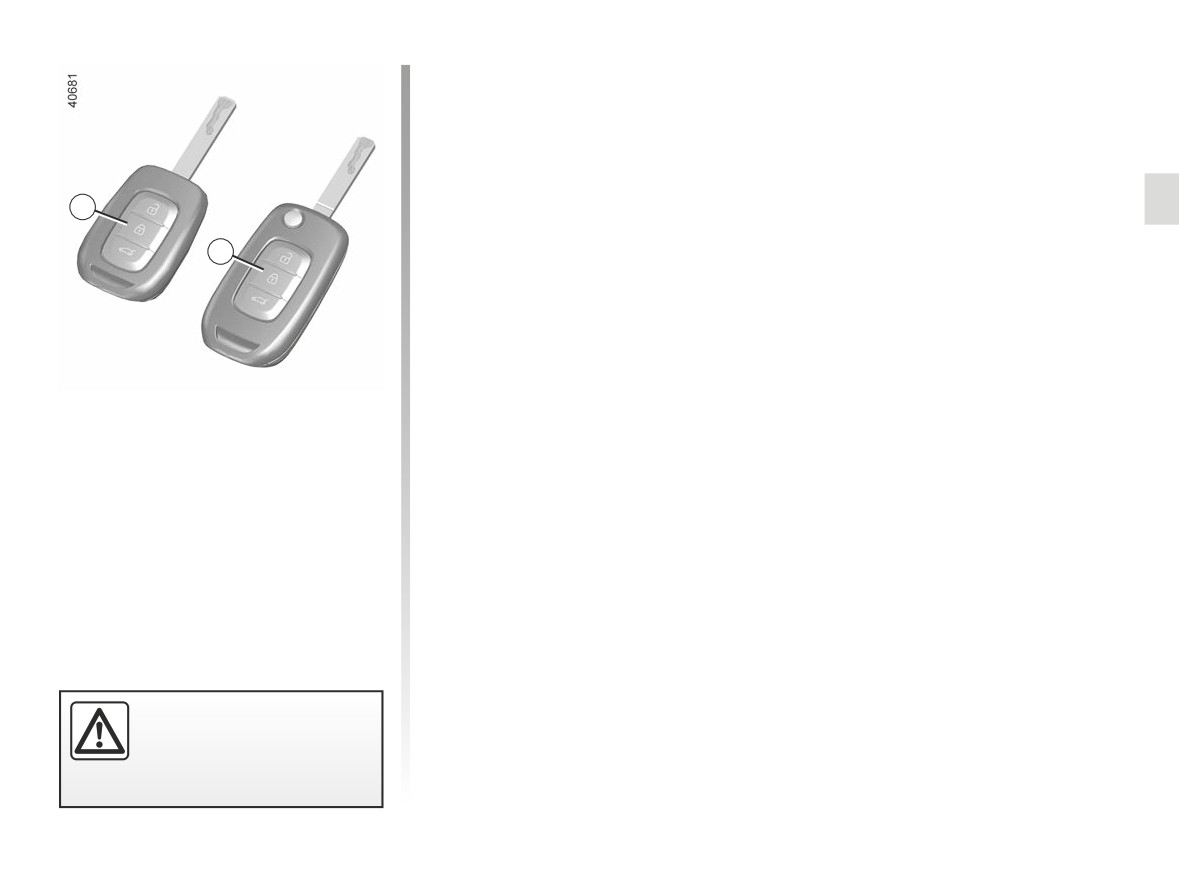
RADIO FREQUENCY REMOTE CONTROL: deadlocking
If the vehicle is equipped with a dead-
locking function, this allows you to lock
the opening elements and to prevent
the doors from being unlocked using
the interior handles (for example, by
breaking the window and then trying to
open the door from the inside).
1
To do this, press button 1 twice in quick
succession.
1
The hazard warning lights and side in-
dicator lights give two slow flashes and
three quick flashes to indicate locking.
Depending on the vehicle, the door mir-
rors fold in automatically when the vehi-
cle is locked. ➥ 1.90
Never use deadlocking if
someone is still inside the
vehicle.
1.5
CarManuals2.co
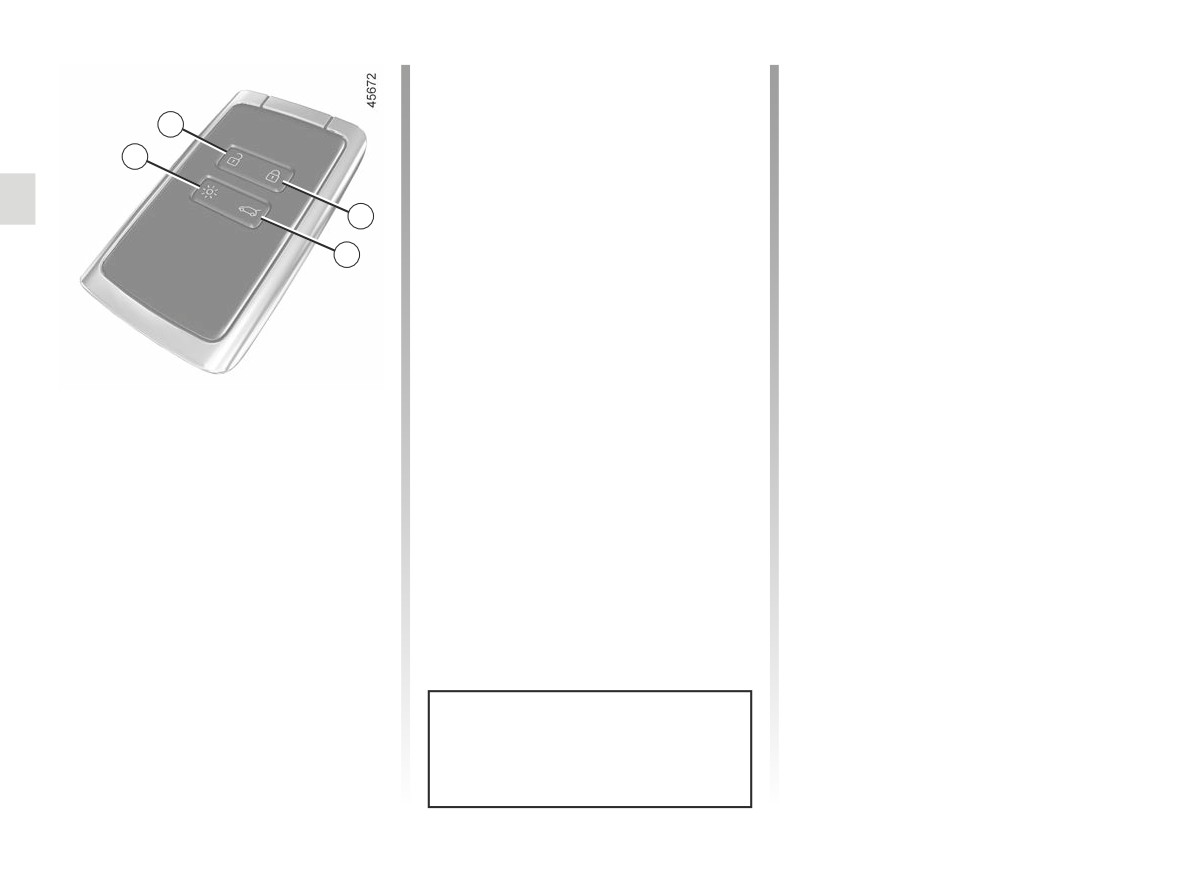
CARD: general information (1/3)
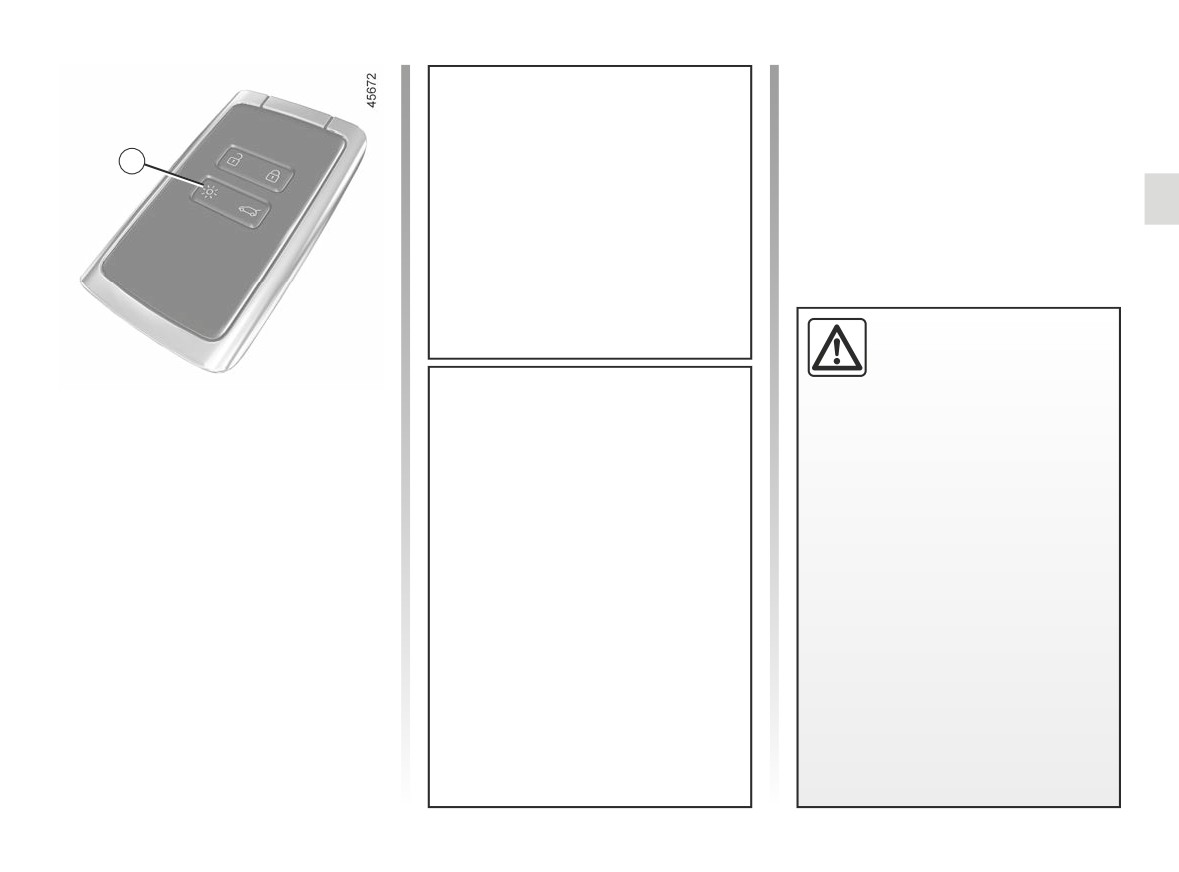
The card is used for:
Card operating range
- locking/unlocking the doors and tail-
This varies according to the environ-
1
gate (doors, tailgate) and the fuel
ment: take care not to accidentally lock
filler flap (see the following pages);
or unlock the vehicle by inadvertently
4
pressing the buttons on the card.
- switching on the vehicle lighting re-
motely (refer to the following pages);
Note: if a door or the boot is open or not
2
properly shut, locking is not carried out.
- automatic remote closing of the elec-
A beep sounds and the hazard warning
tric windows ➥ 3.18.
3
lights and side repeaters do not flash.
Battery life
Make sure that the correct battery type
is being used, and that the battery is in
good condition and inserted correctly.
Its service life is approximately two
1
Unlocking the doors and tailgate.
years: it should be replaced when the
message “Keycard Battery Low” ap-
2
Locking all doors and tailgate.
pears on the instrument panel ➥ 5.20.
3
Unlocking/locking the boot.
4
Switching-on the lighting remotely.
When the battery is flat, you can still
lock/unlock and start your vehicle.
➥ 1.16 and ➥ 2.5
1.6
CarManuals2.co
CARD: general information (2/3)
Interference
Interference by factors in the immediate
vicinity (external installations or the use
Advice
of equipment operating on the same
4
frequency as the card) may disrupt its
Avoid leaving the card in hot, cold or
operation.
humid areas.
Do not keep the card in a place
where it could be bent or dam-
aged accidentally, such as in a back
pocket of a garment.
Driver’s responsibility
when parking or stopping
the vehicle
Never leave an animal,
Distance lighting function
child or adult who is not self-suffi-
Pressing button
4 switches on the
cient alone in your vehicle, even for
dipped beam headlights and the exte-
a short time.
Replacement: need for an
rior lighting for approximately 20 sec-
additional card
They may pose a risk to themselves
onds. This can be used, for example,
or to others by starting the engine,
to identify the vehicle from a distance
If you lose your card or require an-
activating equipment such as the
when parked in a car park.
other, you can obtain one from an
electric windows or locking the
authorised dealer.
Pressing and holding the 4 button for
doors, for example.
approximately two seconds activates
If a card is replaced, it will be neces-
Also, in hot and/or sunny weather,
the exterior lighting and a sound is
sary to take the vehicle and all its
please remember that the tempera-
emitted.
cards to an approved Dealer to ini-
ture inside the passenger compart-
tialise the system.
Note: pressing button 4 again switches
ment increases very quickly.
off the lighting.
You may use up to four cards per
RISK OF DEATH OR SERIOUS
vehicle.
INJURY.
1.7
CarManuals2.co
CARD: general information (3/3)
5
A
7
8
6
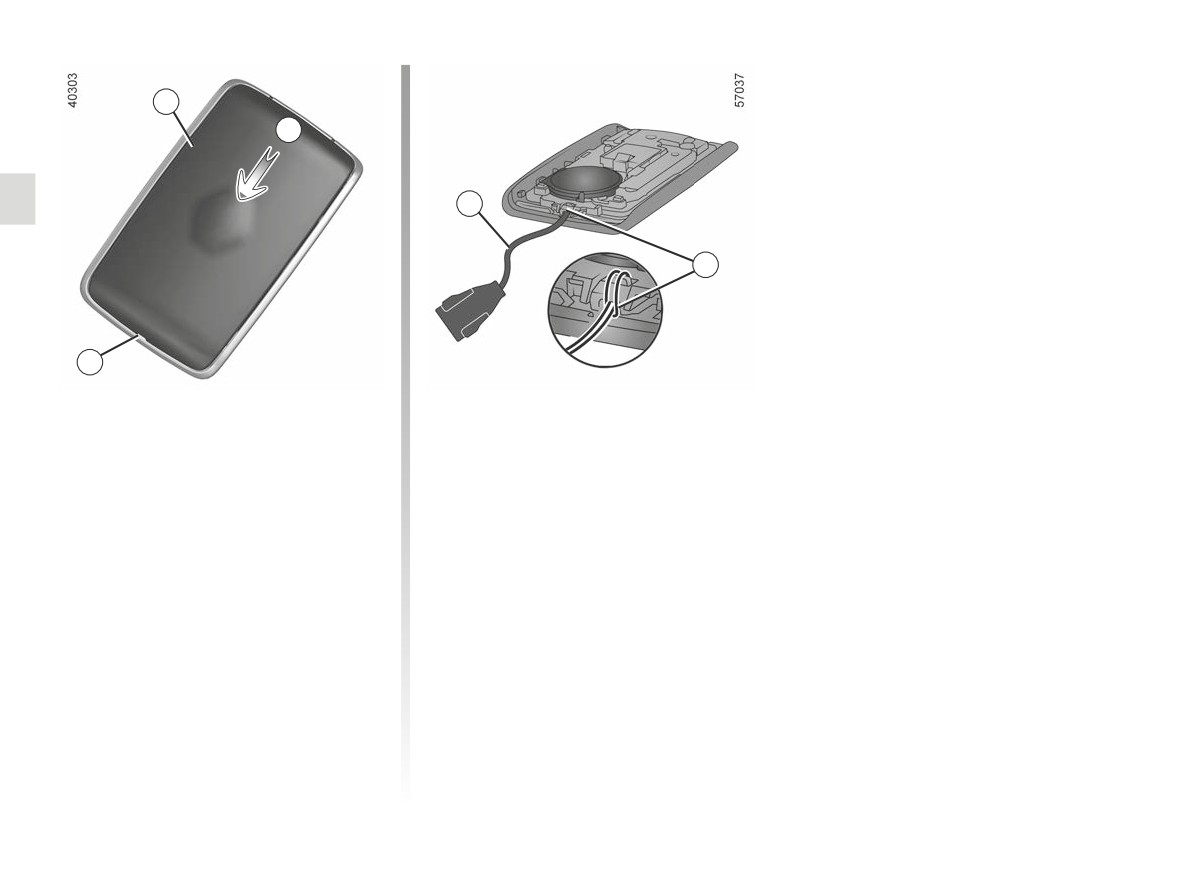
Fitting a strap 7
Insert the hand strap into the 8 com-
ponent and pass the end of the strap
Slide the rear casing
5 downwards
through the buckle.
while pressing on zone A.
Position the strap at the 6 opening and
close the cartridge.
Note: check that the diameter of the
strap cord 7 will fit the opening 6.
1.8
CarManuals2.co
“HANDS-FREE” CARD: use (1/4)
Deactivating/activating the
«hands-free» mode
Depending on the vehicle, you can de-
activate/activate:
1
- unlocking when approaching and
locking when moving away from the
vehicle;
- locking and unlocking by pressing on
the buttons on the door handle.
Driver’s responsibility
2
when parking or stopping
You can also disable/activate the sound
the vehicle
signal that is emitted upon locking when
moving away from the vehicle. ➥ 1.21
Never leave an animal,
child or adult who is not self-suffi-
cient alone in your vehicle, even for
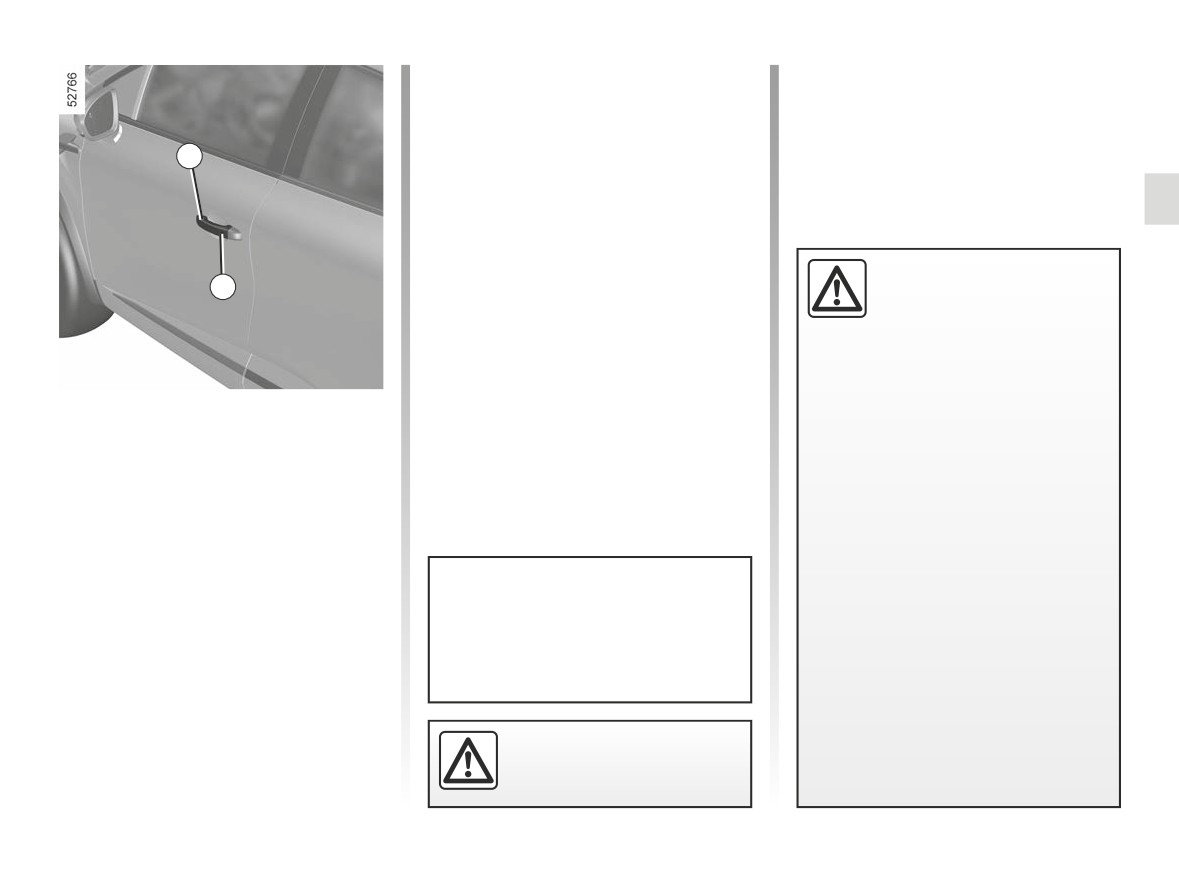
There are three ways to unlock/lock the
a short time.
vehicle:
They may pose a risk to themselves
- “hands-free”, when approaching and
or to others by starting the engine,
moving away from the vehicle;
activating equipment such as the
electric windows or locking the
- depending on the vehicle, “hands-
doors, for example.
free”, using the
2 button on
the 1 handle of one of the front doors;
Also, in hot and/or sunny weather,
please remember that the tempera-
- using the card in remote control
Do not store the card anywhere it
ture inside the passenger compart-
mode.
may come into contact with other
ment increases very quickly.
electronic equipment
(computer,
RISK OF DEATH OR SERIOUS
phone etc.) as this could hinder its
INJURY.
operation.
Never leave your vehicle
with the card inside.
1.9
CarManuals2.co
“HANDS-FREE” CARD: use (2/4)
5
3
4
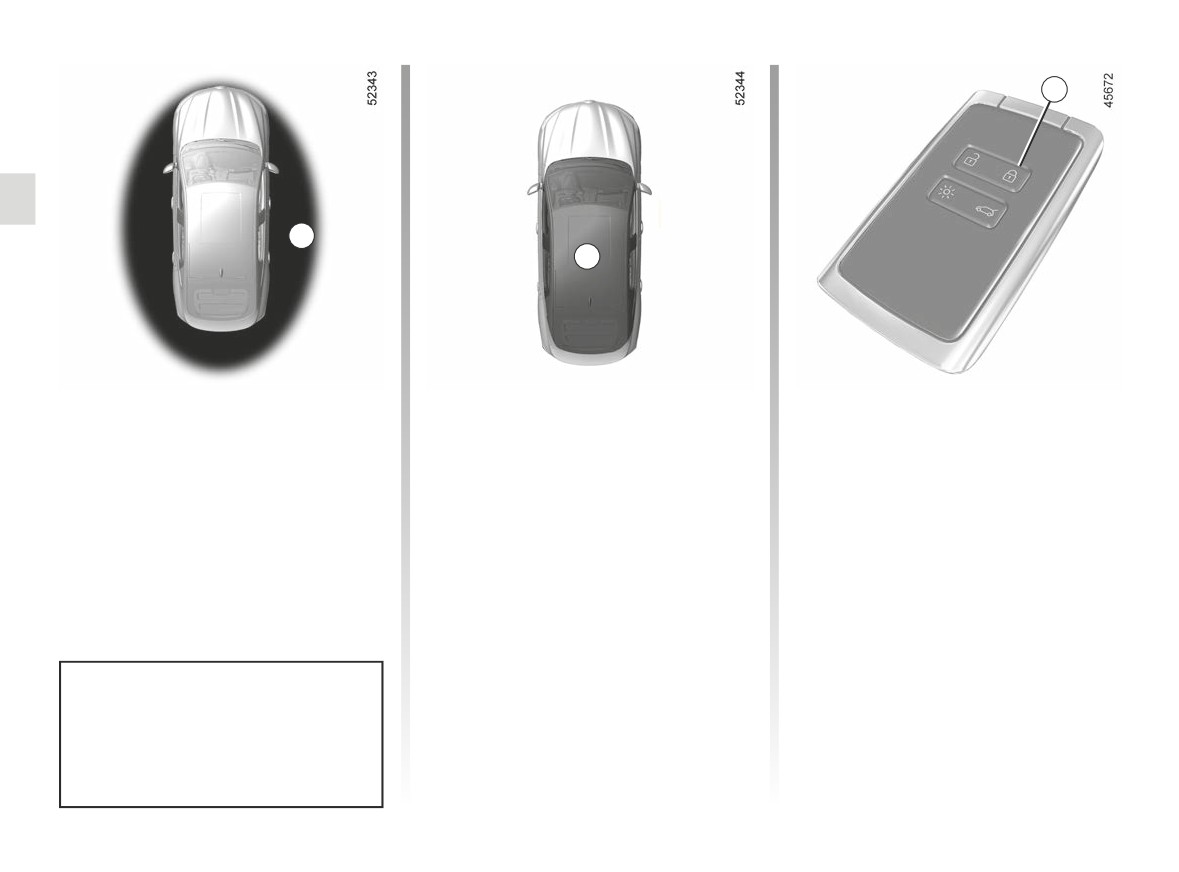
Hands-free unlocking, when
Hands-free locking when
If the card has been within the detec-
tion area 3 for approximately 15 min-
approaching the vehicle;
moving away from the
utes, remote locking is disabled. To
With the card in access zone 3, the ve-
vehicle
lock the vehicle, press the 2 button on
hicle will unlock. Unlocking is indicated
With the card on you, doors and lug-
the 1 handle depending on the vehicle
by one flash of the hazard warning
gage compartment door closed, move
or the 5 button on the card.
lights and the indicator lights.
away from the vehicle: it will lock auto-
The vehicle cannot be remotely locked
matically once you have left the access
if the card is within the area 4.
zone 3.
Note: the distance at which the vehicle
locks depends on the surroundings.
To indicate that the vehicle has been
locked, the hazard warning lights
flash twice and then light up for ap-
Depending on the vehicle, the
proximately four seconds, and a beep
door mirrors fold in/out automati-
sounds in confirmation.
cally when the vehicle is locked/un-
locked. ➥ 1.90
1.10
CarManuals2.co
“HANDS-FREE” CARD: use (3/4)
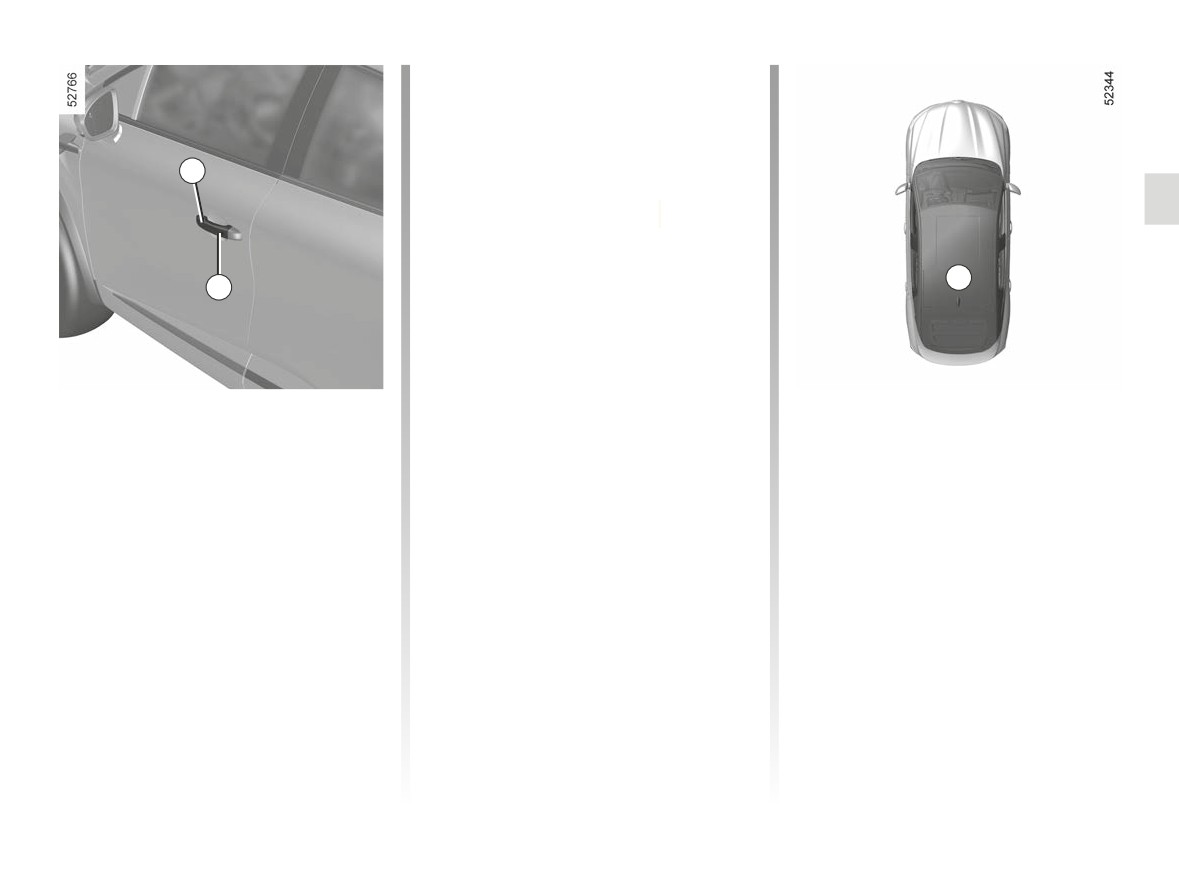
Pressing the 2 button again locks the
vehicle.
The hazard warning lights flash twice
to indicate that the vehicle is locked
and, depending on the vehicle, the door
1
mirrors automatically fold in.
Special features of the
unlocking system
4
2
In certain circumstances, approach un-
locking is disabled:
- after eight days of non-use of the ve-
hicle;
- if the card remains near zone 3 of the
“Hands-free” unlocking/
Special features relating to
vehicle for approximately five min-
locking using button 2
utes after locking the vehicle;
hands-free locking
With the card in zone 3 and the vehi-
- after several passages near zone 3
After locking in “hands-free” mode, you
cle locked, press the button 2 on the
of the vehicle and without the doors
have to wait approximately three sec-
handle 1 of one of the two front doors
having been unlocked.
onds before being able to unlock the
depending on the vehicle: the vehicle
vehicle again. During these three sec-
Press button 2 (front door handle) or
unlocks. Press the button 2 also un-
onds, the door handles can be tried to
use the remote control card you (refer
locks all the doors and the tailgate.
make sure that the vehicle is locked
to the following pages) to unlock the ve-
properly.
The hazard lights and side repeaters
hicle and reactivate hands-free mode.
flash once to indicate that the doors
Note: if a door or the boot is open or not
have unlocked and, on some vehicles,
properly shut, locking is not carried out.
the door mirrors fold out automatically.
A beep sounds and the hazard warning
lights and side repeaters do not flash.
1.11
CarManuals2.co
“HANDS-FREE” CARD: use (4/4)
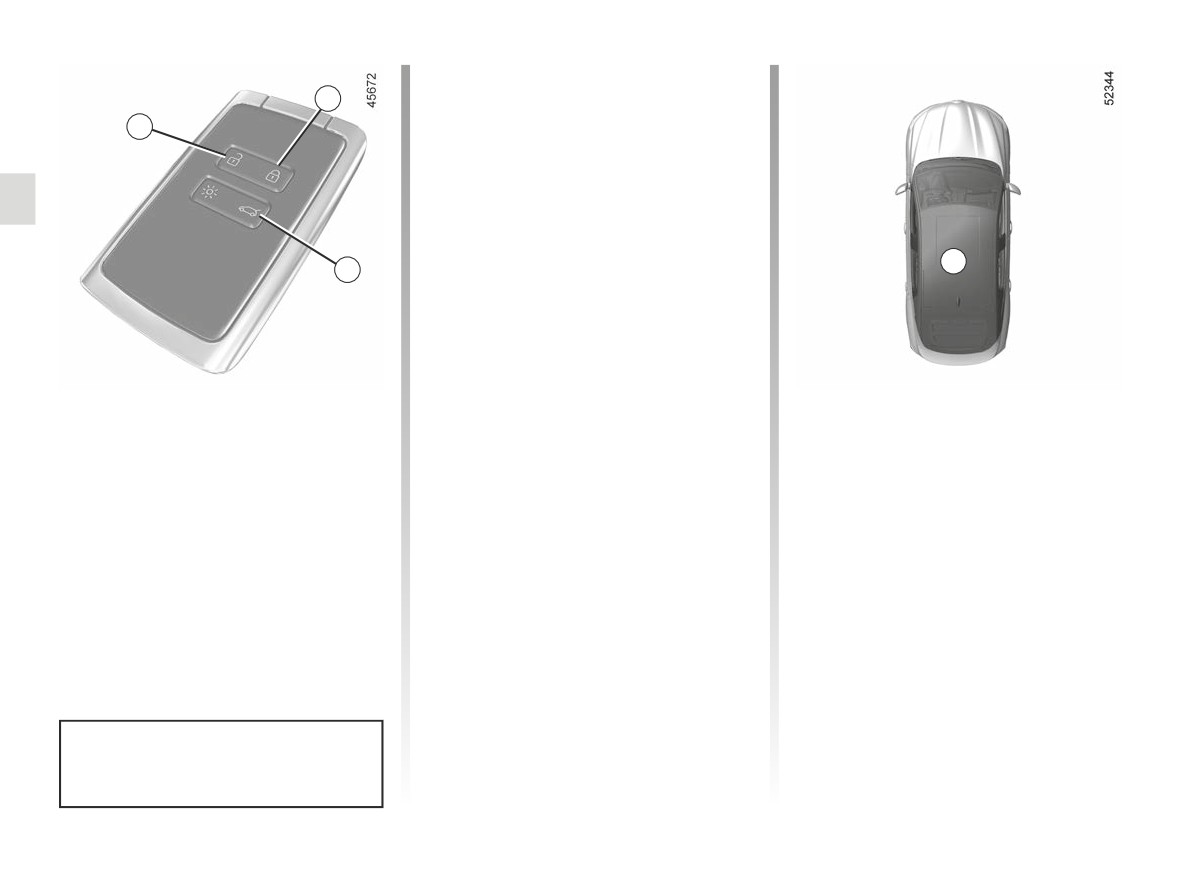
Locking using the card
5
With the doors and boot closed, press
7
button 5: the vehicle locks.
The hazard warning lights flash twice
to indicate that the vehicle is locked
and, depending on the vehicle, the door
mirrors automatically fold in.
Pressing the 5 button twice locks the
vehicle and enables the closure of the
4
6
front and rear windows (depending on
the vehicle).
Note:
- the maximum distance at which the
vehicle locks depends on the sur-
Using the card as a remote
roundings;
If, while the engine is running, a door
is opened and closed, and the card is
control
- if a door or the boot is open or not
no longer in the zone 4, the message
properly shut, locking is not carried
Unlocking with the card
“Keycard Not Detected” indicates that
out. A beep sounds and the hazard
the card is not inside the vehicle. This
Press button 7.
warning lights and side repeaters do
will, for example, prevent you from driv-
not flash.
The hazard lights and side repeaters
ing away after dropping off a passenger
flash once to indicate that the doors
who has kept the card on them.
have unlocked and, on some vehicles,
The warning disappears when the card
the door mirrors fold out automatically.
is detected again.
Locking/unlocking only the
boot
Press the button 6 to lock/unlock the
boot only.
The card buttons are deactivated
when the engine is running.
1.12
CarManuals2.co
“HANDS-FREE” CARD: deadlocking
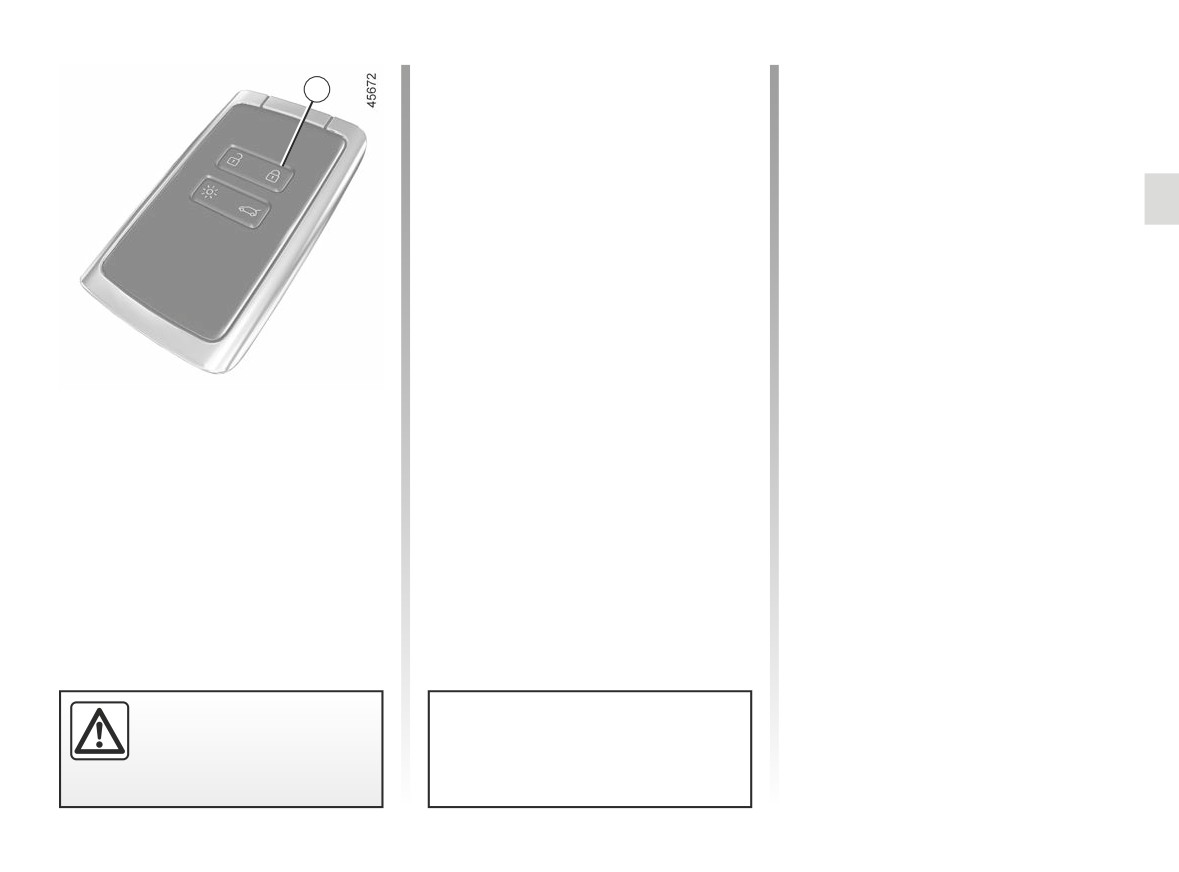
If the vehicle is equipped with a dead-
To deactivate deadlocking
1
locking function, this allows you to lock
Unlock the vehicle using button 1 on
the opening elements and to prevent
the card.
the doors from being unlocked using
the interior handles (for example, by
Unlocking is indicated by one flash of
breaking the window and then trying to
the hazard warning lights and indicator
open the door from the inside).
lights.
To activate deadlocking
To do this, press button 1 twice in quick
succession.
Locking is confirmed by two slow
flashes and three quick flashes of
the hazard warning lights and indicator
lights.
Special note: deadlocking is not pos-
sible if the hazard warning lights or the
side lights are lit.
Never use deadlocking if
someone is still inside the
Depending on the vehicle, the door
vehicle.
mirrors fold in automatically when
the vehicle is locked. ➥ 1.90
1.13
CarManuals2.co
OPENING AND CLOSING THE DOORS (1/2)
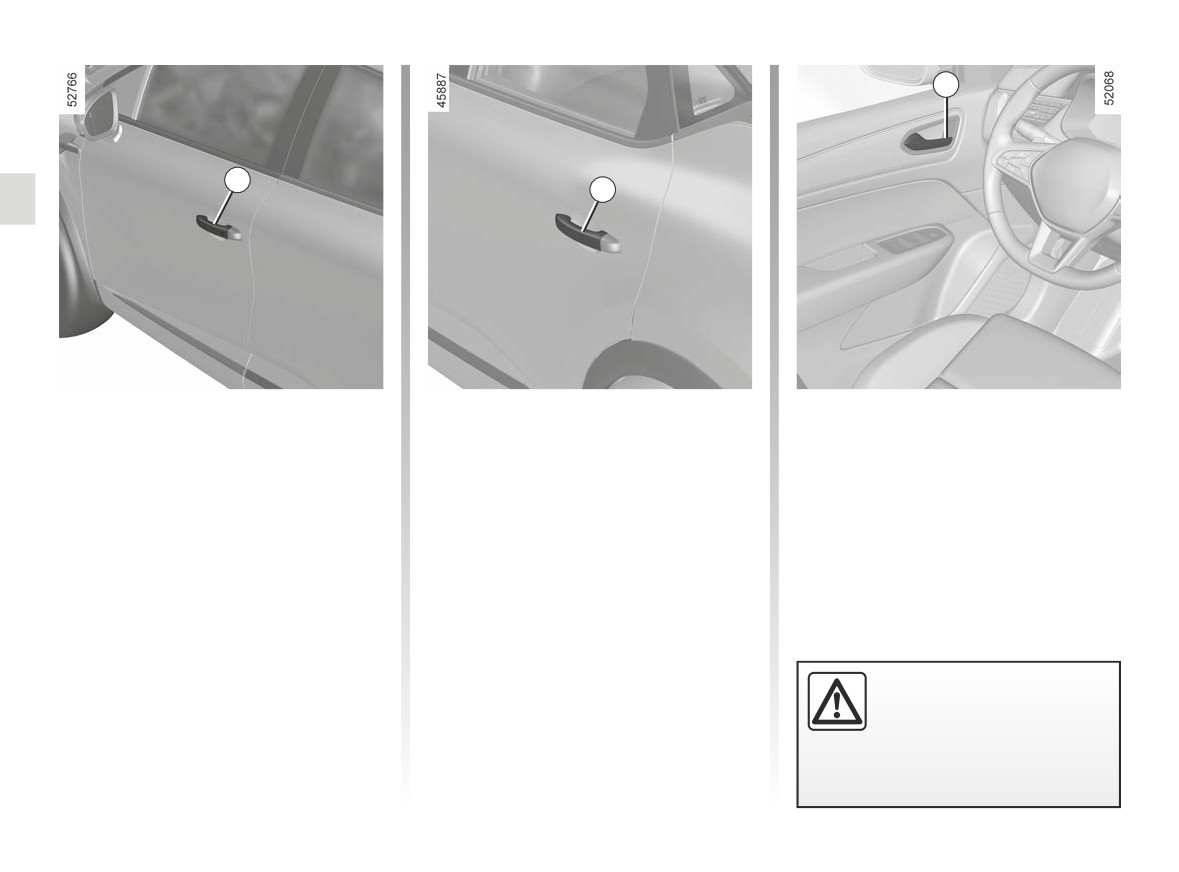
3
1
2
Opening the doors from the
Rear doors
Opening from the inside
outside
With the doors unlocked or the card on
Pull handle 3 once.
you, hold the 2 handle and pull towards
Front doors
Depending on the vehicle, it may be
you.
necessary to pull handle 3 twice: the
With the doors unlocked or the card on
first time to unlock the door, the second
you, hold the 1 handle and pull towards
time to open it.
you.
As a safety precaution,
the doors should only be
opened or closed when the
vehicle is stationary.
1.14
CarManuals2.co
OPENING AND CLOSING THE DOORS (2/2)
Lights-on reminder buzzer
If you have switched off the ignition
and left the lights switched on, a re-
minder buzzer will sound when a door
is opened.
Door/tailgate open buzzer
When the vehicle is stationary, the
2
warning light appears on the instrument
panel accompanied by a warning light
indicating which of the opening ele-
Driver’s responsibility
ments (door(s), luggage compartment)
4
when parking or stopping
are open or incorrectly closed.
the vehicle
Once the vehicle reaches a speed
Never leave an animal,
Child safety
of approximately 6 mph (10 km/h), a
child or adult who is not self-suffi-
warning light indicates if the door(s) or
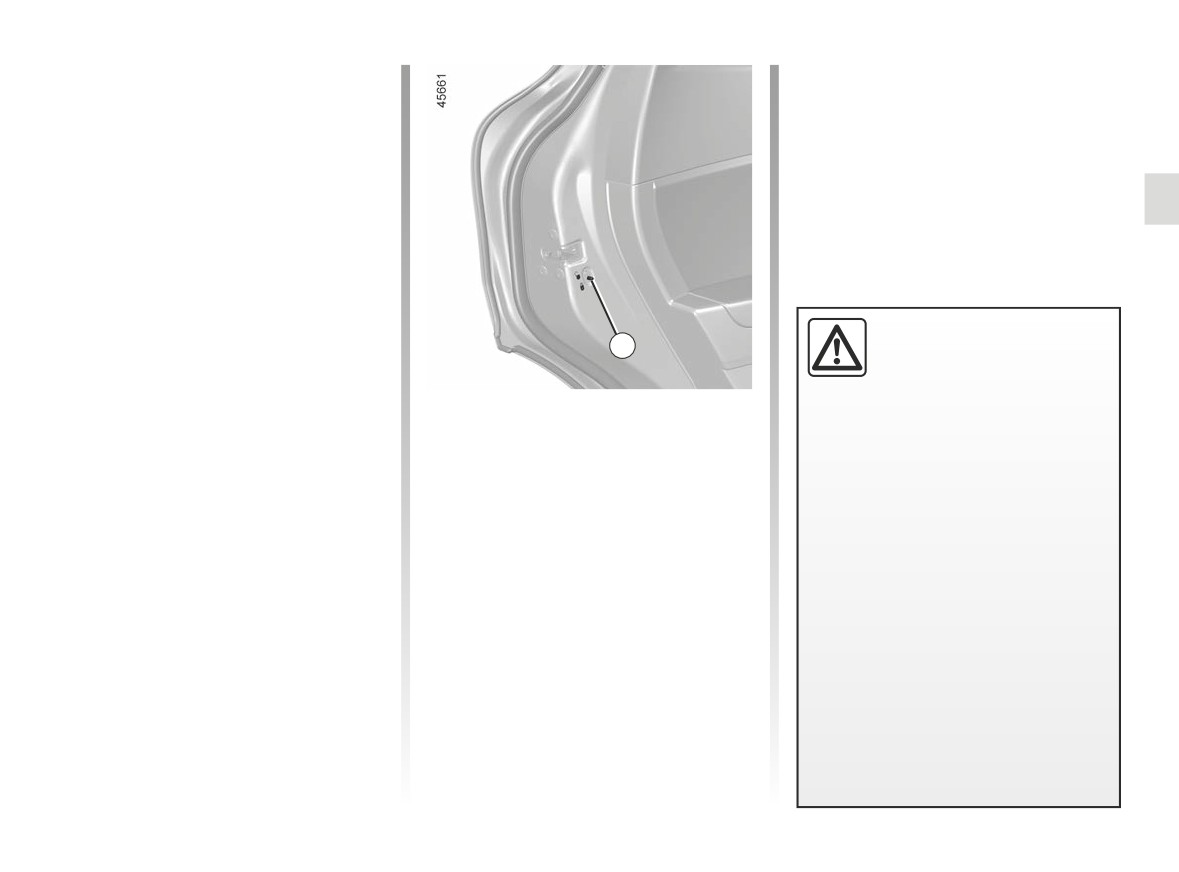
Move lever 4 and check from the inside
cient alone on your vehicle, even for
luggage compartment are open or not
that the doors are securely locked, to
a short time.
properly closed, along with the mes-
prevent the rear doors being opened
They may pose a risk to themselves
sage “Boot open” or “WARNING: Door
from the inside.
or to others by starting the engine,
Open” and a beep will sound for around
activating equipment such as the
40 seconds or until the door/luggage
electric windows or locking the
compartment is closed.
doors.
Also, in hot and/or sunny weather,
please remember that the tempera-
ture inside the passenger compart-
ment increases very quickly.
RISK OF DEATH OR SERIOUS
INJURY.
1.15
CarManuals2.co
LOCKING, UNLOCKING THE DOORS (1/4)
If the remote control or,
depending on the vehicle, the
2
card does not work
A
In some cases, the radio frequency
1
remote control or the card may not
work:
- card or radio frequency remote con-
trol battery worn or run flat, vehicle
battery flat etc.
- use of appliances operating on the
same frequency as the card (mobile
phone, etc.);
- vehicle located in a high electromag-
netic radiation zone.
The card’s built-in key
It is then possible:
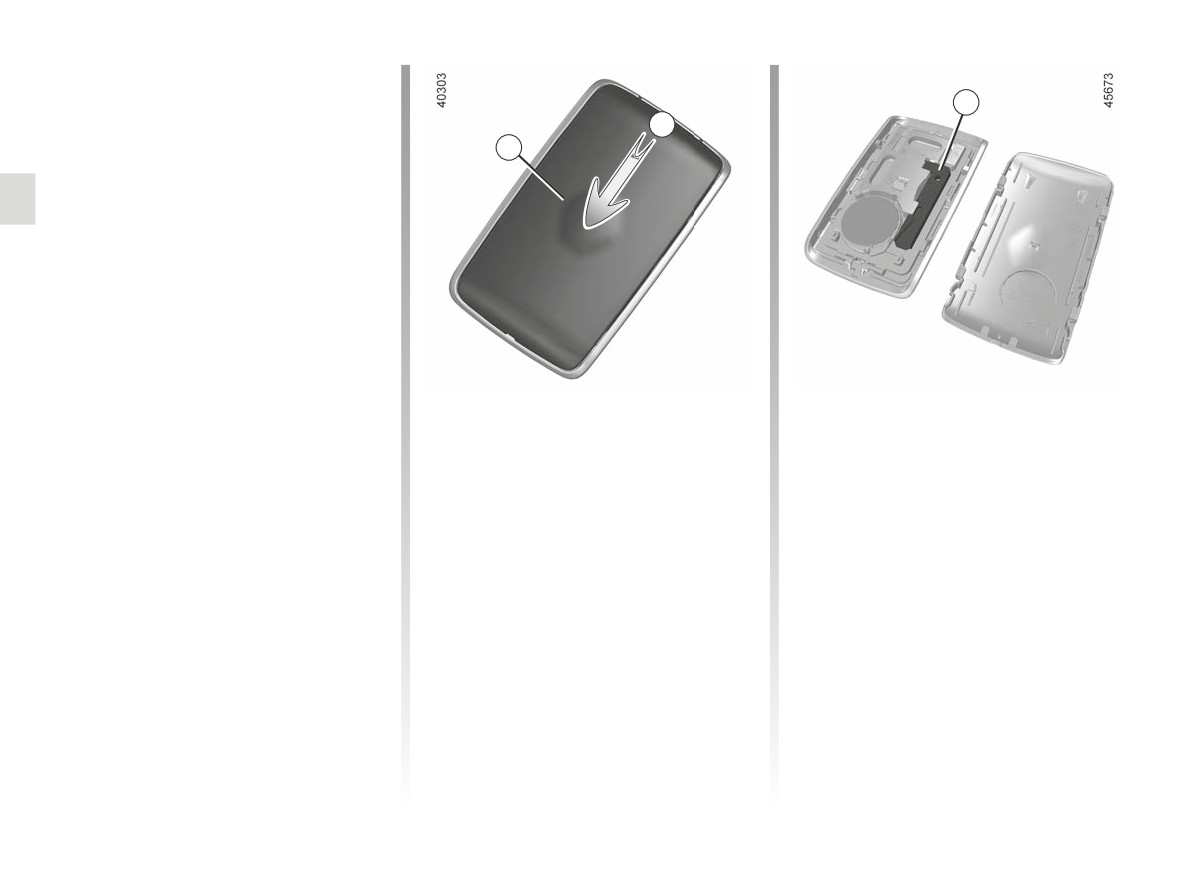
The 2 integrated key can be used to
- to use the radio frequency remote
lock or unlock the driver’s door when
control or the emergency key inte-
the card is not working.
grated in the card (depending on the
vehicle) to unlock the driver’s door;
Access with key 2
- to use the interior door locking/un-
Slide the rear casing
1 downwards
locking control (refer to the following
while pressing on zone A.
pages).
1.16
CarManuals2.co
LOCKING, UNLOCKING THE DOORS (2/4)
B
B
3
3
4
4
2
5
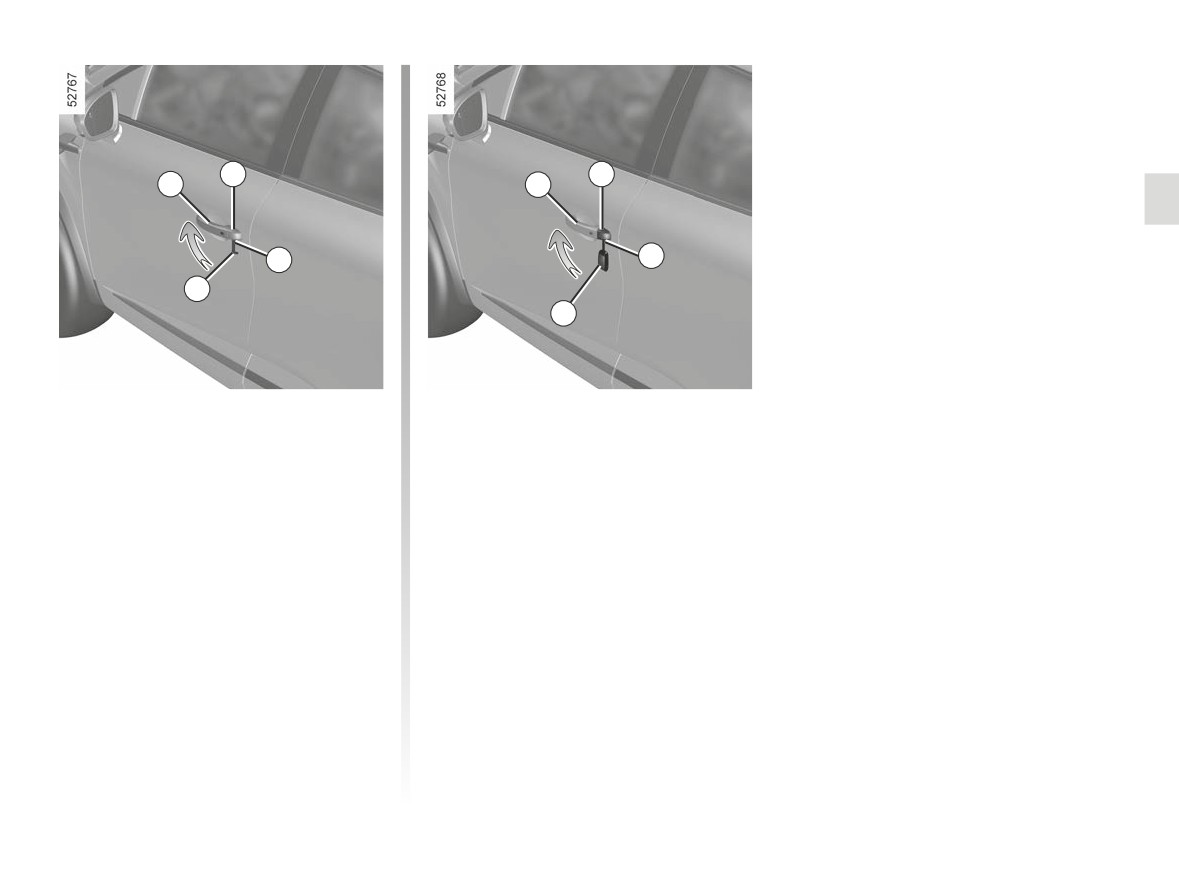
Using the key integrated in
Vehicles with key/remote
the card
control
- Pull handle 3;
Using the key
- press the cover B on the driver’s
- Pull handle 3;
door down;
- press the cover B on the driver’s
- insert the end of the key 2 in the
door down;
notch 4 at the bottom of the cover B;
- insert the end of the key 5 in the
- rotate it upwards to remove the
notch 4 at the bottom of the cover B;
cover B;
- rotate it upwards to remove the
- insert the key 2 into the lock of the
cover B;
driver’s door, lock or unlock.
- insert the key 5 into the lock of the
Once you are inside the vehicle, put the
driver’s door, lock or unlock.
key back in its casing in the card.
1.17
CarManuals2.co
LOCKING, UNLOCKING THE DOORS (3/4)
6
5
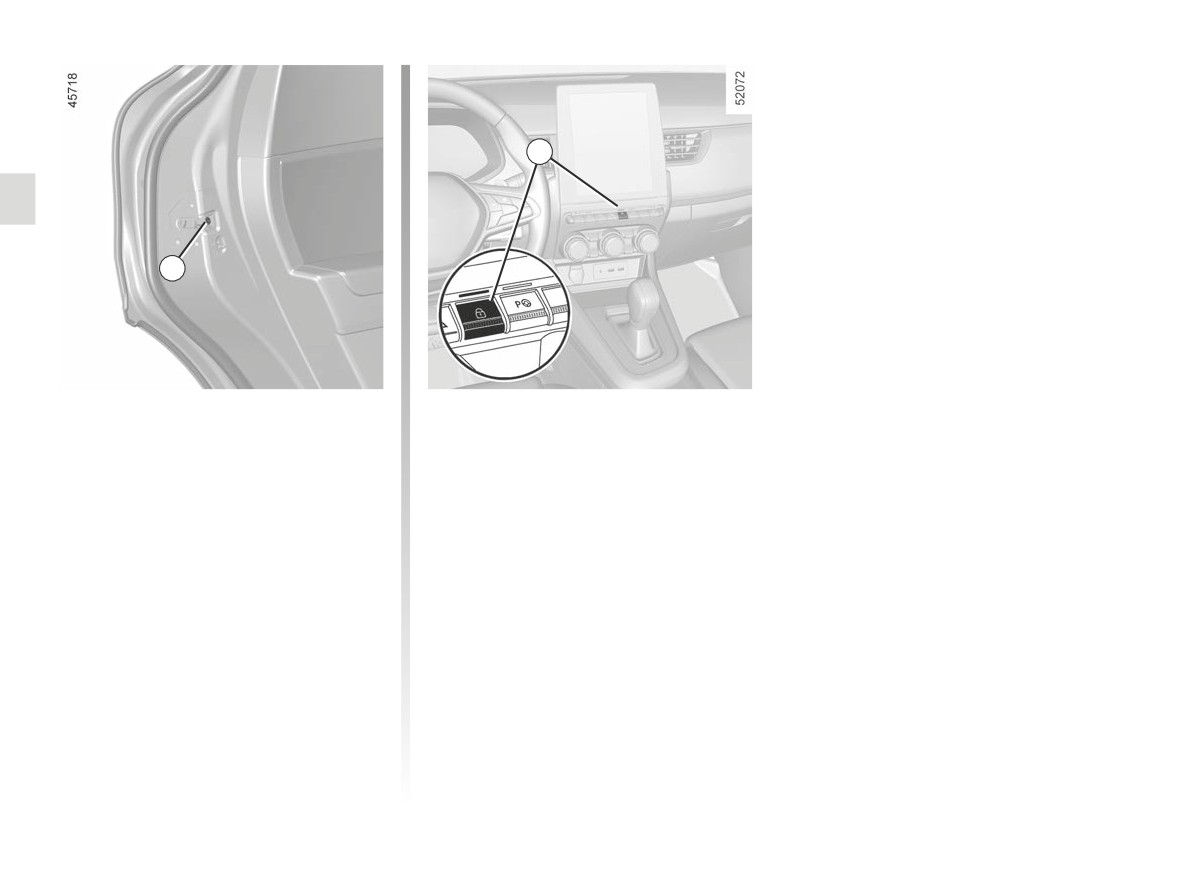
Locking the doors manually
Interior locking/unlocking
door control
Turn screw 5 with the door open (using
the end of the key) and close the door.
Switch 6 controls the doors, the boot
This means that the doors are then
and the fuel filler flap simultaneously.
locked from the outside.
If a door or the tailgate is open or not
The doors may then only be opened
closed properly, the doors and tailgate
from the inside or by using the key in
lock/unlock quickly.
the driver’s door.
If transporting an object with the tail-
gate open, you can still lock the doors:
with the engine stopped, press and
hold switch 6 to lock the other doors.
1.18
CarManuals2.co
LOCKING, UNLOCKING THE DOORS (4/4)
Door and tailgate status
Locking the opening
indicator
elements without the card or
When the ignition is on, the 6 switch
the key
warning light indicates the locking
For example, in the event of a dis-
status of the opening elements:
charged battery or the card or key tem-
porarily not working etc.
- indicator light on, the doors and tail-
gate are locked;
With the engine switched off and a
- indicator light off, the doors and tail-
door or tailgate open, press and hold
gate are unlocked.
the 6 switch for more than five seconds.
When you lock the doors, the indicator
When the door is closed, all the doors
light remains lit and then goes out.
and the tailgate will be locked.
Note: unlocking the vehicle from the
outside is only possible with the card in
the vehicle’s access zone or using the
key.
Driver’s responsibility
If you decide to keep the
doors locked when you are
driving, remember that it
may be more difficult for those as-
sisting you to gain access to the
passenger compartment in the
Never leave your vehicle
event of an emergency.
with the key or card inside.
1.19
CarManuals2.co
//////////////////////////////////////////