Renault Kangoo (2018 year). Manual - part 11
 

  Index      Renault     Renault Kangoo - service manual 2018 year in english


Search            


Content   ..  9  10  11  12   ..


Renault Kangoo (2018 year). Manual - part 11


3.32

TRANSPORTING OBJECTS IN THE BOOT 

(2/2)

/TOWING

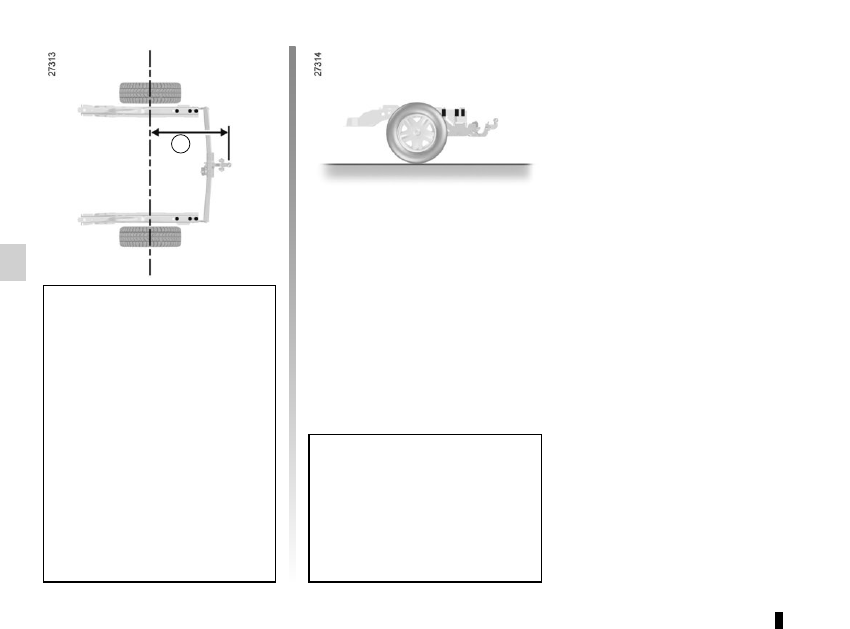
If the towbar ball obscures the regis-

tration plate or the rear fog lights, it 

should be removed when not in use.
In all cases, comply with local leg-

islation.

A = 781 mm.

A

Permissible nose weight, maxi-

mum permissible towing weight, 

braked and unbraked: refer to 

the information on “Weights” in 

Section 6.

Choice and fitting of towing 

equipment

Maximum weight of towing equip-

ment: 23 kg
For fitting and conditions of use, 

refer to the equipment’s fitting in-

structions.

Please keep these instructions with 

the rest of the vehicle documenta-

tion.

3.33

–  The storage position C (depending 

on the vehicle).

To store the luggage compartment 

cover, position it in the runner against 

the rear bench seatback.

The luggage compartment cover is 

made up of two rigid sections.
There are three possible positions:
– top position A;
– bottom position B (depending on the 

vehicle).

In both cases, you can fold section 1 

onto section 2 by lifting it as shown by 

the arrow.

Do not place any objects, 

especially heavy or solid 

objects on the luggage 

cover. These may pose a 

risk to the vehicle occupants if the 

driver has to brake suddenly or if the 

vehicle is involved in an accident.

LUGGAGE COVER

A

C

B

1

2

3.34

The luggage net

(depending on vehicle)
This is located in the luggage compart-

ment.
It may be attached behind the front 

seats or behind the rear bench seat.
Hooks 1 may also be used to hang 

clothes.

LUGGAGE NET

For more information, refer to the 

label sewn onto the net.

1

1

3

4

Positioning the net 2

–  Upper section: insert the tabs at the 

ends of the net in hooks 1;

– lower section: engage belts 3 in 

lashing rings 4 on the floor. Ensure 

that both forks of the lower hook are 

engaged;

–  tighten the net using the tensioning 

units.

Luggage compartment an-

chorages (rings) 4 cannot 

be used if they are already 

being used to secure two 

other components (eg. luggage 

net + load in the luggage compart-

ment or child seat + load in the lug-

gage compartment).

2

The luggage net must not 

be used to restrain or hold 

objects.
Risk of injury

3.35

ROOF BARS 

(1/2)

To place the bars in the 

transverse position

– Unclip levers 1.
–  Lift the bars to allow them to be piv-

oted (figure A).

–  Lock the bars in the transverse posi-

tion (figure B).

–  Check that they are correctly locked.

1

A

2

Maximum weight on each roof bar: 

40 kg evenly distributed (80 kg over 

2 roof bars)

It is strictly forbidden to place the 

roof bars in the transverse position 

(carrying position) when entering a 

roller-type car wash.

B

3.36

To slide the bar

Roof bar 2 can be slid to move it 

closer to or further from the other bar 

(figure C).
There are two positions: centre or rear.
With the bar unlocked, pull it towards 

the front or the rear of the vehicle to 

slide it in rail 3. Once you have chosen 

the position, pivot the bar and lock it in 

the transverse position (figure D).
Check that both bars are correctly 

locked in position.

2

2

D

C

ROOF BARS 

(2/2)

3

3.37

MULTIMEDIA EQUIPMENT

The presence and location of this 

equipment depends on the vehicle’s 

multimedia equipment.
1 Multimedia touchscreen;
2 multimedia sockets;
3 radio;
4  steering column control.

1

3

2

4

Refer to the equipment instructions 

for information on how to operate 

this equipment.

3.38

4.1

Section 4: Maintenance

Bonnet . . . . . . . . . . . . . . . . . . . . . . . . . . . . . . . . . . . . . . . . . . . . . . . . . . . . . . . . . . . . . . . . . . . . . . . .  

4.2

Engine oil level: . . . . . . . . . . . . . . . . . . . . . . . . . . . . . . . . . . . . . . . . . . . . . . . . . . . . . . . . . . . . . . . . .  

4.4

general information, use . . . . . . . . . . . . . . . . . . . . . . . . . . . . . . . . . . . . . . . . . . . . . . . . . . . . . 

4.4

topping up, filling  . . . . . . . . . . . . . . . . . . . . . . . . . . . . . . . . . . . . . . . . . . . . . . . . . . . . . . . . . . 

4.6

Levels  . . . . . . . . . . . . . . . . . . . . . . . . . . . . . . . . . . . . . . . . . . . . . . . . . . . . . . . . . . . . . . . . . . . . . . . .  

4.8

Filters . . . . . . . . . . . . . . . . . . . . . . . . . . . . . . . . . . . . . . . . . . . . . . . . . . . . . . . . . . . . . . . . . . . . . . . . .   4.10

Battery . . . . . . . . . . . . . . . . . . . . . . . . . . . . . . . . . . . . . . . . . . . . . . . . . . . . . . . . . . . . . . . . . . . . . . . .   4.11

Tyre pressure. . . . . . . . . . . . . . . . . . . . . . . . . . . . . . . . . . . . . . . . . . . . . . . . . . . . . . . . . . . . . . . . . . .   4.13

Bodywork maintenance . . . . . . . . . . . . . . . . . . . . . . . . . . . . . . . . . . . . . . . . . . . . . . . . . . . . . . . . . . .   4.15

Interior trim maintenance . . . . . . . . . . . . . . . . . . . . . . . . . . . . . . . . . . . . . . . . . . . . . . . . . . . . . . . . . .   4.18

4.2

BONNET 

(1/2)

1

To open the bonnet, pull the handle 1.

Please note when work-

ing close to the engine that 

it may be hot. In addition, 

the engine cooling fan may 

start at any moment. The 


warning light in the engine compart-

ment reminds you of this.
Risk of injury.

Unlocking the bonnet catch

To open, push tab 2 to the left as you 

open the bonnet.

Opening the bonnet

Lift the bonnet, helping it up, and it will 

rest in position with the help of struts.

Do not press down on the 

bonnet: there is a risk that 

the bonnet may accidentally 

close.

When working in the engine 

compartment, ensure that 

the windscreen wiper stalk 

is in the park position.

Risk of injury.

2

Before performing any 

action in the engine com-

partment, the ignition must 

be switched off (please see 

the information on “Starting, stop-

ping the engine” in Section 2).

4.3

Closing the bonnet

Check that nothing has been left in the 

engine compartment.

To close the bonnet again, hold the 

bonnet in the middle and lower it to 

30 cm above the closed position, then 

release it.

After carrying out any work 

in the engine compart-

ment, check that nothing 

has been left behind (cloth, 

tools, etc.).

These may damage the engine or 

cause a fire.

Ensure that the bonnet is 

properly locked.

Check that nothing is pre-

venting the catch from lock-

ing (gravel, cloth, etc.).

In the event of even a slight 

impact involving the radia-

tor grille or bonnet, have 

the bonnet lock checked by 

an approved dealer as soon as pos-

sible.

BONNET 

(2/2)

4.4

Minimum oil level display A

If the level is above the minimum 

level
The “OIL LEVEL” message appears on 

the display, accompanied by squares 

indicating the level. These squares dis-

appear as the level drops and they are 

replaced by dashes.
To advance to trip computer reading, 

press button 1 or 2 again.

If the level is at the minimum
The “TOP-UP OIL LEVEL” message 
and warning light 

©

 are displayed 

on the instrument panel.
It is vital to top up the oil as soon as 

possible.

The display only warns the 

driver if the oil level is at the 

minimum level. It does not 

inform the driver that the oil 

level has exceeded the maximum 

level as this can only be measured 

using a dipstick.

It is normal for an engine to use oil for 

lubrication and cooling of moving parts 

and it is normal to top up the level be-

tween oil changes. 
However, contact an approved Dealer if 

more than 0.5 litres is being consumed 

every 600 miles (1,000 km) after the 

running in period.
Oil change frequency: check the oil 

level from time to time and certainly 

before any long journey to avoid the 

risk of damaging your engine.

Reading the oil level

The oil level should be read with the ve-

hicle on level ground, after the engine 

has been switched off for some time.
The dipstick must be used to read 

the exact oil level and make sure 

that the maximum level has not been 

exceeded (risk of engine damage). 

Refer to the following pages.
The instrument panel display only 

alerts the driver when the oil level is at 

its minimum.

1

2

A

ENGINE OIL LEVEL: general information 

(1/2)

4.5

Consult your approved Dealer at 

once if you notice an abnormal or 

repeated drop in any of the fluid 

levels.

Please note when work-

ing close to the engine that 

it may be hot. In addition, 

the engine cooling fan may 

start at any moment. The 


warning light in the engine compart-

ment reminds you of this.
Risk of injury.

In order to prevent splashback, it is 

recommended that a funnel be used 

when topping up/filling with oil.

ENGINE OIL LEVEL: general information 

(2/2)

Reading the level using the 

dipstick

Engine switched off:
–  remove the dipstick and wipe with a 

clean, lint-free cloth;

–  push the dipstick in as far as it will 

go;

–  take out the dipstick again;

–  read the level: it should never fall 

below minimum mark A or exceed 

maximum mark B.

Once the level has been read, push the 

dipstick in as far as it will go.

A

B

A

B

Exceeding the maximum 

engine oil level
Under no circumstances 

must the maximum fill 

level B be exceeded: risk of damage 

to the engine and catalytic con-

verter.

If the oil level exceeds the maximum 

level, do not start your vehicle and 

contact an approved Dealer.

Before performing any 

action in the engine com-

partment, the ignition must 

be switched off (please see 

the information on “Starting, stop-

ping the engine” in Section 2).

4.6

Topping up/filling

The vehicle must be parked on level 

ground and the engine should be cold 

(for instance, before the engine is 

started up for the first time in the day).

–  Unscrew the cap 1;
–  top up the level (as a guide, the ca-

pacity between the “min” and “max” 

on the dipstick 2 is 1.5 litres, depend-

ing on the engine);

–  wait for approximately 10 minutes to 

allow the oil to flow into the engine;

–  check the level using the dipstick 2 

(as described above).

Once the operation is complete, ensure 

that the dipstick is fully inserted, or 

the cap-type dipstick screwed in com-

pletely.

Do not exceed the “max” level and 

do not forget to refit the cap 1 and 

the dipstick 2.

1

2

2

1

ENGINE OIL LEVEL: topping up/filling 

(1/2)

1

2

Before performing any 

action in the engine com-

partment, the ignition must 

be switched off (please see 

the information on “Starting, stop-

ping the engine” in Section 2).

4.7

Engine oil grade

Refer to the Maintenance Service 

Booklet for your vehicle.

Oil change

Service interval: refer to the 

Maintenance Service Booklet for your 

vehicle.

Oil change capacity

Please refer to the maintenance docu-

ment for your vehicle, or contact an au-

thorised dealer. 

Always check the engine oil level using 

the dipstick, as explained previously (it 

should never fall below the minimum 

level, or be over the maximum level on 

the dipstick).

Engine oil change: if you 

are changing the oil when 

the engine is hot, be careful 

not to scald yourself if the 

oil overflows.

Consult your approved Dealer at 

once if you notice an abnormal or 

repeated drop in any of the fluid 

levels.

Never run the engine in an 

enclosed space as exhaust 

gases are poisonous.

Filling: take care when 

topping up the oil that 

no oil drips onto engine 

components - risk of fire. 

Remember to refit the cap securely 

as there is a risk of fire if oil splashes 

onto hot engine components.

Please note when work-

ing close to the engine that 

it may be hot. In addition, 

the engine cooling fan may 

start at any moment. The 


warning light in the engine compart-

ment reminds you of this.
Risk of injury.

ENGINE OIL LEVEL: topping up/filling 

(2/2)

ENGINE OIL CHANGE

Exceeding the maximum 

engine oil level
Under no circumstances 

must the maximum fill level 

be exceeded: risk of damage to the 

engine and catalytic converter.

If the oil level exceeds the maximum 

level, do not start your vehicle and 

contact an approved Dealer.

4.8

LEVELS 

(1/3)

 Brake fluid

This should be checked frequently, 

and immediately if you notice even the 

slightest loss in braking efficiency.
The level should be read with the engine 

switched off and on level ground.

Level 1
It is normal for the level to drop as the 

brake shoes become worn, but it must 

never drop lower than the “MINI" warn-

ing line.
If you wish to check the disc and drum 

wear yourself, you should obtain the 

document explaining the checking pro-

cedure from our network or from the 

manufacturer’s website.

Topping up
After any operation on the hydraulic cir-

cuit, a specialist must replace the fluid.
Only use fluids approved by our 

Technical Department (and taken from 

a sealed container).

Replacement intervals
Refer to the Maintenance Document for 

your vehicle.

Please note when work-

ing close to the engine that 

it may be hot. In addition, 

the engine cooling fan may 

start at any moment. The 


label in the engine compartment re-

minds you of this.
Risk of injury.

1

Consult your approved dealer at 

once if you notice an abnormal or 

repeated drop in any of the fluid 

levels.

Before performing any 

action in the engine com-

partment, the ignition must 

be switched off (please see 

the information on “Starting, stop-

ping the engine” in Section 2).

4.9

LEVELS 

(2/3)

 Coolant

The level when cold should be be-

tween the MINI and MAXI marks on the 

coolant reservoir 2.
Top this level up when cold before it 

reaches the MINI mark.
The level should be read with the engine 

switched off and on level ground.

No operations should be 

carried out on the cooling 

circuit when the engine is 

hot.

Risk of burns.

Checking intervals
Check the coolant level regularly
 

(very severe damage is likely to be 

caused to the engine if it runs out of 

coolant).
If the level needs to be topped up, only 

use products approved by our Technical 

Department which ensure:
– antifreeze protection;
–  anticorrosion protection of the cool-

ing system.

Replacement intervals
Refer to the Maintenance Document for 

your vehicle.

Consult your approved dealer at 

once if you notice an abnormal or 

repeated drop in any of the fluid 

levels.

2

2


Content   ..  9  10  11  12   ..