Renault Kangoo (2018 year). Manual - part 10
 

  Index      Renault     Renault Kangoo - service manual 2018 year in english


Search            


Content   ..  8  9  10  11   ..


Renault Kangoo (2018 year). Manual - part 10


3.16

AIR CONDITIONING: information and operating instructions 

(2/2)

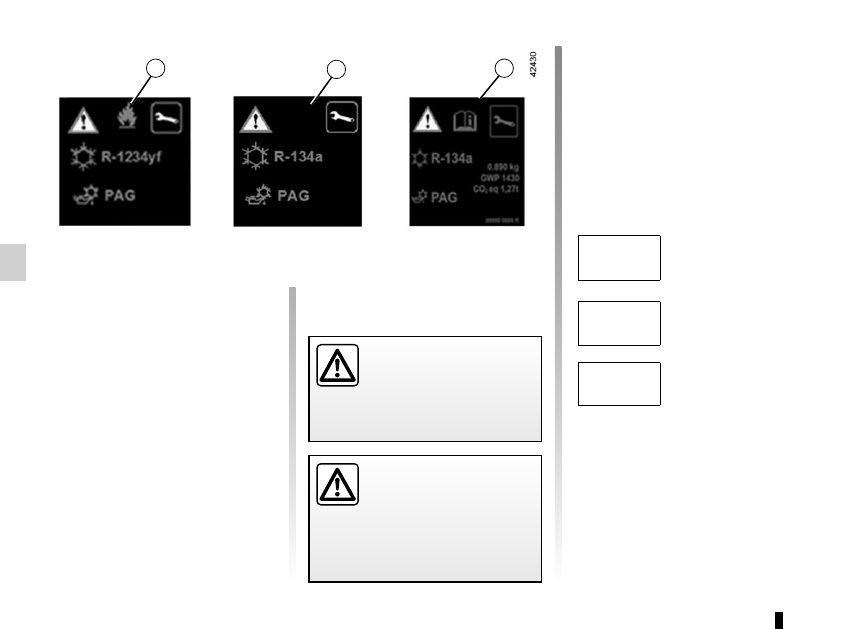
The refrigerant circuit may contain 

fluorinated greenhouse gases.
Depending on the vehicle, you will find 

the following information on label A af-

fixed inside the engine compartment.
The presence and location of the infor-

mation on label A depends on the ve-

hicle.

A

A

A

Do not open the refriger-

ant circuit. The fluid may 

damage eyes or skin.

Before performing any 

action in the engine com-

partment, the ignition must 

be switched off (please see 

the information on “Starting, stop-

ping the engine” in Section 2).

Ñ

Type of refrigerant fluid   

Type of oil in the air condi-

tioning circuit

Inflammable product 


Consult the driver’s hand-

book

Maintenance

Quantity of refrigerant 

fluid present in the ve-

hicle.

x.xxx kg

G l o b a l   Wa r m i n g 

Potential (CO2 equi-

valent).

GWP xxxxx

Quantity in weight and 

in CO2 equivalent.

CO2 eq 

x.xx t

3.17

Map reading lights

(depending on vehicle)
Tilt the switch 3 for permanent lighting.
In the front passenger seat, press 

switch 2.

Courtesy lights

Switches 1 or 3 provide:
– permanent lighting;
–  intermittent lighting, which comes on 

when a door is opened. It goes out 

when the doors concerned are prop-

erly closed;

–  immediate switching off.

INTERIOR LIGHTING 

(1/2)

2

1

Luggage compartment light A

(depending on vehicle)
Tilt the switch 4 for permanent lighting.

A

3

4

Unlocking and opening the doors or 

luggage compartment switches on 

the timed courtesy lights.

3.18

Special features

Depending on the vehicle, remote un-

locking of the doors triggers timed light-

ing of the passenger compartment. If 

one of the front or rear doors is opened, 

the period for which the light is switched 

on will start again.
Then the courtesy light and the luggage 

compartment light dim and go out.
The lighting timer will cut out for vari-

ous reasons:
–  if a door has been open for 15 min-

utes;

–  if all the doors have been closed for 

15 seconds or 5 minutes, depending 

on the vehicle;

–  when the ignition is switched on.

B

Luggage compartment light B

(depending on vehicle)

INTERIOR LIGHTING 

(2/2)

3.19

Courtesy mirror 2

(passenger side)
If the sun visor is fitted with a courtesy 

mirror, it has a cover.

Front sun visor

Lower sun visor 1.
The clip can be used to hold motorway 

passes, etc..

SUN VISOR/MIRRORS

When driving, ensure the 

courtesy mirror cover is 

closed. Risk of injury.

Child minder mirror 3

The child minder mirror allows you to 

keep an eye on your child in the back 

seat.

1

2

3

3.20

Electric windows

With the ignition on:
– press the switch for the window 

concerned to lower it to the desired 

height;

–  lift the switch for the window con-

cerned to raise it to the desired 

height.

From the driver’s seat
Operate the switches as follows:
–  1 for the driver’s side;
–  2 for the front passenger’s side;
–  3 and 5 for the rear passenger win-

dows.

ELECTRIC WINDOWS 

(1/2)

From the rear seats
With the doors closed, press switch 7.

From the front passenger seat
Press switch 6.

1

2

3

4

5

6

Safety of rear occupants

Depending on the vehicle, the driver can disable operation of the rear 

electric windows by pressing switch 4.
Driver’s responsibility

Never leave your vehicle with the remote control unit inside and never leave a 

child (or a pet) unsupervised, even for a short while.

They may pose a risk to themselves or to others by starting the engine or activa-

ting equipment (such as the gear lever or electric windows). If any part of the body 

becomes trapped, reverse the direction of the window immediately by pressing 

the relevant switch.
Risk of serious injury.

7

3.21

One-touch electric window

The one-touch mode works in addition 

to the operation of the electric windows 

described previously.

It is fitted to the driver’s window.
Briefly press or pull the 
 switch 1: the 

window is fully lowered or raised.

Pressing the switch again stops the 

window moving.

ELECTRIC WINDOWS 

(2/2)

/HALF-OPENING WINDOW

Manual window winders

Turn handle 8.

8

9

Half-opening window

To half-open the window, turn handle 9 

in the direction of the arrow then lock it 

by pushing the handle. When closing it, 

check that it is properly locked.

8

1

Avoid resting any objects against a 

half-open window: there is a risk that 

the electric window winder could be 

damaged.

Closing windows can cause 

serious injury.

3.22

MANUAL SUNROOF

Opening

To the first position
Push handle 1 towards the front of the 

vehicle until it stops.

To the second position
Press tab 2 and push handle 1 at the 

same time until it stops again.

1

2

Precautions during use

– check that the sunroof is properly 

closed before leaving your vehicle;

– clean the seal every three months 

using products recommended by our 

Technical Department;

–  do not open the sunroof immedi-

ately after the vehicle has been in 

the rain or after your car has been 

washed.

–  Vehicle with roof bars

As a general rule, if there is a load 

on the roof, use of the sunroof is not 

recommended.
Before using the sunroof, check the 

objects and/or accessories (bike 

racks, roof boxes, etc.) attached to 

the roof bars: they should be prop-

erly arranged and secured and 

should not interfere with the opera-

tion of the sunroof.
Contact your approved Dealer for 

details of possible conversions.

Closing

Hold tab 2 pressed in and return the 

handle 1 to the initial position.

3.23

Removable ashtray 1

This is a removable ashtray which can 

be placed in the cup holders 3.
Lift the cover to open.
To empty it, pull the assembly. The ash-

tray will come out of its housing.

2

ASHTRAYS, CIGAR LIGHTER, ACCESSORIES SOCKETS

1

Accessories sockets

You may use the cigar lighter recess 2 

or one of sockets 4 (depending on the 

vehicle). They are designed for con-

necting accessories with a maximum 

power rating of 120 Watts (voltage: 

12V) which have been approved by our 

Technical Department.
Depending on the battery charge, the 

accessories socket may stop working.

4

3

Cigar lighter 2

With the ignition on, press it in. It will 

spring back with a click when it is ready. 

Pull it out to use.
After use, replace it without pushing it 

all the way in.

3

If your vehicle is not fitted with a 

cigar lighter and an ashtray, these 

can be obtained from an approved 

Dealer.

Connect accessories 

with a maximum power of 

120 Watts only.
Fire hazard.

3.24

Dashboard storage 

compartment 2

Centre console storage 

compartment 3

To open, lift cover 4. It will store a 

1.5 litre bottle.

Glovebox

To open the glove box, lift catch 1.

PASSENGER COMPARTMENT STORAGE SPACE AND FITTINGS 

(1/5)

1

2

4

3

When turning corners, accelerating or braking, ensure that the receptacle 

being held by the cup holder is not dislodged.
There is a risk of burning if hot liquid escapes.

3.25

Storage compartment 8 

under front passenger seat

(for vehicles fitted with front bench seat 

for two)
To get to it:
–  lift up the front of the bench seat 

cushion A as far as the stop;

–  then lift the rear part of the cushion 7 

and tip the seat up against the dash-

board.

Front door storage 

compartments 5

Bottle holders 6

PASSENGER COMPARTMENT STORAGE SPACE AND FITTINGS 

(2/5)

Nothing should be placed 

on the floor area in front of 

the driver as such objects 

may slide under the pedal 

during braking manoeuvres, thus 

obstructing its use.

Ensure that no hard, heavy 

or pointed objects are 

placed in the “open” stor-

age compartments in such 

a way that they may fall onto pas-

sengers during sudden turning or 

braking.

5

6

7

8

A

To replace the seat, proceed in reverse:

–  lift up the bench seat cushion A so 

as to put the rear part of the cush-

ion 7 under the seatback;

–  push down on the front of the cush-

ion A so as to lock the seat base.

3.26

PASSENGER COMPARTMENT STORAGE SPACE AND FITTINGS 

(3/5)

Central upper storage 

compartments 12

To open the storage compartments, pull 

handles 13.
This is not suitable for storing heavy 

items.

Front upper cab storage 

compartment 10

Do not use it for getting into or out of the 

vehicle and do not hang from it.

Sunglasses holder 11

There is a dedicated storage compart-

ment in the centre.

Clip 9

This can be used for storing motorway 

tickets, cards, etc.

9

10

11

12

13

When driving, the upper storage 

compartments 12 must be closed.

Do not hang any heavy and/or sharp objects which may fall whilst driving. 

Risk of injury. Before opening the upper storage compartments, take the 

necessary precautions to avoid falling objects. Risk of injury.

3.27

Trays on the front seat 15

Permitted weight: 5 kg, evenly distrib-

uted.

PASSENGER COMPARTMENT STORAGE SPACE AND FITTINGS 

(4/5)

Front seat storage pockets 16

16

15

14

Sliding side door storage 

compartments 14

3.28

PASSENGER COMPARTMENT STORAGE SPACE AND FITTINGS 

(5/5)

Clothes hook 19

Depending on the vehicle, a hook may 

be located on the partition behind the 

front passenger seat.
For safety reasons, this hook may only 

be used to hang clothes.
Note:  the maximum permitted load is 

4 kg.

19

19

19

Storage compartment 18 in 

the front armrest

(for vehicles fitted with front bench seat 

for two)
Pull on the handle 17 to lower the seat-

back B.

18

17

B

3.29

To raise the seatback

Before raising the seatback, make sure 

there are no objects (water bottle, tool 

box etc.) which will prevent it from lock-

ing properly.
Raise the seatback and click it into po-

sition. Check that it is correctly locked.

To fold down the seatback

Before moving the bench seat, make 

sure the front seats are pushed forward 

enough, that the rear seat belts are un-

fastened and that nothing will obstruct 

the manoeuvre.
Lower the rear headrests to storage po-

sition.
Pull lever 1 of the seatback you wish to 

fold down (on the right- or left-hand side 

of the bench seat), and bring the seat-

back down.

REAR BENCH SEAT: functions 

(1/2)

For safety reasons, carry 

out any adjustments when 

the vehicle is not being 

driven.

When moving the rear 

bench seat, make sure 

the bench seat anchor-

age points are clean (they 

should be free from grit, cloths etc.).

When refitting the seatback, 

make sure it is correctly 

locked.
If using seat covers, make 

sure they do not prevent the seat-

back and seat base latches from 

locking in. Ensure that the seat belts 

and seat belt fasteners are correctly 

positioned.
Reposition the headrests.

Maximum weight: 300 kg, evenly 

distributed.

1

3.30

REAR BENCH SEAT: functions 

(2/2)

Use restriction

It is forbidden to drive with a seatback 

or a front seat folded down when there 

is a passenger occupying a rear seat.

For safety reasons, carry 

out any adjustments when 

the vehicle is not being 

driven.

3.31

Always position the heavi-

est items directly on the 

floor.
Use the lashing points on 

the floor of the luggage compart-

ment, if these are fitted to the vehi-

cle. 
The luggage should be loaded in 

such a way that no items will be 

thrown forward and strike the occu-

pants if the driver has to brake sud-

denly.
Fasten the rear seat belts, even if 

the seats are not occupied.

TRANSPORTING OBJECTS IN THE BOOT 

(1/2)

Always position the objects trans-

ported so that the largest surface is 

against:

– the rear bench seatbacks, for 

normal loads;

–  the front seats for maximum loads.

Always position the heaviest items di-

rectly on the floor.


Content   ..  8  9  10  11   ..