Renault Kangoo (2018 year). Manual - part 6
 

  Index      Renault     Renault Kangoo - service manual 2018 year in english


Search            


Content   ..  4  5  6  7   ..


Renault Kangoo (2018 year). Manual - part 6


1.82

p

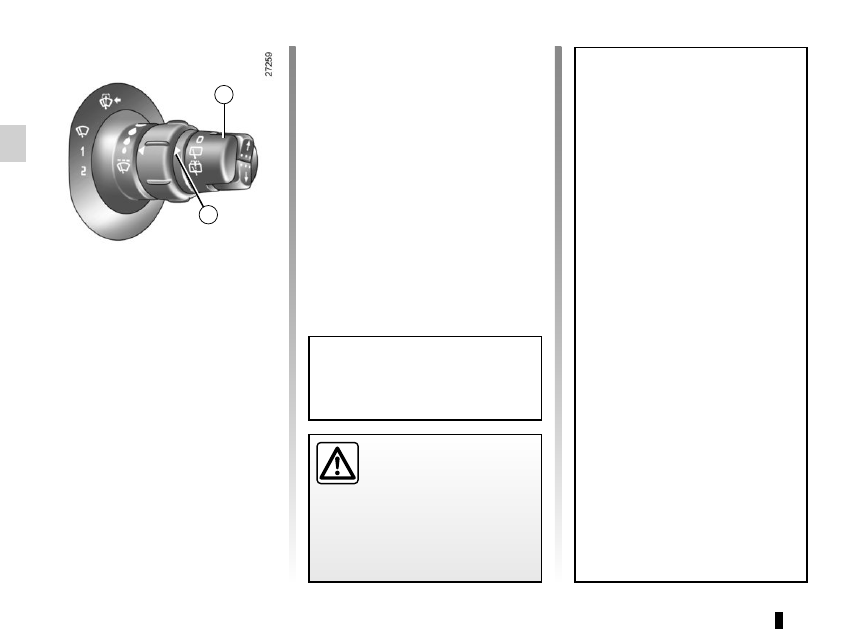
Rear screen wash/wipe

(depending on vehicle)

Turn the end of stalk 1 to position the 

symbol opposite mark 2.
When the stalk is released, it returns to 

the rear screen wiper position.

Y

Speed-dependent rear 

screen wiper with 

timer

(depending on vehicle)
Turn the end of stalk 1 to position the 

symbol opposite mark 2.
Wiping frequency varies with speed.

Special note
If the windscreen wipers are opera-

tional when you select reverse gear, the 

rear screen is wiped intermittently.

REAR WINDSCREEN WASHER, WIPER

1

2

Efficiency of a wiper blade

Check the condition of the wiper 

blades. How long they last depends 

on you:
–  it must remain clean: clean the 

blade and the screen regularly 

with soapy water;

–  do not use it when the screen is 

dry;

–  free it from the screen when it has 

not been used for a long time.

Replace wiper blades as soon as 

their performance starts to diminish: 

Approximately every year (refer to 

the information on “Wiper blades” in 

section 5).

Precautions for using the 

wipers

–  In freezing or snowy weather, 

clear the screen before starting 

the wipers (risk of motor over-

heating);

–  ensure that no objects are ob-

structing the travel of the blade.

Before carrying out any 

action that may affect the 

rear screen (washing the 

vehicle, de-icing, cleaning 

the screen, etc.) return the 1 stalk to 

the P (Park) position.
Risk of injury and/or damage.

Do not use the wiper arm to open or 

close the tailgate.

1.83

FUEL TANK 

(1/3)

A

Fuel filler cap: this is of a 

special type.
If you have to replace it, 

make sure it is identical 

to the original cap. Contact an ap-

proved Dealer.

Never place the cap near a source 

of heat or flame.
Do not wash the filler area with a 

high-pressure washer.

Filling the tank

To open the fuel filler flap, place your 

finger into recess 1.
Use the ignition key to open the cap 2.
Use cap holder 3 on the fuel filler flap B 

during filling to hold the cap 2 in place.
Useful capacity of fuel tank: about 

60 litres for diesel versions and 

about 56 litres for petrol versions.

1

2

3

B

Do not mix even small 

amounts of petrol (un-

leaded or E85) with diesel.

Do not use ethanol-based 

fuel if your vehicle is not compatible 

with this fuel.

Do not add additive to the fuel –

otherwise you risk damaging the 

engine.

Fuel grade

Use a high-grade fuel that complies 

with the legislation in force in each 

country. It must conform to the specifi-

cations given on label A inside the fuel 

filler flap. Please refer to the information 

on “Engine specifications” in Section 6.

Diesel versions
It is essential to use diesel fuel that 

conforms to the specifications given on 

the label inside fuel filler flap A.

Make sure that no water accidentally 

enters the fuel tank during filling. The 

shut-off system and its surrounding 

area must be dust-free.

Fuel types that conform to European 

standards with which the engines of 

vehicles sold in Europe are compat-

ible: refer to the “Engine specifica-

tions” in section 6.

1.84

No modifications what-

soever are permitted on 

any part of the fuel supply 

system (electronic unit, 

wiring, fuel circuit, injector, protec-

tive covers, etc.) as this may be 

dangerous (unless undertaken by 

qualified Network personnel).

Filling with fuel

With the ignition off, insert the nozzle 

so that the valve opens and then fully 

insert it before beginning to fill the tank 

(risk of splashback).
Keep the nozzle in this position through-

out the entire filling operation.
When the pump cuts out automatically 

at the end of the filling procedure, a 

maximum of two further filling attempts 

may be made so as to leave sufficient 

room for expansion.

Petrol versions
Using leaded petrol will damage the 

antipollution system and may lead to a 

loss of warranty.
To ensure that the fuel tank is not filled 

with leaded petrol, the fuel tank filler 

neck consists of a restrictor fitted with 

a foolproof system which only allows 

a nozzle for unleaded petrol to be 

used (at the pump).

FUEL TANK 

(2/3)

Persistent smell of 

fuel

If you notice a persistent 

smell of fuel you should:
–  stop the vehicle when traffic con-

ditions allow it and switch off the 

ignition;

– switch on the hazard warning 

lights and ask your passengers 

to leave the vehicle and to keep 

away from the traffic;

–  contact an approved Dealer.

Petrol versions
It is essential to use unleaded petrol. 

The octane rating (RON) should match 

the information given on the label A lo-

cated inside the fuel filler flap. Please 

refer to the information on “Engine 

specifications” in Section 6.
Vehicles running on ethanol-based 

fuel
It is essential to use unleaded petrol or 

fuel containing a maximum of 85% eth-

anol (E85).
In very cold conditions, it may be very 

difficult or even impossible to start the 

engine. To avoid this problem you can 

use unleaded petrol, or you can use 

the heater that is integrated into the 

engine (on vehicles that are equipped): 

Connect the end piece of the extension 

provided to the socket fitted in the grille, 

and the other end piece to a 220 V 

socket for at least 6 hours before start-

ing the vehicle.
NB: you may notice an increase in fuel 

consumption with this type of fuel.

1.85

Repriming the fuel circuit

After a breakdown caused by com-

pletely running out of fuel, the system 

must be reprimed before the engine is 

restarted:

The engine may be hot 

when carrying out opera-

tions in close proximity. In 

addition, the engine cooling 

fan can come on at any moment.
Risk of injury.

The peripheral components (alter-

nator, starter, engine mountings, 

etc.) should be protected against 

splashes of fuel.

Vehicles with a manual priming bulb
–  If fitted to the vehicle, turn the bleed 

screw located on the diesel filter;

–  activate the priming bulb 1 until it 

hardens and fuel runs in the pipes.

1

FUEL TANK 

(3/3)

Vehicles without a manual priming 

bulb
–  Put the ignition key in “On” posi-

tion  M (please see the information 

on the “Ignition switch” in Section 

2) and wait for a few minutes before 

starting, to enable the fuel circuit to 

be primed;

–  turn the key to position D. If the 

engine does not start, repeat the pro-

cedure.

1.86

2.1

Section 2: Driving

(Advice on use relating to fuel economy and the environment)

Running in . . . . . . . . . . . . . . . . . . . . . . . . . . . . . . . . . . . . . . . . . . . . . . . . . . . . . . . . . . . . . . . . . . . . .  

2.2

Ignition switch . . . . . . . . . . . . . . . . . . . . . . . . . . . . . . . . . . . . . . . . . . . . . . . . . . . . . . . . . . . . . . . . . .  

2.2

Starting, stopping the engine . . . . . . . . . . . . . . . . . . . . . . . . . . . . . . . . . . . . . . . . . . . . . . . . . . . . . . .  

2.3

Stop and Start function . . . . . . . . . . . . . . . . . . . . . . . . . . . . . . . . . . . . . . . . . . . . . . . . . . . . . . . . . . .  

2.4

Gear lever . . . . . . . . . . . . . . . . . . . . . . . . . . . . . . . . . . . . . . . . . . . . . . . . . . . . . . . . . . . . . . . . . . . . .  

2.7

Handbrake/Power-assisted steering . . . . . . . . . . . . . . . . . . . . . . . . . . . . . . . . . . . . . . . . . . . . . . . . .  

2.8

Special features of petrol versions  . . . . . . . . . . . . . . . . . . . . . . . . . . . . . . . . . . . . . . . . . . . . . . . . . .  

2.9

Special features of diesel versions . . . . . . . . . . . . . . . . . . . . . . . . . . . . . . . . . . . . . . . . . . . . . . . . . .   2.10

Driving advice, Eco-driving . . . . . . . . . . . . . . . . . . . . . . . . . . . . . . . . . . . . . . . . . . . . . . . . . . . . . . . .   2.11

Maintenance and antipollution advice . . . . . . . . . . . . . . . . . . . . . . . . . . . . . . . . . . . . . . . . . . . . . . . .   2.15

Environment  . . . . . . . . . . . . . . . . . . . . . . . . . . . . . . . . . . . . . . . . . . . . . . . . . . . . . . . . . . . . . . . . . . .   2.16

Tyre pressure loss warning . . . . . . . . . . . . . . . . . . . . . . . . . . . . . . . . . . . . . . . . . . . . . . . . . . . . . . . .   2.17

Tyre pressure loss warning . . . . . . . . . . . . . . . . . . . . . . . . . . . . . . . . . . . . . . . . . . . . . . . . . . . . . . . .   2.22

Driver correction devices/aids . . . . . . . . . . . . . . . . . . . . . . . . . . . . . . . . . . . . . . . . . . . . . . . . . . . . . .   2.26

Speed limiter . . . . . . . . . . . . . . . . . . . . . . . . . . . . . . . . . . . . . . . . . . . . . . . . . . . . . . . . . . . . . . . . . . .   2.31

Cruise control  . . . . . . . . . . . . . . . . . . . . . . . . . . . . . . . . . . . . . . . . . . . . . . . . . . . . . . . . . . . . . . . . . .   2.34

Parking distance control  . . . . . . . . . . . . . . . . . . . . . . . . . . . . . . . . . . . . . . . . . . . . . . . . . . . . . . . . . .   2.38

Reversing camera . . . . . . . . . . . . . . . . . . . . . . . . . . . . . . . . . . . . . . . . . . . . . . . . . . . . . . . . . . . . . . .   2.40

Automatic gearbox. . . . . . . . . . . . . . . . . . . . . . . . . . . . . . . . . . . . . . . . . . . . . . . . . . . . . . . . . . . . . . .   2.42

2.2

Ignition on position M

The ignition is switched on:
–  petrol version: you can start the ve-

hicle;

–  diesel version: the engine is pre-

heating.

Start position D

If the engine fails to start at the first 

attempt, the key must be turned back 

before the starter can be activated 

again. Release the key as soon as the 

engine starts.
Note: on diesel versions, several sec-

onds may pass between turning the 

key and the engine starting to allow for 

engine preheating.

Ignition switch

Stop and steering lock 

position St

To lock: remove the key and turn the 

steering wheel until the steering column 

locks.
To unlock: turn the key and the steering 

wheel slightly.

Accessories position A

When the ignition is switched off, any 

accessories (radio, etc.) will continue to 

function.

Running in

Petrol version

For the first 600 miles (1,000 km) do 

not exceed 54 mph (90 km/h) in the 

highest gear.
After 600 miles (1,000 km), you can 

use your vehicle normally. However, 

it is only after running 1,800 miles 

(3,000 km) that you can expect full per-

formance.
Service intervals: refer to the 

Maintenance Document for the vehicle.

Diesel version

For the first 930 miles (1,500 km) do 

not exceed 56 mph (90 km/h) in the 

highest gear. After completing this mile-

age you may drive faster, however, it 

is only after approximately 3600 miles 

(6,000 km) that you may reasonably 

expect full performance.
During the running in period, do not ac-

celerate hard while the engine is still 

cold and do not let the engine over-rev.
Service intervals: refer to the 

Maintenance Document for the vehicle.

RUNNING IN/IGNITION SWITCH

In the “Accessories” or “On” posi-

tion, a system may automatically 

switch off your vehicle’s accessories 

depending on the battery charge, to 

prevent it from discharging com-

pletely.

2.3

É

Diesel versions   


–  

Turn the ignition key to the 

“Ignition on” position M, and hold 

this position until the engine pre-

heating light goes off;

–  

turn the key to starter position 

without depressing the accel-

erator pedal;

–  

release the key as soon as the 

engine starts.

Special note: if starting the engine 

when the outdoor temperature is very 

low (below - 10 ° C): hold down the 

clutch pedal until the engine starts.

Starting the engine

Petrol versions

–  

Activate the starter without ac-

celerating;

–  

release the key as soon as the 

engine starts.

Stopping the engine

With the engine idling, turn the key to 

the “Stop” position St.

STARTING, STOPPING THE ENGINE

Never switch off the igni-

tion before the vehicle has 

stopped completely. Once 

the engine has stopped, the 

brake servo, power-assisted steer-

ing, etc., and the passive safety de-

vices such as the airbags and pre-

tensioners will no longer operate.

Driver’s responsibility 

when parking or stopping 

the vehicle
Never leave an animal, 

child or adult who is not self-suffi-

cient alone in your vehicle, even for 

a short time.
They may pose a risk to themselves 

or to others by starting the engine, 

activating equipment such as the 

electric windows or locking the 

doors, for example.
Also, in hot and/or sunny weather, 

please remember that the tempera-

ture inside the passenger compart-

ment increases very quickly.
RISK OF DEATH OR SERIOUS 

INJURY.

2.4

STOP AND START 

 function (1/3)

Warning light 

 is displayed on the 

instrument panel. This notifies you that 

the engine is on standby.
The vehicle equipment remain opera-

tional while the engine is stopped.
The engine will restart as soon as you 

press the clutch pedal and move into 

gear.

This system enables a reduced fuel 

consumption and lower greenhouse 

gas emissions.

The system is activated automatically 

when the vehicle is started.

While driving, the system stops the 

engine (standby) when the vehicle is 

at a standstill (traffic jam, traffic lights, 

etc).

System operating conditions

Engine standby is activated if:
–  the vehicle has been driven since its 

last stop;

–  the gearbox is in neutral;
–  the clutch pedal is released;

and

–  the vehicle is travelling at less than 3 

km/h.

Special feature of the automatic 

engine re-start
Under certain conditions, the engine 

can restart on its own in order to guar-

antee your safety and comfort.

This can occur especially when:

–  the outdoor temperature is too low or 

too high (less than around 0 °C or 

higher than around 35 °C);

– the “Clear View” function is acti-

vated if fitted on the vehicle (please 

see “Automatic Climate Control” in 

Section 3);

–  the battery is not sufficiently charged;
–  the vehicle speed is above 7 km/h 

(downhill slope, etc.);

– repeated pressing on the brake 

pedal or braking system require-

ment;

–  on vehicles fitted with a manual gear-

box, engine restarting may be inter-

rupted if the clutch pedal is released 

too quickly while a gear is engaged;

– ...

Do not drive off when the 

engine is on standby (warn-

ing light 

 is displayed 

on the instrument panel).

The ignition must be 

switched off before leav-

ing the vehicle (please see 

the information on “Starting, 

stopping the engine” in Section 2).

If you get out of the vehicle, a beep 

notifies you that the engine is on 

standby and has not been switched 

off.

2.5

STOP AND START 

 function (2/3)

Special cases

In the event of the engine stalling, if the 

system is operational, press down the 

clutch pedal as far as it will go to restart.

Deactivate the Stop and 

Start function for any opera-

tion performed in the engine 

compartment.

Conditions preventing the 

standby of the engine

Certain conditions prevent the system 

from using the engine standby function, 

including when:
–  after having come out of reverse 

gear;

–  the bonnet is not locked;
–  the outdoor temperature is too low or 

too high (less than around 0 °C or 

higher than around 35 °C);

–  the battery is not sufficiently charged;
–  the difference between the vehicle 

interior temperature and the auto-

matic climate control instruction is 

too high;

– the “Clear View” function is acti-

vated if fitted on the vehicle (please 

see “Automatic Climate Control” in 

Section 3);

–  the engine coolant temperature is 

too low;

–  automatic particle filter cleaning is 

underway;

or

– ...

The warning light 

 on the instru-

ment panel indicates that the engine is 

on standby.
With the vehicle stopped, gear lever en-

gaged and clutch pedal depressed, the 

warning light 

 flashes to tell you 

the engine can be put on standby.

In order to fill-up with fuel, the engine 

must be stopped (NOT in standby): 

You must stop the engine (Please 

see “Starting, stopping the engine” 

in section 2).

2.6

Deactivating, activating the 

function

Press  1 to deactivate the function. 

Warning light 2 in the switch lights up.
Pressing this again will reactivate the 

system. Warning light 2 in switch 1 

goes out.

STOP AND START 

 function (3/3)

The system is automatically reacti-

vated each time the vehicle is started 

(see “Starting, stopping the engine” in 

Section 2).

2

The ignition must be 

switched off before leav-

ing the vehicle (please see 

the information on “Starting, 

stopping the engine” in Section 2).

1

2.7

Selecting reverse gear

(vehicle stationary)
Vehicles with manual gearbox: follow 

the grid drawn on knob 1, and depend-

ing on the vehicle, lift ring against the 

gear lever knob to select reverse.
Vehicle with automatic gearbox: refer 

to the information on the “Automatic 

gearbox” in Section 2. 
The reversing lights will come on as 

soon as reverse gear is selected (with 

the ignition on).

1

GEAR LEVER

An impact to the under-

side of the vehicle while 

manoeuvring (e.g.: strik-

ing a post, raised kerb or 

other street furniture) may result in 

damage to the vehicle (e.g.: defor-

mation of an axle).
To avoid any risk of accident, have 

your vehicle checked by an ap-

proved Dealer.

2.8

To apply:
Pull upwards, check that the vehicle is 

properly immobilised.

Variable power-assisted 

steering

The variable power-assisted steering 

system is equipped with an electronic 

control system which alters the level of 

assistance to suit the vehicle speed.
Steering is made easier during parking 

manoeuvres (for added comfort) while 

the force needed to steer increases 

progressively as the speed rises (for 

enhanced safety at high speeds).

Handbrake

To release:
Pull lever 2 up slightly, press button 1 

and then lower the lever to the floor.

Never switch off the igni-

tion when travelling down-

hill, and avoid doing so in 

normal driving (assistance 

is not provided).

HANDBRAKE/POWER-ASSISTED STEERING

2

1

Make sure that the hand-

brake is properly released 

when driving (red indicator 

light off), otherwise over-

heating, or even damage, may 

occur.

2

1

When stationary and de-

pending on the slope and/or 

vehicle load, it may be nec-

essary to pull up the hand-

brake at least two extra notches and 

engage a gear (1

st

 or reverse gear) 

for vehicles with a manual gearbox 

or position P for vehicles with an au-

tomatic transmission.

2.9

SPECIAL FEATURES OF PETROL VERSIONS

Do not park the vehicle or 

run the engine in locations 

where combustible sub-

stances or materials such 

as grass or leaves can come into 

contact with the hot exhaust system.

The following operating conditions 

should be avoided:
–  driving for long periods when the low 

fuel level warning light is lit;

–  using leaded petrol;
–  using fuel or lubrication additives 

which are not approved.

Or operating faults such as:
–  faulty ignition, running out of fuel or 

disconnected spark plugs resulting 

in the engine misfiring or cutting out 

when driving;

–  loss of power,
may cause the catalytic converter to 

overheat, reducing its efficiency which 

may irreparably damage it and cause 

heat damage to the vehicle.

If you notice any of the above operating 

faults, have the necessary repairs car-

ried out as soon as possible by an ap-

proved dealer.
These faults may be avoided by regu-

larly taking your vehicle to an approved 

Dealer at the intervals specified in the 

Maintenance Document.

Starting problems

To avoid damaging the catalytic con-

verter, do not keep trying to start the 

engine (using the start button, or by 

pushing or towing the vehicle) without 

having identified and corrected the 

cause of the fault.
If the fault cannot be identified, do not 

continue to try and start the engine, but 

contact an approved dealer.

2.10

SPECIAL FEATURES OF DIESEL VERSIONS

Do not park the vehicle or 

run the engine in locations 

where combustible sub-

stances or materials such 

as grass or leaves can come into 

contact with the hot exhaust system.

Precautions to be taken in 

winter

To avoid any faults in icy weather:

–  make sure that the battery is always 

fully charged;

–  always keep the diesel tank rela-

tively full to prevent water vapour 

condensing in it and accumulating at 

the bottom of the tank.

Diesel engine speed

Diesel engines are fitted with an injec-

tion pump with an electronic regulator 

which prevents overrevving of the 

engine irrespective of the gear en-

gaged.

If the 

Ä

 and 

©

 warning lights 

come on, consult an approved dealer 

as soon as possible.

Running out of fuel

You may start the engine normally after 

refilling the fuel tank even if you have 

completely run out of fuel, provided 

that the battery is fully charged.

However, if the engine does not start 

after a few seconds and several at-

tempts, refer to the information on the 

“Fuel tank” in Section 1.

2.11

DRIVING ADVICE, ECO-DRIVING 

(1/4)

Fuel consumption is accredited in ac-

cordance with a standard regulatory 

method. Identical for all manufactu-

rers, this enables vehicles to be com-

pared with one another. Consumption 

in real time depends on vehicle usage 

conditions, the equipment fitted and the 

user’s driving style. To optimise fuel 

consumption, please refer to the fol-

lowing advice.
Depending on the vehicle, you will have 

various functions which enable you to 

lower your fuel consumption:
–  the ECO zone of the rev counter;

–  gear change indicator;

–  the journey record and eco-driving 

advice via the multimedia display;

–  ECO mode – activated by the ECO 

button.

If fitted on the vehicle, the navigation 

system provides additional information.

Gear change indicator 2

Depending on the vehicle, to obtain op-

timum consumption levels, a warning 

light on the instrument panel lets you 

know the best time to move up or down 

a gear:

Š

 move up a gear;

 move down a gear.

2

The ECO zone of the rev 

counter 1

Driving in the ECO zone helps you opti-

mise fuel consumption.

1


Content   ..  4  5  6  7   ..