Renault Kangoo Z.E. (2018 year). Manual - part 4
 

  Index      Renault     Renault Kangoo Z.E. - service manual 2018 year in english


Search            


Content   ..  2  3  4  5   ..


Renault Kangoo Z.E. (2018 year). Manual - part 4


1.50

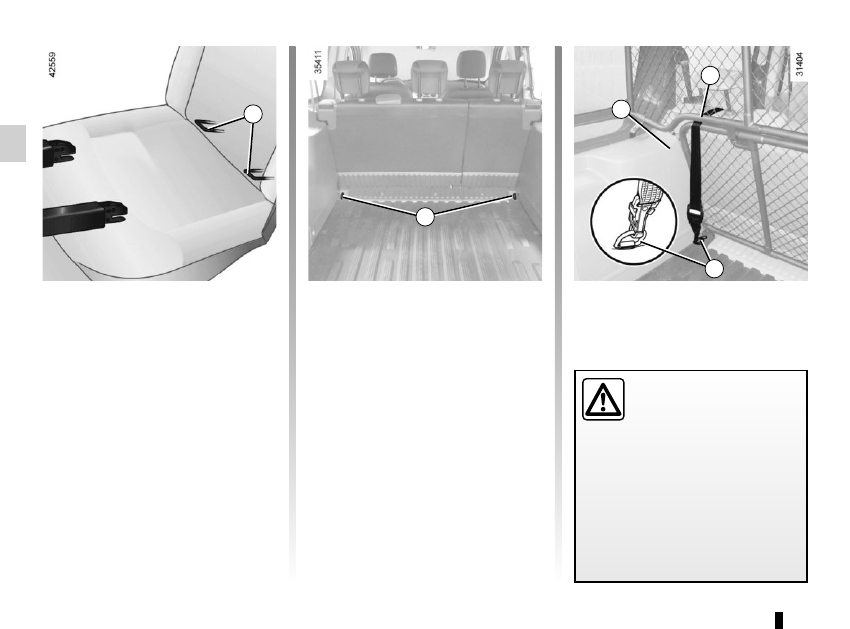
The two rings 1 are located between 

the seatback and the seat base, behind 

the zip fasteners, and are identified by 

a marking.
The third ring is used to attach the 

upper strap on some child seats.

2

CHILD SAFETY: choosing a child seat mounting 

(2/3)

Depending on the vehicle, pass the 

strap between the wheel arch liner 3 

and the underside of the upper parti-

tion 4.
From the luggage compartment, attach 

the strap hook to ring 2 on the corre-

sponding side. Check that the bench 

seatback is correctly locked.
Pull the belt so that the back of the child 

seat comes into contact with the back 

of the vehicle seat.

3

4

2

1

Luggage compartment an-

chorages (rings) 2 cannot 

be used if they are already 

being used to secure two 

of the three following components: 

luggage net, load in the luggage 

compartment or child seat.

1.51

The ISOFIX anchorage 

points have been exclu-

sively designed for child 

seats with the ISOFIX 

system. Never fit a different type of 

child seat, seat belt or other objects 

to these anchorage points.
Check that nothing is obstructing 

the anchorage points.
If your vehicle has been involved in 

a road accident, have the ISOFIX 

anchorage points checked and re-

place your child seat.

The child seat strap must 

be attached to the corre-

sponding ring.
Do not use any other 

mounting point.

CHILD SAFETY: choosing a child seat mounting 

(3/3)

1.52

Some seats are not suitable for fitting 

child seats. The diagrams on the fol-

lowing pages show you how to attach 

a child seat.
The types of child seats indicated may 

not be available. Before using a differ-

ent child seat, check with the manufac-

turer that it can be fitted.

CHILD SAFETY: fitting a child seat 

(1/6)

In the front seat
The laws concerning children travel-

ling in the front passenger seat differ in 

every country. Consult the legislation in 

force and follow the indications on the 

diagrams on the following pages.
Before fitting a child seat in this seat (if 

authorised):

–  lower the seat belt as far as possible;

–  move the seat as far back as possi-

ble;

–  gently tilt the seatback away from 

vertical (approximately 25°);

–  on equipped vehicles, raise the seat 

base as far as possible.

In all situations, reinsert the headrest to 

its full extent so that it does not interfere 

with the child seat (see the information 

on “Front headrests” in Section 1);

RISK OF DEATH OR 

SERIOUS INJURY: before 

installing a child seat on this 

seat, check that the airbag 

has been deactivated (refer to “Child 

safety: front passenger airbag deac-

tivation/activation” in Section 1).

Fit the child seat in a rear 

seat wherever possible.
Check that when installing 

the child seat in the vehicle 

it is not at risk of coming loose from 

its base.
If you have to remove the headrest, 

check that it is correctly stored so 

that it does not come loose under 

harsh braking or impact.
Always attach the child seat to the 

vehicle even if it is not in use so that 

it does not come loose under harsh 

braking or impact.

After installing the child seat, when this 

is possible, you can move the vehi-

cle seat forward if necessary (so as to 

leave enough space in the rear seats 

for passengers or other child seats). In 

the case of a rear-facing child seat, do 

not let it touch the dashboard or move it 

to the furthest forward position.
Do not change these settings after the 

child seat is installed.

1.53

In the rear seat

A carrycot can be installed across the 

vehicle and will take up at least two 

seats. Position the child with his or her 

feet nearest the door.
Move the front seat as far forward as 

possible to install a rear-facing child 

seat, then move back the seat in front 

as far as it will go, although without al-

lowing it to come into contact with the 

child seat.
For the safety of the child in the for-

ward-facing seat, do not move the seat 

in front back past the middle of the 

runner, do not tilt the seatback too far 

(maximum of 25° ) and raise the seat as 

much as possible.
Check that the forward-facing child seat 

is resting against the back of the vehi-

cle seat and that the headrest of the ve-

hicle is not obstructing its use.

CHILD SAFETY: fitting a child seat 

(2/6)

Child’s convertible headrest
If fitted to the vehicle, the child head-

rest and booster cushion can only be 

installed on the rear side seats.
For fitting and use, refer to the equip-

ment instructions.

A child seat with a floor 

support must never be in-

stalled on the rear centre 

seat. RISK OF DEATH OR 

SERIOUS INJURY.

When fitting a child seat 

(Group 2 or 3 booster seat), 

check that the seat belts op-

erate (wind) correctly: refer 

to Section 1 “Rear seat belts”. If 

necessary, adjust the position of the 

vehicle seat.

Ensure that the child seat 

or the child’s feet do not 

prevent the front seat from 

locking correctly. Refer to 

the information on the “Front seat” 

in Section 1 or “Rear seat operation” 

in Section 3.

1.54

CHILD SAFETY: fitting a child seat 

(3/6)

Child seat attached using the belt

¬

 Seat which allows a child seat 

with “Universal” approval to be attached 

by a seat belt.

²

 Seat not suitable for fitting child 

seats.

³

 Check the status of the front 

airbag before fitting a child seat or al-

lowing a passenger to use the seat.
(1)  Before fitting a child seat: position 

the vehicle seat as far back as pos-

sible.

Type of seat group

(weight of the child)

Seats suitable for fitting a child seat

Front passenger seat (1)

WITH PASSENGER 

AIR BAG (2)

WITHOUT 

PASSENGER 

AIR BAG

Group 0, 0+

(weight below 13 kg)

U

U

Group I

(weight from 9 kg to 18 kg)

U

U

Groups II and III

(weight from 15 kg to 36 kg)

U

U

(2) RISK OF DEATH OR 

SERIOUS INJURY: Before 

installing a child seat on the 

front passenger seat, check 

that the airbag has been deacti-

vated (refer to “Child safety: front 

passenger airbag deactivation and 

activation” in Section 1).

2-seat version

1.55

CHILD SAFETY: fitting a child seat 

(4/6)

Child seats attached using the 

ISOFIX mounting

ü

Seat which allows an ISOFIX. 

child seat to be fitted.

³

 Check the status of the air bag 

before fitting a child seat or allowing a 

passenger to use the seat.

²

 Seat not suitable for fitting child 

seats.

±

 The rear seats are fitted with 

an anchorage point which allows a 

forward-facing ISOFIX child seat with 

universal approval to be fitted. The an-

chorage points are located in the lug-

gage compartment and are visible.
The size of the ISOFIX child seat is in-

dicated by a letter:
–  A, B and B1: for forward-facing seats 

in group 1 (9 to 18 kg);

–  C: rear-facing seats in group 1 (9 to 

18 kg);

–  D and E: shell seat or rear-facing 

seats in group 0 or 0+ (less than 

13 kg);

–  F and G: cots in group 0 (less than 

10 kg).

Child seat attached using the belt

¬

 Seat which allows a standard-

ised “Universal” seat to be fitted using 

a seat belt;

 Seat which only allows a rear-

facing standardised “Universal” seat to 

be installed using a seat belt.

Using a child safety system which is not approved for this vehicle will not 

correctly protect the baby or child. They risk serious or even fatal injury.

RISK OF DEATH OR 

SERIOUS INJURY: Before 

fitting a rear-facing child 

seat on the front passenger 

seat, check that the airbag has been 

deactivated (refer to the information 

on “Child safety: front passenger 

airbag deactivation/activation” in 

Section 1).

5-seat version

1.56

CHILD SAFETY: fitting a child seat 

(5/6)

5-seat version

Type of child seat

Weight of 

the child

Seat size

ISOFIX

Front passenger 

seat (1) (2)

Rear side seats

Rear centre seat

Carrycot fitted across the 

vehicle

Group 0

< 10 kg

F, G

X

U - IL (3)

X

Shell seat/rear-facing seat

Group 0, 0+ and 1

< to 13 kg 

and 9 to 

18 kg

C, D, E

U

U - IL (4)

U (4)

Forward-facing seat

Group 1

9 to 18 kg

A, B, B1

X

U - IUF - IL (5)

U (5)

Booster seat

Group 2 and 3

15 to 25 kg 

and 22 to 

36 kg

X

U (5)

U (5)

(1) RISK OF DEATH OR SERIOUS INJURY: Before fitting a rear-facing child seat on the front passenger seat, check 

that the airbag has been deactivated (refer to the information on “Child safety: front passenger airbag deactivation/

activation” in Section 1).

The table below summarises the information already shown on the diagram on the previous page, to ensure the regula-

tions in force are respected.

1.57

X =  Seat not suitable for fitting child seats.

U =  Seat which allows a child seat with “Universal” approval to be installed using a seat belt; check that it can be fitted.

IUF/IL =   On equipped vehicles, seat which allows an approved “Universal/semi-universal” or “vehicle specific” child seat to be at-

tached using the ISOFIX system; check that it can be fitted.

(2)  Only a rear-facing child seat can be fitted in this seat: raise the seat to the maximum and position it as far back as possible, 

tilting the seatback slightly (approximately 25°).

(3)  A carrycot is fitted crosswise and occupies at least two seats (the child’s feet are placed nearest the door).

(4)  Move the front seat as far forward as possible to install a rear-facing child seat, then move back the seat in front as far as it will 

go, although without allowing it to come into contact with the child seat.

(5)  Forward-facing child seat; position the seatback of the child seat in contact with the seatback of the vehicle seat. Adjust the 

headrest, or remove it if necessary. In addition, do not push the seat in front of the child further than halfway along its runners, 

or incline the seatback more than 25°.

CHILD SAFETY: fitting a child seat 

(6/6)

1.58

Deactivating the front 

passenger airbags

(on equipped vehicles)
Before fitting a child seat on the front 

passenger seat you must deactivate 

the passenger airbag.

To deactivate the  airbags: with the 

vehicle stationary and the ignition 

off, press and turn lock 1 to the OFF 

position.
With the ignition on, you must check 

that the warning light 2 is lit on the cen-

tral display and, depending on the ve-

hicle, that the message “passenger 

airbag off” is displayed.
Note: on vehicles fitted with this, the 

side airbag is also deactivated.
This light remains permanently lit to 

let you know that you can fit a child 

seat.

CHILD SAFETY:  deactivating, activating the front passenger airbag 

(1/3)

The passenger airbag must 

only be deactivated or acti-

vated when the vehicle is 

stationary.

If it is interfered with when the ve-

hicle is being driven, indicator lights 

å

 and 

©

 will come on.

Switch the ignition off then on again 

to reset the airbag in accordance 

with the lock position.

2

1

1.59

CHILD SAFETY:  deactivating, activating the front passenger airbag 

(2/3)

3

The marking on the dashboard and 

label A on each side of the passenger 

sun visor 3 (example of label shown 

above) remind you of these instruc-

tions.

A

A

DANGER
Since operation of the front 

passenger airbag is not 

compatible with the po-

sition of a rear-facing child seat, 

NEVER fit a rear-facing child re-

straint system in a seat protected 

by an ACTIVATED front AIRBAG 

This can lead to the DEATH of the 

CHILD or SERIOUS INJURY.

1.60

The passenger airbag must 

only be deactivated or acti-

vated when the vehicle is 

stationary.

If it is interfered with when the ve-

hicle is being driven, indicator lights 

å

 and 

©

 will come on.

Switch the ignition off then on again 

to reset the airbag in accordance 

with the lock position.

Operating faults

In the event that the front passenger 

airbags activation/deactivation system 

is faulty, child seats must not be fitted 

to the front seat.
Allowing any other passenger to sit in 

that seat is not recommended.
Contact your approved Dealer as soon 

as possible.

Front passengerairbag 

activation

You should reactivate the air bag as 

soon as you remove the child seat from 

the front passenger seat to ensure the 

protection of the front passenger in the 

event of an impact.
To reactivate the  airbags: with the 

vehicle stationary and the ignition 

off, press and turn lock 1 to the ON po-

sition.

With the ignition on, you must check 

that the warning light 2 is off.
The front passenger seat belt additional 

restraint systems are activated.

2

CHILD SAFETY:  deactivating, activating the front passenger airbag 

(3/3)

1

DANGER
Since operation of the front 

passenger airbag is not 

compatible with the po-

sition of a rear-facing child seat, 

NEVER fit a rear-facing child re-

straint system in a seat protected 

by an ACTIVATED front AIRBAG

This can lead to the DEATH of the 

CHILD or SERIOUS INJURY.

1.61

STEERING WHEEL/POWER-ASSISTED STEERING

Steering wheel height 

adjustment

Pull lever 1 and move the steering 

wheel to the required position; push 

lever to lock the steering wheel.
Make sure that the steering wheel is 

correctly locked.

For safety reasons, only 

adjust the steering wheel 

when the vehicle is station-

ary.

1

Never switch off the igni-

tion when travelling down-

hill, and avoid doing so in 

normal driving (assistance 

is not provided).

Power-assisted steering

The variable power-assisted steering 

system is equipped with an electronic 

control system which alters the level of 

assistance to suit the vehicle speed.
Steering is made easier during parking 

manoeuvres (for added comfort) while 

the force needed to steer increases 

progressively as the speed rises (for 

enhanced safety at high speeds).

Never leave the steering wheel on 

full lock when the vehicle is station-

ary.
With the engine switched off, or if 

there is a system fault, it is still pos-

sible to turn the steering wheel. The 

force required will be greater.
A noise may be heard when the 

steering wheel is moved quickly. 

This is normal.

1.62

DRIVING POSITION, LEFT-HAND DRIVE 

(1/2)

4

6

13

21

20

3

12

16

11

1

17

24

2

7

8

10

9

5

23

15

26

22

25

14

18

19

1.63

 21 Gear lever.

 22  Remote control/location for radio, 

navigation system.

 23  Cruise control/speed limiter con-

trols.

 24  Bonnet release control.

 25 Controls for:

–  Vertical headlight adjustment;

–  Parking distance control.

 26 Controls for:

–  Cruise control/speed limiter;

–  Activating/deactivating the pe-

destrian horn;

– additional heating.

  1 Stalk for:

–  

direction indicator lights;

– exterior lights;

–  front fog lights;

–  rear fog lights.

  2 – Horn,

–  location for driver’s air bag.

  3 Instrument panel.

  4 Stalk for:

– windscreen wipers;

– windscreen washer;

– trip computer and warning 

system.

  5 Ignition switch.

  6  Multimedia display or touchscreen:

–  seat belt reminder warning light;

– airbag deactivation warning 

light;

– navigation;

– clock;

– exterior temperature.

  7  Centre air vent.

  8  Controls for ventilation, heating 

and de-icing.

  9  Windscreen demister outlet.

 10  Location for passenger air bag.

 11 Speaker.

 12  Side air vent.

 13  Side window demister outlet.

 14 Glove box.

 15  Storage space or accessories 

socket.

 16  Hazard warning lights switch.

 17  Central door locking/unlocking 

switch.

 18  ECO mode switch.

 19  Cigarette lighter or accessories 

socket.

 20 Handbrake.

DRIVING POSITION, LEFT-HAND DRIVER 

(2/2)

The equipment fitted, described below, DEPENDS ON THE VERSION AND COUNTRY.

1.64

DRIVING POSITION: RIGHT-HAND DRIVE 

(1/2)

4

6

23

3

12

15

20

11

1

18

21

2

25

7

8

10

9

26

14

16

5

17

19

27

28

29

22

24

13

1.65

DRIVING POSITION: RIGHT-HAND DRIVE 

(2/2)

 20  Location for radio, navigation 

system.

 21 Gearstick

 22 Handbrake.

 23  ECO mode switch.

 24  Cigarette lighter or accessories 

socket.

 25  Door electric locking/unlocking 

switch.

 26  Hazard warning lights switch.

 27  Storage space or accessories 

socket.

 28 Glovebox.

 29  Bonnet release control.

 10 – Horn.

–  Location for driver’s air bag.

 11 Instrument panel.

 12 Stalk for:

– windscreen wipers;

– windscreen washer;

– trip computer and warning 

system.

 13 Ignition switch.

 14  Cruise control/speed limiter main 

control.

 15  Additional heating switch.

 16  Activation/deactivation control for 

the horn.

 17  Parking distance control switch.

 18  Headlight adjustment control.

 19  Cruise control/speed limiter con-

trols.

  1  Side window demister outlet.

  2  Side air vent.

  3 Speaker.

  4  Location for passenger air bag.

  5  Windscreen demister outlet.

  6  Controls for ventilation, heating 

and de-icing.

  7  Centre air vent.

  8  Multimedia display or touchscreen:

–  seat belt reminder warning light;

– airbag deactivation warning 

light;

– navigation;

– clock;

– exterior temperature.

  9 Stalk for:

–  

direction indicator lights,

– exterior lights;

–  front fog lights;

–  rear fog lights.

The equipment fitted, described below, DEPENDS ON THE VERSION AND COUNTRY.


Content   ..  2  3  4  5   ..