Peugeot 1007 Dag (2008.5). Manual - part 3
 

  Index      Peugeot     Peugeot 1007 Dag 2008.5 - service manual in english


Search            


Content   ..  1  2  3  4   ..


Peugeot 1007 Dag (2008.5). Manual - part 3


2

36

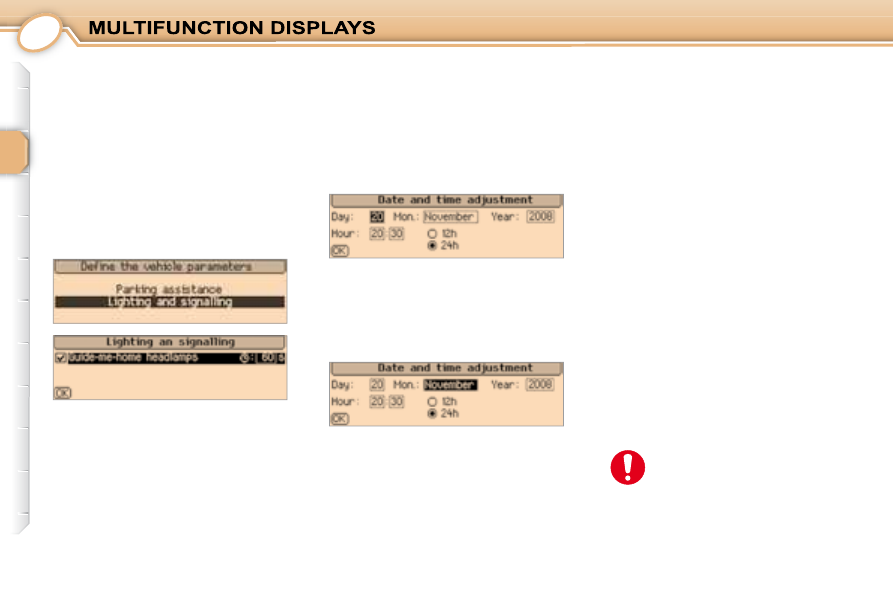
  Defi ne the vehicle parameters 

 Once  this  menu  has  been  selected, 

you can activate or deactivate the fol-

lowing equipment: 
   -  

wiper linked with reverse gear, 

  -  

"follow-me-home" lighting and 
duration.  

 Example:  "Duration  of  the  "follow-

me-home" lighting"  

  Display confi guration 

 Once  this  menu  has  been  selected, 

you  can  access  the  following  set-

tings: 
   -  

brightness-video setting, 

  -  

date and time setting, 

  -  

selection of the units.  

 Once  you  have  selected  a  setting, 

press the navigator. 
 Turn the navigator to change its value. 

 Press  the  navigator  to  record  the 

change and move on to the next set-

ting  or  press  the   "ESC"   button  to 

cancel.  

  Selection of the language 
 Once  this  menu  has  been  selected, 

you  can  change  the  language 

used  on  the  display  (Deutsch, 

English,  Espanol,  Français,  Italiano, 

Nederlands,  Portugues,  Portugues-

Brasil). 

 For  safety  reasons,  it  is  im-

perative that confi guration of 

the multifunction displays by 

the  driver  takes  place  when 

stationary.   


2

37

       MONOCHROME SCREEN C 

  "Audio functions" menu 

 With  the  WIP  Sound  switched  on, 

once  this  menu  has  been  selected, 

you  can  activate  or  deactivate  the 

functions  linked  with  the  use  of  the 

radio  (RDS,  REG,  RadioText),  the 

CD  or  the  CD  changer  (introscan, 

random play, CD repeat).  

  Presentation 

 This  displays  the  following  infor-

mation,  via  the  WIP  Sound  control 

keypad: 
   -  

the time, 

  -  

the date, 

  -  

the outside temperature (this 

fl ashes if there is a risk of ice), 

  -  

the audio source displays 

(radio, CD, ...), 

  -  

the status of the accesses 

(doors, boot, ...), 

  -  

the warning messages 
(e.g.: "Antipollution system 

faulty") or information messages 

(e.g.: "Automatic headlamp 

lighting activated"), displayed 

temporarily, can be cleared by 

pressing the  "ESC"  button, 

  -  

the trip computer (see 

corresponding section).   

  General menu 

 Press the  "MENU"

  button to gain ac-

cess to the general menu: 

   -  

audio functions, 

  -  

trip computer (see 

corresponding section), 

  -  

personalisation-confi guration, 

  -  

telephone (hands-free kit).  

 Press the  

""  or  ""  buttons to se-

lect the menu required, then confi rm 

by pressing the  "OK"  button.  

  "Personalisation-
Configuration" menu 

 Once  this  menu  has  been  selected, 

you can gain access to the following 

functions: 

   -  

defi ne the vehicle parameters, 

  -  

display confi guration, 

  -  

selection of the language.  


2

38

  Defi ne the vehicle parameters 

 Once  this  menu  has  been  selected, 

you can activate or deactivate the fol-

lowing equipment: 
   -  

wiper linked with reverse gear, 

  -  

"follow-me-home lighting" and 
duration.  

 Example:  "Duration  of  follow-me-

home lighting"  

  Display confi guration 

 Once  this  menu  has  been  selected, 

you can gain access to the following 

settings: 
   -  

brightness-video setting, 

  -  

date and time setting, 

  -  

selection of the units.  

 When  you  have  selected  a  setting, 

press  the   "OK"   button,  then  press 
the   ""   or   ""

   buttons  to  change 

its value. 

 Press the  "OK"

  button to record the 

change and move on to the next set-

ting  or  press  the   "ESC"   button  to 

cancel.  

  Selection of the language 
 Once  this  menu  has  been  selected, 

you  can  change  the  language 

used  by  the  display  (Deutsch, 

English,  Espanol,  Français,  Italiano, 

Nederlands,  Portugues,  Portugues-

Brasil). 

 For  safety  reasons,  it  is  im-

perative that confi guration of 

the multifunction displays by 

the  driver  takes  place  when 

stationary.   


2

39

               COLOUR SCREEN 

  Displays on the screen 

 When the ignition is switched on, this 

displays the following information au-

tomatically and directly: 
   -  

the time, 

  -  

the date, 

  -  

the outside temperature (if there 

is a risk of ice, you are warned 

by a message).  

 Warning  messages  (e.g.:  "Fuel  lev-

el  low")  and  vehicle  function  status 

messages  (e.g.:  "Automatic  switch-

ing  on  of  the  headlamps  activated") 

may  appear  temporarily.  These  can 

be  cleared  by  pressing  the   "ESC"  

button.  

  General menu 

 When the WIP Com is switched on, 

select  the  menu  which  corresponds 

to the following applications: 
   -  

the satellite navigation system, 

  -  

the guidance on the map, 

  -  

the traffi c information, 

  -  

the audio sources (radio, CD, 

Jukebox, ...), 

  -  

the telephone directories and 

functions, 

  -  

the confi guration of the 

screen and the setting of the 

parameters of the vehicle's 

equipment, 

  -  

the displaying of a video. 

  -  

the vehicle diagnostics 

(warnings log and status of the 

functions).   

  Controls 

 From the WIP Com control panel, to 

select one of the applications: 
      press the  "MENU"  button to 

gain access to the  general 

menu , 

     turn the dial to move the 

selection, 

  

   press the dial to confi rm the 

selection,  

 or 
      press the  "ESC"  button to 

abandon the operation in 
progress and return to the 
previous display.  

 For  further  details  concerning  these 

applications,  refer  to  the  WIP  Com 

part  of  the  "Audio  and  Telematics" 

section.  


2

40

  Selection of the language 
 Once the "Selection of the language" 

menu  has  been  selected,  you  gain 

access to the following parameters: 

   -  

selection of the display, 

information and voice 

commands language (Français, 

English, Italiano, Portugues, 

Espanol, Deutsch, Nederlands).   

  Display confi guration 

 Once  the  "Display  confi guration" 

menu  has  been  selected,  you  gain 

access to the following parameters: 

   -  

selection of the palette of 

colours available for the display, 

  -  

setting of the brightness and 

brilliance of the display, 

  -  

setting of the date and 
time (12 or 24 hour mode, 
adjustment of the minutes on 

GPS), 

  -  

selection of the units 

(temperature in °Celsius or 

°Fahrenheit; consumption in 

l/100 km or mpg or km/l).   

  Sounds 
 Once  the  "Sounds"  menu  has  been 

selected, you gain access to the fol-

lowing parameters: 
   -  

setting of the voice commands, 

  -  

setting of the voice synthesiser 

(volume of the instructions 

and other messages, male or 

female), 

  -  

activation of the auxiliary input 

AUX.   

  Defi ne the vehicle parameters 

 Once the "Defi ne the vehicle parame-

ters" menu has been selected, you can 

activate  or  deactivate  certain  driving 

and comfort equipment: 

   -  

wiper linked with reverse gear 

(refer to the "Visibility" section), 

  -  

"follow-me-home" lighting and 

duration (refer to the "Visibility" 

section).  

  "Configuration" menu 

      Press the  "MENU"  button on 

the WIP Com to gain access to 

the  general menu . 

  

   Turn the dial to select the 


"Confi guration"  menu, then 

press it to confi rm.  

 Once  this  menu  has  been  selected, 

you can gain access to the following 

functions: 


2

41

  

   Select the line "Duration of the 

"follow-me-home" lighting" then 

confi rm. 

 Example: setting the duration of the 

"follow-me-home" lighting. 
   

   Turn the dial to select the 


"Lighting confi guration"  

menu, then press it to confi rm. 

  

   Select the duration then press 

the dial. 

     Turn the dial to set the value 

required (15, 30 or 60 seconds), 

then press the dial. 

  

   Select the  "OK"  box, then 

confi rm.  

 The  WIP  Com  must  reini-
tialise  and  restart  in  order 

to change the voice used by 

the  voice  synthesiser  (male 

or  female)  or  the  language 

used by the system. 

 For  safety  reasons,  it  is  im-

perative that confi guration of 

the multifunction displays by 

the  driver  takes  place  when 

stationary.   

3

42

3

43

           VENTILATION 

   1.   Windscreen de-icing or 

demisting vent. 

  2.   Side window de-icing or 

demisting vents. 

  3.   Side vents. 
  4.   Central vents. 
  5.   Air outlets to the front footwells. 
  6.   Air outlets to the rear footwells. 
  7.   Temperature sensor.  

  Recommendations for use 

 If  the  interior  temperature  remains 
very  high  following  a  long  period 
parked in the sun, do not hesitate to 
ventilate the passenger compartment 
for a few minutes. 
 For  an  even  air  distribution,  make 
sure  that  you  do  not  block  the  out-
side air inlet grille, the vents and the 
air outlets to the footwells. 
 In certain cases of particularly arduous 
use  (towing  the  maximum  load  on  a 
steep gradient in a high temperature), 
cutting off the air conditioning permits 
recovery  of  the  engine  power  and 
therefore  improvement  of  the  towing 
capacity. 
 Ensure  that  the  passenger  compart-

ment  fi lter,  located  underneath  the 

windscreen,  in  the  engine  compart-
ment,  is  in  good  condition.  Have  the 

fi lter elements replaced regularly (refer 

to  the  chapter  "Checks  -  §  Checks"). 
If  you  drive  in  a  dusty  environment, 
change them twice as often. 

 We  recommend  the  use  of  a  com-

bined passenger compartment fi lter. By 

means of its second special active fi lter, 

it contributes to the purifi cation of the air 

breathed  by  the  occupants  and  to  the 
cleanness  of  the  passenger  compart-
ment  (reduction  of  allergic  symptoms, 
unpleasant odours and oily deposits). 
 Operate  the  air  conditioning  system 
for  5  to  10  minutes,  once  or  twice  a 
month,  to  keep  it  in  perfect  working 
order. 
 To  guarantee  correct  operation  of 
your air conditioning system, we also 
recommend that you have it checked 
regularly. 
 The  condensation  created  by  the  air 

conditioning  results  in  a  fl ow  of  water 

underneath the vehicle when stationary 
which is perfectly normal. 
 If the system does not produce cold air, 
do not use it and contact a  PEUGEOT  
dealer. 
 Do  not  cover  the  temperature  sen-
sor  7 ,  it  is  used  for  regulation  of  the 
air conditioning. 

 The  air  conditioning  system 
does not contain chlorine and 
does not present any danger 
to the ozone layer.  

3

44

 Turn  the  control  from  blue 
(cold)  to  red  (hot)  to  adjust 
the  temperature  to  your 
requirements.  

 HEATING/
VENTILATION 

 The heating and ventilation can only 
operate when the engine is running.  

  1. Temperature adjustment 

  Version with button and indicator light  

   Version with manual control  

  2. Air fl ow adjustment 

 Turn  the  control  from  posi-
tion  1  to position  4  to obtain 

a fl ow of air suffi cient to en-

sure your comfort. 

 To maintain a certain level of comfort 
in the passenger compartment, avoid 
position  0  as much as possible. 
 However,  in  position   0

 ,  a  slight  fl ow 

of  air,  due  to  the  movement  of  the 
vehicle, can still be felt.  

3

45

  3. Air distribution adjustment 

  Version with manual control 

 Windscreen and side 
windows. 

 Windscreen,  side  windows 
and footwells. 

 Footwells (vents closed). 

 Centre and side vents. 

  5.  Demisting the rear screen and 

exterior mirrors 

 With  the  engine  running, 
pressing  the  button  once 
demists  the  rear  screen 
and the exterior mirrors. 

 This switches off automatically in re-
lation to the exterior temperature and 
to prevent an excessive consumption 
of current. 
 It  is  possible  to  stop  demisting  by 
pressing the button again before it is 
switched off automatically.  

  4. Air intake/Air recirculation 
 The  interior  air  recirculation  function 
enables you to isolate the passenger 
compartment  from  exterior  odours 
and smoke. 
 The  outside  air  intake  function  pre-
vents condensation on the windscreen 
and side windows.  

  Pressing button  4  permits re-
circulation of the interior air. 
This is indicated by illumina-
tion of the indicator light. 

 As soon as possible, move the manual
control  4  to the left or press button  4  
again  to  permit  the  intake  of  outside 
air  to  prevent  deterioration  of  the  air 
quality and misting of the windscreen 
and side windows. This is indicated by 
the switching off of the indicator light 
for the button version.  

 Move  the  manual  control   4  
to  the  right  for  the  "Interior 
air recirculation" position.  

  Version with button and indicator 
light

 To  quickly  de-ice  or  demist 
the  windscreen  and  side 
windows:

 The  air  distribution  can  be  adjusted 
by placing the control in an interme-
diate position, marked by " ".  

  De-icing and demisting the 
windscreen 

    -  

Set the air distribution to "Wind-
screen and side windows", 

  -  

Place  the  air  intake  control   4   in 
the ''Outside Air Intake'' position, 

  -  

Place the temperature  1  and air 

fl ow  2  controls at maximum, 

  -  

Close the centre vents.    

3

46

  1. Air conditioning on/off 

 MANUAL AIR CONDITIONING 

 The air conditioning can only operate 
when the engine is running.  

  2. Temperature adjustment 

 Turn  the  control  from  blue 
(cold)  to  red  (hot)  to  adjust 
the  temperature  to  your 
requirements.  

  Version with button and indicator light  

   Version with manual control  

 The  air  conditioning  is  de-
signed to operate effectively 
in all seasons, with the win-
dows  closed.  In  summer, 
it  enables  the  temperature 

to  be  lowered  and  in  winter,  above 
0 °C, it increases the effectiveness of 
the demisting. 
 Press  the  switch,  the  indicator  light 
comes on. 
  The  air  conditioning  does  not  op-

erate while the air fl ow adjustment 

control 3 is in position "0".   

3

47

 Windscreen and side 
windows. 

  4. Air distribution adjustment 

  5. Air intake/Air recirculation 
 The  interior  air  recirculation  function 

enables you to isolate the passenger 

compartment  from  exterior  odours 

and smoke. 
 The outside air intake function enables 

you  to  prevent  condensation  on  the 
windscreen and side windows. 

  3. Air fl ow adjustment 

 Turn  the  control  from  posi-
tion  1  to position  4  to obtain 

a fl ow of air suffi cient to en-

sure your comfort. 

 To maintain a certain level of comfort 
in the passenger compartment, avoid 
position  0  as much as possible. 
 However,  in  position   0

 ,  a  slight  fl ow 

of  air,  due  to  the  movement  of  the 
vehicle, can still be felt.  

 Windscreen,  side  windows 
and footwells. 

 Footwells (vents closed). 

 Centre and side vents. 

 The  distribution  of  the  air  can  be  ad-
justed by placing the control in an inter-
mediate position, marked by

 " ".  

 Move  the  manual  control   5  
to  the  right  for  the  "Interior 
air recirculation" position.  

 With  the  engine  running, 
pressing  the  button  once 
demists  the  rear  screen 
and the exterior mirrors. 

 This switches off automatically in re-
lation to the exterior temperature and 
to prevent an excessive consumption 
of current. 
 It  is  possible  to  stop  demisting  by 
pressing the button again before the 
demisting is switched off automatically.  

  De-icing and demisting the 
windscreen 

 To  quickly  de-ice  or  demist 
the windscreen and side win-
dows: 

  Version with manual control 

  6.  Demisting the rear screen and 

the mirrors 

  Press button  5  for recircula-
tion  of  the  interior  air.  This 
is  indicated  by  illumination 
of the indicator light. 

 As soon as possible, move the manual
control  5  to the left or press button  5  
again  to  permit  the  intake  of  outside 
air,  to  prevent  deterioration  of  the  air 
quality and misting of the windscreen 
and side windows. This is indicated by 
the switching off of the indicator light 
in the case of the button version.  

  Version with button and indicator light

 Used  in  a  humid  climate,  air  recir-
culation  may  result  in  misting  of  the 
windows.  

   -  

set  the  air  distribution  to  "Wind-
screen and side windows", 

  -  

place  the  temperature   2   and  air 

fl ow  3  controls at maximum, 

  -  

close the centre vents, 

  -  

place  the  air  intake  control   5   in 
the "Outside air intake" position, 

  -  

switch on the air conditioning by 
pressing button  1 .    

3

48

         AUTOMATIC AIR CONDITIONING 

 The air conditioning can only operate when the engine is running. 

  1.  Automatic "comfort" 

programme 

 We  recommend  that  you  use  this 
mode,  it  provides  optimised  auto-
matic  control  of  all  of  the  following 
functions:  passenger  compartment 

temperature, air fl ow, air distribution 

and air intake, in accordance with the 
comfort value that you have chosen. 
This  system  is  designed  to  operate 
effectively  in  all  seasons,  with  the 
windows closed. 

 Press  the   "AUTO"   button. 
The  "AUTO"  symbol is dis-
played. 

  The  automatic  comfort  pro-

gramme may not be suffi cient 

for rapid de-icing or demisting 
of  the  windscreen  and  side 
windows  (humidity,  several 
passengers, ice, etc.). 

 In this case, select the automatic visi-
bility programme. The button  3  indicator 
light comes on. 
 The  system  automatically  controls 

the air conditioning and the fl ow of air 

and provides optimum distribution of 
the ventilation to the windscreen and 
side  windows.  It  deactivates  the  air 
recirculation. 
 To exit this programme, press button  3  
again or press the  "AUTO"  button, the 
indicator light on the button is switched 
off and  "AUTO"  is displayed.   

  Note:  for your comfort, when the en-

gine is switched off, the settings are 

retained  until  the  engine  is  switched 

on  again,  if  the  temperature  in  the 

passenger  compartment  has  not  al-

tered signifi cantly; otherwise, opera-

tion resumes in automatic mode. 
 When  the  engine  is  cold,  to  prevent 

too great a distribution of cold air, the 

air  fl ow  will  only  reach  its  optimum 

level gradually.  

  3.  Automatic "visibility" 

programme 

  Automatic operation 

 The  value  indicated  on 
the display corresponds 
to  a  level  of  comfort 
and  not  to  a  tempera-
ture in degrees Celsius 
or Fahrenheit. 

  2. Temperature adjustment 

 On  entering  the  vehicle,  if 
the  interior  temperature  is 
much colder or warmer than 
is  comfortable,  there  is  no 

need  to  change  the  value  displayed 
in order to reach the required level of 
comfort.  The  system  eliminates  the 
temperature difference automatically 
and as quickly as possible.  

 Press  the   "+"   and   "-"   buttons  to 
change this value. A setting around the 
 value 22  enables optimum comfort to 
be  obtained.  However,  depending  on 
your  requirements,  a  setting  between 
18 and 24 is usual. 

3

49

 Press  this  button  to  switch 
off the air conditioning. 
  Automatic  operation  of  the 
air  conditioning  is  resumed 
when the button is pressed 
again. The symbol  "A/C"  is 
displayed.  

  4. Air conditioning on/off 

 Pressing this button several 
times in succession enables 

the air fl ow to be directed in 

turn towards: 

   -  

the windscreen and the side win-
dows (de-icing or demisting), 

  -  

the windscreen, the side windows, 
the vents and the footwells, 

  -  

the windscreen, the side windows 
and the footwells, 

  5. Air distribution adjustment 

 Press buttons  "+"  or  "-"  
respectively to increase 

or reduce the air fl ow. 

  The air fl ow symbol, the 

fan,  fi lls  progressively 

in  relation  to  the  value 
requested.  

  6. Air fl ow adjustment 

 Press  the  air  fl ow   "-"   button   6   until 

the fan symbol is empty. 
 This action switches off all of the func-
tions  of  the  air  conditioning  system, 
with the exception of the rear screen 
demisting  9 . 
 Avoid driving with the air conditioning 
switched off for long periods. 
 Pressing  the  air  fl ow   "+"   button   6  

again  or  the   "AUTO"   button  reacti-
vates the system with the values set 
before it was switched off.  

  7. Switching the system off 

  Control using the manual 
buttons 

 It  is  possible  to  adjust  one  or  more 
functions manually while leaving the 
other functions in automatic mode. 
 The   "AUTO"   button  indicator  light 
switches off. 
 Switching to manual mode may result 
in discomfort (temperature, humidity, 
odour,  condensation)  and  does  not 
provide optimum comfort. 
 To  return  to  automatic  mode,  press 
the  "AUTO"  button. 

 Press  this  button  for  recir-
culation  of  the  interior  air. 
The  air  recirculation  sym-
bol  8  is displayed. 

 Air recirculation enables the passen-
ger compartment to be isolated from 
exterior odours and smoke. 
 Avoid prolonged recirculation of interior 
air (risk of condensation or deterioration 
of the air quality). 
 Press  this  button  again  or  press  the 
 "AUTO"  button to resume automatic 
management of the intake of air.  

  8. Air intake/Air recirculation 

 With  the  engine  running, 
press  this  button  to  demist 
the rear screen and the ex-
terior mirrors. The indicator 
light on button  9  comes on. 

 Demisting switches off automatically 
in relation to the exterior temperature 
and  to  prevent  an  excessive  con-
sumption of current. 
 It is possible to stop operation of the 
demisting  before  it  is  switched  off 
automatically by pressing the button 
again. 
 If  the  engine  is  switched  off  before 
the  demisting  is  switched  off  auto-
matically,  the  demisting  will  resume 
the next time the engine is switched 
on.   

  9.  Demisting the rear screen and 

the mirrors 

  -  

the footwells, 

  -  

the  centre  vents,  the  side  vents 
and the footwells, 

  -  

the centre and side vents.   

3

50

     MIRRORS 

  -  

from outside: 

      lock the vehicle using the remote 

control or the key.   

  Note : if the mirrors are folded using 
switch   A ,  they  will  not  unfold  when 
the  vehicle  is  unlocked  using  the 
remote  control  or  the  key.  Switch   A  
must be turned again.  

  Manual interior mirror 

 The interior mirror has two positions: 
   -  

day (normal), 

  -  

night (anti-dazzle).  

 To  change  from  one  to  the  other, 
push  or  pull  the  lever  on  the  lower 
edge of the mirror.  

         STEERING WHEEL HEIGHT 
AND DEPTH ADJUSTMENT 

 When the vehicle is stationary, unlock 
the steering wheel by pulling handle  A . 
 Adjust  the  height  and  depth  of  the 
steering wheel. 
 Lock  it  by  pushing  handle   A   down 
fully. 

  Demisting 
 To demist the mirrors, with the engine 
running,  press  the  rear  screen  demi-
sting button. 

  Folding 
 When  parked,  the  mirrors  can  be 
folded back manually. 
 If  your  vehicle  is  fi tted  with  electric 

folding: 
   -  

from inside: 

      with the ignition on, turn switch  A  

downwards.  

 Objects observed in the mirrors 
are,  in  reality,  closer  than  they 
appear. 

 Take  this  into  account  to  as-

sess correctly the distance of vehicles 
approaching from the rear.   

  Electric exterior mirrors 

  Adjustment 
      Turn switch  A  to the right or to the 

left  to  select  the  corresponding 
mirror. 

     Move this switch in all four direc-

tions to adjust. 

     Return  switch   A   to  the  centre 

position.   

  Unfolding 
 When parked, the mirrors can be un-
folded manually. 
 If  your  vehicle  is  fi tted  with  electric 

unfolding: 
   -  

from inside: 

      with the ignition on, turn switch  A  

to the central position.  

  -  

from outside: 

      unlock the vehicle using the remote 

control or the key.   

 The  folding  and  unfolding  of  the  ex-
terior  mirrors  can  be  deactivated  by 
a  PEUGEOT  dealer.  

3

51

       FRONT SEATS  

  2 -  Driver's seat height 

adjustment 

 Pull the control upwards. 
 Take your weight off the seat to raise 
it or press on the seat to lower it.  

  3 - Seat back angle adjustment 
 Turn the  knob  to adjust  the  angle  of 
the seat back.  

  1 - Forwards-backwards adjustment 
 Lift the control and slide the seat for-
wards or backwards.  


Content   ..  1  2  3  4   ..