Peugeot 308 SW BL (2013 year). Manual - part 21
 

  Index      Peugeot     Peugeot 308 SW BL - service manual 2013 year in english


Search            


Content   ..  19  20  21  22   ..


Peugeot 308 SW BL (2013 year). Manual - part 21


319

06 USING THE TELEPHONE

   CALLING A RECENTLY ENTERED NUMBER

Press  TEL, select "Call list" and

confi rm, 

Select the desired number and confi rm.

  To erase the calls log, press PHONE  twice, select " Phone 

functions" and confi rm then select " Delete calls log" and

confi rm.

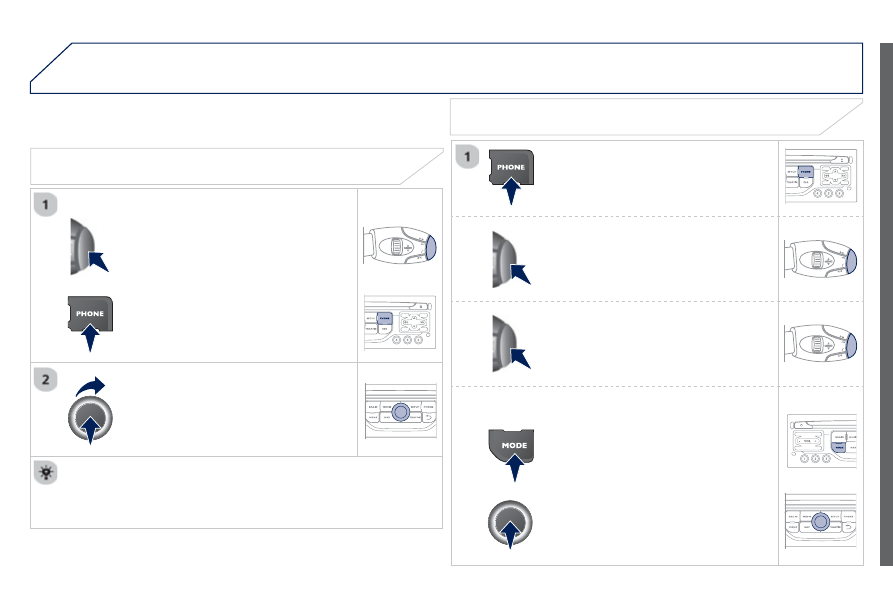
  ENDING A CALL

Press  PHONE then select "OK" to end 

the call.

Or make a long press on  TEL at the 

steering mounted controls.  

Or make two short presses on TEL at

the steering mounted controls.

Or press the MODE  button, as many 

times as necessary, until the telephone 

screen is displayed.

press PHONE  to display the calls log.

or 

Press "OK" to display the contextual

menu then select " Hang up" and

confi rm.   

320

06 USING THE TELEPHONE

  RECEIVING A CALL

  An incoming call is announced by a ring and a superimposed display

on the screen.

"Yes" to accept the call is selected by

default. 
Press " OK" to accept the call. 
Select " No" and confi rm to reject the 

call.  

  A short press on TEL accepts an 

incoming call. 
 A long press on  TEL  rejects an incoming

call.   

321

06 USING THE TELEPHONE

  OPTIONS DURING A CALL *  

During a call, press the  MODE  button 

several times to select display of the

telephone screen, then press " OK " to 

open the contextual menu.  

Select " Private mode " and confi rm to

take the call on the handset. 
Or select " Hands-free mode" and

confi rm to take the call via the vehicle's 

speakers.  

Select " Put call on hold" and confi rm to 

put the current call on hold.
Or select " Resume the call" and

confi rm to resume the call on hold.

Select " DTMF ring tones " to use the

numerical keypad, so as to navigate 

through the menu of an interactive vocal 

server.

  Select " Hang up " to end the call.

*   Depending on the compatibility of the phone and your service plan.

 it is possible to hold a 3-way conference

call by making 2 calls in succession*. 

Select "Conference mode call" in the 

contextual menu accessible using this

button.   

Or make a short press on this button.

322

06

Press  PHONE twice.

Select " List of the paired peripherals"

and confi rm.  

It is possible to:
-

"Connect" or " Disconnect " the

selected telephone,

-  

delete the pairing of the selected 

telephone.

It is also possible to select all pairings.   

USING THE TELEPHONE

  MANAGING PAIRED TELEPHONES

  CHANGING THE RING TONE 

Press  PHONE twice.

Select " Phone functions " and confi rm.  

Select " Ring options" and confi rm.

You can adjust the volume and the type 

of ring tone.

Select " Bluetooth functions".

Select " OK " and confi rm to save the

changes.

323

07  RADIO 

Access to the "RADIO" menu 

""""""""FM / AM band

FM / AM band

FM / AM band

FM / AM band

FM / AM band

FM / AM band

FM / AM band

FM / AM band

FM / AM band

FM / AM band

FM / AM band

FM / AM band

FM / AM band

FM / AM band

FM / AM b

d

FM / AM b

d

FM / AM b

d

FM / AM b

d

FM / AM b

d""""""""

  Press   or    or use the rotary control to select the

previous or next station in the list.

  Go from the list to the menu (left/right).

or   

  Press RADIO.

324

07 RADIO 

By alphabetical list 
Press  RADIO or LIST , select the station

of your choice and confi rm.  

By automatic frequency search 
Press  

for a lower or higher radio frequency. 
Or turn the thumb wheel at the steering

mounted controls.

By manual frequency search
Press   or   to adjust the radio

frequency step by step.

Press the button on the numerical keypad to recall a

preset station. 
Or press then turn the thumb wheel at the steering 

mounted controls.  

SELECTING A STATION 

  The external environment (hill, building, tunnel, underground car park...) may interfere with the reception, including in RDS station tracking mode. 

This phenomenon is a normal result of the way in which radio waves are transmitted and does not in any way indicate a fault with the audio system. 

  PRESETTING A STATION

  After selecting a station, press one of the buttons 

on the numerical keypad for 2 seconds to preset the 

current station.
 An audible signal confi rms that the station has been 

preset.  

The quality of reception is represented by the number of 

active waves in this symbol.  

325

07

  Press RADIO .

ACTIVATE / DEACTIVATE RDS 

  RDS, if activated, allows you to continue listening to the same 

station by automatic retuning to alternative frequencies. However, 

in certain conditions, coverage of an RDS station may not be

assured throughout the entire country as radio stations do not 

cover 100 % of the territory. This explains the loss of reception of 

the station during a journey.

  Select "Guidance options" and confi rm.

  Select "Activate / Deactivate RDS " and 

confi rm.

RADIO 

Select " Activate / Deactivate RDS".

Radio displayed, press "OK " to display the contextual menu.

326

08  MUSIC MEDIA PLAYERS

Access to the "MUSIC MEDIA PLAYER" menu

""""""""MEDIA

MEDIA

MEDIA

MEDIA

MEDIA

MEDIA

MEDIA

MEDIA

MEDIA

MEDIA

MEDIA

MEDIA

MEDIA

MEDIA

MEDIA

MEDIA

MEDIA

MEDIA

MEDIA""""""""

  Go from the list to the menu (left/right). 

or   

Press  MUSIC.

327

08 MUSIC MEDIA PLAYERS 

  CD, MP3 CD / USB PLAYER

  The audio equipment will only play audio fi les with ".wma, .aac, .fl ac, 

.ogg and. mp3" fi le extensions and with a bit rate of between 32 Kbps 

y

y

y p y

and 320 Kbps.
 It also supports VBR (Variable Bit Rate) mode.
 No other type of fi le (.mp4, .m3u...) can be played.
 WMA fi les must be of the standard wma 9 type.
 The sampling rates supported are 11, 22, 44 and 48 KHz.

  It is advisable to restrict fi le names to 20 characters, without using of 

special characters (e.g.: " " ? ; ù) to avoid any playing and displaying

problems.

  In order to be able to play a recorded CDR or CDRW, when recording 

it is preferable to select the ISO 9660 level 1, 2 or Joliet standard. 
 If the disc is recorded in another format it may not be played correctly. 
 It is recommended that the same recording standard is always used 

for an individual disc, with as low a speed as possible (4x maximum)

for optimum sound quality.
 In the particular case of a multi-session CD, the Joliet standard is

recommended.

  INFORMATION AND ADVICE

 The system supports USB mass storage or iPod

devices via the USB port (suitable cable not supplied). 
 Control of the peripheral device is with the audio

system controls.
 Other peripherals, not recognised on connection, must 

be connected to the auxiliary socket using a Jack cable 

(not supplied).  

 In order to be read, a USB memory stick must be formatted FAT 16 or 32.   

328

08 MUSIC MEDIA PLAYERS 

  Insert the CD in the player, insert the USB

memory stick in the USB player or connect the

USB peripheral to the USB port using a suitable

cable (not supplied)
 The system builds playlists (in temporary

memory), an operation which can take from

a few seconds to several minutes at the fi rst

connection. 
 Reduce the number of non-music fi les and the 

number of folders to reduce the waiting time.
 The playlists are updated every time the ignition

is switched off or connection of a USB memory 

stick. However, the system memorises these 

lists and if they are not modifi ed, the loading

time will be shorter.
 Play starts automatically after a period which 

depends on the capacity of the USB memory 

stick.

 SELECTION OF SOURCE

The  SOURCE  button on the steering mounted controls allows a

direct change to the next media source. 

 " CD / CD MP3 " 

"USB, IPod"

"AUX " 

"STREAMING " 

"RADIO "  

Press  MUSIC to display the "MEDIA " 

menu.

  Select "Following media source " and 

confi rm.

  Repeat the operation as many times as necessary to obtain the 

desired media source (except for radio which is accessible either 

with SOURCE  or RADIO).

SOURCES  

329

08

/

/

/

/

/

/

/

+

/

/

/

   SELECTING A TRACK

MUSIC MEDIA PLAYERS 

Previous track.

Next track.  

Previous folder.  

Next folder.  

Fast forward. 

Fast backward. 

Pause: long press on  SRC.    

 MUSIC: List of USB or CD tracks or 

folders  

 Up or down in the list.

 Confi rm, next menu level.

 Up one menu level.   

 Long press  

 Long press  

330

08

AUDIO STREAMING 

Streaming allows audio fi les on your telephone to be played via the

vehicle's speakers.

Connect the telephone: see "USING THE TELEPHONE". 
Select " Audio" or " All" profi le.

If play does not start automatically, it may be necessary to start the 

audio playback from the telephone.
Control is from the peripheral device or by using the audio system 

buttons.

Once connected in streaming mode, the telephone is considered to be

a media source. 
It is recommended that you activate " Repeat" on the Bluetooth 

peripheral.   

MUSIC MEDIA PLAYERS 

  CONNECTING APPLE

®

  PLAYERS 

®

Connect the Apple 

®

player to the USB port using a suitable cable 

(not supplied). 
Play starts automatically.  

Control is via the audio system. 

The classifi cations available are those of the portable device

connected (artists / albums / genres / playlists / audiobooks / 

podcasts). 
The default classifi cation used is by artist. To modify the classifi cation

used, return to the fi rst level of the menu then select the desired 

classifi cation (playlists for example) and confi rm to go down through

the menu to the desired track.

The version of software in the audio system may not be compatible

with the generation of your Apple 

®

player. 

The list of devices compatible with software versions is available from 

PEUGEOT dealers.

331

08 MUSIC MEDIA PLAYERS 

USING THE AUXILIARY INPUT (AUX)  
JACK/RCA AUDIO CABLE NOT SUPPLIED 

  Connect the portable device (MP3, WMA player…) to the RCA audio

sockets (white and red) using a JACK-RCA audio cable.

  Press MUSIC to display the " MUSIC"

menu.  

  Select "Activate / Deactivate AUX

input " and confi rm. 
 First adjust the volume of your portable 

device (to a high level). Then adjust the

volume of your audio system.  

  Display and management of the controls are via the portable device.   

332

09 AUDIO SETTINGS 

They are accessible by the  MUSIC

button in the control panel or by a long

press on  RADIO according to the source 

in use.  

-  " 

Equalizer" (choice of 6 musical ambiences) 

r

-  " 

Bass"

-  " 

Treble " 

-

"Loudness" (Activate/Deactivate) 

-

"Distribution" (" Driver ", "

r

All passengers ") 

-

"Le-Ri balance " (Left/Right) 

-  

Fr-Re balance " (Front/Rear)

-  " 

Auto. Volume " depending on road speed (Activate/Deactivate)

  The audio settings (Equalizer

r Bass ,  Treble and  Loudness ) are

different and independent for each sound source.
The settings for distribution and balance are common to all sources.

  The distribution (or spatialisation using the Arkamys

©

 system) of sound 

©

is an audio process that allows the audio quality to be adapted to the 

number of listeners in the vehicle.  

333

10

Press  SETUP  to display the

"Confi guration " menu.

Select " Choose colour" and confi rm to

r

select the screen colour harmony and 

the map presentation mode:
-  

day mode,

-  

night mode, 

-  automatic 

day/night mode,

according to whether the 

headlamps are on.

Select " Adjust luminosity" and confi rm 

to adjust the screen brightness. 
Press " OK" to save the changes.
The settings for day and night are 

independent.   

Select " Display confi guration" and

confi rm.  

  DISPLAY CONFIGURATION

334

11 SCREEN MENU MAP

  "Navigation - guidance"

MENU 

  Enter an address  

 Select destination

  Directory

  GPS coordinates (Archive)

  Journey leg and route 

  Add a stage

Enter an address

Directory

Previous destinations

  Order/delete journey legs  

  Divert route  

  Chosen destination

Guidance options 

Defi ne calculation criteria

Set speech synthesis  

Delete last destinations  

Map management 

Map orientation  

  Select TMC station 

  Automatic TMC

  Manual TMC

  List of TMC stations   

  Display / Do not display

messages

MAIN FUNCTION 

option A1

option A2

OPTION A 

OPTION B...

Map details

Move the map / "Vehicle monitoring"

Mapping and updating  

Description of risk areas database   

Stop / Restore guidance  

"TRAFFIC" MENU

 Geographic filter 

  Retain all the messages:  

  Retain the messages:

Around the vehicle

On the route

1

2

3

1

2

2

2

1

2

2

3

3

1

1

3

3

2

2

2

2

1

3

1

1

2

2

2

2

2

2

2

2

2

2

2

1

1

Set parameters for risk areas

2


Content   ..  19  20  21  22   ..