Peugeot 207 CC (2014 year). Manual - part 10
 

  Index      Peugeot     Peugeot 207 CC - service manual 2014 year in english


Search            


Content   ..  8  9  10  11   ..


Peugeot 207 CC (2014 year). Manual - part 10


9

PRACTICAL INFORMATION

143

207CC_EN_CHAP09_INFO PRATIQUES_ED01-2014

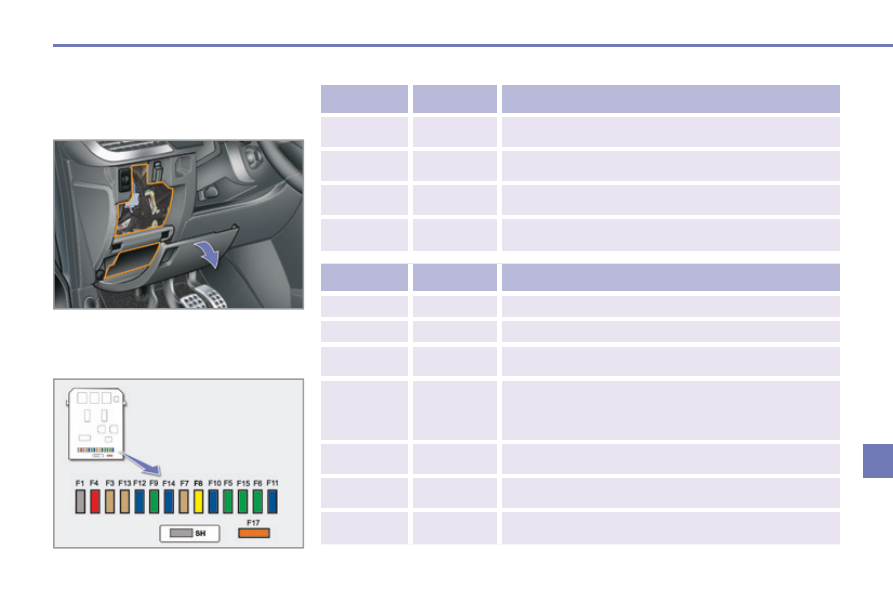
  Dashboard  fuses 


The fusebox is placed in the lower 

dashboard (left-hand side). 

  Access to the fuses 

     refer to the "Access to the tools" 

paragraph.   

  Fuse  table 


Fuse N°   


Rating   


Functions   


G37  


30 A  

 Retractable roof unit supply. 


G38  


20 A  

 Hi-Fi amplifi er. 


G39  


20 A  

 Driver and passenger heated seats. 


G40  


40 A  

 Trailer fusebox supply. 


Fuse N°   


Rating   


Functions   


F1  

 - 

 Not  used. 


F2  

 - 

 Not  used. 


F3  


5 A  

 Airbags and pre-tensioners control 

unit. 


F4  


10 A  

 Clutch pedal switch, diagnostic socket, 

electrochromatic rear view mirror, air conditioning, 

steering wheel angle sensor, particle emission fi lter 

pump (Diesel). 


F5  


30 A  

 Rear electric windows, retractable roof. 


F6  


30 A  

 Front electric windows, folding mirrors 

supply. 


F7  


5 A  

 Front courtesy lamp, map reading reading lamps, 

sun visor lighting, glove box lighting. 

9

PRACTICAL INFORMATION

144

207CC_EN_CHAP09_INFO PRATIQUES_ED01-2014


Fuse N°   


Rating   


Functions   


F8  


20 A  

 Audio/telephone, multifunction screen, steering 

mounted controls, tyre under-infl ation detection, 

trailer fusebox, alarm (accessory). 


F9  


30 A  

 Front 12 V socket, front courtesy lamp, map 

reading lamps, sun visor lighting, glove box lighting. 


F10  


15 A  

 Alarm siren, alarm control unit, directional 

headlamps. 


F11  


15 A  

 Diagnostic socket, low current ignition switch, 

automatic gearbox control unit. 


F12  


15 A  

 Sunshine sensor, trailer fusebox, 

retractable roof. 


F13  


5 A  

 Engine fusebox, ABS relay, dual-function brake 

switch. 


F14  


15 A  

 Instrument panel, seat belt warning lamps panel, 

headlamp adjustment, air conditioning, audio equipment, 

Bluetooth system, rear parking sensors control unit. 


F15  


30 A  

 Locking and deadlocking. 


F17  


40 A  

 Heated rear screen and door mirrors. 


SH  

 - 

 PARC  shunt. 

9

PRACTICAL INFORMATION

145

207CC_EN_CHAP09_INFO PRATIQUES_ED01-2014

  Engine  compartment  fuses 


The fusebox is placed in the engine 

compartment, near the battery (left-

hand side). 

  Access to the fuses 

      Unclip the cover. 

     Replace the fuse (refer to the cor-

responding paragraph). 

     When  you  have  fi nished,  close  the 

cover carefully to ensure correct 

sealing of the fuse box.   

  Fuse  table 


Fuse N°   


Rating   


Functions   


F1  


20 A  

 Engine control unit and fan assembly control relay 

supply, timing and canister electrovalves (1.6 l 16V THP), 

air fl ow sensor (Diesel), injection pump 

(Diesel), water in Diesel sensor (Diesel), EGR 

electrovalves, air heating (Diesel). 


F2  


15 A  

 Horn. 


F3  


10 A  

 Front  wash-wipe. 


F4  


20 A  

 Headlamp  wash. 


F5  


15 A  

 Fuel pump (petrol), Turbo electrovalves 

(1.6 l 16V THP). 


F6  


10 A  

 Vehicle speed sensor, automatic gearbox. 


F7  


10 A  

 Electric power steering, directional headlamps, 

directional headlamps control relay, switching and 

protection unit (Diesel). 


F8  


20 A  

 Starter motor control. 


F9  


10 A  

 ABS/ESP control unit, brake pedal switch. 


F10  


30 A  

 Engine control unit actuators (petrol: ignition coils, 

electrovalves, oxygen sensors, injectors, heaters, 

electronic thermostat) (Diesel: electrovalves, 

heaters). 


F11  


40 A  

 Air conditioning blower. 


F12  


30 A  

 Windscreen wipers Low/High speed. 


F13  


40 A  

 Built-in systems interface supply (ignition positive). 

9

PRACTICAL INFORMATION

146

207CC_EN_CHAP09_INFO PRATIQUES_ED01-2014


Fuse N°   


Rating   


Functions   


F14  


30 A  

 Diesel heater (Diesel). 


F15  


10 A  

 Left main beam headlamp. 


F16  


10 A  

 Right main beam headlamp. 


F17  


15 A  

 Left dipped beam headlamp. 


F18  


15 A  

 Right dipped beam headlamp. 

  Maxi-fuse  table 

  *     The  maxi-fuses  provide  additional  pro-

tection for the electrical systems. All 

work on the maxi-fuses must be car-

ried out by a PEUGEOT dealer or a 

qualifi ed workshop.  


Fuse N°   


Rating   


Functions   


Box 1


MF1  *  


70 A  

 Fan  assembly. 


MF2  *  


20 A/30 A  

 ABS/ESP  pump. 


MF3  *  


20 A/30 A  

 ABS/ESP  electrovalves. 


MF4  *  


60 A  

 Built-in systems interface supply. 


MF5  *  


60 A  

 Built-in systems interface supply. 


MF6  *  


30 A  

 Additional fan assembly (1.6 l 16V THP). 


MF7  *  


80 A  

 Dashboard  fusebox. 


MF8  *  

 - 

 Not  used. 


Box 2


MF9  *  


80 A  

 Heating unit (Diesel). 


MF10  *  


80 A  

 Electric power steering. 


MF11  *  


40 A  

 Valvetronic electric motor (1.6 l 16V THP). 

9

!

PRACTICAL INFORMATION

147

207CC_EN_CHAP09_INFO PRATIQUES_ED01-2014

BATTERY 


Procedure for charging your battery 

when it is fl at or for starting the engine 

using another battery. 

  Access to the battery 

  Starting  using  another 

battery 

      Connect the red cable to the posi-

tive terminal (+) of the fl at battery  

A , 

then to the positive terminal (+) of 

the slave battery  

B . 

    Connect one end of the green or 

black cable to the negative termi-

nal (-) of the slave battery  

B . 

     Connect the other end of the green 

or black cable to the vehicle's offset 

earth point. 

     Start the support vehicle. 

    Operate the starter of the broken 

down vehicle and let the engine run. 

     Wait until the engine returns to idle 

and disconnect the cables.  

 The battery is located under the bonnet. 

 To gain access to it: 

      open the bonnet using the interior re-

lease lever, then the exterior safety 

catch, 

     secure the bonnet stay, 

     lift the plastic cover on the (+) terminal.   

  Certain vehicle functions may not 

be available if the battery is not suf-

fi ciently charged.   

9

!

i

PRACTICAL INFORMATION

148

207CC_EN_CHAP09_INFO PRATIQUES_ED01-2014

 Do not charge the batteries without 

disconnecting the terminals fi rst. 


Do not disconnect the terminals 

while the engine is running. 

 The batteries contain harmful sub-

stances such as sulphuric acid and 

lead. They must be disposed of in 

accordance with regulations and 

must not, in any circumstances, be 

discarded with household waste. 

 Take used remote control batteries 

and vehicle batteries to a special 

collection point. 

  Charging the battery using a 

battery charger 

      Disconnect the battery from the ve-

hicle. 

     Follow the instructions for use pro-

vided by the manufacturer of the 

charger. 

    Reconnect starting with the nega-

tive terminal (-). 

     Check that the terminals and connec-

tors are clean. If they are covered with 

sulphate (whitish or greenish deposit), 

remove them and clean them.  


It is advisable to disconnect the 

battery if the vehicle is to be left un-

used for more than one month. 

  Before  disconnecting  the 

battery 

 Wait 2 minutes after switching off 

the ignition before disconnecting 

the battery. 

 Close the windows and the doors 

before disconnecting the battery.  

  Following reconnection of the 

battery 

 Following reconnection of the bat-

tery, switch on the ignition and wait 

1 minute before starting to permit 

initialisation of the electronic sys-

tems.  However,  if  slight  diffi culties 

are encountered following this op-

eration, contact a PEUGEOT deal-

er or a qualifi ed workshop. 

 Referring to the corresponding sec-

tion, you must yourself reinitialise: 

   -  

the  remote  control  key, 

  -  

the  one-touch  electric  windows, 

  -  

the  GPS  satellite  navigation 

system  (depending  on  version).    

   Disconnecting  the  (+)  cable 

  Reconnecting the (+) cable 

     Position the open clamp  

E  of the 

cable on the positive post (+) of the 

battery. 

     Press vertically on the clamp  

E   to 

position it correctly on the battery. 

     Lock the clamp by spreading the po-

sitioning lug and then lowering the 

tab  

D .  

 Do not apply excessive force on the 

tab as locking will not be possible if the 

clamp is not positioned correctly; start 

the  procedure  again.   

      Raise the locking tab  

D  fully to re-

lease the cable terminal clamp  

E .   

9

!

i

PRACTICAL INFORMATION

149

207CC_EN_CHAP09_INFO PRATIQUES_ED01-2014

 A  fl at  battery  prevents  the  engine 

from starting (refer to the corre-

sponding  paragraph).  

 If a roof operation is in progress, 

it will be completed, but no further 

operation is possible.  

ENERGY ECONOMY MODE 

 System which manages the duration of 

use of certain functions to conserve a 

suffi cient level of charge in the battery. 

 After the engine has stopped, you can 

still use functions such as the audio 

equipment, windscreen wipers, dipped 

beam headlamps, courtesy lamp, etc. 

for a maximum combined duration of 

thirty minutes. 

  Exiting  economy  mode 


These functions are reactivated auto-

matically next time the vehicle is driven. 

      In order to resume the use of these 

functions immediately, start the 

engine and let it run for a few minutes.  

 The time available to you will then be 

double the duration for which the engine 

is left running. However, this period will al-

ways be between fi ve and thirty minutes. 

  Switching to economy mode 


Once the thirty minutes are over, a 

message appears on the multifunction 

screen indicating that the vehicle has 

switched to economy mode and the ac-

tive functions are put on standby. 

CHANGING A WIPER BLADE 

 Procedure for replacing a worn wiper 

blade with a new one without the use 

of tools. 

  Removing a front wiper blade 

      Raise the corresponding wiper arm. 

     Unclip the wiper blade and remove it.   

  Fitting a front wiper blade 

      Check the size of the wiper blade 

as the shorter blade is fi tted on the 

right-hand side of the vehicle. 

   

 Put the corresponding new wiper 

blade in place and clip it. 

     Fold down the wiper arm carefully.   

LOAD REDUCTION MODE 

 System which manages the use of cer-

tain functions according to the level of 

charge remaining in the battery. 


When the vehicle is being driven, the 

load reduction function temporarily deac-

tivates certain functions, such as the air 

conditioning, the heated rear screen... 

 The deactivated functions are reactivated 

automatically as soon as conditions permit. 

9

i

PRACTICAL INFORMATION

150

207CC_EN_CHAP09_INFO PRATIQUES_ED01-2014

TOWING THE VEHICLE 


Procedure for having your vehicle 

towed or for towing another vehicle us-

ing a removable towing eye. 

  Access to the tools 

  Towing  your  vehicle 

      On the front bumper, pull on the cov-

er to unclip it. 

     Screw the towing eye in fully. 

     Install the towing arm. 

     Switch on the hazard warning lamps 

on the towed vehicle. 

      On the rear bumper, unclip the cover 

by pressing at the bottom. 

     Screw the towing eye in fully. 

     Install the towing arm. 

     Switch on the hazard warning lamps 

on the towed vehicle.   

  Towing  another  vehicle 

 The towing eye is installed in a holder at 

the bottom of the boot under the fl oor. 

 For access to it: 

      place the vehicle in "coupé" confi gu-

ration, 

     open the boot, 

     raise the fl oor, 

   

 remove the towing eye from the 

holder.   

     Place the gear lever in neutral 

(position  

N 

 on the automatic 

gearbox).  


Failure to observe this specifi c 

instruction may result in dam-

age to certain braking units and 

the absence of braking assis-

tance when the engine is re-

started.   

9

!

i

PRACTICAL INFORMATION

151

207CC_EN_CHAP09_INFO PRATIQUES_ED01-2014

  General  recommendations 

 Observe the legislation in force in 

your country. 

 Ensure that the weight of the tow-

ing vehicle is higher than that of the 

towed vehicle. 


The driver must remain at the 

wheel of the towed vehicle and 

must have a valid driving licence. 

 When towing a vehicle with all four 

wheels on the ground, always use 

an approved towing bar; rope and 

straps are prohibited. 

 The towing vehicle must move off 

gently. 


When towing a vehicle with the 

engine off, there is no longer any 

power assistance for braking or 

steering. 

 In the following cases, you must al-

ways call on a professional recov-

ery service: 

   -   vehicle broken down on a mo-

torway or fast road, 

  -  

four-wheel  drive  vehicle, 

  -   when it is not possible to put the 

gearbox into neutral, unlock the 

steering, or release the parking 

brake, 

  -   towing with only two wheels on 

the ground, 


  where there is no approved 

towing  bar  available...   

TOWING  A  TRAILER  

  Your vehicle is primarily designed for 

transporting people and luggage, but it 

may also be used for towing a trailer.  

  Driving with a trailer places greater de-

mands on the towing vehicle and the 

driver must take particular care.   

  Distribution  of  loads 

      Distribute the load in the trailer so 

that the heaviest items are as close 

as possible to the axle and the nose 

weight approaches the maximum 

permitted without exceeding it.  

 Air density decreases with altitude, thus 

reducing engine performance. Above 

1 000 metres, the maximum towed load 

must be reduced by 10 % for every 

1 000 metres of altitude.  

  Side  wind 

    

 Take into account the increased 

sensitivity to side wind.   

  Towbar suitable for the attachment of a 

trailer or installation of a bicycle carrier, 

with additional lighting and signalling.  

  We recommend the use of genuine 

PEUGEOT towbars and their har-

nesses that have been tested and 

approved from the design stage of 

your vehicle, and that the fi tting of the 

towbar is entrusted to a PEUGEOT 

dealer or a qualifi ed workshop. 

 If the towbar is not fi tted by a PEUGEOT 

dealer, it is imperative that it is fi tted in 

accordance with the vehicle manufac-

turer's  instructions.  

  Driving  advice 

  Cooling 

 Towing a trailer on a slope increases 

the temperature of the coolant. 

 As the fan is electrically controlled, its 

cooling capacity is not dependent on 

the engine speed. 

      To lower the engine speed, reduce 

your  speed.  

  Refer to the "Technical data" section for 

details of the weights and towed loads 

which apply to your vehicle.  

9

i

!

PRACTICAL INFORMATION

152

207CC_EN_CHAP09_INFO PRATIQUES_ED01-2014

 The maximum towed load on a long in-

cline depends on the gradient and the 

ambient temperature. 

      If the warning lamp and the 


STOP  warning lamp come 

on, stop the vehicle and 

switch off the engine as 

soon  as  possible.   

  Braking 

 Towing a trailer increases the braking 

distance. 

 To avoid overheating of the brakes on a 

long mountain type of descent, the use 

of engine braking is recommended.  

  Tyres 

      Check the tyre pressures of the tow-

ing vehicle and of the trailer, observ-

ing the recommended pressures.   

  The rear parking sensors will be 

deactivated automatically if a gen-

uine PEUGEOT towbar is used.   

 In all cases, keep a check on the cool-

ant temperature. 

  Lighting 

      Check the electrical lighting and sig-

nalling on the trailer.   

BOOT LUGGAGE CARRIER 

 A boot luggage carrier, designed specifi -

cally for your coupé-cabriolet, is available 

from your PEUGEOT dealer as an ac-

cessory. 

 Follow the manufacturer's recommen-

dations for fi tting and use. 

 When loading the boot luggage car-

rier, take care not to cover the third 

brake lamp and the number plate. 

 The retractable roof must not not 

operated when the boot luggage 

carrier is fi tted. 

9

i

!

i

PRACTICAL INFORMATION

153

207CC_EN_CHAP09_INFO PRATIQUES_ED01-2014

     ACCESSORIES 

 A wide range of accessories and genu-

ine parts is available from the PEUGEOT 

dealer network. 


These accessories and parts have 

been tested and approved for reliability 

and safety. 

 They are all adapted to your vehicle and 

benefi t  from  PEUGEOT's  recommen-

dation and warranty.  


Depending on the legislation in 

force in the country, certain safety 

equipment may be compulsory: 

high visibility safety vests, warn-

ing triangles, breathalyzers, spare 

bulbs,  spare  fuses,  a  fi re  extin-

guisher, a fi rst aid kit, mud fl aps at 

the rear of the vehicle. 

 The  fi tting  of  electrical  equipment 

or accessories which are not rec-

ommended by PEUGEOT may 

result in a failure of your vehicle's 

electronic system and excessive 

electrical consumption. 

 Please note this precaution. You are 

advised to contact a PEUGEOT rep-

resentative to be shown the range of 

recommended equipment and ac-

cessories.   

        "Comfort": 

 door  defl ectors,  side  blinds  and  rear 

blind,  coat  hanger  fi xed  to  head  re-

straint, front centre armrest, under shelf 

storage, front and rear parking sen-

sors...  

  Installation  of  radio 

communication transmitters 

 Before installing any after-market ra-

dio communication transmitter, you 

can contact a PEUGEOT dealer for 

the specifi cation of transmitters which 

can  be  fi tted  (frequency,  maximum 

power, aerial position, specifi c instal-

lation requirements), in line with the 

Vehicle Electromagnetic Compatibil-

ity  Directive  (2004/104/EC).    

  "Transport  solutions": 

 boot liner, luggage net, cigarette lighter, 

roof bars, bicycle carrier on roof bars, 

ski carrier, roof box... 

 Towbar, which must be fi tted by PEUGEOT 

dealer or a qualifi ed workshop.  

  "Styling": 

 aluminium gear lever knob, spoiler, styling 

strips, alloy wheels, trims, chromed mirror 

shells, body kit...  

  *     To avoid any risk of jamming of the 

pedals: 

   -   ensure that the mat is positioned 

and secured correctly, 

  -   never fi t one mat on top of another.   

  "Security": 


anti-theft alarm, window engraving, 

wheel security bolts, child seats and 

booster cushions, breathalyzer, fi rst aid 

kit, warning triangle, high visibility jacket, 

stolen vehicle tracking system, tempo-

rary puncture repair kit, snow chains, 

non-slip covers, front foglamps kit...  

  "Protection": 

 mats * , seat covers compatible with lateral 

airbags, aluminium or PVC door aperture 

fi nishers...  

  "Multimedia": 


audio systems, satellite navigation 

systems, hands-free kit, CD changer, 

speakers, DVD player, connection kit 

for MP3 or CD player, USB Box...  

  You can also obtain products for clean-

ing and maintenance (exterior and in-

terior), topping up (screenwash...), and 

refi lls (cartridge for the temporary punc-

ture repair kit...) by visiting a PEUGEOT 

dealer.   

10

154

TECHNICAL DATA

207CC_EN_CHAP10_CARACTERISTIQUES_ED01-2014


ENGINES AND GEARBOXES   


PETROL ENGINE  


1.6 litre VTi 120 hp   


GEARBOX  

  Manual  

  (5-speed)  

  Automatic  

  (4-speed)  

 Cubic capacity (cc) 

  1  598  

 Bore x stroke (mm) 

  77  x  85.8  

 Max power * : EU standard (kW) 

  88  

 Max power engine speed (rpm) 

  5  750  

 Max torque: EU standard (Nm) 

  160  

 Max torque engine speed (rpm) 

  4  250  

 Fuel 

  Unleaded  

 Catalytic  converter 

  Yes  


OIL    CAPACITY    (in litres)  


 Engine (with fi lter replacement) 

  4.25  

  4.25  

  *    The maximum power corresponds to the value type-approved on a test bed, under conditions defi ned in European legislation 

(Directive  1999/99/EC).  

10

TECHNICAL DATA

155

207CC_EN_CHAP10_CARACTERISTIQUES_ED01-2014

  The GTW and towed load values indicated apply up to a maximum altitude of 1 000 metres; the towed load mentioned must 

be reduced by 10 % for every additional 1 000 metres. 

 The speed of a towing vehicle must not exceed 60 mph (100 km/h) (comply with the legislation in force in your country). 

 High ambient temperatures may result in a reduction in the performance of the vehicle to protect the engine; when the ambi-

ent temperature is higher than 37 °C, limit the towed weight.   


WEIGHTS AND TOWED LOADS (in kg)   


Petrol engines  


1.6 litre VTi 120 hp   


Gearboxes  


Manual   


Auto.   

 - Unladen weight (kerb weight * ) 

  1  417  

  1  455  

 -  Payload 

  292  

  312  

 - Gross vehicle weight (GVW) 

  1  709  

  1  767  

 - Gross train weight (GVW) 


 on a 12% gradient 

  2  559  

  2  647  

 - Braked trailer (within GTW limit) 


 on a 10% or 12% gradient 

  -  

  -  

 -  Braked trailer **  (with load transfer within 

GTW limit) 

  1  040  

  1  060  

 - Unbraked trailer 

  600  

  600  

 - Recommended nose weight 

  42  

  43  

  * The kerb weight is equal to the unladen weight + driver (75 kg).  

  **     The weight of the braked trailer can be increased, within the GTW limit, on condition that the GVW of the towing vehicle is re-

duced by the same amount; warning: towing with a lightly loaded towing vehicle may have an adverse effect on its road holding.  

10

156

TECHNICAL DATA

207CC_EN_CHAP10_CARACTERISTIQUES_ED01-2014


ENGINES AND GEARBOXES   


DIESEL ENGINE  


1.6 litre HDi 112 hp   


GEARBOX  

  Manual  (6-speed)  

 Cubic capacity (cc) 

  1  560  

 Bore x stroke (mm) 

  75  x  88.3  

 Max power * : EU standard (kW) 

  80  

 Max power engine speed (rpm) 

  4  000  

 Max torque: EU standard (Nm) 

  240  

 Max torque engine speed (rpm) 

  1  750  

 Fuel 

  Diesel  

 Catalytic  converter 

  Yes  

 Particle emission fi lter 

  Yes  


OIL    CAPACITY    (in litres)  


 Engine (with fi lter replacement) 

  3.75  

  *    The maximum power corresponds to the value type-approved on a test bed, under conditions defi ned in European legislation 

(Directive  1999/99/EC).  

10

TECHNICAL DATA

157

207CC_EN_CHAP10_CARACTERISTIQUES_ED01-2014

  The GTW and towed load values indicated apply up to a maximum altitude of 1 000 metres; the towed load mentioned must 

be reduced by 10 % for every additional 1 000 metres. 

 The speed of a towing vehicle must not exceed 60 mph (100 km/h) (comply with the legislation in force in your country). 

 High ambient temperatures may result in a reduction in the performance of the vehicle to protect the engine; when the ambi-

ent temperature is higher than 37 °C, limit the towed weight.   


WEIGHTS AND TOWED LOADS (in kg)   


Diesel engine  


1.6 litre HDi 112 hp   


Gearbox  


Manual   

 - Unladen weight (kerb weight * ) 

  1  475  

 -  Payload 

  308  

 - Gross vehicle weight (GVW) 

  1  783  

 - Gross train weight (GTW) 


 on a 12% gradient 

  2  673  

 - Braked trailer (within GTW limit) 


 on a 10% or 12% gradient 

  -  

 -  Braked trailer **  (with load transfer within 

GTW limit) 

  1  070  

 - Unbraked trailer 

  600  

 - Recommended nose weight 

  43  

  * The kerb weight is equal to the unladen weight + driver (75 kg).  

  **    The weight of the braked trailer can be increased, within the GTW limit, on condition that the GVW of the towing vehicle is re-

duced by the same amount; warning: towing with a lightly loaded towing vehicle may have an adverse effect on its road holding.  

10

158

TECHNICAL DATA

207CC_EN_CHAP10_CARACTERISTIQUES_ED01-2014

DIMENSIONS (IN MM) 


Content   ..  8  9  10  11   ..