Nissan Qashqai (2007-2010). Manual - part 883
HA-102
< ON-VEHICLE REPAIR >
[AUTOMATIC AIR CONDITIONER (K9K)]
LIQUID TANK
LIQUID TANK
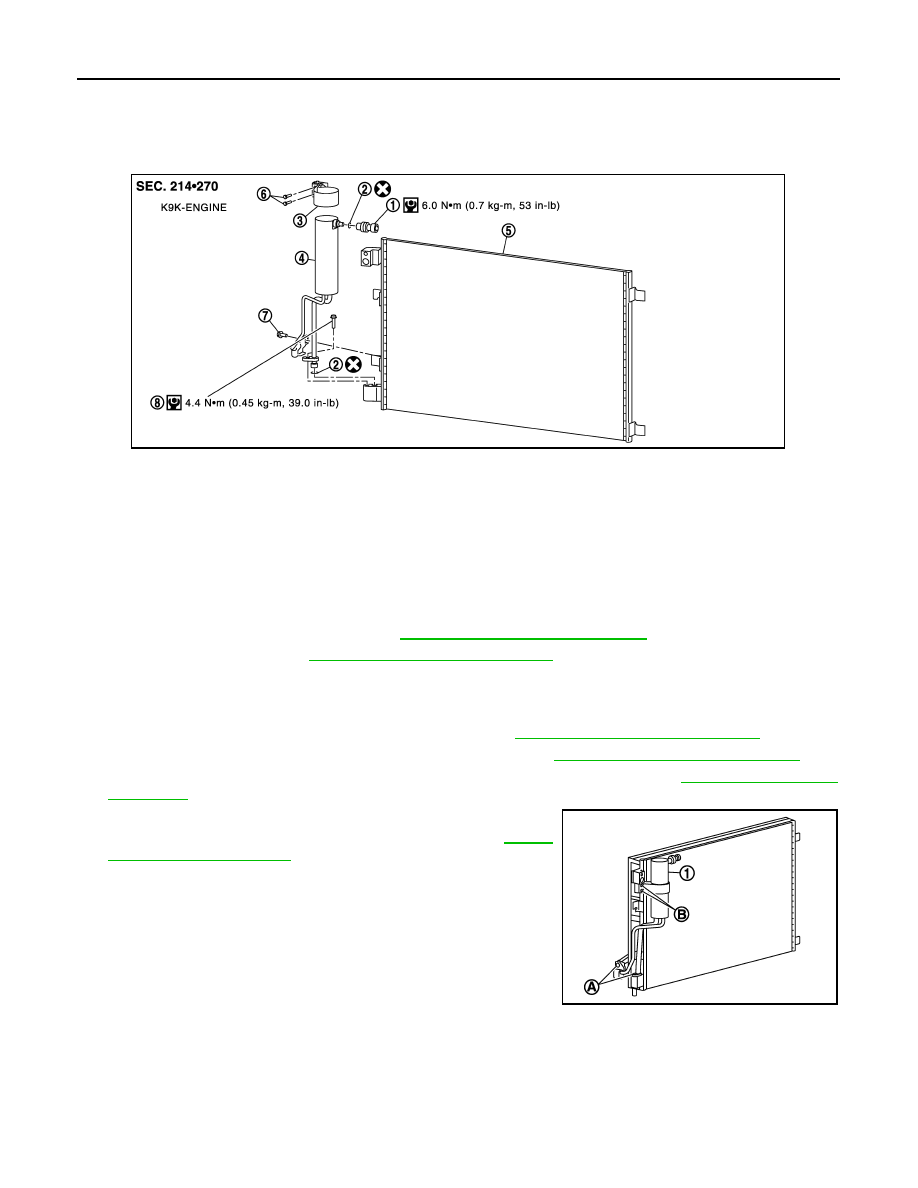
Exploded View
INFOID:0000000001093926
Removal and Installation
INFOID:0000000001093927
REMOVAL
1.
Use a refrigerant collecting equipment (for HFC-134a) to discharge the refrigerant.
2.
Remove engine cover ornament. Refer to
EM-266, "Removal and Installation"
3.
Remove front grille. Refer to
EXT-17, "Removal and Installation"
4.
Clean liquid tank and its surrounding area, and remove dust and rust from liquid tank.
CAUTION:
Be sure to clean carefully.
5.
Disconnect refrigerant sensor harness connector. Refer to
HA-103, "Removal and Installation"
6.
Remove air inlet tube and hose from change air cooler. Refer to
EM-266, "Removal and Installation"
.
7.
Remove radiator air-guide duct (RH) fixing clip to move air-guide duct. Refer to
.
8.
Remove liquid tank bracket support mounting screws (B).
9.
Remove high pressure pipe 1 mounting bolt (A). Refer to
10. Remove liquid tank high pressure pipe mounting bolt (A).
11. Remove liquid tank pipe bracket fixing screw (B).
CAUTION:
Cap or wrap the joint of high pressure pipe, liquid tank
pipes and condenser with suitable material such as vinyl
tape to avoid the entry of air.
12. Remove liquid tank assembly (1).
INSTALLATION
Install liquid tank, and then install liquid tank bracket on condenser.
CAUTION:
• Make sure liquid tank bracket is securely installed at protrusion of condenser. (Make sure liquid tank
bracket does not move to a position below center of liquid tank.)
• Replace O-rings of A/C piping with new ones, and then apply compressor oil to it when installing it.
• When recharging refrigerant, check for leaks.
1.
Refrigerant pressure sensor
2.
O-ring
3.
Liquid tank bracket
4.
Liquid tank
5.
Condensor
6.
Liquid tank fixing screw
7.
Liquid tank pipe fixing screw
8.
Liquid tank pipe fixing bolt
E1KIA0064GB
E1KIA0059ZZ