Nissan Qashqai (2007-2010). Manual - part 882
 

  Index      Nissan     Nissan Qashqai - service and repair manual 2007 - 2010 year


Search            copyright infringement  


Content   ..  880  881  882  883   ..


Nissan Qashqai (2007-2010). Manual - part 882


HA-98

< ON-VEHICLE REPAIR >

[AUTOMATIC AIR CONDITIONER (K9K)]

LOW-PRESSURE PIPE 1 AND HIGH-PRESSURE PIPE 2

LOW-PRESSURE PIPE 1 AND HIGH-PRESSURE PIPE 2

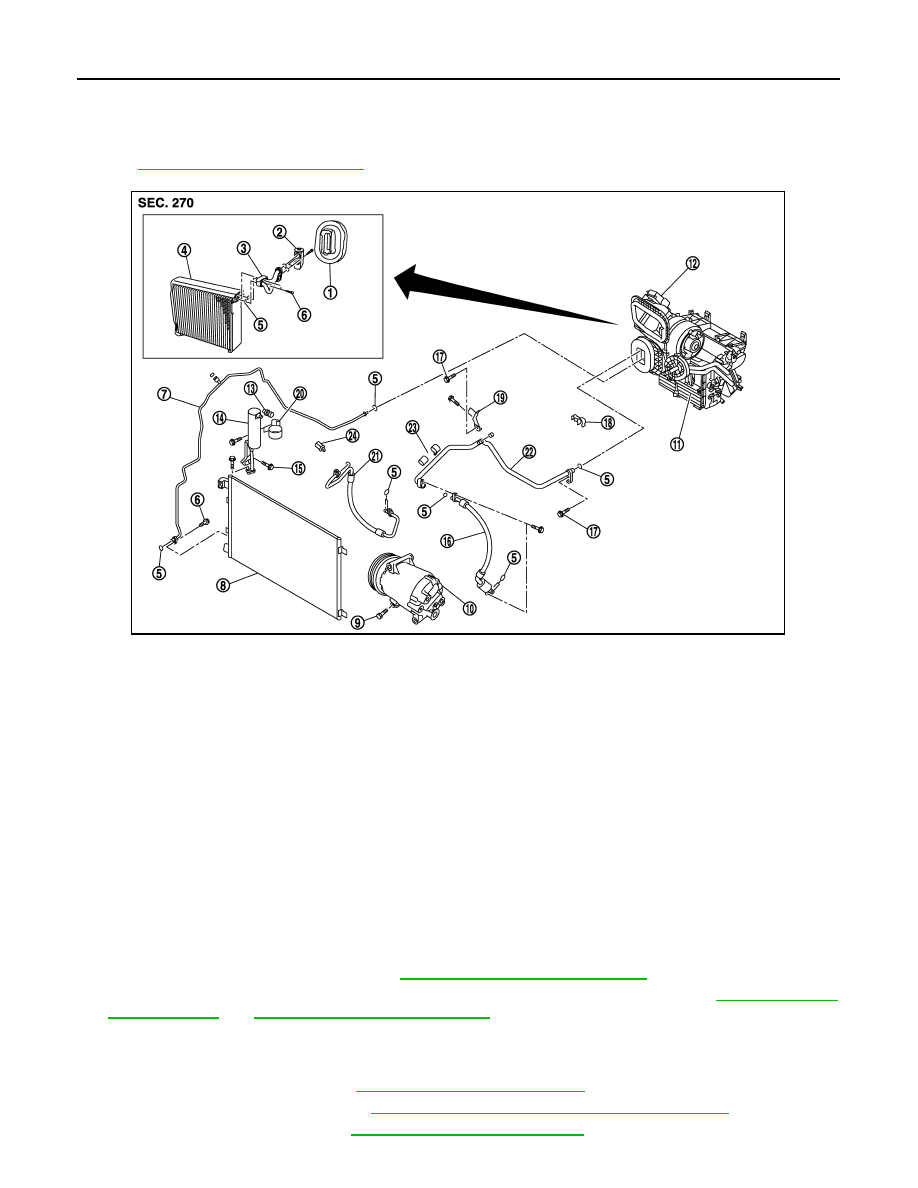
Exploded View

INFOID:0000000001093920

Refer to 

HA-69, "Refrigerant Connection"

.

Removal and Installation

INFOID:0000000001093921

REMOVAL

1.

Set the temperature at 18

°

C (60

°

F), and then disconnect the battery cable from the negative terminal.

2.

Use a refrigerant collecting equipment (for HFC-134a) to discharge the refrigerant.

3.

Remove engine cover ornament. Refer to 

EM-266, "Removal and Installation"

.

4.

Remove high-pressure pipe 1 and low pressure pipe 2 from expansion valve. Refer to 

HA-92, "Removal

and Installation"

 and 

HA-96, "Removal and Installation"

.

CAUTION:

Cap or wrap the joint of the, high-pressure pipe 1, low-pressure pipe 2, and the expansion valve
with suitable material such as vinyl tape to avoid the entry of air.

5.

Remove instrument panel. Refer to 

IP-12, "Removal and Installation"

.

6.

Remove foot duct (RH / LH). Refer to 

VTL-48, "FOOT DUCTS : Removal and Installation"

.

7.

Remove steering column. Refer to 

ST-10, "Removal and Installation"

.

1.

Heater sealing

2.

Expansion valve

3.

Low pressure pipe 1 and high pres-
sure pipe 2 assembly

4.

Evaporator

5.

O-ring

6.

Connector pipe fixing bolt

7.

High pressure pipe 1

8.

Condenser assembly

9.

Fixing bolt

10. Compressor

11.

Heater & cooling unit assembly

12. Heater & blower unit assembly

13. Refrigerant pressure sensor

14. Liquid tank

15. Liquid tank fixing screw

16. Low pressure flexible hose

17. Fixing bolt

18. Pipes fixing clip

19. Low & high pressure pipe bracket

20. Liquid tank fixing bracket

21. High pressure flexible hose

22. Low pressure pipe 2

23. Low pressure pipe fixing clamp as-

sembly

24. Pipe mantening clip

E1KIA0063GB

LOW-PRESSURE PIPE 1 AND HIGH-PRESSURE PIPE 2

HA-99

< ON-VEHICLE REPAIR >

[AUTOMATIC AIR CONDITIONER (K9K)]

C

D

E

F

G

H

J

K

L

M

A

B

HA

N

O

P

8.

Remove steering member. Refer to 

ST-15, "Removal and Installation"

.

9.

Remove heater and cooling assembly. Refer to 

VTL-32, "Removal and Installation"

.

10. Remove mounting screws, and then remove evaporator cover

(1).

11. Using a thin cutter, cut the evaporator insulator (B), and remove

fixing bolt (A) then remove low-pressure pipe 1 and high-pres-
sure pipe 2 assembly.

CAUTION:

Cap or wrap the joint of expansion valve, high-pressure
pipe 2 and low-pressure pipe 1 with suitable material such
as vinyl tape to avoid the entry of air.

INSTALLATION

Installation is basically the reverse order of removal.

CAUTION:

• Replace O-rings of high-pressure pipe 1, 2 and low-pressure pipe 1, 2 with new ones, and then apply

compressor oil to it when installing it.

• Female-side piping connection is thin and easy to deform. Slowly insert the male-side piping

straight in axial direction.

• Insert piping securely until a click is heard.
• After piping connection is completed, pull male-side piping by hand to make sure that connection

does not come loose.

• When recharging refrigerant, check for leaks.

E1KIA0048ZZ

E1KIA0049ZZ

HA-100

< ON-VEHICLE REPAIR >

[AUTOMATIC AIR CONDITIONER (K9K)]

CONDENSER

CONDENSER

Exploded View

INFOID:0000000001093922

Removal and Installation

INFOID:0000000001093923

REMOVAL

1.

Use a refrigerant collecting equipment (for HFC-134a) to discharge the refrigerant.

2.

Remove engine cover ornament. Refer to 

EM-266, "Removal and Installation"

.

3.

Remove front grille. Refer to 

EXT-17, "Removal and Installation"

.

4.

Remove radiator hose, and drain coolant. Refer to 

CO-56, "Removal and Installation"

.

5.

Remove upper radiator fixing bracket. Refer to 

CO-56, "Removal and Installation"

.

6.

Remove radiator air-guide duct (RH). Refer to 

CO-56, "Removal and Installation"

.

7.

Remove high-pressure pipe 1 from condenser. Refer to 

HA-96, "Removal and Installation"

.

8.

Remove high-pressure flexible pipe 1 from condenser. Refer to 

HA-94, "Removal and Installation"

.

CAUTION:

Cap or wrap the joint of low and high-pressure pipe 1 and condenser with suitable material such
as vinyl tape to avoid the entry of air.

9.

Remove harness connector from refrigerant  pressure sensor.

10. Remove liquid tank pipes and liquid tank from condenser and radiator. Refer to 

HA-102, "Removal and

Installation"

, Refer to 

CO-56, "Removal and Installation"

.

CAUTION:

Cap or wrap the joint of liquid tank pipes and condenser  with suitable material such as vinyl tape
to avoid the entry of air.

11. Remove radiator fixing brackets. Refer to 

CO-56, "Removal and Installation"

.

12. Release radiator maintaining pawls, then pull-up the condenser assembly to release it from radiator. Refer

to 

CO-56, "Removal and Installation"

.

13. Maintain radiator pushing back.
14. Pull upward to remove condenser.

CAUTION:

Take care do not damaged condenser or radiator.

INSTALLATION

Installation is basically the reverse order of removal.

CAUTION:

1.

Refrigerant pressure sensor

2.

O-ring

3.

Liquid tank bracket

4.

Liquid tank

5.

Condensor

6.

Liquid tank fixing screw

7.

Liquid tank pipe fixing screw

8.

Liquid tank pipe fixing bolt

E1KIA0064GB

CONDENSER

HA-101

< ON-VEHICLE REPAIR >

[AUTOMATIC AIR CONDITIONER (K9K)]

C

D

E

F

G

H

J

K

L

M

A

B

HA

N

O

P

• Replace O-rings of high-pressure flexible hose and high-pressure pipe 1 with new ones, and then

apply compressor oil to it when installing it.

• Female-side piping connection is thin and easy to deform. Slowly insert the male-side piping

straight in axial direction.

• Insert piping securely until a click is heard.
• After piping connection is completed, pull male-side piping by hand to make sure that connection

does not come loose.

• When recharging refrigerant, check for leaks.


Content   ..  880  881  882  883   ..