Nissan Qashqai (2007-2010). Manual - part 1999


  Index      Nissan     Nissan Qashqai - service and repair manual 2007 - 2010 year


Search            copyright infringement  


Content   ..  1997  1998  1999  2000   ..


Nissan Qashqai (2007-2010). Manual - part 1999


ENGINE MAINTENANCE (MR20DE)

MA-35

< ON-VEHICLE MAINTENANCE >

C

D

E

F

G

H

I

J

K

L

M

B

MA

N

O

A

RADIATOR CAP

RADIATOR CAP : Inspection

INFOID:0000000001095651

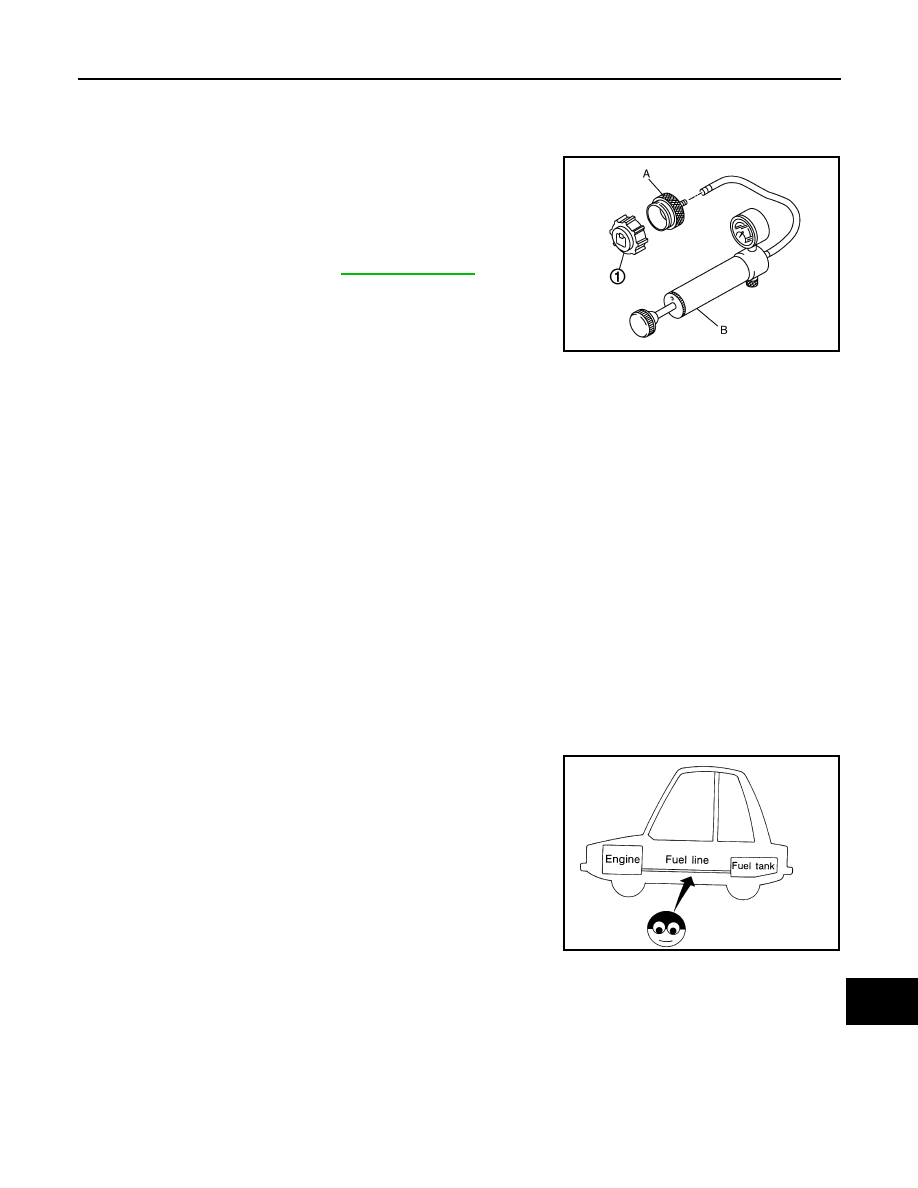
• Fit the adapter to the reservoir tank cap tester [SST: — (M.S.554-

07)] (A) as shown.

• When connecting the reservoir tank cap to the reservoir tank cap

tester, apply water or LLC to the reservoir tank cap seal part.

• Check reservoir tank cap relief pressure.

• Replace the reservoir tank cap if the engine coolant passes

through it, or if any fur signs is detected.

CAUTION:

When installing reservoir tank cap, thoroughly wipe out the res-
ervoir tank filler neck to remove any waxy residue or foreign
material.

RADIATOR

RADIATOR : Inspection

INFOID:0000000001095652

Check radiator for mud or clogging. If necessary, clean radiator as follows.

CAUTION:

• Be careful not to bend or damage radiator fins.
• When radiator is cleaned without removal, remove all surrounding parts such as radiator cooling fan

assembly and horns. Then tape harness and connectors to prevent water from entering.

1.

Apply water by hose to the back side of the radiator core vertically downward.

2.

Apply water again to all radiator core surfaces once per minute.

3.

Stop washing if any stains no longer flow out from radiator.

4.

Blow air into the back side of radiator core vertically downward.
• Use compressed air lower than 490 kPa (5 kg/cm

2

, 71 psi) and keep distance more than 30 cm (11.8 in). 

5.

Blow air again into all the radiator core surfaces once per minute until no water sprays out.

FUEL LINES

FUEL LINES : Inspection

INFOID:0000000001095721

Inspect fuel lines, filler cap and tank for improper attachment, leaks,
cracks, damage, loose connections, chafing or deterioration.
If necessary, repair or replace damaged parts.

AIR CLEANER FILTER

AIR CLEANER FILTER : Removal and Installation

INFOID:0000000001095661

REMOVAL

Standard and limit: Refer to 

CO-46, "Radiator"

.

JPBIA0405ZZ

SMA803A

MA-36

< ON-VEHICLE MAINTENANCE >

ENGINE MAINTENANCE (MR20DE)

1.

Unhook clips (A) and remove holder (2) from air cleaner case
(1).

2.

Remove air cleaner filter (1) from air cleaner case (2).

INSTALLATION

Note the following, and install in the reverse order of removal.
• Install the air cleaner filter by aligning the seal with the notch of air cleaner case.

ENGINE OIL

ENGINE OIL : Draining

INFOID:0000000001095670

WARNING:

• Be careful not to get burned, as engine oil may be hot.
• Prolonged and repeated contact with used engine oil may cause skin cancer. Try to avoid direct skin

contact with used engine oil. If skin contact is made, wash thoroughly with soap or hand cleaner as
soon as possible. 

1.

Warm up the engine, and check for engine oil leakage from engine components. Refer to 

LU-14, "Inspec-

tion"

.

2.

Stop the engine and wait for 10 minutes.

3.

Loosen oil filler cap.

4.

Remove drain plug and then drain engine oil.

ENGINE OIL : Refilling

INFOID:0000000001095671

1.

Install drain plug with new washer. Refer to 

EM-152, "Exploded View"

.

CAUTION:

Be sure to clean drain plug and install with new washer.

2.

Refill with new engine oil.
Engine oil specification and viscosity: Refer to 

MA-21, "Fluids and Lubricants"

.

CAUTION:

• The refill capacity depends on the engine oil temperature and drain time. Use these specifica-

tions for reference only.

JPBIA0464ZZ

JPBIA0465ZZ

Tightening torque

: Refer to 

EM-152, "Exploded View"

.

Engine oil capacity

Refer to 

LU-20, "Periodical Maintenance Specification"

.

ENGINE MAINTENANCE (MR20DE)

MA-37

< ON-VEHICLE MAINTENANCE >

C

D

E

F

G

H

I

J

K

L

M

B

MA

N

O

A

• Always use oil level gauge to determine the proper amount of engine oil in the engine.

3.

Warm up engine and check area around drain plug and oil filter for engine oil leakage.

4.

Stop engine and wait for 10 minutes.

5.

Check the engine oil level. Refer to 

LU-14, "Inspection"

.

OIL FILTER

OIL FILTER : Removal and Installation

INFOID:0000000001116098

REMOVAL

• Using oil filter wrench [SST: KV10115801] (A), remove oil filter.

CAUTION:

• Oil filter is provided with relief valve. Use Genuine NISSAN

Oil Filter or equivalent.

• Be careful not to get burned when engine and engine oil

may be hot.

• When removing, prepare a shop cloth to absorb any engine

oil leakage or spillage.

• Completely wipe off any engine oil that adheres to engine and vehicle.

INSTALLATION

1.

Remove foreign materials adhering to the oil filter installation surface.

2.

Apply new engine oil to the oil seal contact surface of new oil fil-
ter.

3.

Screw oil filter manually until it touches the installation surface,
then tighten it by 2/3 turn. Or tighten to specification.

OIL FILTER : Inspection

INFOID:0000000001095673

INSPECTION AFTER INSTALLATION

1.

Check the engine oil level. Refer to 

LU-14, "Inspection"

.

2.

Start the engine, and check there is no leak of engine oil.

3.

Stop the engine and wait for 10 minutes.

4.

Check the engine oil level, and adjust the level. Refer to 

LU-14, "Inspection"

.

SPARK PLUG

1

: Oil pan (lower)

: Vehicle front

PBIC3916E

SMA010

Oil filter:

: 17.7 N·m (1.8 kg-m, 13 ft-lb)

SMA229B

MA-38

< ON-VEHICLE MAINTENANCE >

ENGINE MAINTENANCE (MR20DE)

SPARK PLUG : Removal and Installation

INFOID:0000000001095674

REMOVAL

1.

Remove ignition coil. Refer to 

EM-160, "Exploded View"

.

2.

Remove spark plug with a spark plug wrench (commercial ser-
vice tool).

INSTALLATION

Installation is the reverse order of removal.

SPARK PLUG : Inspection

INFOID:0000000001095675

INSPECTION AFTER REMOVAL

Use the standard type spark plug for normal condition.

CAUTION:

• Never drop or shock spark plug.
• Never use a wire brush for cleaning.
• If plug tip is covered with carbon, spark plug cleaner may be

used.

• Checking and adjusting plug gap is not required between

change intervals.

EVAP VAPOR LINES

EVAP VAPOR LINES : Inspection

INFOID:0000000001109408

Refer to 

EC-980, "Inspection"

(WITH EURO-OBD), 

EC-1256, "Inspection"

(WITHOUT EURO-OBD).

PBIC3871E

Spark plug (standard)

: Refer to 

EM-236, "Spark Plug"

.

Cleaner air pressure:

Less than 588 kPa (6 kg/cm

2

, 85 psi)

Cleaning time:

Less than 20 seconds

SMA773C

JPBIA0031ZZ


Content   ..  1997  1998  1999  2000   ..