Nissan Qashqai (2007-2010). Manual - part 1199


  Index      Nissan     Nissan Qashqai - service and repair manual 2007 - 2010 year


Search            copyright infringement  


Content   ..  1197  1198  1199  1200   ..


Nissan Qashqai (2007-2010). Manual - part 1199


FUEL FILLER LID OPENER

DLK-875

< ON-VEHICLE REPAIR >

[WITHOUT I-KEY, WITH SUPER LOCK]

C

D

E

F

G

H

I

J

L

M

A

B

DLK

N

O

P

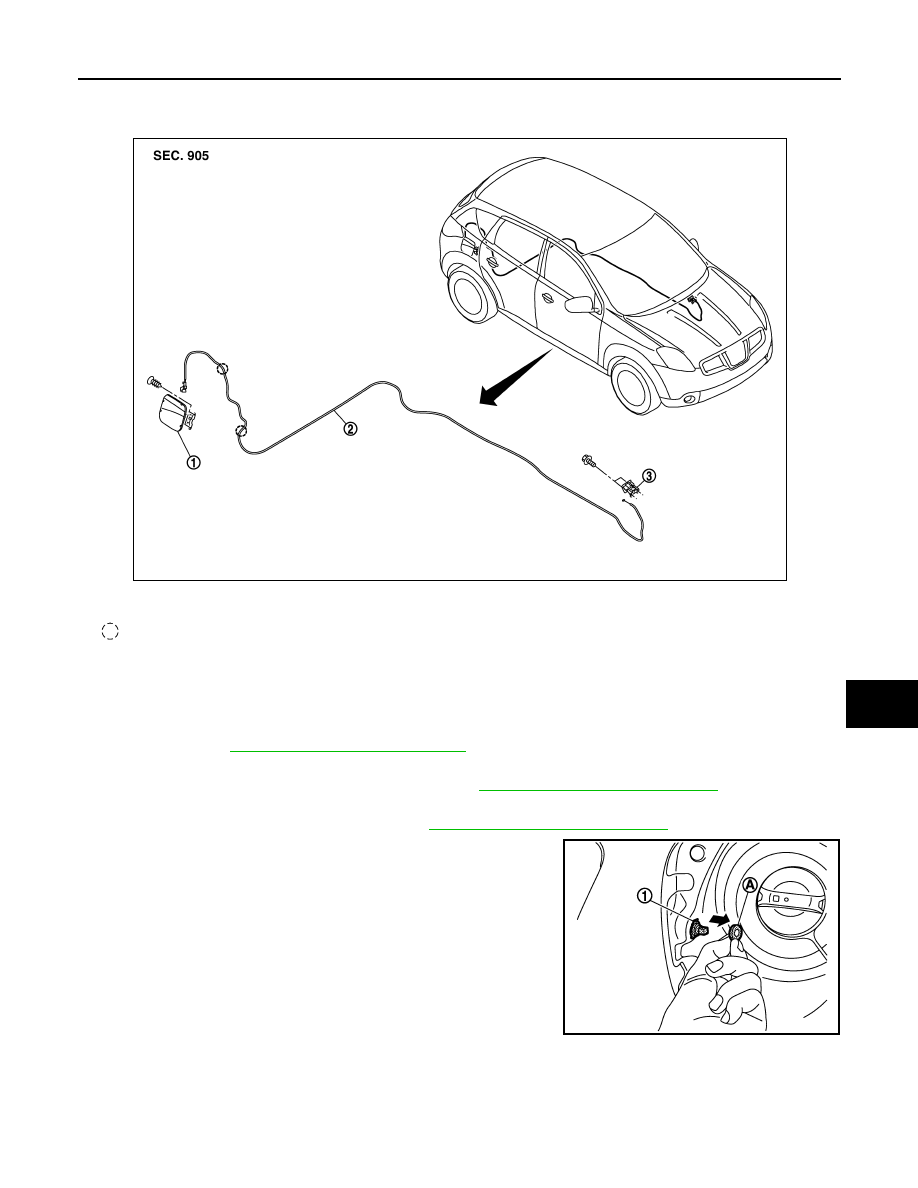
FUEL FILLER OPENER CABLE : Exploded View

INFOID:0000000001098813

FUEL FILLER OPENER CABLE : Removal and Installation

INFOID:0000000001098814

REMOVAL

1.

Remove the rear seat cushion, rear seatback, seatback lower support, and seatback mounting outer
bracket. Refer to 

SE-31, "Removal and Installation"

2.

Remove the dash side finisher, front kicking plate inner, rear kicking plate inner, center pillar lower gar-
nish, and luggage side lower finisher (front). Refer to 

INT-14, "Removal and Installation"

.

3.

Remove the parcel shelf, luggage floor carpet, luggage floor spacer, luggage rear plate, luggage side
lower finisher, and rear pillar finisher. Refer to 

INT-24, "Removal and Installation"

.

4.

Remove the fuel filler lock seal (1).

1.

Fuel filler lid assembly

2.

Fuel filler opener cable

3.

Fuel opener lever

: Clip

JMKIA0187ZZ

JMKIA0182ZZ

DLK-876

< ON-VEHICLE REPAIR >

[WITHOUT I-KEY, WITH SUPER LOCK]

FUEL FILLER LID OPENER

5.

Rotate the fuel filler lock, and then remove the fuel filler lock. 

6.

Remove the fuel filler opener cable mounting clips and the clamps.

7.

Remove the mounting bolts, and then remove the fuel filler lid
opener lever. 

8.

Remove the fuel filler opener cable.

INSTALLATION

Install in the reverse order of removal.

CAUTION:

Check the fuel filler lid open/close operation after installation.

PIIB7988J

JMKIA0183ZZ

DOOR SWITCH

DLK-877

< ON-VEHICLE REPAIR >

[WITHOUT I-KEY, WITH SUPER LOCK]

C

D

E

F

G

H

I

J

L

M

A

B

DLK

N

O

P

DOOR SWITCH

Exploded View

INFOID:0000000001095599

Refer to 

DLK-877, "Removal and Installation"

.

Removal and Installation

INFOID:0000000001095600

REMOVAL

1.

Remove the door switch mounting bolt (A), and then remove
door switch (1).
NOTE:
The same procedure is also performed for door switch (passen-
ger side, rear LH and rear RH).

INSTALLATION

Install in the reverse order of removal.

JMKIA0451ZZ

1.

Door switch (driver side)

JMKIA0452ZZ

DLK-878

< ON-VEHICLE REPAIR >

[WITHOUT I-KEY, WITH SUPER LOCK]

BACK DOOR OPENER SWITCH

BACK DOOR OPENER SWITCH

Exploded View

INFOID:0000000001116794

Refer to 

DLK-878, "Removal and Installation"

.

Removal and Installation

INFOID:0000000001116795

REMOVAL

1.

Remove the back door finisher.
Refer to 

EXT-31, "Exploded View"

 and 

EXT-31, "Removal and Installation"

.

2.

Remove the back door opener switch (1) from back door finisher
(2) using flat-bladed screw driver (A) etc.

INSTALLATION

Install in the reverse order of removal.

JMKIA0516ZZ

1.

Back door opener switch

2.

Back door finisher

JMKIA0519ZZ


Content   ..  1197  1198  1199  1200   ..