Nissan Qashqai (2007-2010). Manual - part 116
 

  Index      Nissan     Nissan Qashqai - service and repair manual 2007 - 2010 year


Search            copyright infringement  


Content   ..  114  115  116  117   ..


Nissan Qashqai (2007-2010). Manual - part 116


DESCRIPTION

CO-47

< FUNCTION DIAGNOSIS >

[K9K]

C

D

E

F

G

H

I

J

K

L

M

A

CO

N

P

O

FUNCTION DIAGNOSIS

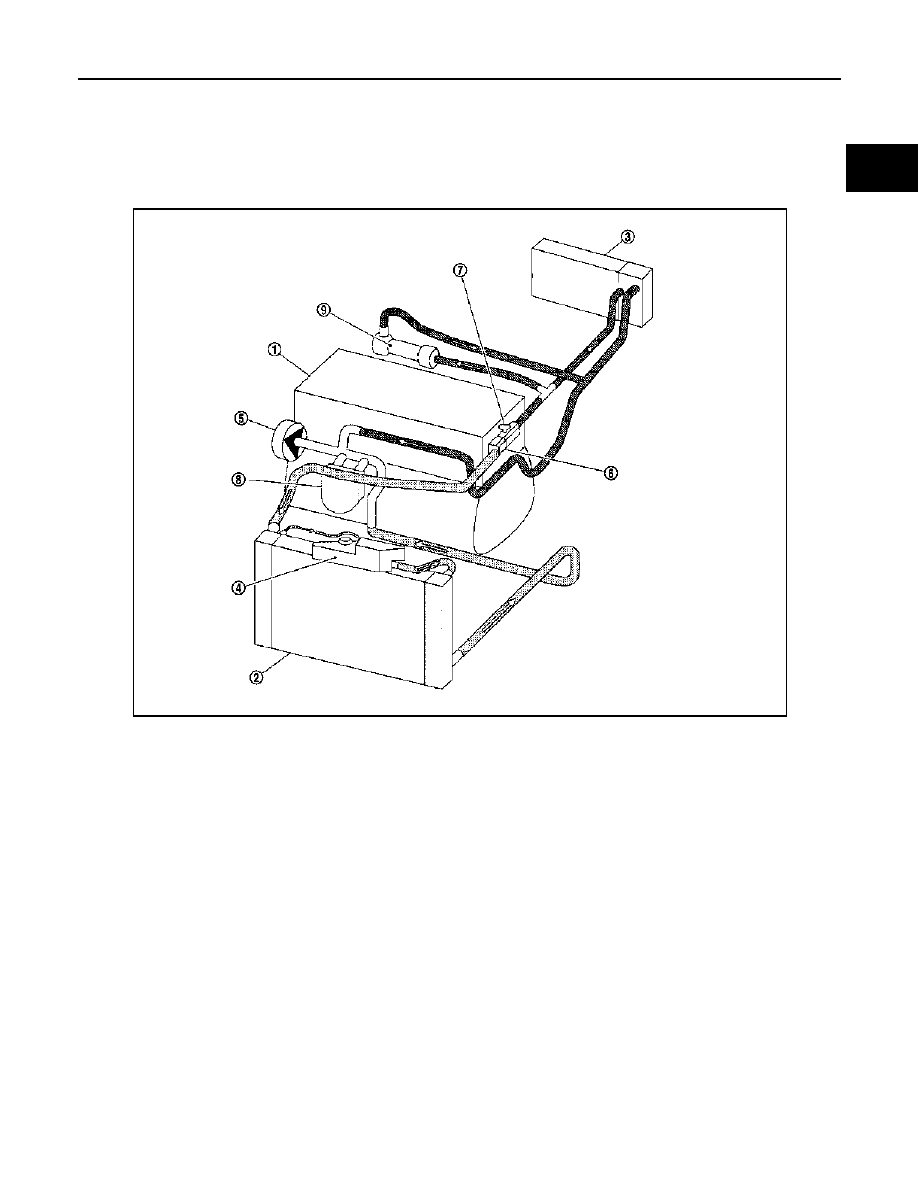
DESCRIPTION

Engine Cooling System

INFOID:0000000001062324

1.

Engine

2.

Radiator

3.

Heater core

4.

Reservoir tank

5.

Water pump

6.

Thermostat

7.

Air relief plug

8.

Oil cooler

9.

EGR cooler

MBIB9046E

CO-48

< SYMPTOM DIAGNOSIS >

[K9K]

OVERHEATING CAUSE ANALYSIS

SYMPTOM DIAGNOSIS

OVERHEATING CAUSE ANALYSIS

Troubleshooting Chart

INFOID:0000000001062495

Symptom

Check items

Cooling sys-
tem parts 
malfunction

Poor heat transfer

Water pump malfunction

Worn timing belt

Thermostat stuck closed

Damaged fins

Dust contamination or pa-
per clogging

Mechanical damage

Clogged radiator cooling 
tube

Excess foreign material 
(rust, dirt, sand, etc.)

Reduced air flow

Cooling fan does not oper-
ate

Fan assembly

High resistance to fan rota-
tion

Damaged fan blades

Damaged radiator shroud

Improper coolant mixture 
ratio

Poor coolant quality

Insufficient coolant

Coolant leaks

Cooling hose

Loose clamp

Cracked hose

Water pump

Poor sealing

Reservoir tank cap

Loose

Poor sealing

Radiator

O-ring for damage, deterio-
ration or improper fitting

Cracked radiator tank

Cracked radiator core

Reservoir tank

Cracked reservoir tank

Overflowing reservoir tank

Exhaust gas leaks into cool-
ing system

Cylinder head deterioration

Cylinder head gasket deteri-
oration

OVERHEATING CAUSE ANALYSIS

CO-49

< SYMPTOM DIAGNOSIS >

[K9K]

C

D

E

F

G

H

I

J

K

L

M

A

CO

N

P

O

Except cool-
ing system 
parts mal-
function

Overload on engine

Abusive driving

High engine rpm under no 
load

Driving in low gear for ex-
tended time

Driving at extremely high 
speed

Powertrain system malfunc-
tion

Installed improper size 
wheels and tires

Dragging brakes

Improper ignition timing

Blocked or restricted air 
flow

Blocked bumper

Blocked radiator grille

Installed car brassiere

Mud contamination or paper 
clogging

Blocked radiator

Blocked condenser

Installed large fog lamp

Symptom

Check items

CO-50

< PRECAUTION >

[K9K]

PRECAUTIONS

PRECAUTION

PRECAUTIONS

Precaution for Liquid Gasket

INFOID:0000000001062496

REMOVAL OF LIQUID GASKET

• After removing the mounting bolts and nuts, separate the mating

surface using a seal cutter and remove the liquid gasket.

CAUTION:

Be careful not to damage the mating surfaces.

• In areas where the cutter is difficult to use, use a plastic hammer to

lightly tap the gasket applied area.

CAUTION:

If for some unavoidable reason a tool such as a flat-bladed
screwdriver is used, be careful not to damage the mating sur-
faces.

LIQUID GASKET APPLICATION PROCEDURE 

1.

Using a scraper, remove the old liquid gasket adhering to the
gasket application surface and the mating surface.
• Remove the liquid gasket completely from the groove of the

gasket application surface, mounting bolts and bolt holes.

2.

Wipe the gasket application surface and the mating surface with
white gasoline (lighting and heating use) to remove adhering
moisture, grease and foreign materials.

3.

Attach the liquid gasket to the tube presser.
Use Genuine Liquid Gasket or equivalent.

4.

Apply the gasket without breaks to the specified location with the
specified dimensions.
• If there is a groove for the liquid gasket application, apply the

gasket to the groove.

• As for the bolt holes, normally apply the gasket inside the

holes. If specified, it should be applied outside the holes. Make
sure to read the manual in this instruction.

• Within five minutes of gasket application, install the mating

component.

• If the liquid gasket protrudes, wipe it off immediately.
• Do not retighten after the installation.
• After 30 minutes or more have passed from the installation, fill

the engine oil and coolant.

CAUTION:

If there are manuals in this instruction, observe them.

PBIC0275E

PBIC0003E

EMA0622D

SEM159F


Content   ..  114  115  116  117   ..