Nissan Qashqai (2007-2010). Manual - part 114
 

  Index      Nissan     Nissan Qashqai - service and repair manual 2007 - 2010 year


Search            copyright infringement  


Content   ..  112  113  114  115   ..


Nissan Qashqai (2007-2010). Manual - part 114


WATER PUMP

CO-39

< ON-VEHICLE REPAIR >

[MR20DE]

C

D

E

F

G

H

I

J

K

L

M

A

CO

N

P

O

WATER PUMP

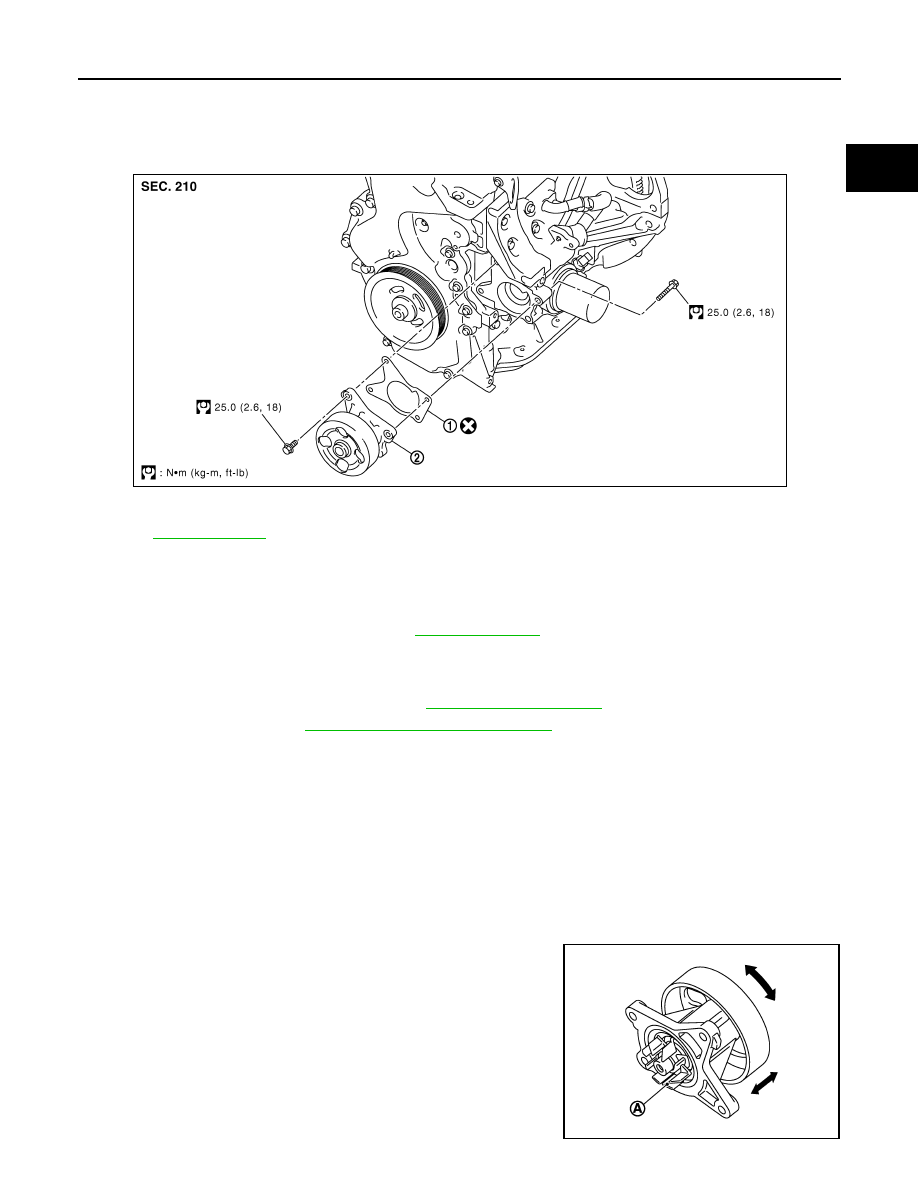
Exploded View

INFOID:0000000000905161

Removal and Installation

INFOID:0000000000905162

REMOVAL

1.

Drain engine coolant from radiator. Refer to 

CO-30, "Draining"

.

CAUTION:

• Perform this step when the engine is cold.
• Never spill engine coolant on drive belts.

2.

Remove front fender protector (RH). Refer to 

EXT-21, "Exploded View"

.

3.

Remove drive belt. Refer to 

EM-143, "Removal and Installation"

.

4.

Remove water pump.
• Engine coolant will leak from cylinder block, so have a receptacle ready below.

CAUTION:

• Handle water pump vane so that it does not contact any other parts.
• Water pump cannot be disassemble and should replaced as a unit.

INSTALLATION

Install in the reverse order of removal.

Inspection

INFOID:0000000000905163

INSPECTION AFTER REMOVAL

• Visually check if there is no significant dirt or rusting on water

pump body and vane (A).

• Make sure that there is no looseness in vane shaft, and that it turns

smoothly when rotated by hand.

• Replace water pump, if necessary.

1.

Gasket

2.

Water pump

Refer to  

GI-4, "Components"

 for symbols in the figure.

PBIC3921E

PBIC3313J

CO-40

< ON-VEHICLE REPAIR >

[MR20DE]

WATER PUMP

INSPECTION AFTER INSTALLATION

• Check that the reservoir tank cap is tightened.
• Check for leaks of engine coolant using the adapter and the reservoir tank cap tester [SST: — (M.S. 554-07).

Refer to 

CO-30, "Inspection"

.

• Start and warm up the engine. Visually make sure that there is no leaks of engine coolant.

THERMOSTAT

CO-41

< ON-VEHICLE REPAIR >

[MR20DE]

C

D

E

F

G

H

I

J

K

L

M

A

CO

N

P

O

THERMOSTAT

Exploded View

INFOID:0000000000905165

Removal and Installation

INFOID:0000000000905166

REMOVAL

1.

Drain engine coolant from radiator. Refer to 

CO-30, "Draining"

CAUTION:

• Perform this step when engine is cold.
• Never spill engine coolant on drive belt.

2.

Disconnect the battery cable from the negative terminal. Refer to 

PG-118, "Exploded View"

.

3.

Add paint mark, then disconnect radiator hose (lower) from water inlet. Refer to 

CO-34, "Exploded View"

.

4.

Remove water inlet and thermostat.
• Engine coolant will leak from cylinder block, so have a receptacle ready below.

5.

Remove thermostat housing with the following procedure:

a.

Remove water pump. Refer to 

CO-39, "Exploded View"

.

1.

Thermostat housing

2.

Clamp (CVT models)

3.

Water hose (CVT models)

4.

Heater thermostat (CVT models)

5.

Water hose (CVT models)

6.

Radiator hose (lower)

7.

Water inlet

8.

Thermostat

9.

Rubber ring

10. Gasket

A.

To CVT fluid cooler

B.

To radiator

C.

To oil cooler

D.

To reservoir tank

: Engine front

Refer to 

GI-4, "Components"

 for symbols in the figure.

JPBIA0315GB

CO-42

< ON-VEHICLE REPAIR >

[MR20DE]

THERMOSTAT

b.

Remove alternator. Refer to 

CHG-29, "MR20DE MODELS : Exploded View"

.

c.

Disconnect water hoses.

INSTALLATION

Note the following, and install in the reverse order of removal.

Thermostat 

• Install thermostat with making rubber ring (1) groove fit to thermo-

stat flange (A) with the whole circumference. 

• Install thermostat (1) with jiggle valve (A) facing upwards. 

Inspection

INFOID:0000000000905167

INSPECTION AFTER REMOVAL

WARNING:

Use a protector to prevent a burn during the work.

Thermostat

• Place a thread (A) so that it is caught in the valves of thermostat

(1). Immerse fully in a container (B) filled with water. Heat while
stirring.

• The valve opening temperature is the temperature at which the

valve opens and falls from the thread.

• Continue heating. Check the full open valve lift amount.
• After checking the maximum valve lift amount, lower the water

temperature and check the valve closing temperature. 

• If out of the standard, replace thermostat.

Heater Thermostat (CVT models)

PBIC3315J

2

: Cylinder block

PBIC3548J

Standard: Refer to 

CO-46, "Thermostat"

.

PBIC3314J


Content   ..  112  113  114  115   ..