Nissan Qashqai (2007-2010). Manual - part 1109


  Index      Nissan     Nissan Qashqai - service and repair manual 2007 - 2010 year


Search            copyright infringement  


Content   ..  1107  1108  1109  1110   ..


Nissan Qashqai (2007-2010). Manual - part 1109


REAR DOOR

DLK-515

< ON-VEHICLE REPAIR >

[WITH I-KEY & SUPER LOCK]

C

D

E

F

G

H

I

J

L

M

A

B

DLK

N

O

P

DOOR HINGE : Removal and Installation

INFOID:0000000001098516

REMOVAL

1.

Remove the center pillar lower garnish and the center pillar upper garnish. Refer to 

INT-14, "Removal and

Installation"

.

2.

Remove the rear door assembly. Refer to 

DLK-242, "DOOR ASSEMBLY : Removal and Installation"

.

3.

Remove the rear door hinge mounting bolts and nuts (body side), and then remove the door hinge.

INSTALLATION

Install in the reverse order of removal.

CAUTION:

• When removing and installing the rear door assembly, perform the fitting adjustment. Refer to 

DLK-

848, "DOOR ASSEMBLY : Adjustment"

.

• Check the door hinge rotating part for poor lubrication. If necessary, apply body grease.
• After installing, apply the touch-up paint (the body color) onto the head of the hinge mounting nuts.
• Check the rear door open/close operation after installation.

DOOR CHECK LINK

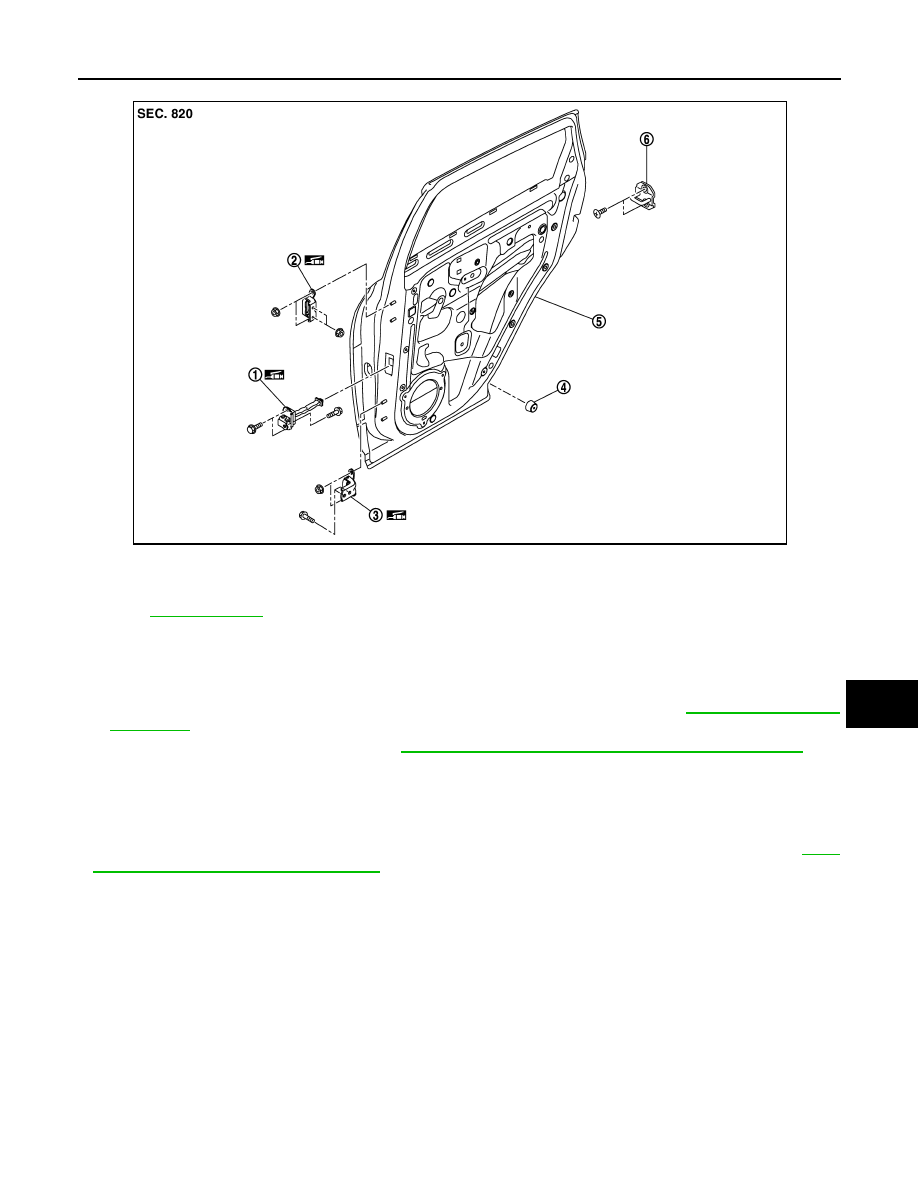
DOOR CHECK LINK : Exploded View

INFOID:0000000001098518

1.

Door check link

2.

Door hinge (upper)

3.

Door hinge (lower)

4.

Bumper rubber

5.

Rear door panel

6.

Door striker

Refer to 

GI-4, "Components"

 for symbols in the figure.

JMKIA0180ZZ

DLK-516

< ON-VEHICLE REPAIR >

[WITH I-KEY & SUPER LOCK]

REAR DOOR

DOOR CHECK LINK : Removal and Installation

INFOID:0000000001098520

REMOVAL

1.

Remove the rear door finisher. Refer to 

INT-10, "FRONT DOOR FINISHER : Removal and Installation"

.

2.

Remove the rear door sealing screen.

3.

Remove the mounting bolts of the check link on the vehicle.

4.

Remove the door check link cover, and then remove the door check link mounting bolts.

5.

Remove the door check link.

INSTALLATION

Install in the reverse order of removal.

CAUTION:

Check front door open/close operation after installation.

DOOR CHECK LINK : Removal and Installation

INFOID:0000000001098521

REMOVAL

1.

Door check link

2.

Door hinge (upper)

3.

Door hinge (lower)

4.

Bumper rubber

5.

Rear door panel

6.

Door striker

Refer to 

GI-4, "Components"

 for symbols in the figure.

JMKIA0180ZZ

PIIB6543E

REAR DOOR

DLK-517

< ON-VEHICLE REPAIR >

[WITH I-KEY & SUPER LOCK]

C

D

E

F

G

H

I

J

L

M

A

B

DLK

N

O

P

1.

Remove the rear door finisher. Refer to 

INT-10, "FRONT DOOR FINISHER : Removal and Installation"

.

2.

Remove the rear door sealing screen.

3.

Remove the mounting bolts of the check link on the vehicle.

4.

Remove the door check link cover, and then remove the door check link mounting bolts.

5.

Remove the door check link.

INSTALLATION

Install in the reverse order of removal.

CAUTION:

Check front door open/close operation after installation.

PIIB6543E

DLK-518

< ON-VEHICLE REPAIR >

[WITH I-KEY & SUPER LOCK]

BACK DOOR

BACK DOOR

BACK DOOR ASSEMBLY

BACK DOOR ASSEMBLY : Exploded View

INFOID:0000000001098525

REMOVAL

ADJUSTMENT

1.

Back door hinge

2.

Back door assembly

3.

Back door lock assembly

4.

Bumper rubber bracket

5.

Back door stay bracket (lower)

6.

Bumper rubber

7.

Back door stay

8.

Back door stay bracket (upper)

9.

Back door striker

Refer to 

GI-4, "Components"

 for symbols in the figure.

JMKIA0186ZZ


Content   ..  1107  1108  1109  1110   ..