Nissan Qashqai (2007-2010). Manual - part 1038


  Index      Nissan     Nissan Qashqai - service and repair manual 2007 - 2010 year


Search            copyright infringement  


Content   ..  1036  1037  1038  1039   ..


Nissan Qashqai (2007-2010). Manual - part 1038


RADIATOR CORE SUPPORT

DLK-231

< ON-VEHICLE REPAIR >

[WITH I-KEY, WITHOUT SUPER LOCK]

C

D

E

F

G

H

I

J

L

M

A

B

DLK

N

O

P

Removal and Installation

INFOID:0000000000939215

REMOVAL

1.

Remove the front fillet molding. Refer to 

EXT-23, "Removal and Installation"

.

2.

Remove the front bumper fascia and the energy absorber. Refer to 

EXT-11, "Removal and Installation"

.

3.

Remove the energy absorber (upper and lower). Refer to 

EXT-11, "Removal and Installation"

.

4.

Remove the air cleaner duct. Refer to 

EM-27, "Removal and Installation"

.

5.

Remove the front combination lamp (LH/RH). Refer to 

EXL-171, "Removal and Installation"

.

6.

Remove the bumper reinforcement. Refer to 

EXT-11, "Removal and Installation"

.

7.

Disconnect the hood lock control cable clamp, and then remove the hood lock assembly. Refer to 

DLK-

228, "HOOD LOCK CONTROL : Removal and Installation"

8.

Remove the air guide mounting clips, and then remove the air guide (LH/RH).

9.

Remove the hood lock stay mounting bolts, and then remove the hood lock stay.

10. Remove the hood switch (with theft warning systems). Refer to SEC-

SEC-156, "Removal and Installa-

tion"

.

11. Remove the crush zone sensor. Refer to 

SR-14, "Removal and Installation"

.

12. Remove the horn. Refer to 

HRN-5, "Removal and Installation"

13. Remove the ambient sensor. Refer to 

VTL-22, "Removal and Installation"

.

14. Remove the radiator mounting bracket (LH/RH). Refer to 

CO-13, "Removal and Installation"

.

15. Remove the Intelligent Key warning buzzer (with Intelligent Key systems). Refer to 

DLK-277, "Removal

and Installation"

.

16. Remove the charge air cooler assembly (with K9K engine models). Refer to 

EM-266, "Removal and

Installation"

.

17. Remove the A/T fluid cooler assembly and the A/T fluid cooler bracket (with A/T models only). Refer to

TM-348, "FLUID COOLER : Removal and Installation"

.

18. Remove the A/T fluid cooler pipe bracket (1) mounting bolts (A)

(with A/T models only).

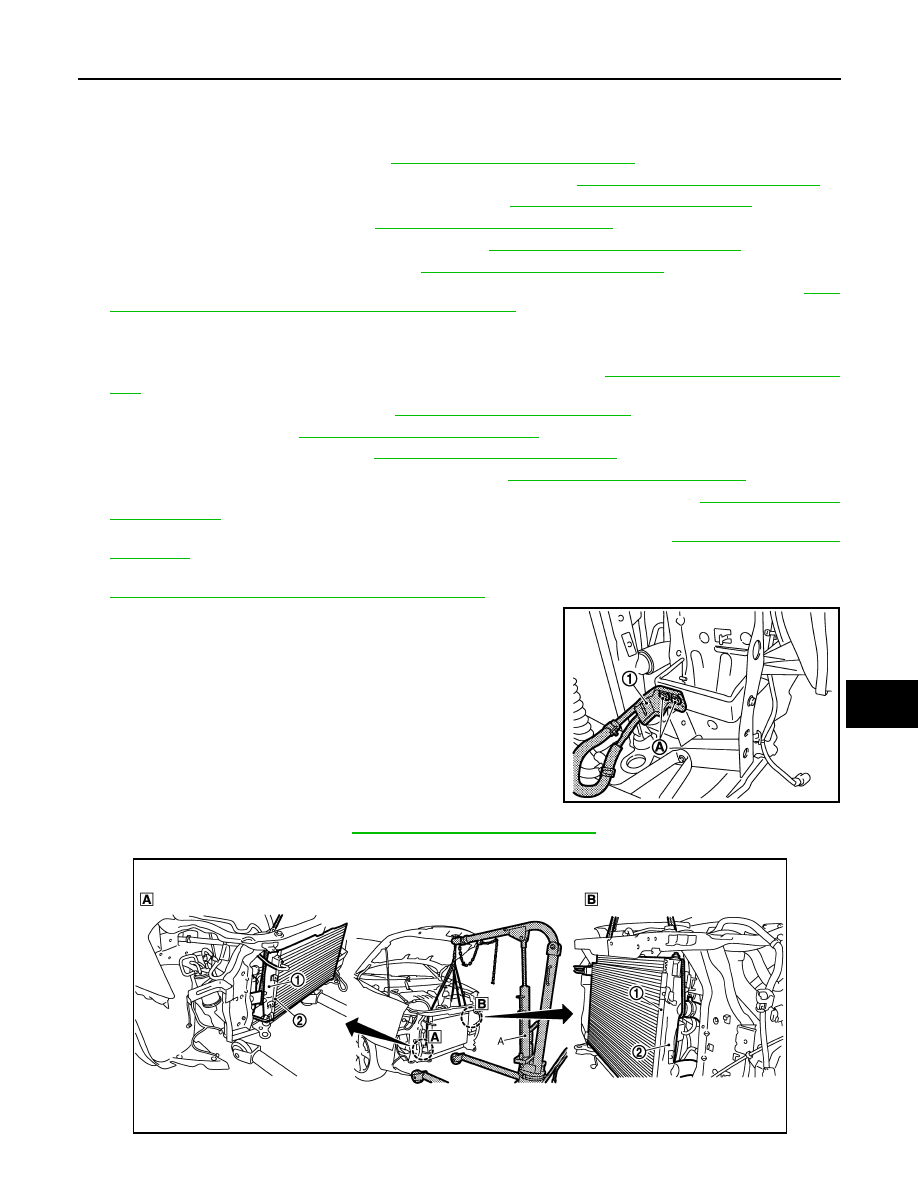
19. Remove the washer tank. Refer to 

WW-99, "Removal and Installation"

20. Use the baby crane (A) or another piece of equipment to suspend the radiator (1) and condenser (2). 

JMKIA0173ZZ

JMKIA0174ZZ

DLK-232

< ON-VEHICLE REPAIR >

[WITH I-KEY, WITHOUT SUPER LOCK]

RADIATOR CORE SUPPORT

21. Remove the radiator core support assembly mounting bolts, and draw out the radiator core support

assembly to the front of the vehicle.

22. Remove the radiator core support assembly.

23. Remove the following parts after removing the radiator core support assembly.

• Inlet tube bracket (with K9K engine models)
• Intercooler bracket (with K9K engine models)
• Apron reinforcement bracket

INSTALLATION

Install in the reverse order of removal.

CAUTION:

After installation, refill the following parts.
• A/T fluid. Refer to 

TM-315, "Changing"

.

• Engine coolant. Refer to 

CO-9, "Refilling"

.

FRONT FENDER

DLK-233

< ON-VEHICLE REPAIR >

[WITH I-KEY, WITHOUT SUPER LOCK]

C

D

E

F

G

H

I

J

L

M

A

B

DLK

N

O

P

FRONT FENDER

Exploded View

INFOID:0000000000939216

Removal and Installation

INFOID:0000000000939217

REMOVAL

1.

Remove the outer fender protector. Refer to 

EXT-22, "Removal and Installation"

.

2.

Remove the inner fender protector. Refer to 

EXT-22, "Removal and Installation"

.

3.

Remove the side turn signal lamp. Refer to 

EXL-178, "Removal and Installation"

.

4.

Remove the front bumper fascia. Refer to 

EXT-11, "Removal and Installation"

.

5.

Remove the front combination lamp.
• XENON TYPE: 

EXL-171, "Removal and Installation"

.

• HALOGEN TYPE: 

EXL-327, "Removal and Installation"

.

6.

Remove the mounting clips and remove hoodledge cover.

7.

Remove the center mudguard. Refer to 

EXT-28, "Removal and Installation"

.

1.

Hood seal assembly (side)

2.

Front fender finisher

3.

Front fender seal

4.

Front fender

: Metal clip

JMKIA0177ZZ

DLK-234

< ON-VEHICLE REPAIR >

[WITH I-KEY, WITHOUT SUPER LOCK]

FRONT FENDER

8.

Peel away the double-faced adhesive tape (A) of the front
fender seal (1) from the front fender (2).

9.

Remove the mounting bolts and remove the front fender.

CAUTION:

Use a shop cloth to protect the body from being damaged during removal.

10. Remove the following parts after removing the front fender.

• Front fender seal.
• Bumper side bracket. Refer to 

EXT-11, "Exploded View"

.

INSTALLATION

Install in the reverse order of removal.

CAUTION:

• Replace the double-faced adhesive tape on the back of the cowl top cover seal with new tape. 
• Do not wash the vehicle within 24 hours after installation so as to keep adhesive. 
• After installation, apply the touch-up paint (the body color) onto the head of the front fender mount-

ing bolts.

• After installation, check the front fender adjustment. Refer to 

DLK-225, "HOOD ASSEMBLY : Adjust-

ment"

 and 

DLK-237, "DOOR ASSEMBLY : Adjustment"

.

JMKIA0178ZZ


Content   ..  1036  1037  1038  1039   ..