Nissan Qashqai (2007-2010). Manual - part 29
EM-64
< ON-VEHICLE REPAIR >
[HR16DE]
CAMSHAFT
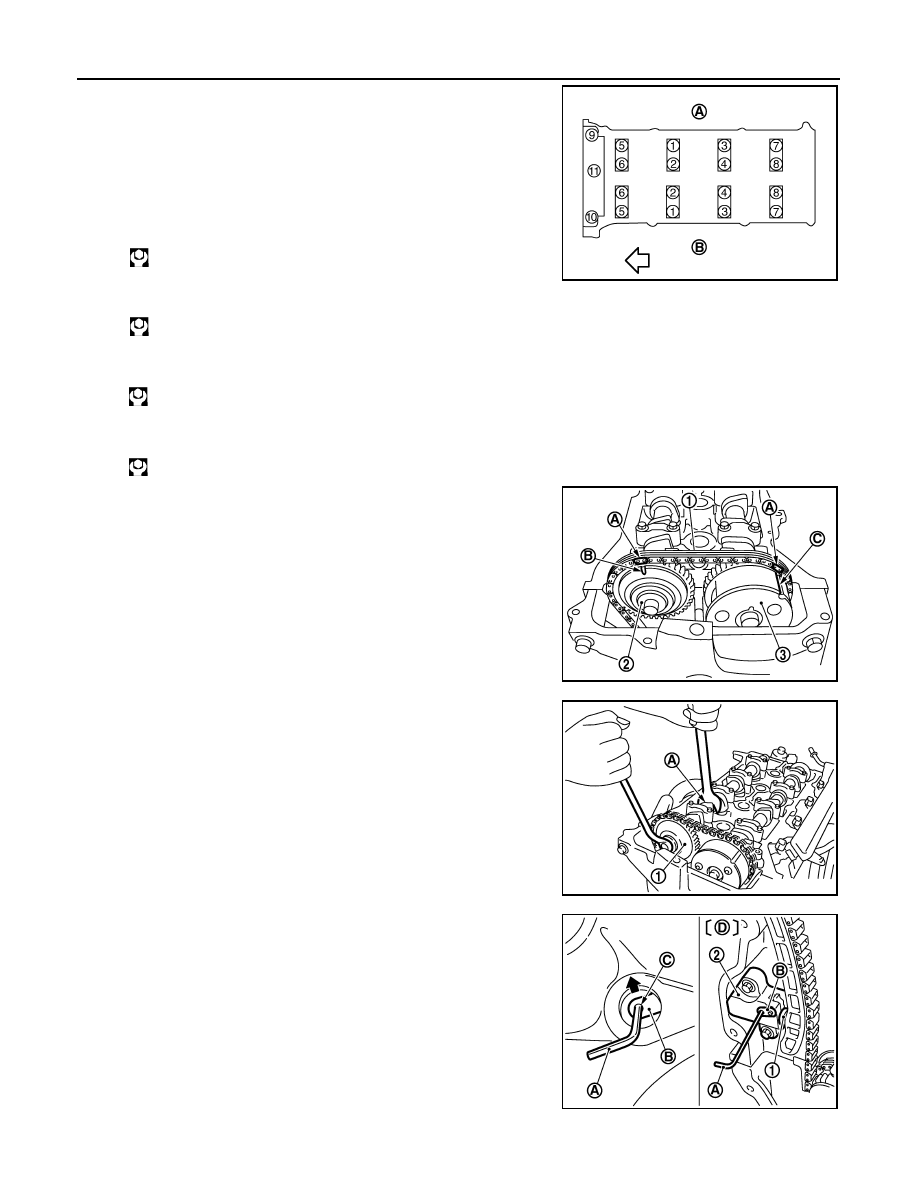
13. Tighten mounting bolts of camshaft brackets in the following
steps, in numerical order as shown in the figure.
a.
Tighten No. 9 to 11 in numerical order.
b.
Tighten No. 1 to 8 in numerical order.
c.
Tighten all bolts in numerical order.
d.
Tighten all bolts in numerical order.
14. Install the camshaft (EXH) to the camshaft sprocket (EXH) (2)
while aligning the matching make (marked when timing chain is
removed) (A) and the matching mark (stamp) (B) of camshaft
sprocket (EXH).
• If the positions of knock pin and pin groove are not aligned,
move the camshaft (EXH) slightly to correct these positions.
15. Tighten the mounting bolt.
CAUTION:
• Hold the camshaft hexagonal part (A), and then secure the
camshaft.
• Make sure that the matching mark (marked when timing
chain is removed) and each camshaft sprocket matching
mark are in the correct location.
16. Pull out the stopper pin (A), and then apply the tension to the
timing chain by rotating the crankshaft pulley clockwise slightly.
A
: EXH side
B
: INT side
: Engine front
: 2.0 N·m (0.2 kg-m, 1 ft-lb)
: 2.0 N·m (0.2 kg-m, 1 ft-lb)
: 5.9 N·m (0.6 kg-m, 4 ft-lb)
: 10.4 N·m (1.1 kg-m, 8 ft-lb)
1
: Timing chain
3
: Camshaft sprocket (INT)
C
: Matching mark (peripheral stamp line)
PBIC3686E
PBIC3674E
1
: Camshaft sprocket (EXH)
PBIC3678E
1
: Plunger
2
: Chain tensioner
B
: Lever
C
: Lever hole
D
: Front cover has been omitted
PBIC3772E