Mitsubishi ASX (2018 year). Manual - part 14
 

  Index      Mitsubishi     Mitsubishi ASX - service manual 2018 year in english


Search            


Content   ..  12  13  14  15   ..


Mitsubishi ASX (2018 year). Manual - part 14


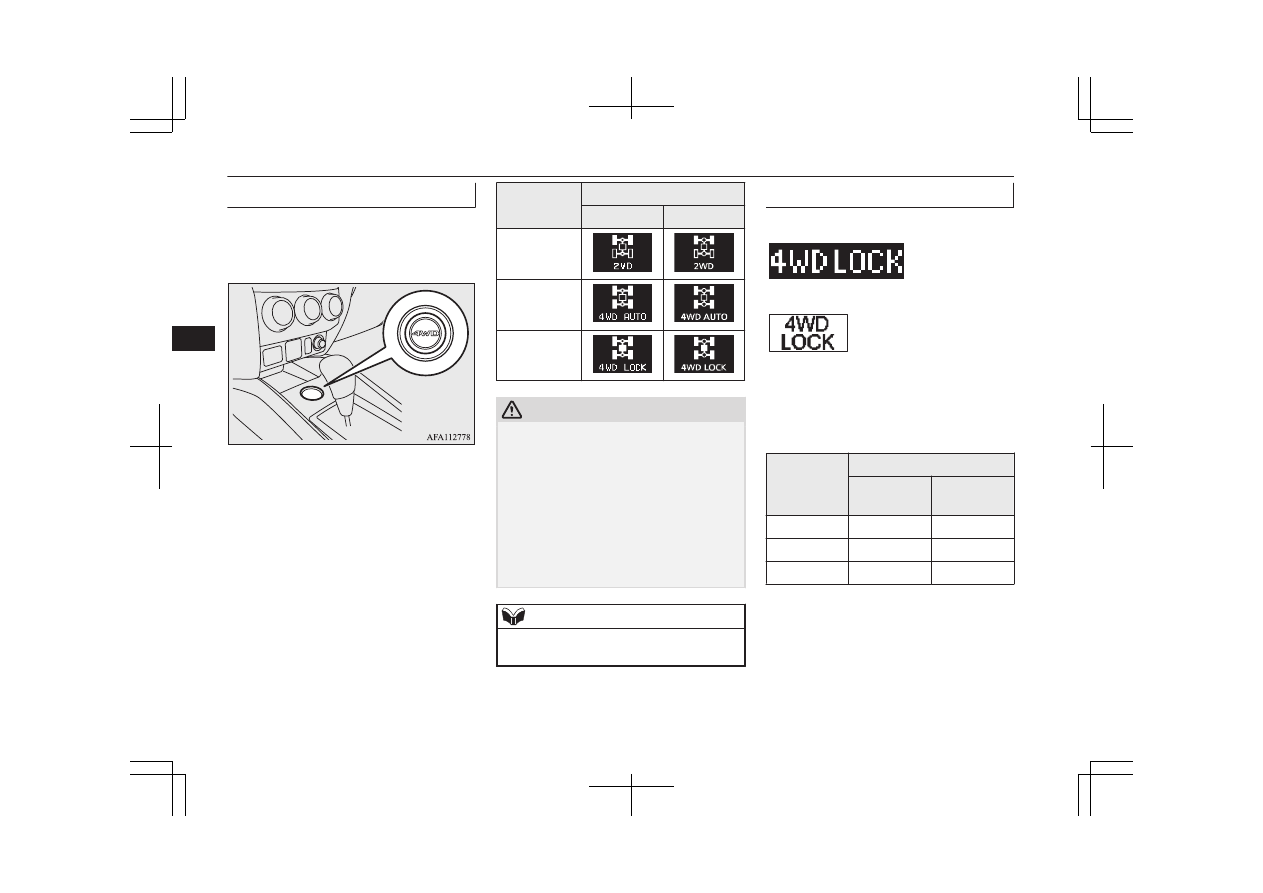
Drive mode-selector

The  drive  mode  can  be  changed  by  pressing
the  drive  mode-selector  while  the  ignition
switch or the operation mode is in ON.

By  pressing  the  drive  mode-selector,  the
drive  mode  can  be  changed  in  order  of
“2WD”, “4WD” AUTO and “4WD LOCK”.
 
The  drive  mode  is  displayed  as  an  interrupt
display on the information screen in the mul-
ti-information display when the drive mode is
changed.
After  a  few  seconds,  the  information  screen
will then return to its prior display.

Drive mode

Display

Type 1

Type 2

2WD

4WD AUTO

4WD LOCK

CAUTION

l

Do not operate the drive mode-selector with
the front wheels spinning on a snowy road or
in  similar  conditions.  The  vehicle  could
lunge in an unexpected direction.

l

Driving  on  dry,  paved  roads  in  “4WD
LOCK”  mode  causes  increased  fuel  con-
sumption and noise.

l

Do  not  drive  with  the  tyres  spinning  in
“2WD” mode.
Doing  so  could  generate  heat  in  the  drive-
system components.

NOTE

l

The drive mode can be switched while driv-
ing or stopped.

Drive mode indicator

Type 1

Type 2

Normally  the  indicator  illuminates  when  the
ignition switch is turned to the “ON” position
or the operation mode is put in ON, and then
the drive mode is displayed a few seconds af-
ter the engine is started.

Drive mode

Drive mode indicator

“4WD” indi-

cator

“LOCK” in-

dicator

2WD

OFF

OFF

4WD AUTO

ON

OFF

4WD LOCK

ON

ON

Electronically controlled 4WD system*

6-40

OGAE18E1

Starting and driving

6

CAUTION

l

If the selected drive mode indicator is blink-
ing,  the  vehicle  switches  automatically  to
front-wheel  drive  in  order  to  protect  the
drive-system  components,  and  drive  mode
selection is no longer possible with the drive
mode-selector.
The warning display is also displayed in the
information  screen  in  the  multi-information
display.
Reduce  speed,  and  if  the  indicator  goes  out
after  driving  a  while,  resume  driving  as  be-
fore.

Type 1

Type 2

CAUTION

l

If  the  warning  display  on  the  information
screen  in  the  multi-information  display,  a
problem has occurred with the electronically
controlled  4WD  system  and  the  safety  de-
vice  has  activated.  Have  your  vehicle  in-
spected  immediately  by  a  MITSUBISHI
MOTORS Authorized Service Point.

Type 1

Type 2

CAUTION

l

Always  use  tyres  of  the  same  size,  same
type,  and  same  brand,  and  which  have  no
wear  differences.  Using  tyres  that  differ  in
size, type, brand, or wear amount may acti-
vate the protection of the drive-system com-
ponents,  causing  the  drive  mode  in  “4WD
AUTO”  mode  to  lock  or  the  “4WD”  and
“LOCK” indicators to blink alternately.

4-wheel drive operation

E00606601116

Your vehicle has been designed primarily for
use on paved roads.
But  its  unique  4-wheel  drive  system  allows
you to occasionally travel on unpaved roads,
to campgrounds, picnic sites, and similar lo-
cations.
Not only does this ensure better handling on
dry, paved roads but also permits better trac-
tion  when  driving  on  slippery,  wet  or  snow-
covered roads and when moving out of mud.
But it is not suitable for heavy off road use or
towing in rough conditions.

It  is  particularly  important  to  note  that  4-
wheel  drive  may  not  give  sufficient  hill
climbing ability and engine braking on steep
slopes.  You  should  try  to  avoid  driving  on
steep slopes.
Also, you must exercise caution when driving
on  sand  and  mud  and  when  driving  through
water  because  sufficient  traction  may  not  be
available in certain circumstances.
Please  avoid  driving  the  vehicle  through
areas  where  the  tyres  may  get  stuck  in  deep
sand or mud.

WARNING

l

Do not over-rely on the 4-wheel drive ve-
hicles.  Even  4-wheel  drive  vehicles  have
limits  to  the  system  and  ability  to  main-
tain control and traction. Reckless driving
may lead to accidents. Always drive care-
fully,  taking  account  of  the  road  condi-
tions.

l

Improperly  operating  this  vehicle  on  or
off-paved  roads  can  cause  an  accident  or
rollover in which you and your passengers
could be seriously injured or killed.

Follow all instructions and guidelines in
the owner’s manual.

Keep  your  speed  low  and  do  not  drive
faster than conditions allow you to.

4-wheel drive operation

6-41

OGAE18E1

Starting and driving

6

NOTE

l

Driving on rough roads can be hard on a ve-
hicle. Before you leave paved roads, be sure
all  scheduled  maintenance  and  service  has
been done, and that you have inspected your
vehicle.  Pay  special  attention  to  the  condi-
tion  of  the  tyres,  and  check  the  tyre  pres-
sures.

l

MITSUBISHI  MOTORS  is  not  responsible
to  the  operator  for  any  damage  or  injury
caused or liability incurred by improper and
negligent operation of a vehicle. All techni-
ques of vehicle operation depend on the skill
and experience of the operator and other par-
ticipating  parties.  Any  deviation  from  the
recommended  operating  instructions  above
is at their own risk.

l

Note that the stopping distance required of a
4-wheel drive vehicle differs very little from
that  of  a  2-wheel  drive  vehicle.  When  driv-
ing  on  a  snow-covered  road  or  a  slippery,
muddy  surface,  make  sure  that  you  keep  a
sufficient distance between your vehicle and
the one ahead of you.

l

The driving posture should be more upright;
adjust  the  seat  to  a  good  position  for  easy
steering and pedal operation. Be sure to wear
the seat belt.

l

After  driving  on  rough  roads,  check  each
part  of  the  vehicle  and  wash  it  thoroughly
with  water.  Refer  to  the  “Inspection  and
maintenance  following  rough  road  opera-
tion” section and “Maintenance” section.

CAUTION

l

Setting  the  drive  mode-selector  to  “4WD
LOCK”  to  drive  on  dry  paved  road  will  in-
crease fuel consumption, with possible noise
generation.

Turning sharp corners

When  turning  a  sharp  corner  in  “4WD
LOCK” position at low speed, a slight differ-
ence  in  steering  may  be  experienced  similar
to as if the brakes were applied. This is called
tight corner braking and results from each of
the 4 tyres being at a different distance from
the  corner.  The  phenomenon  is  typical  of  4-
wheel  drive  vehicles.  If  this  occurs,  either
straighten  out  the  steering  wheel,  or  change
to “2WD” or “4WD AUTO” mode.

On snowy or icy roads

Set the drive mode-selector to “4WD AUTO”
or  “4WD  LOCK”  in  accordance  with  the
road  conditions,  and  then  gradually  depress
the accelerator pedal for a smooth start.

NOTE

l

The use of snow tyres is recommended.

l

Maintain  a  safe  distance  between  vehicles,
avoid sudden braking, and use engine brak-
ing (downshifting).

CAUTION

l

Avoid  sudden  braking,  sudden  acceleration
and sharp turning. Skidding occurs and con-
trol of the vehicle could be lost.

Driving on sandy or muddy

roads

Set the drive mode-selector to “4WD LOCK”
and  then  gradually  depress  the  accelerator
pedal for a smooth start. Keep the pressure on
the accelerator pedal as constant as possible,
and drive at low speed.

CAUTION

l

Do not force the vehicle or drive recklessly
on  sandy  surfaces.  In  comparison  with  nor-
mal  road  surfaces,  the  engine  and  other
drive-system  components  are  put  under  ex-
cessive  strain  when  driving  on  such  a  sur-
face. This could lead to accidents.

l

If the engine coolant temperature display 
flashes on the information screen in the mul-
ti-information  display  or  the  engine  power
drops  suddenly  while  the  vehicle  is  being
driven,  park  your  vehicle  immediately  in  a
safe place.
Refer  to  “Engine  overheating”  on  page
8-04
 for details and take the required meas-
ures.

4-wheel drive operation

6-42

OGAE18E1

Starting and driving

6

WARNING

l

When attempting to rock your vehicle out
of  a  stuck  position,  be  sure  that  the  area
around  the  vehicle  is  clear  of  people  and
physical objects. The rocking motion may
cause  the  vehicle  to  suddenly  launch  for-
ward  or  backward,  causing  injury  or
damage to nearby people or objects.

NOTE

l

Avoid  sudden  braking,  sudden  acceleration
and sharp turning; such operations could re-
sult in the vehicle becoming stuck.

l

If  the  vehicle  becomes  stuck  in  sandy  or
muddy  roads,  it  can  often  be  moved  with  a
rocking motion. Move the gearshift lever al-
ternately between the 1

st

 and “R” (Reverse)

positions  (M/T),  the  “D”  (DRIVE)  and  “R”
(REVERSE) positions (A/T or CVT), while
pressing lightly on the accelerator pedal.

l

Driving on rough roads can cause rust on the
vehicle; wash the vehicle thoroughly as soon
as possible after such use.

Climbing/descending sharp

grades

Your  vehicle  may  not  provide  sufficient  hill
climbing ability and engine braking on steep
slopes.  Avoid  driving  on  steep  slopes  even
though the vehicle is a 4-wheel drive vehicle.

Driving through water

E00618900106

If  the  electrical  circuits  become  wet,  further
operation  of  the  vehicle  will  be  impossible;
therefore, avoid driving through water unless
absolutely  necessary.  If  driving  through  wa-
ter  is  unavoidable,  use  the  following  proce-
dure:
 
Check the depth of the water and the terrain
before  attempting  to  drive  through  it.  Drive
slowly  to  avoid  creating  excessive  water
splashing.

CAUTION

l

Never  drive  through  water  that  is  deep
enough  to  cover  wheel  hubs,  axles  or  ex-
haust pipe. Do not change the gearshift lever
position (M/T) or the selector lever position
(A/T or CVT) while driving through water.
Frequent driving through water can adverse-
ly affect the life span of the vehicle; we rec-
ommend you to take the necessary measures
to prepare, inspect, and repair the vehicle.

l

After  driving  through  water,  apply  the
brakes to be sure they are functioning prop-
erly. If the brakes are wet and not function-
ing properly, dry them out by driving slowly
while lightly depressing the brake pedal. In-
spect each part of the vehicle carefully.

Inspection and maintenance
following rough road
operation

E00606700338

After  operating  the  vehicle  in  rough  road
conditions,  be  sure  to  perform  the  following
inspection and maintenance procedures:

l

Check that the vehicle has not been dam-
aged by rocks, gravel, etc.

l

Carefully wash the vehicle with water.
Drive  the  vehicle  slowly  while  lightly
depressing  the  brake  pedal  in  order  to
dry out the brakes. If the brakes still do
not  function  properly,  we  recommend
you to have the brakes checked as soon
as possible.

l

Remove  the  insects,  dried  grass,  etc.
clogging the radiator core.

l

After  driving  through  water,  check  the
engine, transmission and differential oil.
If the oil or grease is milky or cloudy be-
cause of water contamination, it must be
replaced with new oil or grease.

l

Check the inside of the vehicle. If water
entry is found, dry the carpet etc.

l

Inspect  the  headlamps,  If  the  headlamp
bulb  is  flooded  with  water,  we  recom-
mend you to have it drained.

Inspection and maintenance following rough road operation

6-43

OGAE18E1

Starting and driving

6

Cautions on handling of 4-
wheel drive vehicles

E00606802085

Tyres and wheels

Since the driving torque can be applied to the
4 wheels, the driving performance of the ve-
hicle  when  operating  in  4-wheel  drive  is
greatly affected by the condition of the tyres.
 
Pay close attention to the tyres.

l

Install  only  the  specified  tyres  on  all
wheels. Refer to “Tyres and wheels” on
page 11-12.

l

Be  sure  all  4  tyres  and  wheels  are  the
same size and type.
When  it  is  necessary  to  replace  any  of
the tyres or wheels, replace all 4 tyres.

l

All  tyres  should  be  rotated  before  the
wear  difference  between  the  front  and
rear tyres is recognizable.

Good  vehicle  performance  cannot  be  expec-
ted  if  there  is  a  difference  in  wear  between
tyres. Refer to “Tyre rotation” on page 10-15.

l

Check the tyre inflation pressure regular-
ly.

CAUTION

l

Always  use  tyres  of  the  same  size,  same
type,  and  same  brand,  and  which  have  no
wear  differences.  Using  tyres  of  different
size, type, brands or degree of wear, will in-
crease the differential oil temperature, result-
ing  in  possible  damage  to  the  driving  sys-
tem.  Further,  the  drive  train  will  be  subjec-
ted  to  excessive  loading  possibly  leading  to
oil leakage, component seizure, or other seri-
ous faults.

Towing

CAUTION

l

Do not tow 4-wheel drive vehicles with the
front or rear wheels on the ground (Type A
or Type B) as illustrated. This could result in
damage to the drivetrain, or unstable towing.
If you tow 4-wheel drive vehicles, use Type
C or Type D equipment.

l

Even in “2WD” drive mode, the vehicle can-
not  be  towed  with  the  front  or  the  rear
wheels on the ground.

Jacking up a 4-wheel drive ve-

hicle

WARNING

l

Do not crank the engine while the vehicle
is jacked up.
The tyre on the ground may turn and the
vehicle may roll off the jack.

Braking

E00607001784

All the parts of the brake system are critical
to safety. We recommend you to have the ve-
hicle  checked  at  regular  intervals  according
to the service booklet.

Cautions on handling of 4-wheel drive vehicles

6-44

OGAE18E1

Starting and driving

6

CAUTION

l

Avoid driving habits that cause heavy brak-
ing  and  never  “ride”  the  brakes  by  resting
your foot on the brake pedal while driving.
It causes brake overheating and fade.

Brake system

The  service  brake  is  divided  into  two  brake
circuits.  And  your  vehicle  is  equipped  with
power  brakes.  If  one  brake  circuit  fails,  the
other  is  available  to  stop  the  vehicle.  If  you
should lose the power assist for some reason,
the brakes will still work. In these situations,
even  if  the  brake  pedal  moves  down  to  the
very end of its possible stroke or resists being
depressed,  keep  depressing  the  brake  pedal
down  harder  and  further  than  usual;  stop
driving  as  soon  as  possible  and  have  the
brake system repaired.

WARNING

l

Do not turn off the engine while your ve-
hicle  is  in  motion.  If  you  turn  off  the  en-
gine  while  driving,  the  power  assistance
for  the  braking  system  will  stop  working
and your brakes will not work effectively.

l

If the power assist is lost or if either brake
hydraulic system stops working properly,
have your vehicle checked immediately.

Warning display

The  brake  warning  lamp  illuminates  to  indi-
cate a fault in the braking system. A warning
is  also  displayed  on  the  multi-information
display.  Refer  to  “Brake  warning  lamp”  on
page  5-47
  and  “Brake  warning  display”  on
page 5-48.

When brakes are wet

Check  the  brake  system  while  driving  at  a
low  speed  immediately  after  starting,  espe-
cially  when  the  brakes  are  wet,  to  confirm
they work normally.
A  film  of  water  can  be  formed  on  the  brake
discs  and  prevent  normal  braking  after  driv-
ing in heavy rain or through large puddles, or
after the vehicle is washed. If this occurs, dry
the brakes out by driving slowly while lightly
depressing the brake pedal.

When driving downhill

It  is  important  to  take  advantage  of  the  en-
gine braking by shifting to a lower shift posi-
tion while driving on steep downhill roads in
order to prevent the brakes from overheating.

WARNING

l

Do  not  leave  any  objects  near  the  brake
pedal or let a floor mat slide under it; do-
ing so could prevent the full pedal stroke
that would be necessary in an emergency.
Make sure that the pedal can be operated
freely  at  all  times.  Make  sure  the  floor
mat is securely held in place.

Brake pad

l

Avoid hard braking situations.
New  brakes  need  to  be  broken-in  by
moderate  use  for  the  first  200  km
(124 miles).

l

The  disc  brakes  are  provided  with  a
warning  device  which  emits  a  shrieking
metallic sound while braking if the brake
pads  have  reached  their  wear  limit.  If
you hear this sound, have the brake pads
replaced immediately.

WARNING

l

Driving  with  worn  brake  pads  will  make
it  harder  to  stop,  and  can  cause  an  acci-
dent.

Braking

6-45

OGAE18E1

Starting and driving

6

Hill start assist*

E00628000155

The hill start assist makes it easy to start off
on a steep uphill slope by preventing the ve-
hicle  from  moving  backwards.  It  keeps  the
braking  force  for  about  2  seconds  when  you
move  your  foot  from  the  brake  pedal  to  the
accelerator pedal.

CAUTION

l

Do not overly rely on the hill start assist to
prevent backwards movement of the vehicle.
Under certain circumstances, even when hill
start  assist  is  activated,  the  vehicle  may
move  backwards  if  the  brake  pedal  is  not
sufficiently depressed, if the vehicle is heav-
ily loaded, or if the road is very steep or slip-
pery.

l

The  hill  start  assist  is  not  designed  to  keep
the vehicle stopped in place on uphill slopes
for more than 2 seconds.

l

When facing uphill, do not rely on using the
hill start assist to maintain a stopped position
as an alternative to depressing the brake ped-
al.
Doing so could result in an accident.

CAUTION

l

Do  not  perform  the  following  operation
while the hill start assist is operating.
[Except  for  vehicles  equipped  with  keyless
operation system]
Turn  the  ignition  switch  to  the  “LOCK”  or
“ACC” position.
[Vehicles  equipped  with  keyless  operation
system]
Put the operation mode in OFF or ACC.
The  hill  start  assist  could  stop  operating,
which could result in an accident.

To operate

E00628100374

1. Stop  the  vehicle  completely  using  the

brake pedal.

2. On  vehicles  equipped  with  M/T,  place

the gearshift lever into the 1

st

 position.

On  vehicles  equipped  with  A/T,  CVT,
place the selector lever into the “D” po-
sition.

NOTE

l

When reversing on an uphill slope, place the
gearshift  lever  or  the  selector  lever  into  the
“R” position.

3. Release the brake pedal and the hill start

assist will maintain the braking force ap-
plied while stopping for approximately 2
seconds.

4. Depress  the  accelerator  pedal  and  the

hill  start  assist  gradually  will  decrease
the  braking  force  as  the  vehicle  starts
moving.

NOTE

l

The  hill  start  assist  is  activated  when  all  of
the following conditions are met.

The engine is running.
(The hill start assist will not be activated
while the engine is starting or immediate-
ly after the engine is started.)

On vehicles equipped with M/T, the gear-
shift lever is in the following position.
[When starting an uphill slope forwards.]
The gearshift lever is in any position other
than “R”.
(The  hill  start  assist  will  operate,  even  if
the gearshift lever is in the “N” position.)
[When  starting  an  uphill  slope  back-
wards.]
The gearshift lever is in the “R” position.
(The hill start assist will not operate when
the gearshift lever is in the “N” position.)

On vehicles equipped with A/T, CVT, the
selector lever is in any position other than
“P” or “N”.

The vehicle is completely stationary, with
the brake pedal depressed.

The parking brake is released.

l

The hill start assist will not operate if the ac-
celerator pedal is depressed before the brake
pedal is released.

Hill start assist*

6-46

OGAE18E1

Starting and driving

6

NOTE

l

The  hill  start  assist  also  operates  when  re-
versing on an uphill slope.

Warning display

E00628200199

If  an  abnormal  condition  occurs  in  the  sys-
tem, the following display/indicator will turn
on.

 -

ASC indicator

Warning display type 1

Warning display type 2

NOTE

l

The combination of items shown on the dis-
play varies depending on the vehicle model.

CAUTION

l

If the warning is displayed, the hill start as-
sist will not operate. Start off carefully.

l

Park  your  vehicle  in  a  safe  place  and  stop
the engine.
Restart  the  engine  and  check  whether  the
warning display went out, in which case the
hill start assist is again working normally.
If  the  warning  remains  displayed  or  reap-
pears  frequently,  it  is  not  necessary  to  stop
the  vehicle  immediately,  but  the  vehicle
should  be  inspected  at  a  MITSUBISHI
MOTORS Authorized Service Point as soon
as possible.

Brake assist system

E00627001588

The brake assist system is a device assisting
drivers  who  cannot  depress  the  brake  pedal
firmly when it is necessary to do so (such as
in  emergency  stop  situations)  and  provides
greater braking force.
 
If the brake pedal is depressed suddenly, the
brakes  will  be  applied  with  more  force  than
usual.

CAUTION

l

The  brake  assist  system  is  not  a  device  de-
signed to exercise braking force greater than
its capacity. Make sure to always keep a suf-
ficient distance between vehicles in front of
you  without  relying  too  much  on  the  brake
assist system.

NOTE

l

Once the brake assist system is operational,
it  maintains  great  braking  force  even  if  the
brake pedal is lightly released.
To  stop  its  operation,  completely  remove
your foot from the brake pedal.

l

The brake assist system may become opera-
tional  when  the  brake  pedal  is  fully  de-
pressed  even  if  it  has  not  been  depressed
suddenly.  [Except  for  vehicles  equipped
with Active Stability Control (ASC)]

l

When the brake assist system is in use, you
may  feel  as  if  the  depressed  brake  pedal  is
soft,  the  pedal  moves  in  small  motions  in
conjunction with the sound of the ABS oper-
ation,  or  the  vehicle  body  and  the  steering
wheel  vibrate.  This  occurs  when  the  brake
assist system is operating normally and does
not  indicate  faulty  operation.  Continue  to
firmly depress the brake pedal.

l

You  may  hear  an  operation  noise  when  the
brake  pedal  is  suddenly  or  fully  depressed
while  stationary.  This  does  not  indicate  a
malfunction  and  the  brake  assist  system  is
operating normally.

Brake assist system

6-47

OGAE18E1

Starting and driving

6

NOTE

l

When the ABS warning lamp/display or on-
ly  ASC  warning  display  illuminate,  the
brake assist system in not functioning. [Ve-
hicles  equipped  with  Active  Stability  Con-
trol (ASC)]

Emergency stop signal
system*

E00626001190

This is a device that reduces the possibility of
rear end collisions by the rapid and automatic
blinking of the hazard warning lamps to alert
vehicles  approaching  from  behind  during
sudden  braking.  When  the  emergency  stop
signal  system  operates,  the  hazard  warning
indication  lamp  in  the  instrument  cluster
blinks rapidly at the same time.

CAUTION

l

If the ABS warning or ASC warning is dis-
played,  the  emergency  stop  signal  system
may not operate.
Refer  to  “ABS  warning  lamp/display”  on
page 6-49.
Refer  to  “ASC  warning  display”  on  page
6-53.

NOTE

l

[Activating condition for the emergency stop
signal system]
It activates when all of the following condi-
tions are met.

The  vehicle  speed  is  approximately
55 km/h (34 mph) or higher.

The  brake  pedal  has  been  depressed,  and
the system judges that it was sudden brak-
ing from the vehicle deceleration and the
operating condition of the anti-lock brake
system (ABS).

[Deactivating  condition  for  the  emergency
stop signal system]
It  deactivates  when  one  of  the  following
conditions is met.

The brake pedal is released.

The  hazard  warning  flasher  switch  is
pressed.

The system judges that it was not sudden
braking from the vehicle deceleration and
the  operating  condition  of  the  anti-lock
brake system (ABS).

Anti-lock brake system
(ABS)

E00607101046

The anti-lock brake system (ABS) helps pre-
vent the wheels from locking up when brak-
ing.  This  helps  maintain  vehicle  drivability
and steering wheel handling.

Driving hints

l

Always keep a safe distance from the ve-
hicle in front of you. Even if your vehi-
cle is equipped with ABS, leave a great-
er braking distance when:

• Driving  on  gravel  or  snow-covered

roads.

• Driving with tyre chains installed.
• Driving on uneven road surfaces.

l

Operation of ABS is not restricted to sit-
uations  where  brakes  are  applied  sud-
denly. This system may also prevent the
wheels  from  locking  when  you  drive
over  manholes,  steel  roadwork  plates,
road  markings,  or  any  uneven  road  sur-
face.

l

When  the  ABS  is  activated,  you  may
feel the brake pedal pulsation and the vi-
brations of the vehicle body and steering
wheel. It may also feel as if the pedal re-
sists being pressed.
In  this  situation,  simply  hold  the
brake  pedal  down  firmly.  Do  not
pump  the  brake,  which  will  result  in
reduced braking performance.

Emergency stop signal system*

6-48

OGAE18E1

Starting and driving

6

l

An  operation  noise  is  emitted  from  the
engine  compartment  or  you  can  feel  a
shock  from  the  brake  pedal  when  start
driving immediately after starting the en-
gine. These are normal sounds or opera-
tions that the ABS makes when perform-
ing  a  self-check.  It  does  not  indicate  a
malfunction.

l

The  ABS  can  be  used  after  the  vehicle
has reached a speed over approximately
10 km/h (6 mph). It stops working when
the  vehicle  slows  below  approximately
5 km/h (3 mph).

CAUTION

l

The ABS cannot prevent accidents. It is your
responsibility to take safety precautions and
to drive carefully.

l

To prevent failure of the ABS, be sure all 4
wheels  and  tyres  are  the  same  size  and  the
same type.

l

Do  not  install  any  aftermarket  limited-slip
differential (LSD) on your vehicle. The ABS
may stop functioning properly.

ABS warning lamp/display

E00607201135

Warning lamp

Warning display type 1

Warning display type 2

If  there  is  a  malfunction  in  the  system,  the
ABS  warning  lamp  will  come  on  and  the
warning  display  will  appear  on  the  informa-
tion screen in the multi-information display.
Under  normal  conditions,  the  ABS  warning
lamp only comes on when the ignition switch
is  turned  to  the  “ON”  position  or  the  opera-
tion  mode  is  put  in  ON  and  goes  off  a  few
seconds later.

CAUTION

l

Any of the following indicates that the ABS
is  not  functioning  and  only  the  standard
brake  system  is  working.  (The  standard
brake  system  is  functioning  normally.)  If
this  happens,  we  recommend  you  to  have
your vehicle inspected as soon as possible.

When the ignition switch is turned to the
“ON”  position  or  the  operation  mode  is
put  in  ON,  the  warning  lamp  does  not
come on or it remains on and does not go
off.

The  warning  lamp  comes  on  while  driv-
ing.

The  warning  display  appears  while  driv-
ing.

If the warning lamp/display il-

luminate while driving

E00607301295

If  only  the  ABS  warning  lamp/

display illuminate

Avoid  hard  braking  and  high-speed  driving.
Stop the vehicle in a safe place.
Restart  the  engine  and  check  to  see  whether
the  lamp  goes  out  after  a  few  minutes  driv-
ing;  if  it  then  remains  off  during  driving,
there is no problem.
However, if the warning lamp/display do not
disappear, or if they come on again when the
vehicle is driven, we recommend you to have
the vehicle checked.

Anti-lock brake system (ABS)

6-49

OGAE18E1

Starting and driving

6

If  the  ABS  warning  lamp/

display  and  brake  warning

lamp/display  illuminate  at  the

same time

Warning lamp

Warning display type 1

Warning display type 2

The  ABS  and  brake  force  distribution  func-
tion  may  not  work,  so  hard  braking  could
make the vehicle unstable.
Avoid  hard  braking  and  high-speed  driving.
Stop  the  vehicle  in  a  safe  place  and  we  rec-
ommend you to have it checked.

NOTE

l

The  ABS  warning  lamp  and  brake  warning
lamp  illuminate  at  the  same  time  and  the
warning  displays  appear  alternately  on  the
information  screen  in  the  multi-information
display.

After driving on icy roads

E00618800150

After  driving  on  snow  or  icy  roads,  remove
any snow and ice which may have accumula-
ted around the wheels. On vehicles that have
an ABS, be careful not to damage the wheel
speed  sensors  (A)  or  the  cables  located  at
each wheel.

Front

Rear

Electric power steering
system (EPS)

E00629200226

The power steering system operates while the
engine  is  running.  It  helps  reduce  the  effort
needed to turn the steering wheel.
The  power  steering  system  has  mechanical
steering capability in case the power assist is
lost. If the power assist is lost for some rea-
son, you will still be able to steer your vehi-
cle,  but  you  will  notice  it  takes  much  more
effort to steer. If this happens, have your ve-
hicle inspected at a MITSUBISHI MOTORS
Authorized Service Point.

Electric power steering system (EPS)

6-50

OGAE18E1

Starting and driving

6

WARNING

l

Do not stop the engine while the vehicle is
moving. Stopping the engine would make
the steering wheel extremely hard to turn,
possibly resulting in an accident.

NOTE

l

During  repeated  full-lock  turning  of  the
steering  wheel  (for  example,  while  you  are
manoeuvring  the  vehicle  into  a  parking
space), a protection function may be activa-
ted  to  prevent  overheating  of  the  power
steering system. This function will make the
steering  wheel  gradually  harder  to  turn.  In
this event, limit your turning of the steering
wheel  for  a  while.  When  the  system  has
cooled down, the steering action will return
to normal.

l

If you turn the steering wheel while the vehi-
cle  is  stationary  with  the  headlamps  on,  the
headlamps may become dim. This behaviour
is  not  abnormal.  The  headlamps  will  return
to  their  original  brightness  after  a  short
while.

Electric power steering system

warning display

Type 1

Type 2

When  there  is  a  malfunction  in  the  system,
the warning display will appear on the infor-
mation  screen  in  the  multi-information  dis-
play.

CAUTION

l

If the warning display appears while engine
is  running,  have  the  vehicle  inspected  by  a
MITSUBISHI  MOTORS  Authorized  Serv-
ice Point as soon as possible. It may become
harder to turn the steering wheel.

Active stability control
(ASC)*

E00616700331

The  Active  Stability  Control  (ASC)  takes
overall control of the anti-lock brake system,
traction control function and stability control
function  to  help  maintain  the  vehicle’s  con-
trol  and  traction.  Please  read  this  section  in
conjunction  with  the  page  on  the  anti-lock
brake  system,  traction  control  function  and
stability control function.
 
Anti-lock brake system (ABS) 

® p. 6-48

Traction control function 

® p. 6-52

Stability control function 

® p. 6-52

CAUTION

l

Do not over-rely on the ASC. Even the ASC
cannot  prevent  the  natural  laws  of  physics
from acting on the vehicle.
This system, like any other system, has lim-
its and cannot help you to maintain traction
and control of the vehicle in all circumstan-
ces. Reckless driving may lead to accidents.
It is the driver’s responsibility to drive care-
fully.  This  means  taking  into  account  the
traffic, road and environmental conditions.

l

Be  sure  to  use  the  same  specified  type  and
size  of  tyre  on  all  4  wheels.  Otherwise,  the
ASC may not work properly.

Active stability control (ASC)*

6-51

OGAE18E1

Starting and driving

6

CAUTION

l

Do  not  install  any  aftermarket  limited-slip
differential (LSD) on your vehicle. The ASC
may stop functioning properly.

NOTE

l

An operation noise may be emitted from the
engine  compartment  in  the  following  situa-
tions. The sound is associated with checking
the operations of the ASC. At this time, you
may feel a shock from the brake pedal if you
depress it. These do not indicate a malfunc-
tion.

When the ignition switch is turned to the
“ON”  position  or  the  operation  mode  is
put in ON.

When the vehicle is driven for a while af-
ter the engine is turned on.

l

When the ASC is activated, you may feel a
vibration in the vehicle body or hear a whin-
ing sound from the engine compartment.
This  indicates  that  the  system  is  operating
normally. It does not indicate a malfunction.

l

When  the  anti-lock  brake  system  warning
lamp is illuminated, the ASC is not active.

Traction control function

E00619000087

On  slippery  surfaces,  the  traction  control
function prevents the drive wheels from spin-
ning  excessive,  thus  helping  the  vehicle  to
start moving from a stopped condition. It also
provides sufficient driving force and steering
performance as the vehicle turns while press-
ing the acceleration pedal.

CAUTION

l

When  driving  a  vehicle  on  a  snowy  or  icy
road, be sure to install snow tyres and drive
the vehicle at moderate speeds.

Stability control function

E00619100017

The  stability  control  function  is  designed  to
help the driver maintain control of the vehicle
on slippery roads or during rapid steering ma-
noeuvres.  It  works  by  controlling  the  engine
output and brake on each wheel.

NOTE

l

The  stability  control  function  operates  at
speeds of about 15 km/h (9 mph) or higher.

“ASC OFF” switch

E00619201842

The ASC is automatically activated when the
ignition switch is turned to the “ON” position
or the operation mode is put in ON. You can
deactivate  the  system  by  pressing  down  the
“ASC OFF” switch for 3 seconds or longer.
When the ASC is deactivated, the   display/
indicator will turn on. To reactivate the ASC,
momentarily  press  the  “ASC  OFF”  switch;
the   display/indicator is turned off.

CAUTION

l

For  safety  reasons,  the  “ASC  OFF”  switch
should  be  operated  when  your  vehicle  is
stopped.

l

Be sure to keep the ASC on while driving in
normal circumstances.

Active stability control (ASC)*

6-52

OGAE18E1

Starting and driving

6

NOTE

l

When  moving  out  of  mud,  sand  or  fresh
snow, pressing the accelerator pedal may not
allow  the  engine  speed  to  increase.  In  such
situations,  temporarily  turning  off  the  ASC
with  the  “ASC  OFF”  switch  will  make  it
easier to move out your vehicle.

l

Using the “ASC OFF” switch turns off both
the stability control function and the traction
control function.

l

If  you  continue  to  press  the  “ASC  OFF”
switch after the ASC is turned off, the “mis-
taken operation protection function” will ac-
tivate and the ASC will turn back on.

ASC operation display or ASC

OFF display

E00619300426

 -

ASC  operation  display/ASC  indica-
tor
The  display/indicator  will  blink
when the ASC is operating.

 -

ASC OFF display/ASC OFF indica-
tor
This  display/incicator  will  turn  on
when the ASC is turned off with the
“ASC OFF” switch.

NOTE

l

The combination of items shown on the dis-
play varies depending on the vehicle model.

CAUTION

l

When 

  display/indicator  blinks,  ASC  is

operating, which means that the road is slip-
pery or that your vehicle’s wheels are begin-
ning  to  slip.  If  this  happens,  drive  slower
with less accelerator input.

l

If the temperature in the braking system con-
tinues  to  increase  due  to  continuous  brake
control on a slippery road surface, the   dis-
play/indicator  will  blink.  To  prevent  the
brake  system  from  overheating,  the  brake
control  of  the  traction  control  function  will
be temporarily suspended.
The  engine  control  of  the  traction  control
function and normal brake operation will not
be  affected.  Park  your  vehicle  in  a  safe
place.  When  the  temperature  in  the  braking
system  has  come  down,  the   display/indi-
cator will be turned off and the traction con-
trol function will start operating again.

NOTE

l

The    display/indicator  may  turn  on  when
you start the engine. This means that the bat-
tery voltage momentarily dropped when the
engine  was  started.  It  does  not  indicate  a
malfunction,  provided  that  the  display  goes
out immediately.

l

When a compact spare tyre has been put on
your vehicle, the gripping ability of the tyre
will be lower, making it more likely that the

 display/indicator will blink.

ASC warning display

E00619400443

If  an  abnormal  condition  occurs  in  the  sys-
tem, the following display/indicator will turn
on.

 -

ASC indicator

 -

ASC OFF display/ASC OFF in-
dicator

Active stability control (ASC)*

6-53

OGAE18E1

Starting and driving

6

Warning display type 1

Warning display type 2

NOTE

l

The combination of items shown on the dis-
play varies depending on the vehicle model.

CAUTION

l

The system may be malfunctioning.
Park  your  vehicle  in  a  safe  place  and  stop
the engine.
Restart  the  engine  and  check  whether  the
display/indicator  goes  out.  If  they  go  out,
there  is  no  abnormal  condition.  If  they  do
not go out or appear frequently, it is not nec-
essary  to  stop  the  vehicle  immediately,  but
we recommend you to have your vehicle in-
spected.

Towing

E00624400050

CAUTION

l

When towing the vehicle with only the front
wheels or only the rear wheels raised off the
ground,  do  not  place  the  ignition  switch  in
the  “ON”  position  or  do  not  put  the  opera-
tion mode in ON. Placing the ignition switch
in the “ON” position or putting the operation
mode in ON could cause the ASC to operate,
resulting in an accident.
Note that the correct towing method depends
on  the  transmission  type  and  the  vehicle’s
drive configuration.
For  details,  refer  to  “Towing”  on  page
8-21.

Cruise control*

E00609101138

Cruise  control  is  an  automatic  speed  control
system that keeps a set speed. It can be acti-
vated at about 40 km/h (25 mph) or more.

CAUTION

l

When  you  do  not  wish  to  drive  at  a  set
speed, turn off the cruise control for safety.

l

Do not use cruise control when driving con-
ditions will not allow you to stay at the same
speed,  such  as  in  heavy  traffic  or  on  roads
that  are  winding,  icy,  snow-covered,  wet,
slippery, on a steep downhill slope.

CAUTION

l

On  vehicles  with  M/T,  do  not  move  the
gearshift lever to the “N” (Neutral) position
while driving at a set speed without depress-
ing the clutch pedal. The engine will run too
fast and might be damaged.

NOTE

l

Cruise control may not be able to keep your
speed on uphills or downhills.

l

Your speed may decrease on a steep uphill.
You  may  use  the  accelerator  pedal  if  you
want to stay at your set speed.

l

Your  speed  may  increase  to  more  than  the
set speed on a steep downhill. You must use
the brake to control your speed. As a result,
the set speed driving is deactivated.

Cruise control switches

A- CRUISE CONTROL ON/OFF switch
Used to turn on and off the cruise control.

Cruise control*

6-54

OGAE18E1

Starting and driving

6

 
B- SET - switch
Used  to  reduce  the  set  speed  and  to  set  the
desired speed.
 
C- RES + switch
Used to increase the set speed and to return to
the original set speed.
 
D- CANCEL switch
Used to deactivate the set speed driving.

NOTE

l

When operating the cruise control switches,
press  the  cruise  control  switches  correctly.
The  set  speed  driving  may  be  deactivated
automatically if two or more switches of the
cruise control are pressed at the same time.

To activate

E00609301198

1. With the ignition switch is in “ON” posi-

tion  or  the  operation  mode  is  in  ON,
press the CRUISE CONTROL ON/OFF
switch (A) to turn on the cruise control.
The  “CRUISE”  indication  lamp  in  the
meter cluster will come on.

NOTE

l

If the cruise control is on when the following
operation  is  performed,  cruise  control  will
be  on  automatically  the  next  time  you  start
the  engine.  The  “CRUISE”  indication  lamp
will also be on.
[Except  vehicles  equipped  with  keyless  op-
eration system]
Turn  the  ignition  switch  to  the  “LOCK”  or
“ACC” position.
[Vehicles  equipped  with  keyless  operation
system]
Put the operation mode in OFF or ACC.

NOTE

l

If  the  battery  voltage  is  insufficient,  the
memory  data  for  the  cruise  control  may  be
erased.
As  a  result,  the  “CRUISE”  indication  lamp
may  not  come  on  when  you  restart  the  en-
gine.
If  this  happens,  press  the  CRUISE  CON-
TROL ON/OFF switch once again to turn on
the cruise control.

2. Accelerate  or  decelerate  to  your  desired

speed,  then  push  down  and  release  the
SET  -  switch  (B)  when  the  “CRUISE”
indication lamp is illuminated. The vehi-
cle will then maintain the desired speed.

NOTE

l

When you release the SET - switch, the ve-
hicle speed will be set.

Cruise control*

6-55

OGAE18E1

Starting and driving

6


Content   ..  12  13  14  15   ..