Lexus ES250 (2024 year). Manual in english - page 8
 

  Index      Manuals     Lexus ES250 (2024 year). Manual in english


Search            copyright infringement  


Content      ..     6      7      8      9     ..


Lexus ES250 (2024 year). Manual in english - page 8


245

4-5. Using the driving support systems

4

Driving

steering wheel

AVS (Adaptive Variable Suspen-
sion System) (if equipped)

By independently controlling the 
damping force of the shock absorbers 
for each of the 4 wheels according to 
the road and driving conditions, this 
system helps riding comfort with supe-
rior vehicle stability, and helps good 
vehicle posture.
Also, the damping force changes 
depending on the selected driving 
mode. (

P.210)

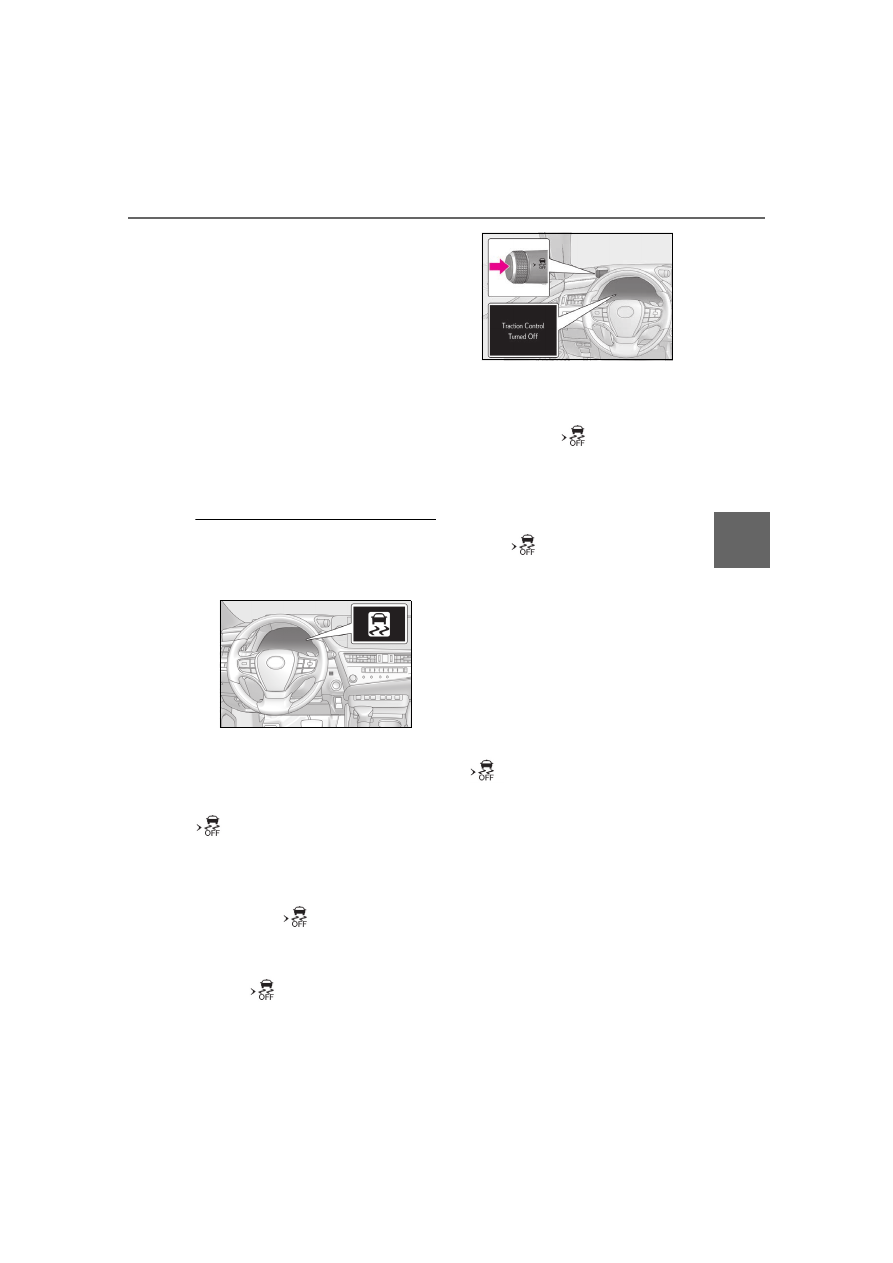
When the TRAC/VSC systems are 

operating

The slip indicator light will flash while the 

TRAC/VSC systems are operating.

Disabling the TRAC system

If the vehicle gets stuck in mud, dirt or snow, 
the TRAC system may reduce power from 
the engine to the wheels. Pressing the 

 switch to turn the system off may 

make it easier for you to rock the vehicle in 
order to free it.
To turn the TRAC system off, quickly press 

and release the 

 switch.

The “Traction Control Turned Off” will be 
shown on the multi-information display. 

Press the 

 switch again to turn the 

system back on.

Turning off both TRAC and VSC sys-

tems

To turn the TRAC and VSC systems off, 

press and hold the 

 switch for more 

than 3 seconds while the vehicle is stopped.
The VSC OFF indicator light will come on 

and the “Traction Control Turned Off” will 
be shown on the multi-information display.

*

Press the 

 switch again to turn the 

system back on.

*

: PCS (Pre-Collision System) will also be 

disabled (only Pre-Collision warning is 
available). The PCS warning light will 
come on and a message will be displayed 
on the multi-information display. 
(

P.183)

When the message is displayed on the 
multi-information display showing that 
TRAC has been disabled even if the 

 switch has not been pressed

TRAC is temporary deactivated. If the 

information continues to show, contact your 

Lexus dealer.

Operating conditions of hill-start assist 

control

When all of the following conditions are 

met, the hill-start assist control will operate:

The shift lever is in a position other than P 

or N (when starting off forward/back-

ward on an upward incline).

The vehicle is stopped.

The accelerator pedal is not depressed.

The parking brake is not engaged.

246

4-5. Using the driving support systems

Automatic system cancelation of hill-

start assist control

The hill-start assist control will turn off in any 

of the following situations:

The shift lever is shifted to P or N.

The accelerator pedal is depressed.

The parking brake is engaged.

2 seconds at maximum elapsed after the 

brake pedal is released.

Sounds and vibrations caused by the 

ABS, brake assist, VSC, TRAC and hill-

start assist control systems

A sound may be heard from the engine 

compartment when the brake pedal is 

depressed repeatedly, when the engine is 

started or just after the vehicle begins to 

move. This sound does not indicate that a 

malfunction has occurred in any of these 

systems.

Any of the following conditions may 

occur when the above systems are oper-

ating. None of these indicates that a mal-

function has occurred.

• Vibrations  may  be  felt through the vehi-

cle body and steering.

• A motor sound may be heard also after 

the vehicle comes to a stop.

• The brake pedal may pulsate slightly after 

the ABS is activated.

• The brake pedal may move down slightly 

after the ABS is activated.

Active Cornering Assist operation 

sounds and vibrations

When the Active Cornering Assist is oper-

ated, operation sounds and vibrations may 

be generated from the brake system, but 

this is not a malfunction.

Automatic reactivation of TRAC and 

VSC systems

After turning the TRAC and VSC systems 

off, the systems will be automatically re-

enabled in the following situations:

When the engine switch is turned off

If only the TRAC system is turned off, the 

TRAC will turn on when vehicle speed 

increases

If both the TRAC and VSC systems are 

turned off, automatic re-enabling will not 

occur when vehicle speed increases.

Secondary Collision Brake operating 

conditions

The system operates when the SRS airbag 

sensor detects a collision while the vehicle 

is in motion.
However, the system does not operate 

when the components are damaged.

Secondary Collision Brake automatic 

cancellation

The system is automatically canceled in any 

of the following situations.

The vehicle speed drops to approxi-

mately 6 mph (10 km/h)

A certain amount of time elapses during 

operation

The accelerator pedal is depressed a 

large amount

Operating conditions of Active Corner-

ing Assist

The system operates when the following 

occurs.

TRAC/VSC can operate

The driver is attempting to accelerate 

while turning

The system detects that the vehicle is 

drifting to the outer side

The brake pedal is released

Reduced effectiveness of the EPS sys-

tem

The effectiveness of the EPS system is 

reduced to prevent the system from over-

heating when there is frequent steering 

input over an extended period of time. The 

steering wheel may feel heavy as a result. 

Should this occur, refrain from excessive 

steering input or stop the vehicle and turn 

the engine off. The EPS system should 

return to normal within 10 minutes.

If a message about AWD is shown on the multi-information display

Perform the following actions.

247

4-5. Using the driving support systems

4

Driving

Message

Details/Actions

“AWD System Overheated 
Switching to 2WD Mode”

AWD system is overheating.

Perform the following actions.

Reduce the vehicle speed until the message disappears.

Stop the vehicle in a safe place and let the engine idle.

Once the display message on the multi-information display 
turns off, there is no problem continuing to drive.
If the message does not disappear, have your vehicle 
checked by your Lexus dealer immediately.

“AWD System Overheated 
2WD Mode Engaged”

The vehicle switched from all-wheel drive (AWD) to front 
wheel drive due to overheating.

Perform the following actions.

Reduce the vehicle speed until the message disappears.

Stop the vehicle in a safe place and let the engine idle.

Once the display message on the multi-information display 
turns off, the AWD system returns to normal.
If the message does not disappear, have your vehicle 
checked by your Lexus dealer immediately.

“AWD System Malfunction 
2WD Mode Engaged Visit 
Your Dealer”

A malfunction occurred in the AWD system.

Have your vehicle checked by your Lexus dealer imme-
diately.

WARNING

The ABS does not operate effectively 

when

The limits of tire gripping performance 

have been exceeded (such as exces-

sively worn tires on a snow covered 

road).

The vehicle hydroplanes while driving 

at high speed on wet or slick roads.

Stopping distance when the ABS is 

operating may exceed that of normal 

conditions

The ABS is not designed to shorten the 

vehicle’s stopping distance. Always 

maintain a safe distance from the vehicle 

in front of you, especially in the following 

situations:

When driving on dirt, gravel or snow-

covered roads

When driving with tire chains

When driving over bumps in the road

When driving over roads with pot-

holes or uneven surfaces

TRAC/VSC may not operate effec-

tively when

Directional control and power may not 

be achievable while driving on slippery 

road surfaces, even if the TRAC/VSC 

system is operating. 

Drive the vehicle carefully in conditions 

where stability and power may be lost.

248

4-5. Using the driving support systems

WARNING

Active Cornering Assist does not 

operate effectively when

Do not overly rely on Active Corner-

ing Assist. Active Cornering Assist 

may not operate effectively when 

accelerating down slopes or driving on 

slippery road surfaces.

When Active Cornering Assist fre-

quently operates, Active Cornering 

Assist may temporarily stop operating 

to ensure proper operation of the 

brakes, TRAC and VSC.

Hill-start assist control does not oper-

ate effectively when

Do not overly rely on hill-start assist 

control. Hill-start assist control may 

not operate effectively on steep 

inclines and roads covered with ice.

Unlike the parking brake, hill-start 

assist control is not intended to hold 

the vehicle stationary for an extended 

period of time. Do not attempt to use 

hill-start assist control to hold the vehi-

cle on an incline, as doing so may lead 

to an accident.

When the TRAC/VSC is activated

The slip indicator light flashes. Always 

drive carefully. Reckless driving may 

cause an accident. Exercise particular 

care when the indicator light flashes.

When the TRAC/VSC systems are 

turned off

Be especially careful and drive at a 

speed appropriate to the road condi-

tions. As these are the systems to help 

ensure vehicle stability and driving force, 

do not turn the TRAC/VSC systems off 

unless necessary.

Secondary Collision Brake

Do not rely solely upon the Secondary 

Collision Brake. This system is designed 

to help reduce the possibility of further 

damage due to a secondary collision, 

however, that effect changes according 

to various conditions. Overly relying on 

the system may result in death or serious 

injury.

Replacing tires

Make sure that all tires are of the speci-

fied size, brand, tread pattern and total 

load capacity. In addition, make sure that 

the tires are inflated to the recom-

mended tire inflation pressure level.
The ABS, TRAC and VSC systems will 

not function correctly if different tires are 

installed on the vehicle. 

Contact your Lexus dealer for further 

information when replacing tires or 

wheels.

Handling of tires and the suspension

Using tires with any kind of problem or 

modifying the suspension will affect the 

driving assist systems, and may cause a 

system to malfunction.

249

4-6. Driving tips

4

Driving

4-6.Driving tips

Use fluids that are appropriate to 
the prevailing outside temperatures.

• Engine oil
• Engine coolant
• Washer fluid

Have a service technician inspect 
the condition of the battery.

Have the vehicle fitted with four 
snow tires or purchase a set of tire 
chains for the front tires.

*

Ensure that all tires are the specified size 
and brand, and that chains match the size 
of the tires.

*

: Tire chains cannot be mounted on vehi-

cles with 18-inch/19-inch tires.

Perform the following according to the 
driving conditions:

Do not try to forcibly open a window 

Winter driving tips

Carry out the necessary prepara-
tions and inspections before driving 
the vehicle in winter. Always drive 
the vehicle in a manner appropriate 
to the prevailing weather condi-
tions.

Preparation for winter

WARNING

Driving with snow tires

Observe the following precautions to 

reduce the risk of accidents. 

Failure to do so may result in a loss of 

vehicle control and cause death or seri-

ous injury.

Use tires of the specified size.

Maintain the recommended level of air 

pressure.

Do not drive in excess of 75 mph (120 

km/h), regardless of the type of snow 

tires being used.

Use snow tires on all, not just some 

wheels.

Driving with tire chains (vehicles with 

17-inch tires)

Observe the following precautions to 

reduce the risk of accidents.
Failure to do so may result in the vehicle 

being unable to be driven safely, and may 

cause death or serious injury.

Do not drive in excess of the speed 

limit specified for the tire chains being 

used, or 30 mph (50 km/h), which-

ever is lower.

Avoid driving on bumpy road surfaces 

or over potholes.

Avoid sudden acceleration, abrupt 

steering, sudden braking and shifting 

operations that cause sudden engine 

braking.

Slow down sufficiently before entering 

a curve to ensure that vehicle control 

is maintained.

Do not use LTA (Lane Tracing Assist) 

system.

NOTICE

Repairing or replacing snow tires

Request repairs or replacement of snow 

tires from Lexus dealers or legitimate tire 

retailers. 

This is because the removal and attach-

ment of snow tires affects the operation 

of the tire pressure warning valves and 

transmitters.

Before driving the vehicle

250

4-6. Driving tips

or move a wiper that is frozen. Pour 
warm water over the frozen area to 
melt the ice. Wipe away the water 
immediately to prevent it from 
freezing.

To ensure proper operation of the 
climate control system fan, remove 
any snow that has accumulated on 
the air inlet vents in front of the 
windshield.

Check for and remove any excess 
ice or snow that may have accumu-
lated on the exterior lights, outside 
rear view mirrors, windows, vehi-
cle’s roof, chassis, around the tires 
or on the brakes.

Remove any snow or mud from the 
bottom of your shoes before getting 
in the vehicle.

To protect the windshield wipers

P.165

Accelerate the vehicle slowly, keep a 
safe distance between you and the 
vehicle ahead, and drive at a reduced 
speed suitable to road conditions.

Park the vehicle and move the shift 
lever to P without setting the park-
ing brake. The parking brake may 
freeze up, preventing it from being 
released. If the vehicle is parked 
without setting the parking brake, 
make sure to block the wheels. 
Failure to do so may be dangerous 

because it may cause the vehicle to 
move unexpectedly, possibly lead-
ing to an accident.

When the parking brake is in automatic 
mode, release the parking brake after shift-
ing the shift lever to P. (

P.151)

If the vehicle is left parked with the 
brakes damp in cold temperatures, 
there is a possibility of the brakes 
freezing.

If the vehicle is parked without set-
ting the parking brake, confirm that 
the shift lever cannot be moved out 
of P

*

.

*

: The shift lever will be locked if it is 

attempted to be shifted from P to any 
other position without depressing the 
brake pedal. If the shift lever can be 
shifted from P, there may be a problem 
with the shift lock system. Have the vehi-
cle inspected by your Lexus dealer 
immediately.

Vehicles with 17-inch tires

Use the correct tire chain size when 
mounting the tire chains.
Chain size is regulated for each tire 
size.

When driving the vehicle

When parking the vehicle

WARNING

When parking the vehicle

When parking the vehicle without apply-

ing the parking brake, make sure to 

chock the wheels. If you do not chock the 

wheels, the vehicle may move unexpect-

edly, possibly resulting in an accident.

Selecting tire chains

251

4-6. Driving tips

4

Driving

Side chain:

0.12 in. (3 mm) in diameter

0.39 in. (10 mm) in width

1.18 in. (30 mm) in length

Cross chain:

0.16 in. (4 mm) in diameter

0.55 in. (14 mm) in width

0.98 in. (25 mm) in length

Vehicles with 18-inch/19-inch tires

Tire chains cannot be mounted.

Snow tires should be used instead.

Regulations regarding the use of tire 
chains vary depending on location and 
type of road. Always check local regu-
lations before installing chains.

Tire chain installation

Observe the following precautions when 

installing and removing chains:

Install and remove tire chains in a safe 

location.

Install tire chains on the front tires. Do not 

install tire chains on the rear tires.

Install tire chains on front tires as tightly 

as possible. Retighten chains after driving 

1/4 - 1/2 mile (0.5 - 1.0 km).

Install tire chains following the instruc-

tions provided with the tire chains.

To enable the windshield wipers to be 
lifted when heavy snow or icy condi-
tions are expected, change the rest 
position of the windshield wipers from 
the retracted position below the hood 
to the service position using the wiper 
lever. (

P.165)

Regulations on the use of tire 
chains (vehicles with 17-inch 
tires)

A

B

C

D

E

F

NOTICE

Fitting tire chains

The tire pressure warning valves and 

transmitters may not function correctly 

when tire chains are fitted.

Windshield wipers

252

4-6. Driving tips

253

5

5

Interio

r fe

atures

Interior features

5-1. Lexus Climate Concierge

Lexus Climate Concierge.....

254

5-2. Using the air conditioning system

Automatic air conditioning sys-

tem................................................

255

Heated steering wheel/seat heat-

ers/seat ventilators.................

261

5-3. Using the interior lights

Interior lights list.........................

265

5-4. Using the storage features

List of storage features............

268

Trunk features..............................

271

5-5. Using the other interior features

Other interior features ...........

272

Garage door opener...............

284

Compass.......................................

289

254

5-1. Lexus Climate Concierge

5-1.Lexus Climate Concierge

1

Select 

 in the main menu on the 

Center Display.

2

Select “Climate”.

3

Select “Front”.

4

Select “Climate concierge”.

The indicator on the air conditioning con-
trol screen illuminates, and the automatic 
air conditioning system, seat heaters and 
ventilators, and heated steering wheel 
operate in automatic mode.
If any of the system is operated manually, 
the indicator turns off. However, all other 
functions continue to operate in automatic 
mode.

Automatic air conditioning system 
(

P.255)

The temperature can be adjusted indi-
vidually for the driver seat and passen-
ger seat.

Seat heaters and ventilators (if 
equipped) (

P.261)

Heating or ventilation is automatically 
selected according to the set tempera-
ture of the air conditioning system, the 
outside temperature, etc. Also, heating 
and ventilation may turn off.
The seat heater and ventilator of the 
front passenger seat operate in auto-
matic mode if a passenger is detected.

Heated steering wheel (if 
equipped) (

P.261)

Heated steering wheel operates auto-
matically according to the set tem-
perature of the air conditioning system, 
the outside temperature, etc.

Seat heater/ventilator operation

When automatic mode is selected using the 

seat heater/ventilator switch, passenger 

detection is not performed.

Lexus Climate Concierge

The seat heaters (if equipped), seat 
ventilators (if equipped) and heated 
steering wheel (if equipped) are 
each automatically controlled 
according to the set temperature of 
the air conditioning system, the out-
side and cabin temperature, etc. 
Lexus Climate Concierge allows a 
comfortable condition to be main-
tained without adjusting each sys-
tem.
Lexus Climate Concierge can be 
operated using the air conditioning 
control screen on the Center Dis-
play (

P.258).

Turning on Lexus Climate Con-
cierge

Operation of each system

255

5-2. Using the air conditioning system

5

Interio

r fe

atures

5-2.Using the air conditioning system

Left-hand side temperature control switch

Automatic mode switch

Off switch

Fan speed decrease switch

Fan speed increase switch

Airflow mode control switch

Windshield defogger switch

Rear window and outside rear view mirror defoggers switch

Outside/recirculated air mode switch

Right-hand side temperature control switch

Adjusting the temperature

Operate the temperature control 
switch upwards to increase the tem-
perature and downwards to decrease 
the temperature.

If the “A/C” indicator is turned off, the sys-

tem will blow ambient temperature air or 
heated air.

Setting the fan speed

Operate the fan speed increase switch 
to increase the fan speed and the fan 
speed decrease switch to decrease the 

Automatic air conditioning system

Air outlets and fan speed are automatically adjusted according to the tem-
perature setting.
The air conditioning system can be operated using the air conditioning con-
trol panel and air conditioning control screen on the Center Display 
(

P.258).

Air conditioning controls

A
B
C
D

E
F

G

H

I

J

256

5-2. Using the air conditioning system

fan speed.

Press the off switch to turn the fan off.

Changing the air flow mode

Press the airflow mode control switch.
The mode changes as follows each 
time the switch is pressed. (

P.258)

Switching between outside air and 
recirculated air modes

Press the outside/recirculated air 
mode switch.
The mode changes as follows each 
time the switch is pressed.

 (recirculated air mode) 


automatic mode

*


(outside 

air mode) 


 (recirculated air 

mode)

When the system is switched to automatic 
mode, the air conditioning system oper-
ates automatically.

*

: This item cannot be selected when the 

air conditioning is off.

Defogging the windshield

Defoggers are used to defog the wind-
shield and front side windows.
Press the windshield defogger switch.

Set the outside/recirculated air mode 
switch to outside air mode if the recircu-
lated air mode is used. (It may switch auto-
matically.)
To defog the windshield and the side win-
dows early, turn the air flow and tempera-
ture up.
To return to the previous mode, press the 
windshield defogger switch again when the 
windshield is defogged.

Defogging the rear window and 
outside rear view mirrors

Defoggers are used to defog the rear 
window, and to remove raindrops, dew 
and frost from the outside rear view 
mirrors.
Press the rear window and outside 
rear view mirror defoggers switch.

The defoggers will automatically turn off 
after 15 to 60 minutes. The operation time 
changes according to the ambient tem-
perature and vehicle speed.

When the outside temperature exceeds 

75°F (24°C) and the air conditioning 

system is on

In order to reduce the air conditioning 

power consumption, the air conditioning 

system may switch to recirculated air 

mode automatically. This may also 

reduce fuel consumption.

Recirculated air mode is selected as a 

default mode when the engine switch is 

turned to IGNITION ON mode.

It is possible to switch to outside air mode 

at any time by pressing the outside/recir-

culated air mode switch.

Fogging up of the windows

The windows will easily fog up when the 

humidity in the vehicle is high. Turning 

“A/C” on will dehumidify the air from the 

outlets and defog the windshield effectively.

If you turn “A/C” off, the windows may 

fog up more easily.

The windows may fog up if the recircu-

lated air mode is used.

When driving on dusty roads

Close all windows. If dust thrown up by the 

vehicle is still drawn into the vehicle after 

closing the windows, it is recommended 

that the air intake mode be set to outside air 

mode and the fan speed to any setting 

except off.

257

5-2. Using the air conditioning system

5

Interio

r fe

atures

Outside/recirculated air mode

Setting to the recirculated air mode tem-

porarily is recommended in preventing 

dirty air from entering the vehicle interior 

and helping to cool the vehicle when the 

outside air temperature is high.

Outside/recirculated air mode may 

automatically switch regardless of the air 

conditioning setting depending on the 

temperature setting or inside tempera-

ture.

Registering air conditioning settings to 

electronic keys

Unlocking the vehicle using an electronic 

key and turning the engine switch to 

IGNITION ON mode will recall that 

key’s registered air conditioning settings.

When the engine switch is turned off, the 

current air conditioning settings will auto-

matically be registered to the electronic 

key that was used to unlock the vehicle.

The system may not operate correctly if 

more than one electronic key is in the 

vicinity or if the smart access system with 

push-button start is used to unlock the 

passenger door.

Vehicles with the driving position mem-

ory: The doors that can recall the air con-

ditioning setting

*

 when unlocked using 

the smart access system with push-but-

ton start can be changed. For details, 

contact your Lexus dealer.

*

: The doors that can recall the driving posi-

tion memory are changed at the same 
time.

Operation of the air conditioning sys-

tem in Eco drive mode

In Eco drive mode, the air conditioning sys-

tem is controlled as follows to prioritize fuel 

efficiency:

Engine speed and compressor operation 

controlled to restrict heating/cooling 

capacity

Fan speed restricted when automatic 

mode is selected

To improve air conditioning performance, 

perform the following operations:

Turn off eco air conditioning mode 

(

P.259)

Adjust the fan speed

Turn off Eco drive mode (

P.210)

When the outside temperature falls to 

nearly 32°F (0°C)

The dehumidification function may not 

operate even when “A/C” is selected.

Ventilation and air conditioning odors

To let fresh air in, set the air conditioning 

system to the outside air mode.

During use, various odors from inside 

and outside the vehicle may enter into 

and accumulate in the air conditioning 

system. This may then cause odor to be 

emitted from the vents.

To reduce potential odors from occur-

ring, the start timing of the blower may be 

delayed for a short period of time imme-

diately after the air conditioning system is 

started in automatic mode.

When parking, the system automatically 

switches to fresh air intake mode to 

encourage better air circulation through-

out the vehicle, helping to reduce odors 

that occur when starting the vehicle.

Using the Intelligent Assistant

Air conditioning system can be operated 

using voice commands. For details, refer to 

the “MULTIMEDIA OWNER’S MAN-

UAL”.

Air conditioning filter

P.328

Air conditioning system refrigerant

A label regarding the refrigerant of the 

air conditioning system is attached to the 

hood at the location shown in the follow-

ing illustration.

The meaning of each symbol on the label 

258

5-2. Using the air conditioning system

are as follows:

Customization

Settings (e.g. A/C Auto switch operation) 

can be changed. 

(Customizable features: 

P.404)

Air conditioning control screen

1

Select 

 in the main menu on the 

Center Display.

2

Select “Climate”.

3

Select “Front”.

Sub menu

Selecting the sub menu item to switch the 
screen display.
“Front”: Display the air conditioning con-
trol screen
“Options”: Display the option screen

Select the air flow mode

Each time the switch is selected, the airflow 
mode is changed.

: Air flows to the upper body

: Air flows to the upper body and feet

: Air flows to the feet

Caution

Air conditioning system

Air conditioning system 
lubricant type

Requires registered tech-
nician to service air con-
ditioning system

Flammable refrigerant

WARNING

To prevent the windshield from fog-

ging up

Do not use the windshield defogger 

switch during cool air operation in 

extremely humid weather. The difference 

between the temperature of the outside 

air and that of the windshield can cause 

the outer surface of the windshield to fog 

up, blocking your vision.

When the outside rear view mirror 

defoggers are operating

Do not touch the outside rear view mir-

ror surfaces, as they can become very 

hot and burn you.

NOTICE

To prevent battery discharge

Do not leave the air conditioning system 

on longer than necessary when the 

engine is off.

When repairing/replacing parts of 

the air conditioning system

Have repair/replacement performed by 

your Lexus dealer. When a part of the air 

conditioning system, such as the evapo-

rator, is to be replaced, it must be 

replaced with a new one.

Air conditioning control screen

A

B

259

5-2. Using the air conditioning system

5

In

te

rio

r f

ea

tu

re

s

: Air flows to the feet and the wind-

shield defogger operates

Turn the function on/off

Each of the following functions can be 
switched on and off.
When the function is on, the indicator illu-
minates on the control screen.
“A/C”: Set cooling and dehumidification 
function
“Sync”: Adjust the temperature for driver 
seat and front passenger seat simultane-
ously (“Sync” mode) (

P.260)

“Climate concierge”: Set Lexus Climate 
Concierge (

P.254)

Fan speed level display

The current fan speed level is displayed.

Option screen

Select “Options” on the air condition-
ing control screen (

P.258).

The functions can be switched 

 (on) 

and 

 (off).

Set eco air conditioning mode

Air conditioning and heater output is lim-
ited to prioritize fuel economy.

Prevent ice from building up on the 
windshield and wiper blades 
(Windshield wiper de-icer) (if 

equipped)

Windshield wiper de-icer (if equipped)

This feature is used to prevent ice from 

building up on the windshield and wiper 

blades.
The windshield wiper de-icer will automati-

cally turn off after approximately 15 min-

utes.

Eco air conditioning mode

When Eco drive mode is selected using the 

Driving Mode Select switch, eco air condi-

tioning mode turns on.
When a drive mode other than Eco drive 

mode is selected, eco air conditioning 

mode may turn off.

1

Press the automatic mode switch.

2

Press the outside/recirculated air 
mode switch to switch to automatic 
air intake mode.

The air conditioning system automatically 

switches between outside air and recircu-

lated air modes.

3

Adjust the temperature setting.

4

To stop the operation, press the off 
switch.

If the fan speed setting or air flow 
modes are operated, the automatic 
mode indicator goes off. However, 
automatic mode for functions other 
than that operated is maintained.

C

D

A

B

WARNING

To prevent burns (vehicles with wind-

shield wiper de-icer)

Do not touch the glass at lower part of 

the windshield or to the side of the front 

pillars when the windshield wiper de-icer 

is on.

Using automatic mode

260

5-2. Using the air conditioning system

Using automatic mode

Fan speed is adjusted automatically 

according to the temperature setting and 

the ambient conditions.
Therefore, the fan may stop for a while until 

warm or cool air is ready to flow immedi-

ately after the automatic mode switch is 

pressed.
Cool air may blow around the upper body 

even when the heater is on due to sunlight.

Automatic mode for air intake control

In automatic mode, the system detects 

exhaust gas and other pollutants and auto-

matically switches between outside air and 

recirculated air modes.
When the dehumidification function is off, 

and the fan is operating, turning automatic 

mode on will activate the dehumidification 

function. The next time the dehumidification 

function is turned off, the automatic mode 

for switching between outside air and recir-

culated air modes is canceled.

To turn on the “Sync” mode, select the 
“Sync” on the air conditioning control 
screen.

The driver’s side temperature control 
switches can be used to adjust the tem-
perature for the driver’s seat and passen-
ger’s seat side. To enter individual mode, 
operate the passenger’s side temperature 
control switches or select the “Sync” again.
The indicator on the air conditioning con-
trol screen comes on when the “Sync” 
mode is on.

Location of air outlets

The air outlets and air volume changes 
according to the selected air flow 
mode.

Adjusting the air flow direction and 
opening/closing the air outlets

Front center/front side

1

Direct air flow to the left or right, up 
or down

2

Turn the knob to open or close the 
vent

Adjusting the temperature for 
driver seat and front passenger 
seat simultaneously (“Sync” 
mode)

Air outlet layout and operations

261

5-2. Using the air conditioning system

5

In

te

rio

r f

ea

tu

re

s

Rear

1

Direct air flow to the left or right, up 
or down

2

Turn the knob to open or close the 
vent

*

: If equipped

WARNING

To prevent the windshield defogger 

from operating improperly

Do not place anything on the instrument 

panel which may cover the air outlets. 

Otherwise, air flow may be obstructed, 

preventing the windshield defoggers 

from defogging.

Heated steering wheel

*

/seat 

heaters

*

/seat ventilators

*

Heated steering wheel

Warms up the grip of the steering wheel

Seat heaters

Warm up the seat upholstery

Seat ventilators

Maintain good air flow by sucking air 
into the seats
The heated steering wheel/seat heat-
ers/seat ventilators can be operated 
using the switches and control screen 
on the Center Display (

P.263

).

WARNING

To prevent minor burn injuries

Care should be taken if anyone in the fol-

lowing categories comes in contact with 

the steering wheel or seats when the 

heater is on:

Babies, small children, the elderly, the 

sick and the physically challenged

Persons with sensitive skin

Persons who are fatigued

Persons who have taken alcohol or 

drugs that induce sleep (sleeping 

drugs, cold remedies, etc.)

NOTICE

To prevent damage to the seat heat-

ers and seat ventilators

Do not put heavy objects that have an 

uneven surface on the seat and do not 

stick sharp objects (needles, nails, etc.) 

into the seat.

262

5-2. Using the air conditioning system

Each time the switch is pressed, the 
operation condition changes as fol-
lows.
AUTO (lit) 

 Hi (2 segments lit) 


Lo (1 segment lit) 

 Off

The AUTO indicator 

 and/or level 

indicator 

 illuminates during opera-

tion.

Operation condition

The engine switch is in IGNITION ON 

mode.

When AUTO mode is selected

The heated steering wheel function may 

turn off according to the air conditioning set 

temperature, outside temperature, etc.

Stored settings

When the engine switch is turned to IGNI-

TION ON mode, the stored settings are 

recalled.

Seat heaters

Each time the switch is pressed, the 
operation condition changes as fol-
lows.
AUTO (lit) 

 Hi (3 segments lit) 


Mid (2 segments lit) 

 Lo (1 segment 

lit) 

 Off

The AUTO indicator 

 and/or level 

indicator 

 illuminates during opera-

tion.

When in the AUTO mode, the seat heat-
ers or seat ventilators automatically oper-
ate according to circumstances.

Seat ventilators

Each time the switch is pressed, the 
operation condition changes as fol-
lows.
AUTO (lit) 

 Hi (3 segments lit) 


Mid (2 segments lit) 

 Lo (1 segment 

lit) 

 Off

The AUTO indicator 

 and/or level indi-

cator 

 illuminates during operation.

When in the AUTO mode, the seat heat-
ers or seat ventilators automatically oper-
ate according to circumstances.

NOTICE

To prevent battery discharge

Do not use the functions when the 

engine is off.

Heated steering wheel

A

B

Seat heaters and ventilators

A

B

A

B

263

5-2. Using the air conditioning system

5

In

te

rio

r f

ea

tu

re

s

Operation condition

The engine switch is in IGNITION ON 

mode.

Air conditioning system-linked control 

mode

When the seat ventilator fan speed level is 

Hi (when “AUTO” is selected), the seat 

ventilator fan speed may become higher 

according to the fan speed of the air condi-

tioning system.

When AUTO mode is selected

The following functions may turn off 

according to the air conditioning set tem-

perature, outside temperature, etc.

Seat heaters

Seat ventilators

Stored settings

When the engine switch is turned to IGNI-

TION ON mode, the stored settings of the 

following functions are recalled.

Seat heaters

Seat ventilators

1

Select 

 in the main menu on the 

Center Display.

2

Select “Comfort”.

Adjust the seat ventilator fan speed 
level

Each time the switch is pressed, the opera-
tion condition changes as follows.
AUTO 

 Hi (3 segments lit) 

 Mid (2 

segments lit)

 Lo (1 segment lit) 

 Off

When in the AUTO mode, the seat heat-
ers or seat ventilators automatically oper-
ate according to circumstances.

Adjust the seat heater temperature 
level

Each time the switch is pressed, the opera-
tion condition changes as follows.
AUTO 

 Hi (3 segments lit) 

 Mid (2 

segments lit)

 Lo (1 segment lit) 

 Off

When in the AUTO mode, the seat heat-
ers or seat ventilators automatically oper-
ate according to circumstances.

Adjust the heated steering wheel 
temperature level

Each time the switch is pressed, the opera-
tion condition changes as follows.
AUTO 

 Hi (2 segments lit)

Lo (1 seg-

ment lit) 

 Off

WARNING

To prevent overheating and minor 

burn injuries

Observe the following precautions when 

using the seat heaters.

Do not cover the seat with a blanket or 

cushion when using the seat heater.

Do not use seat heater more than nec-

essary.

Control screen

A

B

C

264

5-2. Using the air conditioning system

Set the automatic mode

The following functions can be set to auto-
matic mode respectively.
When the automatic mode is on, the switch 
on the screen illuminates.
• Left-hand side seat heater/seat ventila-

tor

• Right-hand side seat heater/seat ventila-

tor

• Heated steering wheel

Customization

Steering wheel heating preference in auto-

matic mode and the automatic mode set-

tings for the seat heaters and ventilators can 

be changed. (Customizable features: 

P.404)

D

265

5-3. Using the interior lights

5

Interio

r fe

atures

5-3.Using the interior lights

Rear personal lights (

P.266)

Inside door handle lights (if equipped)

Instrument panel ornament lights (if equipped)

Shift lever light

Front personal lights (

P.266)

Interior lights (

P.266)

Clock light

Footwell lights

Engine switch illumination

Door trim ornament lights (if equipped)

Door courtesy lights

Outer foot lights (front/ front and rear)

Interior lights list

Location of the interior lights

A
B
C
D

E
F

G

H

I

J

K

L

266

5-3. Using the interior lights

Turning the door position on

Press the door-linked interior light 
switch

The lights are turned on and off according 
to whether the doors are opened/closed.

Turning the lights on/off

Turns the lights on/off (touch the light)

The rear interior light turns on/off together 
with the front interior light.
When a door is opened while the door 
position is on, the lights turn on.

Turning the lights on/off

Front

Turns the lights on/off (touch the light)

Rear

Turns the lights on/off

Illuminated entry system

The lights automatically turn on/off accord-

ing to the engine switch mode, the pres-

ence of the electronic key, whether the 

doors are locked/unlocked, and whether 

the doors are opened/closed.

To prevent the battery from being dis-

charged

If the interior lights remain on when the 

engine switch is turned off, the lights will go 

off automatically after 20 minutes.

When front interior light or front per-

sonal lights do not respond as normal

When water, dirt, etc., have adhered to 

the lens surface

When operated with a wet hand

When wearing gloves, etc.

The interior lights will turn on automati-

cally when

If any of the SRS airbags deploy (inflate) or 

in the event of a strong rear impact, the 

interior lights will turn on automatically.

Operating the interior lights

Operating the personal lights

267

5-3. Using the interior lights

5

In

te

rio

r f

ea

tu

re

s

The interior lights will turn off automatically 

after approximately 20 minutes. The inte-

rior lights can be turned off manually. How-

ever, in order to help prevent further 

collisions, it is recommended that they be 

left on until safety can be ensured. (The inte-

rior lights may not turn on automatically 

depending on the force of the impact and 

conditions of the collision.)

Customization

Some functions can be customized. (Cus-

tomizable features: 

P.404)

NOTICE

To prevent battery discharge

Do not leave the lights on longer than 

necessary when the engine is not run-

ning.

Removing light lenses

Never remove the lens for the front inte-

rior light and front personal lights. Other-

wise, the lights will be damaged. If a lens 

needs to be removed, contact your 

Lexus dealer.

268

5-4. Using the storage features

5-4.Using the storage features

Auxiliary boxes (

P.270)

Cup holders (

P.269)

Open tray (if equipped) (

P.270) Wireless charger (if equipped) (

P.274)

Console box (

P.269)

Glove box (

P.269)

List of storage features

Location of the storage features

A

B

C

D

E

WARNING

Items that should not be left in the 

vehicle

Do not leave glasses, lighters or spray 

cans in the storage spaces, as this may 

cause the following when cabin tempera-

ture becomes high:

Glasses may be deformed by heat or 

cracked if they come into contact with 

other stored items.

Lighters or spray cans may explode. If 

they come into contact with other 

stored items, the lighter may catch fire 

or the spray can may release gas, 

causing a fire hazard.

When storage compartments are not 

in use

When driving or when the storage com-

partments are not in use, keep the lids 

closed. 

In the event of sudden braking or sudden 

swerving, an accident may occur due to 

an occupant being struck by an open lid 

or the items stored inside.

269

5-4. Using the storage features

5

In

te

rio

r f

ea

tu

re

s

1

Open (press the glove box opener)

2

Unlock with the mechanical key

3

Lock with the mechanical key

Glove box light

The glove box light turns on when the tail 

lights are on.

Trunk opener main switch

P.104

Press a button to open the console 
box.

The console box can be opened from 
either side.

Console box light

The console box light turns on when the tail 

lights are on.

Front

Rear

To open, pull down the armrest and 
open the lid.

Glove box

Console box

WARNING

Caution while driving

Keep the console box closed.
Injuries may result in the event of an acci-

dent or sudden braking.

NOTICE

To prevent damage to the console 

box

When the console box is open, do not 

apply excessive force in the direction 

that it was opened.

Cup holders

270

5-4. Using the storage features

Instrument panel

Press in the button.

Front

Auxiliary box (front)

The insole for the auxiliary box can be 

removed for cleaning.

WARNING

Items unsuitable for the cup holder

Do not place anything other than cups or 

beverage cans in the cup holders. Even 

when the lid is closed, items must not be 

stored in the cup holders.

Other items may be thrown out of the 

holder in the event of an accident or sud-

den braking, causing injury. If possible, 

cover hot drinks to prevent burns.

NOTICE

To prevent damage to the cup holder

Stow the rear cup holder before stowing 

the armrest.

Auxiliary boxes

Open tray (if equipped)

WARNING

Items unsuitable for the open tray

Observe the following precautions when 

putting items in the open tray. Failure to 

do so may cause items to be thrown out 

of the tray in the event of sudden braking 

or steering. In these cases, the items may 

interfere with pedal operation or cause 

driver distraction, resulting in an acci-

dent.

Do not store items in the tray that can 

easily shift or roll out.

Do not stack items in the tray higher 

than the tray’s edge.

Do not put items in the tray that may 

protrude over the tray’s edge.

271

5-4. Using the storage features

5

In

te

rio

r f

ea

tu

re

s

Raise the hooks when needed.

The cargo hooks are provided for securing 
loose items.

Lift the luggage mat up.

Trunk features

Cargo hooks

WARNING

When the cargo net hooks are not in 

use

To avoid injury, always return the cargo 

net hooks to their stowed positions when 

not in use.

Grocery bag hooks

Luggage mat

272

5-5. Using the other interior features

5-5.Using the other interior features

1

To set the visor in the forward posi-
tion, flip it down.

2

To set the visor in the side position, 
flip down, unhook, and swing it to 
the side.

3

To use the side extender, place the 
visor in the side position, then slide 
it backward.

Slide the cover to open.

The light turns on when the cover is 
opened.

The GPS clock’s time is automatically 
adjusted by utilizing GPS time infor-
mation.

For details, refer to the “MULTIMEDIA 
OWNER’S MANUAL”.

Please use as a power supply for elec-
tronic goods that use less than 12 
VDC/10 A (power consumption of 
120 W).

Front

Open the lid.

Rear

Open the lid.

Other interior features

Sun visors

Vanity mirrors

NOTICE

To prevent battery discharge

Do not leave the lights on longer than 

necessary when the engine is off.

Clock

Power outlets

273

5-5. Using the other interior features

5

In

te

rio

r f

ea

tu

re

s

The power outlet can be used when

The engine switch is in ACCESSORY or 

IGNITION ON mode.

When stopping the engine

Disconnect electrical devices with charging 

functions, such as mobile battery packs. 

If such devices are left connected, the 

engine switch may not be turned off nor-

mally.

Using the power outlet

The shape of the console box partition 

allows power cables to be passed through 

when the console box lid is partially closed.

The USB Type-C charging ports are 
used to supply 3 A of electricity at 5 V 
to external devices.
The USB Type-C charging ports are 
for charging only. They are not 
designed for data transfer or other 
purposes.
Depending on the external device, it 
may not charge properly. Refer to the 
manual included with the device 
before using a USB Type-C charging 
port.

Using the USB Type-C charging 
ports

Front

Open the lid

To close, press in and release the lid.

NOTICE

When the power outlet is not in use

To avoid damaging the power outlet, 

close the power outlet lid when the 

power outlet is not in use. Foreign 

objects or liquids that enter the power 

outlet may cause a short circuit.

To prevent battery discharge

Do not use the power outlet longer than 

necessary when the engine is off.

USB Type-C charging ports

274

5-5. Using the other interior features

Inside of console box

Rear

Open the lid.

The USB Type-C charging ports can be 

used when

The engine switch is in ACCESSORY or 

IGNITION ON mode.

Situations in which the USB Type-C 

charging ports may not operate cor-

rectly

If a device which consumes more than 3 

A at 5 V is connected

If a device designed to communicate with 

a personal computer, such as a USB 

memory device, is connected

If the connected external device is turned 

off (depending on device)

If the temperature inside the vehicle is 

high, such as after the vehicle has been 

parked in the sun

About connected external devices

Depending on the connected external 

device, charging may occasionally be sus-

pended and then start again. This is not a 

malfunction.

A portable device can be charged by 
just placing Qi standard wireless 
charge compatible portable devices 
according to the Wireless Power Con-
sortium, such as smartphones and 
mobile batteries, etc., on the charge 
area.

NOTICE

To prevent damage to the USB Type-

C charging ports

Do not insert foreign objects into the 

ports.

Do not spill water or other liquids into 

the ports.

Rear: When the USB Type-C 

charging ports are not in use, close the 

lids. If a foreign object or liquid enters a 

port may cause a short circuit.

Do not apply excessive force to or 

impact the USB Type-C charging 

ports.

Do not disassemble or modify the USB 

Type-C charging ports.

To prevent damage to external 

devices

Do not leave external devices in the 

vehicle. The temperature inside the 

vehicle may become high, resulting in 

damage to an external device.

Do not push down on or apply unnec-

essary force to an external device or 

the cable of an external device while it 

is connected.

To prevent battery discharge

Do not use the USB Type-C charging 

ports for a long period of time with the 

engine stopped.

Wireless charger (if equipped)

275

5-5. Using the other interior features

5

Interio

r fe

atures

This function cannot be used with por-
table devices that are larger than the 
charging tray. Also, depending on the 
portable device, it may not operate as 
normal. Please read the operation 
manual for portable devices to be 
used.

The “Qi” logo

The “Qi” logo is a trademark of the 
Wireless Power Consortium.

Name for all parts

Operation indicator light

Charging tray

Charge area

*

Approximately 2.8 in. (7 cm)

Approximately 2.4 in. (6 cm)

*

: Portable devices and wireless chargers 

contain charging coils.
The charging coil in the wireless charger 
can be moved within the charge area 
near the center of the charging tray. If 

the charging coil inside a portable 
device is detected in the charge area, 
the charging coil inside the wireless 
charger will move toward it and start 
charging. If the charging coil inside a 
portable device moves outside of the 
charge area, charging will automatically 
stop.
If 2 or more portable devices are placed 
on the charging tray, their charging coils 
may not be properly detected and they 
may not be charged.

Using the wireless charger

Place the portable device on the 
charging tray

Place the charging side of the portable 
device down with the center of the device 
in the center of the charge area.
Depending on the portable device, the 
charging coil may not be located in the 
center of the device. In this case, place the 
portable device so that its charging coil is 
in the center of the charge area.
When charging, the operation indicator 
light (orange) comes on.
If charging is not occurring, try placing the 
portable device as close to the center of 
the charging area as possible.
When charging is complete, the operation 
indicator light (green) comes on.

Recharging function

When charging is complete and 

A
B
C
D

E

276

5-5. Using the other interior features

after a fixed time in the charge sus-
pension state, charging restarts.

When a portable device is moved 
significantly in the charge area, the 
charging coil is disconnected and 
charging is stopped momentarily. 
However, if there is a charging coil 
in the charge area, the charging coil 
inside the wireless charger will 
move toward it and then charging 
restarts.

Rapid charging function

The following portable devices sup-
port rapid charging.

• Portable devices compliant with WPC 

Ver1.2.4 and compatible with rapid 
charging

• iPhone’s with an iOS version that sup-

ports 7.5 W charging (iPhone 8 and 
later models)

When a portable device that sup-
ports rapid charging is charged, 
charging automatically switches to 
the rapid charging function.

Lighting conditions of operation indicator light

*1

: Charging power will not be output during standby. A metallic object will not be heated, 

if it is placed on the charging tray in this state.

*2

: Depending on the portable device, there are cases where the operation indicator light 

will continue being lit up orange even after the charging is complete.

When the wireless charger does not operate properly

When the wireless charger does not operate properly, handle the probable cause 
based on the following tables.

Operation indicator light

Conditions

Charging tray side

Center display side

Turning off

Disappear

When the Wireless charger power supply is 

off

Green (comes on)

Gray

On Standby (charging possible state)

*1

When charging is complete

*2

Orange (comes on)

Blue

When placing the portable device on the 

charging area (detecting the portable device)

Charging


Content      ..     6      7      8      9     ..