Lexus NX350 (2024 year). Manual in english - page 7
 

  Index      Manuals     Lexus NX350 (2024 year). Manual in english


Search            copyright infringement  


Content      ..     5      6      7      8     ..


Lexus NX350 (2024 year). Manual in english - page 7


Driving in low visibility conditions

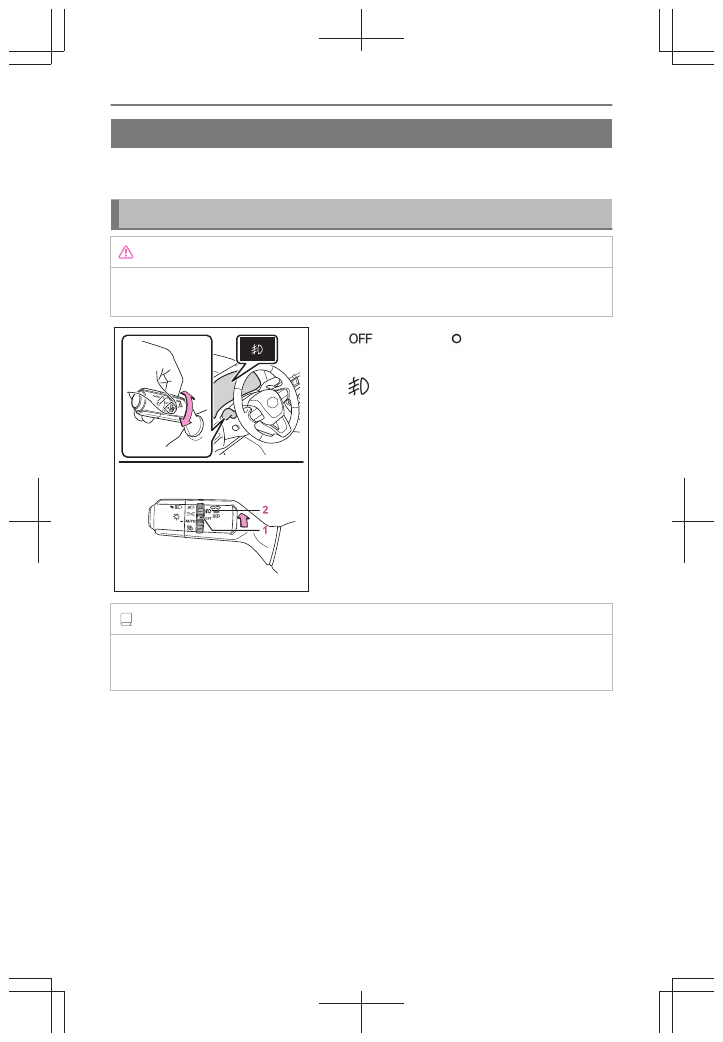
Fog light illumination

When driving in inclement weather, such as in rain and fog, turn on the front fog
lights to ensure forward visibility.

Using the fog lights

NOTICE

To prevent battery discharge, do not leave the lights on longer than necessary with the
engine stopped.


1

 (U.S.A.) or 

 (Canada) Turns the

front fog lights off

2

 Turns the front fog lights on

INFORMATION

Fog lights can be used when

The low beam headlights are on.

3-6. Driving in low visibility conditions

216

Sounding the horn

Press on or close to the 

 mark.

3-6. Driving in low visibility conditions

217

3

Driving accor

ding to the conditions

Utility vehicle precautions

Utility vehicle precautions

This vehicle belongs to the utility vehicle class, which has higher ground clearance
and narrower tread in relation to the height of its center of gravity.

Utility vehicle feature

Specific design characteristics give it a higher center of gravity than ordinary
passenger cars. This vehicle design feature causes this type of vehicle to be
more likely to rollover. Utility vehicles have a significantly higher rollover rate
than other types of vehicles.

An advantage of the higher ground clearance is a better view of the road
allowing you to anticipate problems.

It is not designed for cornering at the same speeds as ordinary passenger
cars any more than low-slung sports cars designed to perform satisfactorily
under off-road conditions. Therefore, sharp turns at excessive speeds may cause
rollover.

WARNING

Utility vehicle precautions

Always observe the following precautions to minimize the risk of death or serious injury
or damage to your vehicle:

In a rollover crash, an unbelted person is significantly more likely to die than a person
wearing a seat belt. Therefore, the driver and all passengers should always fasten their
seat belts.

Avoid sharp turns or abrupt maneuvers, if at all possible. Failure to operate this vehicle
correctly may result in loss of control or vehicle rollover causing death or serious
injury.

Loading cargo on the roof luggage carrier (if equipped) will make the center of the
vehicle gravity higher. Avoid high speeds, sudden starts, sharp turns, sudden braking
or abrupt maneuvers, otherwise it may result in loss of control or vehicle rollover due
to failure to operate this vehicle correctly.

Always slow down in gusty crosswinds. Because of its profile and higher center of
gravity, your vehicle is more sensitive to side winds than an ordinary passenger car.
Slowing down will allow you to have better control.

Do not drive horizontally across steep slopes. Driving straight up or straight down is
preferred. Your vehicle (or any similar off-road vehicle) can tip over sideways much
more easily than forward or backward.

3-7. Utility vehicle precautions

218

Off-road driving

Your vehicle is not designed to be driven off-road. However, in the event that
off-road driving cannot be avoided, please observe the following precautions to
help avoid the areas prohibited to vehicles.

Drive your vehicle only in areas where off-road vehicles are permitted to travel.

Respect private property. Get owner’s permission before entering private prop-
erty.

Do not enter areas that are closed. Honor gates, barriers and signs that restrict
travel.

Stay on established roads. When conditions are wet, driving techniques should
be changed or travel delayed to prevent damage to roads.

INFORMATION

Additional information for off-road driving

For owners in U.S. mainland, Hawaii and Puerto Rico:
To obtain additional information pertaining to driving your vehicle off-road, consult the
following organizations.

State and Local Parks and Recreation Departments

State Motor Vehicle Bureau

Recreational Vehicle Clubs

U.S. Forest Service and Bureau of Land Management

WARNING

Off-road driving precautions

Always observe the following precautions to minimize the risk of death or serious injury
or damage to your vehicle:

Drive carefully when off the road. Do not take unnecessary risks by driving in danger-
ous places.

Do not grip the steering wheel spokes when driving off-road. A bad bump could jerk
the wheel and injure your hands. Keep both hands and especially your thumbs on the
outside of the rim.

Always check your brakes for effectiveness immediately after driving in sand, mud,
water or snow.

After driving through tall grass, mud, rock, sand, water, etc., check that there is no
grass, bush, paper, rags, stone, sand, etc. adhering or trapped to the underbody. Clear

3-7. Utility vehicle precautions

219

3

Driving accor

ding to the conditions

WARNING

off any such matter from the underbody. If the vehicle is used with these materials
trapped or adhering to the underbody, a breakdown or fire could occur.

When driving off-road or in rugged terrain, do not drive at excessive speeds, jump,
make sharp turns, strike objects, etc. This may cause loss of control or vehicle rollover
causing death or serious injury. You are also risking expensive damage to your
vehicle’s suspension and chassis.

NOTICE

To prevent water damage

Take all necessary safety measures to ensure that water damage to the engine or other
components does not occur.

Water entering the engine air intake will cause severe engine damage.

Water entering the automatic transmission will cause deterioration in shift quality,
locking up of your transmission accompanied by vibration, and ultimately damage.

Water can wash the grease from wheel bearings, causing rusting and premature
failure, and may also enter the differentials, transmission and transfer case, reducing
the gear oil’s lubricating qualities.

When you drive through water

If driving through water, such as when crossing shallow streams, first check the depth of
the water and the bottom of the riverbed for firmness. Drive slowly and avoid deep water.

Inspection after off-road driving

Sand and mud that has accumulated around brake discs may affect braking efficiency
and may damage brake system components.

Always perform a maintenance inspection after each day of off-road driving that has
taken you through rough terrain, sand, mud, or water. For scheduled maintenance
information, refer to the "Warranty and Services Guide/Owner’s Manual Supple-
ment/Scheduled Maintenance".

3-7. Utility vehicle precautions

220

Changing the driving characteristics

Driving modes

The following driving modes can be used according to the driving/usage condi-
tions.

Characteristics of each driving mode

Vehicles without Adaptive Variable Suspension System:

Normal mode

Suitable when driving in the city, for good fuel consumption efficiency, silence, and
drive-ability.

Eco mode

In contrast with Normal mode, torque generation is slower when stepping on the
accelerator pedal, air conditioning operations (heating/cooling) are restrained,
and driving becomes suited for improved fuel consumption.

Sport mode

Helps to ensure steering feel and accelerator response by controlling the engine
and transmission. Suitable for sporty, fun driving, such as when driving on mountain
roads.
Vehicles with Adaptive Variable Suspension System:

Normal/Custom mode

Normal mode
Suitable when driving in the city, for good fuel consumption efficiency, silence,
and drive-ability.

Custom mode
Driving is possible by setting the desired function for power train control, chassis
control or air conditioning operations. Custom mode settings can only be
changed on the drive mode customization display of the center display.

Eco mode

In contrast to Normal mode when stepping on the accelerator pedal, torque
generation becomes slower, air conditioning operations (heating/cooling) are
restrained, and driving is suited for improved fuel consumption.

Sport mode

Sport S mode

3-8. Changing the driving characteristics

221

3

Driving accor

ding to the conditions

Through control of the engine and transmission, the generated torque when the
accelerator pedal is depressed is increased. Making this mode suitable for when
powerful acceleration is desired.

Sport S+ mode
Through control of the engine and transmission, the generated torque when
the accelerator pedal is depressed is further increased, and excellent stability
is provided through comprehensive control of the steering and suspension.
Making this mode suitable for sporty driving.

INFORMATION

Operation of the air conditioning system in Eco mode

In the Eco mode, the air conditioning system is controlled as follows to prioritize fuel
efficiency.

Engine speed and compressor operation controlled to restrict heating/cooling
capacity

Fan speed restricted when automatic mode is selected

To improve air conditioning performance, perform the following operations:

Adjust the fan speed

Adjust the temperature setting

Turn off Eco mode

When the driving mode is set to Eco mode, the air conditioning system may automati-
cally change to Eco mode. To cancel eco mode, press [Eco heat/cool].

3-8. Changing the driving characteristics

222

Changing the driving mode


▶ 

Vehicles without Adaptive Variable Suspension System

1

Eco mode
When not in Eco mode, turn the driving
mode select switch to the left to change
the driving mode to Eco mode. The Eco
drive mode indicator will be displayed on
the multi-information display.

2

Sport mode
When not in Sport mode, turn the driving
mode select switch to the right to change
the driving mode to Sport mode. The Sport
mode indicator will be displayed on the
multi-information display.

3

Normal mode
Press the driving mode select switch to
change the driving mode to Normal mode
when Eco mode or Sport mode is selected.


▶ 

Vehicles with Adaptive Variable Suspension System

1

Eco mode
When not in Eco mode, turn the driving
mode select switch to the left to change
the driving mode to Eco mode. The Eco
drive mode indicator will be displayed on
the multi-information display.

2

Sport mode

Sport S mode
When not in Sport S mode, turn the
driving mode select switch to the right
to change the driving mode to Sport S
mode. The Sport S mode indicator will
be displayed on the multi-information
display.

Sport S+ mode
When Sport S mode, turn the driving
mode select switch to the right to change
the driving mode to Sport S+ mode.

3-8. Changing the driving characteristics

223

3

Driving accor

ding to the conditions

The Sport S+ mode indicator will be dis-
played on the multi-information display.

3

Normal/Custom mode
Press the switch to select Normal mode
or Custom mode. Each time the switch is
pressed, the system changes between Nor-
mal mode and Custom mode.
When Custom mode is selected, the Cus-
tom mode indicator will be displayed on the
multi-information display.
If the switch is pressed when in Eco mode
or Sport mode, the system will return to
Normal mode.

INFORMATION

Canceling Sport/Custom mode

Select another driving mode. Sport mode and Custom mode will be canceled auto-
matically when the engine switch is turned off.

Normal mode and Eco mode will not be canceled automatically until another driving
mode is selected, even if the engine switch is turned off.

Display of the multi-information display according to selected driving mode

According to the driving mode selected, the gauges displayed on the multi-information
display may change.

 Related Links 

Customizable features(P. 711)

3-8. Changing the driving characteristics

224

Trail Mode (AWD vehicles)

Trail Mode is designed to control the spinning of the drive wheels by integradely
controlling 4WD, brake and drive force control systems. Use the Trail Mode when
driving bumpy roads, etc.

Press the Trail Mode switch.

Press the Trail Mode switch, to turn the Trail Mode
on. The Trail Mode indicator light will come on the
multi-information display. To turn the system off,
press the Trail Mode switch again.
If the tires are spinning, the slip indicator flashes to
indicate that the Trail Mode is controlling the spin-
ning of the tires.

INFORMATION

Trail Mode

Trail Mode controls the vehicle so that it can use the maximum amount of drive
force when driving on rough roads. As a result, fuel efficiency may diminish when
compared to driving with Trail Mode off.

If Trail Mode is continuously used for a long period of time, depending on the
driving conditions, the load on related parts increases and the system may not
function correctly. In this case, "Traction Control Turned OFF" will be shown on
the multi-information display but the vehicle can be driven normally. The "Traction
Control Turned OFF" on the multi-information display will turn off after a short
while and the system will operate properly.

When Trail Mode is canceled

In the following situations, Trail Mode is automatically canceled even if it is selected:

When the driving mode is changed.

When the engine is restarted.

Sounds and vibrations when driving in Trail Mode

Any of the following conditions may occur when Trail Mode is operating. None of
these indicates that a malfunction has occurred:

3-8. Changing the driving characteristics

225

3

Driving accor

ding to the conditions

Vibrations may be felt throughout the vehicle or steering

Sounds may be heard from the engine compartment

When the Trail Mode indicator does not illuminate

When the Trail Mode indicator does not illuminate even thourgh the Trail Mode switch
is pressed, the system may be malfunctioning.
Have the vehicle checked by your Lexus dealer immediately.

WARNING

Before using Trail Mode

Make sure to observe the following precautions. Failure to observe these precautions
may result in an unexpected accident.

Trail mode is intended for use when driving on rough roads.

Check that the Trail Mode indicator is illuminated before driving.

Trail Mode is not intended to expand the limits of the vehicle. Thoroughly check the
road conditions and drive with caution.

NOTICE

In order to ensure that Trail Mode operates properly

Do not continuously use the Trail Mode for a long period of time. Depending on the
driving conditions, the load on related parts increases and the system may not operate
properly.

 Related Links 

Changing the driving mode(P. 223)

3-8. Changing the driving characteristics

226

DAC (Downhill assist control system)

*

The downhill assist control system helps to prevent excessive speed on steep
downhill slopes. The system will operate when the vehicle is traveling under 18 mph
(30 km/h) with the accelerator and brake pedals released.
Press the “DAC” switch.
The downhill assist control system indicator will
comes on and the system will operate. When
the system is in operation, the slip indicator will
flash, and the stop lights/high mounted stop lights
will be lit. A sound may also occur during the
operation. This does not indicated a malfunction.
Press the “DAC” switch while the system is in operation.
The downhill assist control system indicator will flash as the system gradually
ceases operation, and will turn off when the system is fully off. Press the “DAC”
switch while the downhill assist control system indicator is flashing to start the
system again.

INFORMATION

Operating tips

The system will operate when the shift position is in a 1 range of S mode or R.

If the downhill assist control system indicator flashes

In the following situations, the indicator flashes and the system will not operate:

The shift position is in a position other 1 range of S mode or R.

The vehicle speed exceeds approximately 15 mph (25 km/h).

The brake system overheats.

In the following situation, the indicator flashes to alert the driver, but the system will
operate:

The “DAC” switch is turned off while the system is operating.
The system will gradually ceases operation. The indicator will flash during opera-
tion, and then go off when the system is fully off.

When the downhill assist control system is operated continuously

This may cause the brake actuator to overheat. In this case, the downhill assist control
system will stop operating, a buzzer will sound and the downhill assist control system
indicator will start flashing, and the "Traction Control Turned OFF" will be shown on the
multi-information display. Refrain from using the system until the downhill assist control

* : 

If equipped

3-8. Changing the driving characteristics

227

3

Driving accor

ding to the conditions

system indicator stays on and the "Traction Control Turned OFF" goes off. (The vehicle
can be driven normally during this time.)

Sounds and vibrations caused by the downhill assist control system

A sound may be heard from the engine compartment when the engine is started or
just after the vehicle begins to move. This sound does not indicate that a malfunction
has occurred in downhill assist control system.

Either of the following conditions may occur when the downhill assist control system is
operating. None of these are indicators that a malfunction has occurred.

Vibrations may be felt through the vehicle body and steering.

A motor sound may be heard after the vehicle comes to a stop.

System malfunction

In the following cases, have your vehicle checked by your Lexus dealer.

The downhill assist control system indicator does not come on when the engine switch
is turned to ON.

The downhill assist control system indicator does not come on when the “DAC” switch
is pressed.

The slip indicator comes on.

WARNING

When using downhill assist control system

Do not rely overmuch on the downhill assist control system. This function does not extend
the vehicle’s performance limitations. Always thoroughly check the road conditions, and
drive safely.

Situations in which the system may not operate properly

The system may not operate on the following surfaces, which may lead to an accident
causing death or serious injury.

Slippery surfaces such as wet or muddy roads

Icy surface

Unpaved roads

3-8. Changing the driving characteristics

228

Brake hold system

Brake hold system

WARNING

When the vehicle is on a steep incline

When using the brake hold system on a steep incline, exercise caution. The brake hold
function may not hold the vehicle in such a situation.

When stopped on a slippery road

The system cannot stop the vehicle when the gripping ability of the tires has been
exceeded. Do not use the system when stopped on a slippery road.

NOTICE

When parking the vehicle

The brake hold system is not designed for use when parking the vehicle for a long period
of time. Turning the engine switch off while the system is holding the brake may release
the brake, which would cause the vehicle to move. When operating the engine switch,
depress the brake pedal, shift the shift position to P and set the parking brake.

 Related Links 

Parking brake operation(P. 166)
Brake hold operated indicator (warning buzzer)(P. 569)

Turns the brake hold system on

The brake hold system keeps the brake applied when the shift position is in D, M or
N with the system on and the brake pedal has been depressed to stop the vehicle.
The system releases the brake when the accelerator pedal is depressed with the
shift position in D or M to allow smooth start off.
Turns the brake hold system on
The brake hold standby indicator (green) comes
on. While the system is holding the brake, the
brake hold operated indicator (yellow) comes on.

INFORMATION

Brake hold system operating conditions

The brake hold system cannot be turned on in the following conditions:

3-9. Brake hold system

229

3

Driving accor

ding to the conditions

The driver’s door is not closed.

The driver is not wearing the seat belt.

The parking brake is engaged.

"EPB Activation Stopped Incompletely" or "Parking Brake Malfunction Visit Your
Dealer" is displayed on the multi-information display.

If any of the conditions above are detected when the brake hold system is enabled, the
system will turn off and the brake hold standby indicator light will go off. In addition, if any
of the conditions are detected while the system is holding the brake, a warning buzzer will
sound and a message will be shown on the multi-information display. The parking brake
will then be set automatically.

Brake hold function

If the brake pedal is left released for a period of about 3 minutes after the system has
started holding the brake, the parking brake will be set automatically. In this case, a
warning buzzer sounds and a message is shown on the multi-information display.

The brake hold function may not hold the vehicle when the vehicle is on a steep
incline. In this situation, it may be necessary for the driver to apply the brakes. A
warning buzzer will sound and the multi-information display will inform the driver of
this situation. If a warning message is shown on the multi-information display, read the
message and follow the instructions.

To turn the system off while the system is holding the brake, firmly depress the brake
pedal and press the button again.

When do not wish for the parking brake to operate automatically, press and hold the
brake hold switch until the standby indicator (green) turns off, and then turn the engine
switch off.

When the parking brake is set automatically while the system is holding the brakes

Perform any of the following operations to release the parking brake.

Depress the accelerator pedal. (The parking brake will not be released automatically if
the seat belt is not fastened.)

Operate the parking brake switch with the brake pedal depressed.

Make sure that the parking brake indicator light goes off.

When an inspection at your Lexus dealer is necessary

When the brake hold standby indicator (green) does not illuminate even when the brake
hold switch is pressed with the brake hold system operating conditions met, the system
may be malfunctioning.
Have the vehicle checked by your Lexus dealer immediately.

If "Brake Hold Malfunction" is displayed on the multi-information display

The system may be malfunctioning.

3-9. Brake hold system

230

Have the vehicle checked by your Lexus dealer immediately.

Warning messages and buzzers

Warning messages and buzzers are used to indicate a system malfunction or to inform
the driver of the need for caution. If a warning message is shown on the multi-information
display, read the message and follow the instructions.

 Related Links 

Manual applying/releasing of the parking brake (manual mode)(P. 169)

3-9. Brake hold system

231

3

Driving accor

ding to the conditions

3-9. Brake hold system

232

4

Interior features

4-1. Favorite settings

My Settings ................................

234

4-2. Adjusting the preferred driving

position

Enabling easier driver entry

and exit (Power easy ac-
cess system)............................

236

Driving position registra-

tion/recall/deletion...............

237

4-3. Adjusting the temperature/en-

vironment inside the vehicle

Comfortable condition to

be maintained without ad-
justing each system (Lexus
Climate Concierge)............

243

Air conditioning controls .....

245

Heated steering wheel..........

254

Seat heaters...............................

255

Seat ventilators.........................

257

Using the moon roof .............

258

Using the panoramic moon

roof ..............................................

261

Opening and closing the

electronic sunshade ............

264

4-4. Illuminating the interior

Using the interior lights.........

266

4-5. Using the interior features

Location of the storage fea-

tures ...........................................

270

Convenient interior fea-

tures ...........................................

276

4-6. Using the luggage compart-

ment

Using the cargo hooks..........

287

Using the cargo net hooks .

288

Using the grocery bag

hooks ........................................

289

Deck board...............................

290

Stowing the luggage cover .

292

233

4

Interior feat

ur

es

Favorite settings

My Settings

*

By recognizing an individual through a device, such as an electronic key, the
driving position and vehicle settings recorded for that driver can be recalled when
the vehicle is entered. By assigning an authentication device to a driver in advance,
the driver can enter the vehicle with their preferred settings. Settings for up to
3 drivers can be recorded by My Settings. For details on how to assign/delete
electronic keys, set driver names, perform initialization, change drivers manually, or
delete a driver, refer to the "MULTIMEDIA OWNER'S MANUAL".

Types of assigned authentication devices

An individual can be identified using the following authentication devices.

Electronic key
or Digital key

*

An individual is identified when the smart access system with push-button start detects
their electronic key or digital keys

*

.

Bluetooth devices

An individual can be detected if the same Bluetooth device that was used as a hands-
free phone the last time the vehicle was entered is connected to the audio system.

Recalled functions

When an individual is identified from an authentication device, settings for the
following functions are recalled.

Driving position (memory recall function)

*

After an individual is identified, the driving position that was set when driving was last
completed is recalled when the following operation is performed.
The door is unlocked and opened using the smart access system with push-button start
or wireless remote control.

Meter displays, head-up display

*

 and multimedia information

*1

When an individual is identified, the vehicle settings used when the engine switch was
last turned off are recalled.

Vehicle settings that can be set using the center display

*1

When an individual is identified, the vehicle settings used when the engine switch was
last turned off are recalled.

Safe driving support function

*1

* : 

If equipped

*1 : 

Some settings are excluded

4-1. Favorite settings

234

When an individual is identified, the vehicle settings used when the engine switch was
last turned off are recalled.

4-1. Favorite settings

235

4

Interior feat

ur

es

Adjusting the preferred driving position

Enabling easier driver entry and exit (Power easy access system)

WARNING

Never use any part of your body to intentionally activate the jam protection function.

When all of the following have been performed,
the driver’s seat and steering wheel are automat-
ically adjusted to a position that allows driver to
enter and exit the vehicle easily.

The shift position has been shifted to P.

The engine switch has been turned to ACC or ON.

The driver’s seat belt has been unfastened.

When any of the following has been performed, the driver’s seat and steering
wheel automatically return to their original positions.

The engine switch has been turned to ACC mode or ON.

The driver’s seat belt has been fastened.

INFORMATION

Operation of the power easy access system

When exiting the vehicle, the power easy access system may not operate if the seat is
already close to the rearmost position, etc.

Jam protection function

While the power easy access system is operating, if an object is stuck behind the front
seat, the front seat will stop and then slightly move forward. When the jam protection
function operates, the seat stops at a position other than the set seat position. Check the
seat position.

 Related Links 

Customizable features(P. 711)

4-2. Adjusting the preferred driving position

236

Driving position registration/recall/deletion

*

This feature automatically adjusts the positions of the driver’s seat, steering wheel,
outside rear view mirrors and head-up display

*

 to make entering and exiting the

vehicle easier or to suit your preferences.
Vehicle with the My Settings:
Up to 3 different driving positions can be recorded for each the driver and guest
that have been registered for My Settings. When electronic key (including a card
key) assignment is registered for My Settings, the driving position for each driver
can be recalled (memory recall function).
Vehicle without the My Settings:
Up to 3 different driving positions can be recorded.

INFORMATION

Using the voice control system

*

The following operations can be performed using the voice control system:

Driving position registration

Driving position recall (only when the shift position is in P)

For details, refer to the "MULTIMEDIA OWNER'S MANUAL".

Registering a driving position into memory (position memory function)

1

Check that the shift position is in P.

2

Turn the engine switch to ON.

3

Adjust the driver’s seat, steering wheel, outside rear view mirrors and head-up
display

*

 to the desired positions.

4

While pressing the “SET” button, or within
3 seconds after the “SET” button is pressed,
press button “1”, “2” or “3” until the buzzer
sounds.

If a driving position has already been registered
to the selected button, the previously registered
position will be overwritten.

* : 

If equipped

4-2. Adjusting the preferred driving position

237

4

Interior feat

ur

es

INFORMATION

Seat positions that can be memorized

The adjusted positions other than the position adjusted by lumbar support switch can
be recorded.

In order to correctly use the driving position memory function

If a seat position is already in the furthest possible position and the seat is operated in
the same direction, the registered position may be slightly different when it is recalled.

WARNING

Take care during seat adjustment so that the seat does not contact a rear passenger
or squeeze your body against the steering wheel.

Recalling a driving position (position memory function)

WARNING

Never use any part of your body to intentionally activate the jam protection function.

1

Check that the shift position is in P.

2

Turn the engine switch to ON.

3

Press one of the buttons for the driving po-
sition you want to recall until the buzzer
sounds.

INFORMATION

To stop the position recall operation part-way through

Perform any of the following:

Press the “SET” button.

Press button “1”, “2” or “3”.

Operate any of the seat adjustment switches (only cancels seat position recall).

Operate the tilt and telescopic steering control switch (only cancels steering
wheel position recall).

4-2. Adjusting the preferred driving position

238

Operating the driving position memory after turning the engine switch off

Registered seat positions can be recalled up to 180 seconds after the driver’s door is
opened and another 61 seconds after it is closed again.

When the recorded seat position cannot be recalled

The seat position may not be recalled in some situations when the seat position is
recorded in a certain range.
For details, contact your Lexus dealer.

Jam protection function

While the driving position is recalled or the power easy access system is operating, if
an object is stuck behind the front seat, the front seat will stop and then slightly move
forward. When the jam protection function operates, the seat stops at a position
other than the set seat position. Check the seat position.

Recalling a driving position

Take care so that a head restraint does not contact the ceiling or a sun visor.

Registering/canceling/recall a driving position to an electronic key
(memory recall function) (vehicles with a My Settings function)

*1

Identifying a driver with the electronic key assigned and registered

The driving positions can be automatically recalled for each registered driver by
registering electronic key assignments in My Settings.

Driving position registration procedure

When the shift position is shifted to P after driving the vehicle, the current driving
position will be recorded.

Driving position recall procedure

1

Carry only the key that has been assigned and registered in My Settings, and
then unlock and open the driver’s door using the smart access system with
push-button start or wireless remote control.

The driving position other than the steering wheel and head-up display (if equipped)
will move to the recorded position. However, the seat will move to a position slightly
behind the recorded position in order to make entering the vehicle easier.
If the driving position is in a position that has already been recorded, the driving
position will not move.

2

Turn the engine switch to ACC or ON.

*1 : 

Driver’s side only

4-2. Adjusting the preferred driving position

239

4

Interior feat

ur

es

The seat, steering wheel and head-up display (if equipped) (only when the engine
switch is in ON) will move to the recorded position.

INFORMATION

Recalling the driving position using the memory recall function

Different driving positions can be registered for each electronic key. Therefore, the
driving position that is recalled may be different depending on the key being carried.

Jam protection function

While the driving position is recalled or the power easy access system is operating, if
an object is stuck behind the front seat, the front seat will stop and then slightly move
forward. When the jam protection function operates, the seat stops at a position
other than the set seat position. Check the seat position.

Memory recall function cancelation procedure

Initialize the driver registered settings in My Settings.
For information on initializing driver registered settings, refer to the "MULTIME-
DIA OWNER'S MANUAL".

Registering/canceling/recall a driving position to an electronic key
(memory recall function) (vehicles without a My Settings function)

*2

Identifying a driver with the electronic key assigned and registered

Each electronic key can be registered to automatically recall your preferred
driving position.

Driving position registration procedure

Record your driving position to button “1”, “2” or “3” before performing the
following:
Carry only the key you want to register, and then close the driver’s door.
If 2 or more keys are in the vehicle, the driving position cannot be recorded
properly.

1

Check that the shift position is in P.

2

Turn the engine switch to ON.

3

Recall the driving position that you want to record.

4

While pressing the recalled button, press and hold the door lock switch (either
lock or unlock) until the buzzer sounds.

*2 : 

Driver’s side only

4-2. Adjusting the preferred driving position

240

If the button could not be registered, the buzzer sounds continuously for approximately
3 seconds.

Driving position recall procedure

1

Make sure that the doors are locked before recalling the driving position.
Carry the electronic key that has been registered to the driving position, and
then unlock and open the driver’s door using the smart access system with
push-button start or wireless remote control.

The driving position will move to the recorded position (not including the steering
wheel and head-up display [if equipped]). However, the seat will move to a position
slightly behind the recorded position in order to make entering the vehicle easier.
If the driving position is in a position that has already been recorded, the seat and
outside rear view mirrors will not move.

2

Turn the engine switch to ACC or ON, or fasten a seat belt.

The seat, steering wheel and head-up display (if equipped) will move to the recorded
position.

INFORMATION

Recalling the driving position using the memory recall function

Different driving positions can be registered for each electronic key. Therefore,
the driving position that is recalled may be different depending on the key being
carried.

If a door other than the driver’s door is unlocked with the smart access system with
push-button start, the driving position cannot be recalled. In this case, press the
driving position button which has been set.

Memory recall function cancelation procedure

Carry only the key you want to cancel and then close the driver’s door.
If 2 or more keys are in the vehicle, the driving position cannot be canceled
properly.

4-2. Adjusting the preferred driving position

241

4

Interior feat

ur

es

1

Check that the shift position is in P.

2

Turn the engine switch to ON.

3

While pressing the “SET” button, press and hold the door lock switch (either
lock or unlock) until the buzzer sounds twice.

If it button could not be canceled, the buzzer sounds continuously for approximately 3
seconds.

4-2. Adjusting the preferred driving position

242

Adjusting the temperature/environment inside the vehicle

Comfortable condition to be maintained without adjusting each system
(Lexus Climate Concierge)

Operation of the seat heaters and seat ventilators of the front seats and the heated
steering wheel

*

 is performed automatically according to the temperature setting

of the air conditioning system, outside temperature, temperature inside the vehicle,
etc.

Lexus Climate Concierge

Lexus Climate Concierge operates in conjunction with [AUTO] of the air condi-
tioning system.

1

Select the option screen switch.

 P.247

2

Select the [Climate concierge] switch.

3

Turn the [AUTO] switch on.

Automatically controllable functions

Automatic air conditioning system

 P.245

Operation of the air conditioning system is performed automatically according to the
temperature setting for the driver's side/front passenger's side.

Seat heaters

 P.255

Operation of the seat heaters is performed automatically according to the temperature
setting for the driver's side/front passenger's side.
Operation will automatically change between the seat heaters and seat ventilators ac-
cording to the temperature setting of the air conditioning system, outside temperature,
etc.

Seat ventilators

 P.257

Operation of the seat ventilators is performed automatically according to the tempera-
ture setting for the driver's side/front passenger's side.
Operation will automatically change between the seat heaters and seat ventilators ac-
cording to the temperature setting of the air conditioning system, outside temperature,
etc.

Heated steering wheel

 P.254

Operation of the heated steering wheel is performed automatically according to the
temperature setting of the air conditioning system, outside temperature, etc.

* : 

If equipped

4-3. Adjusting the temperature/environment inside the vehicle

243

4

Interior feat

ur

es

INFORMATION

Passenger detection functions

When a passenger is detected in the front passenger seat, the seat heater and
ventilator will operate automatically.

When the seat heater/seat ventilator switch is set to AUTO, the passenger detection
function will not operate.

Rear seat heater operation (vehicles with rear seat heaters)

The rear seat heaters are not controlled by the Lexus Climate Concierge.

4-3. Adjusting the temperature/environment inside the vehicle

244

Air conditioning controls

When the [AUTO] switch is on, the air outlets and fan speed will automatically be
changed according to the set temperature.

NOTICE

Do not leave the air conditioning system on longer than necessary when the engine is
off.

When repairing/replacing parts of the air conditioning system, have repair/replace-
ment performed by your Lexus dealer. When a part of the air conditioning system,
such as the evaporator, is to be replaced, it must be replaced with a new one.

INFORMATION

When the outside temperature exceeds 75°F (24°C) and the air conditioning
system is on

In order to reduce the air conditioning power consumption, the air conditioning
system may switch to recirculated air mode automatically. This may also reduce fuel
consumption.

Recirculated air mode is selected as a default mode when the engine switch is turned
to ON mode.

It is possible to switch to outside air mode at any time by select the outside/recirculat-
ed air mode switch.

When driving on dusty roads

Close all windows. If dust thrown up by the vehicle is still drawn into the vehicle after
closing the windows, it is recommended that the air intake mode be set to outside air
mode and the fan speed to any setting except off.

When the outside temperature is low

The dehumidification function may not operate even when [A/C] is selected.

Ventilation and air conditioning odors

To let fresh air in, set the air conditioning system to the outside air mode.

During use, various odors from inside and outside the vehicle may enter into and
accumulate in the air conditioning system. This may then cause odor to be emitted
from the vents.

To reduce potential odors from occurring:

It is recommended that the air conditioning system be set to outside air mode prior
to turning the vehicle off.

The start timing of the blower may be delayed for a short period of time immediate-
ly after the air conditioning system is started in automatic mode.

4-3. Adjusting the temperature/environment inside the vehicle

245

4

Interior feat

ur

es

When parking, the system automatically switches to outside air mode to encourage-
better air circulation throughout the vehicle, helping to reduce odors that occur when
starting the vehicle.

Air conditioning system refrigerant

A label regarding the refrigerant of the air condi-
tioning system is attached to the hood at the loca-
tion shown in the following illustration.

The meaning of each symbol on the label are as follows.

Caution

Air conditioning system

Air conditioning system lubricant type

Requires registered technician to service
air conditioning system

Flammable refrigerant

Using the voice command system

Air conditioning system can be operated using voice commands. For details, refer to
"MULTIMEDIA OWNER'S MANUAL"

Customization

Functions that are linked to automatic mode (when the [AUTO] switch is on) can be set
through [Vehicle customize] on the center display.

 Related Links 

Customizable features(P. 711)

4-3. Adjusting the temperature/environment inside the vehicle

246

Option screen switch

▶ 

14-inch center display model

A

Left-hand side temperature control switch

B

Airflow mode control switch

C

Option screen switch

D

Shortcut screen switch

Select to display shortcut icons for various functions.

E

[Sync] switch

F

Right-hand side temperature control switch

G

[A/C] switch

H

Outside/recirculated air mode switch

I

Fan speed control switch

J

[Off] switch

K

[AUTO] switch

▶ 

9.8-inch center display model

A

Left-hand side temperature control switch

B

Airflow mode control switch

C

Option screen switch

D

Shortcut screen switch

Select to display shortcut icons for various functions.

4-3. Adjusting the temperature/environment inside the vehicle

247

4

Interior feat

ur

es


Content      ..     5      6      7      8     ..