Lexus RX500h (2023 year). Manual in english - page 12
 

  Index      Manuals     Lexus RX500h (2023 year). Manual in english


Search            copyright infringement  


Content      ..     10      11      12      13     ..


Lexus RX500h (2023 year). Manual in english - page 12


377

4-5. Using the driving support systems

4

Driving

3

:

5

Using the arrow buttons, adjust the 
position of the parking space to be 
registered, and then select “OK” 
button.

6

Select “Start” button.

A buzzer will sound, an operation message 

will be displayed on the multi-information 

display, and assistance will begin operating.

When the brake pedal is released, “Moving 

Forward…” will be displayed and the vehi-

cle will begin moving forward.
If you feel that the vehicle is approaching 

close to a surrounding vehicle, object, per-

son, or gutter: 

P.369

7

Perform operations as indicated by 
the advice displays until the vehicle 
stops in the target parking space.

8

Check the position that the vehicle 
has stopped. If necessary, adjust the 
position of the parking spot to be 
registered using the arrow buttons, 
and then select “Reg.” button.

“Registration Completed” will be displayed 

on the center display.

Register the parking space only if 
there are no obstructions within the 
area shown by the thick lines.

378

4-5. Using the driving support systems

The amount that the position of the 
parking spot to be registered can be 
adjusted is limited.

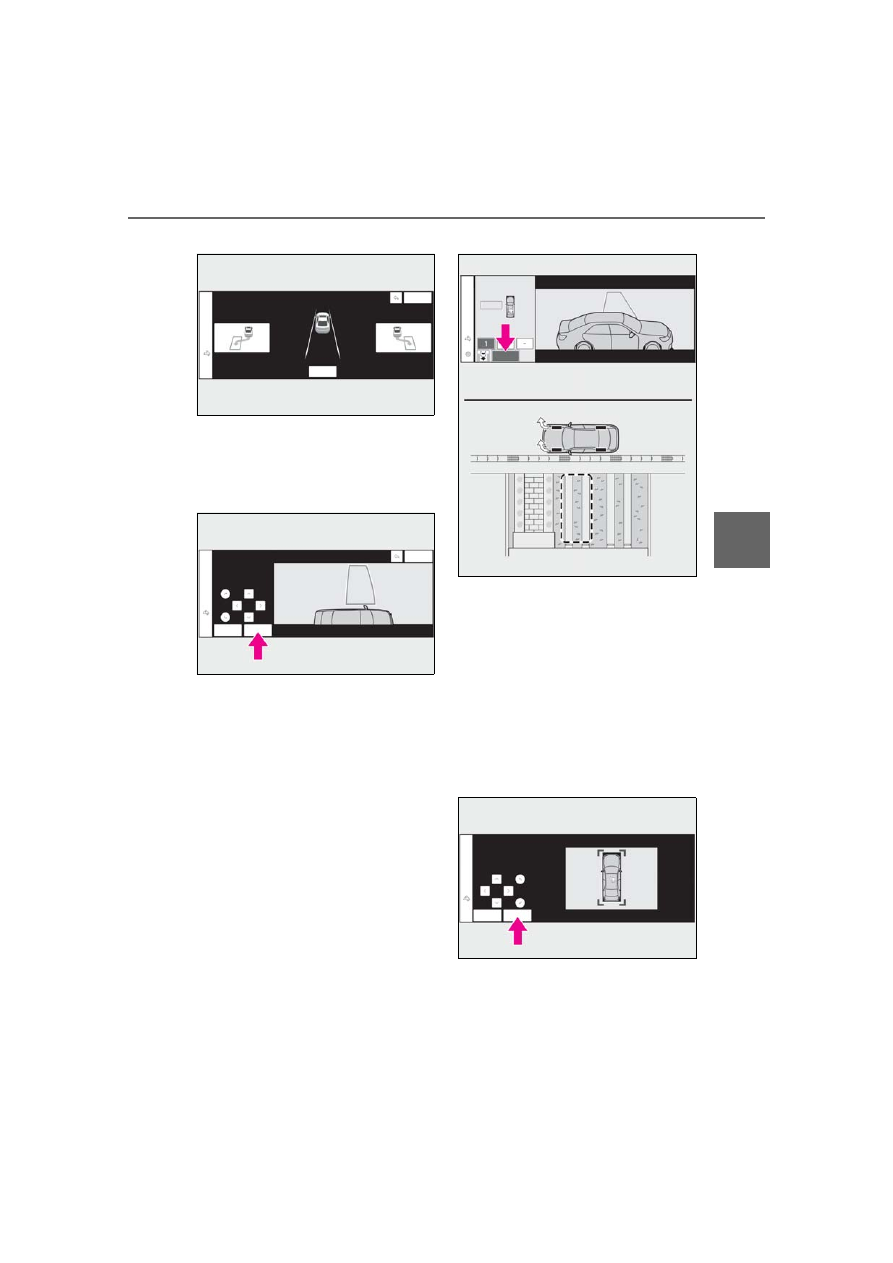
1

Stop the vehicle with it aligned near 
the center of the target parking 
space.

Approximately 3.3 ft. (1 m)

2

Press the Advanced Park main 
switch and check that a possible 
parking space is displayed on the 
center display.

If the “MODE” button is displayed, the but-

ton can be touched to change between the 

memory function, perpendicular parking 

(forward/reverse) function and parallel 

parking function.

3

Select the desired parking space, 
and then select “Start” button.

Perform the procedure for the perpendic-

ular parking (forward/reverse) function 

from step 3. (

P.369)

If you feel that the vehicle is approach-

ing close to a surrounding vehicle, 

object, person, or gutter

P.369

When overwriting a registered parking 

space

If the maximum number of parking spaces 
have been registered and 

 is selected, a 

registered parking space can be selected 

and then overwritten with a new parking 

space.

When multiple parking spaces are reg-

istered

Select the desired parking space, and then 

select “Start” button.

When parking in a parking space 
registered to the memory func-
tion

A

379

4-5. Using the driving support systems

4

Driving

When the brakes have been operated

P.369

NOTICE

When using the memory function 

(

P.369, P.373)

The memory function is a function 

which provides assistance in parking in 

a previously registered parking space. 

If the condition of the road surface, 

vehicle, or surrounding area differs 

from when registration was per-

formed, the parking space may not be 

able to be detected correctly or assis-

tance may not be provided to the point 

that the vehicle is fully parked.

Do not register a parking space in situ-

ations such as the following, as the set 

parking space may not be able to be 

registered or assistance may not be 

possible later.

• When a camera lens is dirty or cov-

ered with water droplets

• When it is raining or snowing

• When the surrounding area is dark (at 

night, etc.)

In situations such as the following, it 

may not be possible to register a park-

ing space.

• When there is insufficient space 

between the road and parking space

• When the road surface around the 

parking space does not have any dif-

ferences the system can recognize

If a parking space has been registered 

in situations such as the following, 

assistance may not be able to be 

started later or assistance to the regis-

tered position may not be possible.

• When shadows are cast on the parking 

space (there is a carport over the 

parking space, etc.)

• When there are leaves, garbage, or 

other objects which will likely move, in 

the parking space

• When the road surface around the 

parking space has the same repeating 

pattern (brick, etc.)

In situations such as the following, it 

may not be possible for the system to 

provide assistance to a registered 

parking spot:

• When the appearance of the parking 

space is affected by the shadow of the 

vehicle or trees

• When an object is detected in the reg-

istered parking space

• When a pedestrian or passing vehicle 

is detected during assistance

• When the position the vehicle is 

stopped when assistance is started dif-

fers from the position when registra-

tion was performed

380

4-5. Using the driving support systems

A smartphone can be used to remotely 
operate the parking functions and exit 
functions. Also, assistance can be pro-
vided to remotely move the vehicle for-
ward or backward into a garage, etc.

A smartphone can be used to remotely 
operate the parking function if the tar-
get parking space can be detected 
when the vehicle is stopped close and 
perpendicular to the center of the 
parking space. Also, depending on the 
condition of the parking space, etc., if it 
is necessary to change the direction of 
travel of the vehicle, the shift position 
can be shifted by assistance control.

1

Stop the vehicle with it aligned near 
the center of the target parking 
space. (

P.367, P.371)

NOTICE

• When the registered parking space 

cannot be reached due to the exis-

tence of parking blocks, etc.

• When the road surface around the 

parking space has changed (road sur-

face has degraded or been resur-

faced)

• When the sunlight conditions differ 

from when registration was performed 

(due to weather or time of day)

• When the sun is shining directly into a 

camera, such as in the early morning 

or evening

• When the color or brightness of the 

road surface is uneven

• When a light is temporarily shined on 

the parking space (lights of another 

vehicle, security light, etc.)

• When the road surface around the 

parking space has the same repeating 

pattern

• When there is a low protrusion on the 

road surface near the parking space

• When the parking space is on a slope

• When a camera has been splashed by 

hot or cold water and the lens has 

fogged up

• When a camera lens is dirty or cov-

ered with water droplets

• When accessories which obstruct the 

view of the camera are installed

If assistance is ended during registration, 
perform registration again.

When registering a parking space to 

the memory function, if the road sur-

face cannot be detected “No available 

parking space to register” will be dis-

played.

When using the memory function, 

make sure to stop immediately in front 

of the stop position. Otherwise the 

parking space may not be able to be 

detected correctly or assistance may 

not be provided to the point that the 

vehicle is fully parked.

Do not use the memory function if a 

camera has been subjected to a strong 

impact or images of the panoramic 

view monitor are misaligned.

If a camera has been replaced, as the 

installation angle of the camera will 

have changed, it will be necessary to 

reregister parking spaces of the mem-

ory function.

Remote control function

Parking using Remote control 
function

381

4-5. Using the driving support systems

4

Driving

2

Press the Advanced Park main 
switch and check that a possible 
parking space is displayed on the 
center display. (

P.367, P.371)

3

Select 

 and then select “Perpen-

dicular/parallel”.

4

Select “OK” button.

5

Exit the vehicle while carrying the 
electronic key and smartphone, 
and then start the Remote Park app 
on the smartphone.

The detection area of the electronic key is 

within approximately 9.8 ft. (3 m) around 

the vehicle.
If there is an obstruction in the path of the 

vehicle, move it before parking the vehicle. 

A corn can also be moved after exit the 

vehicle.

6

From outside of the vehicle, confirm 
the parking space on the screen of 
the smartphone and then select the 
start button.

Start operation of Remote control function 

while standing approximately 1.6 ft. (50 

cm) or more from the vehicle and out of the 

path of the vehicle.

7

Checking the safety of the area 
around the vehicle, trace the oper-
ation area on the screen of the 
smartphone.

While continuously tracing the operation 

area, the vehicle will move and parking 

assistance will be performed.
If operation of the screen of the smart-

phone is stopped, assistance can be sus-

pended and the vehicle can be stopped.
When the operation of the screen of the 

smartphone is resumed to move the vehi-

cle, the vehicle will be locked automatically 

before moving.

8

When the parking space is 
reached, after the vehicle is 

stopped by the parking brake, the 
shift position will be shifted to P, the 
power switch will be turned off, and 
the doors will be locked.

A completion screen will be displayed on 

the smartphone.

The parking function can be used even if 

obstructions exist if

When using the parking functions at a 

parking space made of white lines, even if 

an obstruction exists in the parking 

space, the space can be set as the target 

parking space. This allows for assistance 

to continue after setting a parking space 

from inside the vehicle and then exiting 

the vehicle to move an obstruction, such 

as a traffic cone placed in a handicapped 

parking space.

When perpendicular parking using 

Advanced Park, 3 parking spaces on 

each side of the vehicle (up to 6 total) can 

be detected. However, when using 

Remote control function, only 1 parking 

space on each side of the vehicle can be 

detected.

When the brakes have been operated

P.369

After the vehicle is stopped, assistance 
can be provided to move the vehicle 
into a garage, etc., by using the forward 
and backward movement function.

Moving the vehicle forward and 
backward using Remote control 
function

382

4-5. Using the driving support systems

1

Stop the vehicle at the location you 
would like to start assistance.

2

Press the Advanced Park main 
switch.  (

P.367)

3

Select 

 and then select “For-

ward/reverse”.

4

Select “OK” button.

5

Exit the vehicle while carrying the 
electronic key and smartphone, 
and then start the Remote Park app 
on the smartphone.

The detection area of the electronic key is 

within approximately 9.8 ft. (3 m) around 

the vehicle.

6

From outside of the vehicle, confirm 
the direction of travel on the screen 
of the smartphone and then select 
the start button.

Start operation of Remote control function 

while standing approximately 1.6 ft. (50 

cm) or more from the vehicle and out of the 

path of the vehicle. The detection area of 

the electronic key is within approximately 

9.8 ft. (3 m) around the vehicle.

7

Checking the safety of the area 
around the vehicle, trace the oper-
ation area on the screen of the 
smartphone.

While continuously tracing the operation 

area, the vehicle will move and forward and 

reverse movement assistance will be per-

formed.

If operation of the screen of the smart-

phone is stopped, assistance can be sus-

pended and the vehicle can be stopped.
While assistance is being performed, it can 

be stopped part way or the direction of 

travel of the vehicle can be changed.

8

Select the power button on the 
screen of the smartphone.

The power switch will then turn OFF and 

the doors will lock automatically.

Changing the direction of travel

While assistance is being performed, the 

direction of travel of the vehicle can be 

changed by the forward and reverse move-

ment function.

When there is a wall behind the vehicle, 

etc., by operating the direction of travel 

changing button on the screen of the smart-

phone, the vehicle can be slightly moved 

forward to allow loading of items and then 

moved back to its original position.

When the brakes have been operated

P.369

Assistance can be provided to exit 
from a perpendicular or parallel park-
ing space when the power switch OFF.
When forward and backward move-
ment is selected, the maximum dis-
tance the vehicle can move is 23.0 ft. 
(7 m) from the starting point and possi-
ble to change the direction of travel.

1

While near the parked vehicle, 
unlock the doors using the elec-
tronic key, and then start the 
Remote Park app on the smart-
phone.

If the smartphone cannot connect to the 

vehicle, using the electronic key, unlock the 

Exiting using Remote control 
function

383

4-5. Using the driving support systems

4

Driving

doors again.

2

Select the start button on the 
screen of the smartphone.

The power switch will change to ON.

3

Check that a possible exit direction 
is displayed, select the exit direc-
tion.

4

Checking the safety of the area 
around the vehicle, trace the oper-
ation area on the screen of the 
smartphone.

While continuously tracing the operation 

area, the vehicle will move and departure 

assistance will be performed.
If operation of the screen of the smart-

phone is stopped, assistance can be sus-

pended and the vehicle can be stopped.
While assistance is being performed, it can 

be stopped part way or the direction of 

travel of the vehicle can be changed.

5

Move the vehicle to the position 
where assistance ends and enter 
the vehicle while carrying the elec-
tronic key.

To stop assistance part way, stop operating 

the smartphone or enter the vehicle.

Exit using the remote air conditioning

Assistance can be provided to exit from a 

parking space, even when the remote air 

conditioning is operating.

When Remote control function is started 

while the remote air conditioning is oper-

ating, if tracing operations are not per-

formed on a smartphone, assistance can 

be canceled by entering the vehicle and 

depressing the brake pedal.

When the brakes have been operated

P.369

A smartphone can be used to remotely 
operate the memory function if the tar-
get parking space can be detected 
when the vehicle is stopped close to a 
parking space which was previously 
registered to the memory function.
Also, depending on the condition of 
the parking space, etc., if it is necessary 
to change the direction of travel of the 
vehicle, the shift position can be shifted 
by assistance control.

1

Stop the vehicle with it aligned near 
the center of the target parking 
space. (

P.378)

2

Press the Advanced Park main 
switch and check that a possible 
parking space is displayed on the 
center display. (

P.378)

3

Select 

 and then select “Perpen-

dicular/parallel”.

4

Select “OK” button.

If the “MODE” button is displayed, the but-

ton can be selected to change between the 

memory function, perpendicular parking 

(forward/reverse) function and parallel 

parking function.

5

Exit the vehicle while carrying the 
electronic key and smartphone, 
and then start the Remote Park app 
on the smartphone.

Parking using the Remote control 
function and memory function

384

4-5. Using the driving support systems

The detection area of the electronic key is 

within approximately 9.8 ft. (3 m) around 

the vehicle. If there is a cone or other 

obstruction in the path of the vehicle, move 

it after exiting the vehicle.

6

From outside of the vehicle, confirm 
the parking space on the screen of 
the smartphone and then select the 
start button.

Start operation of Remote control function 

while standing approximately 1.6 ft. (50 

cm) or more from the vehicle and out of the 

path of the vehicle.

7

Checking the safety of the area 
around the vehicle, trace the oper-
ation area on the screen of the 
smartphone.

While continuously tracing the operation 

area, the vehicle will move and parking 

assistance will be performed.
If operation of the screen of the smart-

phone is stopped, assistance can be sus-

pended and the vehicle can be stopped.
When the operation of the screen of the 

smartphone is resumed to move the vehi-

cle, the vehicle will be locked automatically 

before moving.

8

When the parking space is 
reached, after the vehicle is 
stopped by the parking brake, the 
shift position will be shifted to P, the 
power switch will be turned off, and 
the doors will be locked.

A completion screen will be displayed on 

the smartphone.

When the brakes have been operated

P.369

Preparation before using

Make sure to perform the following 
before using Remote control function:

1

Download the Remote Park app 
from the app store.

2

Turn the power switch to ON and 
register the smartphone as a Blue-
tooth device to the multimedia sys-
tem.

For details on registering a Bluetooth 

device, refer to the “MULTIMEDIA 

OWNER’S MANUAL”.

3

Setup the Remote Park app and 
register the vehicle.

4

The registered vehicle will be dis-
played on the screen of the smart-
phone. Select the vehicle.

The name and image of the vehicle can be 

changed on the new vehicle registration 

screen.
Vehicles can be added through the menu 

screen.

Remote control function on/off

1

Select 

 and then select 

“Advanced Park” on the center dis-
play.

2

Select “Remote Park” to turn it 
on/off. (The default setting is on.)

3

Press the Advanced Park main 
switch.

If the switch is pressed while assistance is 

being performed, the assistance will be 

Preparation before using Remote 
control function

385

4-5. Using the driving support systems

4

Driving

canceled.

4

Select the   button displayed on 
the center display.

NOTICE

Remote control function

When using Remote control function, 

make sure carry an electronic key in 

your pocket, etc.

If an electronic key is held together 

with a smartphone, etc., the electronic 

key may not be able to be detected.

Vehicles with a digital key: Remote 

control function cannot be used when 

carrying only a digital key. The driver 

should always carry the electronic key.

When entering the vehicle after using 

Remote control function, make sure 

that the electronic key is brought into 

the vehicle and all of the doors are 

closed.

Vehicles with a power easy access sys-
tem: After entering the vehicle and end-
ing Remote control function operation, 
the seat return function will operate 
when the driver’s seat seat belt is fas-
tened or the brake pedal is depressed.

If the power switch is turned off when 

Remote control function operation has 

finished or been canceled, the doors 

will be locked automatically. However, 

if a door is open, it may not be locked. 

Check the vehicle condition after 

Remote control function operation has 

finished.

When the doors are locked after 

Remote control function operation has 

finished or been canceled, an alarm 

may sound if someone is detected 

inside the vehicle.

Situations in which the function may 

not operate correctly

When the functions of the smart 

access system with push button start 

may not operate correctly: 

P.142

When the vehicle is near fluorescent 

lights

Radio wave interference: 

P.143

Electronic key battery consumption

When Remote control function is 

being used, the electronic key battery 

will be used as the electronic key will 

continuously send and receive radio 

waves.

If the electronic key battery is 

depleted: 

P.501

Situations in which the sensors may 

not operate properly

P.330

When using Remote control function, 

visibility of the area around the vehicle 

may be limited. Make sure to check 

the following when using Remote con-

trol function:

• The vehicle and area around the vehi-

cle are clearly visible

• There are no people, animals, or 

objects in the path of the vehicle

386

4-5. Using the driving support systems

Assistance will be canceled when

In situations such as the following, 
Advanced Park operation will be can-
celed. Firmly hold the steering wheel 
and depress the brake pedal to stop 
the vehicle.
As system operation has been can-
celed, begin the operation again or 
continue parking manually, using the 
steering wheel.

The Advanced Park main switch is 
pushed

The shift position has been shifted to 
P

The parking brake is engaged

A door or the back door is opened

The driver’s seat belt is unfastened

The outside rear view mirrors are 
folded

The TRAC or VSC is turned off

The TRAC, VSC or ABS operates

The power switch is pressed

The system determines assistance 

cannot be continued in the current 
parking environment

The system malfunctions

While the vehicle was stopped, 
“Cancel” was selected on the center 
display

Assistance will be suspended when

In situations such as the following, 
Advanced Park operation will be sus-
pended.
Assistance can be started again by fol-
lowing the directions displayed on the 
center display.
Also, when assistance is suspended, if 
the shift position is shifted twice with 
the brake pedal depressed, assistance 
will be canceled in that shift position.
However, if assistance is suspended by 
shifting the shift position, assistance will 
be canceled if the shift position is 
shifted once.

The steering wheel is operated

The accelerator pedal is depressed

The shift position has been shifted

The shift position was shifted while 
the vehicle was moving (except to P 
position)

A moving object or stationary 
object that may collide with your 
vehicle has been detected, resulting 
in the operation of the hybrid system 
output control/braking control.

Camera switch is pressed

Remote control function assis-
tance will be canceled when

In situations such as the following, 

NOTICE

• An appropriate distance from the vehi-

cle can be maintained and the safety of 

yourself and others can be ensured

• Caution for the area around the vehi-

cle is always maintained and there is no 

potential for danger

• You can cancel Remote control func-

tion immediately if necessary

Advanced Park cancelation/sus-
pension

387

4-5. Using the driving support systems

4

Driving

Remote control function operation will 
be canceled.
As system operation has been can-
celed, while carrying an electronic key, 
enter the vehicle and park the vehicle 
manually, using the steering wheel.

When a condition for stopping 
Advanced Park assistance is met, 
with the exception suspension due 
to a door being opened or the 
driver’s seat seat belt being released

When Remote control function is 
operated while the remote air con-
ditioning is operating and the power 
switch is changed to ON before 
remote air conditioning has ended

When 5 minutes have elapsed since 
Remote control function operation 
was started

When 3 minutes have elapsed since 
any operation was performed

When 30 seconds have elapsed 
with the vehicle not being able to be 
driven, even though the screen of 
the smartphone is being operated to 
drive the vehicle

When the power button on the 
screen of the smartphone is 
selected

When the Remote Park app is force 
closed

When the vehicle is on a steep slope

When an electronic key is detected 
inside the vehicle while Remote 
control function operation is sus-
pended

When the ambient temperature is 

14°F (-10°C) or less

Remote control function assis-
tance will be suspended when

In situations such as the following, 
assistance will be suspended.

When the Bluetooth communica-
tion between the smartphone and 
multimedia system get lost

When smartphone continuous 
operation is suspended

When the Remote Park app is 
pushed to the background (a call is 
received, the home button is 
pressed, etc.)

When electronic key does not 
detected

When there is an obstruction in the 
movement direction of the vehicle

When the vehicle is operated while 
it is being driven by assistance

When the smart key is operated 
while it is being driven by assistance

When the door is unlocked while it 
is being driven by assistance

When a door is opened while the 
vehicle is being driven

Select 

 on the center display, and 

then select “Advanced Park”.

Remote Park

*

Remote control function can be turned 
on/off.

Changing the Advanced Park 
settings

388

4-5. Using the driving support systems

Speed Profile

The vehicle speed for when assistance 
is performed can be set.
This setting cannot be changed when 
registering a parking space to the 
memory function.

Obstacle detection range

The distance from which obstacles will 
be avoided while assistance is being 
performed can be set.

Preferred parking method

The preferred parking direction dis-
played when at a parking space which 
perpendicular (forward/reverse) or 
parallel parking is possible can be set.

Preferred parking direction

The preferred parking direction dis-
played when it is possible to pull per-
pendicular forward or reverse into a 
parking space can be selected.

Preferred exit direction (perpen-
dicular)

The preferred exit direction displayed 
when it is possible to pull forward or 
reverse to the left or right out of a park-
ing space can be selected.

Preferred exit direction (parallel)

The preferred exit direction displayed 
when it is possible to exit to the left or 
right from a parallel parking space can 
be selected.

Camera view when parking

The display angle of the camera image 
when using the perpendicular parking 
(forward/reverse) function or parallel 
parking function can be set.

Camera view when exiting

The display angle of the camera image 
when using the perpendicular exiting 
(forward/reverse) function or parallel 
parking exit function can be set.

Parking path adjustment

The course for when parking assis-
tance is operating can be adjusted 
inward or outward.
If the tires are worn, the path of vehicle 
may be offset from the center of the 
parking space. In this case, use this set-
ting to adjust the parking course.

Road width adjustment

When parking assistance is started, the 
amount of lateral movement while the 
vehicle is moving forward can be 
adjusted.

Park position adjustment (forward)

The position at which perpendicular 
parking (forward) is completed can be 
adjusted. (Except when using the 
memory function.)

Park position adjustment (reverse)

The position at which perpendicular 
parking (reverse) is completed can be 
adjusted. (Except when using the 
memory function.)

Rear accessory setting

If an accessory, such as a trailer hitch, 
has been installed to the rear of the 
vehicle, the length of the rear of the 
vehicle can be adjusted to help avoid 
colliding with objects to the rear of the 
vehicle.

389

4-5. Using the driving support systems

4

Driving

Clear registered parking space

The parking spaces registered to the 
memory function can be deleted. Park-
ing space information cannot be 
deleted when assistance is being per-
formed or when registering parking 
space information to the memory func-
tion.

Intuitive parking assist warning 
sound ON/OFF (Smartphone set-
ting)

The warning sounds of the intuitive 
parking assist from smartphone appli-
cation can be turned on/off using the 
Remote Park app.

Intuitive parking assist warning 
sound volume adjustment (Smart-
phone setting)

The volume of the warning sounds of 
the intuitive parking assist from smart-
phone application can be adjusted 
using the Remote Park app.

The operating state, assistance opera-
tion, etc. of the Advanced Park is dis-
played on the center display. If a 
message is displayed, respond accord-
ing to the content displayed.

If “No available parking space” is dis-

played

Move the vehicle to a location where a 

parking space or parking lines can be 

detected.

If “Unavailable in current condition” is 

displayed

Move the vehicle to another location and 

use the system.

If “Not enough space to exit” is dis-

played

The parallel parking exit function cannot be 

used due to a situation such as the distance 

between your vehicle and vehicles parked 

in front of and behind your vehicle being 

short, the existence of an object in the exit 

direction, etc.
Check the conditions of the area around 

your vehicle and exit from the parking 

space manually.

If “Cannot control speed” is displayed

The system judged that it cannot adjust the 

speed of the vehicle when using the system 

in an area with a slope or step and assis-

tance was canceled.
Use the system in a level location.

If “Obstacle detected” is displayed

As a moving object or stationary object that 

may collide with your vehicle has been 

detected, the hybrid system output con-

trol/braking control operates to suspend 

Advanced Park assistance.
Check the condition of the surrounding 

area. To resume assistance, select the 

“Start” button on the center display.

NOTICE

Take care when using the park position 

adjustment (forward) or park position 

adjustment (reverse) for adjusting 

because the vehicle may collide with 

parking blocks, curb stones, or other 

low objects.

If it is likely that your vehicle will collide 

with a nearby vehicle/object, parking 

block, curb stone, etc., depress the 

brake pedal to stop the vehicle and 

press the Advanced Park main switch 

to disable the system.

Changing the Remote Park app 
settings

Advanced Park displayed mes-
sages

390

4-5. Using the driving support systems

If “No available parking space to regis-

ter” is displayed

This message is displayed when 

 is 

selected at a parking space that cannot be 

detected.
Operate the system at a parking space 

where differences in the road surface can 

be recognized. (

P.376)

1

Select 

 on the center display.

2

Select “Drive mode”.

3

Select driving mode.

1

Normal mode

Provides an optimal balance of fuel econ-
omy, quietness, and dynamic performance. 
Suitable for city driving.

2

Eco drive mode

Helps the driver accelerate in an 
eco-friendly manner and improve fuel 
economy through moderate throttle char-
acteristics and by controlling the operation 
of the air conditioning system (heat-
ing/cooling).
When the Eco drive mode is selected, Eco 
drive mode indicator comes on.

3

Sport mode

Vehicles without Adaptive Variable Sus-
pension System: Controls the hybrid sys-

Driving mode select switch

The driving modes can be selected 
to suit driving conditions.

Selecting a drive mode

391

4-5. Using the driving support systems

4

Driving

tem to provide quick, powerful 
acceleration. This mode also changes the 
steering feel, making it suitable for when 
agile driving response is desired, such as 
when driving on roads with many curves.
Vehicles with Adaptive Variable Suspen-
sion System: Helps to ensure steering per-
formance and driving stability by 
simultaneously controlling the steering and 
suspension in addition to the hybrid sys-
tem. Suitable for sportier driving.
When the Sport mode is selected, “Sport” 
indicator will comes on.

4

Custom mode

Allows you to drive with the power train, 
steering, suspensions

*

 and air condition-

ing system functions set to your preferred 
settings.  (

P.590)

When the Custom mode is selected, Cus-
tom mode indicator comes on.

*

: Vehicles  with  Adaptive Variable Suspen-

sion System

When a driving mode other than normal 

mode is selected

The AWD control switches to that suitable 

for the selected driving mode.

Operation of the air conditioning sys-

tem in Eco drive mode

Eco drive mode controls the heating/cool-

ing operations and fan speed of the air con-

ditioning system to enhance fuel efficiency. 

To improve air conditioning performance, 

perform the following operations:

Adjust the fan speed (

P.411)

Turn off Eco drive mode

Automatic deactivation of sport mode 

and custom mode

If the power switch is turned off after driving 

in sport mode or custom mode, the drive 

mode will be changed to normal mode.

Display of the multi-information display 

according to selected driving mode

According to the driving mode selected, 

the gauges displayed on the multi-informa-

tion display may change.

Customization

Some functions can be customized. 

(

P.590)

392

4-5. Using the driving support systems

Press the Trail Mode switch.

Press the Trail Mode switch, to turn the Trail 
Mode on. The Trail Mode indicator light 
will come on the multi-information display.
To turn the system off, press the Trail Mode 
switch again.

RX500h

RX350h

If the tires are spinning, the slip indica-
tor flashes to indicate that the Trail 
Mode is controlling the spinning of the 
tires.

Trail Mode

Trail Mode controls the vehicle so that it 

can use the maximum amount of drive 

force when driving on rough roads. As a 

result, fuel efficiency may diminish when 

compared to driving with Trail Mode off.

If Trail Mode is continuously used for a 

long period of time, depending on the 

driving conditions, the load on related 

parts increases and the system may not 

function correctly. In this case, “Traction 

Control Turned OFF” will be shown on 

the multi-information display but the vehi-

cle can be driven normally. The “Traction 

Control Turned OFF” on the multi-infor-

mation display will turn off after a short 

while and the system will operate prop-

erly.

When Trail Mode is canceled

In the following situations, Trail Mode is 

automatically canceled even if it is selected:

When the driving mode is changed. 

(

P.390)

When the hybrid system is restarted.

Sounds and vibrations when driving in 

Trail Mode

Any of the following conditions may occur 

when Trail Mode is operating. None of 

Trail Mode

Trail Mode is designed to control 
the spinning of the drive wheels by 
integratedly controlling 4WD, 
brake and drive force control sys-
tems. Use the Trail Mode when 
driving bumpy roads, etc.

Enabling the system

When the Trail Mode is operat-
ing

393

4-5. Using the driving support systems

4

Driving

these indicates that a malfunction has 

occurred:

Vibrations may be felt throughout the 

vehicle or steering

Sounds may be heard from the engine 

compartment

When the Trail Mode indicator does not 

illuminate

When the Trail Mode indicator does not 

illuminate even though the Trail Mode 

switch is pressed, the system may be mal-

functioning. Have the vehicle inspected by 

your Lexus dealer immediately.

ECB (Electronically Controlled 
Brake System)

The electronically controlled system 
generates braking force correspond-
ing to the brake operation

ABS (Anti-lock Brake System)

Helps to prevent wheel lock when the 
brakes are applied suddenly, or if the 
brakes are applied while driving on a 
slippery road surface

Brake assist

Generates an increased level of brak-
ing force after the brake pedal is 
depressed when the system detects a 
panic stop situation

VSC (Vehicle Stability Control)

Helps the driver to control skidding 
when swerving suddenly or turning on 
slippery road surfaces.

Enhanced VSC (Enhanced Vehi-
cle Stability Control)

Provides cooperative control of the 
ABS, TRAC, VSC and EPS.

WARNING

Before using Trail Mode

Make sure to observe the following pre-

cautions. Failure to observe these pre-

cautions may result in an unexpected 

accident.

Trail mode is intended for use when 

driving on rough roads.

Check that the Trail Mode indicator is 

illuminated before driving.

Trail Mode is not intended to expand 

the limits of the vehicle. Thoroughly 

check the road conditions and drive 

with caution.

NOTICE

In order to ensure that Trail Mode 

operates properly

Do not continuously use the Trail Mode 

for a long period of time. Depending on 

the driving conditions, the load on 

related parts increases and the system 

may not operate properly.

Driving assist systems

To keep driving safety and perfor-
mance, the following systems oper-
ate automatically in response to 
various driving situations. Be aware, 
however, that these systems are 
supplementary and should not be 
relied upon too heavily when oper-
ating the vehicle.

Summary of the driving assist 
systems

394

4-5. Using the driving support systems

Helps to maintain directional stability 
when swerving on slippery road sur-
faces by controlling steering perfor-
mance.

Trailer Sway Control

Helps the driver to control trailer sway 
by selectively applying brake pressure 
for individual wheels and reducing 
driving torque when trailer sway is 
detected.

TRAC (Traction Control)

Helps to maintain drive power and pre-
vent the drive wheels from spinning 
when starting the vehicle or accelerat-
ing on slippery roads

Active Cornering Assist (ACA)

Helps to prevent the vehicle from drift-
ing to the outer side by performing 
inner wheel brake control when 
attempting to accelerate while turning

Hill-start assist control

Helps to reduce the backward move-
ment of the vehicle when starting on an 
uphill

DRS (Dynamic Rear Steering) (RX 
500h)

Contributes to maneuverability at low 
speeds, responsiveness at medium 
speeds and stability at high speeds by 
controlling the steering angle of the 
rear wheels in accordance with the 
steering wheel operation and vehicle 
speed.

EPS (Electric Power Steering)

Employs an electric motor to reduce 
the amount of effort needed to turn the 

steering wheel

E-Four

*1

/DIRECT4

*2

 (Electronic 

AWD system)

*1

: RX350h

*2

: RX500h

Automatically controls the drive torque 
distribution between the front and rear 
wheels according to various running 
conditions including normal driving, 
during cornering, on a uphill, when 
starting off, during acceleration, on a 
slippery roads due to snow or rain, thus 
contributing to stable operability and 
driving stability.

Adaptive Variable Suspension Sys-
tem (if equipped)

By independently controlling the 
damping force of the shock absorbers 
for each of the 4 wheels according to 
the road and driving conditions, this 
system helps riding comfort with supe-
rior vehicle stability, and helps good 
vehicle posture.
Also, the damping force changes 
depending on the selected driving 
mode. (

P.390)

VDIM (Vehicle Dynamics Inte-
grated Management) (RX 500h)

Provides integrated control of the 
ABS, brake assist, TRAC, VSC, 
hill-start assist control, EPS, DRS and 
Adaptive Variable Suspension systems.
Helps to maintain vehicle stability when 
swerving on slippery road surfaces by 
controlling the brakes, hybrid system 
output, steering assist and steering 
ratio.

395

4-5. Using the driving support systems

4

Driving

The Secondary Collision Brake

When the SRS airbag sensor detects a 
collision and the system operates, the 
brakes and brake lights are automati-
cally controlled to reduce the vehicle 
speed and help reduce the possibility 
of further damage due to a secondary 
collision.

When the TRAC/VSC/ABS/DRS

*

/

Trailer Sway Control systems are oper-

ating

The slip indicator light will flash while the 

TRAC/VSC/ABS/DRS

*

/Trailer Sway Con-

trol systems are operating.

*

: Only when DRS is operated in line with 

VDIM

Disabling the TRAC system

If the vehicle gets stuck in mud, dirt or snow, 

the TRAC system may reduce power from 

the hybrid system to the wheels. Pressing 
the 

 switch to turn the system off may 

make it easier for you to rock the vehicle in 

order to free it.
To turn the TRAC system off, quickly press 
and release the 

 switch.

The “Traction Control Turned OFF” will be 
shown on the multi-information display.

Press the 

 switch again to turn the sys-

tem back on.

RX500h

RX350h

Turning off both TRAC, VSC and Trailer 

Sway Control systems

To turn the TRAC, VSC and Trailer Sway 

Control systems off, press and hold the 

 switch for more than 3 seconds while 

the vehicle is stopped.
The VSC OFF indicator light will come on 
and the “Traction Control Turned OFF” will 
be shown on the multi-information display.

*

Press the 

 switch again to turn the sys-

tem back on.

*

: On vehicles with PCS (Pre-Collision 

System), PCS will also be disabled (only 
Pre-Collision warning is available). The 
PCS warning light will come on and a 
message will be displayed on the 
multi-information display. (

P.261)

When the message is displayed on the 

multi-information display showing that 

TRAC has been disabled even if the 

 switch has not been pressed

TRAC is temporary deactivated. If the infor-

mation continues to show, contact your 

Lexus dealer.

396

4-5. Using the driving support systems

Operating conditions of hill-start assist 

control

When the following four conditions are met, 

the hill-start assist control will operate:

The shift position is in a position other 

than P or N (when starting off for-

ward/backward on an upward incline)

The vehicle is stopped

The accelerator pedal is not depressed

The parking brake is not engaged

Power switch is turned to ON

Automatic system cancelation of 

hill-start assist control

The hill-start assist control will turn off in any 

of the following situations:

The shift position is shifted to P or N

The accelerator pedal is depressed

The brake pedal is depressed and the 

parking brake is engaged

A maximum of 2 seconds have elapsed 

after the brake pedal is released

Power switch is turned to OFF

Turning path when DRS operates

Turning radius of the vehicle is reduced by 

steering the rear wheels in the opposite 

direction from the front wheels at low 

speeds. At this time, the rear wheels pass 

outside in case of moving forward or inside 

in case of reversing than the vehicle without 

the DRS system. Therefore, take care also 

to observe the rear of the vehicle when 

moving forward or the side of the vehicle 

when reversing in narrow spaces such as 

parking lots.

When moving forward

When reversing

DRS is disabled when

DRS may stop operating in the following sit-

uations.In this case, the minimum turning 

radius becomes larger than when the DRS 

system operates.

When the steering wheel is operated for 

an extended period of time while the 

vehicle is moving very slowly

When the vehicle is started and stopped 

repeatedly in a short period of time with 

the steering wheel operated

The system will restart after these situations 

have passed.

When the 12-volt battery terminals are 

disconnected and reconnected

The system will restart when the vehicle has 

been driven for a certain amount of time 

after the 12-volt battery terminals are con-

nected.

Sounds and vibrations caused by the 

ABS, brake assist, VSC, Trailer Sway 

Control, TRAC and hill-start assist con-

trol systems

A sound may be heard from the engine 

compartment when the brake pedal is 

depressed repeatedly, when the hybrid 

system is started or just after the vehicle 

begins to move. This sound does not indi-

cate that a malfunction has occurred in 

any of these systems.

Any of the following conditions may 

occur when the above systems are oper-

ating. None of these indicates that a mal-

function has occurred.

• Vibrations may be felt through the vehicle 

body and steering.

• A motor sound may be heard also after 

the vehicle comes to a stop.

397

4-5. Using the driving support systems

4

Driving

ECB operating sound

ECB operating sound may be heard in the 

following cases, but it does not indicate that 

a malfunction has occurred.

Operating sound heard from the engine 

compartment when the brake pedal is 

operated.

Motor sound of the brake system heard 

from the front part of the vehicle when 

the driver’s door is opened.

Operating sound heard from the engine 

compartment when one or two minutes 

passed after the stop of the hybrid sys-

tem.

Active Cornering Assist operation 

sounds and vibrations

When the Active Cornering Assist is oper-

ated, operation sounds and vibrations may 

be generated from the brake system, but 

this is not a malfunction.

EPS operation sound

When the steering wheel is operated, a 

motor sound (whirring sound) may be 

heard. This does not indicate a malfunction.

Reduced effectiveness of the EPS sys-

tem

The effectiveness of the EPS system is 

reduced to prevent the system from over-

heating when there is frequent steering 

input over an extended period of time. The 

steering wheel may feel heavy as a result. 

Should this occur, refrain from excessive 

steering input or stop the vehicle and turn 

the hybrid system off. The EPS system 

should return to normal within 10 minutes.

Automatic reactivation of TRAC, Trailer 

Sway Control and VSC systems

After turning the TRAC, Trailer Sway Con-

trol and VSC systems off, the systems will 

be automatically re-enabled in the following 

situations:

When the power switch is turned off

If only the TRAC system is turned off, the 

TRAC will turn on when vehicle speed 

increases

If both the TRAC and VSC systems are 

turned off, automatic re-enabling will not 

occur when vehicle speed increases.

Operating conditions of Active Corner-

ing Assist

The system operates when the following 

occurs.

TRAC/VSC can operate

The driver is attempting to accelerate 

while turning

The system detects that the vehicle is 

drifting to the outer side

The brake pedal is released

Secondary Collision Brake operating 

conditions

The system operates when the SRS airbag 

sensor detects a collision while the vehicle 

is in motion. However, the system does not 

operate when the components are dam-

aged.

Secondary Collision Brake automatic 

cancellation

The system is automatically canceled in any 

of the following situations.

The vehicle speed drops below approxi-

mately 0 mph (0 km/h)

A certain amount of time elapses during 

operation

The accelerator pedal is depressed a 

large amount

When “DRS Malfunction Visit Your 

Dealer” is displayed on the multi-infor-

mation display

DRS may not operate properly. At this time, 

the minimum turning radius may become 

larger than when the DRS system operates 

properly or the vehicle may go straight with 

the steering wheel turned. Have the vehicle 

inspected by your Lexus dealer.

If a messege about AWD is shown on the 

multi-information display

Perform the following actions.

“AWD System Overheated Switching to 

2WD Mode”

AWD system is overheated. Stop the vehi-

cle in a safe place with the hybrid system 

running.

*

If the message disappears after a while, 

there is no problem. If the message remains, 

398

4-5. Using the driving support systems

have the vehicle inspected by your Lexus 

dealer immediately.

“AWD System Overheated 2WD Mode 

Engaged”

AWD system has been temporarily 

released and switched to front-wheel drive 

due to overheating. Stop the vehicle in a 

safe place with the hybrid system running.

*

“AWD System Malfunction 2WD Mode 

Engaged Visit Your Dealer”

A malfunction occurs in the AWD system. 

Have the vehicle inspected by your Lexus 

dealer immediately.

*

: When stopping the vehicle, do not stop 

the hybrid system until the display mes-
sage has turned off.

WARNING

The ABS does not operate effectively 

when

The limits of tire gripping performance 

have been exceeded (such as exces-

sively worn tires on a snow covered 

road).

The vehicle hydroplanes while driving 

at high speed on wet or slick roads.

Stopping distance when the ABS is 

operating may exceed that of normal 

conditions

The ABS is not designed to shorten the 

vehicle’s stopping distance. Always main-

tain a safe distance from the vehicle in 

front of you, especially in the following 

situations:

When driving on dirt, gravel or 

snow-covered roads

When driving with tire chains

When driving over bumps in the road

When driving over roads with potholes 

or uneven surfaces

TRAC/VSC may not operate effec-

tively when

Directional control and power may not 

be achievable while driving on slippery 

road surfaces, even if the TRAC/VSC 

system is operating. Drive the vehicle 

carefully in conditions where stability and 

power may be lost.

Active Cornering Assist does not 

operate effectively when

Do not overly rely on Active Corner-

ing Assist. Active Cornering Assist 

may not operate effectively when 

accelerating down slopes or driving on 

slippery road surfaces.

When Active Cornering Assist fre-

quently operates, Active Cornering 

Assist may temporarily stop operating 

to ensure proper operation of the 

brakes, TRAC and VSC.

Hill-start assist control does not oper-

ate effectively when

Do not overly rely on hill-start assist 

control. Hill-start assist control may 

not operate effectively on steep 

inclines and roads covered with ice.

Unlike the parking brake, hill-start 

assist control is not intended to hold 

the vehicle stationary for an extended 

period of time. Do not attempt to use 

hill-start assist control to hold the vehi-

cle on an incline, as doing so may lead 

to an accident.

When the TRAC/ABS/VSC/Trailer 

Sway Control is activated

The slip indicator light flashes. Always 

drive carefully. Reckless driving may 

cause an accident. Exercise particular 

care when the indicator light flashes.

399

4-5. Using the driving support systems

4

Driving

WARNING

When the TRAC/VSC/Trailer Sway 

Control systems are turned off

Be especially careful and drive at a 

speed appropriate to the road condi-

tions. As these are the systems to help 

ensure vehicle stability and driving 

force, do not turn the 

TRAC/VSC/Trailer Sway Control sys-

tems off unless necessary.

Trailer Sway Control is part of the VSC 

system and will not operate if VSC is 

turned off or experiences a malfunc-

tion.

Replacing tires

Make sure that all tires are of the speci-

fied size, brand, tread pattern and total 

load capacity. In addition, make sure that 

the tires are inflated to the recom-

mended tire inflation pressure level.

The ABS, TRAC, Trailer Sway Control 

and VSC systems will not function cor-

rectly if different tires are installed on the 

vehicle.

Contact your Lexus dealer for further 

information when replacing tires or 

wheels.

Handling of tires and the suspension

Using tires with any kind of problem or 

modifying the suspension will affect the 

driving assist systems, and may cause a 

system to malfunction.

Trailer Sway Control precaution

The Trailer Sway Control system is not 

able to reduce trailer sway in all situa-

tions. Depending on many factors such 

as the conditions of the vehicle, trailer, 

road surface and driving environment, 

the Trailer Sway Control system may not 

be effective. Refer to your trailer owner’s 

manual for information on how to tow 

your trailer properly.

If trailer sway occurs

Observe the following precautions.

Failing to do so may cause death or seri-

ous injury.

Firmly grip the steering wheel. Steer 

straight ahead. Do not try to control 

trailer sway by turning the steering 

wheel.

Begin releasing the accelerator pedal 

immediately but very gradually to 

reduce speed.

Do not increase speed. Do not apply 

vehicle brakes.

If you make no extreme correction with 

the steering or brakes, your vehicle and 

trailer should stabilize. (

P.199)

Secondary Collision Brake

Do not rely solely upon the Secondary 

Collision Brake. This system is designed 

to help reduce the possibility of further 

damage due to a secondary collision, 

however, that effect changes according 

to various conditions. Overly relying on 

the system may result in death or serious 

injury.

400

4-6. Driving tips

4-6.Driving tips

When using Eco drive mode, the 
torque corresponding to the accelera-
tor pedal depression amount can be 
generated more smoothly than it is in 
normal conditions. In addition, the 
operation of the air conditioning sys-
tem (heating/cooling) will be mini-
mized, improving the fuel economy. 
(

P.390)

The Eco-friendly driving is possible by 
keeping the indicate of Hybrid System 
Indicator within Eco area. (

P.95)

Shift the shift position to D when 
stopped at a traffic light, or driving in 
heavy traffic, etc. Shift the shift position 
to P when parking. When using the N 
position, there is no positive effect on 
fuel consumption.
RX350h: In the N position, the gaso-
line engine operates but electricity 
cannot be generated. Also, when using 
the air conditioning system, etc., the 
hybrid battery (traction battery) power 
is consumed.

Drive your vehicle smoothly. Avoid 
abrupt acceleration and decelera-
tion. Gradual acceleration and 
deceleration will make more effec-
tive use of the electric motor (trac-
tion motor) without having to use 
gasoline engine power.

Avoid repeated acceleration. 
Repeated acceleration consumes 
hybrid battery (traction battery) 
power, resulting in poor fuel con-
sumption. Battery power can be 
restored by driving with the acceler-
ator pedal slightly released.

Make sure to operate the brakes gently 
and in a timely manner. A greater 
amount of electrical energy can be 
regenerated when slowing down.

Repeated acceleration and decelera-
tion, as well as long waits at traffic 
lights, will lead to bad fuel economy. 
Check traffic reports before leaving 
and avoid delays as much as possible. 
When driving in a traffic jam, gently 
release the brake pedal to allow the 
vehicle to move forward slightly while 
avoiding overuse of the accelerator 
pedal. Doing so can help control 
excessive gasoline consumption.

Hybrid electric vehicle driv-
ing tips

For economical and ecological 
driving, pay attention to the follow-
ing points:

Using Eco drive mode

Use of Hybrid System Indicator

Changing the shift position

Accelerator pedal/brake pedal 
operation

When braking

Delays

401

4-6. Driving tips

4

Driving

Control and maintain the vehicle at a 
constant speed. Before stopping at a 
toll booth or similar, allow plenty of 
time to release the accelerator and 
gently apply the brakes. A greater 
amount of electrical energy can be 
regenerated when slowing down.

Use the air conditioning only when 
necessary. Doing so can help reduce 
excessive gasoline consumption.
In summer: When the ambient tem-
perature is high, use the recirculated 
air mode. Doing so will help to reduce 
the burden on the air conditioning sys-
tem and reduce fuel consumption as 
well.
In winter: Because the gasoline engine 
will not automatically cut out until it and 
the interior of the vehicle are warm, it 
will consume fuel. Also, fuel consump-
tion can be improved by avoiding over-
use of the heater.

Make sure to check the tire inflation 
pressure frequently. Improper tire infla-
tion pressure can cause poor fuel 
economy.
Also, as snow tires can cause large 
amounts of friction, their use on dry 
roads can lead to poor fuel economy. 
Use tires that are appropriate for the 
season.

Carrying heavy luggage will lead to 
poor fuel economy. Avoid carrying 
unnecessary luggage. Installing a large 
roof rack will also cause poor fuel 
economy.

Since the gasoline engine starts up and 
cuts out automatically when cold, 
warming up the engine is unnecessary. 
Moreover, frequently driving short dis-
tances will cause the engine to repeat-
edly warm up, which can lead to excess 
fuel consumption.

Highway driving

Air conditioning

Checking tire inflation pressure

Luggage

Warming up before driving

402

4-6. Driving tips

Use fluids that are appropriate to 
the prevailing outside temperatures.

• Engine oil
• Engine/power control unit coolant
• Washer fluid

Have a service technician inspect 
the condition of the 12-volt battery.

Have the vehicle fitted with four 
snow tires or purchase a set of tire 
chains for the front tires.

Ensure that all tires are the specified size 
and brand, and that chains match the size 
of the tires.

Perform the following according to the 
driving conditions:

Do not try to forcibly open a window 
or move a wiper that is frozen. Pour 
warm water over the frozen area to 
melt the ice. Wipe away the water 

Winter driving tips

Carry out the necessary prepara-
tions and inspections before driving 
the vehicle in winter. Always drive 
the vehicle in a manner appropriate 
to the prevailing weather condi-
tions.

Preparation for winter

WARNING

Driving with snow tires

Observe the following precautions to 

reduce the risk of accidents.

Failure to do so may result in a loss of 

vehicle control and cause death or seri-

ous injury.

Use tires of the specified size.

Maintain the recommended level of air 

pressure.

Do not drive in excess of 75 mph (120 

km/h), regardless of the type of snow 

tires being used.

Use snow tires on all, not just some 

wheels.

Driving with tire chains

Observe the following precautions to 

reduce the risk of accidents.

Failure to do so may result in the vehicle 

being unable to be driven safely, and may 

cause death or serious injury.

Do not drive in excess of the speed 

limit specified for the tire chains being 

used, or 30 mph (50 km/h), which-

ever is lower.

Avoid driving on bumpy road surfaces 

or over potholes.

Avoid sudden acceleration, abrupt 

steering, sudden braking and shifting 

operations that cause sudden engine 

braking.

Slow down sufficiently before entering 

a curve to ensure that vehicle control is 

maintained.

Do not use the LTA (Lane Tracing 

Assist) system.

NOTICE

Repairing or replacing snow tires

Request repairs or replacement of snow 

tires from Lexus dealers or legitimate tire 

retailers.

This is because the removal and attach-

ment of snow tires affects the operation 

of the tire pressure warning valves and 

transmitters.

Before driving the vehicle

403

4-6. Driving tips

4

Driving

immediately to prevent it from 
freezing.

To ensure proper operation of the 
climate control system fan, remove 
any snow that has accumulated on 
the air inlet vents in front of the 
windshield.

Check for and remove any excess 
ice or snow that may have accumu-
lated on the exterior lights, outside 
rear view mirrors, windows, vehicle’s 
roof, chassis, around the tires or on 
the brakes.

Remove any snow or mud from the 
bottom of your shoes before getting 
in the vehicle.

When the outside door opener 
switch becomes stiff, it may be diffi-
cult to press on it. Open the door 
while pressing the door opener 
switch slightly harder.

Accelerate the vehicle slowly, keep a 
safe distance between you and the 
vehicle ahead, and drive at a reduced 
speed suitable to road conditions.

Turn automatic mode of the parking 
brake off. Otherwise, the parking 
brake may freeze and not be able to 
be released automatically.

Also, avoid using the following as the park-
ing brake may operate automatically, even 
if automatic mode is off.
• Brake hold system

• Advanced Park (Remote Controlled) (if 

equipped)

Park the vehicle and shift the shift 
position to P without setting the 
parking brake. The parking brake 
may freeze up, preventing it from 
being released. If the vehicle is 
parked without setting the parking 
brake, make sure to block the 
wheels.

Failure to do so may be dangerous 
because it may cause the vehicle to move 
unexpectedly, possibly leading to an acci-
dent.

When the parking brake is in auto-
matic mode, release the parking 
brake after shifting the shift position 
to P. (

P.227)

If the vehicle is parked without set-
ting the parking brake, confirm that 
the shift position cannot be moved 
out of P.

If the vehicle is left parked with the 
brakes damp in cold temperatures, 
there is a possibility of the brakes 
freezing.

Use the correct tire chain size when 
mounting the tire chains.
Chain size is regulated for each tire 
size.

When driving the vehicle

When parking the vehicle

Selecting tire chains

404

4-6. Driving tips

Side chain (0.12 in. [3 mm] in diam-
eter)
Side chain (0.43 in. [10.8 mm] in 
width)
Side chain (0.98 in. [25 mm] in 
length)
Cross chain (0.15 in. [3.9 mm] in 
diameter)
Cross chain (0.54 in. [13.8 mm] in 
width)
Cross chain (1.00 in. [25.3 mm] in 
length)

Regulations regarding the use of tire 
chains vary depending on location and 
type of road. Always check local regu-
lations before installing chains.

Tire chain installation

Observe the following precautions when 

installing and removing chains:

Install and remove tire chains in a safe 

location.

Install tire chains on the front tires only. 

Do not install tire chains on the rear tires.

Install tire chains on the front tires as 

tightly as possible. Retighten chains after 

driving 1/4

1/2 mile (0.5

1.0 km).

Install tire chains following the instruc-

tions provided with the tire chains.

To enable the windshield wipers to be 
lifted when heavy snow or icy condi-
tions are expected, change the rest 
position of the windshield wipers from 
the retracted position below the hood 
to the service position using the wiper 
lever. (

P.243)

Regulations on the use of tire 
chains

A

B

C

D

E

F

NOTICE

Fitting tire chains

The tire pressure warning valves and 

transmitters may not function correctly 

when tire chains are fitted.

Windshield wipers

405

4-6. Driving tips

4

Driving

Specific design characteristics give 
it a higher center of gravity than 
ordinary passenger cars. This vehi-
cle design feature causes this type 
of vehicle to be more likely to roll-
over. And, utility vehicles have a sig-
nificantly higher rollover rate than 
other types of vehicles.

An advantage of the higher ground 
clearance is a better view of the 
road allowing you to anticipate 
problems.

It is not designed for cornering at 
the same speeds as ordinary pas-
senger cars any more than 
low-slung sports cars are designed 
to perform satisfactorily under 
off-road conditions. Therefore, 
sharp turns at excessive speeds may 
cause the vehicle to rollover.

Your vehicle is not designed to be 
driven off-road. However, in the event 
that off-road driving cannot be 
avoided, please observe the following 
precautions to help avoid the areas 
prohibited to vehicles.

Drive your vehicle only in areas 
where off-road vehicles are permit-
ted to travel.

Respect private property. Get 

Utility vehicle precautions

This vehicle belongs to the utility 
vehicle class, which has higher 
ground clearance and narrower 
tread in relation to the height of its 
center of gravity.

Utility vehicle feature

WARNING

Utility vehicle precautions

Always observe the following precau-

tions to minimize the risk of death, seri-

ous injury or damage to your vehicle:

In a rollover crash, an unbelted person 

is significantly more likely to die than a 

person wearing a seat belt. Therefore, 

the driver and all passengers should 

always fasten their seat belts.

Avoid sharp turns or abrupt maneu-

vers, if at all possible.

Failure to operate this vehicle correctly 

may result in loss of control or vehicle 

rollover causing death or serious 

injury.

Loading cargo on the roof luggage 

carrier (if equipped) will make the cen-

ter of the vehicle gravity higher. Avoid 

high speeds, sudden starts, sharp 

turns, sudden braking or abrupt 

maneuvers, otherwise it may result in 

loss of control or vehicle rollover due 

to failure to operate this vehicle cor-

rectly.

Always slow down in gusty crosswinds. 

Because of its profile and higher cen-

ter of gravity, your vehicle is more sen-

sitive to side winds than an ordinary 

passenger car. Slowing down will allow 

you to have better control.

Do not drive horizontally across steep 

slopes. Driving straight up or straight 

down is preferred. Your vehicle (or any 

similar off-road vehicle) can tip over 

sideways much more easily than for-

ward or backward.

Off-road driving

406

4-6. Driving tips

owner’s permission before entering 
private property.

Do not enter areas that are closed. 
Honor gates, barriers and signs that 
restrict travel.

Stay on established roads. When 
conditions are wet, driving tech-
niques should be changed or travel 
delayed to prevent damage to 
roads.

Avoid driving on very steep, slippery 
roads and other surfaces, such as 
sand, where the tires are liable to 
lose traction. Your vehicle may not 
perform as well as conventional 
AWD on-road vehicles on these 
surfaces.

Additional information for off-road driv-

ing

For owners in U.S. mainland, Hawaii and 

Puerto Rico:

To obtain additional information pertaining 

to driving your vehicle off-road, consult the 

following organizations.

State and Local Parks and Recreation 

Departments

State Motor Vehicle Bureau

Recreational Vehicle Clubs

U.S. Forest Service and Bureau of Land 

Management

WARNING

Off-road driving precautions

Always observe the following precau-

tions to minimize the risk of death, seri-

ous injury or damage to your vehicle:

Drive carefully when off the road. Do 

not take unnecessary risks by driving in 

dangerous places.

Do not grip the steering wheel spokes 

when driving off-road. A bad bump 

could jerk the wheel and injure your 

hands. Keep both hands and especially 

your thumbs on the outside of the rim.

Always check your brakes for effec-

tiveness immediately after driving in 

sand, mud, water or snow.

After driving through tall grass, mud, 

rock, sand, rivers, etc., check that there 

is no grass, bush, paper, rags, stone, 

sand, etc. adhering or trapped on the 

underbody. Clear off any such matter 

from the underbody. If the vehicle is 

used with these materials trapped or 

adhering to the underbody, a break-

down or fire could occur.

When driving off-road or in rugged 

terrain, do not drive at excessive 

speeds, jump, make sharp turns, strike 

objects, etc. This may cause loss of 

control or vehicle rollover causing 

death or serious injury. You are also 

risking expensive damage to your 

vehicle’s suspension and chassis.

NOTICE

To prevent water damage

Take all necessary safety measures to 

ensure that water damage to the hybrid 

battery (traction battery), hybrid system 

or other components does not occur.

Water entering the engine compart-

ment may cause severe damage to the 

hybrid system. Water entering the inte-

rior may cause the hybrid battery 

(traction battery) stowed under the 

rear seats to short circuit.

Water entering the transmission and 

rear electric motor (traction motor) 

will cause deterioration in transmission 

quality. The malfunction indicator may 

come on, and the vehicle may not be 

drivable.

407

4-6. Driving tips

4

Driving

NOTICE

Water can wash the grease from wheel 

bearings, causing rusting and prema-

ture failure, and may also enter the 

transmission case, reducing the gear 

oil’s lubricating qualities.

When you drive through water

If driving through water, such as when 

crossing shallow streams, first check the 

depth of the water and the bottom of the 

riverbed for firmness. Drive slowly and 

avoid deep water.

Inspection after off-road driving

Sand and mud that has accumulated 

around brake discs may affect braking 

efficiency and may damage brake sys-

tem components.

Always perform a maintenance 

inspection after each day of off-road 

driving that has taken you through 

rough terrain, sand, mud, or water. For 

scheduled maintenance information, 

refer to the “Warranty and Services 

Guide/Owner’s Manual Supple-

ment/Scheduled Maintenance”.

408

4-6. Driving tips


Content      ..     10      11      12      13     ..