Lexus NX (2023 year). Manual in english - page 18
 

  Index      Manuals     Lexus NX (2023 year). Manual in english


Search            copyright infringement  


Content      ..     16      17      18      19     ..


Lexus NX (2023 year). Manual in english - page 18


If a tire is flat

Replacing a tire with a spare tire (vehicles with a spare tire)

Your vehicle is equipped with a spare tire. The flat tire can be replaced with the
spare tire.

WARNING

Do not continue driving with a flat tire.
Driving even a short distance with a flat tire can damage the tire and the wheel beyond
repair, which could result in an accident.

Preparation for lifting the vehicle with a jack

Before lifting the vehicle with a jack, perform the following.

Stop the vehicle in a safe place on a hard, flat surface.

Set the parking brake.

Change the shift position to P.

Stop the engine.

Turn on the emergency flashers.

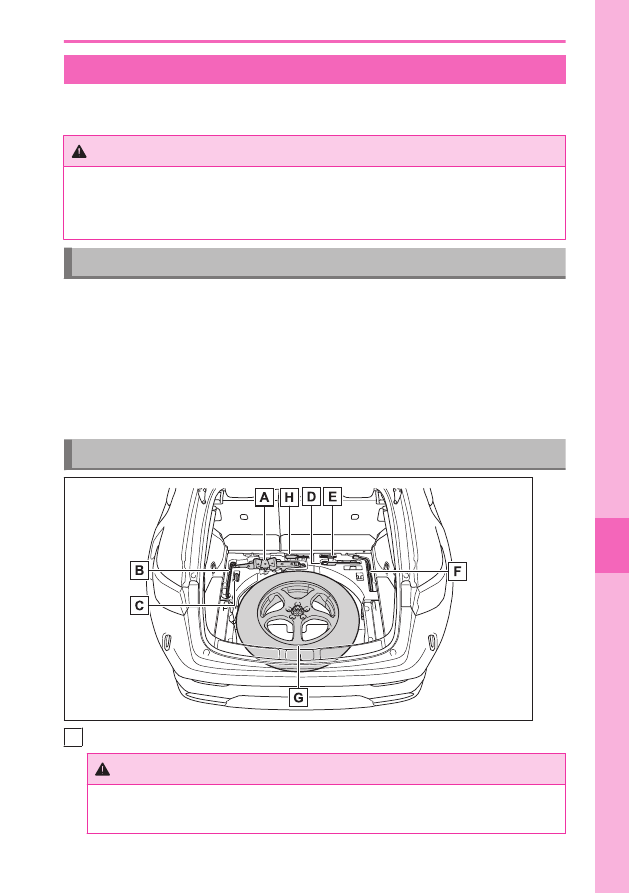
Storage position of the spare tire/tools/jack

A

Jack

WARNING

Improper use of the tire jack may cause the vehicle to fall. Therefore, observe the
following precatutions.

9-4. If a tire is flat

565

9

When tr

ouble arises

WARNING

Do not use the tire jack for any purpose other than replacing tires or installing and
removing tire chains.

Only use the tire jack that comes with this vehicle for replacing a flat tire. Do not
use it on other vehicles, and do not use other tire jacks for replacing tires on this
vehicle.

B

Jack handle

C

Wheel bolt socket

D

Towing eyelet

E

Guide pin

F

Wheel bolt wrench

G

Spare tire

H

Screwdriver

Taking out the jack

1

Remove the deck board.

2

Take out the jack.

Taking out the spare tire

WARNING

When storing the spare tire, be careful so that fingers, etc. do not get caught between the
vehicle body and spare tire.

A

Remove the rubber band.

9-4. If a tire is flat

566

1

Remove the deck board.

2

Loosen the center fastener that secures the
spare tire.

Removing a flat tire

WARNING

Precautions for replacing a flat tire

Do not try to remove the wheel ornament by hand.
Take due care in handling the ornament to avoid unexpected personal injury.

Do not touch the disc wheels or the area around the brakes immediately after the
vehicle has been driven.
After the vehicle has been driven the disc wheels and the area around the brakes
will be extremely hot. Touching these areas with hands, feet or other body parts while
changing a tire, etc., may result in burns.

Setting the power back door when replacing the tires

When replacing a flat tire, make sure to disable the power back door. If not disabled, the
power back door may operate unintentionally, and hands or fingers may be caught and
injured.

1

Chock the tires.

Wheel chock position

9-4. If a tire is flat

567

9

When tr

ouble arises

Flat tire: Front left
Place the wheel chock behind the rear right tire.

Flat tire: Front right
Place the wheel chock behind the rear left tire.

Flat tire: Rear left
Place the wheel chock in front of the front right tire.

Flat tire: Rear right
Place the wheel chock in front of the front left tire.

2

Using a wheel bolt wrench, slightly loosen
the wheel bolts (approximately one turn).

3

Turn the tire jack portion   by hand until the
notch of the jack is in contact with the jack
point.

WARNING

Make sure the jack is positioned properly in the jack point.

4

Install the wheel bolt wrench to the jack han-
dle.

9-4. If a tire is flat

568

5

Raise the vehicle until the tire is slightly raised
off the ground.

WARNING

Observe the following precautions when using the jack.

Do not put any part of your body under the vehicle while it is supported by the
jack.

Do not start the engine or drive the vehicle while the vehicle is supported by the
jack.

Do not raise the vehicle while someone is inside.

When raising the vehicle, do not put an object on or under the jack.

Do not raise the vehicle to a height greater than that required to replace the tire.

Use a jack stand if it is necessary to get under the vehicle.

6

Remove the uppermost wheel bolt and install
the guide pin   by hand.

Turn the guide pin clockwise to tighten it until it
stops.

WARNING

When removing or installing a tire, make sure to use the guide pin.
Also, the guide pin is made of resin. It may be damaged if the wheel is placed
anywhere other than 

 or if a large amount of force is applied to the guide pin.

9-4. If a tire is flat

569

9

When tr

ouble arises

7

Remove the remaining wheel bolts and the
tire.

When resting the tire on the ground, place the
tire so that the wheel design faces up, to avoid
scratching the wheel surface.

Installing the spare tire

INFORMATION

The compact spare tire

Observe the following precautions when installing a spare tire.

The compact spare tire is identified by the label “TEMPORARY USE ONLY” on the
tire sidewall.
Use the compact spare tire temporarily, and only in an emergency.

Make sure to check the tire inflation pressure of the compact spare tire.

WARNING

Observe the following precautions when using a spare tire.

Remember that the compact spare tire provided is specifically designed for use with
your vehicle. Do not use your spare tire on another vehicle.

Do not use more than one compact spare tire simultaneously.

1

Remove any dirt or foreign matter from the wheel contact surfaces and wheel
bolts.

If foreign matter is not removed, the wheel bolts may loosen while the vehicle is in
motion, and the wheel may come off.

9-4. If a tire is flat

570

2

Align a wheel bolt hole on the spare tire with the guide pin, and set the spare
tire on the guide pin.

Securely set the spare tire so that its wheel is touching the contact surface.

WARNING

When removing or installing a tire, make sure to use the guide pin.
Also, the guide pin is made of resin. It may be damaged if the wheel is placed
anywhere other than 

 or if a large amount of force is applied to the guide pin.

3

Loosely tighten each wheel bolt by hand or using a wheel bolt socket   .

Push the spare tire to prevent it from falling.
Do not use the wheel bolt socket for anything other than loosely tightening the wheel
bolts by hand.

9-4. If a tire is flat

571

9

When tr

ouble arises

WARNING

Observe the following precautions. Failure to do so may lead to the wheel bolts
loosening and the tire falling off.

Never apply oil or grease to the wheel bolts or their contact surface on the wheel

 .

Doing so may cause the wheel bolts to be tightened excessively, leading to
damage to the wheel bolts, the threaded portion the wheel bolts install to 

 , or

the wheel.
Also, the wheel bolts may come loose, possibly leading to the wheel coming off,
causing a serious accident.
If oil or grease is attached to either of these parts, remove it.

When installing a wheel, use the same wheel bolts that were removed with the
wheel. Also, do not use any wheel bolts other than Lexus Genuine wheel bolts.

If a wheel bolt hole in a wheel or the threads of a wheel bolt or the wheel hub
are deformed, cracked, rusty or otherwise damaged, have the vehicle inspected
by any authorized Lexus retailer or Lexus authorized repairer, or any reliable
repairer.

Do not install the wheel ornament if it is damaged, as it may fly off the wheel while
the vehicle is being driven.

4

Remove the guide pin and loosely tighten the wheel bolt as in step 

3

.

9-4. If a tire is flat

572

5

Lower the vehicle.

WARNING

When lowering the vehicle, make sure that no one is near the vehicle. If there are
people nearby, warn them vocally before lowering the vehicle.

6

Firmly tighten each wheel bolt in the order shown in the illustration two or
three times.

Tightening torque: 140 N•m (14.3 kgf•m, 103 ft•lbf)

WARNING

When tightening the wheel bolts, do not tighten them excessively. Doing so may
cause the wheel bolts, the threads of the wheel hub, or the wheel to be damaged.

Have the wheel bolts tightened with a torque wrench to 140 N•m (14.3 kgf•m,
103 ft•lbf) as soon as possible after changing wheels.

7

Stow the flat tire, tire jack and all tools.

INFORMATION

When using the compact spare tire

As the compact spare tire is not equipped with a tire pressure warning valve and
transmitter, low inflation pressure of the spare tire will not be indicated by the tire

9-4. If a tire is flat

573

9

When tr

ouble arises

pressure warning system. Also, if you replace the compact spare tire after the tire
pressure warning light comes on, the light remains on.

When a compact spare tire is installed

The vehicle becomes lower when driving with the compact spare tire compared to
when driving with standard tires.

WARNING

When using the compact spare tire

Replace the compact spare tire with a standard tire as soon as possible.

Avoid sudden acceleration, abrupt steering, sudden braking and shifting opera-
tions that cause sudden engine braking.

When the compact spare tire is attached

The vehicle speed may not be correctly detected, and the following systems may not
operate correctly:

ABS & Brake assist

VSC

TRC

Trailer Sway Control

EPS

Dynamic radar cruise control

PCS (Pre-Collision System)

LTA (Lane Tracing Assist)

LDA (Lane Departure Alert)

Lexus parking assist monitor

*

RSA (Road Sign Assist)

*

Panoramic view monitor

*

Lexus parking assist-sensor

*

PKSB (Parking Support Brake)

*

Navigation system

*

BSM (Blind Spot Monitor)

*

Automatic High Beam

*

* : 

If equipped

9-4. If a tire is flat

574

WARNING

AHS (Adaptive High-beam System)

*

AFS (Adaptive Front-lighting System)

*

Tire pressure warning system

Also, not only can the following system not be utilized fully, but it may even negatively
affect the drive-train components:

AWD system (AWD models)

Speed limit when using the compact spare tire

Do not drive at speeds in excess of 80 km/h (50 mph) when a compact spare tire is
installed on the vehicle.
The compact spare tire is not designed for driving at high speeds. Failure to observe
this precaution may lead to an accident causing death or serious injury.

After using the tools and jack

After using the tools and jack, before driving, make sure that the tools and jack are
securely stored. Failure to do so may result in injury during a collision or sudden
braking.

NOTICE

Be careful when driving over bumps with the compact spare tire installed on the
vehicle

The vehicle becomes lower when driving with the compact spare tire compared to
when driving with standard tires. Be careful when driving over uneven road surfaces.

When replacing the tires

When removing or fitting the wheels, tires or the tire pressure warning valve and
transmitter, contact any authorized Lexus retailer or Lexus authorized repairer, or
any reliable repairer as the tire pressure warning valve and transmitter may be
damaged if not handled correctly.

9-4. If a tire is flat

575

9

When tr

ouble arises

If you get a flat front tire on a snowy or icy road (vehicles with a spare
tire)

NOTICE

Do not install tire chains to a compact spare tire.
Tire chains may damage the vehicle body and adversely affect driving performance.

Install the compact spare tire on the rear of the vehicle. Perform the following steps
and install tire chains to the front tires:

1

Replace a rear tire with the compact spare tire.

2

Replace the flat front tire with the tire removed from the rear of the vehicle.

3

Install tire chains to the front tires.

 Related Links 

Replacing a tire with a spare tire (vehicles with a spare tire)(P. 565)

9-4. If a tire is flat

576

Precautions for when you have a flat tire (vehicles with run-flat tires)

Your vehicle is not equipped with a spare tire, but instead you can continue driving
the vehicle with run-flat tires even if any tire goes flat. In this case, slow down and
drive with extra caution.
Take your vehicle to the nearest authorized Lexus retailer or Lexus authorized
repairer, or any reliable repairer, or authorized tire dealer as soon as possible if any
tire goes flat.
The vehicle can be driven for a maximum of 80 km (50 miles) at a speed below
80 km/h (50 mph) after the tire pressure warning light comes on.

A run-flat tire has a 

 mark on the side wall.

INFORMATION

In some conditions (such as at high temperatures)

You cannot continue driving for up to 80 km (50 miles).

NOTICE

When replacing the tires

When removing or fitting the wheels, tires or the tire pressure warning valve and
transmitter, contact any authorized Lexus retailer or Lexus authorized repairer, or any
reliable repairer as the tire pressure warning valve and transmitter may be damaged if not
handled correctly.

When driving over bumps

If a vehicle has a flat tire, the vehicle height will be lower than usual. Ensure that nothing
strikes the bottom of the vehicle.

To avoid damage to the tire pressure warning valves and transmitters

When a tire is repaired with liquid sealants, the tire pressure warning valve and transmit-
ter may not operate properly. If a liquid sealant is used, contact any authorized Lexus
retailer or Lexus authorized repairer, or any reliable repairer or other qualified service
shop as soon as possible. Make sure to replace the tire pressure warning valve and
transmitter when replacing the tire.

9-4. If a tire is flat

577

9

When tr

ouble arises

If a door cannot be opened or locked

If a key has been lost

New genuine mechanical keys can be made by any authorized Lexus retailer or
Lexus authorized repairer, or any reliable repairer using another mechanical key
and the key number stamped on your key number plate.
Keep the plate in a safe place such as your wallet, not in the vehicle.

NOTICE

If the electronic key remains lost, the risk of vehicle theft increases significantly. Visit
any authorized Lexus retailer or Lexus authorized repairer, or any reliable repairer
immediately with all remaining electronic keys and the card key

*

 that were provided

with your vehicle.

* : 

If equipped

9-5. If a door cannot be opened or locked

578

When the doors/windows/moon roof cannot be operated using an elec-
tronic key

If communication between the electronic key and vehicle is interrupted or the
electronic key cannot be used because the battery is depleted, the smart entry &
start system and wireless remote control cannot be used.

The smart entry & start system may have been disabled by a customize setting.
In this case, change the customize setting to enable the smart entry & start
system.

NOTICE

When taking the vehicle to any authorized Lexus retailer or Lexus authorized repairer,
or any reliable repairer due to a malfunction of the smart entry & start system, make
sure to bring all registered electronic keys (including the card key).

The electronic key may have been set to battery saving mode.
battery saving mode has been set, cancel it.
The battery of the electronic key may be discharged.

Replace the battery.

Using the mechanical key.

The battery may be discharged.
Restarting the engine using the jumper (or booster) cables.

Replace the electronic key battery

Replace the battery with a new one if it is depleted.
The battery for the card key is available only at any authorized Lexus retailer or
Lexus authorized repairer, or any reliable repairer. Your Lexus retailer or Lexus
authorized repairer, or any reliable repairer can replace the battery for you.
Prepare the following before replacing the battery:

Flathead screwdriver

Small flathead screwdriver

Lithium battery CR2032

9-5. If a door cannot be opened or locked

579

9

When tr

ouble arises

INFORMATION

Use a CR2032 lithium battery

Batteries can be purchased at any authorized Lexus retailer or Lexus authorized repairer,
or any reliable repairer, local electrical appliance shops or camera stores.

If the electronic key battery is depleted

The following symptoms may occur:

The smart entry & start system and wireless remote control will not function properly.

The operational range will be reduced.

1

Take out the mechanical key.

2

Remove the cover.

To prevent damage to the key, cover the tip of the
flathead screwdriver with a tape.

3

Remove the depleted battery.

Insert a new battery with the “+” terminal facing
up.

WARNING

Battery precautions

Observe the following precautions. Failure to do so may result in death or serious
injury.

9-5. If a door cannot be opened or locked

580

WARNING

Do not swallow the battery. Doing so may cause chemical burns.

A coin battery or button battery is used in the electronic key. If a battery is
swallowed, it may cause severe chemical burns in as little as 2 hours and may
result in death or serious injury.

Keep away new and removed batteries from children.

If the cover cannot be firmly closed, stop using the electronic key and stow the key
in the place where children cannot reach, and then contact any authorized Lexus
retailer or Lexus authorized repairer, or any reliable repairer.

If you accidentally swallow a battery or put a battery into a part of your body, get
emergency medical attention immediately.

To prevent battery explosion or leakage of flammable liquid or gas

Replace the battery with a new battery of the same type. If a wrong type of battery
is used, it may explode.

Do not expose batteries to extremely low pressure due to high altitude or ex-
tremely high temperatures.

Do not burn, break or cut a battery.

Lithium battery precautions

CAUTION
RISK OF EXPLOSION IF BATTERY IS REPLACED BY AN INCORRECT TYPE.
DISPOSE OF USED BATTERIES ACCORDING TO THE INSTRUCTIONS

NOTICE

When replacing the battery

Use a flathead screwdriver of appropriate size. Applying excessive force may de-
form or damage the cover.

For normal operation after replacing the battery

Observe the following precautions to prevent accidents:

Always work with dry hands.
Moisture may cause the battery to rust.

Do not touch or move any other component inside the remote control.

Do not bend either of the battery terminals.

9-5. If a door cannot be opened or locked

581

9

When tr

ouble arises

Using the mechanical key

To take out the mechanical key, push the release
button and take the key out.
The mechanical key can only be inserted in one
direction, as the key only has a groove on one
side. If the key cannot be inserted in a lock cylin-
der, turn it over and attempt to insert it again.
After using the mechanical key, return it to its
original position and carry it with the electronic
key. If the electronic key battery is depleted, the
entry function is not operating properly, or the
vehicle battery is discharged, you will need the
mechanical key.

NOTICE

Do not apply excess force when inserting the mechanical key into the card key. Doing so
may damage the card key.

INFORMATION

If the incorrect key is used

The key cylinder rotates freely to isolate inside mechanism.

Card key

If it is difficult to take out the mechanical key, push down the release button using a pen
tip, etc. If it is still difficult to pull it out, use a coin, etc.

To store the mechanical key in the card key, insert it while pressing the release button.

9-5. If a door cannot be opened or locked

582

Alarm

*

Using the mechanical key to lock the doors will not set the alarm system. If a door is
unlocked using the mechanical key when the alarm system is set, the alarm may be
triggered.

Locking/unlocking the doors

1

Insert a plastic card, etc. into the gap in the
door handle and remove the cover.

To avoid damage, do not apply excessive force to
the cover.

2

Use the mechanical key in order to perform the following operations:


1

Unlocks all the doors

2

Locks all the doors

INFORMATION

Key linked functions


1

Opens the windows and the moon roof

*

or

panoramic moon roof

*

 (turn and hold)

*1

2

Closes the windows and the moon roof

*

or

panoramic moon roof

*

 (turn and hold)

*1

* : 

If equipped

*1 : 

These settings must be customized at any authorized Lexus retailer or Lexus author-

ized repairer, or any reliable repairer.

9-5. If a door cannot be opened or locked

583

9

When tr

ouble arises

WARNING

Operate the power window and moon roof or panoramic moon roof after checking
to make sure that there is no possibility of any passenger having any of their body
parts caught in the window or moon roof or panoramic moon roof.. Also, do not
allow children to operate the mechanical key. It is possible for children and other
passengers to get caught in the power window or moon roof or panoramic moon
roof.

Restarting the engine when the battery is discharged

If you have a set of jumper (or booster) cables and a second vehicle with a battery,
you can jump start your vehicle by following the steps below.  

INFORMATION

The engine cannot be started by push-starting.

WARNING

Avoiding battery fires or explosions    

Observe the following precautions to prevent accidentally igniting the flammable gas that
may be emitted from the battery:  

Make sure each jumper cable is connected to the correct terminal and that it is not
unintentionally in contact with any other than the intended terminal.

Do not allow the + and - clamps of the jumper cables to come into contact with each
other.

Do not allow the other end of the jumper cable connected to the “+” terminal to come
into contact with any other parts or metal surfaces in the area, such as brackets or
unpainted metal.

Do not smoke, use matches, cigarette lighters or allow open flame near the battery.

Battery precautions

The battery contains poisonous and corrosive acidic electrolyte, while related parts
contain lead and lead compounds. Observe the following precautions when handling the
battery:  

When working with the battery, always wear safety glasses and take care not to allow
any battery fluids (acid) to come into contact with skin, clothing or the vehicle body.    

Do not lean over the battery.  

In the event that battery fluid comes into contact with the skin or eyes, immediately
wash the affected area with water and seek medical attention. Place a wet sponge or
cloth over the affected area until medical attention can be received.

9-5. If a door cannot be opened or locked

584

WARNING

Always wash your hands after handling the battery support, terminals, and other
battery-related parts.  

Do not allow children near the battery.

1

Confirm that the electronic key is being car-
ried.

When connecting the jumper (or booster) cables,
depending on the situation, the alarm may acti-
vate and the doors may lock.

2

Open the hood.

3

Remove the positive (+) battery terminal
cover.

▶ 

NX250

▶ 

NX350

▶ 

NX200

9-5. If a door cannot be opened or locked

585

9

When tr

ouble arises

4

Connect a positive jumper cable clamp to   on your vehicle and connect the
clamp on the other end of the positive cable to   on the second vehicle. Then,
connect a negative cable clamp to   on the second vehicle and connect the
clamp at the other end of the negative cable to 

▶ 

NX200

A

Exclusive jump starting terminal (your vehicle)

B

Positive (+) battery terminal (second vehicle)

C

Negative (-) battery terminal (second vehicle)

D

Solid, stationary, unpainted metallic point away from the exclusive jump starting
terminal and any moving parts as shown in the illustration

NOTICE

When handling jumper cables

When connecting the jumper cables, ensure that they do not become entangled in
the cooling fan or belt.

9-5. If a door cannot be opened or locked

586

▶ 

NX250

A

Exclusive jump starting terminal (your vehicle)

B

Positive (+) battery terminal (second vehicle)

C

Negative (-) battery terminal (second vehicle)

D

Solid, stationary, unpainted metallic point away from the exclusive jump starting
terminal and any moving parts as shown in the illustration

NOTICE

When handling jumper cables

When connecting the jumper cables, ensure that they do not become entangled in
the cooling fan or belt.

▶ 

NX350

A

Exclusive jump starting terminal (your vehicle)

9-5. If a door cannot be opened or locked

587

9

When tr

ouble arises

B

Positive (+) battery terminal (second vehicle)

C

Negative (-) battery terminal (second vehicle)

D

Solid, stationary, unpainted metallic point away from the exclusive jump starting
terminal and any moving parts as shown in the illustration

NOTICE

When handling jumper cables

When connecting the jumper cables, ensure that they do not become entangled in
the cooling fan or belt.

5

Start the engine of the second vehicle. Increase the engine speed slightly and
maintain at that level for approximately 5 minutes to recharge the battery of
your vehicle.  

6

Open and close any of the doors of your vehicle with the engine switch off.

7

Maintain the engine speed of the second vehicle and start the engine of your
vehicle by turning the engine switch to ON.

8

Once the vehicle’s engine has started, remove the jumper cables in the exact
reverse order from which they were connected.

Once the engine starts, have the vehicle inspected at any authorized Lexus retailer or
Lexus authorized repairer, or any reliable repairer as soon as possible.

9-5. If a door cannot be opened or locked

588

If a door cannot be opened using the door opener switch

If a door cannot be opened using the door opener switch, it can be opened
using a manual release handle.

Operating a manual release handle

NOTICE

Normally, the manual release handles cannot be used to open the doors. To enable
manual release handle operation, perform the following. If the following is not performed
and/or a manual release handle is operated with force, it may deform or be damaged.

▶ 

Outside the vehicle

Pull the manual release handle 

 to open the door.

Normally, the manual release handles cannot be used to open the doors.
To open a door, enable manual release handle operation.

 P.591

▶ 

Inside the vehicle

Pull the manual release handle 

 twice to open the door.

Pulling the handle once will enable operation. Pulling the handle again will open the door.

9-5. If a door cannot be opened or locked

589

9

When tr

ouble arises

INFORMATION

Manual release handle operating conditions

If the vehicle is involved in a severe frontal or rear collision, manual release handle
operation will be enabled for all of the doors.
However, the manual release handle may not become operable depending on the
force of the impact and conditions of the collision.

When the battery voltage drops slowly while a door was unlocked
It may not work depending on how it is lowered.

When manual release handle operation is enabled from inside the vehicle

When manual release handle operation is enabled from outside the vehicle using a
mechanical key

Conditions which manual release handle operation is disabled

Normally, operation of the outside manual release handles is disabled, and they cannot
be used to open the doors.
When operation is enabled by operating a manual release handle or using a mechani-
cal key, operation will be disabled automatically if the door is opened using the door
opener switch or locked.

Operation of the inside manual release handles is disabled when the engine switch is
in ON, and they cannot be used to open the doors.
When operation is enabled by operating a manual release handle or using a mechani-
cal key, operation will be disabled automatically if the door is opened using the door
opener switch or locked.

9-5. If a door cannot be opened or locked

590

To prevent a door from being opened accidentally, when the engine switch is in ON,
after an inside manual release handle is operated once, operation will automatically be
disabled after approximately 1 second.

 Related Links 

Using the mechanical key(P. 582)

Enabling outside manual release handle operation using a mechanical key

Operation of a manual release handle can be enabled by unlocking a door with the
mechanical key.

1

Insert a plastic card, etc. into the gap in the
door handle and remove the cover.

To avoid damage, do not apply excessive force to
the cover.

2

Using the mechanical key, turn the lock cylin-
der to the unlock side to enable the manual
release handle.

The mechanical key can only be inserted in one
direction, as the key only has a groove on one
side.
If the key cannot be inserted in a lock cylinder,
turn it over and re-attempt to insert it.

Operation of the manual release handle will be enabled.

9-5. If a door cannot be opened or locked

591

9

When tr

ouble arises

If the rear doors cannot be opened from the inside

The child-protector lock may be engaged.
Open the door from outside the vehicle and disengage the child-protector lock.

 Related Links 

Preventing the rear doors from being opened from the inside of the vehicle (child-protec-
tor lock)(P. 26)

9-5. If a door cannot be opened or locked

592

If the back door cannot be opened

The back door can be unlocked from the inside.

1

Using a flathead screwdriver, remove the
cover.

To protect the cover, place a rag between the
flathead screwdriver and the cover as shown in
the illustration.

Vehicles without a power back door:

2

Turn the cover.

3

Using a screwdriver, push the lever.

Vehicles with a power back door:

4

Loosen the screw and turn back the cover.

9-5. If a door cannot be opened or locked

593

9

When tr

ouble arises

5

Using a screwdriver, push the lever.

9-5. If a door cannot be opened or locked

594

If the moon roof or electronic sunshade does not operate correctly

If the moon roof does not operate correctly

If the moon roof closes but then re-opens slightly

1

Stop the vehicle.

2

Press and hold the 

switch.

*1

The moon roof will close, reopen and pause for approximately 10 seconds.

*2

Then it will close again, tilt up and pause for approximately 1 second. Finally, it will tilt
down, open and close.

3

Check to make sure that the moon roof completely stops and then release
the switch.

If the moon roof reverses and does not fully close even after performing the
previous procedure, have the vehicle inspected by any authorized Lexus retailer or
Lexus authorized repairer, or any reliable repairer.

If the moon roof tilts down but then tilts back up

1

Stop the vehicle.

2

Press and hold the 

switch until the moon roof moves into the tilt up

position and stops.

*3

3

Release the switch once and then press and hold the 

 switch again.

*3

The moon roof will pause for approximately 10 seconds in the tilt up position.

*4

4

Check to make sure that the moon roof is completely closed and then
release the switch.

*1 : 

If the switch is released at the incorrect time, the procedure will have to be performed

again from the beginning.

*2 : 

If the switch is released after the above mentioned 10 second pause, automatic
operation will be disabled. In that case, press and hold the 

 or 

 switch, and

the moon roof will tilt up and pause for approximately 1 second. Then it will tilt down,

open and close. Check to make sure that the moon roof is completely closed and then

release the switch.

*3 : 

If the switch is released at the incorrect time, the procedure will have to be performed

again from the beginning.

*4 : 

If the switch is released after the above mentioned 10 second pause, automatic
operation will be disabled. In that case, press and hold the 

 or 

 switch, and

the moon roof will tilt up and pause for approximately 1 second. Then it will tilt down,

open and close. Check to make sure that the moon roof is completely closed and then

release the switch.

9-6. If the moon roof or electronic sunshade does not operate correctly

595

9

When tr

ouble arises

If the moon roof reverses and does not fully close even after performing the
previous procedure, have the vehicle inspected by any authorized Lexus retailer or
Lexus authorized repairer, or any reliable repairer.

9-6. If the moon roof or electronic sunshade does not operate correctly

596


Content      ..     16      17      18      19     ..