Lexus ES (2023 year). Manual in english - page 9
 

  Index      Manuals     Lexus ES (2023 year). Manual in english


Search            copyright infringement  


Content      ..     7      8      9      10     ..


Lexus ES (2023 year). Manual in english - page 9


134

3-2. Opening, closing and locking the doors and trunk

WARNING

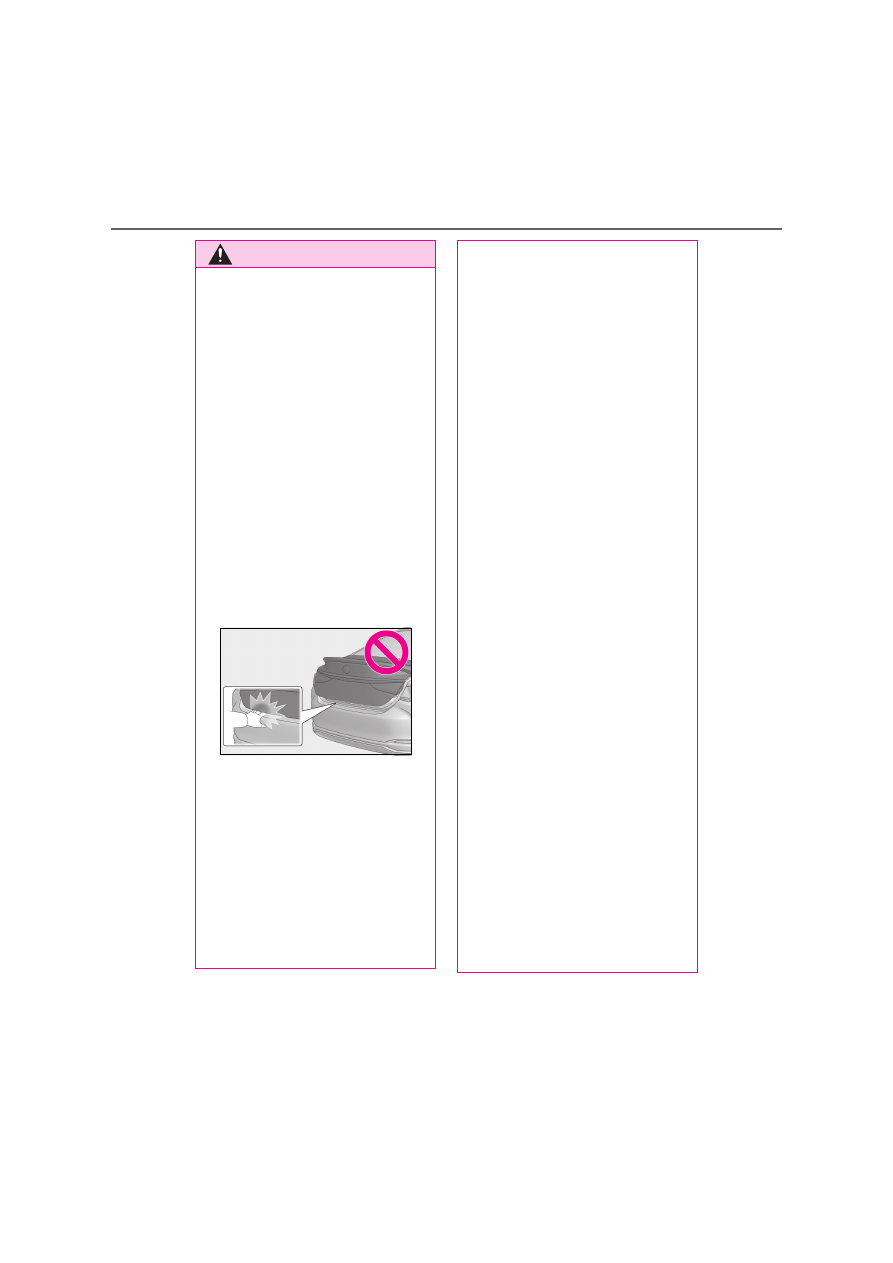
Vehicles without power trunk lid: 

When closing the trunk lid, make sure 

to press it lightly on its outer surface. If 

the trunk grip is used to fully close the 

trunk lid, it may result in hands or arms 

being caught.

Do not attach any accessories other 

than genuine Lexus parts to the trunk 

lid. Such additional weight on the trunk 

lid may cause the lid to suddenly shut 

again after it is opened.

Trunk easy closer (vehicles with 

power trunk lid)

In the event that the trunk lid is left slightly 

open, the trunk easy closer will automati-

cally close it to the fully closed position. It 

takes several seconds before the trunk 

easy closer begins to operate. Be careful 

not to catch fingers or anything else in 

the trunk lid, as this may cause bone frac-

tures or other serious injuries.

Power trunk lid (if equipped)

Observe the following precautions when 

operating the power trunk lid.

Failure to do so may cause serious injury.

Check the safety of the surrounding 

area to make sure there are no obsta-

cles or anything that could cause any 

of your belongings to get caught.

If anyone is in the vicinity, make sure 

they are safe and let them know that 

the trunk is about to open or close.

If the trunk closer switch is pressed 

while the trunk lid is opening during 

automatic operation, the trunk lid 

stops opening. Take extra care when 

on an incline, as the trunk lid may open 

or close suddenly.

On an incline, the trunk lid may sud-

denly shut after it opens automatically. 

Make sure the trunk lid is fully open 

and secure before using the trunk.

In the following situations, the power 

trunk lid may detect an abnormality 

and automatic operation may be 

stopped. In this case, the trunk lid has 

to be operated manually. Take extra 

care in this situation, as the stopped 

trunk lid may suddenly shut, causing an 

accident.

• When the trunk lid contacts an obsta-

cle

• When the 12-volt battery voltage sud-

denly drops, such as when the power 

switch is turned to ON mode or the 

hybrid system is started during auto-

matic operation

Do not attach any accessories other 

than genuine Lexus parts to the trunk 

lid. The power trunk lid may not oper-

ate, causing itself to malfunction, or the 

trunk lid may suddenly shut again after 

it is opened.

Hands Free Power Trunk Lid (vehi-

cles with power trunk lid)

Observe the following precautions.

Failure to do so may cause serious injury.

Exhaust gases cause the exhaust pipes 

to become quite hot. When operating 

the Hands Free Power Trunk Lid, be 

careful not to touch the exhaust pipe.

Do not operate the Hands Free Power 

Trunk Lid if there is little space under 

the rear bumper.

135

3

3-2. Opening, closing and locking the doors and trunk

Before drivi

ng

Trunk opener switch

Press the trunk opener switch.

Smart entry & start system

While carrying the electronic key, 
press the button.
When all the doors are unlocked using 
one of the following methods, the trunk 
can be opened without the electronic 
key:

Entry function

Wireless remote control

Door lock switches

Automatic door unlocking system

Mechanical key

Wireless remote control

Press and hold the switch.

WARNING

Jam protection function (vehicles 

with power trunk lid)

Observe the following precautions.

Failure to do so may cause serious injury.

Never use any part of your body to 

intentionally activate the jam protec-

tion function.

The jam protection function may not 

work if something gets caught just 

before the trunk lid fully closes. Be 

careful not to catch fingers or anything 

else in the trunk lid.

The jam protection function may not 

work depending on the shape of the 

object that is caught. Be careful not to 

catch fingers or anything else.

NOTICE

To prevent trunk easy closer mal-

functions (vehicles with power trunk 

lid)

Do not apply force to the trunk lid while 

the trunk easy closer is operating.

To prevent damage to the power 

trunk lid (vehicles with power trunk 

lid)

Make sure that there is no luggage or 

snow on the trunk lid before operating 

the power trunk lid. In addition, make 

sure that there is no ice between the 

trunk lid and frame that prevents 

movement of the trunk lid. Operating 

the power trunk lid when excessive 

load is present on the trunk lid may 

cause a malfunction.

Do not apply excessive force to the 

trunk lid while the power trunk lid is 

operating.

Opening / closing the trunk

136

3-2. Opening, closing and locking the doors and trunk

Hands Free Power Trunk Lid (vehi-
cles with power trunk lid)

1

While carrying an electronic key, 
stand within the smart entry & start 
system operation range, approxi-
mately 30 to 50 cm (11.8 to 19.7 
in.) from the rear bumper.

Kick sensor

Hands Free Power Trunk Lid oper-
ation detection area

Smart entry & start system opera-
tion detection area (

P.140)

2

Perform a kick operation by mov-
ing your foot to within approxi-
mately 10 cm (3.9 in.) of the rear 
bumper, and then pulling your foot 
back after the buzzer sounds.

• Perform the entire kick operation 

within 1 second.

• The trunk lid will not start operating 

while a foot is detected under the 
rear bumper.

• Operate the Hands Free Power 

Trunk Lid without contacting the 
rear bumper with your foot.

• If another electronic key is in the 

cabin or trunk, it may take slightly 
longer than normal for the opera-
tion to occur.

• If the buzzer sounds twice, wait for 3 

seconds or more and then perform 
a kick operation again.

Kick sensor

Hands Free Power Trunk Lid oper-
ation detection area

3

When the kick sensor detects that 
your foot is pulled back, a buzzer 
will sound and the trunk will auto-
matically fully open/close.

If a foot is moved under the rear bumper 

while the trunk lid is opening, the trunk lid 

will stop moving.

If a foot is moved under the rear bumper 

while the trunk lid is closing, the trunk lid 

will open.

Trunk closer switch (vehicles with 
power trunk lid)

Press the trunk closer switch.

A buzzer will sound and the trunk lid will 
fully close.

A
B

C

A
B

137

3

3-2. Opening, closing and locking the doors and trunk

Before drivi

ng

Pressing the switch while the trunk lid is 
closing opens the trunk lid again.

Trunk grip

Using the trunk grip, lower the trunk 
without applying force to the side and 
push the trunk down from the outside 
to close it.

Trunk light

The trunk light turns on when the trunk is 

opened.

Trunk easy closer (vehicles with power 

trunk lid)

In the event that the trunk lid is left slightly 

open, the trunk easy closer will automati-

cally close it to the fully closed position.

The trunk easy closer will operate 

regardless of the power switch mode.

If the trunk easy closer does not operate, 

open the trunk to the half open position 

or more and then close it.

Function to prevent the trunk being 

locked with the electronic key inside

When all doors are being locked, closing 

the trunk lid with the electronic key left 

inside the trunk will sound an alarm.

In this case, the trunk lid can be opened 

pressing the trunk release button on the 

trunk lid.

If the spare electronic key is put in the 

trunk with all the doors locked, the key 

confinement prevention function is acti-

vated so the trunk can be opened. In 

order to prevent theft, take all electronic 

keys with you when leaving the vehicle.

If the electronic key is put in the trunk 

with all the doors locked, the key may not 

be detected depending on the location of 

the key and the surrounding radio wave 

conditions. In this case, the key confine-

ment prevention function cannot be acti-

vated, causing the doors to lock when the 

trunk is closed. Make sure to check 

where the key is before closing the trunk.

The key confinement prevention function 

cannot be activated if any one of the 

doors is unlocked. In this case, open the 

trunk using the trunk opener.

Overload protection function (vehicles 

with power trunk lid)

The trunk lid will not operate when exces-

sive load is present on the top of the trunk 

lid.

Fall-down protection function (vehicles 

with power trunk lid)

While the trunk lid is opening automatically, 

applying excessive force to it will stop the 

opening operation to prevent the trunk lid 

from rapidly falling down.

Jam protection function (vehicles with 

power trunk lid)

While the trunk lid is closing automatically, 

the trunk lid will stop closing and open if 

something gets caught.

Using the mechanical key

The trunk can be also opened using the 

mechanical key. (

P.440)

If the trunk is unlocked using the mechani-

138

3-2. Opening, closing and locking the doors and trunk

cal key, the power trunk lid and trunk easy 

closer will not be operational. To return 

them to an operational state, fully close the 

trunk lid by hand.

If the smart entry & start system or the 

wireless remote control does not oper-

ate properly

Use the mechanical key to unlock the trunk. 

(

P.440)

Replace the key battery with a new one if it 

is depleted. (

P.387)

Hands Free Power Trunk Lid operating 

conditions (vehicles with power trunk 

lid)

When the Hands Free Power Trunk Lid 

(kick sensor) operation setting is turned 

on (

P.461) and the power switch is 

turned off

When an electronic key is carried within 

the operation range

Situations in which the Hands Free 

Power Trunk Lid may not operate prop-

erly (vehicles with power trunk lid)

In the following situations, the Hands Free 

Power Trunk Lid may not operate properly:

When a foot remains under the rear 

bumper

If the rear bumper is strongly hit with a 

foot or is touched for a while

If the rear bumper has been touched for a 

while, wait for a short time before 

attempting to operate the Hands Free 

Power Trunk Lid again.

When operated while a person is too 

close to the rear bumper

When an external radio wave source 

interferes with the communication 

between the electronic key and the vehi-

cle (

P.142)

When the vehicle is parked near an elec-

trical noise source or metallic object 

which affects the sensitivity of the Hands 

Free Power Trunk Lid, such as a pay 

parking spot, gas station, electrically 

heated road, fluorescent light, or above a 

steel plate.

When the vehicle is near a TV tower, 

electric power plant, radio station, large 

display, airport or other facility that gen-

erates strong radio waves or electrical 

noise

When a large amount of water is applied 

to the rear bumper, such as when the 

vehicle is being washed or in heavy rain

When mud, snow, ice, etc. is attached to 

the rear bumper

When the vehicle has been parked for a 

while near objects that may move and 

contact the rear bumper, such as plants

When an accessory is installed to the rear 

bumper

If an accessory has been installed, turn 

the Hands Free Power Trunk Lid (kick 

sensor) operation setting off.

Preventing unintentional operation of 

the Hands Free Power Trunk Lid (vehi-

cles with power trunk lid)

When an electronic key is in the operation 

range, the Hands Free Power Trunk Lid 

may operate unintentionally, so be careful 

in the following situations.

When a large amount of water is applied 

to the rear bumper, such as when the 

vehicle is being washed or in heavy rain

When dirt is wiped off the rear bumper

When a small animal or small object, such 

as a ball, moves under the rear bumper

When an object is moved from under the 

rear bumper

If someone is swinging their legs while sit-

ting on the rear bumper

If the legs or another part of someone’s 

body contacts the rear bumper while 

passing by the vehicle

When the vehicle is parked near an elec-

trical noise source or metallic object 

which affects the sensitivity of the Hands 

Free Power Trunk Lid, such as a pay 

parking spot, gas station, electrically 

heated road, or fluorescent light

When the vehicle is near a TV tower, 

electric power plant, radio station, large 

display, airport or other facility that gen-

erates strong radio waves or electrical 

139

3

3-2. Opening, closing and locking the doors and trunk

Before drivi

ng

noise

When the vehicle is parked in a place 

where objects such as plants are near the 

rear bumper

If luggage, etc. is set near the rear 

bumper

If accessories or a vehicle cover is 

installed/removed near the rear bumper

When the vehicle is being towed

To prevent unintentional operation, turn the 
Hands Free Power Trunk Lid (kick sensor) 
operation setting off. (

P.461)

Open door warning buzzer

P.131

Customization

Some functions can be customized. (Cus-

tomizable features: 

P.461)

The trunk opener switch can be tem-
porarily disabled to protect luggage 
stored in the trunk against theft.
Turn the main switch in the glove box 
off to disable the trunk opener.

On

Off

When the trunk opener main switch is off, 
the trunk lid cannot be opened even with 
the wireless remote control, entry function 
or Hands Free Power Trunk Lid (if 

equipped).

When leaving a key to the vehicle with a 

parking attendant

P.127

Protecting luggage against theft

A
B

140

3-2. Opening, closing and locking the doors and trunk

Antenna location

Antennas outside the cabin

Antennas inside the cabin

Antenna inside the trunk

Antenna outside the trunk

Effective range (areas within which the 

electronic key is detected)

When locking or unlocking the doors 
The system can be operated when the 
electronic key is within about 0.7 m 
(2.3 ft.) of an outside door handle. 
(Only the doors detecting the key can 
be operated.)

When opening the trunk 
The system can be operated when the 
electronic key is within about 0.7 m 
(2.3 ft.) of the trunk release button.

When starting the hybrid system or 
changing power switch modes 
The system can be operated when the 
electronic key is inside the vehicle.

If an alarm sounds or a warning message 

is displayed

An alarm sounds and warning messages 

are displayed on the multi-information dis-

play to protect against unexpected acci-

dents or theft of the vehicle resulting from 

erroneous operation. When a warning 

message is displayed, take appropriate 

measures based on the displayed message.
When only an alarm sounds, circumstances 

and correction procedures are as follows.

Smart entry & start system

The following operations can be 
performed simply by carrying the 
electronic key (including the card 
key) on your person, for example in 
your pocket. The driver should 
always carry the electronic key.

Locks and unlocks the doors 
(

P.128)

Opens the trunk (

P.135)

Starts the hybrid system 
(

P.186)

A

B

C

D

A

B

C

141

3

3-2. Opening, closing and locking the doors and trunk

Before drivi

ng

When an exterior alarm sounds once for 

5 seconds

When an interior alarm sounds continu-

ously

If “Key Detected In Vehicle” is shown on 

the multi-information display

An attempt was made to lock the doors 

using the smart entry & start system while 

the electronic key was still inside the vehi-

cle. Retrieve the electronic key from the 

vehicle and lock the doors again.

Battery-saving function

The battery-saving function will be acti-

vated in order to prevent the electronic key 

battery and the 12-volt battery from being 

discharged while the vehicle is not in opera-

tion for a long time.

In the following situations, the smart entry 

& start system may take some time to 

unlock the doors.

• The electronic key has been left within 

approximately 2 m (6 ft.) of the outside of 

the vehicle for 10 minutes or longer.

• The smart entry & start system has not 

been used for 5 days or longer.

If the smart entry & start system has not 

been used for 14 days or longer, the 

doors cannot be unlocked at any doors 

except the driver’s door. In this case, take 

hold of the driver’s door handle, or use 

the wireless remote control or the 

mechanical key, to unlock the doors.

Turning an electronic key to battery-

saving mode

When battery-saving mode is set, battery 

depletion is minimized by stopping the 

electronic key from receiving radio waves.

Press 

 twice while pressing and 

holding 

. Confirm that the elec-

tronic key indicator flashes 4 times. 
While the battery-saving mode is set, the 
smart entry & start system cannot be used. 
To cancel the function, press any of the 
electronic key buttons.

Electronic keys that will not be used for 

long periods of time can be set to the bat-

tery-saving mode in advance.

Situation

Correction proce-

dure

The trunk was 
closed while the 
electronic key was 
still inside the trunk 
and all the doors 
were locked.

Retrieve the elec-
tronic key from the 
trunk and close the 
trunk lid.

An attempt was 
made to lock the 
vehicle while a door 
was open.

Close all of the 
doors and lock the 
doors again.

Situation

Correction proce-

dure

The power switch 
was turned to 
ACCESSORY 
mode while the 
driver’s door was 
open (or the driver’s 
door was opened 
while the power 
switch was in 
ACCESSORY 
mode).

Turn the power 
switch off and close 
the driver’s door.

The power switch 
was turned off while 
the driver’s door 
was open.

Close the driver’s 
door.

142

3-2. Opening, closing and locking the doors and trunk

When electronic key function stops

If the position of the electronic key has not 

changed for a certain amount of time such 

as when the electronic key is left some-

where, the function of the electronic key 

stops to reduce depletion of the battery.

Conditions affecting operation

The smart entry & start system uses weak 

radio waves. In the following situations, the 

communication between the electronic key 

and the vehicle may be affected, preventing 

the smart entry & start system, wireless 

remote control and immobilizer system 

from operating properly. (Ways of coping: 

P.439)

When the electronic key battery is 

depleted

Near a TV tower, electric power plant, 

gas station, radio station, large display, 

airport or other facility that generates 

strong radio waves or electrical noise

When carrying a portable radio, cellular 

phone, cordless phone or other wireless 

communication device

When the electronic key is in contact 

with, or is covered by the following metal-

lic objects

• Cards to which aluminum foil is attached

• Cigarette boxes that have aluminum foil 

inside

• Metallic wallets or bags

• Coins

• Hand warmers made of metal

• Media such as CDs and DVDs

When other wireless keys (that emit 

radio waves) are being used nearby

When carrying the electronic key 

together with the following devices that 

emit radio waves

• Another electronic key or a wireless key 

that emits radio waves

• Personal computers or personal digital 

assistants (PDAs)

• Digital audio players

• Portable game systems

If window tint with a metallic content or 

metallic objects are attached to the rear 

window

When the electronic key is placed near a 

battery charger or electronic devices

When the vehicle is parked in a pay park-

ing spot where radio waves are emitted.

Notes for the entry function

Even when the electronic key is within the 

effective range (detection areas), the sys-

tem may not operate properly in the fol-

lowing cases:

• The electronic key is too close to the win-

dow or outside door handle, near the 

ground, or in a high place when the doors 

are locked or unlocked.

• The electronic key is near the ground or 

in a high place, or too close to the center 

of the rear bumper when the trunk is 

opened.

• The electronic key is on the instrument 

panel, rear package tray or floor, or in the 

door pockets or glove box when the 

hybrid system is started or power switch 

modes are changed.

Do not leave the electronic key on top of 

the instrument panel or near the door 

pockets when exiting the vehicle. 

Depending on the radio wave reception 

conditions, it may be detected by the 

antenna outside the cabin and the doors 

will become lockable from the outside, 

possibly trapping the electronic key 

inside the vehicle.

As long as the electronic key is within the 

effective range, the doors may be locked 

or unlocked by anyone. However, only 

the doors detecting the electronic key 

can be used to unlock the vehicle.

Even if the electronic key is not inside the 

vehicle, it may be possible to start the 

hybrid system if the electronic key is near 

the window.

The doors may unlock or lock if a large 

amount of water splashes on the door 

handle, such as in the rain or in a car 

wash, when the electronic key is within 

the effective range. (The doors will auto-

matically be locked after approximately 

30 seconds if the doors are not opened 

and closed.)

If the wireless remote control is used to 

143

3

3-2. Opening, closing and locking the doors and trunk

Before drivi

ng

lock the doors when the electronic key is 

near the vehicle, there is a possibility that 

the door may not be unlocked by the 

entry function. (Use the wireless remote 

control to unlock the doors.)

Touching the door lock sensor while 

wearing gloves may delay or prevent 

lock operation. Remove the gloves and 

touch the lock sensor or unlock sensor 

again.

When the lock operation is performed 

using the lock sensor, recognition signals 

will be shown up to two consecutive 

times. After this, no recognition signals 

will be given.

If the door handle becomes wet while the 

electronic key is within the effective 

range, the door may lock and unlock 

repeatedly. In this case, follow the follow-

ing correction procedures to wash the 

vehicle:

• Place the electronic key in a location 2 m 

(6 ft.) or more away from the vehicle. 

(Take care to ensure that the key is not 

stolen.)

• Set the electronic key to battery-saving 

mode to disable the smart entry & start 

system. (

P.141)

If the electronic key is inside the vehicle 

and a door handle becomes wet during a 

car wash, a message may be shown on 

the multi-information display and a 

buzzer will sound outside the vehicle. To 

turn off the alarm, lock all the doors.

The lock sensor may not work properly if 

it comes into contact with ice, snow, mud, 

etc. Clean the lock sensor and attempt to 

operate it again, or use the lock sensor on 

the lower part of the door handle.

A sudden approach to the effective 

range or door handle may prevent the 

doors from being unlocked. In this case, 

return the door handle to the original 

position and check that the doors unlock 

before pulling the door handle again.

If there is another electronic key in the 

detection area, it may take slightly longer 

to unlock the doors after the door handle 

is gripped.

When the vehicle is not driven for 

extended periods

To prevent theft of the vehicle, do not 

leave the electronic key within 2 m (6 ft.) 

of the vehicle.

The smart entry & start system can be 

deactivated in advance.

Battery-saving mode can reduce the 

power consumption of electronic keys. 

(

P.141)

To operate the system properly

Make sure to carry the electronic key 

when operating the system. Do not get 

the electronic key too close to the vehicle 

when operating the system from the out-

side of the vehicle.

Depending on the position and holding 

condition of the electronic key, the key 

may not be detected correctly and the 

system may not operate properly. (The 

alarm may go off accidentally, or the door 

lock prevention function may not oper-

ate.)

Do not leave the electronic key inside the 

trunk. 

The key confinement prevention function 

may not operate, depending on the loca-

tion of the key (close to a spare tire, the 

inside edge of the Trunk), conditions 

(inside a metal bag, close to metallic 

objects) and the radio waves in the sur-

rounding area. (

P.137)

If an electronic key does not work prop-

erly

If the doors cannot be locked or 

unlocked and the trunk cannot be 

opened, perform the following.

• Bring the electronic key close to the door 

handle and perform a lock or unlock 

operation.

• Bring the electronic key close to the but-

ton on the trunk (

P.135) and press the 

button.

• Use the wireless remote control.
If the doors cannot be locked or unlocked 
by perform the above, use the mechanical 
key. (

P.440)

However, if the mechanical key is used 

144

3-2. Opening, closing and locking the doors and trunk

while the alarm system is set, the warning 
will sound. (

P.88)

If the hybrid system cannot be started, 

refer to P.441

Customization

Settings (e. g. smart entry & start system) 

can be changed. 

(Customizable features: 

P.461)

If the smart entry & start system has been 

deactivated in a customized setting, refer to 

the explanations for the following opera-

tions.

Locking and unlocking the doors and 

opening the trunk: 

Use the wireless remote control or 

mechanical key. (

P.128, 135, 440)

Starting the hybrid system and changing 

power switch modes: 

P.441

Stopping the hybrid system: 

P.188

WARNING

Caution regarding interference with 

electronic devices

People with implantable cardiac pace-

makers, cardiac resynchronization 

therapy-pacemakers or implantable 

cardioverter defibrillators should 

maintain a reasonable distance 

between themselves and the smart 

entry & start system antennas. 

(

P.140)

The radio waves may affect the opera-

tion of such devices. If necessary, the 

entry function can be disabled. Ask 

any authorized Lexus retailer or Lexus 

authorized repairer, or any reliable 

repairer for details, such as the fre-

quency of radio waves and timing of 

the emitted radio waves. Then, consult 

your doctor to see if you should dis-

able the entry function.

Users of any electrical medical device 

other than implantable cardiac pace-

makers, cardiac resynchronization 

therapy-pacemakers or implantable 

cardioverter defibrillators should con-

sult the manufacturer of the device for 

information about its operation under 

the influence of radio waves.

Radio waves could have unexpected 

effects on the operation of such medi-

cal devices.

Ask any authorized Lexus retailer or 

Lexus authorized repairer, or any reli-

able repairer for details on disabling the 

entry function.

145

3

3-3. Adjusting the seats

Before drivi

ng

3-3.Adjusting the seats

Seat position adjustment

Seatback angle adjustment

Seat cushion (front) angle adjust-
ment

Vertical height adjustment

Lumbar support adjustment

Pelvic support adjustment (if 
equipped)

Seat cushion length adjustment (if 
equipped for driver’s side)

When adjusting the front seat

Make sure that no surrounding passen-

gers or objects are in contact with the 

seat.

Take care when adjusting the seat so that 

the head restraint does not touch the ceil-

ing.

Power easy access system (if equipped)

The driver’s seat and steering wheel move 

in accordance with power switch mode and 

the driver’s seat belt condition. (

P.147)

Front seats

The seats can be adjusted (longitu-
dinally, vertically, etc.). Adjust the 
seat to ensure the correct driving 
posture.

Adjustment procedure

A
B
C

D

E
F

G

WARNING

When adjusting the seat position

Take care when adjusting the seat 

position to ensure that other passen-

gers are not injured by the moving 

seat.

Do not put your hands under the seat 

or near the moving parts to avoid 

injury.

Fingers or hands may become 

jammed in the seat mechanism.

Make sure to leave enough space 

around the feet so they do not get 

stuck.

Seat adjustment

To reduce the risk of sliding under the lap 

belt during a collision, do not recline the 

seat more than necessary.

If the seat is too reclined, the lap belt may 

slide past the hips and apply restraint 

forces directly to the abdomen, or your 

neck may contact the shoulder belt, 

increasing the risk of death or serious 

injury in the event of an accident.

Adjustments should not be made while 

driving as the seat may unexpectedly 

move and cause the driver to lose con-

trol of the vehicle.

146

3-3. Adjusting the seats

Tilts the seatback forward

Tilts the seatback backward

Moves the seat forward

Moves the seat backward

*

: If  equipped

Press the switch.

1

Tilts the seatback forward

2

Tilts the seatback backward

Seat operation switches on the 
side of the front passenger’s seat 
(if equipped)

WARNING

Operating the front passenger’s seat 

from the driver’s seat or rear seat

Do not operate the front passenger’s 

seat when a passenger is seated in it. In 

addition, do not let anyone sit down in the 

front passenger’s seat while the seat is 

being operated.
The front passenger may catch their legs 

between the instrument panel and seat, 

resulting in injury.

NOTICE

Operating the front passenger’s seat 

from the driver’s seat or rear seat

Before operating the front passenger’s 

seat, make sure that there is no luggage 

or any other objects on the seat or in the 

footwell that could prevent its operation. 

Such items may result in excess force 

being applied, causing damage to the 

seat and/or the luggage.

A
B
C
D

Rear seats (reclining type)

*

The seatbacks of the rear seats can 
be adjusted to a comfortable posi-
tion.

Adjustment procedure

147

3

3-3. Adjusting the seats

Before drivi

ng

*

: If equipped

The seat and steering wheel are auto-
matically adjusted to allow the driver to 
enter and exit the vehicle easily.
When all of the following have been 
performed, the seat and steering wheel 
are automatically adjusted to a position 
that allows the driver to enter and exit 
the vehicle easily.

The shift lever has been shifted to P.

The power switch has been turned 
off.

The driver’s seat belt has been 
unfastened.

When any of the following has been 
performed, the driver’s seat and steer-
ing wheel automatically return to their 
original positions.

The power switch has been turned 
to ACCESSORY mode or ON 
mode.

The driver’s seat belt has been fas-
tened.

Operation of the power easy access 

system

When exiting the vehicle, the power easy 

access system may not operate if the seat 

is already in the rearmost or uppermost 

position or close to the rear seat.

If the seat position is adjusted during 

power easy access system operation, the 

automatic operation will stop. (The seat 

will change to manual operation.)

If the seat position is adjusted during or 

after the power easy access system oper-

ation when the driver is exiting the vehi-

cle, the power easy access system will not 

operate when entering the vehicle.

Customization

The seat movement amount settings of the 

power easy access system can be custom-

ized. (Customizable features: 

P.461)

Driving position memory

*

This feature automatically adjusts 
the positions of the driver’s seat, 
steering wheel, outside rear view 
mirrors (if equipped), the Digital 
Side-view Monitor display range (if 
equipped) and head-up display (if 
equipped) to make entering and 
exiting the vehicle easier or to suit 
your preferences.
Up to 3 different driving positions 
can be recorded.
Each electronic key (including a 
card key) can be registered to 
recall your preferred driving posi-
tion.

Power easy access system

148

3-3. Adjusting the seats

1

Check that the shift lever is in P.

2

Turn the power switch to ON 
mode.

3

Adjust the driver’s seat, steering 
wheel, outside rear view mirrors (if 
equipped) and head-up display to 
the desired positions, and the Digi-
tal Side-view Monitor (if equipped) 
to the desired display range.

4

While pressing the “SET” button, or 
within 3 seconds after the “SET” 
button is pressed, press button “1”, 
“2” or “3” until the buzzer sounds.

If the selected button has already been 

preset, the previously recorded position 

will be overwritten.

Vehicles with position memory for the 
front passenger’s seat: To record the 
position of the front passenger’s seat, 
adjust the front passenger’s seat to the 
desired position and perform step 

4


using the buttons on the front passen-
ger’s side.

Seat positions that can be memorized 

(

P.145)

The positions adjusted by the following pro-

cedure can be recorded:

Seat position adjustment

Seatback adjustment

Seat cushion (front) angle adjustment

Vertical height adjustment

In order to correctly use the driving 

position memory function

If a seat position is already in the furthest 

possible position and the seat is operated in 

the same direction, the recorded position 

may be slightly different when it is recalled.

1

Check that the shift lever is in P.

2

Turn the power switch to ON 
mode.

3

Press one of the buttons for the 
driving position you want to recall 
until the buzzer sounds.

To stop the position recall operation 

part-way through

Perform any of the following:

Press the “SET” button.

Recording a driving position into 
memory

WARNING

Seat adjustment caution

Take care during seat adjustment so that 

the seat does not strike the rear passen-

ger or squeeze your body against the 

steering wheel.

Recalling a driving position

149

3

3-3. Adjusting the seats

Before drivi

ng

Press button “1”, “2” or “3”.

Operate any of the seat adjustment 

switches (only cancels seat position 

recall).

Operate the tilt and telescopic steering 

control switch (only cancels steering 

wheel position recall).

Vehicles with the head-up display: Oper-

ate the meter control switches to adjust 

the head-up display position (only can-

cels head-up display position recall).

Operating the driving position memory 

after turning the power switch off

Driver’s seat:

Recorded seat positions can be activated 

up to 180 seconds after the driver’s door is 

opened and another 60 seconds after it is 

closed again.
Front passenger’s seat (if equipped):

Recorded seat positions can be activated 

up to 180 seconds after the front passen-

ger’s door is opened.

When the recorded seat position can-

not be recalled

The seat position may not be recalled in 

some situations when the seat position is 

recorded in a certain range. For details, 

contact any authorized Lexus retailer or 

Lexus authorized repairer, or any reliable 

repairer.

Registering procedure

Record your driving position to button 
“1”, “2” or “3” before performing the 
following:
Carry only the key you want to regis-
ter, and then close the driver’s door.
If 2 or more keys are in the vehicle, the 

driving position cannot be recorded 
properly.

1

Check that the shift lever is in P.

2

Turn the power switch to ON 
mode.

3

Recall the driving position that you 
want to record.

4

While pressing the recalled button, 
press and hold the door lock switch 
(either lock or unlock) until the 
buzzer sounds.

If the button could not be registered, the 

buzzer sounds continuously for approxi-

mately 3 seconds.

Cancelation procedure

1

Carry only the key you want to can-
cel and then close the driver’s door.

If 2 or more keys are in the vehicle, the 

driving position cannot be canceled prop-

erly.

2

Check that the shift lever is in P.

3

Turn the power switch to ON 
mode.

4

While pressing the “SET” button, 
press and hold the door lock switch 
(either lock or unlock) until the 
buzzer sounds twice.

If the button could not be canceled, the 

buzzer sounds continuously for approxi-

Registering/canceling/recall-
ing a driving position to an elec-
tronic key (including a card key) 
(memory recall function)


Content      ..     7      8      9      10     ..