Hyundai Santa Fe (2019 year). Manual - part 36
Maintenance
Check tyre inflation pressure
If you overfill the tyre, release air by
Tyre rotation
pushing on the metal stem in the
Check your tyres, including the spare
To equalize tread wear, HYUNDAI
centre of the tyre valve. Recheck the
tyre, once a month or more.
recommends that the tyres be rotat-
tyre pressure with the tyre gauge. Be
ed every 7,500 miles (12,000 km) or
sure to put the valve caps back on
sooner if irregular wear develops.
How to check
the valve stems. Without the valve
During rotation, check the tyres for
cap, dirt or moisture could get into
Use a good quality tyre pressure
correct balance.
the valve core and cause air leakage.
gauge to check tyre pressure. You
If a valve cap is missing, install a new
When rotating tyres, check for uneven
can not tell if your tyres are properly
one as soon as possible.
wear and damage. Abnormal wear is
inflated simply by looking at them.
usually caused by incorrect tyre pres-
Radial tyres may look properly inflat-
sure, improper wheel alignment, out-
ed when they are under-inflated.
of-balance wheels, severe braking or
Remove the valve cap from the tyre
severe cornering. Look for bumps or
valve stem. Press the tyre gauge
bulges in the tread or side of the tyre.
firmly onto the valve to get a pres-
Replace the tyre if you find any of
sure measurement. If the cold tyre
these conditions. Replace the tyre if
inflation pressure matches the rec-
fabric or cord is visible. After rotation,
ommended pressure on the tyre and
be sure to bring the front and rear tyre
loading information label, no further
pressures to specification and check
adjustment is necessary. If the pres-
lug nut tightness
(proper torque is
sure is low, add air until you reach
11~13 kgf·m [79~94 lbf·ft]).
the recommended pressure. Make
sure to put the valve caps back on
the valve stems. Without the valve
cap, dirt or moisture could get into
the valve core and cause air leakage.
If a valve cap is missing, install a new
one as soon as possible.
7-34
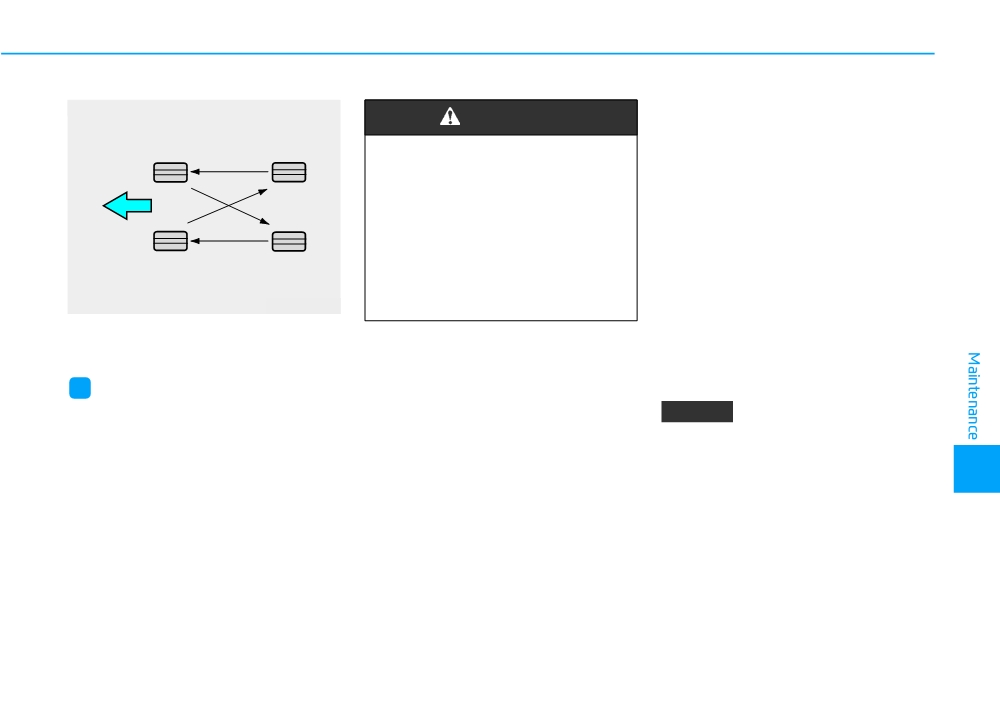
■ Without a spare tyre
Wheel alignment and tyre bal-
WARNING
ance
The wheels on your vehicle were
•
Do not use the compact spare
tyre for tyre rotation.
aligned and balanced carefully at the
factory to give you the longest tyre
•
Do not mix bias ply and radial
life and best overall performance.
ply tyres under any circum-
stances. This may cause
In most cases, you will not need to
have your wheels aligned again.
unusual handling characteris-
tics that may cause loss of
However, if you notice unusual tyre
wear or your vehicle pulling one way
vehicle control resulting in an
accident.
or the other, the alignment may need
ODH073802
to be reset.
Disc brake pads should be inspected
If you notice your vehicle vibrating
for wear whenever tyres are rotated.
when driving on a smooth road, your
wheels may need to be rebalanced.
i
Information
The outside and inside of the unsym-
NOTICE
metrical tyre is distinguishable. When
Incorrect wheel weights can dam-
installing an unsymmetrical tyre, be
age your vehicle’s aluminium
sure to install the side marked "out-
7
wheels. Use only approved wheel
side" facing the outside. If the side
weights.
marked "inside" is installed on the
outside, it will have a negative effect
on vehicle performance.
7-35
Maintenance
Tyre replacement
WARNING
•
When replacing tyres
(or
wheels), it is recommended to
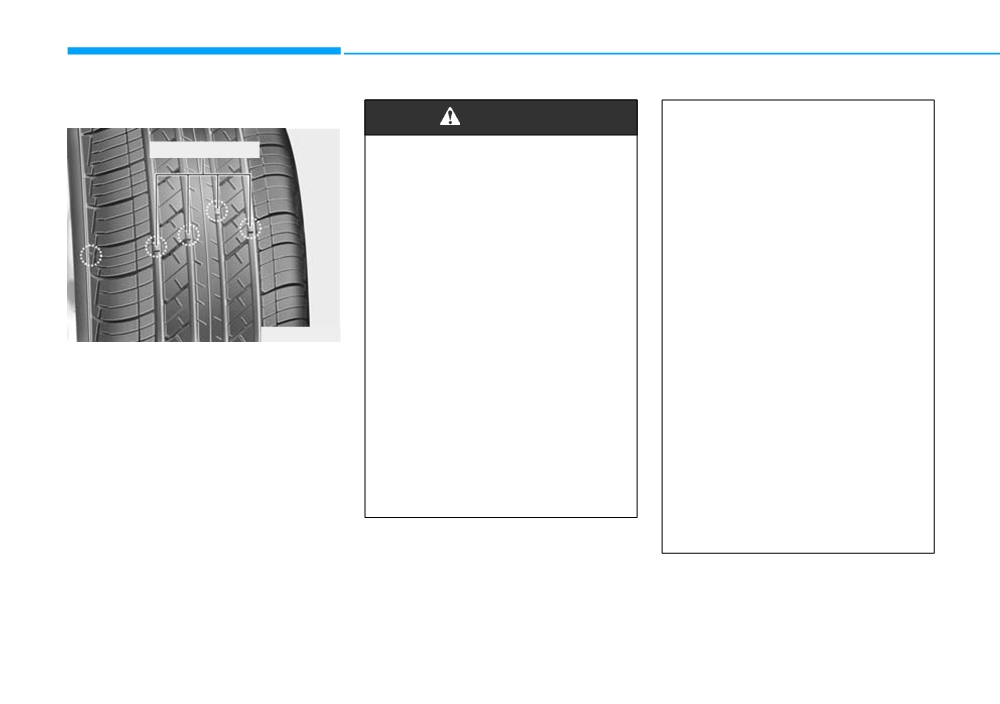
Tread wear indicator
To reduce the risk of DEATH or
replace the two front or two
SERIOUS INJURY:
rear tyres
(or wheels) as a
pair. Replacing just one tyre
•
Replace tyres that are worn,
can seriously affect your vehi-
show uneven wear, or are
cle’s handling. If only replac-
damaged. Worn tyres can
ing one pair of tyres, it is rec-
cause loss of braking effec-
ommended to install the pair
tiveness, steering control, and
of new tyres on the rear axle.
traction.
•
Tyres degrade over time, even
•
Always replace tyres with the
when they are not being used.
same size as each tyre that
OLMB073027
Regardless of the remaining
was originally supplied with
tread, HYUNDAI recommends
this vehicle. Using tyres and
If the tyre is worn evenly, a tread
that tyres be replaced after six
wear indicator will appear as a solid
wheels other than the recom-
(6) years of normal service.
mended sizes could cause
band across the tread. This shows
unusual handling characteris-
•
Heat caused by hot climates or
there is less than 1.6 mm (1/16 in.) of
tics, poor vehicle control, or
frequent high loading condi-
tread left on the tyre. Replace the
negatively affect your vehi-
tions can accelerate the aging
tyre when this happens.
cle’s Anti-Lock Brake System
process. Failure to follow this
Do not wait for the band to appear
(ABS) resulting in a serious
warning may cause sudden
across the entire tread before replac-
accident.
tyre failure, which could lead
ing the tyre.
to a loss of vehicle control
resulting in an accident.
7-36
Compact spare tyre replace-
Wheel replacement
Tyre maintenance
ment (if equipped)
When replacing the metal wheels for
In addition to proper inflation, correct
A compact spare tyre has a shorter
any reason, make sure the new
wheel alignment helps to decrease
tread life than a regular size tyre.
wheels are equivalent to the original
tyre wear. If you find a tyre is worn
Replace it when you can see the
factory units in diameter, rim width
unevenly, have your dealer check the
tread wear indicator bars on the tyre.
and offset.
wheel alignment.
The replacement compact spare tyre
When you have new tyres installed,
should be the same size and design
make sure they are balanced. This
tyre as the one provided with your
Tyre traction
will increase vehicle ride comfort and
new vehicle and should be mounted
Tyre traction can be reduced if you
tyre life. Additionally, a tyre should
on the same compact spare tyre
drive on worn tyres, tyres that are
always be rebalanced if it is removed
wheel. The compact spare tyre is not
improperly inflated or on slippery
from the wheel.
designed to be mounted on a regular
road surfaces. Tyres should be
size wheel, and the compact spare
replaced when tread wear indicators
tyre wheel is not designed for mount-
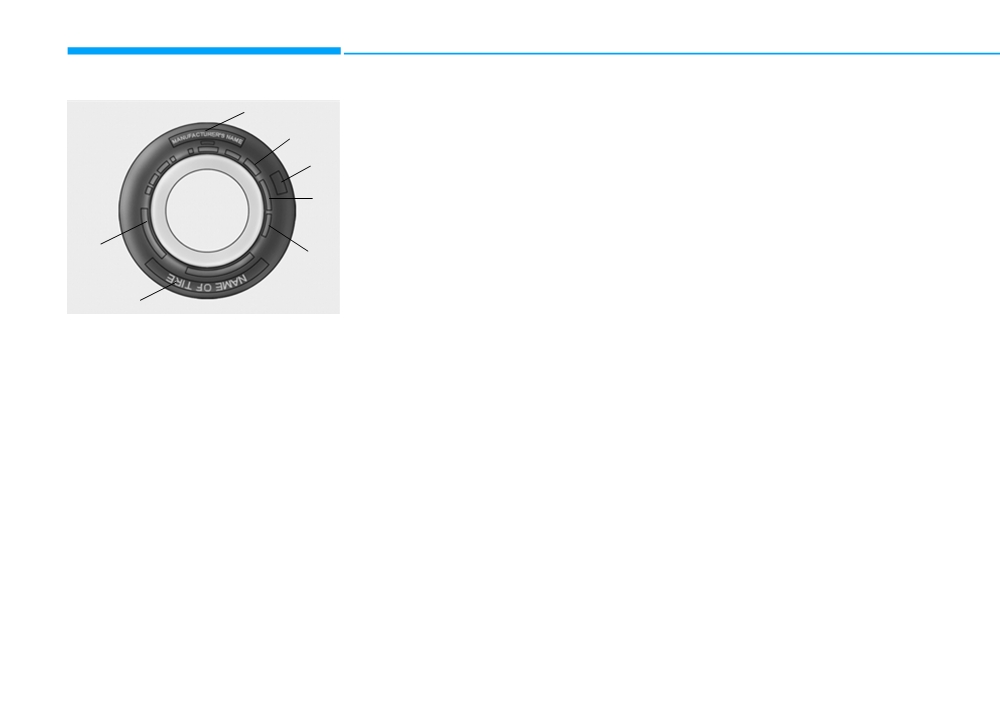
Tyre sidewall labelling
appear. To reduce the possibility of
ing a regular size tyre.
losing control, slow down whenever
This information identifies and
there is rain, snow or ice on the road.
describes the fundamental charac-
WARNING
teristics of the tyre and also provides
the tyre identification number (TIN)
The original tyre should be
for safety standard certification. The
repaired or replaced as soon as
TIN can be used to identify the tyre in
7
possible to avoid failure of the
case of a recall.
spare and loss of vehicle control
resulting in an accident.The com-
pact spare tyre is for emergency
use only. Do not operate your
vehicle over 50 mph (80 km/h)
when using the compact spare
tyre.
7-37
Maintenance
1
Example tyre size designation:
Wheel size designation
(These numbers are provided as an
Wheels are also marked with impor-
5,6
example only; your tyre size designa-
tant information that you need if you
7
tor could vary depending on your
ever have to replace one. The follow-
vehicle.)
ing explains what the letters and
4
numbers in the wheel size designa-
235/60R18 102H
tion mean.
Example wheel size designation:
2
235 - Tyre width in millimeters.
3
7.5J X 18
60 - Aspect ratio. The tyre’s section
height as a percentage of its
7.5 - Rim width in inches.
1
OLMB073028
width.
J - Rim contour designation.
1. Manufacturer or brand name
R - Tyre construction code (Radial).
18 - Rim diameter in inches.
Manufacturer or brand name is
18 - Rim diameter in inches.
shown.
102 - Load Index, a numerical code
associated with the maximum
load the tyre can carry.
2. Tyre size designation
H - Speed Rating Symbol. See the
A tyre’s sidewall is marked with a tyre
speed rating chart in this section
size designation. You will need this
for additional information.
information when selecting replace-
ment tyres for your car. The following
explains what the letters and num-
bers in the tyre size designation
mean.
7-38
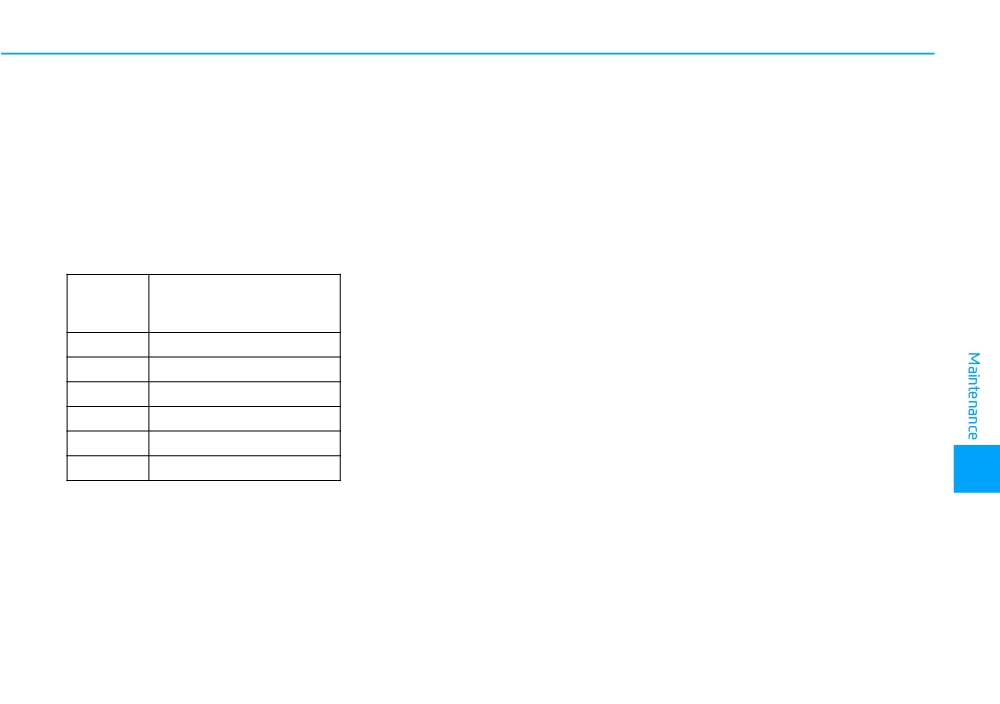
Tyre speed ratings
3. Checking tyre life (TIN : Tyre
4. Tyre ply composition and
The chart below lists many of the dif-
Identification Number)
material
ferent speed ratings currently being
Any tyres that are over six years old,
The number of layers or plies of rub-
used for passenger vehicle tyres.
based on the manufacturing date,
ber-coated fabric in the tyre. Tyre
The speed rating is part of the tyre
(including the spare tyre) should be
manufacturers also must indicate the
size designation on the sidewall of
replaced by new ones. You can find
materials in the tyre, which include
the tyre. This symbol corresponds to
the manufacturing date on the tyre
steel, nylon, polyester, and others.
that tyre’s designed maximum safe
sidewall (possibly on the inside of the
The letter "R" means radial ply con-
operating speed.
wheel), displaying the DOT Code.
struction; the letter "D“ means diago-
The DOT Code is a series of num-
nal or bias ply construction; and the
Speed
bers on a tyre consisting of numbers
letter "B" means belted-bias ply con-
Rating
Maximum Speed
and English letters. The manufactur-
struction.
Symbol
ing date is designated by the last four
S
180 km/h (112 mph)
digits (characters) of the DOT code.
5. Maximum permissible infla-
T
190 km/h (118 mph)
tion pressure
DOT : XXXX XXXX OOOO
H
210 km/h (130 mph)
This number is the greatest amount
of air pressure that should be put in
V
240 km/h (149 mph)
The front part of the DOT shows a
the tyre. Do not exceed the maximum
W
270km/h (168mph)
plant code number, tyre size and
permissible inflation pressure. Refer
tread pattern and the last four num-
Y
300km/h (186mph)
to the Tyre and Loading Information
7
bers indicate week and year manu-
label for recommended inflation
factured.
pressure.
For example:
DOT XXXX XXXX 1518 represents
that the tyre was produced in the
15th week of 2018.
7-39
Maintenance
6. Maximum load rating
Tread wear
Traction - AA, A, B & C
This number indicates the maximum
The tread wear grade is a compara-
The traction grades, from highest to
load in kilograms and pounds that
tive rating based on the wear rate of
lowest, are AA, A, B and C. Those
can be carried by the tyre. When
the tyre when tested under controlled
grades represent the tyre’s ability to
replacing the tyres on the vehicle,
conditions on a specified govern-
stop on wet pavement as measured
always use a tyre that has the same
ment test course. For example, a tyre
under controlled conditions on spec-
load rating as the factory installed
graded 150 would wear one-and-a-
ified government test surfaces of
tyre.
half times (1½) as well on the gov-
asphalt and concrete. A tyre marked
ernment course as a tyre graded
C may have poor traction perform-
100.
ance.
7. Uniform tyre quality grading
The relative performance of tyres
Quality grades can be found where
depends upon the actual conditions
WARNING
applicable on the tyre sidewall
of their use, however, and may
between tread shoulder and maxi-
depart significantly from the norm
The traction grade assigned to
mum section width.
due to variations in driving habits,
this tyre is based on straight-
For example:
service practices and differences in
ahead braking traction tests,
TREAD WEAR 200
road characteristics and climate.
and does not include accelera-
TRACTION AA
These grades are molded on the
tion, cornering, hydroplaning,
sidewalls of passenger vehicle tyres.
or peak traction characteristics.
TEMPERATURE A
The tyres available as standard or
optional equipment on your vehicle
may vary with respect to grade.
7-40
Temperature - A, B & C
Low aspect ratio tyres
•
When there is an impact on a
The temperature grades are A (the
A low aspect ratio tyre, of which the
tyre, inspect the tyre condi-
highest), B and C representing the
aspect ratio is lower than
50, is
tion. Or, contact a HYUNDAI
tyre’s resistance to the generation of
designed for a sporty-look vehicle.
authorised repairer.
heat and its ability to dissipate heat
The low aspect ratio is to optimize
•
Inspect the tyre condition and
when tested under controlled condi-
handling and braking. Thus, it may
pressure every
1,800 miles
tions on a specified indoor laboratory
be uncomfortable to ride and it may
(3,000 km) to prevent a tyre
test wheel.
generate noises, in comparison with
damage.
Sustained high temperature can
a normal tyre.
•
It is difficult to recognise a tyre
cause the material of the tyre to
damage only with your eyes.
degenerate and reduce tyre life, and
CAUTION
When there is a slight hint of a
excessive temperature can lead to
tyre damage, check and
sudden tyre failure. Grades B and A
The side wall of a low aspect
replace the tyre to prevent the
represent higher levels of perform-
ratio tyre is shorter than the
damage caused by air leakage.
ance on the laboratory test wheel
nor- mal one. Thus, the low-
than the minimum required by law.
aspect wheel and tyre are easily
•
When a tyre is damaged
dam- aged. Follow the below
whilst driving on a rough
instructions.
road, off a road, or over obsta-
WARNING
cles, such as a pothole, man-
• When driving on a rough road
hole, or kerb stone, your war-
The temperature grade for this
or driving off a road, be care-
ranty does not cover the dam-
7
tyre is established for a tyre that
ful not to damage the tyres
age.
is properly inflated and not
and wheels. After driving,
overloaded. Excessive speed,
inspect the tyres and wheels.
•
The tyre information is speci-
under-inflation, over-inflation,
fied on the tyre side wall.
• When passing over a pothole,
or excessive loading, either
speed bump, manhole, or kerb
separately or in combination,
stone, slowly drive the vehicle
can cause heat build-up and
not to damage the tyres and
possible sudden tyre failure.
wheels.
This may cause loss of vehicle
control resulting in an accident.
7-41
Maintenance
FUSES
■ Blade type
A vehicle’s electrical system is pro-
i
Information
tected from electrical overload dam-
age by fuses.
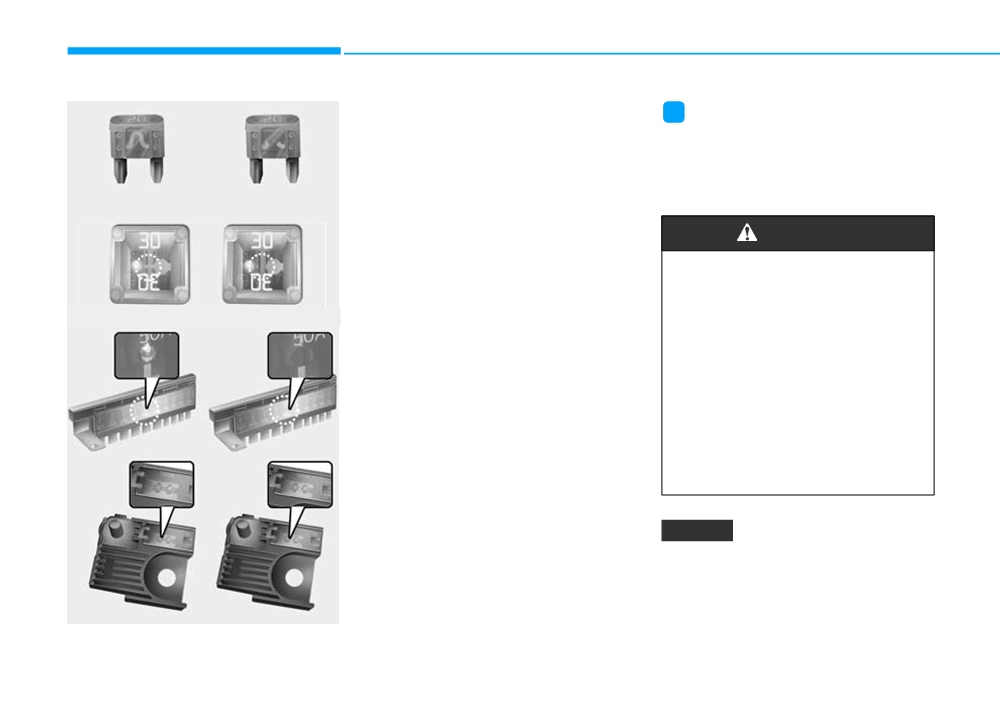
Three kinds of fuses are used: blade
type for lower amperage rating, car-
This vehicle has 2 (or 3) fuse panels,
tridge type, and multi fuse for higher
one located in the driver’s side panel
Normal
Blown
amperage ratings.
bolster, the other in the engine com-
■ Cartridge type
partment.
WARNING
If any of your vehicle’s lights, acces-
sories, or controls do not work, check
NEVER replace a fuse with any-
the appropriate circuit fuse. If a fuse
thing but another fuse of the
has blown, the element inside the
Normal
same rating.
Blown
fuse will be melted or broken.
■ Multi fuse
• A higher capacity fuse could
If the electrical system does not
cause damage and possibly
work, first check the driver’s side
cause a fire.
fuse panel. Before replacing a blown
fuse, turn the engine and all switches
• Do not install a wire or alu-
off, and then disconnect the negative
minium foil instead of the
battery cable. Always replace a
proper fuse - even as a tem-
Normal
Blown
blown fuse with one of the same rat-
porary repair. It may cause
ing.
extensive wiring damage and
possibly a fire.
If the replacement fuse blows, this indi-
cates an electrical problem. Avoid
using the system involved and immedi-
ately consult a HYUNDAI authorised
NOTICE
repairer.
Do not use a screwdriver or any
other metal object to remove
fuses because it may cause a
Normal
Blown
short circuit and damage the sys-
OLF074075
tem.
7-42
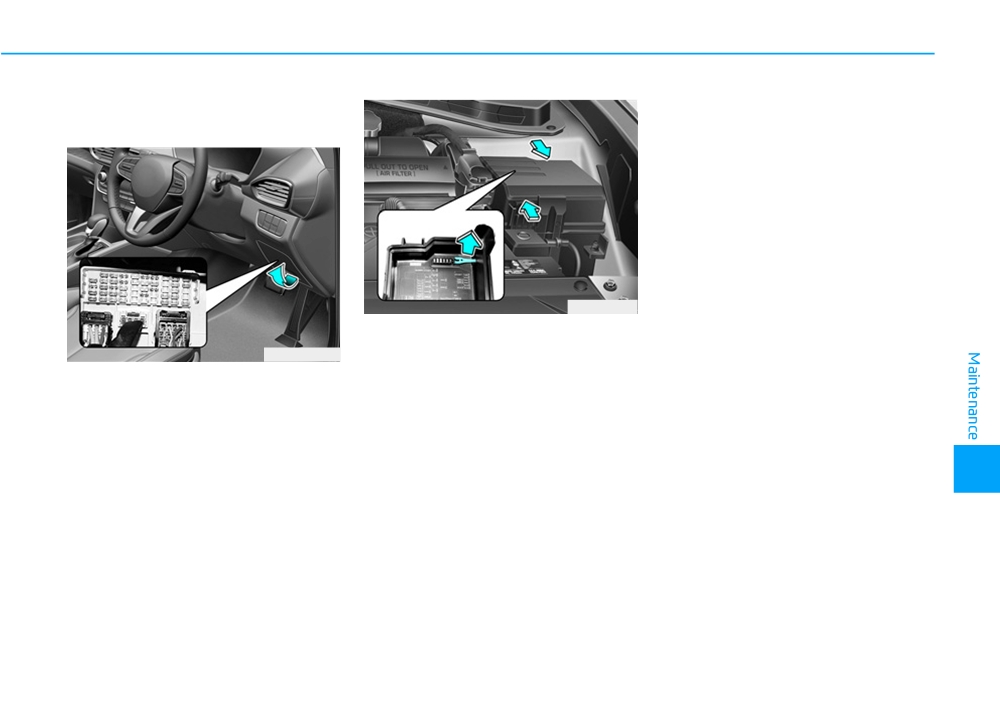
Instrument panel fuse replace-
In an emergency, if you do not have
ment
a spare fuse, use a fuse of the same
rating from a circuit you may not
need for operating the vehicle, such
as the cigarette lighter fuse.
If the headlamps or other electrical
components do not work and the
fuses are undamaged, check the
fuse panel in the engine compart-
ment. If a fuse is blown, it must be
replaced with the same rating.
OTM078037
5. Pull the suspected fuse straight
out. Use the removal tool provided
OTM078036R
in the engine compartment fuses
1. Turn the vehicle off.
panel.
2. Turn all other switches OFF.
6. Check the removed fuse; replace it
3. Open the fuse panel cover.
if it is blown. Spare fuses are pro-
vided in the instrument panel fuse
4. Refer to the label on the inside of
panels (or in the engine compart-
the fuse panel cover to locate the
7
ment fuse panel).
suspected fuse location.
7. Push in a new fuse of the same
rating, and make sure it fits tightly
in the clips. If it fits loosely, consult
a HYUNDAI authorised repairer.
7-43
Maintenance
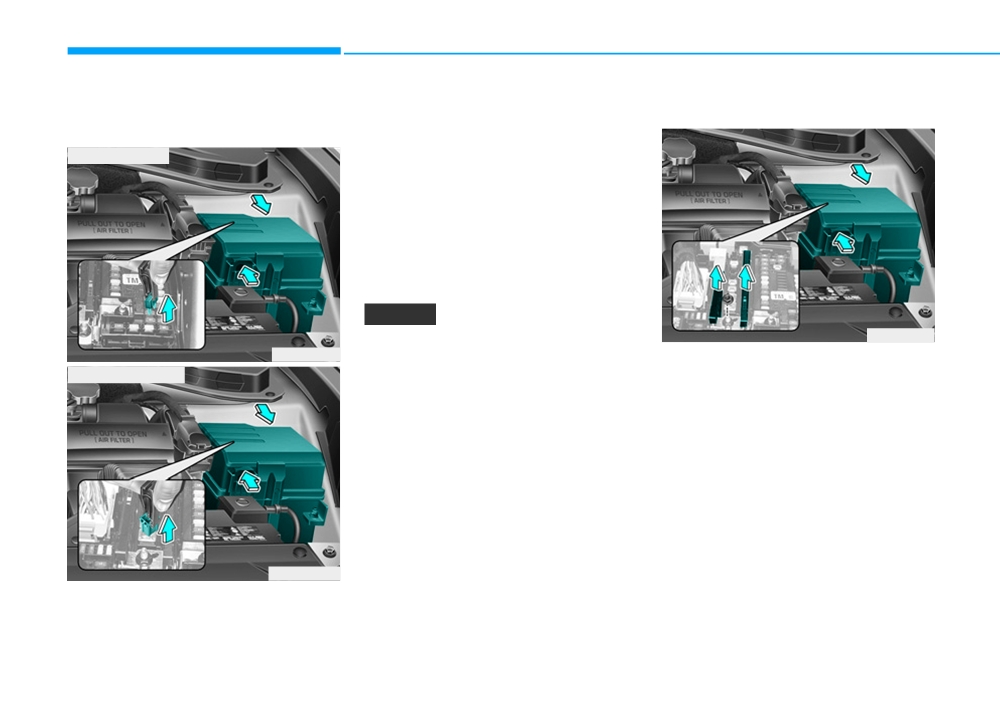
Engine compartment panel
3. Remove the fuse panel cover by
Multi fuse (Main fuse)
fuse replacement
pressing the tab and pulling up.
4. Check the removed fuse; replace it
■ Blade type fuse
if it is blown. To remove or insert
the fuse, use the fuse puller in the
engine compartment fuse panel.
5. Push in a new fuse of the same
rating, and make sure it fits tightly
in the clips. If it fits loosely, consult
a HYUNDAI authorised repairer.
NOTICE
OTM078041
After checking the fuse panel in
OTM078043
the engine compartment, securely
If the multi fuse is blown, it must be
■ Cartridge type fuse
removed as follows:
install the fuse panel cover. You
1. Turn the vehicle off.
may hear a clicking sound if the
cover is securely latched. If it is
2. Disconnect the negative battery
cable.
not securely latched, electrical
failure may occur from water con-
3. Remove the fuse panel cover by
tact.
pressing the tab and pulling it up.
4. Remove the nuts shown in the pic-
ture above.
5. Replace the fuse with a new one
of the same rating.
6. Reinstall in the reverse order of
OTM078042
removal.
1. Turn the vehicle off.
If the multi fuse is blown, we recom-
2. Turn all other switches OFF.
mend that you consult a HYUNDAI
authorised repairer.
7-44
Fuse/Relay panel description
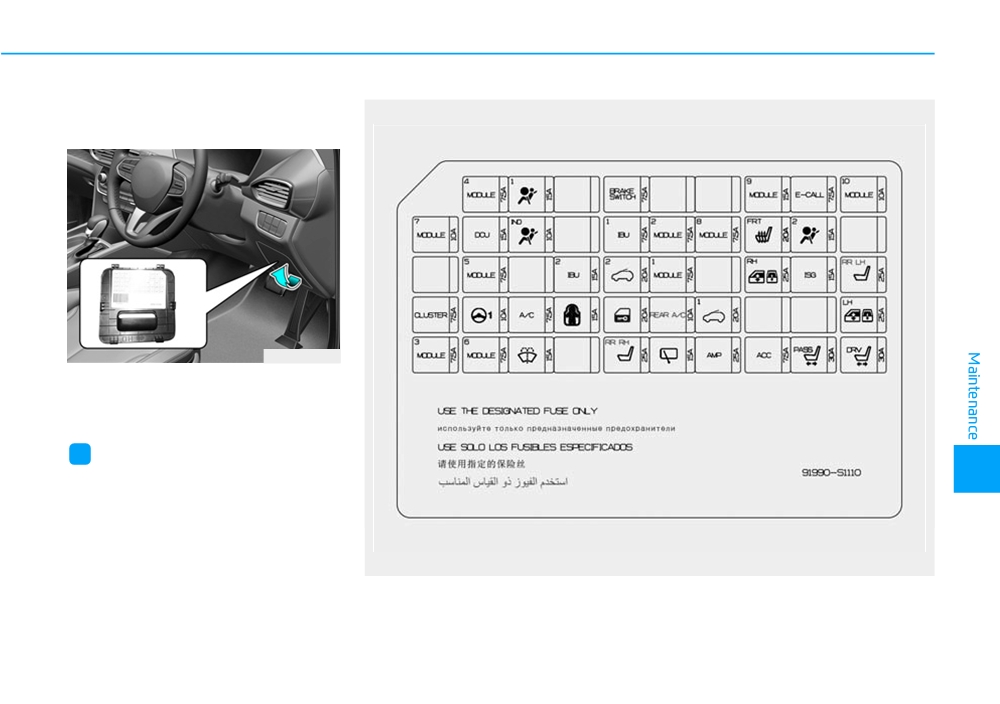
Driver’s side fuse panel
OTM078044R
Inside the fuse/relay box covers, you
can find the fuse/relay label describ-
ing fuse/relay names and ratings.
i
Information
7
Not all fuse panel descriptions in this
manual may be applicable to your
vehicle. It is accurate at the time of
printing. When you inspect the fuse
box on your vehicle, refer to the fuse
box label.
OTM078045L
7-45
Maintenance
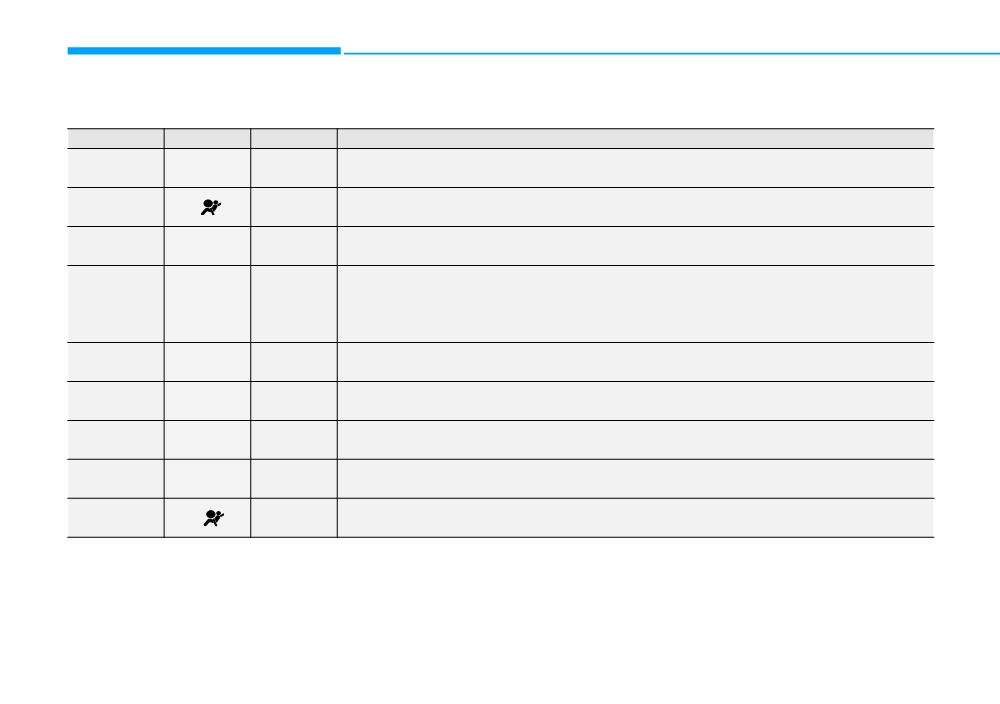
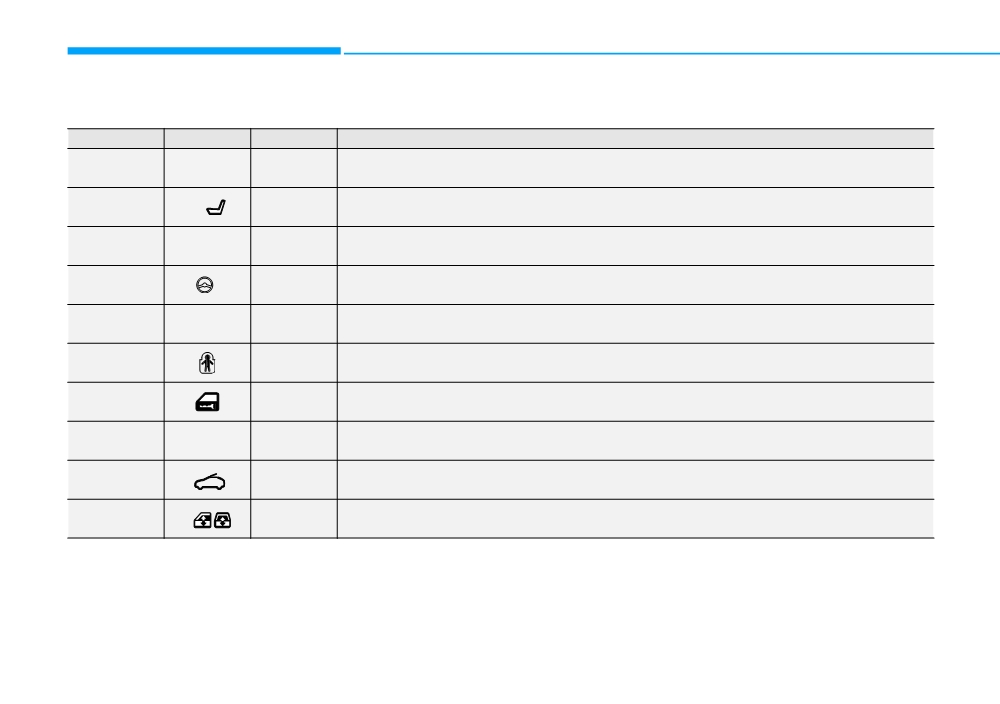
Driver's side fuse Panel
Fuse Name
Symbol
Fuse Rating
Circuit Protected
4
MODULE 4
MODULE
7.5A
Stop Lamp, Low Beam Assist-Dynamic, Driver Door Module
1
AIR BAG 1
15A
SRS Control Module
BRAKE
BRAKE
SWITCH
7.5A
IBU, Stop Lamp Switch
SWITCH
Audio, A/V & Navigation Head Unit, Instrument Cluster, Low DC-DC Converter (Audio/AMP),
9
A/C Control Module, Head Up Display, Auto Light & Photo Sensor, Rain Sensor,
MODULE 9
MODULE
15A
Rear Seat Alert, Driver IMS Control Module, Driver Door Module,
Driver/Passenger Power Outside Mirror, Power Tail Gate Module
E-CALL
E-CALL
7.5A
MTS E-Call Module
10
Data Link Connector, Blind-Spot Collision Warning Unit LH/RH,
MODULE 10
MODULE
10A
Front Wireless Charger, Rear A/C Control Module
7
MODULE 7
MODULE
10A
Auto Head Lamp Levelling Device Module, Head Lamp LH/RH
DCU
DCU
15A
Dosing Control Unit
IND
AIR BAG IND.
10A
A/C Control Module, Instrument Cluster
7-46
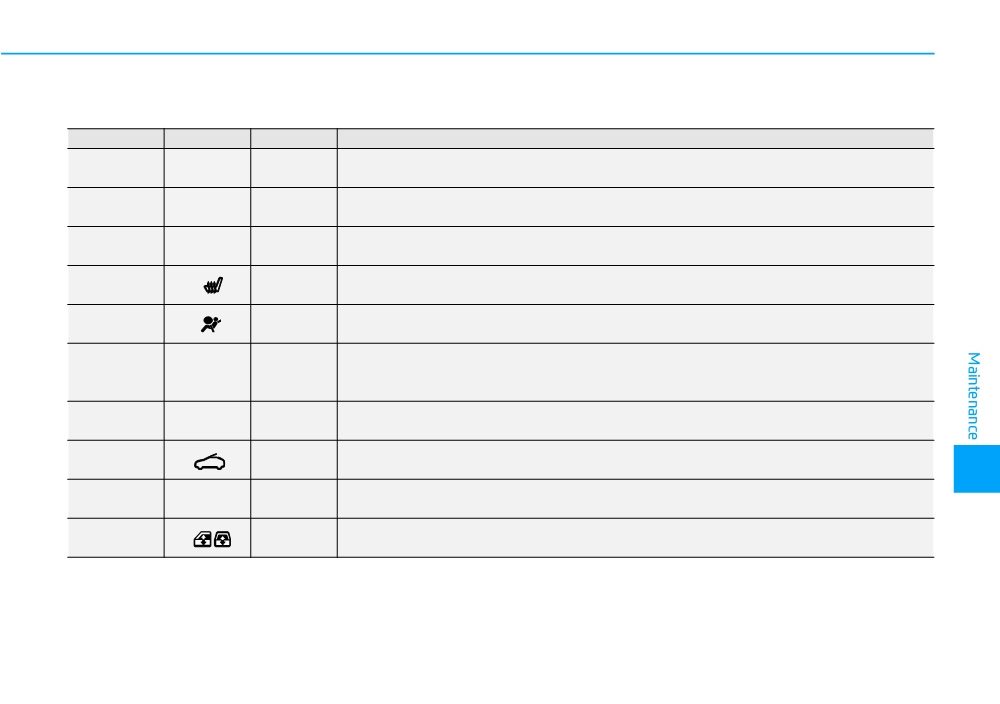
Driver's side fuse Panel
Fuse Name
Symbol
Fuse Rating
Circuit Protected
1
IBU 1
IBU
7.5A
IBU
2
Surround View Monitor, AC Inverter Outlet, AC Inverter Unit, Rear Seat Heater LH/RH,
MODULE 2
MODULE
7.5A
Front Air Ventilation Control Module, Front Seat Warmer Control Module
8
MODULE 8
MODULE
7.5A
Hazard Switch, Key Solenoid
S/HEATER
FRT
20A
Front Air Ventilation Control Module, Front Seat Warmer Control Module
FRT
2
AIR BAG 2
15A
SRS Control Module
Sttering Angle Sensor, Lane Departure Warning Unit, Crash Pad Switch, IBU,
5
MODULE 5
MODULE
7.5A
Parking Assist-Parallel Module, Fuel Pressure Sensor, Console Switch,
ATM Shift Lever IND., 4WD ECM, Sport Mode Switch
2
IBU 2
IBU
15A
IBU, Ignition Switch
2
SUNROOF 2
20A
Panorama Sunroof
7
1
MODULE 1
MODULE
7.5A
IBU
RH
Driver/Passenger Safety Power Window Module, Passenger Power Window Switch,
P/WDW RH
10A
Rear Safety Power Window RH, Rear Power Window Switch RH
7-47
Maintenance
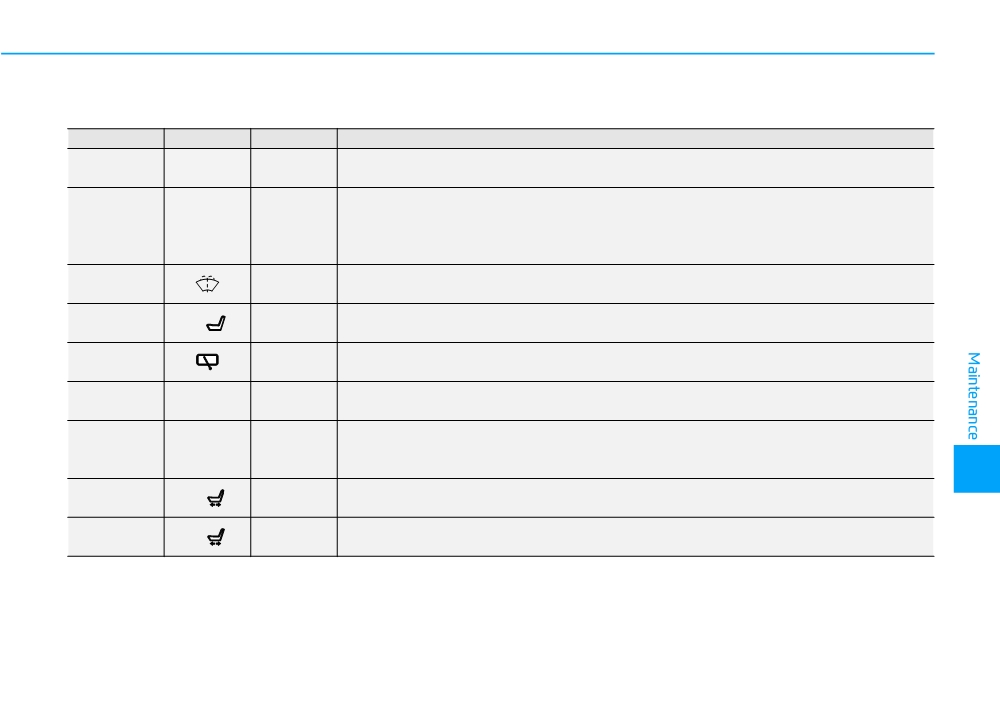
Driver's side fuse Panel
Fuse Name
Symbol
Fuse Rating
Circuit Protected
Low DC-DC Converter (AMP), Instrument Cluster, A/V & Navigation Head Unit,
ISG
ISG
15A
Head Up Display, A/C Control Module
RR S/HEATER
RR LH
25A
Rear Seat Heater LH
LH
CLUSTER
CLUSTER
7.5A
Instrument Cluster, Head Up Display
MDPS
1
10A
MDPS Unit
A/CON
A/C
7.5A
E/R Junction Block (RLY. 4), SUB Junction Block (RLY. 1,2,3)
CHILD LOCK
15A
ICM Relay Box (Child Lock/Unlock Relay)
DOOR LOCK
20A
Door Lock Relay, Door Unlock Relay, Tail Gate Relay, Dead Lock Relay
REAR A/CON
REAR A/C
10A
Rear A/C Control Module, Rear Blower Motor, A/C Control Module
1
SUNROOF 1
20A
Panorama Sunroof
LH
Driver/Passenger Safety Power Window Module, Passenger Power Window Switch,
P/WDW LH
25A
Rear Safety Power Window LH, Rear Power Window Switch LH
7-48
Driver's side fuse Panel
Fuse Name
Symbol
Fuse Rating
Circuit Protected
3
MODULE 3
MODULE
7.5A
IBU
Audio, A/V & Navigation Head Unit, A/C Control Module, MTS E-Call Module,
6
Low DC-DC Converter (Audio/AMP), Electro Chromic Mirror, Centre Low Panel Switch,
MODULE 6
MODULE
7.5A
Driver IMS Control Module, Rear Seat Heater LH/RH, AMP Front Air Ventilation Control Module,
Front Seat Warmer Control Module
WASHER
15A
Multifunction Switch
RR S/HEATER
RR RH
25A
Rear Seat Heater RH
RH
WIPER RR
15A
Rear Wiper Relay, Rear Wiper Motor
AMP
AMP
25A
AMP, Low DC-DC Converter (AMP)
MTS E-Call Module, Surround View Monitor, AMP, IBU, Front Wireless Charger,
ACC
ACC
7.5A
Low DC-DC Converter (Audio/AMP), Audio, A/V & Navigation Head Unit,
Front USB Charger, Rear USB Charger LH/RH
7
PASS
P/SEAT PASS
30A
Passenger Seat Manual Switch, Walk In Relay
DRV
P/SEAT DRV
30A
Driver IMS Control Module, Driver Seat Manual Switch
7-49
Maintenance
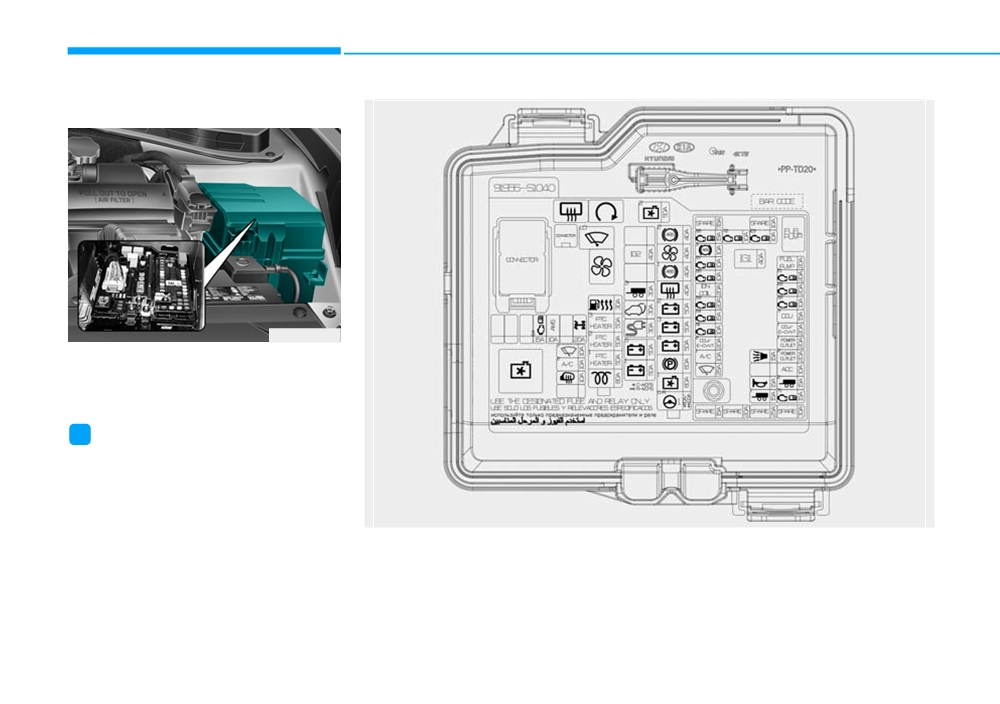
Engine compartment fuse panel
OTM078039
Inside the fuse/relay box covers, you
can find the fuse/relay label describ-
ing fuse/relay names and ratings.
i
Information
Not all fuse panel descriptions in this
manual may be applicable to your
vehicle. It is accurate at the time of
printing. When you inspect the fuse
OTM078049L
box on your vehicle, refer to the fuse
box label.
7-50