Hyundai Santa Fe (2019 year). Manual - part 35
Recommended engine coolant
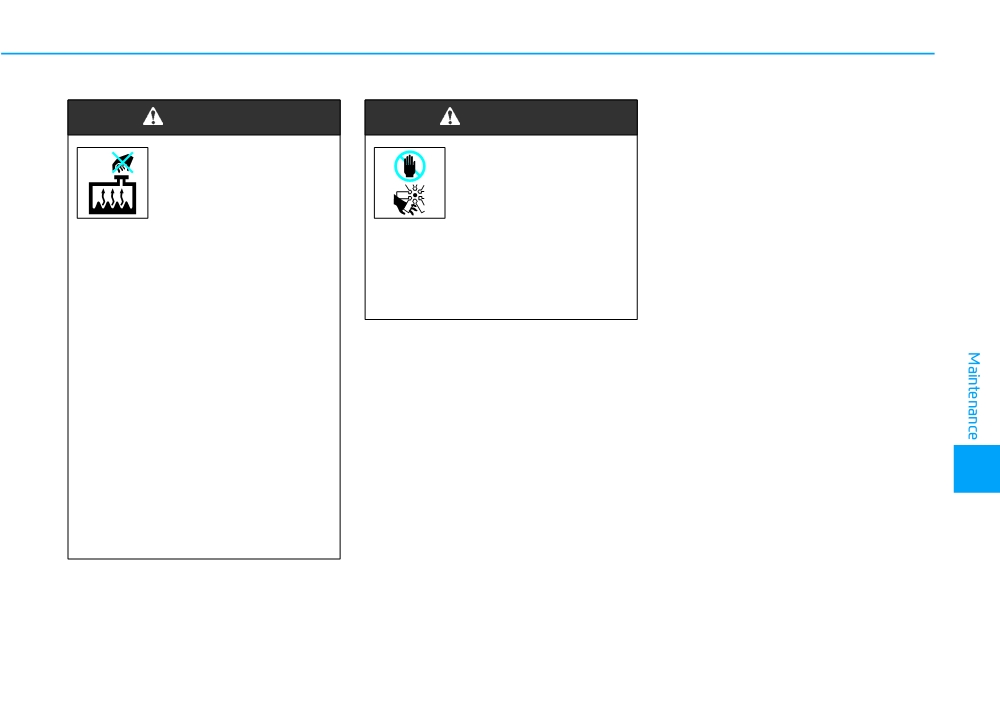
WARNING
WARNING
•
When adding coolant, use only dis-
tilled
(deionised) water for your
Never remove the
The electric motor for
vehicle and never mix hard water in
coolant cap/radiator
the cooling fan may
the coolant filled at the factory. An
cap or the drain plug
continue to operate
incorrect coolant mixture can result
whilst the engine and
or start up when the
in serious malfunction or engine
radiator are hot. Hot
engine is not running
damage.
coolant and steam may blow out
and can cause serious injury.
under pressure, causing serious
•
The engine in your vehicle has alu-
Keep hands, clothing and tools
injury.
minium engine parts and must be
away from the rotating fan blades
protected by an ethylene-glycol
of the cooling fan.
Turn the engine off and wait until
with phosphate based coolant to
the engine cools down. Use
prevent corrosion and freezing.
extreme care when removing the
The electric motor for the cooling fan
•
DO NOT USE alcohol or methanol
coolant cap/radiator cap. Wrap a
is controlled by engine coolant tem-
coolant or mix them with the spec-
thick towel around it, and turn it
perature, refrigerant pressure and
ified coolant.
counterclockwise slowly to the
vehicle speed. As the engine coolant
first stop. Step back whilst the
•
Do not use a solution that contains
temperature decreases, the electric
pressure is released from the
more than 60% antifreeze or less
motor will automatically shut off. This
cooling system. When you are
than 35% antifreeze, which would
is a normal condition. If your vehicle
sure all the pressure has been
reduce the effectiveness of the solu-
is equipped with GDI, the electric
7
released, press down on the cap,
tion.
motor for the cooling fan may begin
using a thick towel, and continue
to operate at any time and continue
turning counterclockwise to
to operate until you disconnect the
remove it.
negative battery cable.
7-17
Maintenance
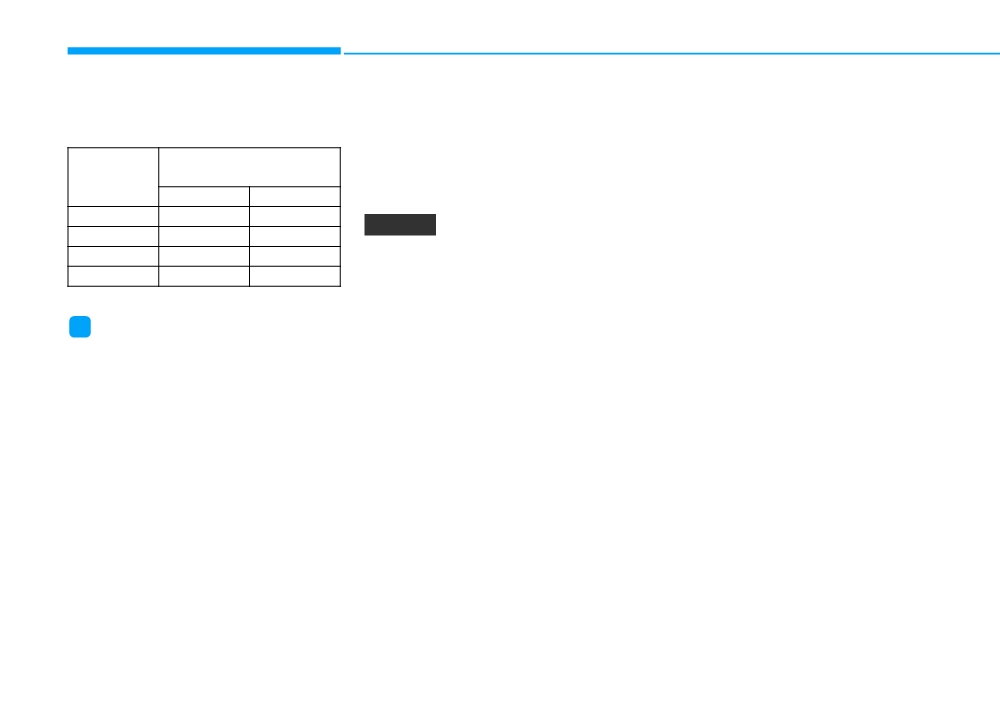
For mixture percentage, refer to the
Changing the engine coolant
following table.
We recommend that coolant be
changed by a HYUNDAI authorised
Mixture Percentage
Ambient
repairer
according
to
the
(volume)
Temperature
Maintenance Schedule.
Antifreeze
Water
-15°C (5°F)
35
65
NOTICE
-25°C (-13°F)
40
60
-35°C (-31°F)
50
50
To prevent damage to engine parts,
put a thick towel around the radiator
-45°C (-49°F)
60
40
cap and/or radiator cap before refill-
ing the coolant to prevent the
i
Information
coolant from overflowing into
engine parts, such as the alternator.
If in doubt about the mix ratio, a 50%
water and 50% antifreeze mix is the
easiest to mix together as it will be the
same quantity of each. It is suitable to
use for most temperature ranges of
-35°C (-31°F) and higher.
7-18
BRAKE/CLUTCH FLUID (IF EQUIPPED)
Checking the brake/clutch
If the fluid level is excessively low,
WARNING
fluid level
we recommend that the system be
checked by a HYUNDAI authorised
If
the brake/clutch system
repairer.
requires frequent additions of
fluid this could indicate a leak in
i
Information
the brake/clutch system. We
Use only the specified brake/clutch
recommend that the vehicle be
fluid. Refer to “Recommended lubri-
inspected by a HYUNDAI autho-
cants and capacities” in chapter 8.
rised repairer.
i
Information
WARNING
Before removing the brake/clutch filler
cap, read the warning on the cap.
Do not allow brake/clutch fluid
OTM078089R
to come in contact with your
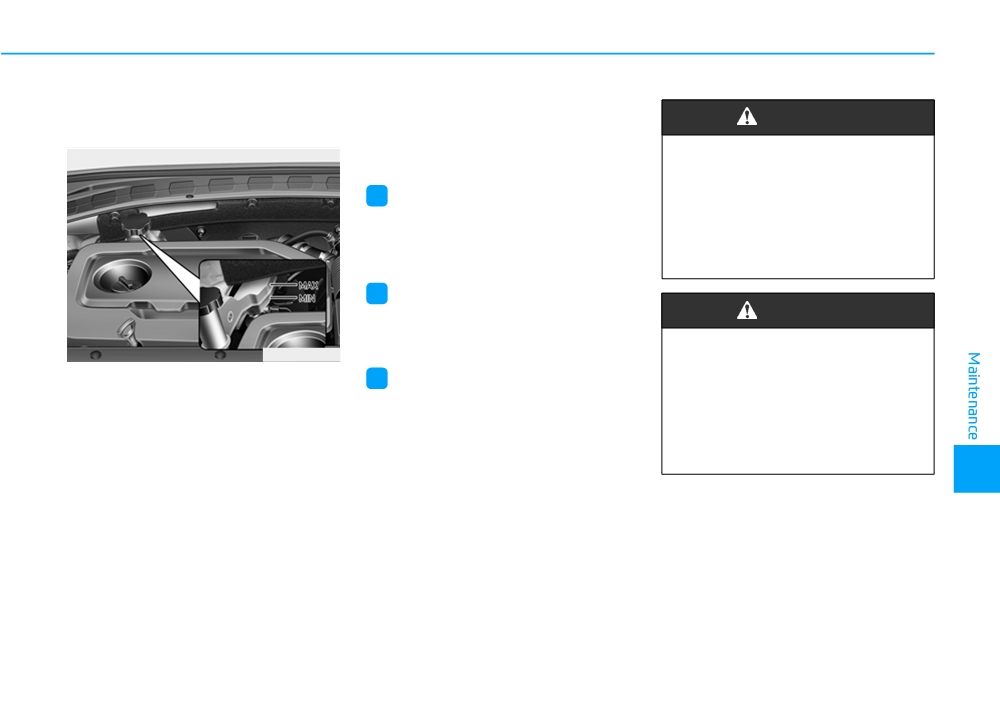
Check the fluid level in the reservoir
i
Information
eyes. If brake/clutch fluid comes
periodically. The fluid level should be
in contact with your eyes, flush
Clean the filler cap before removing.
between MAX and MIN marks on the
your eyes with clean water for at
Use only DOT3 or DOT4 brake/clutch
side of the reservoir.
least 15 minutes and get imme-
fluid from a sealed container.
Before removing the reservoir cap
diate medical attention.
and adding brake/clutch fluid, clean
7
the area around the reservoir cap
thoroughly to prevent brake/clutch
fluid contamination.
If the level is low, add fluid to the MAX
level. The level will fall with accumulat-
ed mileage. This is a normal condition
associated with the wear of the brake
linings.
7-19
Maintenance
WASHER FLUID
NOTICE
Checking the washer fluid
WARNING
level
•
Do not allow brake/clutch fluid
to contact the vehicle's body
To prevent serious injury or
paint, as paint damage will
death, take the following safety
result.
precautions when using washer
fluid:
•
Brake/clutch fluid, which has
been exposed to open air for an
•
Do not use engine coolant or
extended time should never be
antifreeze in the washer fluid
used as its quality cannot be
reservoir. Engine coolant can
guaranteed. It should be dis-
severely obscure visibility
posed of properly.
when sprayed on the wind-
screen and may cause loss of
•
Don't put in the wrong kind of
vehicle control resulting in an
fluid. A few drops of mineral-
OTM078025
accident or damage to paint
based oil, such as engine oil, in
and body trim.
your brake/clutch system can
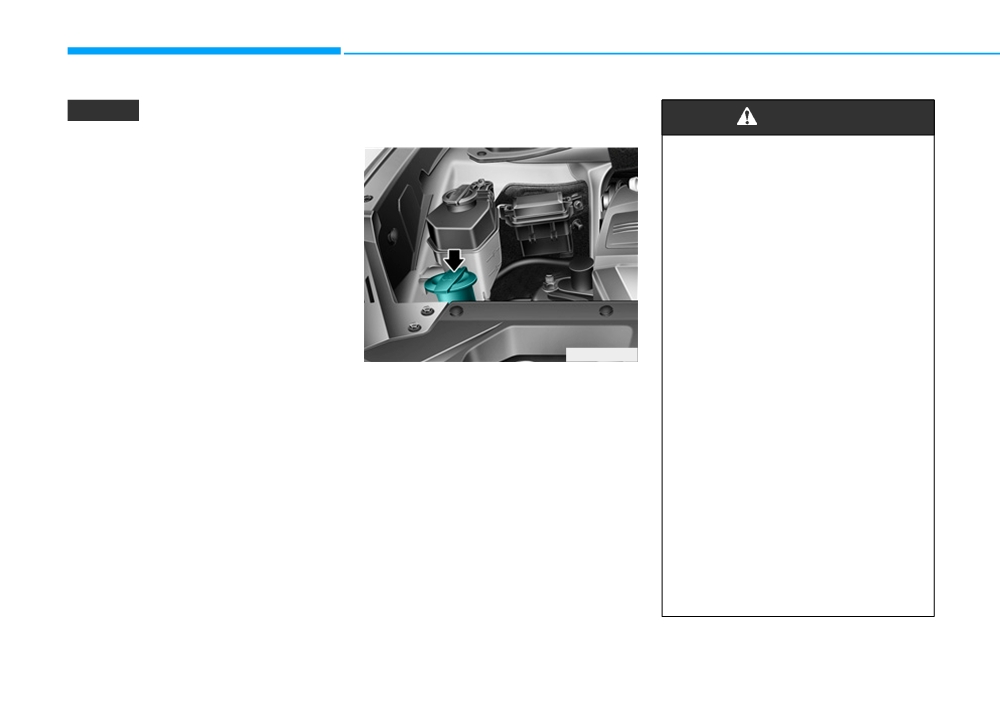
Check the fluid level in the washer
damage system parts.
•
Do not allow sparks or flames
fluid reservoir and add fluid if neces-
to contact the washer fluid or
sary. Plain water may be used if
the washer fluid reservoir.
washer fluid is not available.
Washer fluid may contain
However, use washer solvent with
alcohol and can be flamma-
antifreeze characteristics in cold cli-
ble.
mates to prevent freezing.
•
Do not drink washer fluid and
avoid contact with skin.
Washer fluid is poisonous to
humans and animals.
•
Keep washer fluid away from
children and animals.
7-20
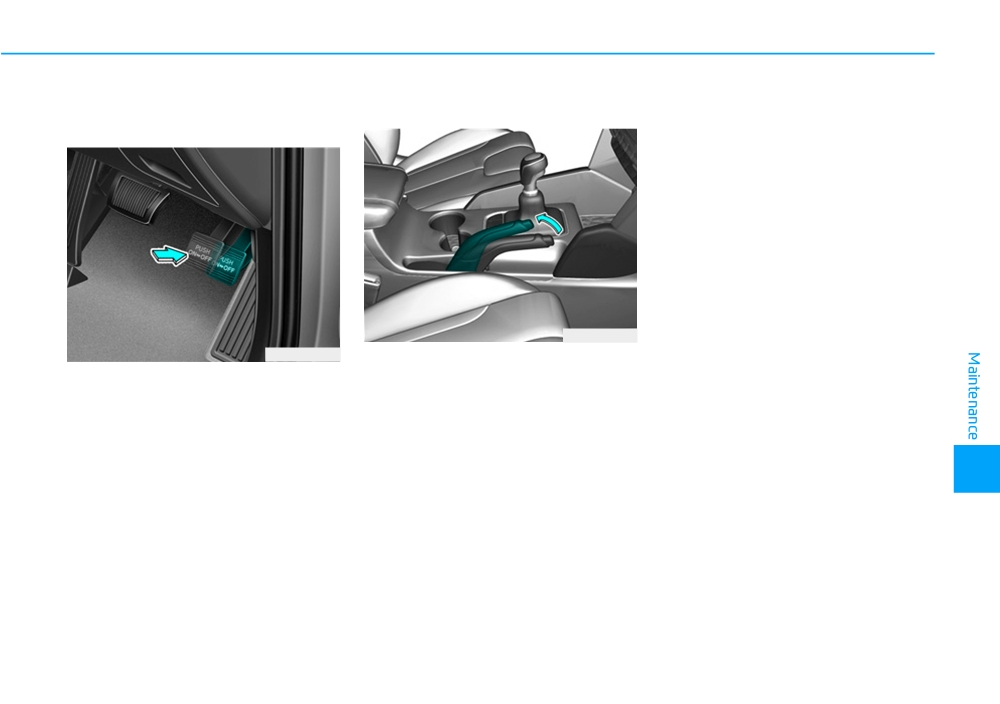
PARKING BRAKE
Checking the parking brake
Type B
Type A
OTM058128R
OTM058014R
Check the stroke of the parking
brake by counting the number of
Check whether the stroke is within
“clicks’’ heard whilst fully applying it
specification when the parking brake
from the released position. Also, the
pedal is depressed with 30 kg (66 lb,
parking brake alone should securely
294N) of force. Also, the parking
hold the vehicle on a fairly steep
brake alone should securely hold the
grade. If the stroke is more or less
vehicle on a fairly steep grade. If the
7
than specified, we recommend that
stroke is more or less than specified,
the system be serviced by a
we recommend that the system be
HYUNDAI authorised repairer.
serviced by a HYUNDAI authorised
repairer.
Stroke : 5~7 “clicks’’ at a force of
20 kg (44 lbs, 196 N).
Stroke : 8~9 notch
7-21
Maintenance
FUEL FILTER (FOR DIESEL)
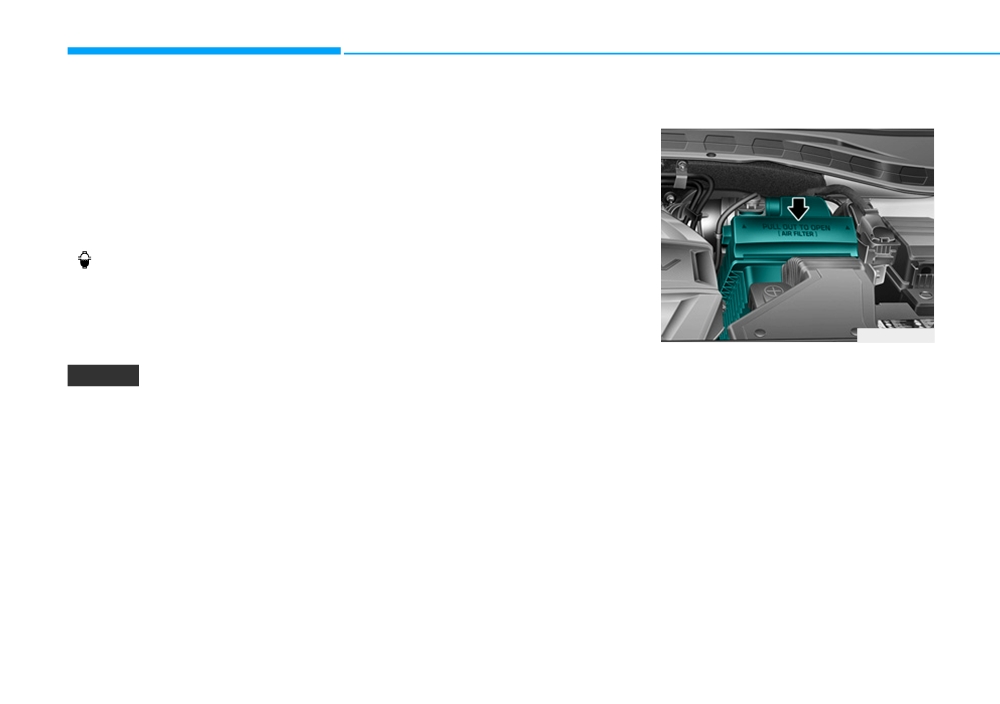
AIR CLEANER
Draining water from fuel filter
Fuel filter cartridge replace-
Filter replacement
ment
The fuel filter in the diesel engine
operates the critical function of sepa-
We recommend the fuel filter car-
rating water from the fuels and pre-
tridge be replaced by a HYUNDAI
venting accumulating of water in the
authorised repairer according to the
base.
Maintenance Schedule.
When enough water is accumulated
inside the fuel filter, the warning light
(
) illuminates with the ignition
switch in the ON position.
In this case, we recommend you to
have the system checked by a
HYUNDAI authorised repairer.
OTM078027R
The air cleaner filter can be cleaned
NOTICE
for inspection using compressed air.
When the accumulated water is not
Do not attempt to wash or to rinse it,
drained at the proper timing, water
as water will damage the filter.
may permeate in the fuel filter,
If soiled, the air cleaner filter must be
damaging the major vehicle com-
replaced.
ponents, such as the fuel system.
7-22
i
Information
If the vehicle is operated in extremely
dusty or sandy areas, replace the element
more often than the usual recommended
intervals.
NOTICE
• Do not drive with the air cleaner
filter removed. This will result in
excessive engine wear.
OTM078028R
OTM078029R
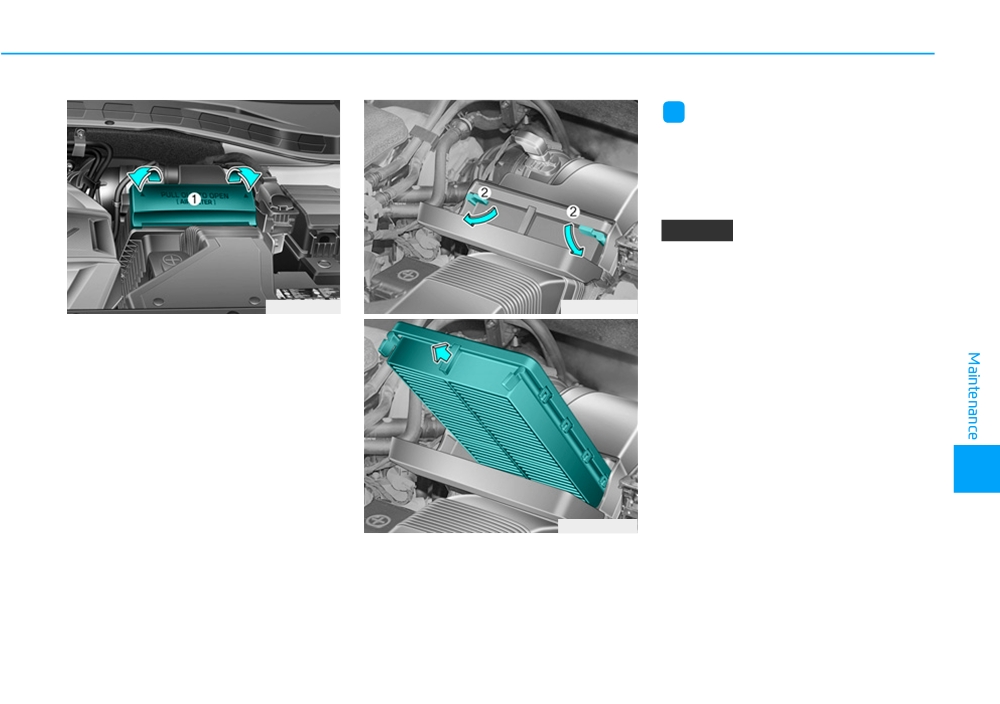
• When removing the air cleaner
1. Pull down the air cleaner filter
filter, be careful that dust or dirt
cover (1).
does not enter the air intake, or
damage may result.
• Use HYUNDAI genuine parts.
Use of non-genuine parts could
damage the air flow sensor.
7
OTM078030R
2. Wipe the inside of the air cleaner.
3. Pull down the lever to the
UNLOCK position.
4. Replace the air cleaner filter.
5. Reassemble the air cleaner cover
in the reverse order.
7-23
Maintenance
CLIMATE CONTROL AIR FILTER
Filter inspection
If the vehicle is operated in the
severely air-polluted cities or on dusty
rough roads for a long period, it
should be inspected more frequently
and replaced earlier. When you, the
owner, replace the climate control air
filter, replace it performing the follow-
ing procedure, and be careful to
avoid damaging other components.
OTM078031R
OIK077021
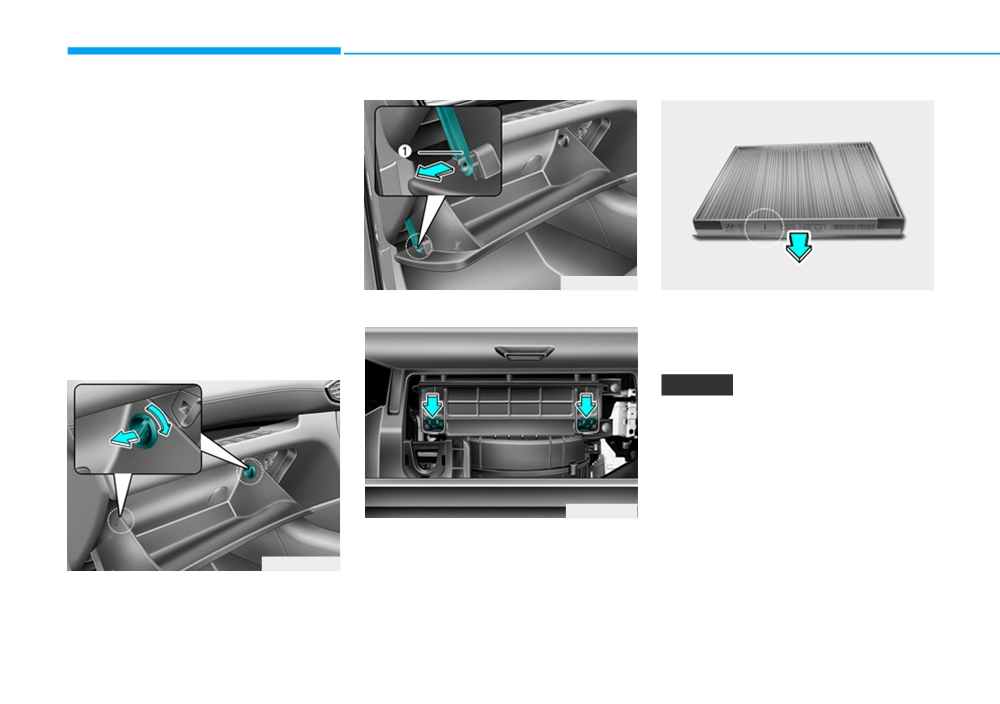
Replace the filter according to the
2. Remove the support strap (1).
4. Replace the climate control air filter.
Maintenance Schedule.
5. Reassemble in the reverse order
of disassembly.
Filter replacement
NOTICE
Install a new climate control air filter
in the correct direction with the
arrow symbol(↓) facing downwards,
otherwise, it may be noisy and the
effectiveness of the filter may be
reduced.
OTM078033
3. Remove the climate control air filter
case whilst pressing the lock on the
OTM078032R
right side of the cover.
1. With the glove box open, remove
the stoppers on both sides.
7-24
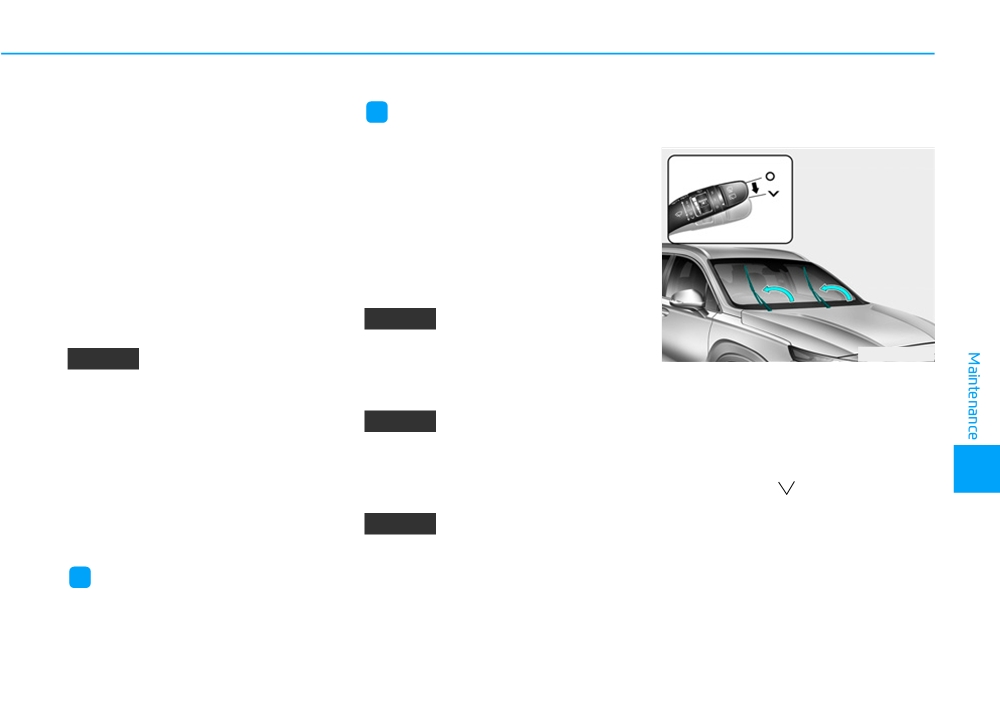
WIPER BLADES
Blade inspection
Front windscreen wiper service
i
Information
positions
Contamination of either the wind-
Wiper blades are a consumable item
screen or the wiper blades with for-
and normal wear of the wipers may not
eign matter can reduce the effective-
be covered by your vehicle warranty.
ness of the windscreen wipers.
Common sources of contamination
are insects, tree sap, and hot wax
Blade replacement
treatments used by some commer-
When the wipers no longer clean
cial car washes. If the blades are not
adequately, the blades may be worn
wiping properly, clean both the win-
or cracked, and require replacement.
dow and the blades with a good
cleaner or mild detergent, and rinse
NOTICE
thoroughly with clean water.
To prevent damage to the wiper arms
NOTICE
OTM078056E
or other components, do not attempt
to move the wipers manually.
This vehicle has a "hidden" wiper
To prevent damage to the wiper
design which means that the wipers
blades, arms or other compo-
cannot be lifted when they are in
nents, do not:
NOTICE
their bottom resting position.
• Use petrol, kerosene, paint thin-
The use of a non-specified wiper
1. Within 20 seconds of turning off
ner, or other solvents on or near
blade could result in wiper mal-
the engine, hold the wiper lever
7
them.
function and failure.
down to the
position for about
• Attempt to move the wipers
2 seconds until the wipers move to
manually.
NOTICE
the top wipe position.
• Use non-specified wiper blades.
2. At this time you can lift the wipers
• In order to prevent damage to the
off the windscreen.
bonnet and the wiper arms, the
i
Information
wiper arms should only be lifted
3. Gently put the wipers back down
Commercial hot waxes applied by auto-
when in the top wiping position.
onto the windscreen.
matic car washes have been known to
• Always return the wiper arms to
4. Turn the wipers to any ON position
make the windscreen difficult to clean.
the windscreen before driving.
to return the wipers to the bottom
resting position.
7-25
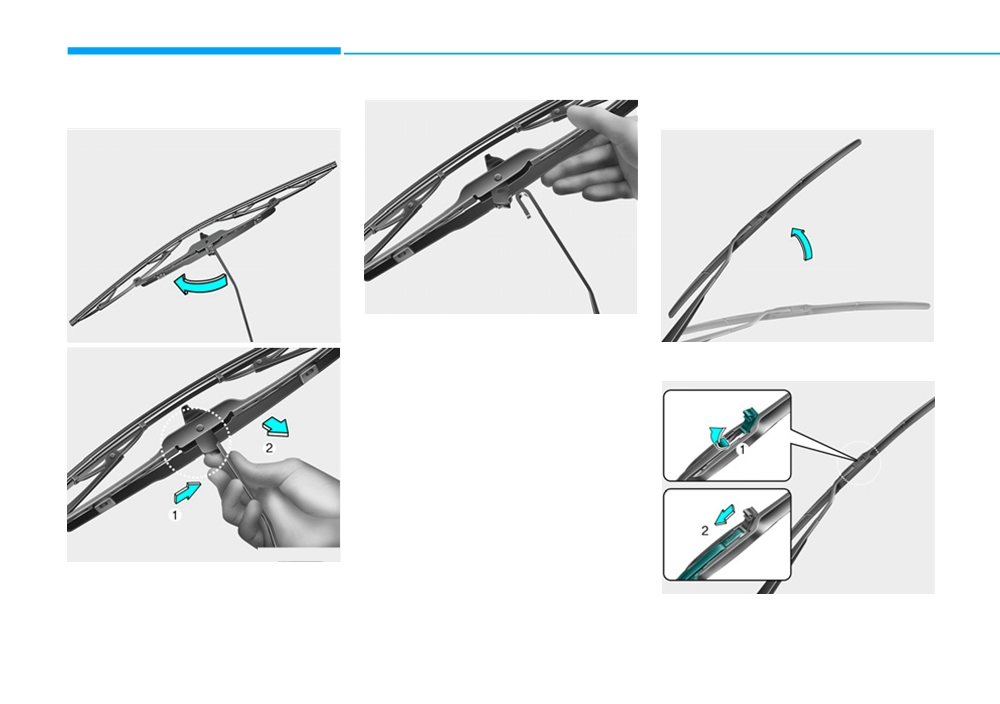
Maintenance
Type A
Type B
OOS077074R
3. Remove the wiper blade from the
OOS077072R
OJS078073AU
wiper arm.
1. Raise the wiper arm.
4. Install a new wiper blade assem-
bly in the reverse order of removal.
5. Return the wiper arm on the wind-
screen.
OOS077073R
1. Lift up the wiper blade clip. Then
OLF074018R
lift up the wiper blade.
2. Lift up the wiper blade clip. Then
2. Whilst pushing the lock (1), pull
pull down the blade assembly and
down the wiper blade (2).
remove it.
7-26
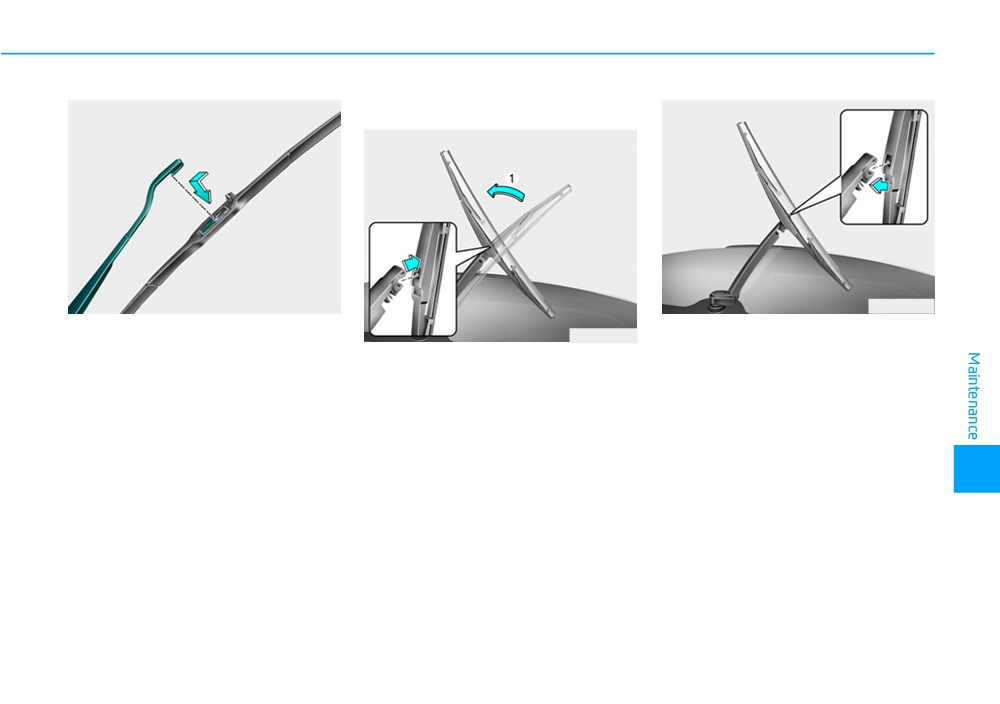
Rear window wiper blade
OIK077068R
OTL075051
3. Install the new blade assembly in
2. Install the new blade assembly by
OTL075050
the reverse order of removal.
inserting the centre part into the
1. Raise the wiper arm and pull out
slot in the wiper arm until it clicks
4. Return the wiper arm on the wind-
the wiper blade assembly.
into place.
screen.
3. Make sure the blade assembly is
installed firmly by trying to pull it
slightly.
To prevent damage to the wiper arms
7
or other components, we recommend
that the wiper blades be replaced by a
HYUNDAI authorised repairer.
7-27
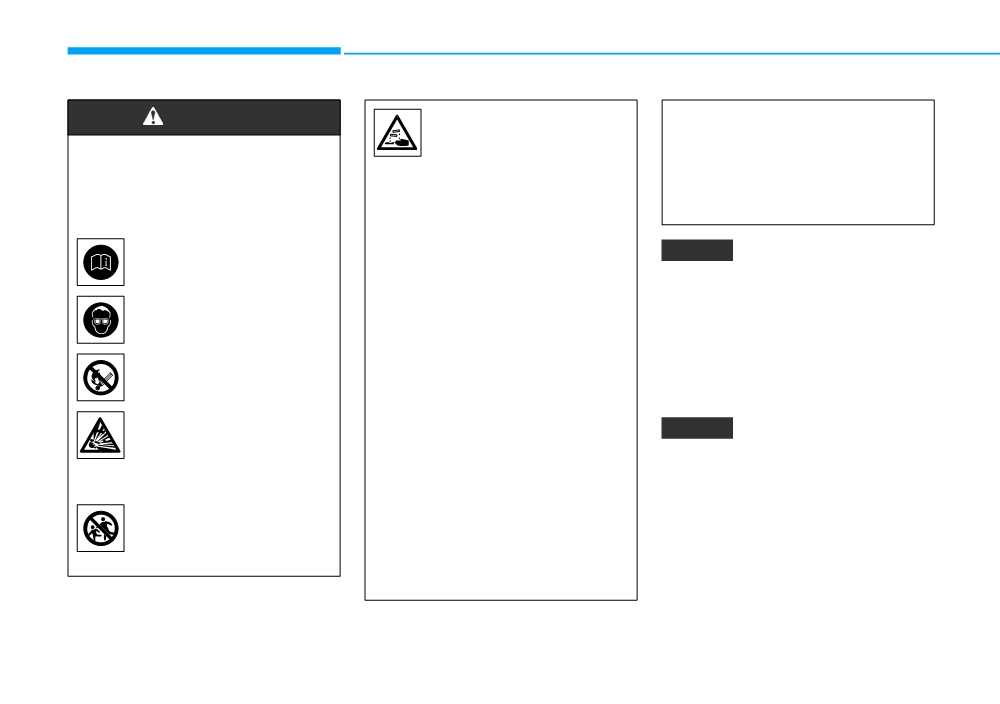
Maintenance
BATTERY
WARNING
Batteries contain sulfu-
• The electrical ignition system
ric acid which is highly
works with high voltage.
To prevent SERIOUS INJURY or
corrosive. Do not allow
NEVER touch these compo-
DEATH to you or bystanders,
acid to contact your
nents with the engine running
always follow these precautions
eyes, skin or clothing.
or when the ignition switch is
when working near or handling
in the ON position.
If acid gets into your eyes, flush
the battery:
your eyes with clean water for at
Always read and follow
least 15 minutes and get imme-
NOTICE
instructions carefully
diate medical attention. If acid
when handling a battery.
gets on your skin, thoroughly
• When you do not use the vehicle
wash the area. If you feel pain or
for a long time in a low tempera-
Wear eye protection
a burning sensation, get med-
ture area, disconnect the battery
designed to protect the
ical attention immediately.
and keep it indoors.
eyes from acid splashes.
• When lifting a plastic-cased
• Always charge the battery fully
Keep all flames, sparks,
battery, excessive pressure
to prevent battery case damage
or smoking materials
on the case may cause battery
in low temperature areas.
away from the battery.
acid to leak. Lift with a battery
Hydrogen is always
carrier or with your hands on
NOTICE
present in battery cells,
opposite corners.
is highly combustible,
If you connect unauthorised elec-
• Do not attempt to jump start
and may explode if ignit-
tronic devices to the battery, the
your vehicle if your battery is
ed.
battery may be discharged. Never
frozen.
use unauthorised devices.
Keep batteries out of
• NEVER attempt to recharge
reach of children.
the battery when the vehicle’s
battery cables are connected
to the battery.
7-28
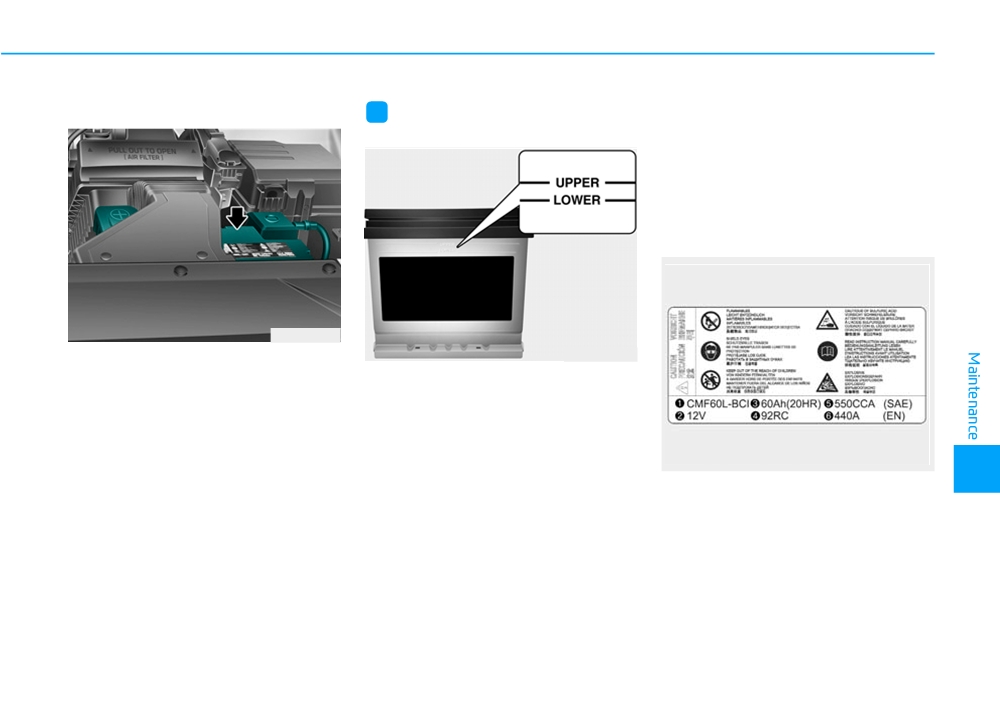
For best battery service
If not, it may corrode the battery or
i
Information - For batteries
other components. Finally, securely
marked with UPPER and LOWER
close the cell cap. However, we recom-
mend you to contact a HYUNDAI
authorised repairer for better battery
service.
Battery capacity label
■ Example
OTM078034
OHYK077011
•
Keep the battery securely mounted.
•
Keep the battery top clean and dry.
If your vehicle is equipped with a bat-
•
Keep the terminals and connec-
tery marked with LOWER (MIN) and
tions clean, tight, and coated with
UPPER (MAX) on the side, you
petroleum jelly or terminal grease.
should check the electrolyte level.
•
Rinse any spilled electrolyte from
The electrolyte level should be
OLMB073072
7
the battery immediately with a
between LOWER (MIN) and UPPER
The actual battery label in the vehicle
(MAX). When the electrolyte level is
solution of water and baking soda.
may differ from the illustration.
low, add distilled (or de-mineralized)
•
If the vehicle is not going to be
water. (Never add sulfuric acids or
1. CMF60L-BCI
: The HYUNDAI
used for an extended time, discon-
other electrolyte).
model name of battery
nect the battery cables.
Be careful not to spill distilled (or de-
2.12V : The nominal voltage
mineralized) water over the battery
3.60Ah(20HR) : The nominal capaci-
surface or other adjacent components.
ty (in Ampere hours)
Also, do not overfill the battery cells.
7-29
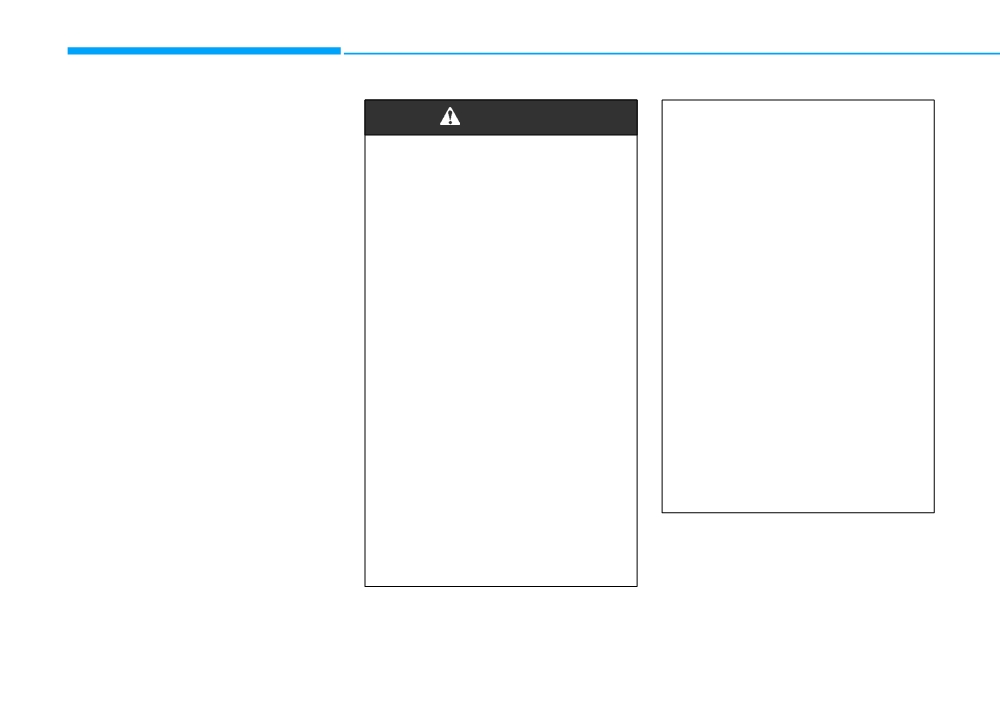
Maintenance
4.92RC : The nominal reserve capac-
WARNING
•
Watch the battery during
ity (in min.)
charging, and stop or reduce
5.550CCA : The cold-test current in
Always follow these instruc-
the charging rate if the battery
amperes by SAE
tions when recharging your
cells begin boiling violently.
6.440A
: The cold-test current in
vehicle’s battery to avoid the
•
The negative battery cable
amperes by EN
risk of SERIOUS INJURY or
must be removed first and
DEATH from explosions or acid
installed last when the battery
burns:
is disconnected. Disconnect
Battery recharging
•
Before performing mainte-
the battery charger in the fol-
By battery charger
nance or recharging the bat-
lowing order:
Your vehicle has a maintenance-free,
tery, turn off all accessories
(1) Turn off the battery charg-
calcium-based battery.
and place the Engine Start/
er main switch.
• If the battery becomes discharged
Stop button to the OFF posi-
(2) Unhook the negative
in a short time (because, for exam-
tion.
clamp from the negative
ple, the headlights or interior lights
•
Keep all flames, sparks, or
battery terminal.
were left on whilst the vehicle was
smoking materials away from
not in use), recharge it by slow
(3) Unhook the positive clamp
the battery.
charging (trickle) for 10 hours.
from the positive battery
•
Always work outdoors or in an
terminal.
• If the battery gradually discharges
area with plenty of ventilation.
because of high electric load whilst
•
Always use a genuine
•
Wear eye protection when
the vehicle is being used, recharge
HYUNDAI approved battery
it at 20-30A for two hours.
checking the battery during
when you replace the battery.
charging.
•
The battery must be removed
from the vehicle and placed in
a well ventilated area.
7-30
By jump starting
Reset items
CAUTION
After a jump start from a good bat-
The following items may need to be
tery, drive the vehicle for 20-30 min-
reset after the battery has been dis-
AGM battery (if equipped)
utes before it is shutoff. The vehicle
charged or the battery has been dis-
•
Absorbent Glass Matt (AGM)
may not restart if you shut it off
connected.
batteries are maintenance-
before the battery had a chance to
•
Auto up/down window
free and we recommend that
adequately recharge. See
“Jump
•
Sunroof
the AGM battery be serviced
Starting” in chapter 6 for more infor-
by a HYUNDAI authorised
mation on jump starting procedures.
•
Trip computer
repairer. For charging your
•
Climate control system
AGM battery, use only fully
i
Information
•
Driver position memory system
automatic battery chargers
that are specially developed
An inappropriately disposed
•
Clock
for AGM batteries.
of battery can be harmful to
•
Audio system
the environment and human
•
When replacing the AGM bat-
health.
tery, we recommend that you
use parts for replacement
Dispose of the battery according to
from a HYUNDAI authorised
your local law(s) or regulations.
repairer.
•
Do not open or remove the
cap on top of the battery. This
7
may cause leaks of internal
electrolyte that could result in
severe injury.
7-31
Maintenance
TYRES AND WHEELS
Tyre care
WARNING
•
Replace tyres that are worn,
show uneven wear, or are dam-
Tyre failure may cause loss of
aged. Worn tyres can cause
vehicle control resulting in an
loss of braking effectiveness,
accident. To reduce risk of
steering control, or traction.
SERIOUS INJURY or DEATH,
•
ALWAYS replace tyres with
take the following precautions:
the same size as each tyre
•
Inspect your tyres monthly for
that was originally supplied
proper inflation as well as
with this vehicle. Using tyres
wear and damage.
and wheels other than the rec-
ommended sizes could cause
•
The recommended cold tyre
unusual handling characteris-
pressure for your vehicle can
tics, poor vehicle control, or
OTM078063R
be found in this manual and on
negatively affect your vehi-
the tyre label located on the
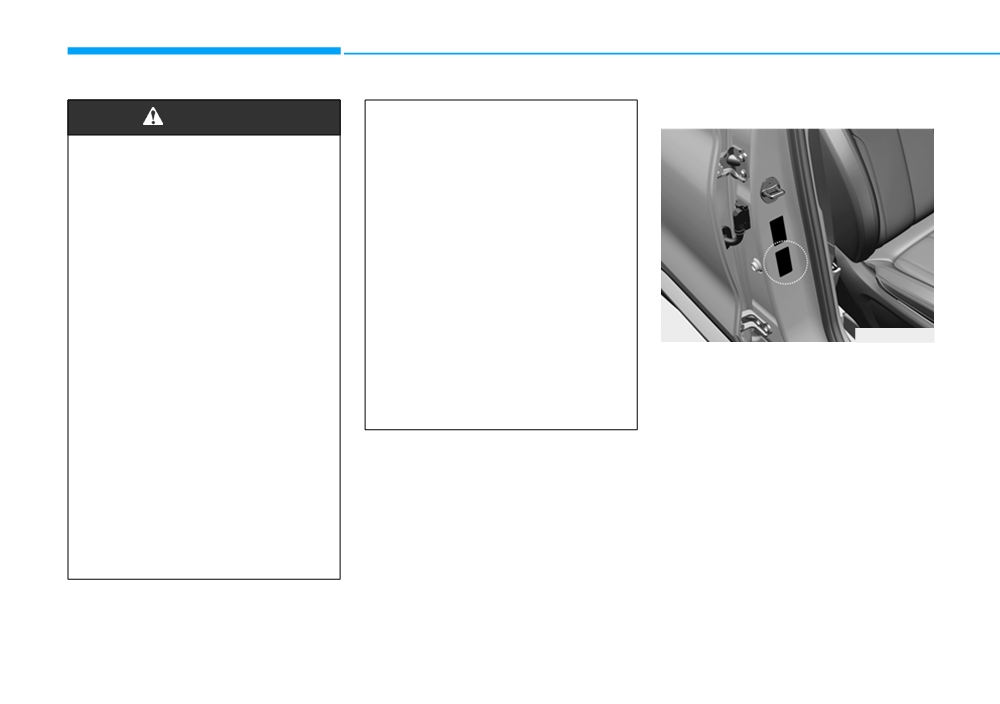
For proper maintenance, safety, and
cle’s Anti-Lock Brake System
driver’s side centre pillar.
maximum fuel economy, you must
(ABS) resulting in a serious
Always use a tyre pressure
always maintain recommended tyre
accident.
gauge to measure tyre pres-
inflation pressures and stay within the
sure. Tyres with too much or
load limits and weight distribution rec-
too little pressure wear
ommended for your vehicle.
unevenly causing poor han-
All specifications (sizes and pressures)
dling.
can be found on a label attached to the
•
Check the pressure of the
driver’s side centre pillar.
spare every time you check
the pressure of the other tyres
on your vehicle.
7-32
Recommended cold tyre infla-
WARNING
CAUTION
tion pressures
All tyre pressures
(including the
Recommended pressures must
•
Under-inflation results in
spare) should be checked when the
be maintained for the best ride,
excessive wear, poor handling
tyres are cold. “Cold tyres” means
vehicle handling, and minimum
and reduced fuel economy.
the vehicle has not been driven for at
tyre wear.
Wheel deformation is also
least three hours or has been driven
Over-inflation or under-inflation
possible. Keep your tyre pres-
for less than 1 mile (1.6 km).
sures at the proper levels. If a
can reduce tyre life, adversely
Warm tyres normally exceed recom-
affect vehicle handling, and
tyre frequently needs refilling,
mended cold tyre pressures by 28 to
lead to sudden tyre failure that
we recommend it be checked
41 kPa (4 to 6 psi). Do not release air
could result in loss of vehicle
by a HYUNDAI authorised
from warm tyres to adjust the pres-
control resulting in an accident.
repairer.
sure or the tyres will be under-inflat-
•
Over-inflation produces a
Severe under-inflation can lead
ed. For recommended inflation pres-
to severe heat build-up, causing
harsh ride, excessive wear at
sure, refer to “Tyre and Wheels” in
the centre of the tyre tread,
blowouts, tread separation and
chapter 8.
other tyre failures that can
and a greater possibility of
damage from road hazards.
result in the loss of vehicle con-
trol resulting in an accident.
This risk is much higher on hot
days and when driving for long
7
periods at high speeds.
7-33