Honda Insight (2019 year). Manual - part 2
 

  Index      Honda     Honda Insight - service manual 2019 year in english


Search            copyright infringement  


Content   ..   1  2  3   ..


Honda Insight (2019 year). Manual - part 2


15

Quick

 Referenc

e Guide

Safety Precautions

Do not touch the High Voltage system

Attempting to take a High Voltage system component apart or disconnect one of its wires 
can cause severe electrical shock. Make sure that any maintenance or repairs to the High 
Voltage system is performed by a dealer.

If a crash occurs

●Be careful of electric shock hazard.

u

If a severe crash damages your vehicle’s High Voltage system, there is a possibility of 

electrical shock due to exposed High Voltage components or wires. If this happens, do not 
touch any of the High Voltage system components or any of its orange wires.

●Avoid contact with High Voltage battery fluid.

u

The High Voltage battery contains a flammable electrolyte that could leak as a result of 

a severe crash. Avoid skin or eye contact with the electrolyte as it is corrosive. If you 
accidentally come into contact with the electrolyte, rinse the exposed skin or flush your 
eyes with copious amounts of water for at least five minutes, and seek medical attention 
immediately.

●Use a fire extinguisher for an electrical fire.

u

Attempting to extinguish an electrical fire with a small quantity of water, from a garden 

hose for instance, can be dangerous.

●Anytime the vehicle is damaged in an accident, have it repaired by a dealer.

Emergency Shutdown System for the High Voltage System

If the vehicle is involved in a crash, the emergency shutdown system will activate depending 
on the severity of the impact. When the system activates, the High Voltage system 
automatically shuts down, and the vehicle can no longer move under its own power. To 
return the High Voltage system back to normal operation, consult a dealer.

Honda collects and recycles High Voltage batteries used in its vehicles – consult a dealer for 
more information.

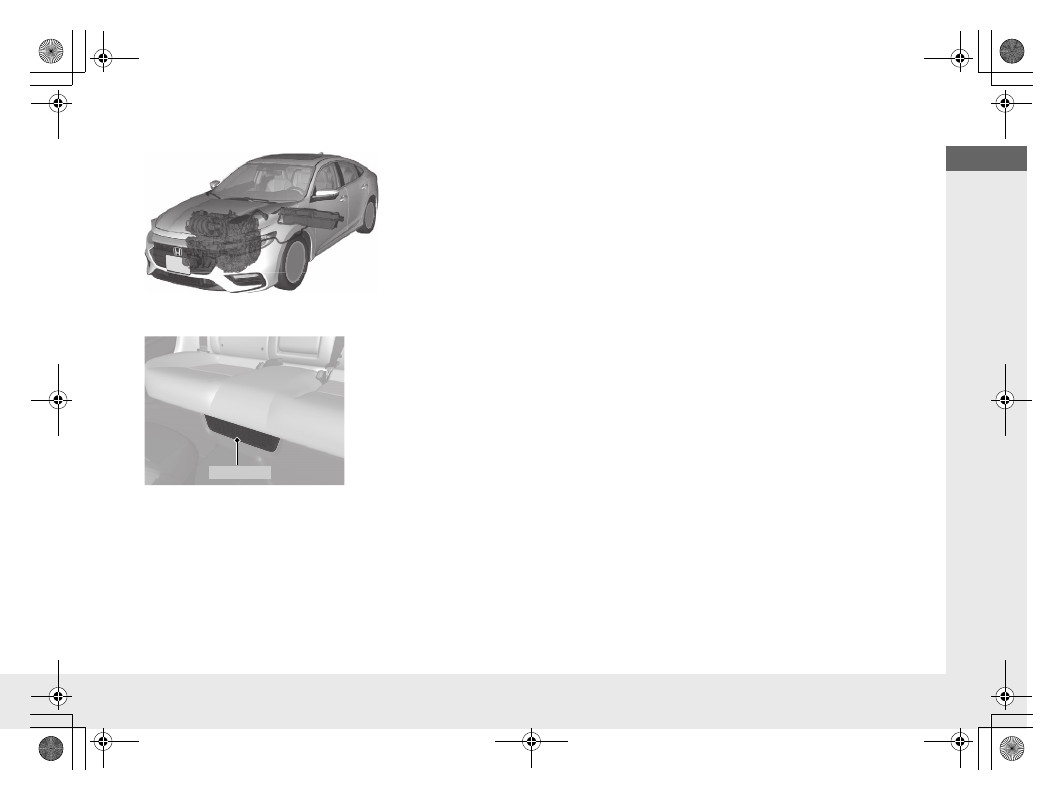
Do not cover the air intake.

If the air intake is obstructed 
during vehicle operation, the High 
Voltage battery can become too 
hot. To protect the battery, the 
system may start to limit the 
battery’s output and cause the 
power system and 12-volt battery 
charging system indicators to come 
on.

Air Intake

16

Quick

 Referenc

e Guide

Eco Assist® System 

(P 467)

Ambient Meter

With SPORT mode off, the color 
of the ambient meter changes to 
green to indicate that the vehicle 
is being driven in a fuel efficient 
manner.

ECON Button 

(P 467)
Helps maximize 
fuel economy.

ECON Mode Indicator 

(P 96)

Comes on when the ECON button is 
pressed.

The message is displayed 
for a few seconds when the 
ECON button is pressed.

17

Quick

 Referenc

e Guide

Drive Cycle Score/Lifetime Points

● Comes on when the power mode is in VEHICLE OFF.

Eco Drive Display

● Keep the vehicle icon near the center of the circle.

Drive Cycle Score

Lifetime Points

Fuel economy is:

Worse

Better

Best

Better

Worse

Aggressive 
Deceleration

Moderate 
Deceleration

Slow Acceleration/
Deceleration

Moderate 
Acceleration

Aggressive 
Acceleration

18

Quick

 Referenc

e Guide

Safe Driving 

(P 39)

Airbags 

(P 51)

● Your vehicle is fitted with airbags to help protect you and 

your passengers during a moderate-to-severe collision.

Child Safety 

(P 64)

● All children 12 and younger should be seated in the rear seat.

● Smaller children should be properly restrained in a forward-facing child seat.

● Infants must be properly restrained in a rear-facing child seat.

Exhaust Gas Hazard 

(P 77)

● Your vehicle emits dangerous exhaust gases that contain carbon 

monoxide. Do not run the engine in confined spaces where carbon 
monoxide gas can accumulate.

Before Driving Checklist 

(P 43)

● Before driving, check that the front seats, head restraints, 

steering wheel, and mirrors have been properly adjusted.

Seat Belts 

(P 44)

● Fasten your seat belt and sit upright well 

back in the seat.

● Check that your passengers are wearing 

their seat belts correctly.

Fasten your lap belt as 
low as possible.

19

Quick

 Referenc

e Guide

Instrument Panel 

(P 79)

Indicators 

(P 80)

/Driver Information Interface 

(P 131)

/Gauges 

(P 128)

Speedometer

Fuel Gauge

Driver Information Interface

Immobilizer System Indicator/
Security System Alarm Indicator

Shift Position Indicator/
Transmission System Indicator

Deceleration Paddle 
Selector Indicator

POWER/CHARGE Gauge

High Voltage Battery 
Charge Level Gauge

20

Quick

 Referenc

e Guide

Controls 

(P 163)

Clock 

(P164)

a

Press and hold the MENU/CLOCK 
button.

b

Rotate 

 to change hour, then press 

.

c

Rotate 

 to change minute, then 

press .

d

Select Set, then press 

.

These indications are used to show how to 
operate the selector knob.
● Rotate 

 to select.

● Press   to enter.

Models with color audio

To adjust time

To adjust date

a

Press 

, then select Settings.

b

Select System, then Day & Time.

c

Select Set Date & Time.

d

Select Automatic Date & Time, then 
select OFF.

Models with Display Audio

e

Select Set Date or Set Time.

f

Adjust the dates, hours and minutes by 
selecting /

.

g

Select Save to set the date or time.

The clock is automatically updated through 
the audio system.

POWER Button 

(P190)

Press the button to change the vehicle’s 
power mode.

3 4

21

Quick

 Referenc

e Guide

Turn Signals 

(P 193)

Lights 

(P 193)

Turn Signal Control Lever

Right

Left

Light Control Switches

Low Beam

High Beam

Flashing

Wipers and Washers 

(P 200)

*1:Models with automatic intermittent 

wipers

*2:Models without automatic intermittent 

wipers

Wiper/Washer Control Lever

Adjustment Ring

(

-: Low Sensitivity

*1

(

-  : Lower speed, fewer sweeps

*2

(

+: High Sensitivity

*1

(

+  : Higher speed, more sweeps

*2

MIST
OFF
AUTO

*1

: Wiper speed varies automatically

INT

*2

: Low speed with intermittent

LO: Low speed wipe
HI: High speed wipe

Pull toward 
you to spray 
washer fluid.

AUTO should always be turned OFF before 
the following situations in order to prevent 
severe damage to the wiper system:
● Cleaning the windshield

● Driving through a car wash

● No rain present

Steering Wheel 

(P 204)

● To adjust, pull the adjustment lever 

toward you, adjust to the desired 
position, then lock the lever back in place.

Models with automatic intermittent wipers

To lock

To adjust

22

Quick

 Referenc

e Guide

Unlocking the Front Doors 
from the Inside 

(P 176)

● Pull either front door inner handle to 

unlock and open it at the same time.

● Unlocking and opening the driver’s door 

from the inner handle unlocks all the 
other doors.

Trunk 

(P 180)

● Press the trunk opener on the driver’s 

door to unlock and open the trunk.

● Press the trunk release button on the 

remote to unlock and open the trunk.

● Press the trunk release button

*

 on the 

trunk lid to unlock and open the trunk.

Trunk Opener

Power Door Mirrors 

(P 206)

● With the power mode in ON, move the 

selector switch to L or R.

● Push the appropriate edge of the 

adjustment switch to adjust the mirror.

Selector Switch

Adjustment Switch

Power Windows 

(P 186)

● With the power mode in ON, open and 

close the power windows.

● If the power window lock button is in the 

off position, each passenger’s window 
can be opened and closed with its own 
switch.

● If the power window lock button is in the 

on position (indicator on), each 
passenger’s window switch is disabled.

Power Window 
Lock Button

Window Switch

Indicator

23

Quick

 Referenc

e Guide

Climate Control System 

(P 225)

● Press the AUTO button to activate the climate control system.

● Press the 

 button to turn the system on or off.

● Press the 

 button to defrost the windshield.

AUTO Button

Floor vents

Dashboard 
vents

Dashboard 
and floor 
vents

Floor and 
defroster 
vents

Models without SYNC button

Temperature Control Dial

 (Recirculation) Button

 (Windshield Defroster) Button

Fan Control Dial

 (ON/OFF) Button

A/C (Air Conditioning) Button

MODE Control Button

Floor vents

Dashboard 
vents

Dashboard 
and floor 
vents

Floor and 
defroster 
vents

A/C (Air Conditioning) Button

Driver’s Side Temperature 
Control Dial

AUTO Button

 (ON/OFF) Button

 (Recirculation) Button

MODE Control Button

Passenger’s Side Temperature 
Control Dial

SYNC (Synchronization) Button

 (Windshield Defroster) Button

Fan Control Button

Models with SYNC button

* Not available on all models

24

Quick

 Referenc

e Guide

Features 

(P 233)

Audio Remote Controls 

(P 237)

● VOL

(

+/VOL

(

- (Volume) Buttons

Press to adjust the volume up/down.

● SOURCE Button

Press to change the audio mode:
FM1FM2AMUSB/iPodPandora®
Bluetooth® Audio.

 / 

 (Seek/Skip) Buttons

Radio:Press 

 / 

 to change the 

preset station.

iPod, USB device, or Bluetooth® Audio:

Press 

 / 

 to skip to the 

beginning of the next song or 
return to the beginning of the 
current song.

Models with color audio

 / 


(Seek/Skip) Buttons

SOURCE 
Button

VOL

(

+/VOL

(

- (Volume) Buttons

● VOL

(

+/VOL

(

- (Volume) Buttons

Press to adjust the volume up/down.

● Left Selector Wheel

When selecting the audio mode
Press the 

 (home) button, then roll up 

or down to select Audio on the driver 
information interface, and then press the 
left selector wheel.

USB device or Bluetooth® Audio:

Press and hold 

 / 

 to 

change a folder/group.

Pandora®:

Press 

 to skip to the next 

track. Press and hold 

 / 


to select the next or previous track.

Models with Display Audio

 / 


(Seek/Skip) Buttons

Left Selector 
Wheel

VOL

(

+/VOL

(

- (Volume) Buttons

 (home) Button

FM

AM

SiriusXM®

*

USB1

USB2

Bluetooth® Audio

Smartphone Connection 

(Apple CarPlay/Android Auto)

Roll up or down: To cycle through the 
audio modes, roll up or down and then 
press the left selector wheel:

25

Quick

 Referenc

e Guide

 / 

 (Seek/Skip) Buttons

Radio:Press 

 / 

 to change the 

preset station.

iPod, USB device, Bluetooth® Audio or 
Smartphone Connection:

Press 

 / 

 to skip to the 

beginning of the next song or 
return to the beginning of the 
current song.

USB device:

Press and hold 

 / 

 to 

change a folder.

* Not available on all models

26

Quick

 Referenc

e Guide

Audio System 

(P241, 262)

 (Seek/Skip) Button

RADIO Button

 (Day/Night) Button

MEDIA Button

Preset Buttons (1-6)

 (Seek/Skip) Button

VOL/

 (Volume/Power) Knob

Audio/Information Screen

 (Back) Button

 (Sound) Button

MENU/CLOCK Button

Selector Knob

 (Phone) Button


(P 241)

Models with color audio

27

Quick

 Referenc

e Guide

 (Home) Button

 (Back) Button

Audio/Information Screen


(P262)

For navigation system operation 

() See the Navigation System Manual

Models with Display Audio

 (Day/Night) Button

 (Seek/Skip) Button

 (Seek/Skip) Button

VOL/

 (Volume/Power) 

Knob

28

Quick

 Referenc

e Guide

Driving 

(P 441)

Shift Position Indicator

Shift Button 
Indicator

Electronic Gear Selector 

(P 457)

● Select 

(

P and depress the brake pedal when turning on the power.

Shift Position Indicator
The shift position indicator and 
the shift button indicator 
indicate the current gear 
selection.

Park
Press the 

(

P button.

Used when parking or before turning 
the power on or off.
Transmission is locked.

Reverse
Press back the 

(

R button.

Used when reversing.

Neutral
Press the 

(

N button.

Transmission is not locked.

Drive
Press the 

(

D button.

Used for normal driving.
The deceleration paddle selector can be 
used temporarily.
The deceleration paddle selector can be 
used when SPORT mode is on.

Shift selection

29

Quick

 Referenc

e Guide

When SPORT mode is 
ON, the deceleration 
stage and M appear.

(

- Paddle 

Selector

(

+ Paddle 

Selector

Deceleration Paddle Selector 

(P464)

When you release the accelerator pedal, you can control the rate of deceleration 
without releasing your hands from the steering wheel. Using the deceleration 
paddle selector situated on the steering wheel, you can sequentially shift through 
three stages of deceleration.
Pull the 

(

+ selector for a few seconds when you want to cancel the deceleration 

paddle selector.
● When SPORT mode is OFF

If you pull back the paddle selector, the rate of deceleration will change 
temporarily, and the stage will appear in the instrument panel.

● When SPORT mode is ON

If you pull back the paddle selector, the rate of deceleration will change and 
the stage along with M will appear in the instrument panel.

Deceleration stage

When SPORT mode is 
OFF, the deceleration 
stage appears.

30

Quick

 Referenc

e Guide

VSA® On and Off 

(P 470)

● The Vehicle Stability Assist® (VSA®) system 

helps stabilize the vehicle during 
cornering, and helps maintain traction 
while accelerating on loose or slippery 
road surfaces.

● VSA® comes on automatically every time 

you turn on the power system.

● To partially disable or fully restore VSA® 

function, press and hold the button until 
you hear a beep.

CMBS

TM

 On and Off 

(P 486)
● When a possible collision is likely 

unavoidable, the CMBS

TM

 can help you to 

reduce the vehicle speed and the severity 
of the collision.

● The CMBS

TM

 is turned on every time you 

turn on the power system.

● To turn the CMBS

TM

 on or off, use the 

safety support switch.

Tire Pressure Monitoring 
System (TPMS) 

(P 472)

● Detects a change in tire conditions and 

overall dimensions due to decrease in tire 
pressures.

● The TPMS is turned on automatically 

every time you turn on the power system.

● A calibration procedure must be 

performed when certain conditions arise.


Content   ..   1  2  3   ..