Harley Davidson 2008 Touring Models. Electrical Diagnostics Manual - page 40
HOME
DTC U1016
E.20
GENERAL
DIAGNOSTICS
Loss of ECM Serial Data
PART NUMBER
TOOL NAME
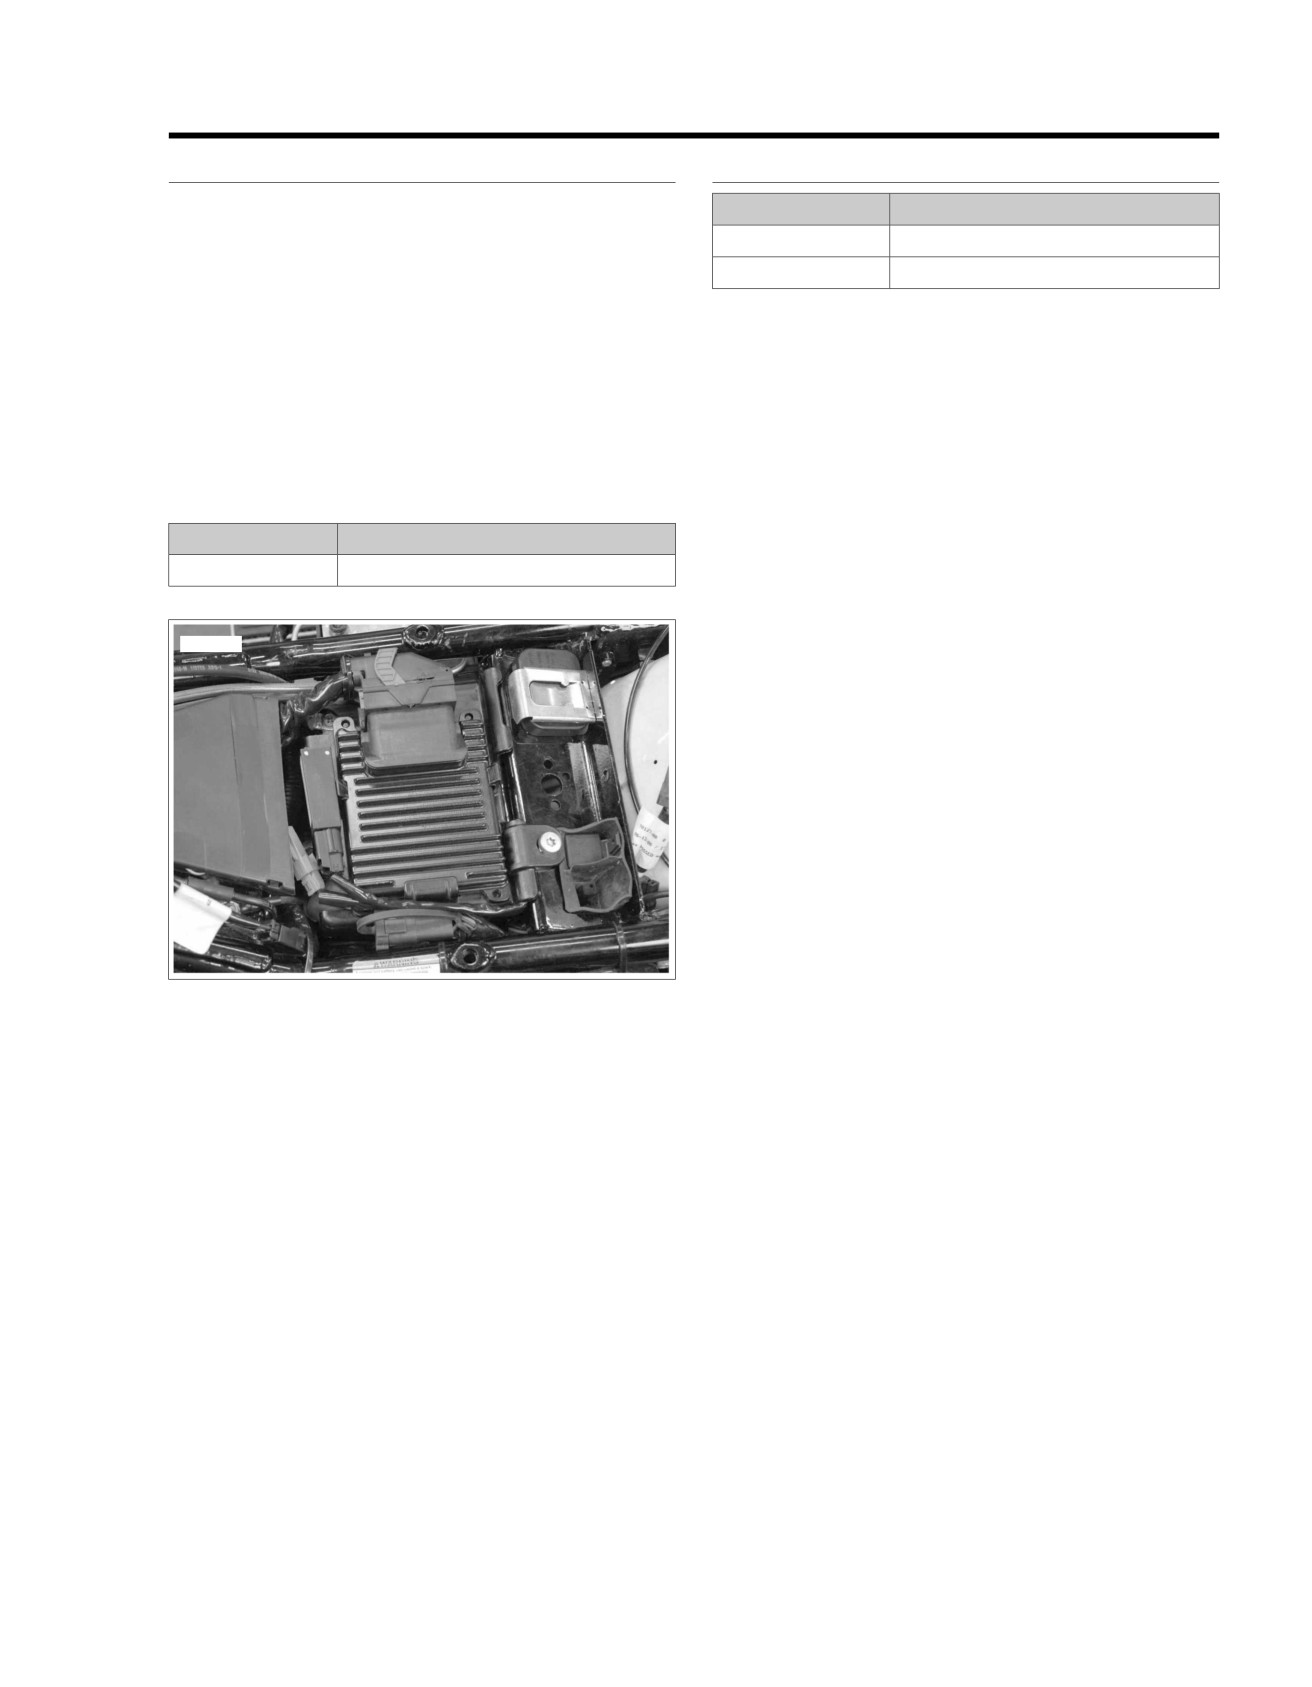
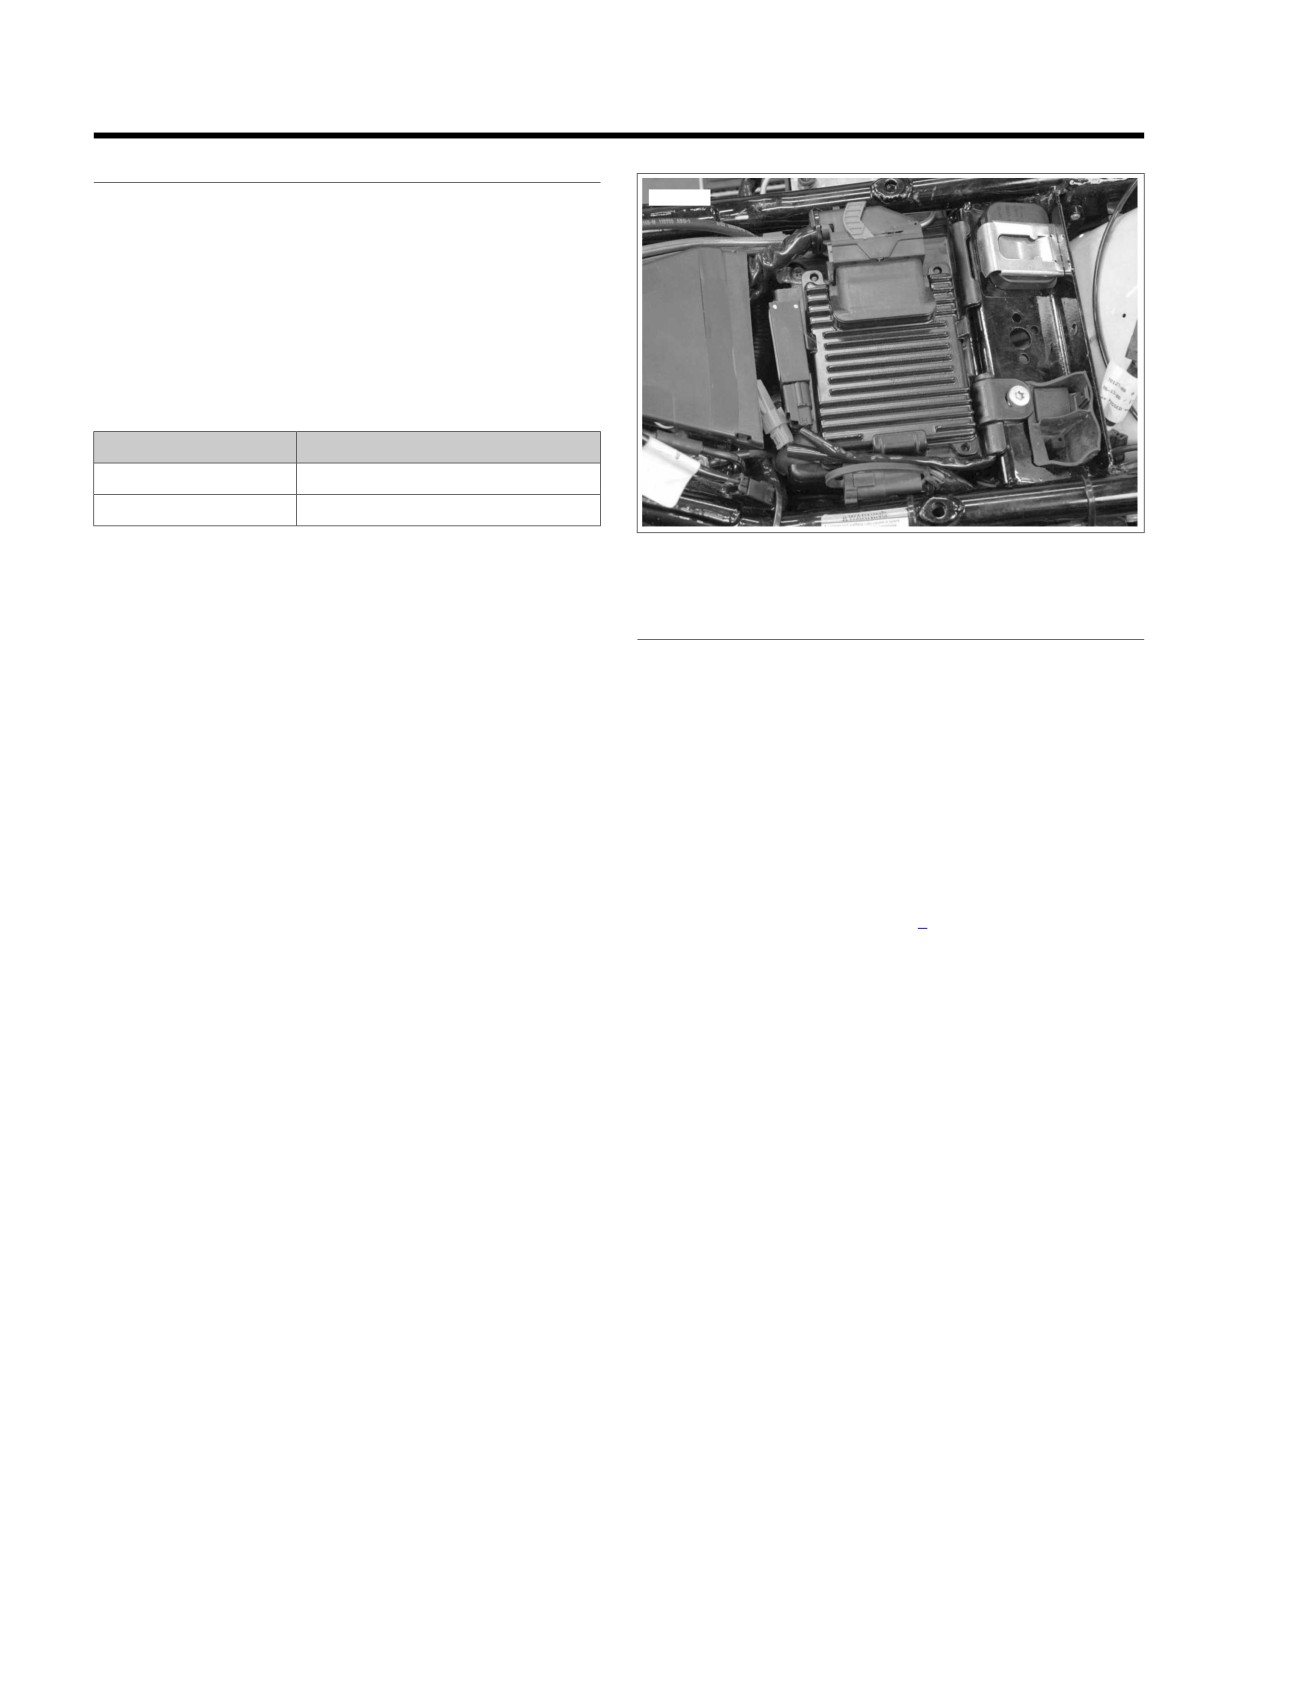
See Figure E-29. The serial data connector provides a means
HD-42682
BREAKOUT BOX
for the Electronic Control Module (ECM), TSM/TSSM, and
HD-43876
BREAKOUT BOX
speedometer to communicate their current status. When all
operating parameters on the serial data bus are within specific-
Diagnostic Notes
ations, a state of health message is sent between the compon-
Each reference number below correlates to a circled number
ents. A Diagnostic Trouble Code (DTC) U1016 indicates that
on the flow chart(s).
the ECM is not capable of sending this state of health message.
A DTC U1016 also indicates that there was communication on
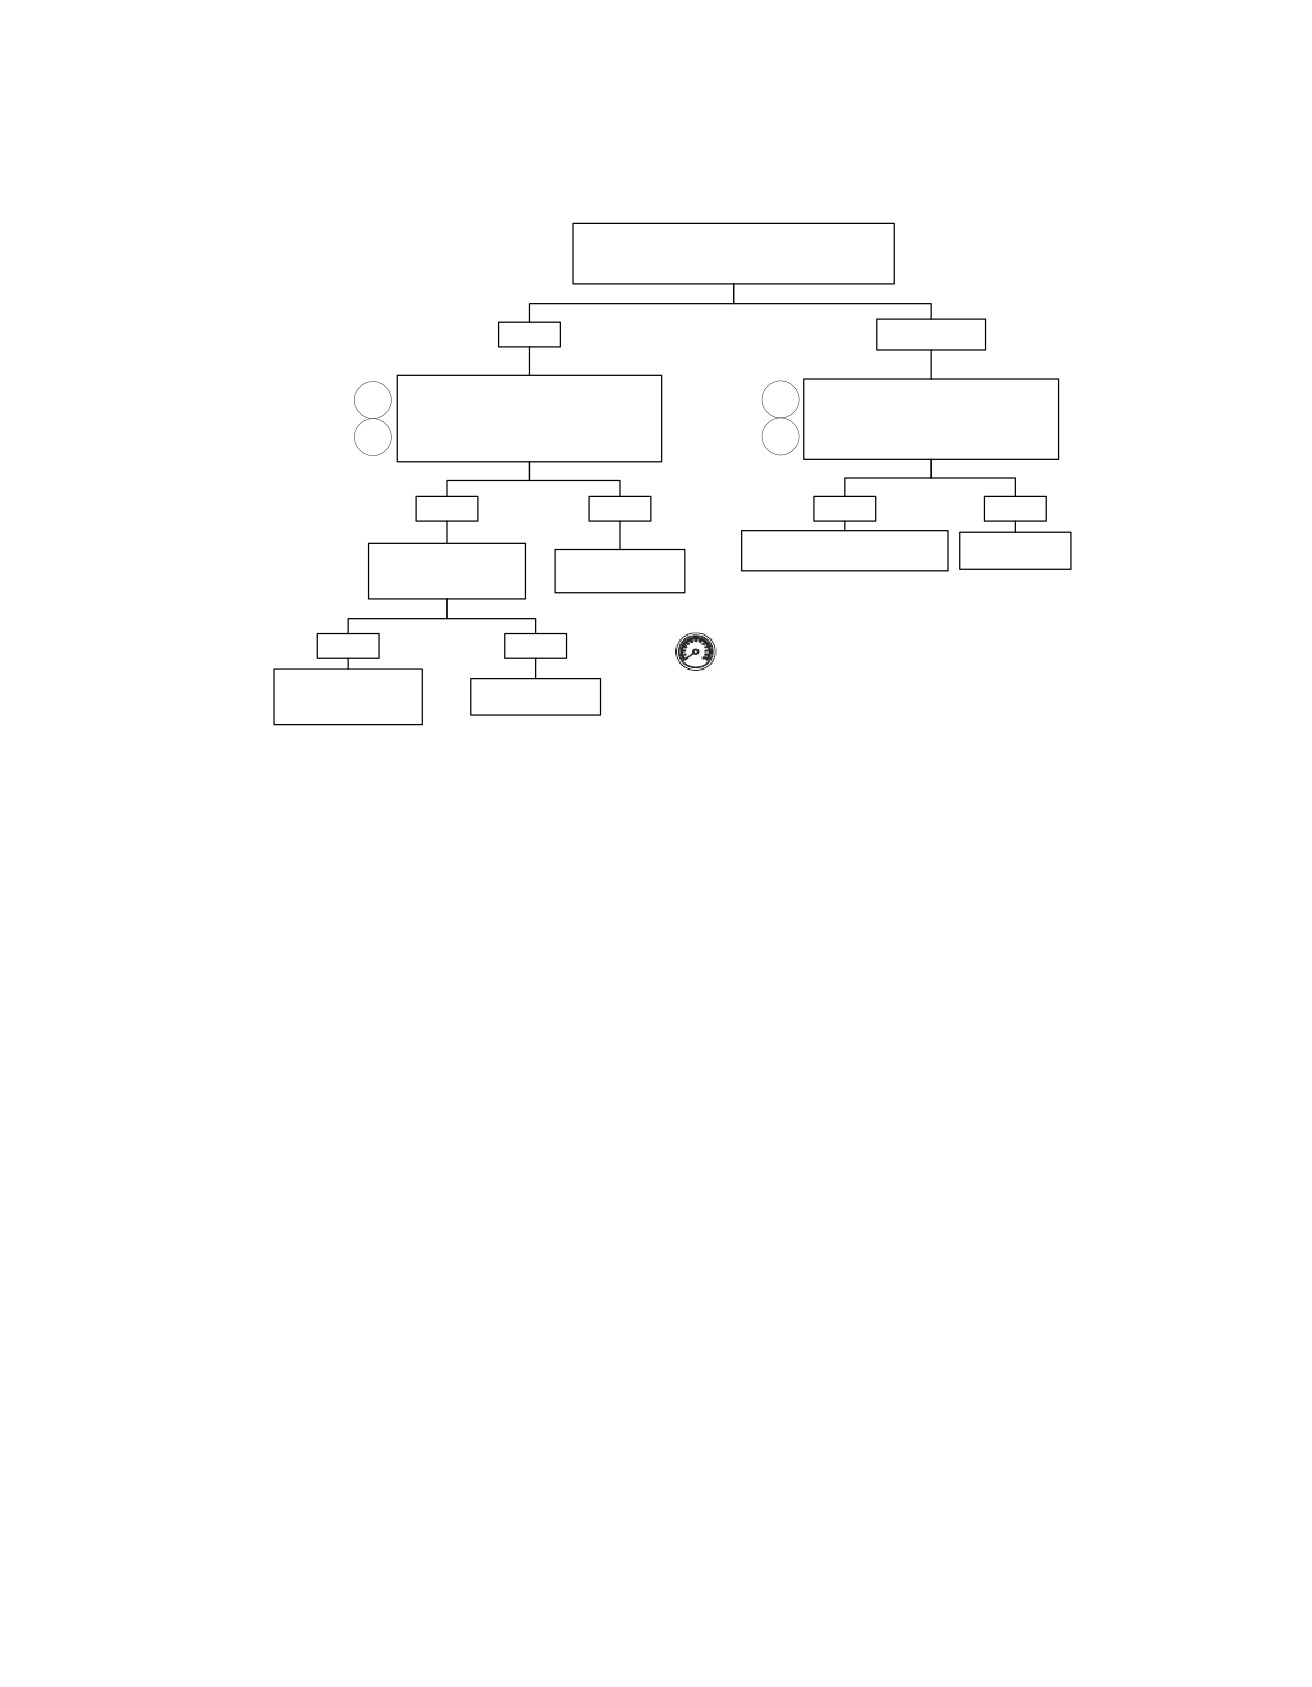
1. Connect BREAKOUT BOX (Part No. HD-42682) (gray)
the data bus since power up, but was lost or interrupted during
between TSM/TSSM connector [30A] and wire harness
that key cycle.
connector [30B]. See E.11 BREAKOUT BOX: TSM/TSSM.
2. Connect BREAKOUT BOX (Part No. HD-43876) between
Table E-23. Code Description
wire harness and ECM. See 4.7 BREAKOUT BOX: EFI.
DTC
DESCRIPTION
U1016l
Loss of all ECM serial data
ed01569
Figure E-29. Electronic Control Module (ECM)
2008 Touring Diagnostics: Appendix E TSM/TSSM (Japan/Korea) E-61
HOME
15A
em00056
Radio
[1A][1B]
Instruments
Fuse
O
O
[27A]
9
Main to interconnect
[27B]
9
harness
To
ignition
switch
BK/GN
LGN/V
LGN/V
LGN/V
GY
BN/GY
1
2
3
12
[30B]
1
2
3
12
[30A]
BN/GY
TSM/TSSM
GY
BK/GN
1
2
5
7
[108B]
1
2
5
7
[39B]
1
2
5
7
[108A]
1
2
5
7
[39A]
1
To
ignition
2
Tachometer
fuse
Data Link
Speedometer
LGN/V
3
Connector
BN/GY
GY
4
9
[2B]
4
9
[91A]
[2A]
4
Main to interconnect
ABS
harness
(Optional)
69
[78B]
69
[78A]
To
battery
fuse
ECM
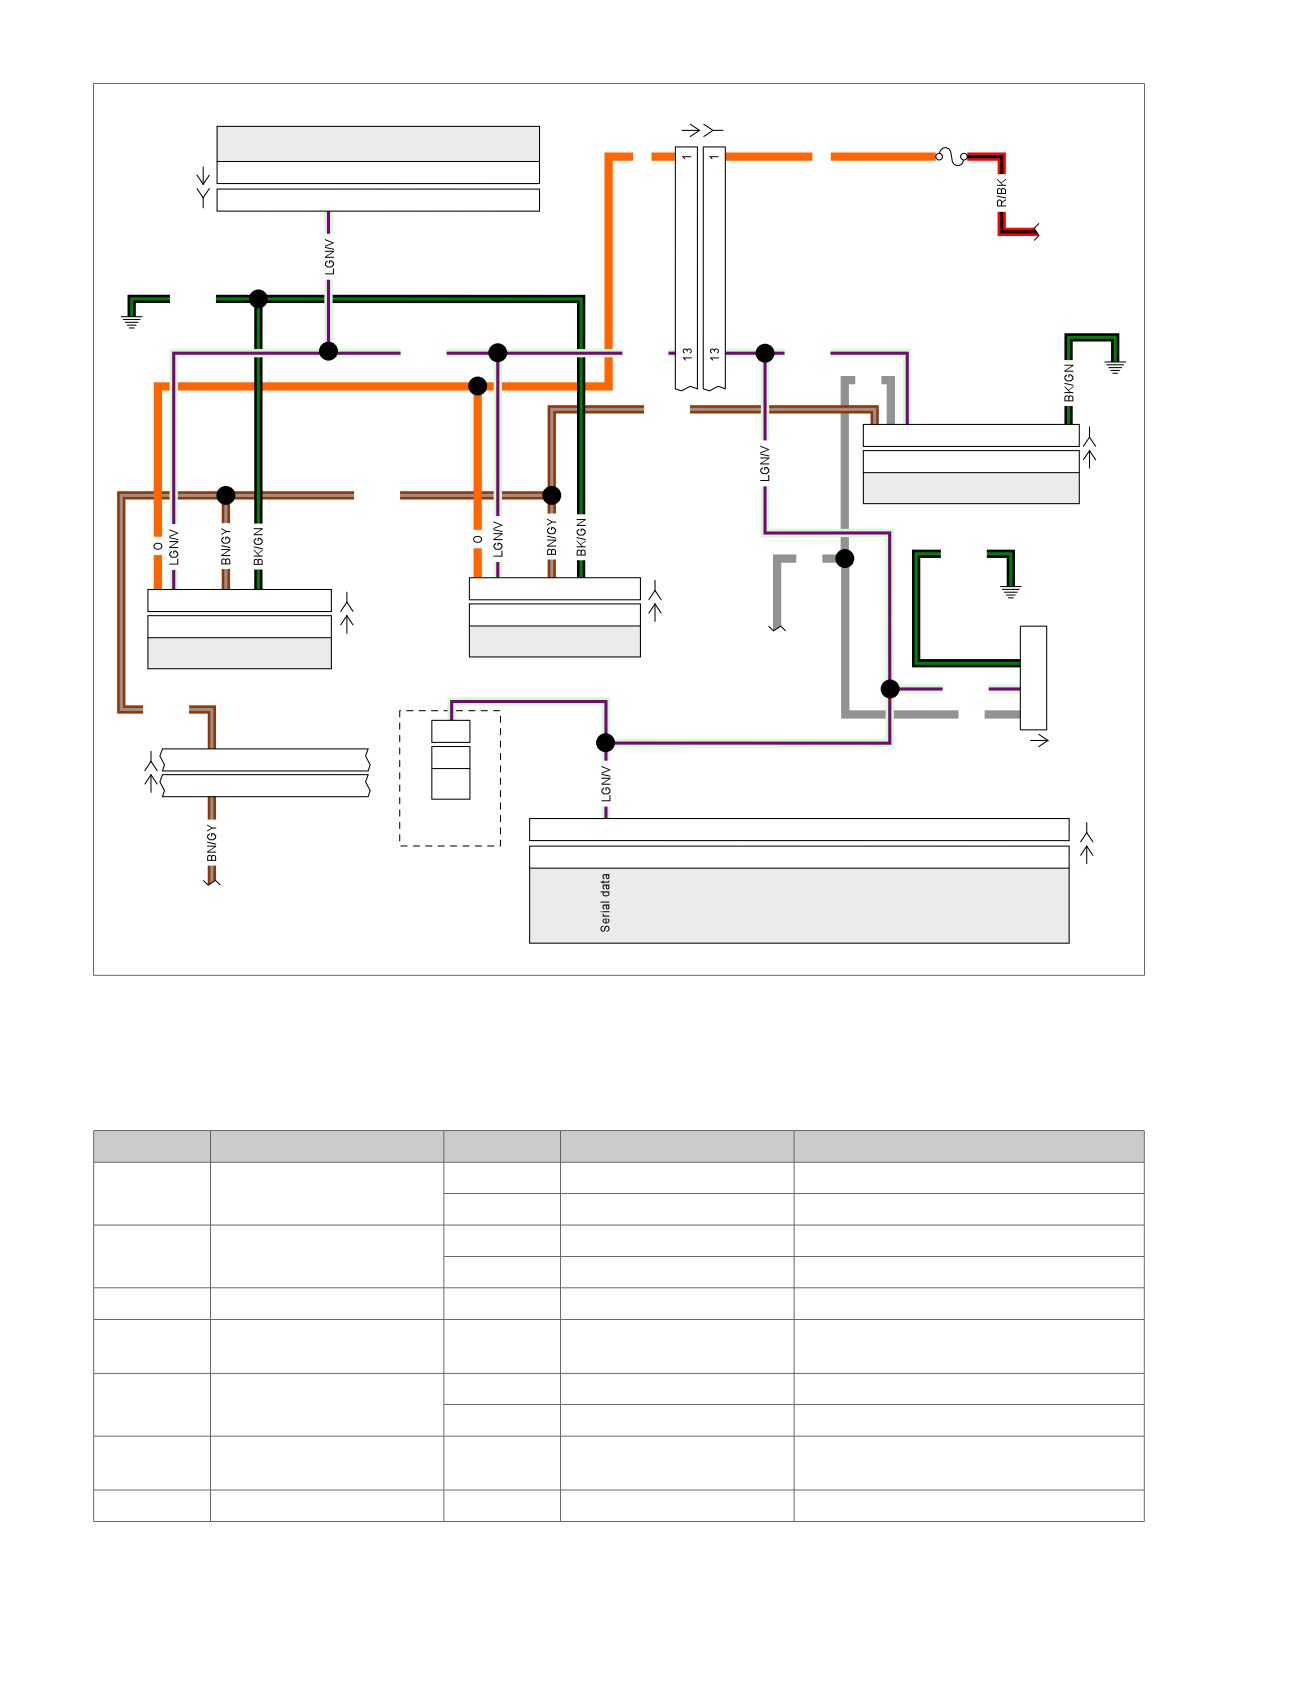
Figure E-30. Serial Data Circuit: FLHX, FLHT/C/U, FLTR
Table E-24. Wire Harness Connectors
NO.
DESCRIPTION
MODEL
TYPE
LOCATION
[1]
Main to interconnect har-
FLHT/C
16-place Molex (Black)
Inner fairing - right radio support bracket
ness
FL
TR
16-place Molex (Black)
Inner fairing - below radio (right side)
[2]
Main to interconnect har-
FLHT/C
12-place Molex (Gray)
Inner fairing - right fairing support brace
ness
FL
TR
12-place Molex (Gray)
Inner fairing - below radio (right side)
[20]
Radio
All
23-place Amp
Inner fairing - back of radio (right side)
[30]
TSM/TSSM
All
12-place Deutsch
Cavity in crossmember at rear of battery
box (under seat)
[39]
Speedometer
FLHT/C
12-place Packard
Inner fairing (back of speedometer)
FL
TR
12-place Packard
Under bezel (back of speedometer)
[78]
Electronic Control Module
All
73-place Packard
Under seat
(ECM)
[91]
Data link connector
All
4-place Deutsch
Under left side cover
E-62 2008 Touring Diagnostics: Appendix E TSM/TSSM (Japan/Korea)
HOME
Table E-24. Wire Harness Connectors
NO.
DESCRIPTION
MODEL
TYPE
LOCATION
[108]
T
achometer (If equipped)
FLHT/C
12-place Packard
Inner fairing (back of tachometer)
FLTR
12-place Packard
Under bezel (back of tachometer)
[166]
ABS (if equipped)
All
20-place Molex
Under right side cover
em00057
BK/GN
GY
BK/GN
LGN/V
LGN/V
BN/GY
O
1
2
3
12
[30B]
BN/GY
1
2
3
12
[30A]
TSM/TSSM
1
2
5
7
[39B]
1
2
5
7
[39A]
GY
Speedometer
15A
To
Instruments
battery
Fuse
To
fuse
ignition
O
switch
1
To
ignition
BK/GN
2
Data Link
fuse
LGN/V
3
Connector
GY
4
[91A]
9
9
ABS
(Optional)
69
[78B]
[78A]
69
ECM
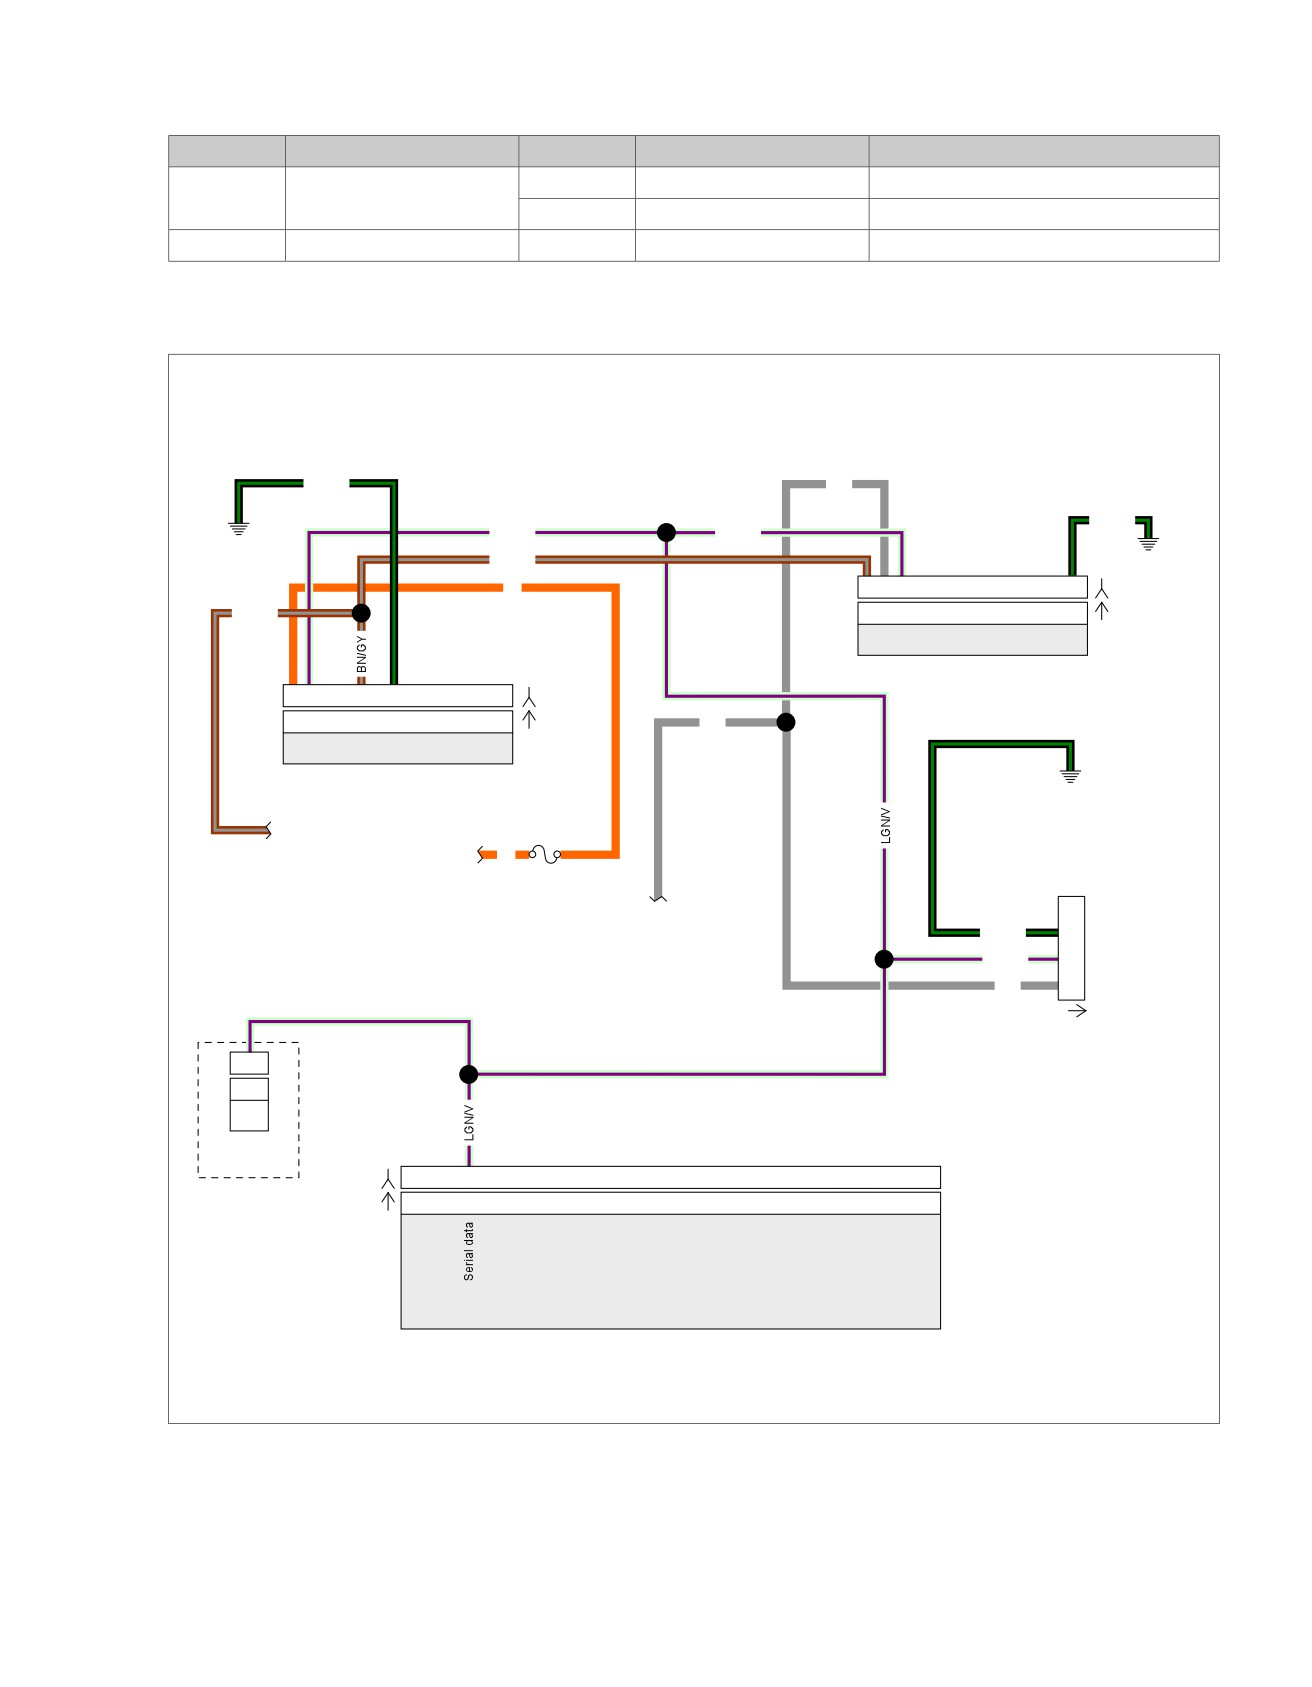
Figure E-31. Serial Data Circuit: FLHR/C/S
2008 Touring Diagnostics: Appendix E TSM/TSSM (Japan/Korea) E-63

HOME
Table E-25. Wire Harness Connectors
NO.
DESCRIPTION
TYPE
LOCATION
[30]
TSM/TSSM
12-place Deutsch
Cavity in crossmember at rear of bat-
tery box (under seat)
[39]
Speedometer
12-place Packard
Under console (back of speedometer)
[78]
Electronic Control Module (ECM)
73-place Packard
Under seat
[91]
Data link connector
4-place Deutsch
Under left side cover
[166]
ABS (If equipped)
20-place Molex
Under right side cover
E-64 2008 Touring Diagnostics: Appendix E TSM/TSSM (Japan/Korea)
HOME
Loss of ECM Serial Data: DTC U1016
Can you read Electronic Control Module (ECM)
hardware part number?
See E.10 SPEEDOMETER SELF DIAGNOSTICS.
YES
NO or “No Rsp”
While wiggling harness, check continuity
1
between terminal “3” (gray) of TSM/TSSM
1
Check continuity between terminal “3”
(gray) of TSM/TSSM Breakout Box and
Breakout Box and terminal “5” of ECM
terminal “5” of ECM Breakout Box.
2
Breakout Box.
2
Continuity present?
Continuity present?
YES
NO
YES
NO
Replace ECM.
Repair open on
Clear DTCs. Test ride.
Repair intermittent
Reprogram and learn password
(LGN/V) wire.
Did DTC U1016 return?
on (LGN/V) wire.
Clear DTCs using speedometer self diagnostics.
YES
NO
See E.10 SPEEDOMETER SELF DIAGNOSTICS.
Confirm proper operation with no check engine lamp.
Replace ECM.
Reprogram and learn
No trouble found.
fc01330_en
password.
2008 Touring Diagnostics: Appendix E TSM/TSSM (Japan/Korea) E-65
HOME
DTC U1300,
U1301 OR BUS ER
E.21
GENERAL
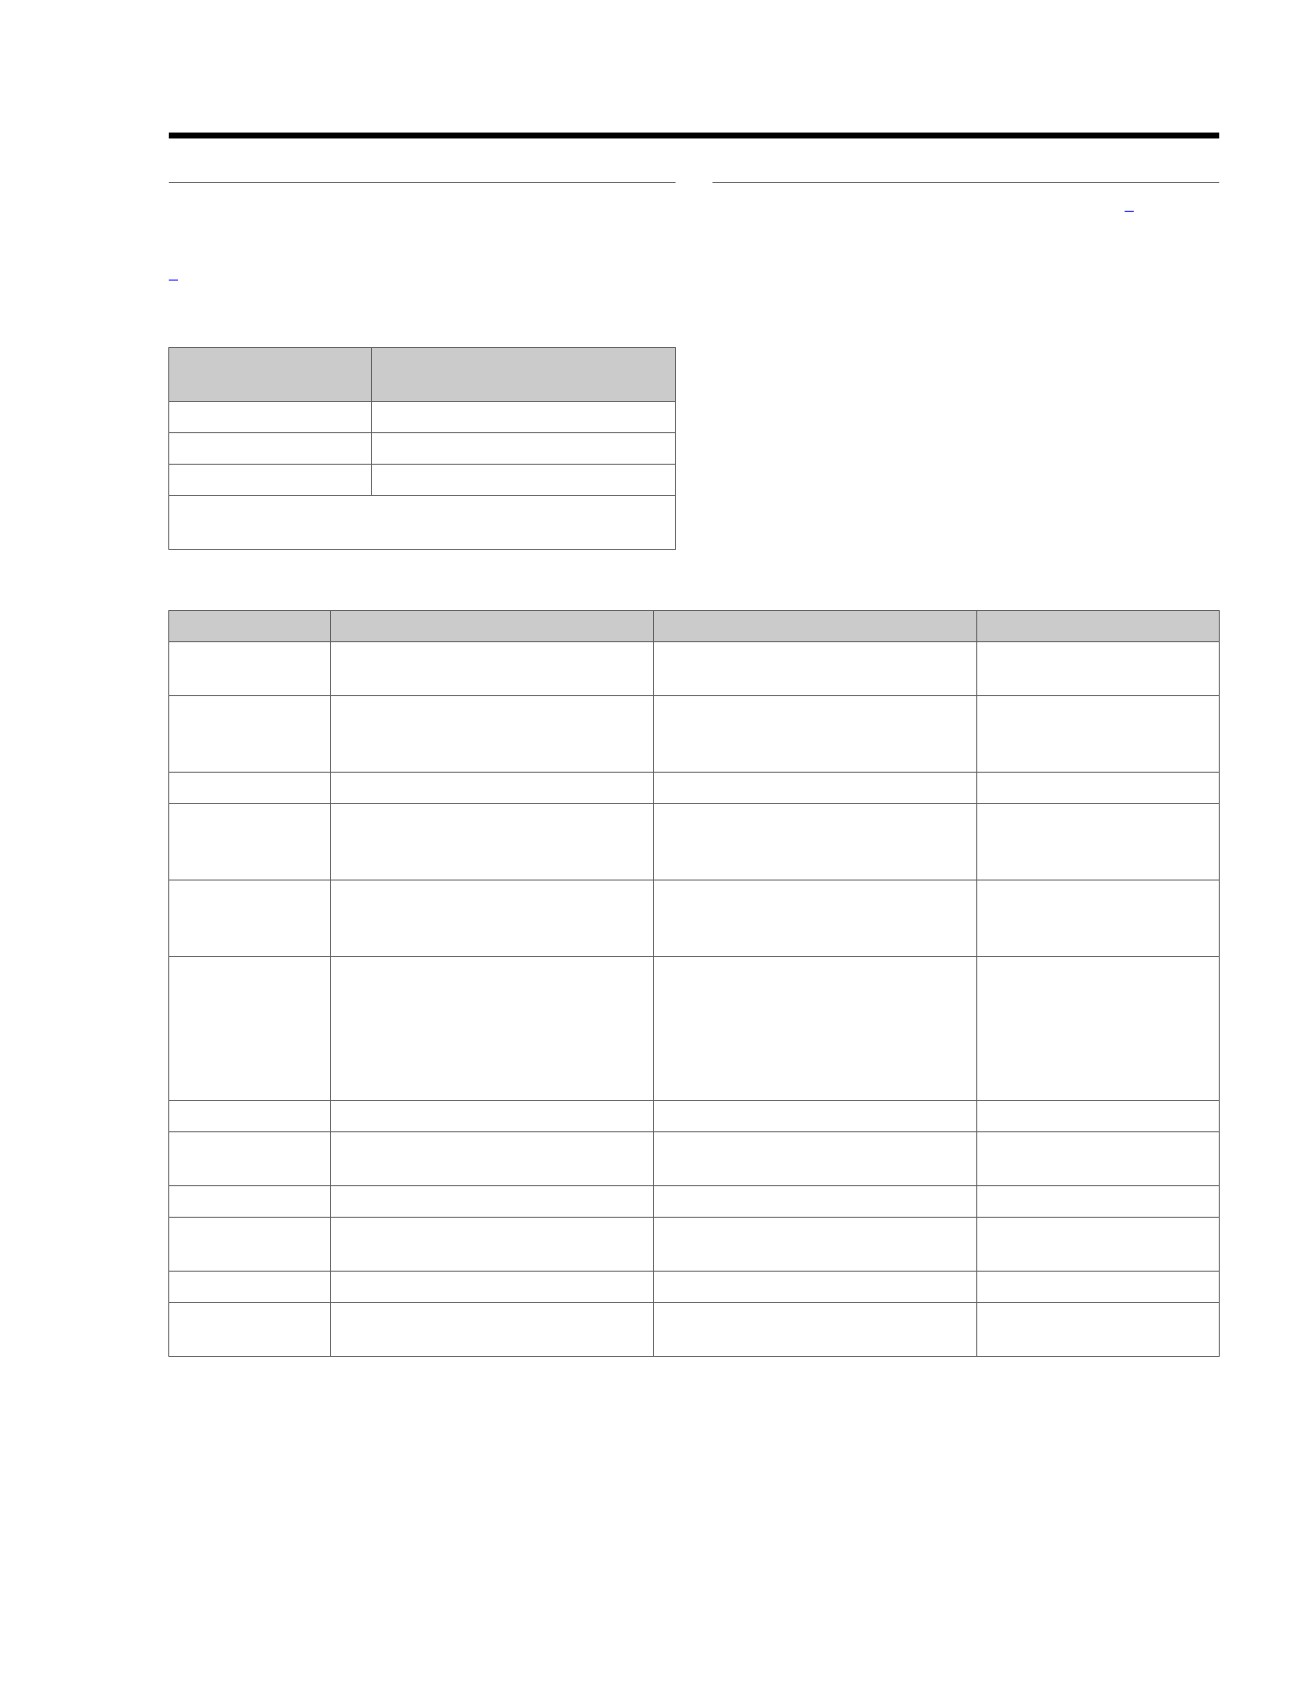
ed01569
Serial Data Low or Serial Data Open/High
The typical serial data voltage range is 0 volts (inactive) to 7
volts (active). Due to the short pulse, voltages will be much
lower on a digital/voltmeter (DVOM). In analog mode, a DVOM
reading serial data will show continuous voltage when active,
typically 0.6 to 0.8 volts. The range for acceptable operations
is 0 to 7.0 volts.
Table E-26. Code Description
DTC
DESCRIPTION
U1300
Serial data low
U1301
Serial data bus open/high
Figure E-32. Electronic Control Module (ECM)
DIAGNOSTICS
Diagnostic Tips
•
If serial data is shorted, these Diagnostic Trouble Codes
(DTCs) will automatically cause the check engine lamp to
illuminate. The odometer will read "BUS Er" in this condi-
tion.
•
DTCs P1009 and P1010 may accompany DTCs U1300
and U1301.
Diagnostic Notes
If a U1300, U1301 or "BUS Er" is present, perform diagnostic
procedures listed in 4.12 STARTS, THEN STALLS.
E-66 2008 Touring Diagnostics: Appendix E TSM/TSSM (Japan/Korea)
HOME
TSM/TSSM:
PASSWORD LEARN
E.22
GENERAL
PASSWORD LEARNING
If the ECM or TSM/TSSM is faulty, follow the instructions in
To perform password learning procedure, refer to Table E-28.
the Service Manual for ECM or TSM/TSSM replacement. Then,
When finished, continue with all instructions under
to determine if password learn is necessary, refer to
E.3 TSM/TSSM VEHICLE DELIVERY.
Table E-27.
Always perform all appropriate instructions under
E.3 TSM/TSSM VEHICLE DELIVERY after TSM/TSSM
Table E-27. Password Learn
replacement or removal.
DEVICE REPLACED
IS PASSWORD LEARN
NOTE
NECESSARY?
Do not forget to enter a Personal Identification Number (PIN)
ECM
Yes
for TSSM vehicles. If a code is not assigned and the key fob
is lost or damaged while the vehicle is armed, the TSSM must
TSM
No *
be replaced.
TSSM
Yes
* If a TSM has been replaced by a TSSM, or a TSSM has
been replaced by a TSM, password learn is necessary.
Table E-28. Setting TSM/TSSM and ECM Password
NO.
ACTION
CONFIRMATION
NOTES
Ignition must be turned off for at least
With ignition turned off, Check Engine
15 seconds.
Lamp and Security Lamp will be off.
1
Install new TSM/TSSM or ECM. Per-
form all steps under E.3 TSM/TSSM
VEHICLE DELIVERY.
2
Set Engine Stop Switch to RUN.
3
Turn Ignition Switch ON.
Verify Check Engine Lamp and
TSM/TSSM enables starter
Security Lamp illuminate and then turn
relay.
off.
4
Attempt normal start one time.
Engine starts and stalls. Check Engine
Password has not been
Lamp illuminates and stays on.
learned. ECM sets DTC
P1009.
5
Wait ten seconds.
Security Lamp will
Security Lamp illuminates.
ECM enters Password
illuminate and stay on.
Learning mode for ten
minutes. Do not cycle Ignition
Switch or interrupt vehicle
power or Password Learn will
be unsuccessful.
6
Wait until Security Lamp turns off
This takes ten minutes.
7
Quickly (within one second) turn Igni-
ECM must not be allowed to
tion Switch OFF-ON.
shutdown.
8
Wait until Security Lamp turns off
This takes ten minutes.
9
Quickly (within one second) turn Igni-
ECM must not be allowed to
tion Switch OFF-ON.
shutdown.
10
Wait until Security Lamp turns off
This takes ten minutes.
11
Quickly (within one second) turn Igni-
ECM must not be allowed to
tion Switch OFF-ON.
shutdown.
2008 Touring Diagnostics: Appendix E TSM/TSSM (Japan/Korea) E-67

HOME
Table E-28. Setting TSM/TSSM and ECM Password
NO.
ACTION
CONFIRMATION
NOTES
12
Turn Ignition Switch OFF. Wait
15
seconds before turning Ignition Switch
ON. Turn Ignition Switch ON and start
engine to confirm successful Password
Learn procedure. Clear Diagnostic
Trouble Codes (DTCs).
13
Perform all steps under E.3 TSM/TSSM
VEHICLE DELIVERY.
E-68 2008 Touring Diagnostics: Appendix E TSM/TSSM (Japan/Korea)
HOME
TSSM MAINTENANCE
E.23
GENERAL
ed030114
The TSSM system uses batteries in the key fob and siren.
These are the only parts requiring periodic maintenance.
KEY FOB
1
2
Schedule
Replace the key fob battery every 2 years.
Battery Replacement
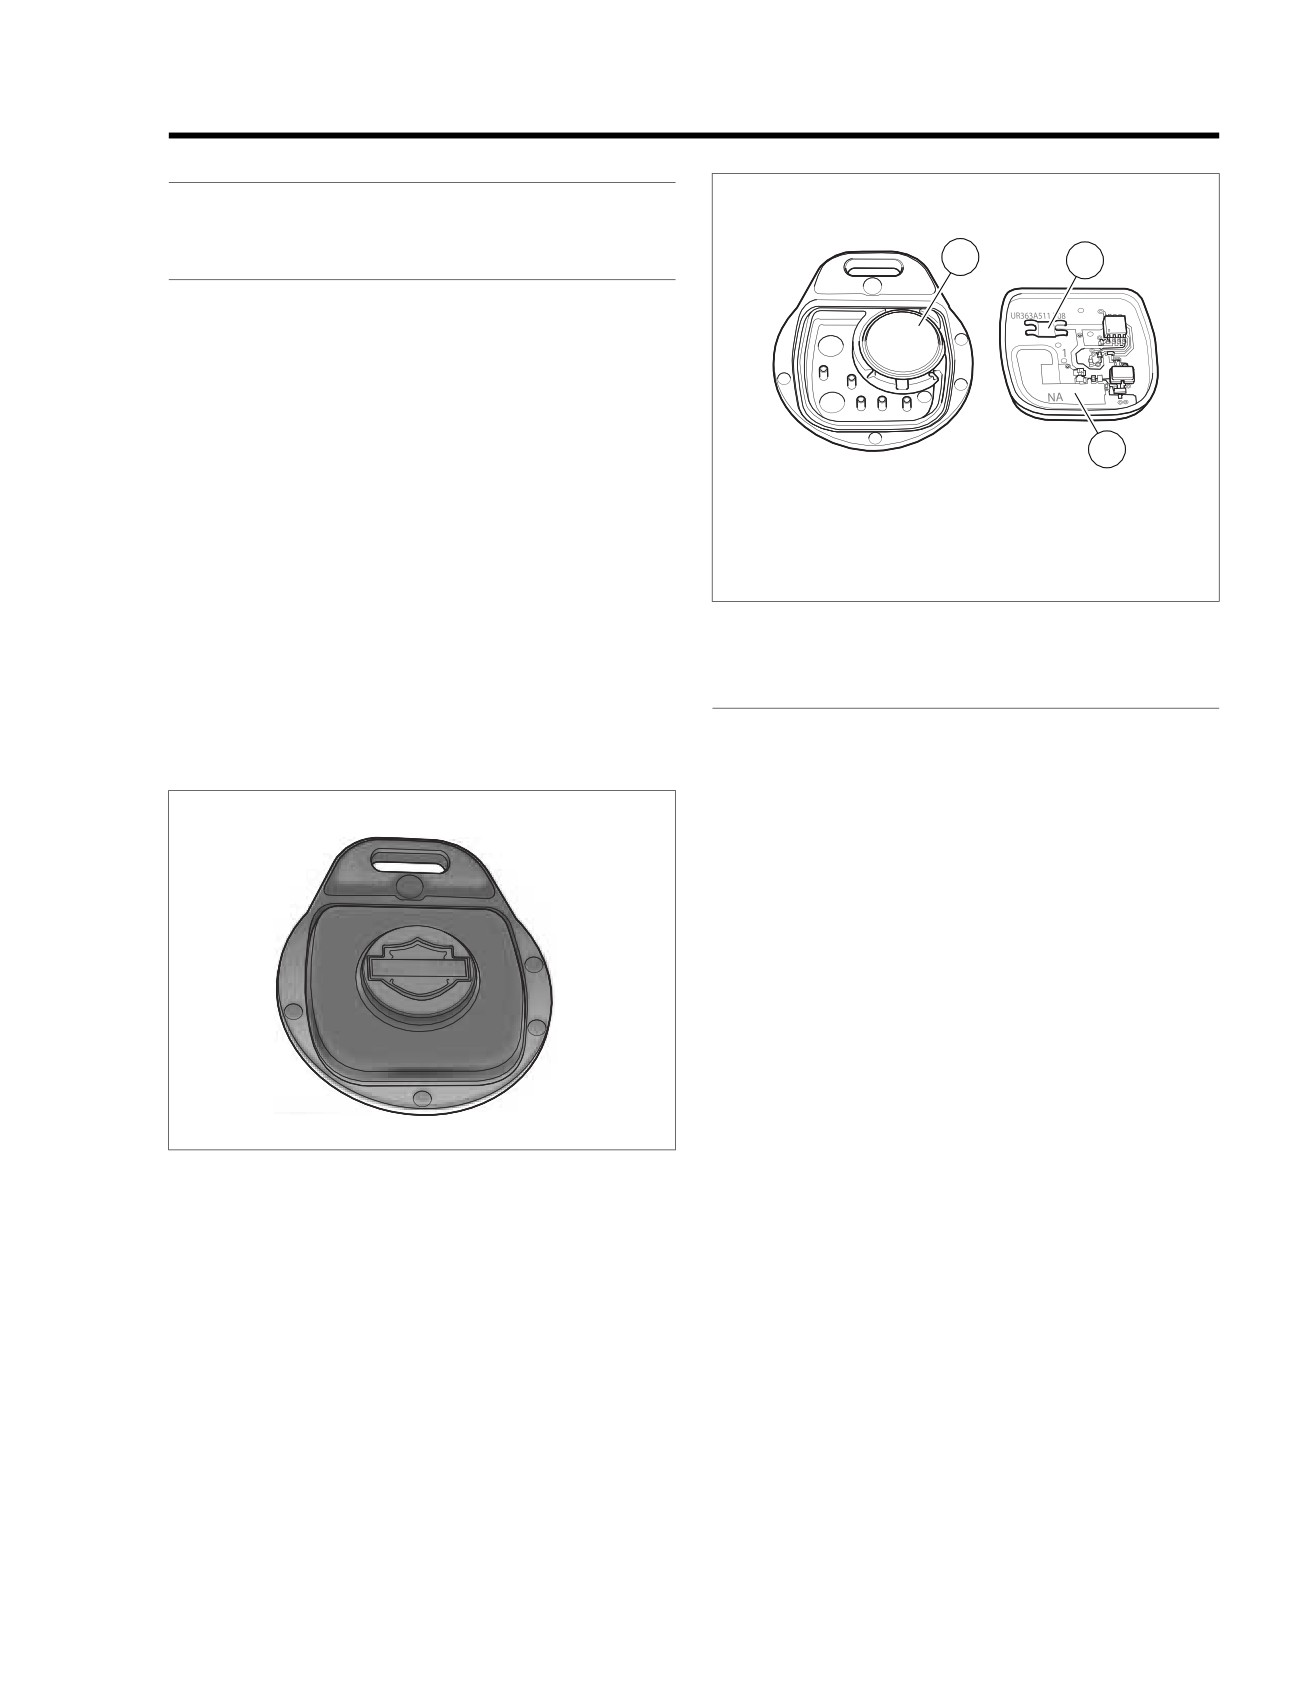
1. See Figure E-33. Open the key fob case.
a. Place a thin blade between the 2 halves of the case.
3
b. Slowly twist the blade.
2. Replace battery (1).
a. Remove the original battery.
1. Battery
2. Battery Contact
b. Install a new battery with the positive (+) side down.
3. Circuit Board
Use a Panasonic® 2032 or equivalent.
Figure E-34. Open Key Fob: TSSM
3. Align case and circuit board (3) as shown. Snap case
halves together.
SIREN (IF INSTALLED)
4. While standing next to the motorcycle, press and hold the
key fob button for 10-15 seconds until the security system
Schedule
responds with two turn signal flashes/siren chirps.
The siren's internal 9 volt battery is rechargeable and does not
need to be replaced on a regular basis. Battery life under
ed03015
normal conditions is approximately three to six years.
NOTES
•
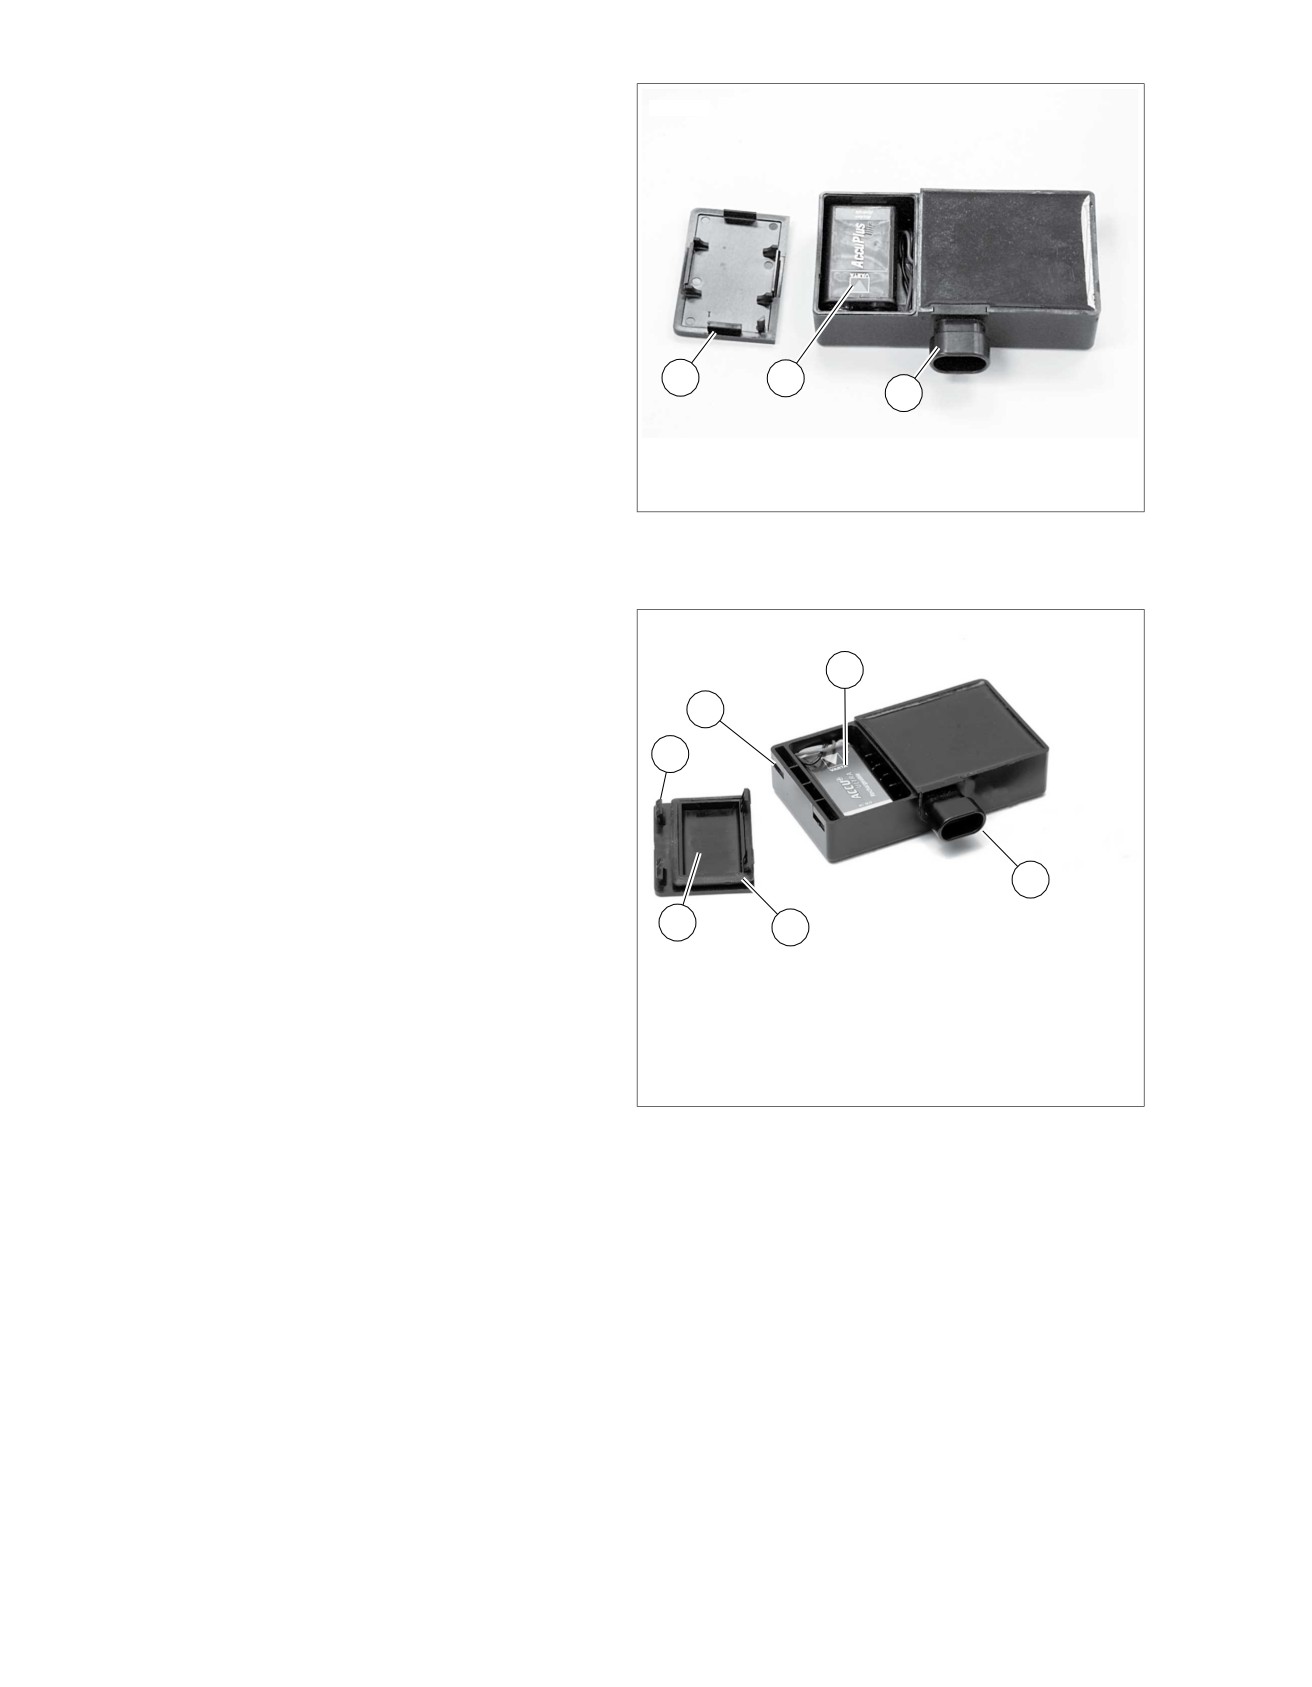
See Figure E-35 and Figure E-36. Early style siren will
work with both TSSM and HFSM. Late style siren will only
work with HFSM.
•
The internal siren battery may not charge if the vehicle's
battery is less than 12.5 volts.
Battery Replacement: Early Style Siren
1. Disarm system and remove siren.
2. See Figure E-35. Remove battery cover.
a. Place the siren module on a flat and sturdy table with
the potted section (area with epoxy covering circuit
board) facing up and towards you.
Figure E-33. Key Fob Assembly: TSSM
b. Position a knife blade at a 45 degree angle to the long
side of the siren case. Insert the knife blade between
the siren case and battery cover at one of the two
accessible corners of the battery cover. Keep the
blade slightly higher towards the battery cover as this
helps keep the blade away from the battery seal.
c. Slowly twist the blade towards the battery cover and
the cover will pop off.
NOTES
•
For protection against corrosion, battery terminals and
battery clip are covered with a special grease. Do not wipe
2008 Touring Diagnostics: Appendix E TSM/TSSM (Japan/Korea) E-69
HOME
away this substance. Apply all available existing grease
ed03016
to terminals on new battery.
•
Only a 9 volt nickel metal hydride battery should be used
in the siren.
3. Replace battery by removing old battery from polarized
battery clip. Install a new 9 volt nickel metal hydride bat-
tery.
4. Reinstall battery cover.
a. Carefully replace the rubber seal.
b. Align battery cover with case placing round corners
on cover away from connector [142A]. Snap cover
1
2
into place.
3
5. Install siren and check operation. If siren is working prop-
1. Cover
erly, it will respond with two chirps after receiving the arm
2. Battery
command.
3. Connector [142A]
Battery Replacement: Late Style Siren
Figure E-35. Battery Compartment (Early Style Siren)
1.
Disarm system and remove siren.
2.
See Figure E-36. With a small screwdriver or pick, push
the catches (1) in through the two slots (2) in the end of
ed02958
the siren to release the battery cover (3).
4
NOTES
•
For protection against corrosion, battery terminals and
2
battery clip are covered with a special grease. Do not wipe
away this substance. Apply all available existing grease
1
to terminals on new battery.
•
Only a 9 volt nickel metal hydride battery should be used
in the siren.
3.
Replace battery (4) by removing old battery from polarized
battery clip.
6
4.
Recharge and re-install or install a new 9 volt nickel metal
3
5
hydride battery.
5.
Reinstall battery cover (3).
1. Catch
2. Slot
a. Carefully replace the rubber seal (5) on the cover.
3. Cover
b. Align battery cover with case placing round corners
4.
9 volt battery
on cover away from connector [142A] (6).
5.
Rubber seal
6.
Connector [142A]
c. Snap cover into place.
Figure E-36. Siren Battery Compartment (Late Style Siren)
6.
Install siren and check operation. If siren is working prop-
erly, it will respond with two chirps after receiving the arm
command.
E-70 2008 Touring Diagnostics: Appendix E TSM/TSSM (Japan/Korea)
Tools Used in This Manual
PART NUMBER
TOOL NAME
NOTES
HD-23738
VACUUM PUMP
4.18 DTC P0107, P0108, P0112, P0113, Diagnostics
HD-25070
ROBINAIR HEAT GUN
A.19 SEALED SPLICE CONNECTORS, Sealed Splice
Connector Repair
HD-26792
SPARK TESTER
4.10 ENGINE CRANKS, BUT WILL NOT START, Dia-
gnostics
HD-26792
SP
ARK TESTER
4.16 MISFIRE AT IDLE OR UNDER LOAD, Diagnostics
HD-34730-2C
FUEL INJECTOR TEST LAMP
4.10 ENGINE CRANKS, BUT WILL NOT START, Dia-
gnostics
HD-34730-2C
FUEL INJECTOR
TEST LAMP
4.22 DTC P0261, P0262, P0263, P0264, Diagnostics
HD-34730-2C
FUEL INJECTOR
TEST LAMP
4.24 DTC P0444, P0445, Diagnostics
HD-34730-2C
FUEL INJECTOR
TEST LAMP
4.24 DTC P0444, P0445, Diagnostics
HD-34730-2C
FUEL INJECTOR
TEST LAMP
4.33 DTC P1351, P1352, P1354, P1355, Diagnostics
HD-35500
MUL
TI-METER
2.6 FUEL GAUGE, Fuel Gauge and Sender Test
HD-38125-6
PACKARD TERMINAL CRIMP TOOL
A.15 METRI-PACK TERMINALS, Metri-Pack Terminal
Crimps
HD-38125-7
PACKARD TERMINAL CRIMPER
A.1 AMP 1-PLACE CONNECTORS, AMP 1-Place Con-
nector Repair
HD-38125-7
PACKARD TERMINAL CRIMPER
A.7 DEUTSCH MINI-TERMINAL CRIMPS, Deutsch Mini
Terminal Crimps
HD-38125-7
PACKARD TERMINAL CRIMPER
A.15 METRI-PACK TERMINALS, Metri-Pack Terminal
Crimps
HD-38125-8
PACKARD CRIMPING TOOL
A.15 METRI-PACK TERMINALS, Metri-Pack Terminal
Crimps
HD-38125-8
PACKARD CRIMPING TOOL
A.19 SEALED SPLICE CONNECTORS, Sealed Splice
Connector Repair
HD-39621-27
SOCKET TERMINAL TOOL
A.1 AMP 1-PLACE CONNECTORS, AMP 1-Place Con-
nector Repair
HD-39621-28
PIN TERMINAL REMOVER
A.1 AMP 1-PLACE CONNECTORS, AMP 1-Place Con-
nector Repair
HD-39965-A
DEUTSCH TERMINAL CRIMP TOOL
A.6 DEUTSCH STANDARD TERMINALS, Deutsch
Standard Terminal Crimps
HD-39969
ULTRA-TORCH UT-100
A.19 SEALED SPLICE CONNECTORS, Sealed Splice
Connector Repair
HD-39978
DVOM
4.8 WIGGLE TEST, Procedure
HD-41182
FUEL PRESSURE GAUGE
4.15 FUEL PRESSURE TEST, Testing
HD-41183
HEAT SHIELD ATTACHMENT
A.19 SEALED SPLICE CONNECTORS, Sealed Splice
Connector Repair
HD-41404-B
HARNESS CONNECTOR
TEST KIT
1.2 STARTING SYSTEM DIAGNOSIS, Diagnostics
HD-41404-B
HARNESS CONNECTOR
TEST KIT
1.7 CHARGING SYSTEM, Testing
HD-41404-B
HARNESS CONNECTOR
TEST KIT
2.4 SPEEDOMETER/TACHOMETER, Diagnostics
HD-41404-B
HARNESS CONNECTOR TEST KIT
2.7 OIL, AIR AND VOLTMETER GAUGES, Oil Pressure
Gauge and Indicator Light
HD-41404-B
HARNESS CONNECTOR TEST KIT
3.15 TSM/HFSM: TURN SIGNAL ERRORS AND
DTCS, Diagnostics
HD-41404-B
HARNESS CONNECTOR
TEST KIT
3.16 DTC B1131, B1132 (HFSM ONLY), Diagnostics
HD-41404-B
HARNESS CONNECTOR
TEST KIT
3.20 DTC B1141 (HFSM ONLY), Diagnostics
HD-41404-B
HARNESS CONNECTOR
TEST KIT
3.22 DTC B1151, B1152, B1153, Diagnostics
HD-41404-B
HARNESS CONNECTOR TEST KIT
4.10 ENGINE CRANKS, BUT WILL NOT START, Dia-
gnostics
HD-41404-B
HARNESS CONNECTOR TEST KIT
4.10 ENGINE CRANKS, BUT WILL NOT START, Dia-
gnostics
I

Tools Used in This Manual
PART NUMBER
TOOL NAME
NOTES
HD-41404-B
HARNESS CONNECTOR
TEST KIT
4.11 NO ECM POWER, Diagnostics
HD-41404-B
HARNESS CONNECTOR
TEST KIT
4.13 FUEL SYSTEM ELECTRICAL TEST, Diagnostics
HD-41404-B
HARNESS CONNECTOR
TEST KIT
4.16 MISFIRE AT IDLE OR UNDER LOAD, Diagnostics
HD-41404-B
HARNESS CONNECTOR TEST KIT
4.17 COMBUSTION ABSENT/INTERMITTENT, Dia-
gnostics
HD-41404-B
HARNESS CONNECTOR
TEST KIT
4.18 DTC P0107, P0108, P0112, P0113, Diagnostics
HD-41404-B
HARNESS CONNECTOR
TEST KIT
4.18 DTC P0107, P0108, P0112, P0113, Diagnostics
HD-41404-B
HARNESS CONNECTOR
TEST KIT
4.19 DTC P0117, P0118, Diagnostics
HD-41404-B
HARNESS CONNECTOR TEST KIT
4.20 DTC P0120, P0122, P0123, P0220, P0222,
P0223, Diagnostics
HD-41404-B
HARNESS CONNECTOR
TEST KIT
4.22 DTC P0261, P0262, P0263, P0264, Diagnostics
HD-41404-B
HARNESS CONNECTOR
TEST KIT
4.23 DTC P0373, P0374, Diagnostics
HD-41404-B
HARNESS CONNECTOR
TEST KIT
4.24 DTC P0444, P0445, Diagnostics
HD-41404-B
HARNESS CONNECTOR
TEST KIT
4.25 DTC P0501, P0502, Diagnostics
HD-41404-B
HARNESS CONNECTOR
TEST KIT
4.28 DTC P0577, Diagnostics
HD-41404-B
HARNESS CONNECTOR
TEST KIT
4.30 DTC P0641, P0651, Diagnostics
HD-41404-B
HARNESS CONNECTOR
TEST KIT
4.33 DTC P1351, P1352, P1354, P1355, Diagnostics
HD-41404-B
HARNESS CONNECTOR
TEST KIT
4.33 DTC P1351, P1352, P1354, P1355, Diagnostics
HD-41404-B
HARNESS CONNECTOR
TEST KIT
4.34 DTC P1475, P1477, P1478, Diagnostics
HD-41404-B
HARNESS CONNECTOR
TEST KIT
4.35 DTC P1501, P1502, Diagnostics
HD-41404-B
HARNESS CONNECTOR
TEST KIT
4.36 DTC P1510, P1511, P1512, Diagnostics
HD-41404-B
HARNESS CONNECTOR
TEST KIT
4.39 DTC P2100, P2101, P2102, P2103, Diagnostics
HD-41404-B
HARNESS CONNECTOR
TEST KIT
4.43 DTC P2122, P2123, P2127, P2128, Diagnostics
HD-41404-B
HARNESS CONNECTOR
TEST KIT
4.44 DTC P2135, P2138, Diagnostics
HD-41404-B
HARNESS CONNECTOR TEST KIT
5.2 RADIO SWITCH DIAGNOSTICS: DTC B2006-
B2015, Diagnostics
HD-41404-B
HARNESS CONNECTOR
TEST KIT
5.4 SERIAL DATA BUS DIAGNOSTICS, Diagnostics
HD-41404-B
HARNESS CONNECTOR TEST KIT
5.5 ADVANCED AUDIO SYSTEM SYMPTOMS, Dia-
gnostics
HD-41404-B
HARNESS CONNECTOR TEST KIT
6.12 DTC C1032, C1034, DTC C1032, C1034: Wheel
Speed Sensor Circuit Open Or Shorted (Front or Rear)
HD-41404-B
HARNESS CONNECTOR TEST KIT
6.15 DTC C1094, DTC C1094: Front Brake Switch Always
On
HD-41404-B
HARNESS CONNECTOR TEST KIT
E.13 TSM/TSSM TURN SIGNAL ERRORS: B1121,
B1122, B1141, Diagnostics
HD-41404-B
HARNESS CONNECTOR
TEST KIT
E.15 DTC B1131, B1132, Diagnostics
HD-41404-B
HARNESS CONNECTOR
TEST KIT
E.18 DTC B1151, B1152, B1153, Diagnostics
HD-41417
PROP
ANE ENRICHMENT KIT
4.9 INTAKE LEAK TEST, Leak Tester
HD-41475
DEUTSCH CONNECTOR SERVICE KIT
A.5 DEUSCH ELECTRICAL CONNECTORS, Deutsch
Connector Repair
HD-41475-100
FLAT BLADE L-HOOK
A.5 DEUSCH ELECTRICAL CONNECTORS, Deutsch
Connector Repair
HD-41609
AMP MULTILOCK CRIMPER
A.2 AMP MULTILOCK CONNECTORS, AMP Multilock
Connector Repair
HD-42682
BREAKOUT BOX
1.2 STARTING SYSTEM DIAGNOSIS, Diagnostics
II TOOLS

Tools Used in This Manual
PART NUMBER
TOOL NAME
NOTES
HD-42682
BREAKOUT BOX
2.2 INITIAL DIAGNOSTIC CHECK: SPEEDOMETER, Ini-
tial Diagnostics
HD-42682
BREAKOUT BOX
2.4 SPEEDOMETER/TACHOMETER, Diagnostics
HD-42682
BREAKOUT BOX
2.5 BREAKOUT BOX: SPEEDOMETER/TACHO-
METER, General
HD-42682
BREAKOUT BOX
2.9 DTC B1004, B1005, Diagnostics
HD-42682
BREAKOUT BOX
2.11 DTC B1008, Diagnostics
HD-42682
BREAKOUT BOX
2.12 DTC U1016, Diagnostics
HD-42682
BREAKOUT BOX
2.13 DTC U1064, U1255, Diagnostics
HD-42682
BREAKOUT BOX
3.3 H-DSSS ACTUATION, Power Disruption and Config-
uring
HD-42682
BREAKOUT BOX
3.10 INITIAL DIAGNOSTIC CHECK: TSM/HFSM, Initial
Diagnostics
HD-42682
BREAKOUT BOX
3.12 BREAKOUT BOX: TSM/HFSM, General
HD-42682
BREAKOUT BOX
3.16 DTC B1131, B1132 (HFSM ONLY), Diagnostics
HD-42682
BREAKOUT BOX
3.17 DTC B1134, Diagnostics
HD-42682
BREAKOUT BOX
3.22 DTC B1151, B1152, B1153, Diagnostics
HD-42682
BREAKOUT BOX
3.23 DTC B1154, B1155, Diagnostics
HD-42682
BREAKOUT BOX
4.46 DTC U1064, Diagnostics
HD-42682
BREAKOUT BOX
E.9 INITIAL DIAGNOSTIC CHECK: TSM/TSSM, Initial
Diagnostics
HD-42682
BREAKOUT BOX
E.11 BREAKOUT BOX: TSM/TSSM, General
HD-42682
BREAKOUT BOX
E.15 DTC B1131, B1132, Diagnostics
HD-42682
BREAKOUT BOX
E.16 DTC B1134, Diagnostics
HD-42682
BREAKOUT BOX
E.18 DTC B1151, B1152, B1153, Diagnostics
HD-42682
BREAKOUT BOX
E.19 DTC B1154, B1155, Diagnostic Notes
HD-42879
ELECTRICAL CRIMPER TOOL
A.8 DEUTSCH SOLID BARREL TERMINALS, Deutsch
Solid Barrel Terminal Crimps
HD-43876
BREAKOUT BOX
2.12 DTC U1016, Diagnostics
HD-43876
BREAKOUT BOX
3.24 DTC U1016, U1255, Diagnostics
HD-43876
BREAKOUT BOX
4.13 FUEL SYSTEM ELECTRICAL TEST, Diagnostics
HD-43876
BREAKOUT BOX
5.4 SERIAL DATA BUS DIAGNOSTICS, Diagnostics
HD-43876
BREAKOUT BOX
E.20 DTC U1016, Diagnostics
HD-44061
FUEL PRESSURE GAUGE ADAPTER
4.15 FUEL PRESSURE TEST, Testing
HD-44687
IGNITION COIL CIRCUIT TEST ADAPTER
4.10 ENGINE CRANKS, BUT WILL NOT START, Dia-
gnostics
HD-44687
IGNITION COIL CIRCUIT
TEST ADAPTER
4.33 DTC P1351, P1352, P1354, P1355, Diagnostics
HD-44750
DIGITAL TECHNICIAN
2.1 CHECKING FOR DIAGNOSTIC TROUBLE
CODES, Code Types
HD-44750
DIGIT
AL TECHNICIAN
3.3 H-DSSS ACTUATION, Sidecar Configuration
HD-44750
DIGIT
AL TECHNICIAN
3.7 SERVICE/EMERGENCY FUNCTIONS, Service Mode
HD-44750
DIGIT
AL TECHNICIAN
3.22 DTC B1151, B1152, B1153, Diagnostics
HD-44750
DIGIT
AL TECHNICIAN
4.2 EFI SYSTEM, General
HD-44750
DIGIT
AL TECHNICIAN
4.15 FUEL PRESSURE TEST, General
TOOLS III

Tools Used in This Manual
PART NUMBER
TOOL NAME
NOTES
HD-44750
DIGITAL TECHNICIAN
6.1 ANTILOCK BRAKE SYSTEM (ABS) GENERAL
INFORMATION, Code Types
HD-44750
DIGITAL TECHNICIAN
E.8 DIAGNOSTIC TROUBLE CODES (DTC), Code
Types
HD-44750
DIGIT
AL TECHNICIAN
E.18 DTC B1151, B1152, B1153, Diagnostics
HD-45928
PACKARD MICRO-64 TERMINAL
A.18 PACKARD MICRO-64 CONNECTORS, Packard
REMOVER
Micro-64 Connector Repair
HD-45929
PACKARD MICRO-64 TERMINAL
A.18 PACKARD MICRO-64 CONNECTORS, Packard
CRIMPER
Micro-64 Connector Repair
HD-46601
INSTRUMENT HARNESS ADAPTERS
2.2 INITIAL DIAGNOSTIC CHECK: SPEEDOMETER, Ini-
tial Diagnostics
HD-46601
INSTRUMENT HARNESS ADAPTERS
2.4 SPEEDOMETER/TACHOMETER, Diagnostics
HD-46601
INSTRUMENT HARNESS ADAPTERS
2.5 BREAKOUT BOX: SPEEDOMETER/TACHO-
METER, General
HD-46601
INSTRUMENT HARNESS ADAPTERS
2.9 DTC B1004, B1005, Diagnostics
HD-46601
INSTRUMENT HARNESS ADAPTERS
2.11 DTC B1008, Diagnostics
HD-46601
INSTRUMENT HARNESS ADAPTERS
2.13 DTC U1064, U1255, Diagnostics
HD-46601
INSTRUMENT HARNESS ADAPTERS
3.10 INITIAL DIAGNOSTIC CHECK: TSM/HFSM, Initial
Diagnostics
HD-46601
INSTRUMENT HARNESS ADAPTERS
4.5 INITIAL DIAGNOSTIC CHECK: EFI, Initial Dia-
gnostics
HD-46601
INSTRUMENT HARNESS ADAPTERS
4.47 DTC U1097, Diagnostics
HD-46601
INSTRUMENT HARNESS ADAPTERS
E.9 INITIAL DIAGNOSTIC CHECK: TSM/TSSM, Initial
Diagnostics
HD-47918
RADIO BREAKOUT BOX
5.2 RADIO SWITCH DIAGNOSTICS: DTC B2006-
B2015, Diagnostics
HD-47918
RADIO BREAKOUT BOX
5.3 RADIO SPEAKER DIAGNOSTICS: DTC B2016-
B2027, Diagnostics
HD-47918
RADIO BREAKOUT BOX
5.5 ADVANCED AUDIO SYSTEM SYMPTOMS, Dia-
gnostics
HD-48037
SWR METER ADAPTER
5.5 ADVANCED AUDIO SYSTEM SYMPTOMS, Dia-
gnostics
HD-48037
SWR METER ADAPTERS
5.5 ADVANCED AUDIO SYSTEM SYMPTOMS, Dia-
gnostics
HD-48053
ADVANCED BATTERY CONDUCTANCE
1.7 CHARGING SYSTEM, Troubleshooting
AND ELECTRICAL SYSTEM ANALYZER
HD-48053
ADVANCED BATTERY CONDUCTANCE
1.7 CHARGING SYSTEM, Testing
AND ELECTRICAL SYSTEM ANALYZER
HD-48114
MOLEX ELECTRICAL CONNECTOR
TER-
A.16 MOLEX CONNECTORS, Molex Connector Repair
MINAL REMOVER
HD-48637
BREAKOUT BOX
4.5 INITIAL DIAGNOSTIC CHECK: EFI, Initial Dia-
gnostics
HD-48637
BREAKOUT BOX
4.7 BREAKOUT BOX: EFI, General
HD-48637
BREAKOUT BOX
4.8 WIGGLE TEST, Procedure
HD-48637
BREAKOUT BOX
4.10 ENGINE CRANKS, BUT WILL NOT START, Dia-
gnostics
HD-48637
BREAKOUT BOX
4.11 NO ECM POWER, Diagnostics
IV TOOLS

Tools Used in This Manual
PART NUMBER
TOOL NAME
NOTES
HD-48637
BREAKOUT BOX
4.14 SYSTEM RELAY FAULT, Diagnostics
HD-48637
BREAKOUT BOX
4.16 MISFIRE AT IDLE OR UNDER LOAD, Diagnostics
HD-48637
BREAKOUT BOX
4.17 COMBUSTION ABSENT/INTERMITTENT, Dia-
gnostics
HD-48637
BREAKOUT BOX
4.18 DTC P0107, P0108, P0112, P0113, Diagnostics
HD-48637
BREAKOUT BOX
4.18 DTC P0107, P0108, P0112, P0113, Diagnostics
HD-48637
BREAKOUT BOX
4.19 DTC P0117, P0118, Diagnostics
HD-48637
BREAKOUT BOX
4.20 DTC P0120, P0122, P0123, P0220, P0222,
P0223, Diagnostics
HD-48637
BREAKOUT BOX
4.21 DTC P0131, P0132, P0134, P0151, P0152,
P0154, Diagnostics
HD-48637
BREAKOUT BOX
4.22 DTC P0261, P0262, P0263, P0264, Diagnostics
HD-48637
BREAKOUT BOX
4.24 DTC P0444, P0445, Diagnostics
HD-48637
BREAKOUT BOX
4.25 DTC P0501, P0502, Diagnostics
HD-48637
BREAKOUT BOX
4.30 DTC P0641, P0651, Diagnostics
HD-48637
BREAKOUT BOX
4.31 DTC P1009, P1010, Diagnostics
HD-48637
BREAKOUT BOX
4.33 DTC P1351, P1352, P1354, P1355, Diagnostics
HD-48637
BREAKOUT BOX
4.34 DTC P1475, P1477, P1478, Diagnostics
HD-48637
BREAKOUT BOX
4.35 DTC P1501, P1502, Diagnostics
HD-48637
BREAKOUT BOX
4.36 DTC P1510, P1511, P1512, Diagnostics
HD-48637
BREAKOUT BOX
4.39 DTC P2100, P2101, P2102, P2103, Diagnostics
HD-48637
BREAKOUT BOX
4.43 DTC P2122, P2123, P2127, P2128, Diagnostics
HD-48637
BREAKOUT BOX
4.44 DTC P2135, P2138, Diagnostics
HD-48637
BREAKOUT BOX
4.46 DTC U1064, Diagnostics
HD-48637
BREAKOUT BOX
4.47 DTC U1097, Diagnostics
HD-48642
BREAKOUT BOX
6.3 BREAKOUT BOX: ABS, General
HD-48642
BREAKOUT BOX
6.12 DTC C1032, C1034, DTC C1032, C1034: Wheel
Speed Sensor Circuit Open Or Shorted (Front or Rear)
TT600-3
SNAP-ON PICK
A.13 630 METRI-PACK CONNECTORS, 630 Metri-Pack
Connector Repair
TOOLS V
DTC P0605
4-145
1
Job/Time Code Values
1-3
150 Metri-Pack Connector
Diagnostic Trouble Code Types
2-3
Repair
A-20
Diagnostic Trouble Code Types
6-3
Current
2-3
2
Current
6-3
280 Metri-Pack Connector
Historic
2-3
Repair
A-22
Historic
6-3
4
Retreiving Diagnostic Trouble Codes
2-3
DTC B0563: Battery Voltage High
3-30
480 Metri-Pack Connector
DTC B0563 Battery Voltage High
E-44
Repair
A-24
DTC B1006 Accessory Line Overvoltage
2-28
6
DTC B1007 Ignition Line Overvoltage
2-28
DTC B1121, B1122, B1141 Turn Signals Will Not Flash, 4-Way
630 Metri-Pack Connector
Flashers Inoperable
3-31
Repair
A-25
DTC B1123 Left Turn Signal Short-to-Ground
3-31
A
DTC B1124 Right Turn Signal Short-to-Ground
3-31
ABS Diode Pack
6-1
DTC B1125 Left Turn Signal Short-to-Voltage
3-31
ABS Indicator
6-2
DTC B1126 Right Turn Signal Short-to-Voltage
3-31
Ambient Air Temperature Gauge
DTC B1131 Alarm Output Low
3-47
Problem
2-18
DTC B1131 Alarm Output Low
E-45
AMP 1-Place Connector
DTC B1132 Alarm Output High
3-47
Repair
A-1
DTC B1132 Alarm Output High
E-45
AMP Multilock Connector
DTC B1135 Accelerometer Fault
3-53
Repair
A-3
DTC B1135 Accelerometer Fault
E-51
Antilock Brake System (ABS) Description
6-1
DTC B1136 Accelerometer Tip-Over Self-Test Fault
3-54
DTC B1142 Internal Fault
3-54
B
DTC B1143 Security Antenna Short-to-Ground
3-61
Bank Angle Sensor
3-1
DTC B1144 Security Antenna Short-to-Battery
3-61
Bank Angle Sensor
E-3
DTC B1145 Security Antenna Open
3-61
Battery Testing
1-26
DTC C0562: Device Voltage Low
6-17
Conductance Test
1-26
DTC C0563: Device Voltage High
6-20
Load Test
1-26
DTC C1014, C1055-C1066, C1118, C1121: ECU Internal
Voltmeter Test
1-26
Fault
6-75
DTC C1017: Pump Motor Power Circuit Open Fault
6-23
C
DTC C1018: Pump Motor Ground High Resistance Fault. 6-27
Changing the Pin
DTC C1021, C1023: Wheel Speed Sensor Equals Zero (Front
Modifying an Existing Pin
3-6
or Rear)
6-31
Check Engine Lamp
2-1
DTC C1025, C1027, C1206, C1208: Wheel Speed Signal
Check Engine Lamp
4-7
Intermittent or Frequency Out Of Range
6-34
Code Types
DTC C1032, C1034: Wheel Speed Sensor Circuit Open Or
Current
4-9
Shorted (Front or Rear)
6-37
Connector Locations
B-1
DTC C1042: Pump Motor Open
6-43
Conversions
DTC C1043: Pump Motor Stalled
6-44
Fluid
C-2
DTC C1094: Front Brake Switch Always On
6-45
Length
C-1
DTC C1095: Front Brake Switch Open
6-49
Torque
C-3
DTC C1151: Front Wheel Release Too Long
6-53
Cruise Control
DTC C1153: Rear Wheel Release Too Long
6-56
Cruise Inoperative Diagnostics
4-143
DTC C1158: Calibration Programming Required
6-59
System Operation
4-136
DTC C1212: Front or Rear Brake Not Applied with Decel. 6-63
Cruise Disenage Causes
DTC C1214: Rear Brake Switch Always On
6-67
DISENGAGE Request
4-144
DTC C1216: Rear Brake Switch Open
6-71
Cruise Disengage Causes
DTC U1300 Serail Data Low
E-66
OFF Request
4-144
DTC U1301 Serial Data Open/High
E-66
D
E
Delphi Connector
Electronic Control Unit (ECU)
6-1
Repair
A-8
F
Deutsch 1-Place Connector
Repair
A-10
Fluid Conversions
C-2
Deutsch Connector
Front Wheel Speed Sensor
6-1
Crimping Mini Terminals
A-16
Fuel Gauge
Crimping Solid Barrel Terminals
A-17
Fuel Gauge and Sender Test
2-17
Crimping Standard Terminals
A-15
Fuse Block Repair
A-19
Repair
A-11
G
Diagnostics
Diagnostic Notes
3-47
General
DTC P0603
4-145
Alternator
1-18
IX
Battery Voltage
4-123
S
Diagnostic Trouble Codes U1300, U1301, or BUS
ER
4-38
Sealed Splice
A-37
ECM Failure
4-145
Security Lamp
E-14
ET Sensor
4-85
Security System Functions (TSSM Only)
E-11
Fuel Injectors
4-102
Service Bulletins
I-I
IAT Signal
4-77
Service Preparation
I-I
Ignition Coil
4-160
Sidecar Configuration
E-5
Loss of ECM Serial Data
2-32
Siren
3-10
MAP Signal
4-77
Siren Battery
3-82
Misfire at Idle or Under Load
4-66
Siren Battery
E-69
No Spark/No Check Engine Lamp at Key On
4-33
Smart Security System
Oxygen Sensor
4-96
Transport Mode
3-11
Password Problem
4-152
SPX Kent-Moore
I-II
Serial Data Low or Serial Data Open/High
2-42
Starter Activation Circuits
1-14
System Relay
4-52
Starter Free Running Current Draw Test
1-16
Trip Odometer Reset Switch
2-13
Starter Solenoid
Trip Odometer Reset Switch Closed
2-30
Solenoid Hold-In Test
1-16
Voltage Regulator
1-18
Solenoid Pull-In Test
1-16
Glossary
Solenoid Return Test
1-17
Acronyms and Abbreviations
D-1
T
H
Testing
Hands-Free Fob Battery
3-82
AC Output Check
1-25
Hands-Free Security Module (HFSM)
3-2
Milliampere Draw Test
1-22
Hydraulic Control Unit (HCU)
6-1
Stator Check
1-24
Total Current Draw Test
1-22
I
Torque Conversion
C-3
Intake Leak Test
4-24
Trademarks
Harley-Davidson
I-II
K
Referenced Products
I-II
Key Fob Assignment:TSSM
E-5
Troubleshooting
Key Fob Battery
E-69
Battery
1-18
TSM/HFSM: Password Learn
3-81
L
TSM/TSSM: Password Learn
E-67
Leak Tester
Turn Signal Functions
Parts List
4-24
4-Way Flashing
E-9
Tester Assembly
4-24
Automatic Cancellation
E-9
Loctite
I-II
Manual Cancellation
E-9
M
Turn Signal Module
3-1
Turn Signal Module
E-3
Maxi-Fuse Housing
Turn Signal Security Module
E-3
Repair
A-26
Metric System
C-2
V
Metri-Pack Terminals
Voltmeter Gauge
Crimping
A-28
Problem
2-18
Molex Connector
Repair
A-30
W
Wiggle Test
4-23
O
Wiring Diagrams
B-18
Oil Pressure Gauge and Indicator
WOW Test
2-11
Problem
2-18
P
Packard 100W Connector
Repair
A-32
Packard Micro-64 Connector
Repair
A-34
Personal Identification Number (PIN)
3-6
PIN Entry:TSSM
E-6
R
Rear Wheel Speed Sensor
6-1
X INDEX