Harley Davidson Sportster Models 2009. Service Repair Manual - page 43
1.6
TESTING STARTER ON BENCH
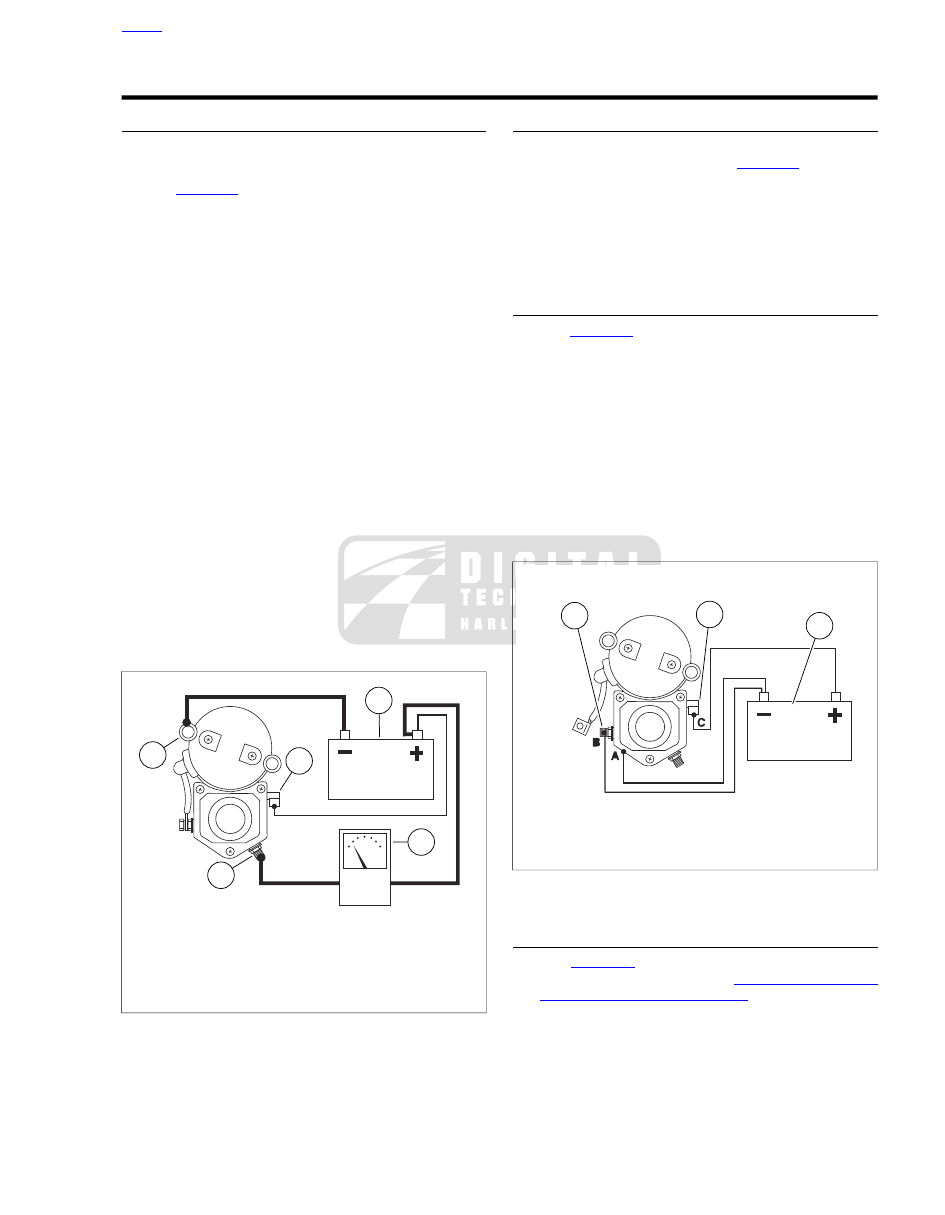
FREE RUNNING CURRENT DRAW TEST
1.
Place starter in vise, using a clean shop towel to prevent
scratches or other damage.
2.
. Attach one heavy jumper cable (6 gauge
minimum).
a.
Connect one end to the starter mounting flange.
b.
Connect the other end to the negative (-) terminal of
a fully charged battery.
3.
Connect a second heavy jumper cable (6 gauge minimum).
a.
Connect one end to the positive (+) terminal of the
battery.
b.
Connect the other end to the battery terminal on the
starter solenoid. Place an induction ammeter over
cable.
4.
Connect a smaller jumper cable (14 gauge minimum).
a.
Connect one end to the positive (+) terminal of the
battery.
b.
Connect the other end to the solenoid relay terminal.
5.
Check ammeter reading.
a.
Ammeter should show 90 amps maximum.
b.
If reading is higher, disassemble starter for inspection.
See the service manual.
c.
If starter current draw on vehicle was over 200 amps,
and this test was within specification, there may be a
problem with engine or primary drive.
2
3
4
5
1
ed02794
1.
Mounting flange
2.
Battery
3.
Induction ammeter
4.
Battery terminal
5.
Relay terminal
Figure 1-7. Free Running Current Draw Test
STARTER SOLENOID
Do not disassemble solenoid. Before testing, disconnect field
wire from motor terminal as shown in
Each test should be performed for only 3-5 seconds to prevent
damage to solenoid.
The solenoid Pull-in, Hold-in, and Return tests must be per-
formed together in one continuous operation. Conduct all three
tests one after the other in the sequence given without interrup-
tion.
SOLENOID PULL-IN TEST
1.
See
. Using a 12 volt battery, connect three
separate test leads as follows:
a.
Solenoid housing to negative battery post.
b.
Solenoid motor terminal to negative battery post.
c.
Solenoid relay terminal to positive battery post.
2.
Observe starter shaft.
a.
If starter shaft extends strongly, solenoid is working
properly.
b.
If starter shaft does not extend strongly, replace the
solenoid.
2
3
1
ed02795
1.
Motor terminal
2.
Relay terminal
3.
Battery
Figure 1-8. Pull-In Test
SOLENOID HOLD-IN TEST
1.
See
. With test leads still connected in the
manner specified in the previous
ON BENCH, Solenoid Pull-In Test
motor terminal/battery negative test lead at negative bat-
tery post only; reconnect loose end of this test lead to
positive battery post instead.
2009 Sportster Diagnostics: Starting / Charging 1-15