Harley Davidson Sportster Models 2009. Service Repair Manual - page 32
4.
Inspect the fuel tank for leaks or other damage. If a dam-
aged fuel tank cannot be successfully repaired, replace
it.
ASSEMBLE FUEL TANK
When servicing the fuel system, do not smoke or allow
open flame or sparks in the vicinity. Gasoline is extremely
flammable and highly explosive, which could result in
death or serious injury. (00330a)
1.
. Install O-ring (5) on top ring (4). Ensure
it is seated properly.
2.
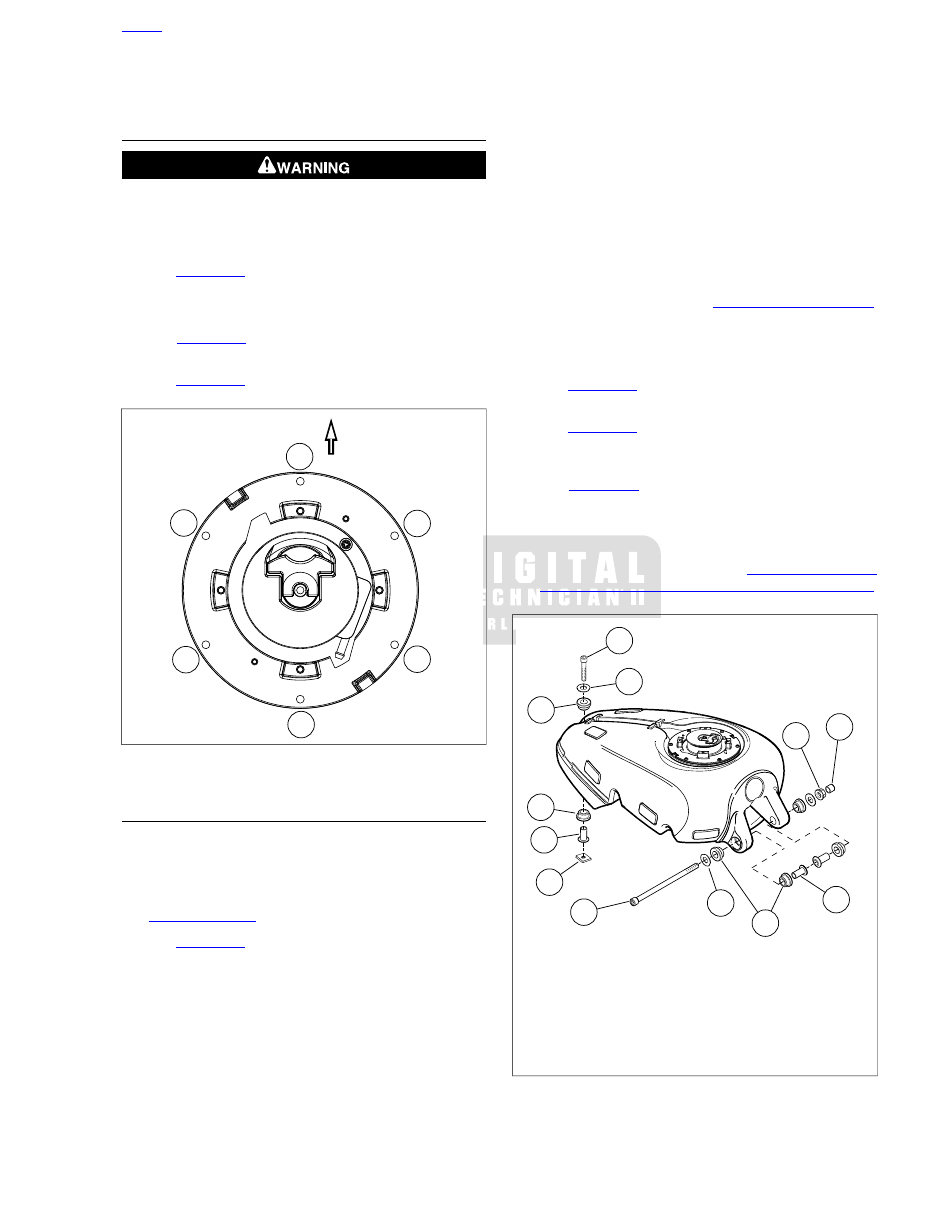
Install top ring and clamp ring with screws (7).
3.
See
. Tighten screws in the sequence shown
to 40-45 in-lbs (4.5-5.1 Nm).
4.
. Install filler cap (1) with O-ring (2).
2
1
6
4
3
5
sm05461
Figure 4-25. Filler Housing Torque Sequence
INSTALLING FUEL TANK
NOTE
Be sure that wiring harnesses do not get pinched between fuel
tank and frame during tank installation.
1.
Install fuel pump into fuel tank using new gasket. See
2.
See
. Install rubber grommets (3) in both front
mounting holes of fuel tank. Insert metal bushings (4) into
rubber grommets, oriented as shown. Make certain clip
nut (5) is installed on frame bracket.
3.
Position fuel tank on motorcycle. Make certain that ignition
coil bracket is positioned between tank mount and frame
and that airbox mounting brackets are correctly mated.
4.
Insert screw (6) with washer (2) through fuel tank front
mounting brackets and vehicle frame. Install remaining
washer and lock nut (7) on other end of screw. Do not
tighten at this time.
5.
Secure pump harness to main harness retainer located
under fuel tank.
6.
Make certain metal bushing (4) is located inside rear lower
rubber grommet (3) of fuel tank. Install screw (1), washer
(2), and upper grommet (3) and thread into clip nut (5).
Tighten to 15-20 ft-lbs (20.3-27.1 Nm).
7.
Tighten front screw (6) and nut (7) to 15-20 ft-lbs (20.3-
27.1 Nm).
NOTE
Be sure airbox grommet is securely installed on induction
module and airbox opening. See
An improperly seated grommet could lead to accelerated engine
wear.
8.
Secure airbox to brackets on bottom of fuel tank.
9.
See
. Secure throttle cables to bottom of fuel
tank using a new loop retainer.
10. See
. Connect vent hose (3) and ground wire
(5) as shown. Route ground wire and vent hose in trough
in top of tank.
11. See
. Install fuel tank cover and secure with
four screws (1). Tighten screws to 24-30 in-lbs (2.7-3.4
Nm).
12. Connect fuel pump connector [141].
13. Connect fuel supply fitting. See
MODELS, Reconnecting Fuel Hose and Filling Fuel Tank
4
3
3
5
6
2
3
4
7
8
1
2
sm05411
1.
Rear screw
2.
Washer (3)
3.
Rubber grommet (6)
4.
Metal bushing
5.
Clip nut
6.
Front screw
7.
Locknut
8.
Cap
Figure 4-26. Fuel Tank Mounting
2009 Sportster Service: Fuel System 4-19