Harley Davidson 2008 Touring Models. Service Manual - page 22
 

  Главная      Harley Davidson     Harley Davidson 2008 Touring Models. Service Manual


Search            copyright infringement  


Content      ..     20      21      22      23     ..


Harley Davidson 2008 Touring Models. Service Manual - page 22


NOTE

Lubricate oil pump parts with clean H-D 20W50 motor oil
during assembly.

d.

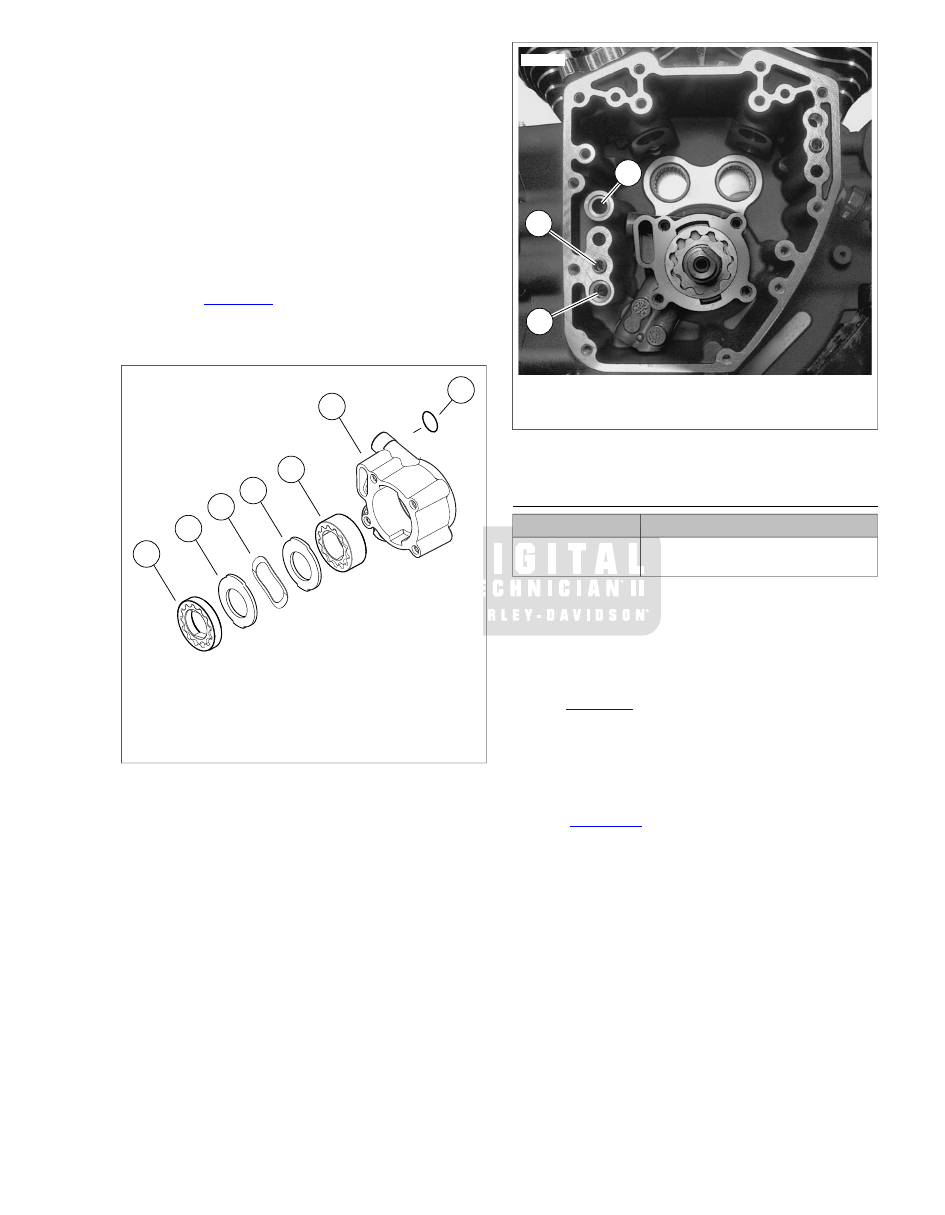
Fit the smaller of the wide gerotor gears into the
larger. Slide the wide gerotor set (4) down the crank-
shaft until it bottoms in the oil pump housing.

e.

Slide inside separator plate (2) down the crankshaft
until it contacts the wide gerotor set (4). Install wave
washer (3) and outside separator plate (2).

f.

Fit the smaller of the narrow gerotor gears into the
larger. Slide the narrow gerotor set (1) down the
crankshaft until it contacts the outside separator plate
(2).

g.

See 

Figure 3-59

. Apply a very thin film of clean H-D

20W50 engine oil to new o-ring (3) for crankcase
post. Install new o-ring in groove on crankcase post.

1

6

2

3

2

4

5

sm02187

1.

Narrow gerotor set (feed)

2.

Separator plate

3.

Wave washer

4.

Wide gerotor set (scavenge)

5.

Oil pump housing

6.

Scavenge port O-ring

Figure 3-58. Assembling Oil Pump

3

2

1

sm02414

1.

Oil feed hole O-ring

2.

Rear ring dowel

3.

O-ring on crankcase post

Figure 3-59. Oil Feed Hole

COVER AND CAM SUPPORT PLATE

TOOL NAME

PART NUMBER

CRANKSHAFT/CAMSHAFT
SPROCKET LOCKING TOOL

HD-47941

NOTE

O-rings that are missing, distorted, pinched or otherwise dam-
aged will result in either oil leakage or low oil pressure. Use of
the wrong o-ring will have the same results. Since many o-rings
are similar in size and appearance, always use new o-rings
keeping them packaged until use to avoid confusion.

1.

See 

Figure 3-59

. Apply a very thin film of clean H-D 20W50

engine oil to new o-ring (1) for crankcase flange. Install
new o-ring in groove around oil feed hole directly below
rear ring dowel (2).

2.

Lubricate cam needle bearings with clean H-D 20W50
engine oil.

3.

See 

Figure 3-60

. Using a straightedge, verify that the

timing marks on the ends of the front and rear camshafts
are in alignment. If necessary, rotate camshafts in order
to make this observation.

2008 Touring Service:  Engine  3-49

2

1

3

sm02300

1.

Rear camshaft

2.

Front camshaft

3.

Timing marks

Figure 3-60. Verify Alignment of Timing Marks

4.

Aligning bushing in cam support plate with end of crank-
shaft, slide cam support plate over crankshaft onto two
ring dowels in crankcase flange. Use a rubber mallet to
fully seat cam support plate on ring dowels.

5.

See 

Figure 3-61

. Install cam support plate screws.

a.

Loosely install the six screws (1/4 x 1.0 in.) to secure
the cam support plate to the crankcase flange.

b.

Tighten screws to 90-120 in-lbs (10.2-13.6 Nm) in
the sequence shown.

6.

See 

Figure 3-62

. Install oil pump.

a.

Start four screws (1/4 x 1.0 in.) to secure oil pump.

NOTE

For methods of engine rotation, see 

3.15 TOP END

OVERHAUL: DISASSEMBLY, Rocker Arm Support Plate

.

b.

While rotating the engine, enabling the pump to find
its natural center, alternately tighten screws (1 and
2) until snug.

c.

Tighten the screws (3 and 4) until snug.

d.

Tighten all four screws to 40-45 in-lbs (4.5-5.1 Nm)
in sequence shown.

e.

Final tighten all four screws to 90-120 in-lbs (10.2-
13.6 Nm) in the sequence shown. Numbers cast
adjacent to the bolt holes also indicate the oil pump
torque sequence.

7.

With the lettering facing inboard, install rear cam sprocket
spacer onto the rear camshaft.

4

2

6

3

5

1

sm02404

Figure 3-61. Cam Support Plate Torque Sequence

4

2

1

3

sm02185

Figure 3-62. Oil Pump Torque Sequence

8.

If using the original cam support plate, camshafts, primary
cam sprocket, crank sprocket and flywheel assembly, then
move to next step. However, if any of these parts have
been replaced, then proceed as follows:

a.

Install primary cam sprocket onto splines of rear
camshaft. Install long flange bolt with thicker flat
washer to secure sprocket to end of camshaft.

b.

Install crank sprocket onto crankshaft. Install short
flange bolt with a temporary smaller diameter flat
washer from bulk inventory.

3-50  2008 Touring Service:  Engine

9.

See 

Figure 3-65

. Apply a light amount of clean H-D 20W50

oil to splines on rear cam. Install the primary cam chain
and sprocket assembly.

a.

Place the rear cam sprocket (2) in the primary chain.
Hold the sprocket allowing the chain to hang loose.
Rotate the sprocket so that the timing mark on the
sprocket root faces straight downward.

NOTE

To maintain the original direction of rotation, verify that
the colored mark placed on the chain link (7) and crank
sprocket (4) is visible during installation.

b.

Place the crank sprocket (4) in the opposite end of
the chain with the timing mark on the sprocket tooth
facing straight upward (directly toward the cam
sprocket timing mark).

c.

Maintaining the position of the sprockets on the chain
with the timing marks in alignment, start the rear cam
sprocket onto the end of the rear camshaft. Note that
the sprocket has an integral key that must be aligned
with the keyway in the camshaft.

d.

Maintaining the position of the crank sprocket on the
chain, rotate the rear cam sprocket in a clockwise
direction until the flat on the crank sprocket is aligned
with the flat on the crankshaft. Install the crank
sprocket.

10. Rotate the rear cam sprocket in a clockwise direction until

the timing mark on the root is aligned with the timing mark
on the crank sprocket tooth. Locate alignment mark (5)
on cam support plate to verify that the timing marks are
in alignment.

NOTES

If the timing marks are not in alignment, then the sprockets
must be removed and reinstalled. Misaligned sprockets
will make the engine run erratically.

Rear sprocket bolt and crank sprocket bolt must install
freely by hand. Before installing bolts, remove any build-
up of LOCTITE THREADLOCKER from the bolt holes with
the proper sized thread chaser.

Both crank and rear cam sprocket flange bolts are specially
hardened while the flat washers are of a special diameter.
Use only genuine Harley-Davidson parts when replace-
ment is necessary. If new flange bolts are not available,
thoroughly clean both internal and external threads and
apply a small amount LOCTITE THREADLOCKER 262
(red) before installation. The crank and rear cam sprocket
flange bolts and flat washers are not interchangeable.

11. Apply oil to bottom of new crank flange bolt head and

washer (3). Loosely install to secure crank sprocket (4) to
end of crankshaft.

12. Apply oil to bottom of new rear cam sprocket bolt head

and washer (1). Loosely install to secure rear cam sprocket
(2) to end of camshaft.

13. Position the CRANKSHAFT/CAMSHAFT SPROCKET

LOCKING TOOL (Part No. HD-47941) between the crank
and rear cam sprockets to prevent rotation. The handle

of the tool is stamped "Crank" and "Cam" to ensure proper
orientation.

a.

Tighten both sprocket bolts (1, 3) to 15 ft-lbs (20.3
Nm).

b.

Loosen both bolts one revolution (360 degrees).

c.

Final tighten the rear cam sprocket bolt (1) to 34 ft-
lbs (46.1 Nm).

d.

Final tighten the crank sprocket bolt (3) to 24 ft-
lbs (32.5 Nm).

e.

Remove the sprocket locking tool.

14. Install primary cam chain tensioner. Tighten fasteners to

100-120 in-lbs (11.3-13.6 Nm).

15. Apply clean H-D 20W50 engine oil to crank and rear cam

sprockets.

16. See 

Figure 3-66

. Align holes in new cam cover gasket

with those in the crankcase flange.

4

6

7

3

5

2

1

sm02423

1.

Rear cam sprocket bolt (large) and flat washer

2.

Rear cam sprocket

3.

Crank sprocket bolt (small) and flat washer

4.

Crank sprocket

5.

Alignment mark on support plate

6.

Primary chain tensioner

7.

Marked link

Figure 3-65. Primary Chain and Sprockets

3-52  2008 Touring Service:  Engine

sm02425

Figure 3-66. Cam Cover Gasket

NOTE

Before installing cam cover, verify cleanliness of blind holes in
the crankcase flange. Tightening a screw with dirt, water or oil
in the hole can cause the casting to crack or break. Damage
to the casting requires replacement of the right crankcase half.

17. See 

Figure 3-65

. Install the cam cover using ten allen head

socket screws (1/4 x 1-1/4 in.). Following the sequence
shown, alternately tighten the screws to 125-155 in-
lbs
 (14.1-17.5 Nm). If cam cover assembly was completely
removed continue as follows.

18. Complete motorcycle assembly.

a.

If engine was completely overhauled, see 

3.16 TOP

END OVERHAUL: ASSEMBLY

. Perform all steps.

b.

If only cam compartment components were serviced,
install push rod covers, push rods, rocker arm support
plate and breather assembly. See appropriate topics
under 

3.16 TOP END OVERHAUL: ASSEMBLY

.

6

1

5

8

7

4

9

10

2

3

sm02183

Figure 3-67. Cam Cover Screws

2008 Touring Service:  Engine  3-53

3.19

BREATHER ASSEMBLY

REMOVAL OVERVIEW

To remove breather assembly, see 

3.15 TOP END OVER-

HAUL: DISASSEMBLY

.

DISASSEMBLY

1.

See 

Figure 3-68

. Remove two fasteners (1) from the

breather assembly cover (2) and remove breather
assembly from rocker arm support plate (8).

2.

Remove the breather cover and cover gasket (3). Discard
gasket. Remove breather baffle (5) and breather baffle
gasket (7). Discard gasket. Pull filter element (6) from bore
on underside of breather baffle. Pull umbrella valve (4)
from hole at top of breather baffle. Discard both filter ele-
ment and umbrella valve.

CLEANING AND INSPECTION

Compressed air can pierce the skin and flying debris from
compressed air could cause serious eye injury. Wear
safety glasses when working with compressed air. Never
use your hand to check for air leaks or to determine air
flow rates. (00061a)

1.

Clean all parts in a non-volatile cleaning solution or
solvent. Blow parts dry with low pressure compressed air.

2.

See 

Figure 3-68

. Set a straightedge diagonally across the

length of the breather cover (2) intersecting the opposite
corners of the gasket surface. Slide a feeler gauge beneath
the straightedge to check the breather cover for warpage.
Repeat the step checking the opposite diagonal. Discard
the breather cover if any low spot exceeds  0.005 in. (0.13
mm).

3.

Using method outlined in previous step, inspect the
breather baffle (5) gasket surface for flatness. Discard the
breather baffle if any low spot exceeds  0.005 in. (0.13
mm).

ASSEMBLY

1.

See 

Figure 3-68

. Insert stem of new umbrella valve (4)

through center hole at top of breather baffle (5). Carefully
pull rubber bead on stem through hole in baffle. Use
denatured alcohol or glass cleaner to lubricate stem, if
necessary. Verify that rubber bead is pulled completely
through hole and resides on bottom side of baffle.

2.

Press new filter element (6) into bore at bottom of baffle.
Hole in filter element accommodates umbrella valve stem.

3.

Place breather baffle gasket (7) on a clean flat surface.

a.

Aligning holes, place breather baffle (5), cover gasket
(3) and breather cover (2) on top of breather baffle
gasket.

b.

Slide two fasteners (1) through stackup to keep
assembly together until time of installation.

5

3

2

7

8

6

4

1

sm02429

1.

Fasteners (2)

2.

Breather cover

3.

Cover gasket

4.

Umbrella valve

5.

Breather baffle

6.

Filter element

7.

Breather baffle gasket

8.

Rocker arm support plate

Figure 3-68. Breather Assembly

INSTALLATION OVERVIEW

See 

3.16 TOP END OVERHAUL: ASSEMBLY, Breather

Assembly

.

1.

Install breather assembly.

2.

Continue with vehicle assembly as directed.

3-54  2008 Touring Service:  Engine

3.20

ROCKER ARM SUPPORT PLATE

REMOVAL OVERVIEW

See 

3.15 TOP END OVERHAUL: DISASSEMBLY

.

1.

Remove breather assembly.

2.

Remove rocker arm support plate.

DISASSEMBLY

1.

See 

Figure 3-69

. Remove four bolts with flat washers (1)

from the rocker arm support plate (5). The rocker arm
shafts (4) on the push rod side (right) are notched to lock
them in position.

2.

Using a hammer and brass drift, tap left side of rocker arm
shafts (4) so that the notched ends exit the rocker arm
support plate (5) first. Mark the shafts so that they are
installed in their original locations at time of assembly.

3.

Remove the rocker arms from the rocker arm support
plate. Mark the rocker arms to indicate location.

CLEANING AND INSPECTION

TOOL NAME

PART NUMBER

ROCKER ARM BUSHING REAMER

HD-94804-57

Inspection

Compressed air can pierce the skin and flying debris from
compressed air could cause serious eye injury. Wear
safety glasses when working with compressed air. Never
use your hand to check for air leaks or to determine air
flow rates. (00061a)

1.

Clean all parts in a non-volatile cleaning solution or
solvent. Blow parts dry with low pressure compressed air.

2.

See 

Figure 3-69

. Check rocker arms (3) for uneven wear

or pitting where contact is made with the valve stem tips.
Check for concave wear where rocker arms contact the
push rod ends. Replace rocker arm if excessive wear is
found at either location.

3.

Verify that oil holes in rocker arms and rocker arm support
plate (5) are clean and open.

4.

Inspect rocker arm shafts (4) for scratches, burrs, scoring
or excessive wear. Replace as necessary.

6

5

1

2

3

4

sm02298

1.

Bolt with flat washer

2.

Rocker arm bushings

3.

Rocker arm

4.

Rocker arm shaft

5.

Rocker arm support plate

6.

Notch

Figure 3-69. Rocker Arm Assembly

Rocker Shaft Fit

1.

See 

Figure 3-70

. Measure the inside diameter of the rocker

arm support plate bore.

2.

See 

Figure 3-71

. Measure the outside diameter of the

rocker arm shaft where it fits in the bore.

3.

Repeat the measurement on opposite side of support plate
and shaft. Replace shaft or support plate if clearance
equals or exceeds  0.0035 in. (0.089 mm).

sm02431

Figure 3-70. Checking Support Plate Bore

2008 Touring Service:  Engine  3-55

sm02432

Figure 3-71. Checking Shaft to Support Plate Fit

Rocker Arm Shaft to Bushing

1.

Check rocker arm shaft to bushing fit.

a.

See 

Figure 3-72

. Measure the inside diameter of the

rocker arm bushing.

b.

See 

Figure 3-73

. Measure the outside diameter of

the rocker arm shaft where it rides in the bushing.

2.

Repeat measurement on opposite side of rocker arm and
shaft. Replace shaft or bushings if clearance equals or
exceeds service wear limit of  0.0035 in. (0.089 mm).

sm02433

Figure 3-72. Checking Bushings

sm02434

Figure 3-73. Checking Shaft to Bushing Fit

Replace Rocker Arm Bushings

NOTE

Bushing replacement and reaming must be done one at a time
to ensure proper alignment. Follow all steps for one bushing
and then repeat for the other bushing.

1.

See 

Figure 3-74

Turn a 9/16"-18 tap (2) into bushing until

tight. Place rocker arm under ram of arbor press with tap
at bottom. Slide a discarded rocker arm shaft (1) through
open end of rocker arm until contact is made with tap.
Using shaft as driver (and untapped bushing as pilot),
press against shaft until both tap and bushing are free.

2.

See 

Figure 3-75

. Using a suitable driver, press new

bushing into side of rocker arm until flush with casting. Be
sure to orient bushing so that split line faces top of rocker
arm.

NOTE

Never back reamer out of rocker arm or new bushing will be
damaged.

3.

See 

Figure 3-76

. Lock rocker arm in a vise using brass

jaw inserts or shop towels to prevent casting damage.
Insert tapered end of ROCKER ARM BUSHING
REAMER (Part No. HD-94804-57) into old bushing in
rocker arm. Note that old bushing on drive side of reamer
as pilot. Rotate reamer until the new bushing on the far
side is reamed, and then continuing in the same direction,
draw drive side of reamer from new bushing.

4.

Repeat steps to remove, install and ream second bushing.

3-56  2008 Touring Service:  Engine

2

1

sm02437

1.

Discarded shaft used as driver

2.

Tap

Figure 3-74. Removing Bushing

1

sm02438

1.

Driver

Figure 3-75. Installing Bushing

1

sm02487

1.

Reamer

Figure 3-76. Ream Bushing

ASSEMBLY

1.

Place the rocker arms into position on the rocker arm
support plate.

2.

Push the un-notched ends of the rocker arm shafts into
the right side of the support plate and then into the rocker
arms. As they approach their fully installed positions, rotate
the shafts so that the notches are aligned with the bolt
holes in the support plate.

3.

See 

Figure 3-77

. Check for proper end play.

a.

Insert a feeler gauge between the rocker arm and
support plate.

b.

Repeat measurement on other rocker arm.

c.

Replace the rocker arm, rocker arm support plate or
both if end play exceeds  0.025 in. (0.635 mm).

4.

Install the four bolts with flat washers in the rocker arm
support plate. Remember that the two bolts on the push
rod side (right) must engage the notches in the rocker arm
shafts for proper assembly.

sm02488

Figure 3-77. Check End Play

INSTALLATION OVERVIEW

See 

3.16 TOP END OVERHAUL: ASSEMBLY

.

1.

Install rocker arm support plate.

2008 Touring Service:  Engine  3-57

2.

Install breather assembly.

3.

Continue with vehicle assembly as directed.

3-58  2008 Touring Service:  Engine

3.21

PUSH RODS, LIFTERS AND COVERS

REMOVAL OVERVIEW

See 

3.15 TOP END OVERHAUL: DISASSEMBLY

.

1.

Remove breather assembly.

2.

Remove rocker arm support plate.

3.

Remove push rods, lifters and covers.

DISASSEMBLY

See 

Figure 3-78

. With the exception of the lifter covers, all

parts should have been disassembled and marked during the
removal procedure. Disassemble the lifter covers as follows:

1.

Separate upper (2) and lower push rod covers (8).

2.

Remove o-ring (9) from seat at bottom of lower push rod
cover. Discard o-ring.

3.

Remove o-ring (1) from seat at top of upper push rod
cover. Slide o-ring (7), flat washer (6), spring (5) and spring
cap (4) from body of upper push rod cover (2). Discard o-
rings.

CLEANING AND INSPECTION

1.

See 

Figure 3-78

. Scrape old gasket material from the lifter

cover (11) flange. Old gasket material left on mating sur-
faces will cause leaks.

2.

With the exception of the hydraulic lifters (14), clean all
parts in a non-volatile cleaning solution or solvent. Verify
that the o-ring seats and contact surfaces of the push rod
covers (2, 8) are completely clean.

Compressed air can pierce the skin and flying debris from
compressed air could cause serious eye injury. Wear
safety glasses when working with compressed air. Never
use your hand to check for air leaks or to determine air
flow rates. (00061a)

3.

Blow parts dry with low pressure compressed air. Verify
that all oil holes are clean and open.

4.

Verify that the hydraulic lifter rollers turn freely and are
free of flat spots, scuff marks and pitting. If flat spots exist,
examine the cam lobe on which the lifter operates.

5.

Inspect the lifter socket for signs of wear. Verify that the
plunger of the hydraulic lifter is fully extended up against
the C-clip. Use index finger to pump plunger to verify lifter
operation.

6.

Examine the push rods (15). Replace any push rods that
are bent, dented, broken or discolored. Replace the rod
if the ball ends show signs of excessive wear or damage.

7.

Cover all parts with a clean plastic sheet to protect them
from dust and dirt.

14

7

13

10

15

8

6

9

11

12

5

4

3

2

1

sm02492

1.

Upper O-ring (small)

2.

Upper push rod cover

3.

Spring cap retainer

4.

Spring cap

5.

Spring

6.

Flat washer

7.

Middle O-ring (intermediate)

8.

Lower push rod cover

9.

Lower O-ring (large)

10. Lifter cover screw
11. Lifter cover
12. Anti-rotational pin
13. Lifter cover gasket
14. Hydraulic lifter
15. Push rod

Figure 3-78. Push Rods, Lifters and Covers

2008 Touring Service:  Engine  3-59

LIFTER INSPECTION

NOTE

Inside and outside micrometers used for measuring lifters and
lifter bores must be calibrated to ensure accurate readings.

1.

Inspect lifters for excessive clearance in bores. Accurately
measure the lifter outer diameter and record the measure-
ment.

2.

Accurately measure lifter bore inner diameter with a snap
gauge. Subtract this measurement from the lifter measure-
ment to determine clearance.

a.

Clearance should be within  0.0008-0.0020
in. (0.0203-0.0508 mm).

b.

Install new lifters and/or replace crankcases if clear-
ance exceeds SERVICE WEAR LIMIT of   0.0030
in (0.076 mm).

3.

Check lifter roller radial play.

a.

Roller radial movement should be within  0.0006-
0.0010 in (0.0152-0.0254 mm).

b.

Replace lifters if radial movement exceeds SERVICE
WEAR LIMIT of  0.0015 in. (0.0381 mm).

4.

Check lifter roller end clearance.

a.

End clearance should be within  0.008-0.022
in. (0.203-0.559 mm).

b.

Replace lifters if end clearance exceeds SERVICE
WEAR LIMIT of  0.022 in. (0.559 mm).

5.

Soak lifters in clean engine oil. Keep covered until
assembly.

1

2

9

8

6

3

5

4

7

10

sm02493

1.

Upper O-ring (small)

2.

Upper push rod cover

3.

Spring cap retainer

4.

Spring cap

5.

Spring

6.

Flat washer

7.

Middle O-ring (intermediate)

8.

Lower push rod cover

9.

Lower O-ring (large)

10. Flared end of lower push rod cover

Figure 3-79. Assembled Push Rod Cover

ASSEMBLY

With the exception of the push rod covers, all parts will be
assembled during the installation procedure. Assemble the
push rod covers as follows:

NOTE

O-rings that are missing, distorted, pinched or otherwise dam-
aged will result in either oil leakage or low oil pressure. Use of
the wrong o-ring will have the same results. Since many o-rings
are similar in size and appearance, always use new o-rings
keeping them packaged until use to avoid confusion.

1.

See 

Figure 3-79

. Obtain three new o-rings (1, 7 and 9).

Apply a very thin film of clean H-D 20W50 engine oil to o-
rings before installation.

2.

Install new small o-ring (1) on seat at the top of the upper
push rod cover (2).

3-60  2008 Touring Service:  Engine

3.

Slide the spring cap (4), spring (5), flat washer (6) and
new intermediate size o-ring (7) onto the body of the upper
push rod cover. Move parts up body until spring cap (4)
contacts upper o-ring seat.

4.

Fit the straight end of the upper push rod cover into the
flared end of the lower push rod cover (8).

5.

Install new large o-ring (9) on seat at bottom of lower push
rod cover.

INSTALLATION OVERVIEW

See 

3.16 TOP END OVERHAUL: ASSEMBLY

.

1.

Install push rods, lifters and lifter covers.

2.

Install rocker arm support plate.

3.

Install breather assembly.

4.

Continue with vehicle assembly as directed.

2008 Touring Service:  Engine  3-61

3.22

CYLINDER HEAD

REMOVAL OVERVIEW

See 

3.15 TOP END OVERHAUL: DISASSEMBLY

.

1.

Remove breather assembly.

2.

Remove rocker arm support plate.

3.

Remove push rods and push rod covers. Do not remove
lifters or lifter covers.

4.

Remove cylinder head.

DISASSEMBLY

TOOL NAME

PART NUMBER

VALVE SPRING COMPRESSOR

HD-34736-B

CYLINDER HEAD HOLDING FIXTURE

HD-39786

1.

Before proceeding with the disassembly procedure,
determine if cylinder head reconditioning is necessary.

a.

Raise valve ports of cylinder head to strong light
source. If light is visible around edges of seats, then
move to step 2 to recondition cylinder head.

b.

Fill ports at top of cylinder head with solvent. Wait ten
full seconds and then check for leakage into combus-
tion chamber. If solvent leakage into combustion
chamber is evident, then move to step 2 to recondition
cylinder head.

2.

See 

Figure 3-80

. Secure cylinder head for service.

a.

Thread 12 mm end of CYLINDER HEAD HOLDING
FIXTURE (Part No. HD-39786) (1) into cylinder head
(2) spark plug hole.

b.

Clamp tool in vise at a 45 degree angle or one that
offers a comfortable working position.

1

3

1

2

sm02494

1.

Holding fixture

2.

Cylinder head

3.

12 mm end of fixture

Figure 3-80. Cylinder Head Holding Fixture

3.

See 

Figure 3-81

. Release valve spring compression.

a.

Place VALVE SPRING COMPRESSOR (Part No. HD-
34736-B) (2) over cylinder head. Center blunt end on
the valve head. Seat adapter at end of forcing screw
on the valve spring retainer.

b.

Rotate forcing screw to compress valve spring.

c.

See 

Figure 3-82

. If spring retainer (2) has not broken

free of tapered keepers (1), give head of tool a sharp
tap with a soft mallet. Using magnetic rod or small
screwdriver, remove the keepers (1) from the valve
stem (11) groove.

d.

Rotate forcing screw to release the valve spring
compression.

4.

Remove the spring retainer (2) and valve spring (3).

5.

Slide the valve (11) from the valve guide (5).

6.

Remove valve seal assembly.

7.

Mark the bottom of the valve F(ront) or R(ear) for identific-
ation. Also, separate and tag tapered keepers, valve spring
and spring retainer so that they are installed on the same
valve at time of assembly.

8.

Repeat steps 3-7 to remove the other valve components.

9.

Release the cylinder head holding fixture from the vise.
Remove fixture tool from spark plug hole.

3-62  2008 Touring Service:  Engine

2

2

1

sm02495

1.

Holding fixture

2.

Compressor

Figure 3-81. Valve Spring Compressor (Part No.

HD-34736-B)

9

3

11

10

6

5

4

8

7

1

2

sm02496

1.

Tapered keepers

2.

Spring retainer

3.

Valve spring

4.

Spring seat/valve stem seal

5.

Valve guide

6.

Lock ring

7.

Cylinder head bolt, short

8.

Cylinder head bolt, long

9.

Cylinder head

10. Valve seat
11. Valve

Figure 3-82. Cylinder Head Assembly

CLEANING

1.

See 

Figure 3-82

. Remove old gasket material from cylinder

head (9). Gasket material left on sealing surfaces will
cause leaks.

2008 Touring Service:  Engine  3-63

Do not use glass or sand to bead blast surfaces exposed
to engine oil. Blasting materials can lodge in pores of the
casting. Heat expansion releases this material which can
contaminate oil resulting in engine damage. (00534b)

NOTE

Bead blasting materials could also enter threaded holes
adversely affecting fastener engagement and torque indication.
Cover all threaded holes before bead blasting.

2.

Remove all carbon deposits from combustion chamber
and machined surfaces of cylinder head. Exercise caution
to avoid removing any metal material. For best results,
use an air tool with a worn wire brush. Scraping may result
in scratches or nicks.

3.

To soften stubborn deposits, soak the cylinder head in a
chemical solution, such as GUNK HYDRO-SEAL or other
carbon and gum dissolving agent. Repeat step 2 as
necessary.

4.

Thoroughly clean the cylinder head, spring retainers,
tapered keepers, valves and valve springs in a non-volatile
cleaning solution or solvent. Follow up with a thorough
wash in hot soapy water.

Compressed air can pierce the skin and flying debris from
compressed air could cause serious eye injury. Wear
safety glasses when working with compressed air. Never
use your hand to check for air leaks or to determine air
flow rates. (00061a)

5.

Blow parts dry with low pressure compressed air.

INSPECTION

TOOL NAME

PART NUMBER

VALVE GUIDE HONE

B-45525

VALVE GUIDE CLEANING BRUSH

HD-34751

VALVE SPRING TESTER

HD-96796-47

Cylinder Head

1.

Check for scratches and nicks on all gasket sealing sur-
faces.

2.

Check for warpage.

a.

With the combustion chamber side facing upward,
set a straightedge diagonally across the length of the
cylinder head intersecting the upper and lower corners
of the gasket surface.

b.

Slide a feeler gauge beneath the straightedge to
check the head for warpage.

c.

Checking the opposite diagonal, repeat the procedure
to verify that the gasket surface is flat (especially if a
head gasket was blown). Discard the head if any low
spot is   0.006 in. (0.152 mm) or greater.

NOTE

For best results, use one of the CYLINDER TORQUE PLATES
(HD-42324-A) in lieu of the straightedge. Lay the upper plate
(without vise grip) flat on the machined surface of the head.

As a preliminary check, see if the plate rocks from side to side.
A head on which the plate rocks is immediately suspect. Insert
a feeler gauge between the plate and head at various locations
to see if warpage exceeds above specification.

3.

Verify that oil passageways are open and clean.

Valve Guides

1.

Inspect external surfaces, particularly the combustion
chamber side, for cracks. Replace the guide if any cracks
are found.

2.

Prepare valve guides for inspection.

a.

Lightly hone bore using the VALVE GUIDE
HONE (Part No. B-45525).

b.

Scrub with the VALVE GUIDE CLEANING
BRUSH (Part No. HD-34751) to remove any dust or
debris.

c.

Polish the valve stem with fine emery cloth or steel
wool to remove carbon buildup.

3.

Check valve stem to guide clearance:

a.

Carefully measure the inside diameter of the valve
guide using an inside ball micrometer.

b.

Measure the outside diameter of the valve stem with
an outside micrometer.

c.

Refer to 

Table 3-34

. If the clearance between stem

and guide exceeds the limits shown, the valve stem
and/or guide are excessively worn.

d.

Repeat measurements with a new valve to determine
if the guide must be replaced.

Table 3-34. Valve Stem to Guide Clearance Service Wear

Limits

MM

IN.

VALVE

0.0965

0.0038

Intake

0.0965

0.0038

Exhaust

Valves

1.

Replace the valve if there is evidence of burning or
cracking.

2.

Inspect the end of the valve stem for pitting or uneven
wear. Replace the valve if either of these conditions are
found.

3.

Inspect for burrs around the valve stem keeper groove.
Remove burrs with a fine tooth file if found.

4.

To determine if the valve stem is excessively worn, see
valve guide inspection.

Valve Springs

1.

Inspect springs for broken or discolored coils. Replace
springs if either of these conditions are found.

2.

Set the intake and exhaust valve springs on a level surface
and use a straightedge to check for proper squareness
and height. Too much height corresponds to a reduction
in spring pressure which results in sluggish valve action.

3-64  2008 Touring Service:  Engine

3.

Check free length of springs using a dial vernier caliper
or load test with the VALVE SPRING TESTER (Part
No. HD-96796-47). Replace springs if free length or com-
pression force do not meet specifications. See 

3.1 SPE-

CIFICATIONS

.

Tapered Keepers

1.

Inspect parts for damage or rust pits. Replace as neces-
sary.

2.

Inspect inboard side of tapered keepers for excessive
wear. Upraised center must be pronounced and fit snugly
in valve stem groove. Place keepers into groove and verify
that they grip tightly without sliding.

Valve Seats

1.

Inspect seats for cracking, chipping or burning. Replace
seats if any evidence of these conditions are found.

2.

Check seats for recession by measuring valve stem pro-
trusion. See 

3.22 CYLINDER HEAD, Valve and Seat

Refacing

.

VALVE GUIDE REPLACEMENT

TOOL NAME

PART NUMBER

VALVE GUIDE REAMER

B-45523

VALVE GUIDE DRIVER

B-45524-1

VALVE GUIDE INSTALLER SLEEVE

B-45524-2A

VALVE GUIDE HONE

B-45525

VALVE GUIDE CLEANING BRUSH

HD-34751

VALVE GUIDE CLEANING BRUSH

HD-34751

CYLINDER HEAD SUPPORT STAND

HD-39782-1

INTAKE SEAT ADAPTER

HD-39782-3

EXHAUST SEAT ADAPTER

HD-39782-4

CYLINDER HEAD SUPPORT STAND
KIT

HD-39782-A

CYLINDER HEAD HOLDING FIXTURE

HD-39786

REAMER T-HANDLE

HD-39847

REAMER LUBRICANT

HD-39964

Removal

NOTES

If valve guide replacement is necessary, always install
new guide before refacing valve seat.

CYLINDER HEAD SUPPORT STAND KIT (Part No. HD-
39782-A) ensures that valve guide and seat are perpen-
dicular. If perpendicularity is not achieved, the cylinder
head valve guide bore will be damaged during the press
procedure.

1.

See 

Figure 3-83

. Prepare cylinder head for valve guide

replacement.

a.

Obtain CYLINDER HEAD SUPPORT STAND
KIT (Part No. HD-39782-A).

b.

Insert sleeve of INTAKE SEAT ADAPTER (Part
No. HD-39782-3) (3) or EXHAUST SEAT
ADAPTER (Part No. HD-39782-4) (4) seat adapter
into tube at top CYLINDER HEAD SUPPORT
STAND (Part No. HD-39782-1) (2).

c.

Position cylinder head so that valve seat is centered
on seat adapter.

NOTE

Do not press out the valve guide from the bottom of the cylinder
head. Carbon buildup on the combustion chamber side of the
guide can deeply gouge the cylinder head bore diminishing
the likelihood of achieving the proper interference fit and pos-
sibly requiring replacement of the cylinder head casting.

2.

Remove and discard lock ring from valve guide groove.

NOTE

Lock ring is present on OEM intake and exhaust valve guides.

3.

At top of the cylinder head, insert VALVE GUIDE
DRIVER (Part No. B-45524-1) (1) into valve guide bore
until stopped by shoulder.

4.

See 

Figure 3-84

. Center valve guide driver under ram of

arbor press. Apply pressure until valve guide drops free
of cylinder head. Discard valve guide.

1

5

2

3

4

sm02497

1.

Valve guide driver

2.

Cylinder head support stand

3.

Intake seat adapter

4.

Exhaust seat adapter

5.

Valve guide installer sleeve

Figure 3-83. Valve Guide Replacement Tools

2008 Touring Service:  Engine  3-65


Content      ..     20      21      22      23     ..