Harley Davidson 1986-2003 XL/XLH Sportster. Service Manual - page 33
2. Remove the circlip (B, Figure 121) from the crankcase
groove. This circlip is located behind the main drive gear
oil seal.
3. Drive the main drive gear bearing out of the crankcase,
working from inside the transmission housing, with a suit-
able bearing driver. Discard the bearing.
4. Clean the bearing bore and dry with compressed air.
Check the bore for nicks or burrs. Check the circlip groove
for damage.
NOTE
The main drive gear remover and installer
and cross plate tool, used to remove the main
drive gear, are used to install the new bear-
ing. Refer to
Main Drive Gear
for further in-
formation on these tools.
NOTE
Install the bearings with the manufacturer’s
name and size code facing out.
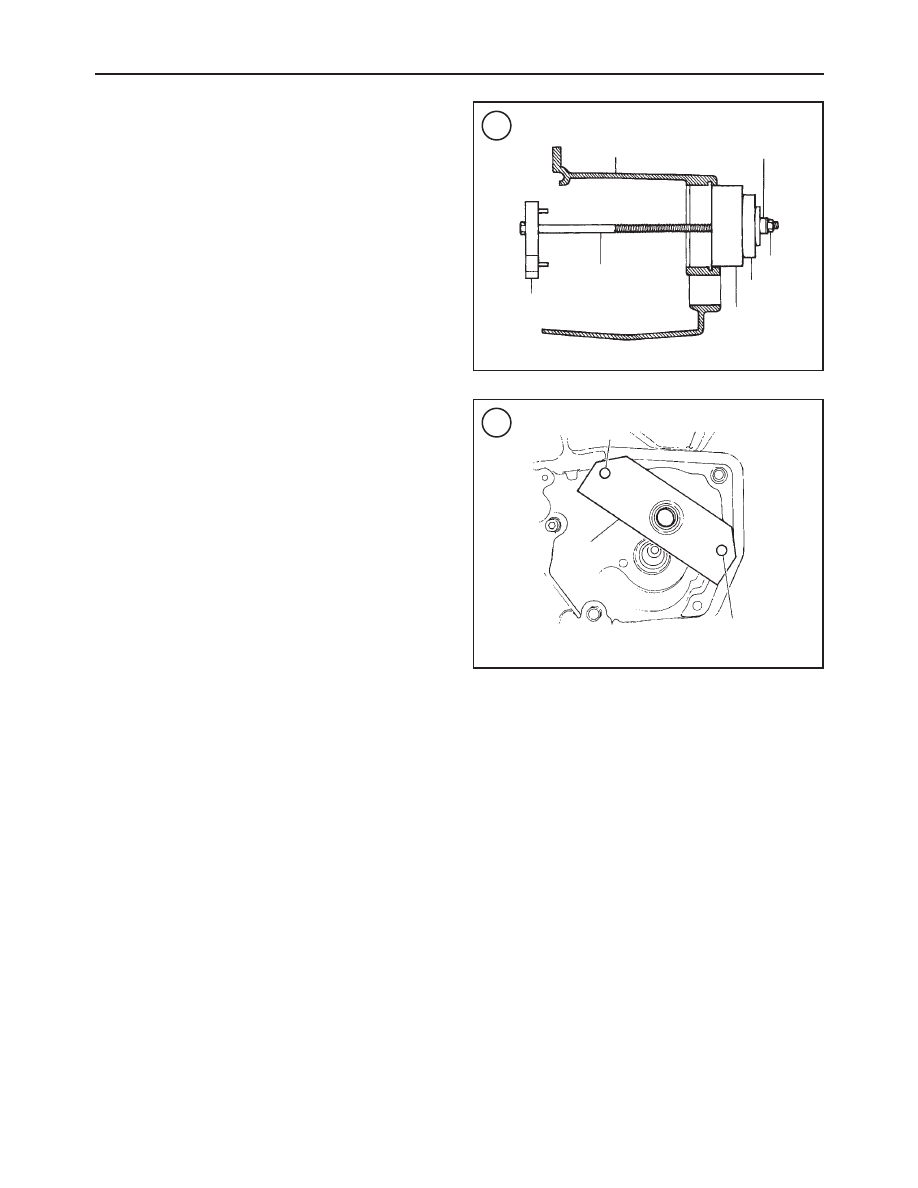
5. Install the new bearing onto the main drive gear remover
and installer and cross plate tools as shown in Figure 124.
NOTE
Insert the two cross plate pins into the pin
holes in the transmission housing (
Figure
125
). This will center the cross plate with the
main drive gear bearing.
6. Tighten the puller nut to pull the bearing into the crank-
case. Continue until the bearing bottoms out against the
bearing bore surface.
7. Disassemble and remove the puller tool assembly.
8. Install the circlip, with its beveled side facing into the
crankcase groove. Make sure the circlip is fully seated in
the groove.
NOTE
The main drive gear bearing oil seal is installed
during the transmission installation procedure.
Refer to
Transmission
in this chapter.
9. Lubricate the bearing with new transmission fluid.
Countershaft Needle Bearing Replacement
1. Drive the countershaft needle bearing (A, Figure 122)
out of the crankcase, working from inside the transmission
housing, with a suitable bearing driver. Discard the bearing.
2. Clean the bearing bore and dry with compressed air.
Check the bearing bore for nicks or burrs.
3. Align the new bearing, with its closed side facing out,
with the crankcase bearing bore.
4. Drive in the new bearing until its outer surface is flush
with or 0.030 in. (0.76 mm) below the bushing bore inside
surface.
5. Lubricate the bearing with new transmission fluid.
Shift Drum Needle Bearing Replacement
1. Drive the shift drum needle bearing (B, Figure 122) out
of the crankcase, working from inside the transmission
housing, with a suitable bearing driver. Discard the bearing.
2. Clean the bearing bore and dry with compressed air.
Check the bearing bore for nicks or burrs.
3. Align the new bearing, with its closed side facing out,
with the crankcase bearing bore.
4. Drive in the new bearing until its outer surface is flush
with or 0.030 in. (0.76 mm) below the bushing bore inside
surface.
5. Lubricate the bearing with new transmission fluid.
SHIFT MECHANISM
To inspect and service the shift shaft assembly, the trans-
mission must be disassembled as described in this chapter.
The shift lever can be removed by loosening the pinch bolt.
Tighten the pinch bolt to 90-110 in.-lb. (10-12 N•m).
330
CHAPTER NINE
124
Crankcase
Thrust bearing
Nut
Driver
Mainshaft
ball bearing
Bolt
Cross plate
125
Pin
Crankcase
Cross plate
Pin