Ford Mondeo (petrol engines). Manual - part 48
 

  Index      Ford     Ford Mondeo - service and repair manual (petrol engines)


Search            


Content   ..  46  47  48  49   ..


Ford Mondeo (petrol engines). Manual - part 48


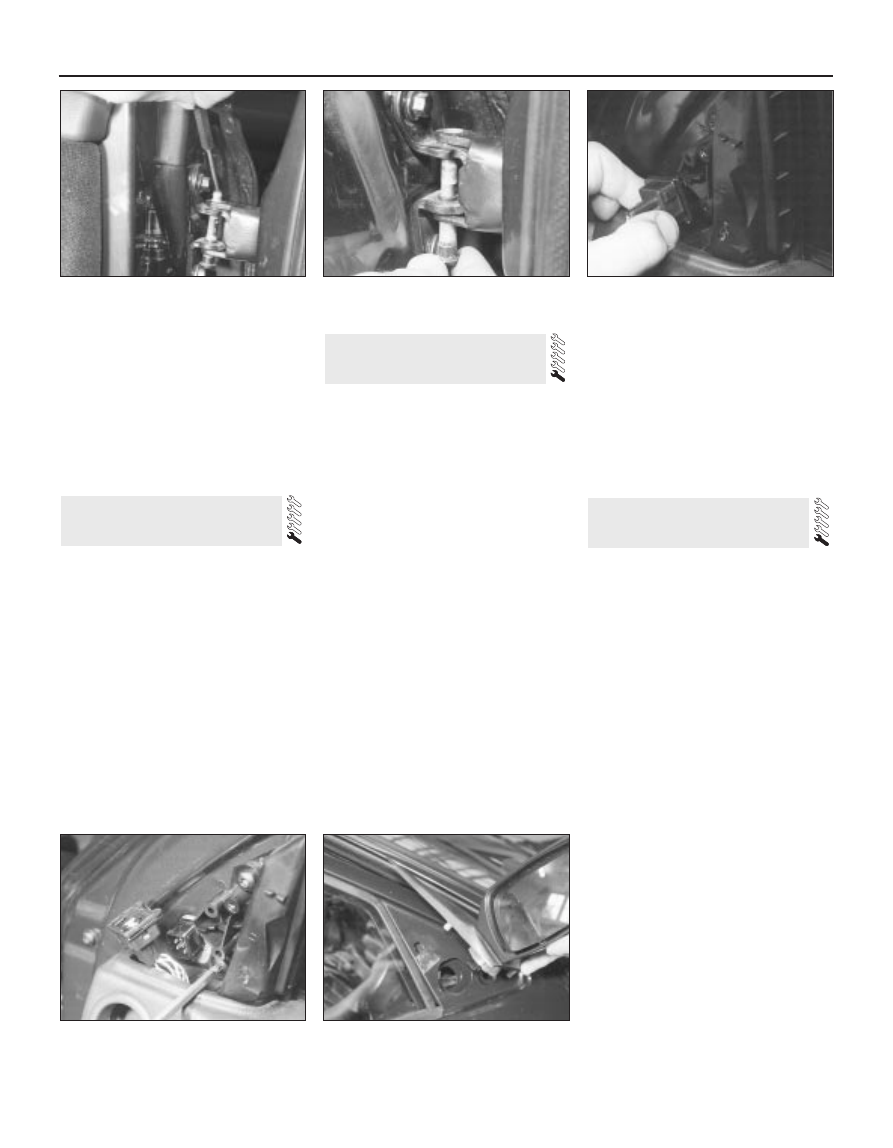
door, then drive the hinge pins down through
the hinges using a small drift (see
illustrations)
.
Carefully withdraw the door from the
hinges.

Refitting

Refitting is a reversal of the removal
procedure, but check that the door lock
passes over the striker centrally. If necessary,
re-position the striker.

Removal

Where electric mirrors are fitted, disconnect
the battery negative (earth) lead (Chapter 5,
Section 1).
Prise off the cap, unscrew the screw, and
remove the quarter bezel from the front of the
window opening.
On manual mirrors, detach the adjustment
lever.
On electric mirrors, disconnect the wiring
multi-plug (see illustration).
On both types of mirror, use a Torx key to
unscrew the mirror mounting screws, then
withdraw the mirror from the outside of the
door (see illustrations). Recover the gasket.

Refitting

Refitting is a reversal of the removal
procedure.

Removal

Using a length of strong thin cord or fishing
line, break the adhesive bond between the
base of the mirror and the glass. Have an
assistant support and remove the mirror as it
is released.
If the original mirror is to be refitted,
thoroughly clean its base with methylated
spirit and a lint-free cloth. Allow a period of
one minute for the spirit to evaporate. Clean
the windscreen black patch in a similar
manner.

Refitting

During the installation of the mirror, it is
important that the mirror base, windscreen
black patch and the adhesive patch are not
touched or contaminated in any way,
otherwise poor adhesion will result.
Prior to fitting the mirror, the vehicle should
have been at an ambient temperature of at
least 20ºC.
With the contact surfaces thoroughly
cleaned, remove the protective tape from one
side of the adhesive patch, and press it firmly
into contact with the mirror base.
If fitting the mirror to a new windscreen, the
protective tape must also be removed from
the windscreen black patch.
Using a hairdryer or a hot air gun, warm the

mirror base and the adhesive patch for about
30 seconds to a temperature of 50 to 70ºC.
Peel back the protective tape from the other
side of the adhesive patch on the mirror base.
Align the mirror base and the windscreen
patch, and press the mirror firmly into
position. Hold the base of the mirror firmly
against the windscreen for a minimum period
of two minutes, to ensure full adhesion.
Wait at least thirty minutes before adjusting
the mirror position.

Removal

Disconnect the battery negative (earth) lead
(Chapter 5, Section 1), and open the boot lid.
Where applicable, pull off the trim covering,
and release the wiring on the hinge arm.
Where fitted, remove the trim from inside
the boot lid.
Disconnect the wiring at the connectors
visible through the boot lid inner skin aperture.
Attach a length of strong cord to the end of
the wires in the aperture, to act as an aid to
guiding the wiring through the lid when it is
refitted.
Release the cable guide rubber grommet,
and withdraw the wiring loom through it. Untie
the cord, and leave it in the boot lid.
Mark the position of the hinge arms with a
pencil.
Place rags beneath each corner of the boot
lid, to prevent damage to the paintwork.
With the help of an assistant, unscrew the
mounting bolts and lift the boot lid from the
car.

Refitting

10 Refitting is a reversal of the removal
procedure. Check that the boot lid is correctly
aligned with the surrounding bodywork, with
an equal clearance around its edge.
Adjustment is made by loosening the hinge
bolts, and moving the boot lid within the
elongated mounting holes. Check that the
lock enters the striker centrally when the boot
lid is closed.

18 Boot lid - removal and refitting

17 Interior mirror 

removal and refitting

16 Exterior mirror and glass -

removal and refitting

11•14 Bodywork and fittings

15.5A  . . . then drive out the hinge pins . . .

15.5B  . . . and remove them

16.4  Disconnecting the wiring multi-plug

from an electric exterior mirror

16.5A  Unscrew the screws . . .

16.5B  . . . and withdraw the mirror

Removal

Lock barrel

Disconnect the battery negative (earth) lead
(Chapter 5, Section 1).
With the boot lid open, remove the luggage
space trim from the right-hand rear corner.
Remove the screws, and prise out the rear
light trim cover from the guides.
Release the door-ajar sensor from the clip
near the lock.
Slide the outer cable from the lock bracket.
Raise the inner cable until it is aligned with the
slot in the barrel lever, and disconnect it.
Pull out the lock locating spring clip.
Detach the cable mounting bracket from
the barrel, and remove the barrel.

Lock

Disconnect the battery negative (earth) lead
(Chapter 5, Section 1).
With the boot lid open, prise out the clips
and remove the trim from inside the boot lid.
10 Release the door-ajar sensor from the clip
near the lock.
11 Using a Torx key, unscrew the lock
mounting screws, and withdraw the lock for
access to the cables.
12 Disconnect both the inner and outer
cables from the lock bracket.

13 Prise open the plastic lip, and remove the
central locking control rod.
14 Withdraw the lock assembly.

Refitting

Lock barrel and lock

15 Refitting is a reversal of the removal
procedure.

Removal

Hatchback

Disconnect the battery negative (earth) lead
(Chapter 5, Section 1). Open the tailgate.
The tailgate may be unbolted from the
hinges and the hinges left in position, or the
hinges may be detached from the roof panel
by unscrewing the mounting nuts. In the latter
case, carefully pull down the rear edge of the
headlining for access to the nuts. Take care
not to damage the headlining.
Remove the parcel shelf left-hand support
bracket as follows. Fold the rear seat
forwards, and disconnect the left-hand seat
pull cable from the bracket and clips.
Unscrew the screws and remove the bracket.
Pull up the rear seat side bolster, then
carefully remove the side trim from the left-
hand side of the luggage area. On low-series
models, the bolster is retained with a screw.

Separate the tailgate wiring loom multi-
plugs, located on the left-hand side of the
luggage compartment, on top of the wheel
arch.
Unclip and remove the upper trim panel
from the inside of the tailgate. Also remove
the rear shelf cord plastic post (see
illustrations)
.
Prise out the rubber grommet from the top
of the tailgate aperture, and pull the wiring
loom out through the hole in the body (see
illustration)
.
Disconnect the rear window washer tube
from the jet.
Prise out the rubber grommet from the
right-hand side of the tailgate aperture, and
pull out the washer tube.
10 Have an assistant support the tailgate in
its open position.
11 Using a small screwdriver, prise off the
clips securing the struts to the tailgate. Pull
the sockets from the ball-studs, and move the
struts downwards.
12 If the headlining has been pulled back,
unscrew and remove the hinge nuts from the
roof panel. Otherwise, unscrew the bolts
securing the tailgate to the hinges (see
illustration)
.
13 Withdraw the tailgate from the body
aperture, taking care not to damage the
paintwork.

Estate

14 Disconnect the battery negative (earth)
lead (Chapter 5, Section 1).
15 The tailgate may be unbolted from the
hinges and the hinges left in position, or the
hinges may be detached from the rear roof
panel by unscrewing the mounting nuts. In the
latter case, carefully pull down the rear edge
of the headlining for access to the nuts. Take
care not to damage the headlining.
16 Unscrew the retaining screws, then unclip
the “D” pillar trim panels from both sides (see
illustration)
.
17 Unclip and remove the upper trim panel
from inside the tailgate.
18 Carefully remove the side trim from the
left-hand side of the luggage area, and
separate the tailgate wiring loom multi-plugs
in the rear light cluster housing.

20 Tailgate 

removal and refitting

19 Boot lid lock components -

removal and refitting

Bodywork and fittings  11•15

11

20.12  Unscrewing the bolts securing the

tailgate to the hinges

20.16  “D” pillar trim panel retaining

screws (arrowed) - Estate models

20.6A  Unclipping the upper trim panel

from the tailgate

20.6B  Shelf cord post removal

20.7  Removing the wiring loom rubber

grommet

19 Attach a strong fine cord to the end of the
wiring loom, to act as an aid to guiding the
wiring through the tailgate when it is refitted.
20 Prise the rubber grommet from the top
left-hand side of the tailgate aperture, and pull
out the wiring loom. Untie the cord, leaving it
in position in the “D” pillar.
21 Disconnect the rear window washer tube
from the jet. Pull out the rubber grommet, and
remove the tube.
22 Have an assistant support the tailgate in
its open position.
23 Using a small screwdriver, prise off the
clip securing the struts to the tailgate. Pull the
sockets from the ball-studs, and move the
struts downwards.
24 Unscrew and remove the hinge nuts from
the roof panel, or the hinge bolts from the

hinge, as desired (see illustration). Withdraw
the tailgate from the body aperture, taking
care not to damage the paintwork.

Refitting

Hatchback and Estate

25 Refitting is a reversal of the removal
procedure, but check that the tailgate is
located centrally in the body aperture, and
that the striker enters the lock centrally. If
necessary, loosen the mounting nuts and re-
position the tailgate as required.

Removal

Support the tailgate in its open position.
Prise off the upper spring clip securing the
strut to the tailgate, then pull the socket from
the ball-stud (see illustration).
Similarly prise off the bottom clip (see
illustration)
, and pull the socket from the ball-
stud. Withdraw the strut.

Refitting

Refitting is a reversal of the removal
procedure, but make sure that the piston end
of the strut is fitted on the body (ie
downwards).

Removal

Lock barrel (Hatchback)

Disconnect the battery negative (earth) lead
(Chapter 5, Section 1).
With the tailgate open, pull up the
weatherstrip for access to the lock. Remove
the screws and clips, and remove the trim
panel from the rear of the luggage
compartment.
Unhook the parcel net, then remove the
screws and clips, and remove the rear
crossmember trim.
Remove the screws, and prise out the rear
light trim cover from the guides.
Release the door-ajar sensor from the clip
near the lock.
Slide the outer cable from the lock bracket.
Raise the inner cable until it is aligned with the
slot in the barrel lever, and disconnect it (see
illustration)
.
Pull out the lock barrel locating spring clip.
Detach the cable mounting bracket from
the barrel, and remove the barrel and cylinder
(see illustrations).

Lock barrel (Estate)

Disconnect the battery negative (earth) lead
(Chapter 5, Section 1).
10 Unclip and remove the tailgate trim panel.
Undo the three screws and remove the lock
shield, then unclip the door-ajar sensor.
11 Working through the aperture in the
tailgate inner panel, pull out the lock barrel
locating spring clip. Unhook the operating rod
and withdraw the lock barrel.

Lock (Hatchback)

12 Disconnect the battery negative (earth)
lead (Chapter 5, Section 1).
13 With the tailgate open, pull up the
weatherstrip for access to the lock. Remove
the screws and clips, and remove the trim
panel from the rear of the luggage
compartment.

22 Tailgate lock components -

removal and refitting

21 Tailgate support strut -

removal and refitting

11•16 Bodywork and fittings

20.24  Tailgate hinge and bolts - Estate

models

21.2  Prising the spring clip from the upper

end of the strut

21.3  Prising the spring clip from the lower

end of the strut

22.6  Tailgate lock barrel and bracket

22.8A  Removing the lock barrel . . .

22.8B  . . . and cylinder

14 Release the door-ajar sensor from the clip
near the lock (see illustration).
15 Using a Torx key, unscrew the lock
mounting screws, and withdraw the lock for
access to the cables (see illustration).
16 Disconnect both the inner and outer
cables from the lock bracket (see
illustration)
.
17 Prise open the plastic clip, and remove
the central locking control rod.
18 Withdraw the lock assembly.

Lock (Estate)

19 Disconnect the battery negative (earth)
lead (Chapter 5, Section 1).
20 Open the tailgate. Undo the screws and
remove the inner trim.
21 Using a Torx key, unscrew the lock
mounting screws, and carefully withdraw the
lock (see illustration).
22 Release the door-ajar sensor from the clip
near the lock.
23 Disconnect the barrel operating rod, and
remove the lock.
24 If necessary, the lock striker assembly
may be removed by disconnecting the release
cable and unscrewing the mounting bolts (see
illustration)
.

Refitting

Lock barrel and lock - all models

25 Refitting is a reversal of the removal
procedure.

Testing

The central locking module incorporates a
service-test mode, which is activated by
operating one of the lock position switches 8
times within 10 seconds. A buzzer will sound,
to indicate that the service-test mode is
operating, and to indicate that no faults have
been found in the system. If a fault has been
found, the system should be checked by a
Ford dealer or electrical specialist. The central
locking module also incorporates the alarm
system module.

Removal

Central locking/alarm module

To remove the module, first remove the
lower right-hand facia panel (right-hand-drive
models) or the glovebox (left-hand-drive
models).
Disconnect the battery negative (earth) lead
(Chapter 5, Section 1).
Unscrew the mounting bolts, and remove
the module from the bracket beneath the
facia.
Disconnect the wiring multi-plug, and
withdraw the module from inside the vehicle.

Note that a different module is used for
models without an anti-theft alarm.

Central locking set/reset switch

This procedure is covered in Section 14,
under front door handle removal.

Central locking door-ajar switch

This procedure is covered in Section 14,
under front door lock motor removal.

Refitting

Central locking/alarm module

Refitting is a reversal of the removal
procedure.

Central locking set/reset switch

10 Refitting is a reversal of the removal
procedure.

Central locking door-ajar switch

11 Refitting is a reversal of the removal
procedure.

The windscreen and rear window on all
models are bonded in place with special
mastic, as are the rear side windows on
Estate models. Special tools are required to
cut free the old units and fit replacements;
special cleaning solutions and primer are also
required. It is therefore recommended that
this work is entrusted to a Ford dealer or
windscreen replacement specialist.
Note that the windscreen contributes
towards the structural strength of the vehicle
as a whole, so it is important that it is fitted
correctly.

Removal

Insert a length of strong cord (fishing line is
ideal) behind the moulding or emblem
concerned. With a sawing action, break the

25 Body side-trim mouldings

and adhesive emblems -
removal and refitting

24 Windscreen and fixed

windows - removal and refitting

23 Central locking system

components 
testing, removal and refitting

Bodywork and fittings  11•17

11

22.21  Tailgate lock - Estate models

22.24  Lock striker assembly - Estate

models

22.14  Removing the door-ajar sensor from

the lock

22.15  Removing a lock mounting screw

22.16  Disconnecting the cables from the

lock


Content   ..  46  47  48  49   ..