Ford Mondeo (petrol engines). Manual - part 10
check the cylinder head threads and tapered
sealing surfaces for signs of wear, excessive
corrosion or damage; if any of these
conditions is found, seek the advice of a Ford
dealer as to the best method of repair.
7 As each plug is removed, examine it as
follows - this will give a good indication of the
condition of the engine. If the insulator nose of
the spark plug is clean and white, with no
deposits, this is indicative of a weak mixture.
8 If the tip and insulator nose are covered
with hard black-looking deposits, then this is
indicative that the mixture is too rich. Should
the plug be black and oily, then it is likely that
the engine is fairly worn, as well as the mixture
being too rich.
9 If the insulator nose is covered with light tan
to greyish-brown deposits, then the mixture is
correct, and it is likely that the engine is in
good condition.
10 If you are renewing the spark plugs,
purchase the new plugs, then check each of
them first for faults such as cracked insulators
or damaged threads. Note also that,
whenever the spark plugs are renewed as a
routine service operation, the spark plug (HT)
leads should be checked as described below.
11 The spark plug electrode gap is of
considerable importance as, if it is too large or
too small, the size of the spark and its
efficiency will be seriously impaired. The gap
should be set to the value given in the
Specifications Section of this Chapter. New
plugs will not necessarily be set to the correct
gap, so they should always be checked
before fitting.
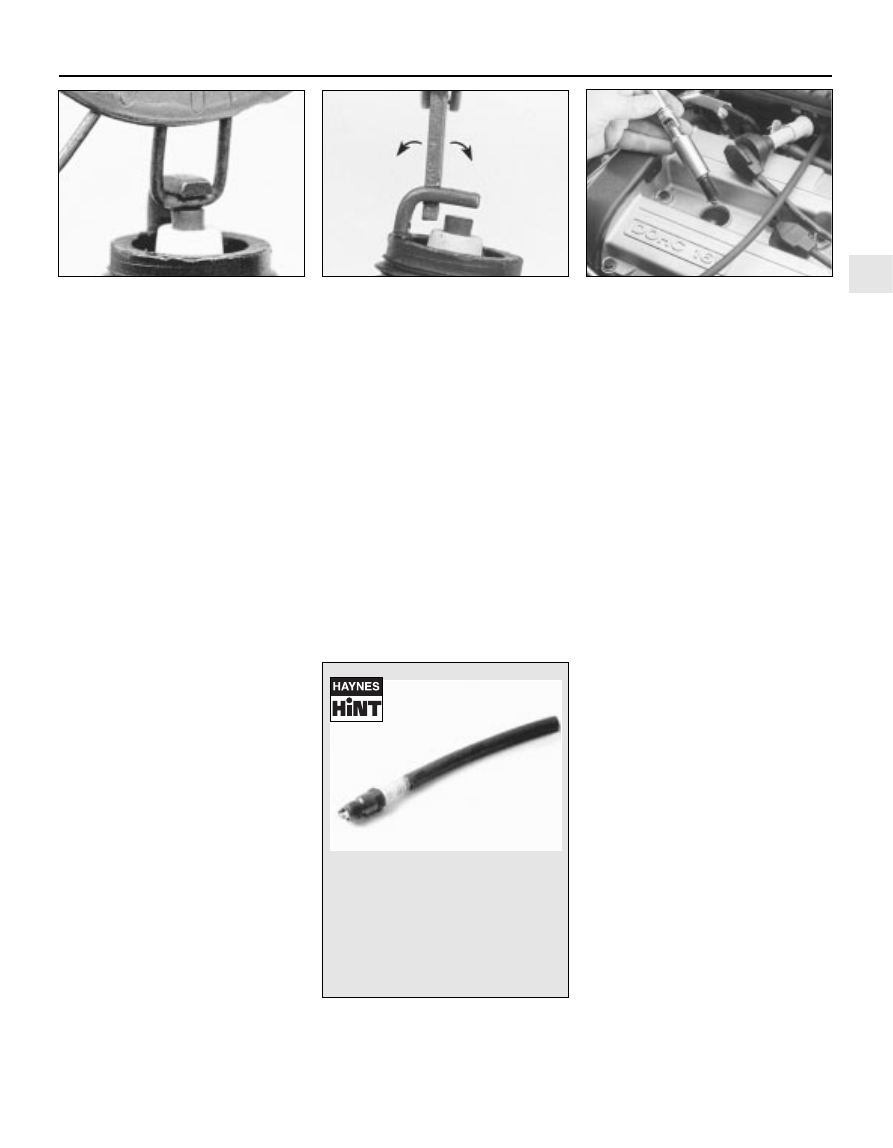
12 Special spark plug electrode gap
adjusting tools are available from most motor
accessory shops (see illustration).
13 To set the electrode gap, measure the
gap with a feeler gauge, and then bend open,
or closed, the outer plug electrode until the
correct gap is achieved (see illustration). The
centre electrode should never be bent, as this
may crack the insulation and cause plug
failure, if nothing worse. If the outer electrode
is not exactly over the centre electrode, bend
it gently to align them.
14 Before fitting the spark plugs, check that
the threaded connector
sleeves at the top of the plugs are tight, and
that the plug exterior surfaces and threads are
clean. Brown staining on the porcelain,
immediately above the metal body, is quite
normal, and does not necessarily indicate a
leak between the body and insulator.
15 On installing the spark plugs, first check
that the cylinder head thread and sealing
surface are as clean as possible; use a clean
rag wrapped around a paintbrush to wipe
clean the sealing surface. Apply a smear of
copper-based grease or anti-seize compound
to the threads of each plug, and screw them
in by hand where possible. Take extra care to
enter the plug threads correctly, as the
cylinder head is of aluminium alloy - it’s often
difficult to insert spark plugs into their holes
without cross-threading them.
16 When each spark plug is started correctly
on its threads, screw it down until it just seats
lightly, then tighten it to the specified torque
wrench setting (see illustration). If a torque
wrench is not available - and this is one case
where the use of a torque wrench is strongly
recommended - tighten each spark plug
through no more than 1/16 of a turn. Do not
exceed the specified torque setting, and
NEVER overtighten these spark plugs - their
tapered seats mean they are almost
impossible to remove if abused.
17 Reconnect the spark plug (HT) leads in
their correct order, using a twisting motion on
the boot until it is firmly seated on the end of
the spark plug and on the cylinder head cover.
Spark plug (HT) lead check
18 The spark plug (HT) leads should be
checked whenever the plugs themselves are
renewed. Start by making a visual check of
the leads while the engine is running. In a
darkened garage (make sure there is
ventilation) start the engine and observe each
lead. Be careful not to come into contact with
any moving engine parts. If there is a break in
the lead, you will see arcing or a small spark
at the damaged area.
19 The spark plug (HT) leads should be
inspected one at a time, to prevent mixing up
the firing order, which is essential for proper
engine operation. Each original lead should be
numbered to identify its cylinder. If the
number is illegible, a piece of tape can be
marked with the correct number, and
wrapped around the lead (the leads should be
numbered 1 to 4, with No 1 lead nearest the
timing belt end of the engine). The lead can
then be disconnected.
20 Check inside the boot for corrosion, which
will look like a white crusty powder. Clean this
off as much as possible; if it is excessive, or if
cleaning leaves the metal connector too badly
corroded to be fit for further use, the lead
must be renewed. Push the lead and boot
back onto the end of the spark plug. The boot
should fit tightly onto the end of the plug - if it
doesn’t, remove the lead and use pliers
carefully to crimp the metal connector inside
the boot until the fit is snug.
21 Using a clean rag, wipe the entire length of
1•25
1
Every 30 000 miles
31.12 Spark plug manufacturers
recommend using a wire-type gauge when
checking the gap - if the wire does not
slide between the electrodes with a slight
drag, adjustment is required
31.13 To change the gap, bend the outer
electrode only, as indicated by the arrows,
and be very careful not to crack or chip the
porcelain insulator surrounding the centre
electrode
31.16 Spark plugs have tapered seats - do
not overtighten them on refitting, or you
will not be able to get them out again
without risking damage to the plugs and
cylinder head
To avoid the possibility of cross-
threading a spark plug, fit a short piece
of rubber hose over the end of the
plug. The flexible hose acts as a
universal joint, to help align the plug
with the plug hole. Should the plug
begin to cross-thread, the hose will slip
on the spark plug, preventing thread
damage.