Ford Orion. Manual - part 5
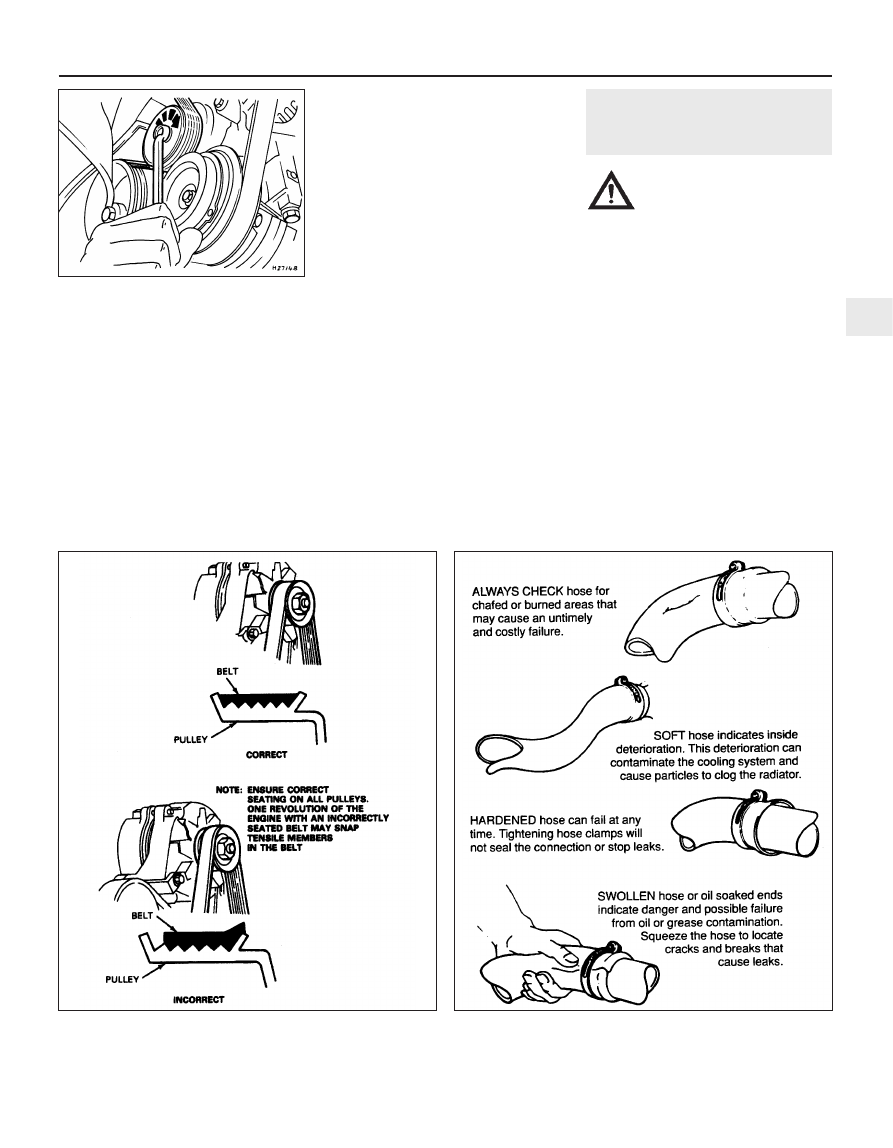
drivebelt, reach up between the body and the
engine (above the crankshaft pulley), and
apply a spanner to the hexagon in the centre
of the automatic tensioner’s pulley. Rotate the
tensioner pulley clockwise to release its
pressure on the drivebelt, then slip the
drivebelt off the crankshaft pulley, and release
the tensioner again (see illustration).
Note that on certain models, a self-
cocking tensioner is fitted, and that this will
remain in the released position. Working from
the wheel arch or engine compartment as
necessary, and noting its routing, slip the
drivebelt off the remaining pulleys and
withdraw it.
24 Check all the pulleys, ensuring that their
grooves are clean, and removing all traces of
oil and grease. Check that the tensioner
works properly, with strong spring pressure
being felt when its pulley is rotated clockwise,
and a smooth return to the limit of its travel
when released.
25 If the original drivebelt is being refitted,
use the marks or notes made on removal, to
ensure that it is installed to run in the same
direction as it was previously. To fit the
drivebelt, arrange it on the grooved pulleys so
that it is centred in their grooves, and not
overlapping their raised sides, and is routed
correctly (see illustrations). Start at
the top, and work down to finish at the
crankshaft pulley; rotate the tensioner pulley
clockwise, slip the drivebelt onto the
crankshaft pulley, then release the tensioner
again.
26 Using a spanner applied to the crankshaft
pulley bolt, rotate the crankshaft
through at least two full turns clockwise to
settle the drivebelt on the pulleys, then
check that the drivebelt is properly
installed.
27 Refit the auxiliary drivebelt cover and
roadwheel, then lower the vehicle to the
ground.
12 Underbonnet check for fluid
leaks and hose condition
1
Caution: Renewal of air
conditioning hoses must be left
to a dealer service department or
air conditioning specialist who
has the equipment to depressurise the
system safely. Never remove air
conditioning components or hoses until
the system has been depressurised.
General
1 High temperatures in the engine compart-
ment can cause the deterioration of the rubber
and plastic hoses used for engine, accessory
and emissions systems operation. Periodic
inspection should be made for cracks, loose
clamps, material hardening and leaks.
2 Carefully check the large top and bottom
radiator hoses, along with the other smaller-
diameter cooling system hoses and metal
pipes; do not forget the heater hoses/pipes
which run from the engine to the bulkhead.
Inspect each hose along its entire length,
replacing any that is cracked, swollen or
shows signs of deterioration. Cracks may
become more apparent if the hose is
squeezed (see illustration). If you are using
Every 10 000 miles
1•17
11.25 When installing the auxiliary drivebelt, make sure that it is
centred - it must not overlap either edge of the grooved pulleys
12.2 Hoses, like drivebelts, have a habit of failing at the worst
possible time - to prevent the inconvenience of a blown radiator
or heater hose, inspect them carefully as shown here
11.23 Automatic drivebelt tensioner -
“polyvee” type drivebelt
Turn tensioner clockwise to release tension
1