Citroen C4 Dag (2013 year). Manual - part 14
 

  Index      Citroen     Citroen C4 Dag - service manual 2013 year in english


Search            


Content   ..  12  13  14  15   ..


Citroen C4 Dag (2013 year). Manual - part 14


11

P R A C T I C A L   I N F O R M A T I O N

207 

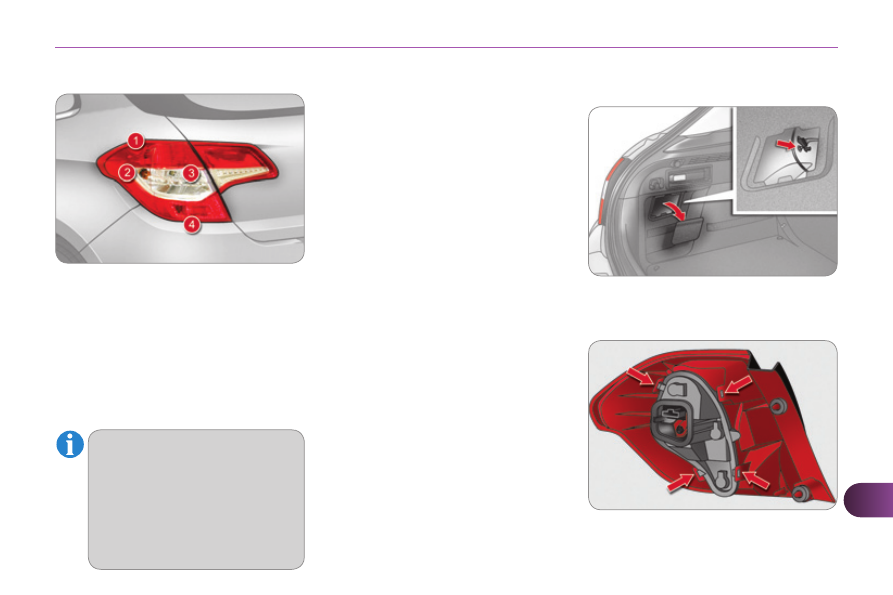
                            Rear lamps 

   1.    Brake/  sidelamp   (P21/5W).  
  2.    Direction   indicator   

(PY21W amber) . 

  3.    Reversing lamp (P21W).  
  4.    Rear   foglamp   (P21W).   

 Amber bulbs, such as those for 

the direction indicators, must be 

replaced by bulbs of the same 

rating and colour. 
 The lamps on the tailgate are 

dummy units. They are there for 

aesthetic purposes only. 

  Changing bulbs 
 These four bulbs are changed from in-

side the boot: 
      open the boot, 
    remove the access fl ap from the 

corresponding side trim panel, 

     unclip the lamp unit connector, 
     As a precaution, place a cloth in the 

bottom of the housing to catch the 

nut if it is dropped on removal, 

     slacken the hexagonal nut using a 

10 mm tube spanner then remove 

the nut by hand, 

     remove the two bulb holder fi xing 

screws, 

     extract the lamp unit carefully pull-

ing in its middle towards the outside, 

    spread the four tabs and remove 

the bulb holder, 

     turn the bulb a quarter of a turn and 

change it.  

 To refi t, carry out these operations in 

reverse order. 
 Take care to engage the lamp unit in its 

guides, while keeping it in line with the 

vehicle. 
 Tighten suffi ciently to ensure sealing, 

but without damaging the lamp.   

11

P R A C T I C A L   I N F O R M A T I O N

208 

 To facilitate the removal of the lamp, 

carry out this operation with the tailgate 

half open. 
     Insert a thin screwdriver into the 

lens cutout. 

     Push it outwards. 
     Remove the lens. 
     Change the faulty bulb.  
 To refi t, press on the lens to clip it in 

place.  

        Number plate lamps (W5W)  

 For the replacement of this type of LED 

lamp, contact a CITROËN dealer or a 

qualifi ed workshop.   

   Third brake lamp (LEDs) 

11

P R A C T I C A L   I N F O R M A T I O N

209 

                     CHANGING A FUSE 

  Access to the tools 

 The extraction tweezer is attached 

to the back of the dashboard fusebox 

cover. 
 For access to it: 
      unclip the cover by pulling at the top 

right, then left 

    disengage the cover completely 

and turn it over, 

     remove the carrier, on the back of 

which the tweezer is fi tted.   

  Changing a fuse 

 Before changing a fuse: 
     the cause of the failure must be 

identifi ed and rectifi ed, 

    all electrical consumers must be 

switched off, 

    the vehicle must be immobilised 

with the ignition off, 

     identify the failed fuse using the ta-

bles and diagrams in the following 

pages.  

  Good  

  Failed  

 To replace a fuse, you must: 
      use the special tweezer to extract 

the fuse from its housing and check 

the condition of its fi lament. 

     always replace the failed fuse with 

a fuse of the same rating (same col-

our); the use of a fuse of different 

rating fuse may cause malfunctions 

(risk of fi re).  

 If the fault recurrs soon after replac-

ing the fuse, have the electrical system 

checked by a CITROËN dealer or a 

qualifi ed workshop. 

  Installing electrical 

accessories 
 Your vehicle's electrical sys-

tem is designed to operate with 

standard or optional equipment. 
 Before installing other elec-

trical equipment or accesso-

ries on your vehicle, contact a 

CITROËN dealer or a qualifi ed 

workshop. 

 CITROËN will not accept re-

sponsibility for the cost incurred 

in repairing your vehicle or for 

rectifying malfunctions resulting 

from the installation of accesso-

ries not supplied and not recom-

mended by CITROËN and not 

installed in accordance with its 

instructions, in particular when 

the combined consumption of 

all of the additional equipment 

connected exceeds 10 milliam-

peres.   

 The replacement of a fuse not 

mentioned in the tables below 

may cause a serious malfunc-

tion of your vehicle. Contact a 

CITROËN dealer or a qualifi ed 

workshop. 

  Tweezer  

11

P R A C T I C A L   I N F O R M A T I O N

210 

  Dashboard fuses 

 The fuseboxes are located in the lower 

dashboard (left-hand side). 

  Access to the fuses 
      Refer to the paragraph "Access to 

the tools".   

  Fuse tables 
  Fusebox 1  

   Fuse N°   

   Rating   

  Functions  

   F8   

   3 A   

 Alarm siren, alarm ECU. 

   F13   

   10 A   

 12 V socket. 

   F14   

   10 A   

 12 V socket in boot. 

   F16   

   3 A   

 Lighting for the large multifunctional storage unit, 

rear map reading lamps, glove box illumination. 

   F17   

   3 A   

 Sun visor illumination, front map reading lamps. 

   F28   

   15 A   

 Audio system, radio (after-market). 

   F30   

   20 A   

 Rear wiper. 

   F32   

   10 A   

 Hi-Fi amplifi er. 

11

P R A C T I C A L   I N F O R M A T I O N

211 

   Fuse N°   

   Rating   

  Functions  

   F36   

   15 A   

 Rear 12 V socket. 

   F37   

   -   

 Not used. 

   F38   

   -   

 Not used. 

   F39   

   -   

 Not used. 

   F40   

   25 A   

 230 V / 50 Hz socket. 

  Fusebox 2  

11

P R A C T I C A L   I N F O R M A T I O N

212 

   Fuse N°   

   Rating   

  Functions  

   F19   

   30 A   

 Windscreen wipers slow / fast speed. 

   F20   

   15 A   

 Front and rear screenwash pump. 

   F21   

   20 A   

 Headlamp wash pump. 

   F22   

   15 A   

 Horn. 

   F23   

   15 A   

 Right-hand main beam headlamp. 

   F24   

   15 A   

 Left-hand main beam headlamp. 

   F27   

   5 A   

 Left-hand dipped headlamp. 

   F28   

   5 A   

 Right-hand dipped headlamp. 

  Engine compartment fuses 

 The fusebox is placed in the engine 

compartment near the battery (left-

hand side). 

  Access to the fuses 
      Unclip the cover. 
     Change the fuse (see correspond-

ing paragraph). 

     When you have fi nished, close the 

cover carefully to ensure sealing of 

the fusebox.   

  Fuse table 

11

P R A C T I C A L   I N F O R M A T I O N

213 

 When your vehicle's battery is dis-

charged, the engine can be started 

using a slave battery (external or on 

another vehicle) and jump lead cables. 

             Starting using another battery 

     12 V BATTERY 

 The battery is located under the bonnet. 
 For access to the (+) terminal: 
      release the bonnet using the interior 

lever, then the exterior safety catch, 

     raise the bonnet and secure it with 

its stay, 

     lift the plastic cover for access to the 

(+) terminal.  

  Access to the battery 

       The presence of this label, in par-

ticular with the Stop & Start sys-

tem, indicates the use of a 12 V 

lead-acid battery with special 

technology and specifi cation; 

the involvement of a CITROËN 

dealer or a qualifi ed workshop is 

essential when replacing or dis-

connecting the battery.  

  Procedure for starting the engine us-

ing another battery or charging a dis-

charged battery.  

  After refi tting the battery, the 

Stop & Start system will only be 

active after a continuous period 

of immobilisation of the vehicle, 

a period which depends on the 

climatic conditions and the state 

of charge of the battery (up to 

about 8 hours).  

  First check that the slave battery 

has a nominal voltage of 12 V 

and a capacity at least equal to 

that of the discharged battery. 
 Do not try to start the engine by 

connecting a battery charger. 
 Do not disconnect the (+) termi-

nal when the engine is running.  

  Before doing any work 
 Immobilise the vehicle: apply the 

parking brake, put the gearbox 

in neutral, then switch off the ig-

nition. 
 Check that all electrical equip-

ment is switched off.   

11

P R A C T I C A L   I N F O R M A T I O N

214 

  Reconnecting the (+) cable 
      Position the open clamp  

E  of the 

cable on the positive post (+) of the 

battery. 

     Press vertically on the clamp  E  to 

position it correctly on the battery. 

    Lock the clamp by spreading the 

positioning lug and then lowering 

the tab  D .  

     Start the engine of the vehicle with 

the good battery and leave it run-

ning for a few minutes. 

     Operate the starter on the broken 

down vehicle and let the engine run  .


If the engine does not start straight 

away, switch off the ignition and wait 

a few moments before trying again. 

     Wait until the engine returns to idle 

then disconnect the jump lead ca-

bles in the reverse order.   

       Before disconnecting the battery 
 Wait 2 minutes after switching off the ig-

nition before disconnecting the battery. 
 Close the windows and the doors be-

fore disconnecting the battery.   

   Disconnecting the (+) cable 
      Raise the locking tab  D  fully to re-

lease the cable terminal clamp  E .   

 Do not apply excessive force 

on the tab as locking will not be 

possible if the clamp is not posi-

tioned correctly; start the proce-

dure again.   

      Connect the red cable to the posi-

tive terminal (+) of the fl at battery  A , 

then to the positive terminal (+) of 

the slave battery  B . 

     Connect one end of the green or 

black cable to the negative termi-

nal (-) of the slave battery  

B  (or 

earth point on the other vehicle). 

     Connect the other end of the green 

or black cable to the earth point  C  

on the broken down vehicle (or on 

the engine mounting). 

11

P R A C T I C A L   I N F O R M A T I O N

215 

          Charging the battery using a 

battery charger 

  It is advisable to disconnect the 

battery if the vehicle is to be left 

unused for more than one month.  

             The batteries contain harmful 

substances such as sulphuric 

acid and lead. They must be 

disposed of in accordance with 

regulations and must not, in any 

circumstances, be discarded 

with household waste. 
 Take used remote control bat-

teries and vehicle batteries to a 

special collection point.  

      Disconnect the battery from the vehicle. 
     Follow the instructions for use pro-

vided by the manufacturer of the 

charger. 

     Connect the battery starting with the 

negative terminal (-). 

     Check that the terminals and con-

nectors are clean. If they are covered 

with sulphate (whitish or greenish 

deposit), remove them and clean 

them.   

  Protect your eyes and face be-

fore handling the battery. 
 All operations on the battery 

must be carried out in a well 

ventilated area and away from 

naked  fl ames and sources of 

sparks, so as to avoid the risk of 

explosion or fi re. 
 Do not try to charge a frozen 

battery; the battery must fi rst 

be thawed out to avoid the risk 

of explosion. If the battery has 

been frozen, before charging 

have it checked by a CITROËN 

dealer or a qualifi ed  workshop 

who will check that the inter-

nal components have not been 

damaged and the casing is not 

cracked, which could cause a 

leak of toxic and corrosive acid. 
 Do not reverse the polarity and 

use only a 12 V charger. 
 Do not disconnect the terminals 

while the engine is running. 
 Do not charge the batteries with-

out disconnecting the terminals 

fi rst. 
 Wash your hands afterwards.   

  Reinitialisation after 

reconnection 

  After any reconnection of the battery, 

switch on the ignition and wait at least 

one minute before starting, to allow 

time for the initialisation of the electron-

ic systems. 
 By referring to the corresponding sec-

tions, you should set or initialise the fol-

lowing systems yourself: 
   -  

one-touch electric windows, 

  -  

time and date, 

  -   audio and navigation system set-

tings.  

 Check that no alert message or warn-

ing lamp comes on after switching on 

the ignition. 
 However, if minor problems persist af-

ter carrying out these operations, con-

tact a CITROËN dealer or a qualifi ed 

workshop.   

  Some functions are not available 

if the battery is not suffi ciently 

charged.  

          Do not push the vehicle to start 

the engine if you have an elec-

tronic or automatic gearbox.  

  With Stop & Start, the battery 

does not have to be disconnect-

ed for charging.  

11

P R A C T I C A L   I N F O R M A T I O N

216 

         LOAD REDUCTION MODE 

 System which manages the use of cer-

tain functions according to the level of 

charge remaining in the battery. 
 When the vehicle is being driven, the 

load reduction function temporarily de-

activates certain functions, such as the 

air conditioning, the heated rear screen... 
 The deactivated functions are reactivat-

ed automatically as soon as conditions 

permit. 

         ENERGY ECONOMY MODE 

 System which manages the period of 

use of certain functions to conserve a 

suffi cient level of charge in the battery. 
 After the engine has stopped, you can 

still use functions such as the audio 

equipment, windscreen  wipers,  dipped 

beam headlamps, courtesy lamps, etc. 

for a maximum combined period of thirty 

minutes. 

  Switching to economy mode 

 Once this period has elapsed, a message 

appears in the screen indicating that the 

vehicle has switched to economy mode 

and the active functions are put on standby. 

 If the telephone is being used at 

the same time on the navigation 

system, it will be interrupted after 

10 minutes.  

 A  fl at battery prevents the en-

gine from starting (refer to the 

corresponding paragraph).  

  Exiting economy mode 

 These functions are reactivated auto-

matically the next time the vehicle is 

driven. 
      In order to resume the use of these 

functions immediately, start the engine 

and let it run for a few minutes.  

 The time available to you will then be 

double the period for which the engine 

is left running. However, this period will

always be between fi ve and thirty minutes. 

 This period may be greatly re-

duced if the battery is not fully 

charged. 

         CHANGING A WIPER BLADE 

  Before removing a front wiper 

blade 

     Within one minute after switching 

off the ignition, operate the wiper 

stalk to position the wiper blades 

vertically on the windscreen.   

  Removing 

      Raise the corresponding wiper arm. 
     Unclip the wiper blade and remove it.   

  Fitting 

     Put the corresponding new wiper 

blade in place and clip it. 

     Fold down the wiper arm carefully.   

  After fitting a front wiper blade 

      Switch on the ignition. 
    Operate the wiper stalk again to 

park the wiper blades.   

11

P R A C T I C A L   I N F O R M A T I O N

217 

         VERY COLD CLIMATE SCREEN *  

  *   According to country.  

  Fitting 

     Offer up the very cold climate 

screen to the front of the lower sec-

tion of the front bumper. 

     Press around its edge to engage its 

fi xing clips one by one.   

  Removal 

      Use a screwdriver as a lever to re-

lease each fi xing clip in turn.  

  Do not forget to remove the very 

cold climate screen when: 
   -   the ambient temperature ex-

ceeds 10 °C, 

  -  towing, 
  -  

driving at speeds above 75 mph 

(120 km/h).    

 Removable protective screen which 

prevents the accumulation of snow at 

the radiator cooling fan. 

            FITTING ROOF BARS  

  For safety reasons and to avoid dam-

aging the roof, it is essential to use the 

transverse bars approved for your ve-

hicle.  

  When fi tting roof bars, use only the four 

fi xing points located in the roof frame. 

The points are masked by the vehicle 

doors when closed. 
 The roof bar fi xings include a stud to be 

fi tted to the hole at each fi xing point. 
 Observe the fi tting instructions and the 

conditions of use in the guide supplied 

with the bars.  

  Maximum authorised weight on 

the roof rack, for a loading height 

not exceeding 40 cm (with the 

exception of bicycle carriers): 

 80   kg . 
 As this value is subject to 

change, check the maximum 

load  fi gure given in the guide 

provide d with the roof bars. 
 If the height exceeds 40 cm, 

adapt the speed of the vehicle 

to the profi le of the road to avoid 

damaging the roof bars and the 

fi xings on the vehicle. 
 Be sure to refer to national leg-

islation in order to comply with 

the regulations for transporting 

objects which are longer than 

the vehicle.   

11

P R A C T I C A L   I N F O R M A T I O N

218 

      TOWING THE VEHICLE 

 Procedure for having your vehicle 

towed or for towing another vehicle us-

ing a removable towing eye. 

 The towing eye is installed in the boot 

under the fl oor. 
 To gain access to it: 
      open the boot, 
    raise the fl oor, 
     secure it by hooking its cord on the 

hook on the rear parcel shelf sup-

port, 

    remove the towing eye from the 

holder.   

  Access to the tools 

  General recommendations 

 Observe the legislation in force in your country. 
 Ensure that the weight of the towing vehicle is higher than that of the towed 

vehicle. 
 The driver must remain at the wheel of the towed vehicle and must have a 

valid driving licence. 
 When towing a vehicle with all four wheels on the ground, always use an 

approved towing bar; rope and straps are prohibited. 
 When towing a vehicle with the engine off, there is no longer any power 

assistance for braking or steering. 

 In the following cases, you must always call on a professional recovery 

service: 
   -  

vehicle broken down on a motorway or fast road, 

  -  

4 wheel drive vehicle, 

  -  

when it is not possible to put the gearbox into neutral, unlock the steering, 

or release the parking brake, 

  -  

towing with only two wheels on the ground, 

  -  

where there is no approved towing bar available...   

11

P R A C T I C A L   I N F O R M A T I O N

219 

      On the front bumper, unclip the cover 

by pressing at the bottom. 

     Screw the towing eye in fully. 
     Install the towing bar. 

  Towing your vehicle 

     Place the gear lever in neu-

tral (position  

N  on an elec-

tronic or automatic gearbox).  

  Failure to observe this in-

struction could result in dam-

age to certain components 

(braking, transmission...) and 

the absence of braking as-

sistance the next time the 

engine is started. 

      On the rear bumper, unclip the cover 

by pressing at the bottom. 

     Screw the towing eye in fully. 
     Install the towing bar. 
     Switch on the hazard warning lamps 

on both vehicles. 

     Move off gently, drive slowly and for 

a short distance.   

  Towing another vehicle 

     Unlock the steering by turning the 

key in the ignition one notch and re-

lease the parking brake. 

     Switch on the hazard warning lamps 

on both vehicles. 

     Move off gently, drive slowly and for 

a short distance.   

11

P R A C T I C A L   I N F O R M A T I O N

220 

         TOWING A TRAILER  

  We recommend the use of genu-

ine CITROËN towbars and their 

harnesses that have been tested 

and approved from the design 

stage of your vehicle, and that 

the  fi tting of the towbar is en-

trusted to a CITROËN dealer or 

a qualifi ed workshop. 
 If the towbar is not fi tted by a 

CITROËN dealer, it is impera-

tive that it is fi tted in accordance 

with the vehicle manufacturer's 

instructions.  

  The rear parking sensors will 

be deactivated automatically if 

a genuine CITROËN towbar is 

used.   

  Towbar suitable for the attachment of a 

trailer or installation of a bicycle carrier, 

with additional lighting and signalling.  

  Your vehicle is primarily designed for 

transporting people and luggage, but it 

may also be used for towing a trailer.  

  Driving with a trailer places greater de-

mands on the towing vehicle and the 

driver must take particular care.   

  Driving advice 

  Distribution of loads 
      Distribute the load in the trailer so 

that the heaviest items are as close 

as possible to the axle and the nose 

weight approaches the maximum 

permitted without exceeding it.  

 Air density decreases with altitude, thus 

reducing engine performance. Above 

1 000 metres, the maximum towed load 

must be reduced by 10 % for every 

1 000 metres of altitude.  

  Side wind 
     Take into account the increased 

sensitivity to side wind.   

  Cooling 
 Towing a trailer on a slope increases 

the temperature of the coolant. 
 As the fan is electrically controlled, its 

cooling capacity is not dependent on 

the engine speed. 
      To lower the engine speed, reduce 

your speed.  

 The maximum towed load on a long in-

cline depends on the gradient and the 

ambient temperature. 
 In all cases, keep a check on the cool-

ant temperature. 

      If the warning lamp and the 

 STOP  warning lamp come 

on, stop the vehicle and 

switch off the engine as 

soon as possible.   

  Braking 
 Towing a trailer increases the braking 

distance. 
 To avoid overheating of the brakes on a 

long mountain type of descent, the use 

of engine braking is recommended.  

  Tyres 
      Check the tyre pressures of the towing 

vehicle and of the trailer, observing the 

recommended pressures.   

  Lighting 
      Check the electrical lighting and sig-

nalling on the trailer.   

  Refer to the "Technical data" section for 

details of the weights and towed loads 

which apply to your vehicle.  

11

P R A C T I C A L   I N F O R M A T I O N

221 

      AUDIO PRE-EQUIPMENT 

 Your vehicle is equipped with certain 

factory-fi tted audio equipment: 
   -   a dual-function aerial at the rear of 

the roof, 

  -  

a coaxial aerial cable, 

  -  

basic interference suppression, 

  -  

cabling for speakers in the front doors 

and tweeters in the dashboard, 

  -   cabling for speakers in the rear 

doors, 

  -  

two 8-way connectors.  

 Before installing a radio unit or 

speakers in your vehicle, contact 

a CITROËN dealer or a qualifi ed 

workshop to obtain a suitable 

wiring harness. 

 Never use a separate wire to 

connect the (+) of your audio 

equipment (risk of discharging of 

the battery). 

  Fitting an audio unit 

 The audio unit is fi tted in place of one 

of the storage boxes located above 

the heating and air conditioning control 

panel. 

      Unclip the storage box on each side 

using a screwdriver and pull out.  

 You will then have access to an aerial

coaxial cable and two 8-way connectors. 
 Then refer to the instructions provided 

with your audio unit.  

             Fitting speakers  

 It is possible to fi t: 
   -   165 mm diameter speakers in the 

front doors, 

  -   130 mm diameter speakers in the 

rear doors, 

  -   22.5 mm diameter tweeters in the 

top of the dashboard.  

  Connectors  

  8-way connector (A)  
 A1: - 
 A2: - 
 A3: - 
 A4: - 
 A5: - 
 A6: (+)  Ignition positive (in this case, 

the audio equipment only oper-

ates when the ignition is on) 

 A7: (+) Permanent 
 A8: Earth 

  8-way connector (B)  
 B1: (+) Rear right speaker 
 B2: (-) Rear right speaker 
 B3: (+) Front right speaker and tweeter 
 B4: (-) Front right speaker and tweeter 
 B5: (+) Front left speaker and tweeter 
 B6: (-) Front left speaker and tweeter 
 B7: (+) Rear left speaker 
 B8: (-) Rear left speaker 

11

P R A C T I C A L   I N F O R M A T I O N

222 

      ACCESSORIES 

 A wide range of accessories and genu-

ine parts is available from the CITROËN 

dealer network. 
 These accessories and parts have 

been tested and approved for reliability 

and safety. 
 They are all adapted to your vehicle 

and benefi t from CITROËN's recom-

mendation and warranty.  

   Conversion kits 
 You can obtain an "Enterprise" kit to 

convert a trade vehicle to a private car 

and vice-versa.   

   "Comfort": 
 door defl ectors, side window blinds, 

rear screen blind, insulated module, 

coat hanger fi xed to head restraint, 

reading lamp, mirror for caravan, cruise 

control, scented air freshener and car-

tridges, parking sensors...  

  "Transport systems": 
 boot carpet, boot liner, boot net, boot 

spacers, transverse roof bars, bicycle 

carrier, ski carrier, roof boxes, towbars, 

towbar wiring harnesses... 

  "Styling": 
 gear lever knobs, aluminium foot rest, 

alloy wheels, wheel embellishers, 

chrome mirror shells, chrome door ap-

erture  fi nishers, door sill fi nishers,  tail-

gate lower chrome fi nisher...  

  *    To avoid any risk of jamming the 

pedals: 

   -   ensure that mats are correctly 

positioned and secured, 

  -  never 

fi t one mat on top of an-

other.   

  "Security and safety": 
 anti-intrusion alarm, microwave sensor, 

anti-tilt sensor, stolen vehicle tracking 

system, child seats and booster cush-

ions, breathalyser, fi rst aid kit, fi re extin-

guisher, warning triangle, high visibility 

vest, dog guard, pet seat belt, wheel 

security bolts, snow chains, non-slip 

covers, front foglamp kit...  

  "Protection": 
 mats * , seat covers compatible with lat-

eral airbags, door sill protectors, mud 

fl aps, door protective rubbing strips, 

bumper protection strips, protective 

covers for pets, vehicle cover...  

 If a towbar and wiring harness 

are  fi tted outside the CITROËN 

dealer network, the installation 

must be done using the vehicle's 

electrical pre-equipment and in 

line with the manufacturer's rec-

ommendations.  


Content   ..  12  13  14  15   ..